In this chapter, we will set up and use Mapbox maps in an iOS app. Mapbox is an independent mapping data provider that publishes software development kits for iOS, Android, and the Web. Mapbox allows you to easily style your maps, so that you can give your application a custom look and feel. We will work with map styles in the next chapter.
The example application we build in this chapter is similar to the introductory applications we built with Apple’s MapKit and Google Maps.
Getting a Mapbox access token
You will need an access token to use Mapbox services, so you will need to create an account at www.mapbox.com. While you are creating an account, also take some time to understand Mapbox’s pricing and free tier limits. At the time of writing, you can utilize Mapbox at the free level for up to 25,000 monthly active users on mobile devices, with payment being required for numbers of users above that amount. This could certainly change, so make sure that Mapbox fits the needs you have and your budget before building it into your application.
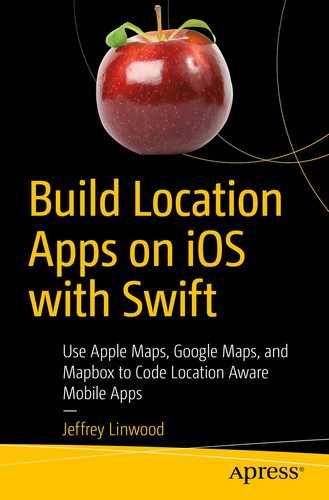
Once you create a Mapbox account and review the pricing, you will need to create an access token to use in your Mapbox application. Although you could use a default access token, it’s better to create an access token for each of your Mapbox projects, in case you need to revoke a token or limit its capabilities. Find the Create a token button (Figure 11-1) on your Mapbox account page.
Figure 11-1
The Create a token button
Click the Create a token button, and name your access token FirstMapboxApp (or anything else you choose) on the next screen (Figure 11-2). The defaults are fine for the token scopes.
Figure 11-2
Creating an access token
Create your token (at the bottom of the Create an access token screen), and then confirm your password if the web application prompts you. You will be taken to a list of your access tokens. Keep your access token confidential, and don’t share it publicly, such as in a source code repository. We will add this access token to our application’s Info.plist file after we set up our Xcode project.
Now that we have our access token, let’s create an Xcode project and add the Mapbox SDK for iOS.
Starting a new project with the Mapbox SDK
We are going to build a new iOS application to demonstrate Mapbox functionality. Create a new project in Xcode, named FirstMapboxApp. This project should be a Single View Application, use Swift as the programming language, and use storyboard/UIKit for the user interface, as seen in Figure 11-3.
Figure 11-3
Creating the FirstMapboxApp project in Xcode
After creating this Xcode project, we need to install the Mapbox SDK. Unlike Google Maps or MapKit, the Mapbox SDK is open source. The easiest way to include the SDK in your application is to use CocoaPods, similar to how we installed the Google Maps for iOS SDK. If you have not installed CocoaPods on your Mac, please visit https://cocoapods.org/ for installation instructions.
Once you have CocoaPods set up, go to the command line, and change directories into the folder for the project you just created (FirstMapBoxApp).
In that directory, create a CocoaPods Podfile for your project with this command:
pod init
The Podfile you create will look like Listing 11-1.
target 'FirstMapboxApp' do
# Comment the next line if you don't want to use dynamic frameworks
use_frameworks!
# Pods for FirstMapboxApp
end
Listing 11-1
Generated Podfile for the project
Within this file, we have a target that points to your Xcode project and a place to list libraries (known as pods in CocoaPods) that your project depends on. We only need to add one pod for Mapbox and then declare a version to use, as shown in Listing 11-2. At the time of this writing, that version is 5.8.
target 'FirstMapboxApp' do
# Comment the next line if you don't want to use dynamic frameworks
use_frameworks!
# Pods for FirstMapboxApp
pod 'Mapbox-iOS-SDK', '~> 5.8'
end
Listing 11-2
Added Mapbox CocoaPods library to project
After editing and saving the Podfile file, run the following command on the command line:
pod install
CocoaPods will download the Mapbox library and install it into a Pods folder. You will also see a new FirstMapboxApp.xcworkspace file that you will open in Xcode. In this workspace will be your project, plus any dependencies from CocoaPods.
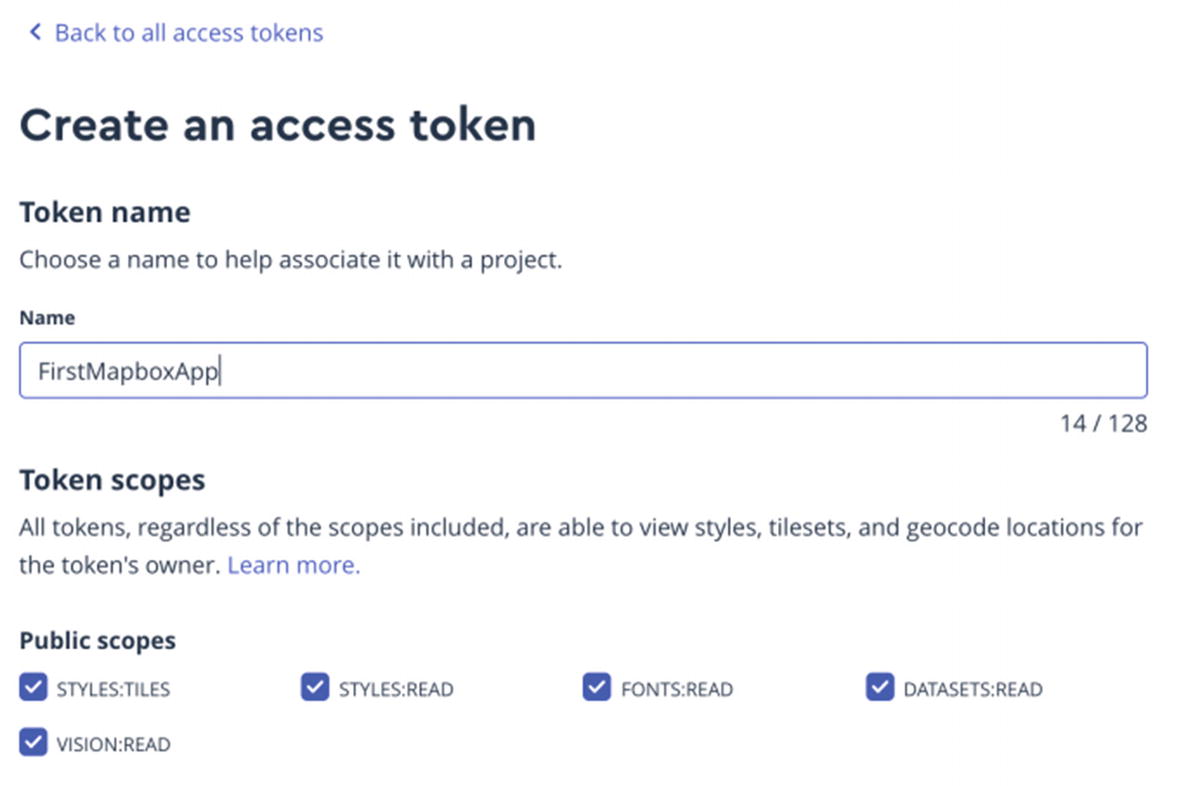
Go ahead and open up the workspace. In your project’s Info.plist file (Figure 11-4), add an entry for MGLMapboxAccessToken, and set its string value to be your access token.
Figure 11-4
Project Info.plist file with Mapbox access token setting
Once you have added the access token, we have everything we need to use Mapbox. Let’s get started by adding a map to our default view controller.
Displaying a map view
Mapbox provides a map view class named MGLMapView (MGL is short for Mapbox GL). To use that map view class in a storyboard, drag a UIView onto your view controller, and then change the custom class in the identity inspector to MGLMapView, as shown in Figure 11-5.
Figure 11-5
Setting the MGLMapView custom class
Let’s make sure everything is set up. Go ahead and run the application. You should see a basic world map appear in the iOS Simulator, similar to Figure 11-6.
Figure 11-6
Displaying a basic world map in the map view
Tip
If you see a blank map with an info button, you may need to double-check your Mapbox access token in the Info.plist file.
Now that we have the map view, let’s change the way the map appears by centering it on a new location and choosing a different map style.
Customizing the map view’s appearance
Our first task is to create an outlet for our map view, so that we can change its properties programmatically. Use the Xcode Assistant to drag an outlet into the ViewController class. Name the outlet mapView. The declaration will look like this:
@IBOutlet weak var mapView: MGLMapView!
You will also need to add an import statement at the top of the class:
import Mapbox
Now that you have the map view declared as a variable, you can easily center the map over a new location. Inside your viewDidLoad() method, add these two lines. Feel free to adjust the latitude and longitude to match your location – the position I picked out is centered over Austin, Texas:
After running the application, you’ll see that the map is now showing a lot more detail. Adjusting the zoom level programmatically is easy as well, with a zoom level of 10 being sufficient for central Austin.
One of the best features of Mapbox is the ease of changing how the map renders. You can create your own map styles and then refer to them with a style URL. Or you can use some of the built-in Mapbox styles – these are available through the MGLStyle class. Try changing the style URL of your map view to an outdoors style:
mapView.styleURL = MGLStyle.outdoorsStyleURL
Other map styles available on the MGLStyle class are
darkStyleURL
lightStyleURL
streetsStyleURL
satelliteStyleURL
ssatelliteStreetsStyleURL
In Chapter 12, we will examine map styles in much more detail, using the same styleURL property. Let’s move on to display a basic marker on the map.
Display a point annotation on the map
The Mapbox SDK supports displaying markers, overlays, and lines on the map as annotations, similar to MapKit or Google Maps for iOS. Let’s try a basic example and display a simple map marker, with an associated callout. There are two different steps we need to implement. The first is to create an annotation and display it. The second is to adopt the MGLMapViewDelegate protocol and then implement the mapView: annotationCanShowCallout function. Let’s get started by displaying an annotation.
When we work with annotations at a given latitude and longitude, we can use the MGLPointAnnotation class. Instances of this class have properties for their coordinate, title, and subtitle, similar to the MKPointAnnotation class in Apple’s MapKit framework. Go ahead and create a function named displayAnnotation, as shown in Listing 11-3. You need to call displayAnnotation() at the end of the viewDidLoad() method.
func displayAnnotation() {
let annotation = MGLPointAnnotation()
annotation.coordinate = CLLocationCoordinate2D(
latitude: 30.25,
longitude: -97.75)
annotation.title = "Austin"
annotation.subtitle = "Texas"
mapView.addAnnotation(annotation)
}
Listing 11-3
Display an annotation on the map view
We’ll also need to adopt the MGLMapViewDelegate protocol. We can do that with an extension of the ViewController class. Add the extension in Listing 11-4 to the bottom of the ViewController.swift file.
The only method implemented in the delegate controls whether or not a given annotation will show a callout when the user selects it. If we had some annotations that didn’t show information, we could have more complicated logic here, but we can just return true. The default behavior for Mapbox will be to show the title and subtitle properties of the annotation in a simple callout.
Last, we need to tell the map view that it has a delegate. Inside the viewDidLoad() method, add this line:
mapView.delegate = self
We can always implement more methods from the delegate protocol in the future. Go ahead and run the project now, so that you can see how this basic example works. Your code should look similar to Listing 11-5.
import UIKit
import Mapbox
class ViewController: UIViewController {
@IBOutlet weak var mapView: MGLMapView!
override func viewDidLoad() {
super.viewDidLoad()
// Do any additional setup after loading the view.
After running the project in the iOS Simulator and then clicking the marker, you should see something similar to Figure 11-7.
Figure 11-7
Displaying a marker with a callout on a map view
This is a straightforward example of how to get started with Mapbox, but we haven’t really covered anything that makes Mapbox different from other mapping providers. In the next chapter, we will go in depth on customizing the look and feel of your map with Mapbox. This will give your mobile application a unique personality, and it’s pretty easy to do.