You can support region monitoring with geofences inside your iOS application with CoreLocation. iOS has built-in region monitoring, meaning that your application does not have to be in the foreground and also does not have to use excessive energy by continually checking the user’s location.
Concepts for region monitoring
Conceptually speaking, region monitoring is simple. Your application can specify up to 20 geofences (called regions in CoreLocation). Each region gets a unique identifier, and you can specify whether or not the application is notified when the user enters or exits each region. The CoreLocation Manager (CLLocationManager) that we worked with in Chapter 2 can start and stop monitoring individual regions. You can also get a list of the currently monitored regions. Events for entering or exiting regions are delivered to the location manager delegate, which is typically a view controller or the app delegate class.
The difficulties of region monitoring lie in the nuances for monitoring regions. For instance, region monitoring requires the always allow location permission, but the user will only be prompted to allow the when in use location permission the first time the application requests it. The always allow permission will occur in a separate request for the user when one of the geofences sends an enter or exit event to the application while it is running in the background.
The end user does not need to accept the always allow location permission for your application to monitor regions, but the triggers will only occur after the end user allows permission. This will require you to educate the user as to why they need to allow the application to have the always allow location permission.
In addition to permissions, your application will not be instantly notified when a user enters or exits a geofence. According to Apple, to avoid sending too many notifications to your application, iOS will require a 20-second wait and a minimum distance between when the region boundary was crossed and when your application will receive a notification. If your regions are small and the user is in a car, riding a bike, or even walking at a fast pace, they could be past the region by the time they get the alert.
Setting up your location-based application
This chapter will build on the discussion of the CoreLocation Manager from Chapter 2. We will need to initialize a location manager, set the delegate, and request permission to always get the user’s location.
Privacy - Location When In Use Usage Description (NSLocationWhenInUseUsageDescription)
Privacy - Location Always and When In Use Usage Description (NSLocationAlwaysAndWhenInUseUsageDescription)
If you would like to know more about the location manager, delegate, and permissions, please see Chapter 2.
Requesting always allow location authorization with CoreLocation
We will also need to set the text for the permissions in the Info.plist file – we’ll tell the user we are going to be monitoring geofences.

Permission description for Always and When in Use Location Usage in the Info.plist file
So far, these are all steps you would need to do for any iOS application that uses the user’s location. Let’s move on to creating geofences.
Getting started with region monitoring
The CoreLocation location manager is responsible for monitoring geofences, and your application is responsible for telling the manager which geofences to monitor. You can set geofences programmatically in your application, in case you need to retrieve them from a server, or let a user create their own geofences (for instance, for their home, school, and work locations).
The first step is to ensure that region monitoring is available for the region class you are using. In theory, any class that subclasses CLRegion could be used, but in practice, the only class that subclasses CLRegion in iOS 13 is CLCircularRegion, which draws a radius around a coordinate. The isMonitoringAvailable(for:) static method on the CLLocationManager takes a class as an argument, so you would typically pass in CLCircularRegion.self . If monitoring is available, you can create a region and then start monitoring it.
Each region has two Boolean properties for triggers – notifyOnEntry and notifyOnExit. If both are set to false, the geofence won’t do anything. Both may be set to true, or only one may be.
After instantiating and configuring the region, pass the region to an instance of the location manager with the startMonitoring(for:) method.
Creating a geofence to monitor
As you can see in the preceding method, creating a region for a geofence and telling iOS to monitor it for entries and exits is pretty straightforward. The next part of this application will listen for changes in the user’s location that will either take them into or out of the geofence.
Listening for geofence triggers
After registering geofences with the location manager, any entries or exits associated with that geofence will be sent to the location manager’s delegate.
The next step is to create an extension for the CLLocationManagerDelegate protocol at the end of the ViewController.swift source code file. Inside this extension, we are going to implement the locationManager(_ manager: didEnterRegion region:) and locationManager(_ manager: didExitRegion region:) methods.
Listening to geofence triggers for entering and exiting regions
A more advanced usage of region monitoring might trigger business logic within the application, for instance, offering a discount, popping up a reminder from a to-do list, or offering to check you into a favored location. These would all be based on the region’s identifier, which should be a unique string. For instance, you may want to use a primary id from a database or the id of an object retrieved from a RESTful resource on a server.
If you are starting monitoring a region that has the same identifier as another region, the existing region will be replaced. You can also monitor up to 20 regions at a time, so take that into account when considering your overall system design – you can’t monitor any more than that with iOS.

Custom Location dialog box in the iOS Simulator
You should see a message in the output window of Xcode that says “Did enter Geofence1”. Change the Location of the simulator to “City Run” or another built-in location, and you will see a debug statement for leaving the Geofence.
Displaying a local notification inside the app
One very common use case for geofences is to display a local notification, even when the application is not active. To do this, you will typically add functionality to the AppDelegate class , although you can certainly encapsulate most of this into its own class, and then let the app delegate call into that class to perform the functionality.
When working with local notifications, you will need to ask the user for permission to display notifications (similar to the location permissions).
Setting up the notification center
Here, all we are doing is requesting authorization from the user to display alerts for notifications. We could also request sound and badge access if we needed it by adding those to the options array. We do need to specify a completion handler, but it is OK if it is empty.
The next line sets the delegate for the user notification center. This is important for cases where the user enters or exits a geofence while the application is in the foreground. We will need to implement the userNotificationCenter(_ center: willPresent notification: completionHandler) method of the UNUserNotificationCenterDelegate delegate. Inside that method, we will only add one line, to handle the foreground notifications the same way we would as if the app were running in the background by displaying a notification alert. You could display an alert view here if you wanted.
The user notification center delegate extension for handling foreground notifications
This was a lot of boilerplate for a simple function, but it’s essential if you want your local notifications to work properly when the app is in the foreground.
Displaying a local notification for a region
Our next step will be to write a function that creates a local notification from a monitored region. This function will take two arguments – a region and a Boolean for whether this is an enter or exit notification.
Inside this function, we will create a mutable notification content and set its title and body. We will also create a trigger that will display the notification a second after it is requested and a notification request that we will pass to the user notification center.
A function to display local notifications for a given monitored region
Now that we have a way to create notifications from regions, we just need to listen to region changes in the app delegate and then call this function.
Monitoring region changes in the app delegate
CoreLocation location manager delegate that handles displaying notifications
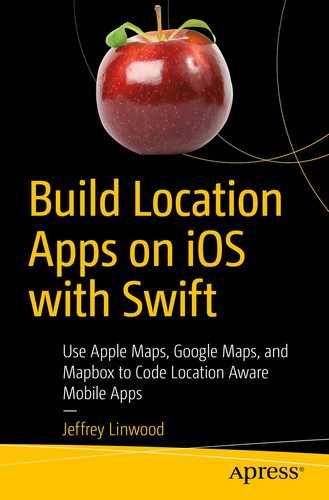
The iPhone Simulator displaying a local notification from a geofence
You can continue to build on this example by implementing features to handle a user selecting a notification, either while the application is running or after the application has been terminated. Those are outside the scope of this book, with its focus on mapping and locations.
Removing geofences from the app
The location manager contains a set of geofences that are currently being monitored by the application. These regions are recreated every time the application loads and should be compared using the unique identifier, not an object comparison, as the instance may change between starting to monitor a region and retrieving a set of regions from the location manager. The name of the property of the location manager is monitoredRegions, and it consists of a set of CLRegion objects.
If you would like, you could compare the region’s identifier to a known set of identifiers you would either like to keep monitoring or you would like to stop monitoring and remove the geofences then.
This wraps up our discussion of iOS region monitoring and geofences. This functionality is independent of any mapping technology used and can be used in both the foreground and background for iOS apps. The next chapter will show you how to use Google Maps for iOS, which is a similar technology to Apple’s MapKit framework. You can certainly use these geofences in an application that uses Google Maps.