
Businesses of any size can benefit from the reliable and trusted PayPal brand. Using PayPal for osCommerce transactions, you use one of the easier modules to work with. In fact, you can have a more or less working PayPal facility up and running in no time at all. The hard work comes from ironing out the wrinkles along the way and ensuring the smoothest operation of your payments in the future.
If you are happy with the most basic setup, then all you need to do is create your own PayPal account, and enable the PayPal module in osCommerce using the admin tool. Then, when customers attempt to purchase goods, they will have the option to pay with PayPal and be redirected to the PayPal site, where they can make the transaction.
There are a couple of problems to doing things this way! The main thing is that customers making payment might simply close their browser, without continuing back to the store. In this case, the order is simply not recorded in the database. This is clearly quite a problem because straightaway you will be unsure as to who has paid for what without manually checking your records. Secondly, customers must have a PayPal account in order to complete the transaction-this is not necessarily the case if you decide to implement PayPal functionality on your own because PayPal has now introduced Account Optional facilities.
As of milestone 2, version 2.2, there is a contribution that uses the PayPal IPN system to make transactions secure and reliable. This is what we are going to use for the example site, so head on over to the contribution’s homepage and download it from http://www.osCommerce.com/ community/contributions,2679.
Note
This is a community contribution, and is subject to upgrades and changes. As a result of this, you may not use exactly the same version as shown here. At the time of writing, the recommended version is the one uploaded on the 6th of August by judebert.
Some of you may be asking, "What is an IPN?"
Well, very briefly, let’s quickly go over the payment transaction process for PayPal to get a good idea of what is going on under the hood. From the PayPal website, the definition of an IPN is:
Instant Payment Notification (IPN) is PayPal’s interface for handling real-time purchase confirmation and server-to-server communications. IPN delivers immediate notification and confirmation of PayPal payments you receive and provides status and additional data on pending, cancelled, or failed transactions.
Basically, an IPN is sent to your server as soon as a payment is made, allowing you to incorporate information sent with this notification into your programming. On receiving the notification, your server will send the information, including the encrypted code, back to a secure PayPal URL. PayPal will then authenticate the transaction and send your server a Verified or Invalid response, which you can use to fulfill an order after you have performed a few checks.
Now, you don’t even have to have any form of security enabled to do this because there is no sensitive client information being passed back and forth between your server and PayPal. But while this is an option, you shouldn’t really treat it as such—consequently, from your point of view, you either need to have encryption enabled to work with PayPal or you must have a secure server that can be targeted by PayPal.
As well as this, in order to get the IPN system functional you need to be able to supply PayPal with a valid URL, which it will use to send its messages to. For now, though, let’s begin with setting up a PayPal account...
It’s very easy to set up your PayPal account. Simply head along to http://www.paypal.com, click on Sign up, and select the type of account you wish to create—more than likely a business or premier account. You will then have to furnish PayPal with a bunch of details about yourself and your business, and confirm all this before you will be given an account. Once that is done, you will be presented with a screen that looks much like this:
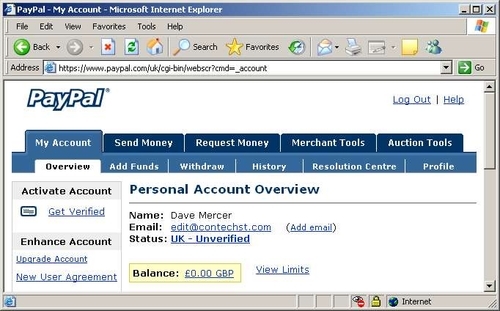
At some stage you will need to have your account verified, which will allow you to lift the limit on the amount of funds that can be withdrawn from your new account. Everything in this interface is reasonably self explanatory, and you are advised to spend some time learning your way around it before continuing. Assuming you have got your account to the status and state you need it in so as to run your business, you can turn to the admin tool and install the PayPal module in the Modules/Payments section, like so:
With that done, you can check to see whether everything is working by purchasing an item from the site and ensuring you are taken to the correct PayPal page to make the payment. Unless you have a couple of accounts, you will either be unable to pay yourself, or you will end up having to pay from your own account into your business account, so it isn’t recommended you take it any further than this at this stage.
Unfortunately, this is not the end of the story because in order to make sure that the payments work smoothly without us having to verify orders manually, we are going to have to use the PayPal IPN contribution.
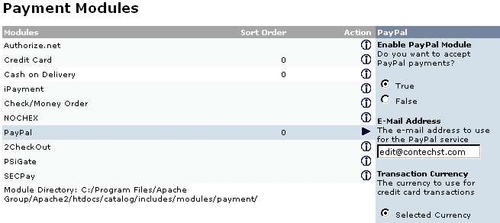
The first step here is to install the IPN contribution, which requires you to copy files into the catalog directory. Please read the instructions supplied with the contribution to ensure that you copy everything across properly. Once this is done, you can simply go to the Payment page in the Modules section of the administration tool and click install. (Remember to remove the other PayPal module at the same time.) This will bring up a list of options, which you will need to edit.
Note
For simplicity’s sake we will show you how to get a live site up and running (so you know it can be done). In reality you will need to do some testing before using the live PayPal server. In order to perform some testing you need to register as a developer with PayPal, at http://developer.paypal.com, and make use of their sandbox site. There is plenty of advice and documentation to help you on your way, so we won’t cover it further here.
You can use the PayPal IPN contribution to choose whether to use the live site or the developer’s sandbox to process transactions by simply changing the Gateway Server option to Testing instead of Live. Remember that when you do your testing work you will need to create several accounts—one to act as the receiver of payments, and a few buyers.
Let’s get back to the live site. By now you should have the IPN contribution installed and the default module disabled. You should edit the module appropriately according to your circumstances. For example, you might have something like the following setup:
|
Property |
Setting |
|---|---|
|
Enable PayPal IPN Module Do you want to accept PayPal IPN payments? |
This is obviously set to True. |
|
E-Mail Address The e-mail address to use for the PayPal IPN service |
The email address of your PayPal account at which you wish to receive your store’s payments. |
|
Transaction Currency The currency to use for transactions |
This was left as Select Currency, but you will need to decide this based on your payment criteria. |
|
Payment Zone If a zone is selected, only enable this payment method for that zone. |
Since we are happy to receive payments via PayPal from anywhere in the world, this was left as none. |
|
Set Preparing Order Status Set the status of prepared orders made with this payment module to this value |
This was set to Preparing [PayPal IPN] instead of Processing in order to distinguish it from the default module. |
|
Set PayPal Completed Order Status Set the status of orders made with this payment module to this value |
This was set to Processing, but can be changed to any of the values in the drop-down list depending on how you want to structure your payments. For example, you might want to take certain actions based on the status of an order, in which case set this (along with other the status of other payments) to the status you desire. |
|
Set PayPal Denied/Refunded Order Status Set a specific status to denote that something has gone wrong |
A new status, Denied, was used here. You can add it to the drop-down list by going to Localization | Orders Status in the admin tool and adding a Denied status there. This option is then available for you to use in all your payment modules. |
|
Gateway Server Use the testing (sandbox) or live gateway server for transactions? |
You will obviously use the sandbox for some time until you are happy everything is working as it should. For the purposes of this demonstration, though, it has been set to Live. |
|
Transaction Type Send individual items to PayPal or aggregate all as one total item? |
This was set to Aggregate since we want entire orders processed in one go. |
|
Page Style The page style to use for the transaction procedure (defined at your PayPal profile page) |
You can set the look and feel of your personal PayPal payment page from the your account’s page by selecting the Custom Payment Pages option in the Seller Preferences category of the Profile section—in this case it has been set to contechst, which you will see shortly. |
|
Debug E-Mail Address All parameters of an Invalid IPN notification will be sent to this email address if one is entered |
Decide on an email address on which you can receive notifications of any IPN irregularities. |
|
Sort order of display Sort order of display. Lowest is displayed first. |
This is a standard option and simply governs the order in which the modules are presented on the payment information page. |
Incidentally, due to the nature of dealing with downloadable products, many of the order status settings shown in the preceding table will be changed in the Working with Downloadable Products section in Chapter 7.
Note
It is strongly recommended that you take a look at Chapter 7 before finalizing your order statuses even if you aren’t going to work with downloadable products. This is because the way in which order statuses can be manipulated is covered in some detail there and will provide you with a more sophisticated way of controlling your purchases.
Also, we haven’t covered the encryption section of this module’s settings because we will deal with that on its own in Chapter 7. Saving the above settings with their appropriate values and ignoring the rest, we can move to the next task. Common wisdom has it that you need to tell PayPal where it is that it should be sending its notifications... or do you? Actually, this contribution is really meant to take pretty much all responsibility off your hands, and you don’t even have to tell PayPal where it needs to send its IPN.
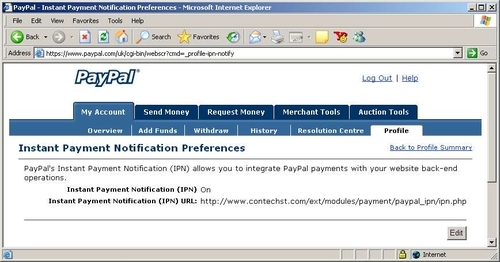
This may seem slightly confusing to some of you who have already worked with PayPal previously because it is recommended that you supply a target address under the Profile section of your PayPal account page. I will show the standard process here because it highlights a couple of points, but please bear in mind that you don’t need to do this if you are using the PayPal IPN module.
Under other circumstances, you would set things up on the PayPal side by clicking on the Profile link on your PayPal account page and then navigating to the Instant Payment Notification Preferences under the Selling Preferences heading. Once you are there, edit the settings like so (obviously substituting the correct values for your server):
Two things you will notice here:
The first is why we needed a live site to work with PayPal—obviously a development machine will have no way of receiving IPNs from PayPal, so only a working URL (shown here as http://www.contechst.com) will do. Second, we have told PayPal to send payments to the ipn.php file in the ext/modules/payment/paypal_ipn/ folder. This location might change depending on the version of the IPN contribution you are using.
Now, in contrast to this, the target URL for PayPal is actually passed to PayPal by the IPN payment module as part of the request, which is why we don’t need to perform any actions other than installing the module. A customer can then select this payment method off the site, be redirected to PayPal, and can make the payment. You can verify this by observing the various stages of the order in the Orders section of the admin tool.
That’s everything you need to do to get osCommerce talking to PayPal and making everything work nice and smoothly—easy! Let’s run through the whole process step by step so that everything is clear at this point. First, a customer gets to the following stage on the site:
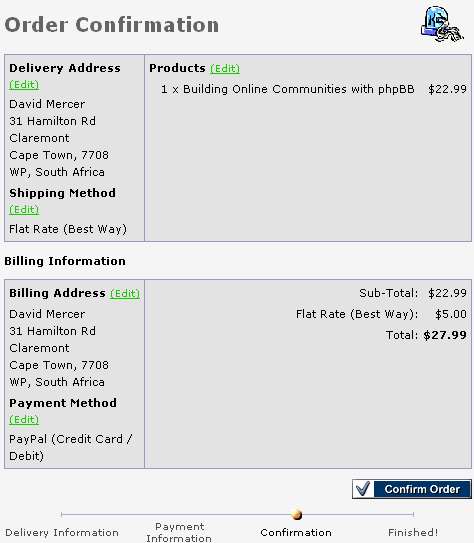
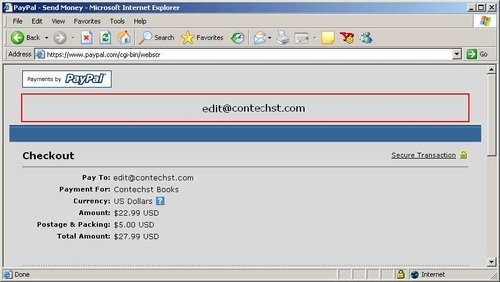
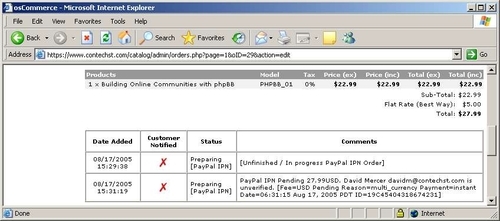
Notice that the customer has selected the PayPal (Credit Card/ Debit) payment option, and that the total price of the purchase is $27.99. Once the Confirm Order button is clicked, the customer is redirected to the PayPal site to complete the payment. If, however, we take a look at the admin tool, we see that it has already picked up on the fact that we are, in all likelihood, about to receive a payment via PayPal, and the screen looks like this:
Now, the Status message is set during the editing of the IPN payment module as you have already seen earlier in the table presented. So, at this stage, osCommerce knows what is coming in terms of the type of payment that is being made, and it’s waiting on the customer to go through and make the payment. Assuming the customer does just this, he or she will be presented with the following customized page (recall that this setting was also made when editing the IPN payment module):
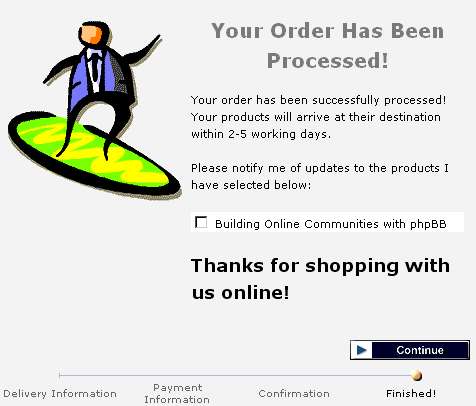
Of course, this is just a demo to show that you can control the look and feel of the PayPal page so that it provides a more seamless transition between your site and PayPal for customers. Once the payment has been made, we can look at the order in more detail. You will notice that there is now a new section, which shows the status of the IPN, towards the bottom of the screen:
The first two status rows actually get added between the purchasing of the product on the site and the acceptance of payment by the merchant once the customer has paid. Of course, to confirm all this, you should receive an email from PayPal informing you that you have received a payment from a customer. Once the customer clicks Continue to complete their payment, they are returned to your server and will be shown your customized checkout success page:
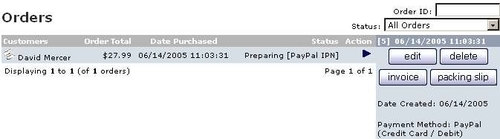
The story is not quite finished yet; you, as the receiver of funds, still need to accept payments made. Should you choose to accept the payments, then the following note will be added to the order:
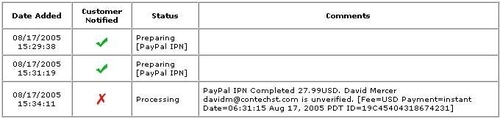
Notice that at the bottom of the list we now have the latest record (in this case at 15:34:11): the customer hasn’t been notified of this development by osCommerce (but remember that PayPal will notify them that their payment has been accepted), the Status of the order has been set to Processing as expected, but the really interesting point is that the Comments section is telling us that the actual process is Completed as opposed to Unfinished as it was initially. This means we have the money, safe and sound.
For the demo site, things were set up like this because we want the opportunity to print out an invoice and packing slip, and then finally set the status of the order to Delivered manually so that the final order page looks like this (note that we also emailed the customer to inform them of the delivery and they can now check the site to view the full order history of this order):

Obviously, how you choose to deal with your particular setup will come from what you want out of the site and what you learn as you go along. Having been through this example, though, you should feel pretty good about the process of obtaining payments via PayPal. Of course, there is plenty of testing to do, and you should always ensure that your purchases and stock levels are adjusted as you expect—you can take a look at the Products Purchased report in the admin tool to confirm whether the correct products have indeed been purchased by your PayPal customer.
There is really no substitute for the two things to ensure you have everything set up correctly: practice and experience. Make sure you play around with every aspect of this module so that you understand how it works thoroughly. Then, how to best implement the functionality can be tweaked as you gain experience—you may wish to do things entirely differently altogether.
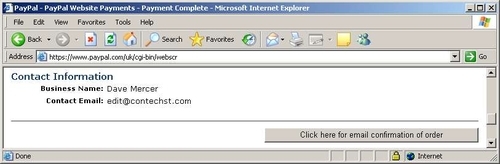
For example, you may wish to entice customers to actually click on the Continue button when finished with PayPal so that they do go back to your site and are given a confirmation email, instead of logging off and then wondering why no one is talking to them. For this, open up the includes/modules/payments/paypal_ipn.php file and search for the following two lines somewhere about line 330:
$parameters[‘cancel_return’] = tep_href_link(FILENAME_CHECKOUT_PAYMENT, ‘’, ‘SSL’);
$parameters[‘bn’] = $this->identifier;
Under that line, add the following line so your code looks like this:
$parameters[‘cancel_return’] = tep_href_link(FILENAME_CHECKOUT_PAYMENT, ‘’, ‘SSL’);
$parameters[‘bn’] = $this->identifier;
$parameters[‘cbt’] = ‘Click here for email confirmation of your order’;
Once you have saved that, take a look at the button you get when you are making payments via PayPal. You should see something like the following:
Pretty neat, huh? Apart from this, the other important thing we learned in this section is that we can create custom order statuses to suit our needs in the Localization section of the admin tool. In this case, we set the status to Processing once we were in a position to accept funds. As you will see in Chapter 7, when we deal with the download controller, having a solid approach to naming the various statuses your store encounters is quite important.
That about wraps it up for a live, functional PayPal-based payment system, but you should never leave things as they are. You need to secure everything using encryption, and for this you will probably need access to some sort of certificate and key generation tool or be able to use a secure server—most good web hosts should provide you with either.