
The Catalog section of the administration tool is a pretty nifty piece of content management software. You can control your stock with a fine tooth comb from here, and although it is not complete on its own, using some of the community contributions to extend the default functionality provided should give you all the help you need to run and maintain the stock on your site; as mentioned, you may wish to look at EasyPopulate in order to upload a number of products at once.
Before we begin by looking at the subsections of the Catalog administration tool, there are a few things that you should know beforehand. Above and beyond the standard functionality provided, osCommerce also gives you a drop-down navigation list to help find your way around your data directory structure, as well as a search tool. If you open up the Catalog page, you will be presented with something like this:
Use the Search textbox (type in the name of the product or category and hit Enter) to find products or categories quickly, or use the drop-down list to navigate to various sections without having to click on the individual category links. Apart from this, you should be familiar with the way the tool works from your experience while configuring osCommerce. Let’s go ahead and look through each of the sections in the Catalog section.
You should ensure that you have a clear idea of what your directory structure looks like as well where your products are going to fit within that structure before you begin adding products. Assuming you do, we can go ahead and make that structure a reality by adding some data. However, we won’t show more than a product or two since we have not dealt with the subject of images, which are obviously a fairly important part of the site.
Click on the new category button to add your new categories in the Categories/Products section of the Catalog folder in the admin tool. You will notice that you have the option to fill in the Sort Order while adding the new category. Adding an integer here will define where in the navigation list the current entry should appear. Leaving this blank means that osCommerce will sort the categories in alphabetic order. For example, Contechst Books wishes the e-Books and Documents category to appear last, so it is given a high sort order while the other categories are left blank.
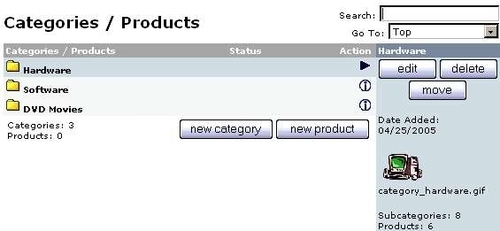
Once you have defined all your categories—including adding subcategories by navigating to a category and clicking the add category button to add a new folder there—check your site to view the changes made. The demo site at this stage looks like this:
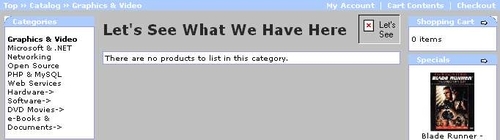
There are several things to note here. First, the new categories and subcategories have been added (you can tell that e-Books & Documents has subcategories because of the arrow to the right of the title) and that obviously, there are as yet no products in the Graphics & Video section, which is the currently selected category. Secondly, you will notice a broken picture link to the immediate left of the shopping-cart box. This is because we have not yet added any category images to the images folder. You may even decide to do away with these images altogether, so wait until next chapter where they are covered in detail before making a choice.
Notice also that we have not yet gotten rid of the default categories. This is because removing all these products now will leave us with a pretty dismal looking website and make it harder to ascertain what changes have had what effect and where. There’s no rush to remove them for the moment, so leave them as they are for now.
Next, let’s add a new product to the database. Go to a product category and click on new product. This will bring up the product’s buying info page, which we discussed earlier. Fill out the details of the product and click preview; you will then be shown what your product listing will look like on the site. For example, we have added a book entitled VirtualDub Video: Capture, Processing and Encoding with all its accompanying details. The result on the site is:

From this you should be able to tell the following:
- A small image for the product has been uploaded here. Assuming you havent uploaded an image file for the product you will have a broken link instead.
- HTML formatting tags have been used to lay out the information nicely. For example, the books specification information has been bolded using the
<b>and</b>tags, and blank lines have been inserted using the<br>tag. All in all, the effect is pretty striking. If you want to try some special effects, remember that you have a stylesheet, which you can use to fiddle around with, and if you wish to learn more about HTML, search Google with the term HTML example. - The Products Model has been entered as VirtualDub; you can see this by looking at the breadcrumb at the top left of the page.
- If you look closely, you will note that a manufacturer image (Packt Publishing), shown in the Manufacturer Info box on the left, has also been added.
That is really all there is to adding products to the database. Of course, you can remove them just as easily by clicking the delete button on the products administration page. This is how the new products administration page looks:
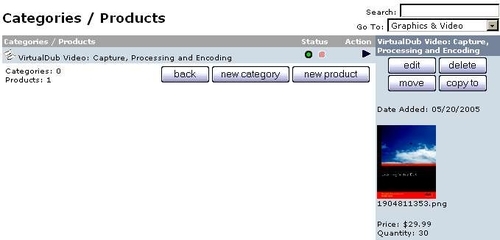
Notice that there are now two more buttons available apart from edit and delete that you are already familiar with. These two options relate to where and how the product is stored and accessed in the database, and we’ll look at these in a moment.
Along with all the buttons are two ‘lights’ under the Status heading towards the middle of the screen. These are used to activate and deactivate products without having to go through the trouble of adding them or removing them from the database. So, if there is a product that you don’t want to make available on the site for some reason, but you also don’t want to play around with its settings, you can simply set it to inactive by clicking on the pink button.
Let’s say that it so happens that the VirtualDub title is available for download (it isn’t, but let’s just assume that it is). This being the case, it would make sense to have it appear under the e-Books & Documents folder too. Now, we don’t really want to navigate to that category and re-enter all that information, so rather than that, simply click on copy to, and the following options are presented:
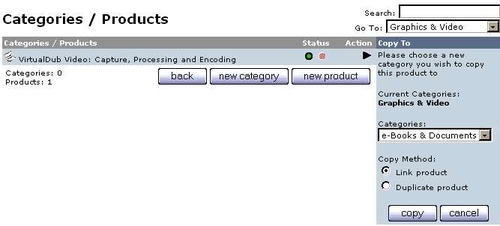
Now we can choose whether or not to Duplicate product, which will create an entirely new record in the database under the stipulated category, or alternatively, choose Link product, which will simply link the product to the stipulated category. Since we don’t want to create unnecessary redundant data it is a far better idea to link the product than duplicate it. Doing this means that when we navigate to the e-Books and Documents category on the site, we are presented with the same VirtualDub product.
This has quite far-reaching consequences for stock control because if you choose to duplicate the product you now have to worry about two sales channels for the same products and ensure that you have enough stock for both. If you simply link the product then you only have one product being sold and your stock control continues as normal.
The other option, move, will simply move that product to the category of your choice. The product then no longer exists in its original place, but only in the new category. This example should have highlighted the fact that sometimes you need to think closely about whether to link, duplicate, or move a product because it may be necessary to set the weight property of the product to 0 in order to make it downloadable. In this case, duplicating the data and modifying the Product’s Weight property in the duplicated version is probably the best option.
It should be mentioned that you can also move categories although you aren’t able to use copy to. For categories, move works in exactly the same way as for products, by simply adding the category entry to the target category and removing it from the present one. It is recommended that you experiment with these features since there are other default behaviors you should learn about. For example, what happens if you try to move a product to a folder that already contains that product?
Don’t get the product attributes confused with the properties we covered in the Preparing to Add Product Data section earlier. What we have looked at is effectively the ‘buying information’ that is used to inform customers about a product on the website. The product attributes that we will look at later deal with a different type of information. For example, in the last section there was no way to indicate whether the product you added was available for download.
Depending on what it is you are selling you will obviously need different product attributes to be reflected in your application. For example, should you wish to become the largest retailer of Bonsai trees in the northern hemisphere, it is unlikely the default attributes of color, size, model, Memory, and version will be of much use to you. By the same token, making up a couple of categories on the fly will probably also not help because there are a few tricks up osCommerce’s sleeve that should be exploited—we will come to this while looking at how to use the Product Attributes section of the administration tool in a little while.
Assuming you were the aforementioned horticulturalist, then product attributes such as species, style, and age are probably of more use to you because they apply directly to the type of product you are selling. Furthermore, you would need to be able to offer price ranges based on these attributes. For example, the older a tree gets the more valuable it would become so you could have a range of age options presented to the buyer with their corresponding prices.
For Contechst Books, the matter is slightly different. The type of attributes we are really concerned about are things like whether the cover is soft or hardback, whether the book comes with an accompanying CD, whether it is downloadable, or whether it has more than one edition. Obviously, you will need to understand the range of options inherent in your specific selection of stock before working on this section.
Once you have a list of all the attributes that could have more than one value, you should enter meaningful names into the first group of textboxes under the heading Product Options on the Products Attributes page as shown here:
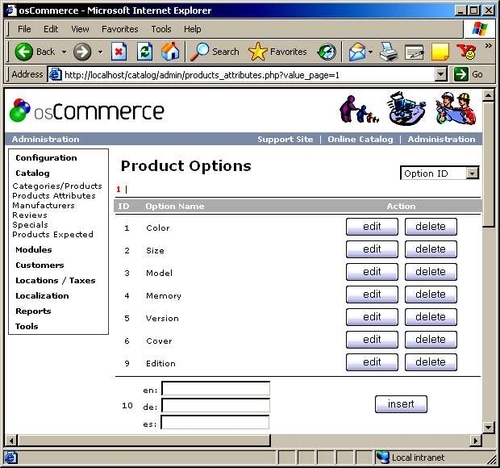
From this it is quite clear that we have added options 6 and 9, which will apply to some, if not all, of the books we are selling. Remember that the attributes you set in this section don’t have to apply to a wide range of products; even if there is a single product that comes in a variety of flavors, you will need to add the attribute here in order to have the options presented to the buyer. You may recall that we also talked about whether a book would be downloadable; well, this attribute falls neatly under the Version title, so we have not added a new Product Option for downloads.
Note
Due to the way in which osCommerce and the download controller community contribution works, it is recommended that you look at the Working with Downloadable Products section of Chapter 7 before attempting to set up a working downloadable-product site.
One you have your options safely entered, move across the screen to the Option Values section. This section deals with the specifics of each of the options declared in the first section. So, for example, we would define two values for Cover here, namely Hardback and Paperback. The following screenshot shows the rest of the settings used for the demo site’s products:
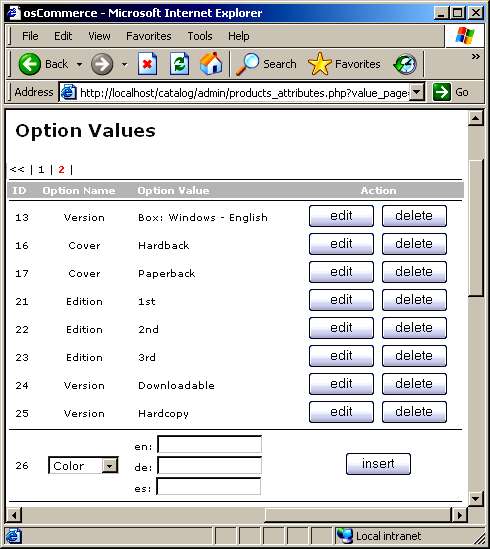
Make sure you can do this yourself by first selecting an option to work on from the drop-down list (shown in the screenshot above as ID number 26) under Option Values, then add the option value to the text box and click insert.
Now, should the issue arise, we would be able to provide a user with the options of purchasing either the Hardback or Paperback covers (if a book comes in both), or the 1st, 2nd, or 3rd edition of the book (obviously if there is only one edition of a book you simply don’t associate this attribute with that book), and finally if there is a Downloadable version as well as a paper version of a book, then customers can decide which they prefer.
The final stage is to actually tie these settings to the relevant title. So, say for example, the VirtualDub book we talked about earlier had two editions as well as being bound in both hardback and paperback. We would need to ensure that the buyers could stipulate their preference while making purchases. In order to do this you scroll down to the final section, which is entitled Product Attributes as shown here:
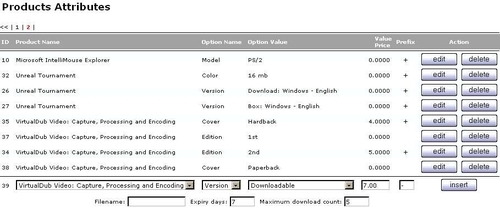
At the bottom of the table you are presented with a drop-down list of all your products as well as the product options, values, and resulting modification to the price. This is really where you get down to business and associate the attributes with their respective products. As you can see in the above figure, the VirtualDub title has had two Edition options added, with 1st and 2nd as their values, as well as Hardback and Paperback Cover options too.
The Value Price column heading holds the value of the change to the standard price, and the Prefix column shows whether or not this change is positive or negative. If you leave out these values when adding a product attribute, then osCommerce defaults to no change in price. You should be able to tell that in this case, the Hardback version will cost $4 more than a normal book, and the second edition is $5 more expensive than the first edition. Notice that the Downloadable Version of the book (the Product Attribute in the process of being added) is actually $7 cheaper than its standard counterpart.
The upshot of all this is that when a customer decides to buy a copy of VirtualDub, they have a series of choices that affect the type of product they purchase. In this case, let’s say the customer wanted a first edition hardcopy, hardback version of the book. Well, in this case, they would make the selections as shown below:
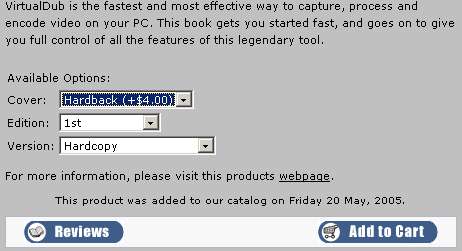
And the total price would, as we expect, be $29.99 plus $4.00, which it duly is when we view the cart contents:
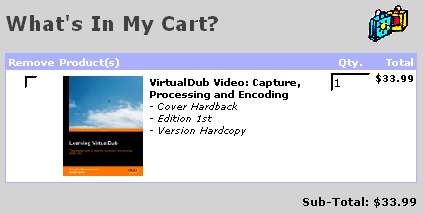
Notice that the actual options specified when the choice is originally made are now displayed underneath the product’s name. The price is $33.99 as we expected, but had we bought the downloadable version it would have been $7.00 cheaper. Many of you should be frowning at this stage because something just isn’t right! What could it be?
I must confess that you have been led astray slightly in order to demonstrate the need to plan ahead. Adding attributes such as the ones we have shown here will lead to inconsistent charges because we have failed to carefully identify the nature of each option. Obviously, if we categorize related attributes differently we can set up inconsistencies in the way the products present their options. In this case, we should not be able to choose a downloadable hardback book because it is impossible to have such a thing.
So where did we go wrong? The answer is quite simple! The hardback, softback, and downloadable product attributes are related in that they specify the type, or version, of book we are offering. Sure, the first two are a type of cover as well, but this is why it can be tricky to just jump in and make decisions like this. In order to rectify this problem we need to realize that a book cannot be a combination of hardback, softback, and downloadable, while it can be a combination of softback and edition one or two, hardback and edition one or two, or downloadable and edition one or two.
Accordingly, the solution is to go back and remove the category Cover, and insert Hardback and Paperback into the Version option, so buyers have to pick one of the three, but no more. Of course, trying to delete Cover will result in the following message from osCommerce:
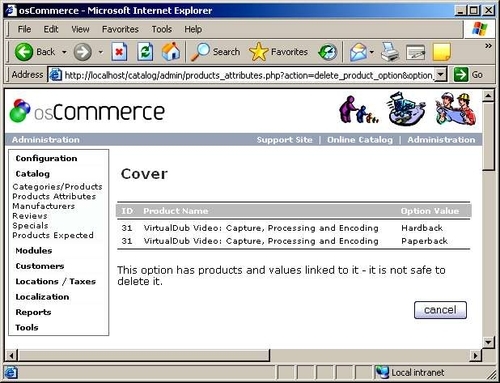
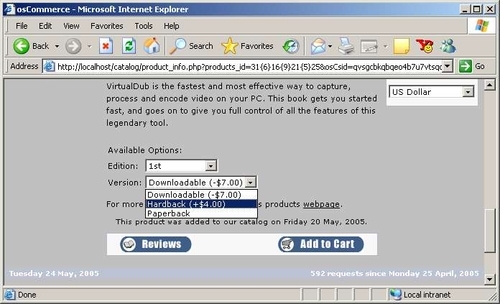
osCommerce quite rightly forces us to think carefully about what we are removing in order to maintain a valid and accurate list of product attributes at all times. This means we have to remove the settings from the Product Attributes section first, followed by the Option Values section before finally removing the Cover attribute entirely. Once this is done, the two cover options can be added to the Version attribute and associated with the book again. Now when the customer attempts to purchase the book, they are presented with sensible options, like so:
One thing to note before we move on is that it can be quite a pest to perform a large number of operations one at a time using this interface, so careful planning and using the drop-down list (at the top center of the screen) to toggle between listing the attributes by ID or alphabetically will help keep frustration to a minimum.
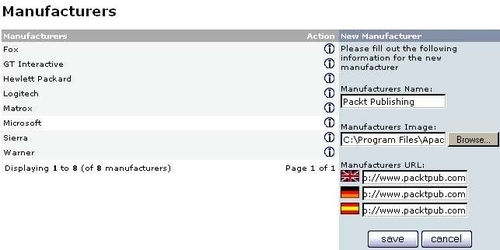
The Manufacturers section is pretty straightforward. Using this section is a case of adding or removing the names and logos of the companies who make your products. Recall that the manufacturers declared in this section play a role in adding a product to the database since one of the drop-down lists available in that section links the manufacturers to the product. Apart from this, it is easy to add a manufacturer; simply click on insert and type in the name of the manufacturer, add a link to the location of the logo image, which will be held somewhere in your images folder, and then insert the URLs for the company’s site(s), like so:
Clicking on save should bring up a screen similar to the following one. (Note that if you are not dealing with images yet, instead of the nice green message along the top of the screen there will be an alarming pink one with a warning that no file was uploaded.)
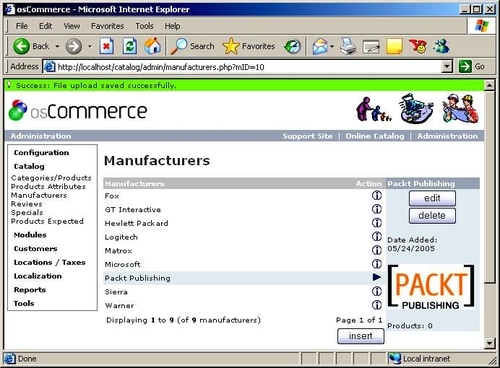
Of course, it is no problem if you want to come back at a later stage and edit your manufacturers. Simply clicking on edit will bring up the same screen as the insert button, which will allow you to change whatever you need to. Recall that in the case of the demo site, the manufacturers are in fact publishers and we are going to modify the site to reflect this in the next chapter. Doing this will serve as a nice example of how to get your hands dirty by making modifications directly to the PHP files that make up osCommerce’s customer interface.
Finally, there are a few options that you should consider closely while deleting a manufacturer. The first is whether or not to delete the manufacturer’s image, and the second is whether or not to remove all trace of the manufacturer’s products including reviews, specials, and upcoming products. How you decide on these is really up to you, but unless you have a major fallout with the sales rep for a particular company, it is unlikely you will need to use this option that often.
As with all good websites, the administrator has the final say on what reviews actually remain on the site. So when rival companies begin writing reviews like "So and so’s products are designed by baboons" all over your site, you have the ability to delete or edit these reviews appropriately. Remember that reviews will be added by customers on the website, so this facility should really only be used for a moderator-type role. It is easy enough to click on edit and insert text or modify the star rating, or delete a review by clicking on delete, so we won’t discuss this any further here.
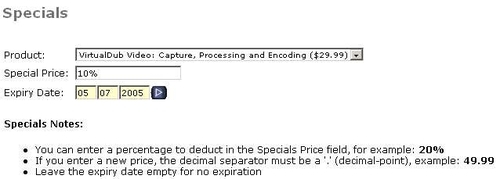
At some stage you will no doubt want to offer specials to boost sales or clear old stock. Whatever your reasons, this section makes it easy to add whatever products you want to the specials list and specify how long they are to remain on special offer and how much to take off (either a set amount or a percentage), like so:
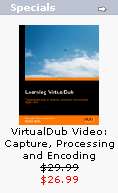
Like so many other things in the administration tool, you can, of course, edit and delete specials with ease. The upshot of adding a special, however, is that predictably, every once in a while (depending on how many products you have on special), your new product will pop up in the specials box as well as displaying its new price in a different color like so:
One final thing to note is that you can activate or deactivate any specials by using the pink and green buttons on the specials homepage.
At first glance, this section might seem slightly superfluous because it is easy enough to set when a product is in or out of stock and when it is expected to arrive from the Categories/Products section, which we looked at earlier in the chapter in the Preparing to Add Product Data section. Actually, its function is exactly the same as the adding a product page; it simply provides an interface to show all the expected products in one place. Useful if you have several hundred products coming in at any one time!
When a new product is entered into the catalog, it is not necessary for that product to physically be present at your place of work yet. Accordingly, you can set a date from the pop-up calendar that stipulates when the product is expected to arrive. Provided the product has an arrival date in the future, the product will appear in the Products Expected page. There is only one option given for the products in the Products Expected page, and that is edit.
Clicking on edit simply brings up the same page used to add the product to the database in the first place, and from here you can make any necessary changes. For example, if your product has arrived early, you can set the date expected to the current date and the product will no longer be listed in the Products Expected page. Anything with an expected date prior to the current date will not show up on this list.
Apart from making life easy when trying to keep track of when all your expected products are to arrive, setting expected arrival dates will also cause osCommerce to inform customers of the expected date on the actual site, with notes, for example, such as this one:
This product will be in stock on Thursday 26 May, 2006.
As well as this, upcoming products are displayed at the bottom of the index page on the site along with their expected date.