
Pages in osCommerce obtain their style-related information from the associated stylesheet entitled stylesheet.css, found in the catalog folder. Using stylesheets gives you excellent, fine-grained control over the appearance of your web pages, and even allows you to produce some great effects. The appearance of pretty much every aspect of the site can be controlled from here, and all that is needed is a little knowledge of fonts, colors, and stylesheet syntax.
Before we go any further, it will make life easier if you have a readymade list of the type of things you should look at setting using the stylesheet. The following is a list of the most common areas (defined by HTML elements) where stylesheets can be used to determine the look and feel of a site:
- Background
- Text
- Font
- Border
- Margin
- Padding
- List
As well as being able to change all these aspects of HTML, you can also apply different effects depending on ‘whether or not’ conditions like a mouse cursor hovering over the specified area—as will be demonstrated a little later on. You can also specify attributes for certain HTML tags, which can then be used to apply stylesheet styles to those specific tags instead of creating application-wide changes. For example, if you had one paragraph style with a class attribute set, like so:
<p class="center"></p>
then you could specify this type of paragraph in your stylesheet explicitly by saying something like:
p.center { color: green; }
Analyzing this line highlights the structure of the standard stylesheet code block, which appears in the form:
- Selector: In this case
p.center - Property: In this case
color - Delimiter: Always
: - Value: In this case
green
All the property/value pairs are contained within curly braces, and are ended with a semi-colon. Now, without getting too carried away in the niceties of stylesheets, let’s finish off the bulk of the modifications to the visual part of the site using the stylesheet. In your favorite editor, open up stylesheet.css, and let’s begin...
In order to insert the background image that was shown in the last section, the following modification was made to the stylesheet:
/* Background image added */
TR.header {
background: #ffffff;
background-image: url(‘images/heading_background.gif’);
}
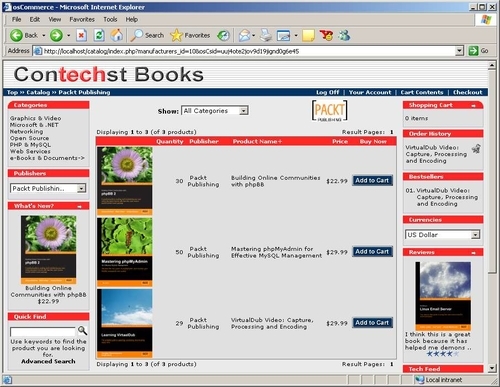
Make a similar change to your stylesheet using your background image—or any image for that matter, since you just want to ensure that something is inserted into the background. Take a look at your site, and you should notice that the header of each page now has a background image. Simple? Not always... It can be quite tricky to know which modification to make and in what place. For this, you have to find out how all the HTML elements have been created. For example, open up header.php and look for the line:
<tr class="header">
Can you see why the above modification affected only the header section of the page? It’s because the class declaration for this particular tr HTML tag has been given the class header, which is then defined in the stylesheet using the TR.header selector. Adding background images anywhere in your code is therefore simply a case of locating the right HTML tag and shoving it in. Remember, though, that not all tags have the same properties—a paragraph tag <p> doesn’t have a background-image property, for example.
As an exercise, try inserting an image into one infobox heading without having it placed in all of them.
There are a lot of interesting things to be done on the color front. You can change the color of any area of the screen with only minimal effort. Since the demo site needs to fit in with its parent site, we are going to go with the gray, black, and red color scheme with only minor hints of other colors here and there. There is not really much point in rattling off a long list of all the modifications made to get the color scheme to this point:
Notice some of the more interesting modifications to the stylesheet (as well as the addition of the new buttons).
BODY {
background: #EAEAEA;
color: #000000;
margin: 0px;
}
The header section:
TR.header {
background-image: url(‘images/heading_background.gif’);
}
The navigation bar:
TD.headerNavigation {
font-family: Verdana, Arial, sans-serif;
font-size: 10px;
background: #003366;
color: #ffffff;
font-weight : bold;
border: 0px;
border-bottom-width: 1px;
border-style: solid;
border-color: #B7B7B7;
}
The infobox content sections:
.infoBoxContents {
background: #E0E0E0;
font-family: Verdana, Arial, sans-serif;
font-size: 10px;
}
There are quite a few other changes that were made, but the above list should show you enough to get the idea. For more information on using stylesheets, try Google, or go to http://www.w3schools.com/ css/.
Now, there is one thing concerning changes made to the background colors that needs mentioning quickly. In order to get that rounded effect on some of the infobox heading bars, graphic images were used. Namely, corner_left.gif, corner_right.gif, corner_right_left.gif, and arrow_right.gif, which are housed in the imagesinfobox folder. So, if you wish to change the color of the background for the TD.infoBoxHeading HTML elements, you will need to change these GIF files accordingly lest you end up with odd looking corners.
Fonts get much the same treatment as the colors used in the site in general. One of the really interesting effects for text that is used in HTML links is the hover effect. Take a look in the stylesheet at the code block which reads:
A:hover {
color: #AABBDD;
text-decoration: underline;
}
Given the color scheme of the demo site, we really want to change this color so that when the mouse cursor is hovered over a link, the color changes to something more apparent. Modify the code to look like this, and then point your mouse over the navigation links on a refreshed page:
A:hover {
color: #F79418;
text-decoration: underline;
}
Since that color does not really suit the color of the link in the navigation bar (don’t ask me why, it just doesn’t), you can try the following changes to the hover property of the navigation text:
A.headerNavigation:hover {
color: #F79418;
}
This gives the link text a Packt-ish kind of feel (in other words, orange), which we all like!
Of course, you can always change the actual font properties of the font, instead of simply playing around with the colors. You can bold and underline to your heart’s content. Such changes should really be done to taste, and if you get stuck, search for the answers online. For now, the demo site is quite happy with the fonts as they are.
Before we leave stylesheets, remember that it is very important to test your entire site thoroughly; it is almost impossible to predict what effect every single little change will have on your site. You might find that error messages, for example, pop up in a totally different color and font than the rest of your site because you never modified them earlier—this is an easy mistake to make, because not all text or HTML elements are visible all the time.
Even worse, a few colors are not defined in the stylesheet but are instead done using <span> tags directly in the language files. This happens, for example, on the login-page default text. You simply have to look over your site very carefully and ensure that you have modified everything accordingly.