
Take my word, there’s a fair old amount to do in terms of configuring your individual osCommerce installation to suit a new business. Fortunately, the people at osCommerce have made a lot of default choices that are pretty sensible, so provided you have a good look at everything that is up for configuration, and ensure that you understand what all the settings do and mean, quite a bit of it can go unchanged. Apart from actually making a decision about the multitude of settings that go into defining osCommerce’s look, feel, and behavior, you also have to physically implement your choices. For this, we are given the excellent administration tool (found under the admin folder in your installation), which you can think of this as osCommerce’s command center.
From the administration tool, we can perform just about any configuration task our hearts desire. I say "just about" because there are always fiddly bits that aren’t easily dealt with from the standard administrative interface. Consequently, in this chapter, we won’t perform every bit of configuration needed to get our site up and running—that would involve a lot of work, which we don’t need to concern ourselves with until a bit later on.
Basically, in order to be as efficient as possible in terms of our overall development of the site, we are going to work with the 80/20 philosophy in mind. This means we should aim to get roughly 80% of the configuration done with about 20% of the overall effort. The remaining 20% of configuration work will get done when we look at different or specialized bits of functionality, and for that we may need specialist knowledge, third-party software, or simply more time than we want to spend on configuring our setup for the moment. So what is it precisely that we are going to get done in this chapter? Well, we are going to discuss and modify the following sections found under the Configuration tab of the administration tool:
- My Store
- Maximum and minimum values
- Images
- Customer details
- Shipping/packaging
- Product listing
- Stock
- Logging
- Cache
- Email options
- Download
- GZip compression
- Sessions
What are we not going to look at in this chapter? Well, we aren’t going to run through each and every option available in osCommerce in detail. Many of the default settings are pretty self- explanatory, and require nothing more than a quick decision on your part. The ones that have a slightly less clear meaning or are more complex in their action will be scrutinized more closely. More or less it’s fair to say that it’s the default behavior of osCommerce that’s going to be modified in this section of the book. Things like changing the look and feel of the site, or populating the product database are left to their own chapters a little later.
One final thing to bear in mind is that if you still, at this stage, don’t have a clear idea of what you expect from your site, you will find that it is hard to make some of the decisions concerning how you want certain aspects of osCommerce to behave. Now, it is understood that sometimes it is simply not possible to know everything in advance, so you might wish to take notes of what you are and are not modifying, and what you think you will need to come back to at a later stage. Having a quick reference of what you have and haven’t done at any given junction in the development phase will make your life a lot easier if you ever do need to take a step back.
Anyway, it’s certainly exciting to be finally working on the actual site; so without further delay, let’s begin...
Having an online tool like the one shipped with osCommerce is of great value and advantage to us osCommerce users. If, for example, you had undertaken to build your own site from scratch, then no matter how well you built your site, it would probably be prohibitive in terms of time taken to develop a fully functional online administration center to go with it. This would mean effectively that you were doomed forever to modify your database manually, or go searching for default settings within the actual pages of your code.
Thankfully, that scenario is not one we need to consider, and the only real challenges for us are to learn how to use the admin tool effectively, and to understand the behavior of all the settings. Don’t be fooled, though; if we make changes to the default settings without fully understanding the consequences of the changes, there can be some unexpected and untimely surprises, and surprises in the programming world are never good! The administration tool goes a long way to helping us make our decisions though; it even provides a sentence or two outlining what each given option means—although this is often insufficient to fully appreciate the effects of changing the setting. The following screenshot shows the administration tool, open on the My Store page of the Configuration section:
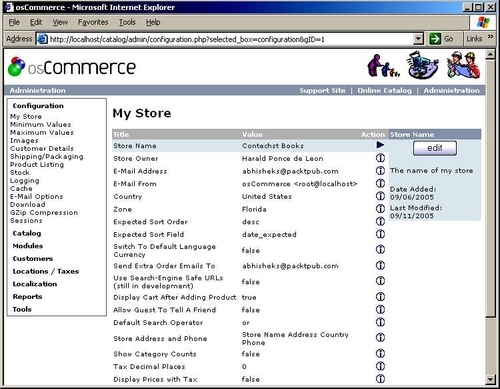
All the pages in the administration tool have several common generic features, which you should be aware of. First, there is a navigation bar running along the top of the screen, which allows us to jump to the Administration home page (this option is presented again on the far right of the bar), the osCommerce homepage (Support Site), as well as our actual osCommerce site’s homepage, held in Online Catalog. Nothing too life-threatening there, but useful if you want to jump around to find information, or test the results of your modifications.
Next, all the setting options that are available for us to use are categorized and stored in the box on the far left of the screen. This chapter concentrates on only the first option, Configuration, because the other options all overlap specific topics that warrant their own chapters. Clicking on a heading category—for example, Configuration —will bring up its list of options, and clicking on these subcategories will bring up a page containing all the setting options for that category.
The category setting options are displayed in the center of the screen in a tabular format, and each option is a link that will bring up its own edit option and description on the far right of the screen. So, for example, in the previous screenshot the setting we are looking at is the Store Name.
Clicking on the edit button will bring up the following page, which we can use to enter text and save the new setting:
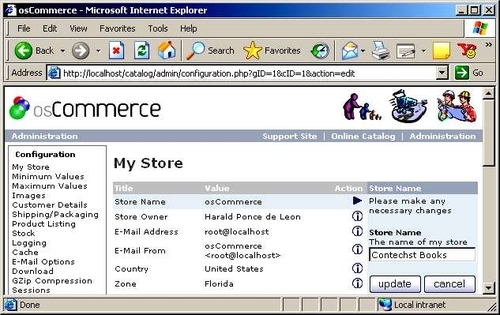
Clicking the update button will then take us back to the settings page, which should now reflect any changes we have made. That about explains how we go about configuring the site. The rest is really about understanding what effect the changes will have. Of course, as with anything, there is also a good way and a bad way to go about making changes. Most of you should be able to guess straight off that the good way will involve some sort of verification process to ensure that our changes have the desired effect.
Now, for something as simple as deciding on the store’s name, there is probably little that could go wrong, so don’t feel you have to waste time verifying every single change you make. However, you should make it a point to check results after a certain number of easy modifications, as well as verify the more complicated settings (if possible) as and when you make them.
Note
You should make a note (a physical one, not a mental one) of the settings you have changed in case you have to come back and fiddle around with things. Save your notes in a file called configuration_settings.txt and leave it in a folder entitled, for example development_notes, somewhere where you will find it again.
There are a few settings of interest in this section, and they warrant a fair investigation. For the most part, however, it is pretty plain sailing and there isn’t too much in here that should cause stress. The first four items in the table—Store Name, Store Owner, E-Mail Address, and E-Mail
From— are reasonably straightforward to understand, although there are a few things you might want to consider before writing in your personal details.
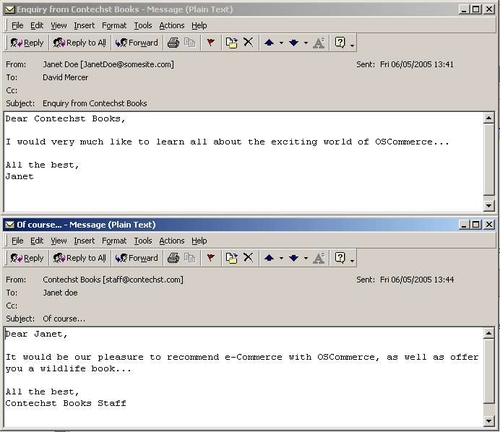
The Store Name property will appear, among other things, in emails sent to the store owner when customers use the Contact Us page on the site. The Store Owner is most likely yourself; if you are developing for someone else, then your employer’s name should go in here. Not very exciting stuff, but you will notice that the store owner’s name is the name that appears in the To: field of the emails received from customers.
Talking of which, the part worth thinking about here is whether you really want all customer queries (complaints, compliments, suggestions, or anything else for that matter) to land up at your personal email. The answer is probably an emphatic "No!" So what do you do? The best way to get around this is to create an E-Mail Address on your site that is used to collect all the customer emails in one place, which you can then peruse at your leisure, or pass off to an employee, or deal with in whatever manner you choose—at least they aren’t clogging up your private email inbox.
So, in this instance, it is probably best to ignore the short description of E-Mail Address (The email address of my store owner) given by osCommerce, and enter an address that you have access to but is not necessarily your personal email address—in this case, I have used <[email protected]>. If you wish to test out this functionality, then you will need to ensure that whatever address you enter is at least valid and can be accessed by you.
The following screenshot shows an email sent from a client to the store, and the reply from the store to the customer, shown below it. Take note in particular of the values in all the fields shown:
This brings up an important point, which should be mentioned before we continue:
Note
Just because a configurable property has a given name and description, doesn’t mean you have to follow the wording precisely. It is far more important to think about how you want your site to work when filling in values.
Next, the Send Extra Order Email To option allows you to specify who else receives a copy of the order confirmation email sent out whenever a customer completes an order. By default this is only sent to the customer, but you may wish to set up an email address to which these order emails are sent so that you can keep track or maintain copies of orders via email—you don’t have to do this; it is quite easy to track orders through the admin tool as well. So, assuming you have an email address <[email protected]>, you could edit the option to send a duplicate email by typing the following in the textbox presented: Order Email <[email protected]>.
At the time of writing, the Use Search-Engine Safe URLs feature was still under development, and should be left as false unless you have a newer version where this is a tried and tested feature. The Store Address and Phone option allows you to enter the details you wish to be made available to customers who are using a check or money order to pay for their goods. Apart from these options, the rest are all pretty self explanatory, and it is really up to the individual to make a decision. The following screenshot shows all the My Store settings for the demo site:
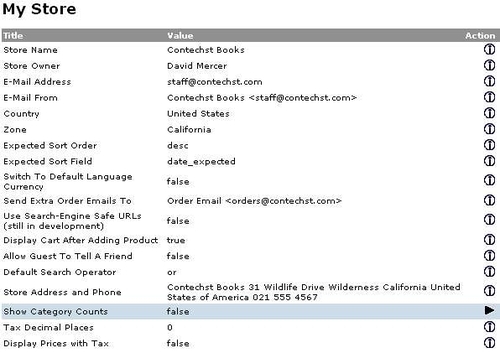
Notice that the Default Search Operator and Show Category Counts options have had their values modified, while the Display Cart After Adding Product has been left as true—these simply reflect my personal preference for how a site should be presented, and I am quite certain that ten different people will have ten different opinions. The rest of these properties are left in your capable hands to decide on.
The maximum and minimum values deal with a variety of things ranging from governing customer information, to determining how many search results to present, to customer order history. Fortunately, most of these settings are pretty straightforward, so there isn’t much that should cause problems here either. Before we show the default settings for Contechst Books, it is worth looking at a couple of things when determining the type of settings you want to put in place here.
The first thing to do is to navigate to the customer registration page, which you can reach by clicking on the create an account? link on the site’s index page. This will bring up a page consisting of a list of textboxes that your customers will use to enter their information in order to create an account. It’s a worthwhile exercise to actually fill this information out with legal and illegal values (illegal values are those that do not meet the stated minimum requirements in your Minimum Values configuration page) to check how your application behaves and to give you a better appreciation for the values you are setting.
For example, the minimum length of the date is given as 10 by default in the configuration section. Why ten? This is a bit strange because you only need six, or at most eight, characters to specify a date. Without looking at the create an account page, you might well change this value not realizing that osCommerce requires the user to input forward slashes to separate the days, months, and years provided in birthdates.
With that said, there is nothing we are going to modify in this section for now, since all the default minimum values represent sensible options. It is recommended, however, that you still look through each and every setting and ensure you understand what each one does, as there are still options you may wish to consider at this point. Looking at the password setting, you might consider upping the minimum length to 6 in order to encourage greater security among customers—obviously, enforcing longer passwords reduces the risk of customers’ accounts being hijacked.
The Maximum Values section does not deal with customers, but with how osCommerce behaves in terms of the number of items it displays in a variety of categories. While the default settings are pretty much spot on, there are a few settings worth looking over. The first two are self explanatory, although at this stage you might not be aware that Address Book Entries refers to the fact that customers can add several addresses to their account. This allows them to specify different mailing addresses depending on where and to whom they want purchased good to go.
The Page Links value specifies the maximum number of links that will be shown on a results page. For example, if you set this to 5, then assuming you have enough products or results, you will get the following link structure:
1 2 3 4 5 [Next >>]
If you set it to 10, you would get:
1 2 3 4 5 6 7 8 9 10 [Next >>]
Categories to List Per Row might cause some confusion as it is not particularly clear what this refers to. To see how this influences your site, go to any one of the default links under the Categories section of the index page in your catalog site.
If, for example, you go to the Hardware option, you will be presented with the following screen:
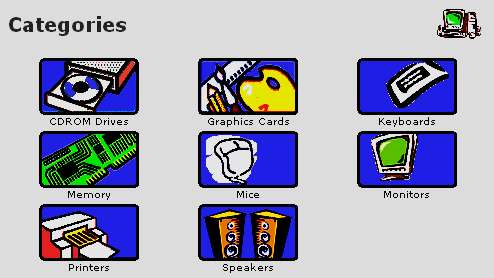
The main thing to note here, though, is that there are three columns of subcategories shown. If you don’t already have a window open with your Maximum Values settings page in the admin tool, then open one up and change the default value for Categories to List Per Row to 1. Refreshing the Categories page will give you the following result:
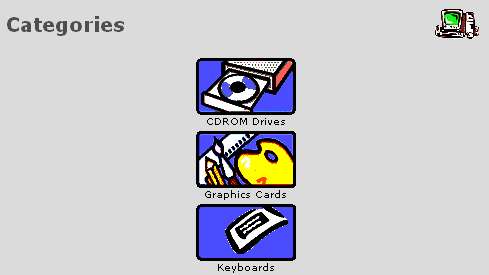
From this you can see that this setting governs how many columns are used to present the categories of products you have in your store. Simple once you know, but it can be tricky to find this out if you don’t. Some things to consider when deciding on this setting are:
- How big your product category images (if any) are going to be
- How wide your page is going to be
- How many product subcategories, on average, you are going to have
Once again, the default setting is fine for the demonstration site, but this illustrates quite well that some thought should go into each and every setting—even if the end result is simply leaving the value as is.
The rest of the values in this section are pretty self explanatory, and it is left to you to go through each one and make a decision regarding what your preferences are for your own site. If you have any doubt about what a setting does, then leave it as the default. Remember, you can always come back to this section and change the values to suit your needs at any stage.
Learning how to set the default values for the Images section can be a bit of a laugh. The best way to do it is to change the settings and view the results in the catalog section. Of course, ensure that you remember your default settings so that you can get things back to normal once you are done. The following screenshot shows the modified values in the Images section:
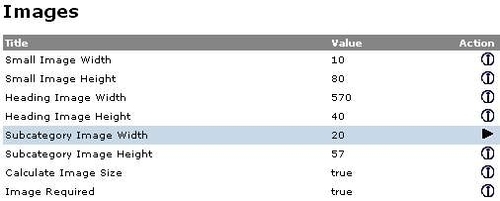
In this case, the Small Image Width has been reduced from 100 to 10, the Heading Image Width has been increased from 57 to 570, and the Subcategory Image Width has been reduced from 100 to 20. To see the effect of these changes we will go to our catalog section and view a couple of pages. The following screenshot shows the Categories page under these modifications:
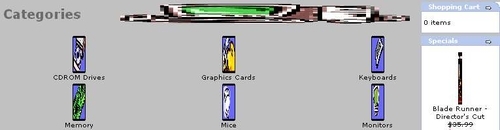
Oh dear, that’s not really what we want, but it has helped to demonstrate which setting does what. The image of the Blade Runner title on the right-hand side of the screen has been squashed to only ten pixels in width—so we know how the Small Image Width affects the site. The Heading Image Width influences the image shown at the top of the page in line with the Categories title, and this image now takes up half the screen’s width, which is obviously not appropriate. Finally the most obvious of the settings, the Subcategory Image Width, has been squashed to only 20 pixels, which is also not very tidy.
Playing around like this has raised some interesting questions. What size are your site’s images? In other words, will they look nice with the default settings? Notice that the heading image shown in the previous screenshot is all deformed and unclear because of the stretching it has undergone. Well, it’s possible that if you have made or obtained images that are of different dimensions than the default ones, then you might suffer the same fate unless you think closely about what Image values you set.
Note
It is possible to leave out the Width (or Height) setting for your images entirely. This will force osCommerce to size your images according to their remaining specified Height (or Width) property. Doing this should avoid any horizontal or vertical distortion as osCommerce will render the image appropriately. For this to work, the Calculate Image Size option must be set to True.
Of course, you may also decide, for example, to not have heading images at all, in which case you can leave the settings as the default ones because you will remove the images from your pages altogether when you customize your site.
Finally, it is recommended that you leave the Image Required setting as true while you are building the site, because this will allow you to spot if anything is amiss with your images—for example, if osCommerce cannot find an image, this will show up as a broken link on the screen. You can test this by modifying the name of an image in the images folder of your catalog directory and then viewing (in your browser) a page that should contain that image.
This is a very straightforward section, and the only setting that is modified for the demonstration site is the Company option, which has been set to false because it slows down customer registration and is not that important for our purposes. If you feel your store will benefit from knowing who your customers work for, then by all means keep it. While it is easy to understand what each setting controls in this case, you still need to think closely about what you do and don’t want to store in the way of customer information.
Off the top of your head you may wonder why on earth you really need to store a customer’s birthdate. After all, the more information you store about each customer, the more space you are going to use in your database. But what if down the line you decide to implement a marketing strategy that sends out a promotional discount on certain products on your customers’ birthdays? Well, this is certainly a plausible marketing strategy, but one that is thoroughly impossible to implement if you haven’t been storing customer birthdates from the start. The same type of argument could be made for storing gender, since certain products might be more attractive to one gender than the other, so a marketing strategy based on gender is also plausible.
At this point you should be able to see why it is so important to have a clear picture of where you want your site to go. It’s a very easy slip to make saying that you don’t need customer birthdates because you don’t really need them at the moment. When in doubt, save the details rather than not—this will at least give you the option later on. If you know that you are really never going to use the information (like the Company value for the demo site), then remove it so as to prevent redundant data piling up in your database.
This section is also pretty straightforward, although there are several issues you need to make sure you are aware of before making any decisions here. The first two options, Country of Origin and Postal Code, can be dealt with pretty swiftly, but the next setting requires a bit of research. In order to Enter the Maximum Package Weight you will ship, you need to know the weight-to-cost scale of your shipping service provider, and find out what limits they have on their service.
Most good providers will have a list of all their charges, and assuming you will actually be using them often, will also have special rates and deals available to regular users. For example,http://www.ups.com/content/us/en/shipping/time/zones/current/select.html provides information regarding UPS’s rates as well as information pertaining to their services. Whoever you choose to work with will likely have a solid support and information service to help you find your way. For example, you can find out all about costs and charges at the US Postal Service at the http://pe.usps.gov/text/dmm/R700.htm#Xih82834 page, which highlights the costs of mailing packages of different weights and sizes.
Obviously, it is imperative that you look at a shipping provider of your choice in order to work out what your expenses are going to be, as well as the most cost-effective and efficient solution for your business. Once you know how your shipping service will work (for example, whether you are going to use a daily or weekly pick-up service, whether you are going to get a special deal on international shipments, and so on), you can determine what settings are right for you.
Of course, the values you set are in pounds, and you should be aware of how much your packaging itself is going to weigh. The Package Tare Weight allows you to set a minimum value for the packaging (or throw-away) weight. If a package is large, then it is conceivable that you need to set the weight of the packaging as a percentage of the package weight instead of a single value. In such a case, osCommerce uses the percentage value given in the Larger packages percentage increase option. The default sets the tare weight at 3 pounds and the percentage at 10, which means that for packages heavier than 30 pounds, the percentage value is the one which is used to calculate the package weight.
In the case of the demo site’s settings, the Package Tare Weight is set to 2 pounds, and the Larger packages-percentage increase value is changed to 5 with the Maximum Package Weight being left at its default value. This means that for packages of 40 pounds or less, we are confident that only a maximum of two pounds of packaging is required—for anything above 40 pounds, we will use the percentage calculation. This is reasonable in our case since books need very little in the way of specialized packaging.
This section controls how you intend your products to be viewed on the site. Pretty much anything and everything from whether you actually want to display a product image at all, to whether you want to display its name or the name of the manufacturer, gets done here. This is a straightforward section with no difficult options to research—or so it would seem. Of course, depending on what you are selling, you might want different properties for your products altogether. By this I mean that if you are a book retailer, then it is unlikely you want to mention Display Product Manufacturer Name at all, but rather Display Product Publisher Name, or something to that effect.
Oh dear! What are we going to do if the actual properties we are configuring are not even the correct ones? Well, the quick answer is that we will get to a stage a little later on where we can configure our product attributes, among other things—and of course, we’ll cheat by exploiting the difference between what we as the site’s administrators see in the admin tool, and what the customer viewing the catalog sees!
The following screenshot shows the settings for the demo site:
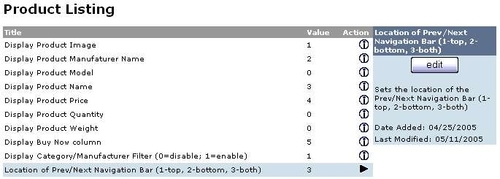
Looking through the settings shown in the previous screenshot, you can see that we want to display, in order, the product image, the manufacturer’s name, the product’s name, its price, and finally the Buy Now button. You might be asking yourself why—if it has already been mentioned that, as a book retailer, we don’t want to Display Product Manufacturer Name —we are putting it in the line-up. The answer to this has presented itself almost too perfectly—look at the Display Product Manufaturer Name line closely in the previous screenshot. You will notice there is a spelling mistake. However, look at the results of these settings in the catalog:
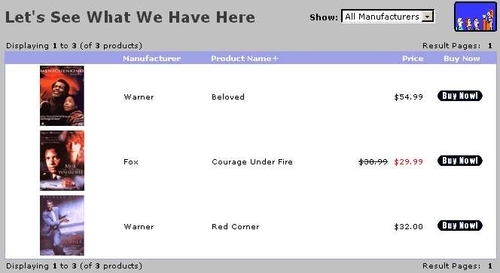
You will notice that the column heading Manufacturer is spelled correctly. This means that what is shown on the screen is not directly linked to the name given for a property in the admin tool. So, we can choose to show the manufacturer in our product listing, but this does not mean we have to make the column heading in the catalog site Manufacturer; we could, if we were so inclined, change it to Publisher. This, however, will come a bit later on in the story. What’s more important than this for now is that you have related the settings made to the product listing on the site page.
The final two settings are slightly different in that they deal more with navigation than anything else. Notice in the admin tool that Display Category/Manufacturer Filter is set to 1. The resulting filter when enabled in this manner is shown above the product listing in line with Let’s See What We Have Here. It is a good idea to include this, as people often have some sort of brand loyalty and would wish to search your catalog for specific brands.
Finally, Location of Prev/Next Navigation Bar is set to 3. Why have we done this, and what is the ‘prev/next navigation bar’? Well, when you get round to populating your database and enter the multitude of goodies you have for sale, you will get to a stage where the number of products in a category is greater than the number of products you are willing to display on the page. Incidentally, we have already set the number of items to display per page property in the Search Results setting in the Maximum Values section.
Once that happens, the navigation bar (which at present only displays Displaying 1 to 3 (of 3 products)) will be the customer’s method of hopping from one page in the product listing to another. Now, I don’t know about you, but I hate scrolling down to the bottom of a page only to find that I have to go right back to the top to click on the Next page link. Conversely, if I only want to look at the first couple of items and then go to the Next page, I certainly don’t want to be forced to scroll to the bottom to do so. Setting this property to 3 ensures that you will make it easier for your customer to navigate your product listings by having a navigation bar at the top and bottom of the page.
Deciding how you want osCommerce to deal with your stock is a very tricky business, and you will be forced to do a bit of soul searching before defining the settings in this section. Ensuring that you have a coherent game plan when it comes to dealing with stock levels and how your application deals with these stock levels is paramount to the perceived and actual integrity and reliability of your system. If you are selling products that are not in stock, and are unable for some reason to fulfill your orders... Well, I don’t need to continue on with the type of things word of mouth will spread about your store.
With that in mind, let’s take a quick look at what the demo site’s settings are:
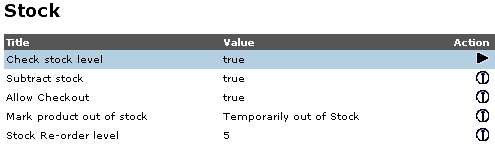
What do these settings mean in terms of how osCommerce will behave when a customer is purchasing an item? OK, the Check stock level setting simply means that osCommerce will retrieve the number of items in stock before the customer checks out. The Subtract stock setting means that once items are purchased, the database is updated by subtracting the number of items purchased from the number of items in stock. Obviously you should be able to see that this effectively automates your stock control on the purchasing side of things.
The tricky bit is the Allow Checkout setting. Since we have set Check stock level to true, osCommerce is aware of how much stock is available when a customer attempts to make a purchase. Setting Allow Checkout to true is taking a bit of a risk because it is saying that I, as the retailer, am confident that I can ship the purchased product on time despite the fact it is not in stock at the moment. Since the demo site relies on Packt’s ability to ship product, we have gone with true in this instance because Packt’s business model is such that they can deliver books very quickly.
You really need to determine whether you can do the same for all of your products before setting this to true. Some people may view this as a trade-off. In other words, do you make a loss from not selling the product, or do you risk having to refund the customer if you can’t get stock in quickly enough. From a business perspective, this is not particularly sound reasoning since your value as a business stems partly from your reputation of reliability. This is not worth trading on, so rather take the hit from a direct loss of sales instead of proving to be unreliable and endeavor to improve your stock control.
The final two settings are pretty easy to understand, and are not life-threatening in any way. You can choose these to best suit you with little effort. The following screenshot shows how these settings influence the behavior of osCommerce when ordering products that have low stock. Take note of the Temporarily out of Stock message, and the notes below the product which informs the customer of their choice to continue with checkout because of our Allow Checkout setting:
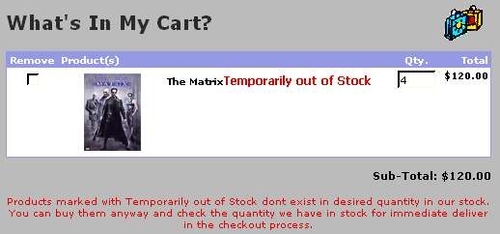
Of course, if we had set the Allow Checkout setting to false, then the second line of the checkout message would have read:
Please alter the quantity of products marked with (Temporarily out of Stock), Thank you
That all for now! We say goodbye to stocks until the next chapter, when we begin dealing with data.
Logging can be a very useful, if not critical, tool for maintaining a system’s health. Logs can be used to record just about any action or change in state of an application. Most changes within an application are really of no interest to the average person, but certain things are useful to record in case you need that information at a later stage. Like any good system, osCommerce gives us options to create and monitor certain actions within our application. This ability comes with a caveat, however. If left untended, logs can become resource hogs, taking up gigabytes of space in a surprisingly short amount of time.
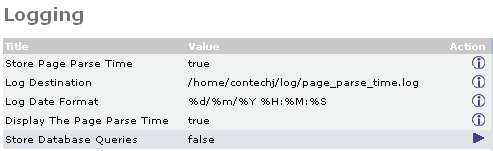
Accordingly, you need to decide what information you want to record, and then work out a good management strategy for maintaining that information. Also, logs should be kept in a secure place—you don’t really need to air your database query history to the world, or worse, have it modified by someone. The options presented to us by osCommerce, along with the settings used for the demo site, are shown here:
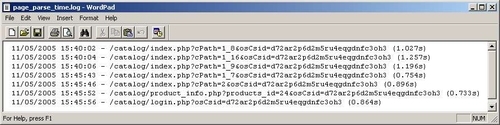
After browsing around the site a bit, we can look at what is created in the designated log file to see the type of information we are storing. To be honest, this information is not really relevant to you at the moment, so unless there is a reason for recording logs during the configuration and customization phase, you can do without it altogether for now:
It is recommended that you leave the Store Database Query setting as false all the time unless you have a really good reason for needing it, and you know exactly how you are going to deal with all the information being stored. These logs can grow very quickly and take up a lot of space, causing problems for your site’s performance if you’re not careful.
Finally, remember to make a note of all the settings, in this case the log-file path, which you will need to change come deployment time, and add the files to the development_notes folder, which you created earlier.
A cache is implemented as a directory of web pages, which are held separately from the rest of the pages. The purpose of this cache is to allow the server to quickly serve cached pages instead of querying for the page afresh each time it is requested. This has implications for the speed of delivery of pages and therefore impacts positively on the customer’s experience. It is recommended that you do use caching on your live site for this reason.
During development, however, it’s not a good thing, because we want to see the results of changes (configuration or customization, or straightforward hacking) that we make to our pages every time we load them. Using a cached version of a page might not reflect the changes we have implemented, as that page would not been refreshed yet. This can often cause confusion and frustration, so for now, leave the cache entirely.
Once you are happy that the site is complete and that all your testing is done, you can switch caching on. To do so, simply set the Use Cache value to true, and pick a folder to save the files—by default this is /tmp/.
Try this! Go to the last option in the administration tool, Tools, click on the Send Email option, and send an email to whatever customer you have on your site (If you don’t have one, then create an account by registering on your site). Ensure before doing this that the customer you are sending the email to has an email address that you can receive, because you are going to test whether or not osCommerce is able to send emails with its default configuration. If not, you will need to go back to the Customers option and edit the email address for the customer appropriately.
Once you have sent the email, hang around for a bit to see if you receive it in good order. If so, then you can pretty much leave the email settings as they are for the time being. The only thing you need concern yourself with regards to email is whether your site is hosted on a Linux server (very likely) or a Windows server. If it’s Linux, then you can probably leave the site as is; if it’s Windows, you will probably need to change the first two settings—E-mail Transport Method and E-mail Linefeeds—to their alternative settings.
The Use MIME HTML when sending Emails option should be left as false for the moment. Obviously at a later stage you might decide you would like to spruce up your emails with some HTML, but for the moment there is no need. Remember, however, that not all mail-client applications support HTML, so you might be marginalizing some customers by using this. The good news is that as time goes by, more and more people will be able to receive MIME format emails—as opposed to just the majority for the moment.
You might decide that you want to check whether your customers are supplying you with email addresses that actually exist. If this is the case, then you should set the Verify E-mail Addresses Through DNS setting to true. osCommerce will then check with the relevant domain server to ensure that the given email address exists on that server and so will be able to receive the email that you are attempting to send.
You can also disable email sending entirely if you wish. For the moment this is not necessary, because at some stage we will need to test certain things relating to emails—for example, whether osCommerce is sending confirmation of order emails, and so on. It is entirely likely that you will be developing osCommerce with live data further down the line; in other words, data that reflects real live customer’s details. In this case, it is unlikely that we would want them to receive erroneous emails as the result of our testing, so we simply set the Send E-Mails option to false.
If your initial attempt at sending an email didn’t pay off, then try swapping the Email Transport Method setting and resending. If this fails, then I am afraid it is time for you to put the osCommerce community to good use—think of any problems like this as a chance to learn how to use the osCommerce community resource.
Now we come to my personal favorite—the downloads section! One of the true wonders of the world is that we can now generate money by simply transferring information without the need for a physical medium. To this end, the demo site has a section where ebooks and articles are available for purchase and download from the site. Obviously, if you are going to be retailing products that are available for download, such as software or ebooks, then this section is of particular interest to you. If not, then feel free to leave the settings as they are and continue.
To begin with, Enable Downloads should be set to true. The rest of the other settings can be left as they are for the time being. In order to demonstrate how this now works, we will need to add a product to our product database quickly. Go to the Catalog heading option and then navigate through Categories/Products till you get to the Strategy category of the Software products—it doesn’t really matter where you add a product; if you feel like adding one somewhere else, go ahead—it will make no difference.
Here you should click on the new product button, and fill out the form for a new product. For this example, the new product is called My Download in order to distinguish it from the other products, as shown here:
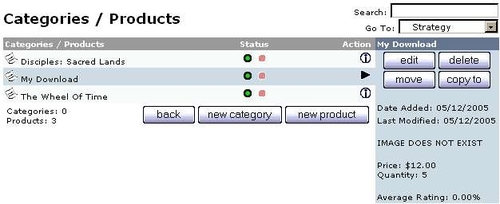
Notice the properties of My Download in the box on the right of the screen—these are arbitrary settings, and you can put in whatever you like. There is no need to hunt for an image here; this is just a quick and nasty demonstration.
Now, downloadable products in osCommerce are held in the download folder under the catalog directory, so we will need to place a file in here so that osCommerce is able to provide customers with something to download. It doesn’t matter what we use for this example, but obviously when it comes to real downloads you will most likely have a zipped file with the same name as your product. In other words, if a customer downloads a computer game called unreal tournament, you will probably name your zipped download file unreal_tournament.zip to make it easy to track which files are supposed to be downloaded.
For our purposes we simply need to show that a file can be downloaded, so in this case we are going to copy account.php from the catalog folder into download. You can place any file you like in download folder, and we will attach that file to the product in the Products Attributes section in a moment. Now that the product is registered in the database, and the product file is present in the download folder, we need to set some of its attributes. For this, click on the Products Attributes link in the left-hand box of the admin tool.
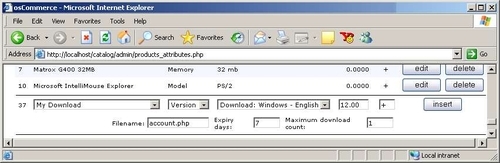
At the bottom of the screen under the Products Attributes section, you will notice a drop-down list from which to select products. Find My Download from that list, add in the settings that are appropriate to the file you have placed in the download folder, and insert the product. For this example, the page looks like this:
Once the product has been inserted, we can shop for it as normal on the site. If you haven’t already created a customer account on the website, you will need to do so in order to be able to purchase this product. However, if you navigate to the product category in which you added the My Download product, you will notice that it is now available for purchase just like any other product. Go ahead and buy it as you would on any other site. You should end up with a page like this:
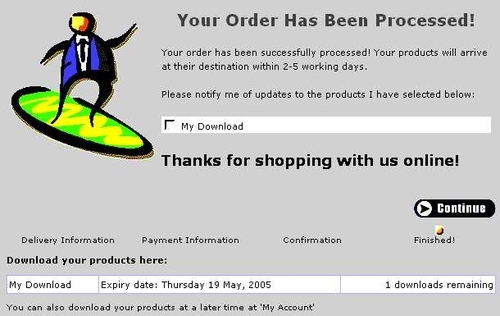
Clicking on the My Download link will allow you to begin the product download. That’s all there is to it. If you are unable to download the file, then the first thing to do is check the permission settings on the pub and download folders. For Linux users, pub and download permissions should be set to 777 and 755 respectively, for Windows users, simply ensure there is no Read-Only setting in the folder properties.
You may or may not have noticed that since we have not dealt with how to set up proper payments, osCommerce has made these downloads available to use while our purchase orders are still pending. Since we haven’t used a credit card, this means that the download came before the payment. Not a very satisfactory state of affairs at the moment, but this will all be rectified a little later on in Chapter 7, when we use a community contribution to sort things out properly. For now, though, we are able to download products if needs be.
GZipping is really a good way to reduce your usage of bandwidth. Basically it allows osCommerce to send compressed files over to the customer’s browser, where they are rendered as normal. Most browsers support this feature, so you should not have too many problems with compatibility if you decide to enable this setting. The only thing to look out for here is whether your server supports Zlib, and is using a version of PHP later than 4.0.4. Incidentally, if you ever need to find out how your server is configured, this simple PHP script will help you out:
<?
phpinfo();
?>
Give the script a name and navigate to it in your browser, and it will automatically print out a list of all the configuration settings (alternatively, click on Server Info in the Tools section of the admin tool). This is useful if, for example, you need to find out whether your server supports Zlib.
The Compression Level default setting is 5, and this is fine for use in general, so unless you specifically want to play around to measure performance differences, it is recommended that you leave it as is if you are going to use it. Remember that some browsers might run into problems if you enable compression, so be wary of this when your site goes live and ensure that it works through a number of different browser types.
Sessions can be a complicated beast to understand. The 5¢ simple explanation is that sessions are what PHP uses to retain the state of a web application. What this means is that when a customer logs on to your website, PHP assigns him or her something called a session. This session holds information about this user and allows osCommerce to keep track of various important things. For example, without the use of session, how would osCommerce know which user was using which shopping cart? Since all users have their own chosen products added to their cart, osCommerce needs to be able to tell which user is which so that it can display the correct cart for each user.
This is obviously a critical function of an e-commerce site, because where money is involved, it is paramount that the right information is recorded for each transaction. In this case a transaction could mean anything from clicking on a link to purchasing a product.
Since sessions are such a critical part of osCommerce, some thought needs to go into how you want to configure your session support. We originally asked osCommerce to use database-based session support, so the first setting in the Sessions section should not affect you. If you have configured osCommerce for file-based session support, then simply set this option to the file where you would like osCommerce to record session information. You should keep this folder in your home directory for reasons of security.
The Force Cookie Use option determines whether or not we want to use cookies. Cookies are small files that are stored on the customer’s browser. The information in these files can then be used for a host of different things, including making sessions more secure. The problem is that over the years many people have abused the use of cookies to the extent that a lot of people disable their use on their browsers.
If you feel you require cookies for your sessions, then osCommerce automatically inserts a page explaining to customers why and how they should enable cookies if it detects a browser that doesn’t allow their use. For the moment, though, we can leave this setting as false because it is useful for us to view session information in the URL during development. Once your site is ready to go live, you will most likely want to make use of cookies.
While we haven’t got to the stage of worrying about securing our site using SSL and many other wondrous things, it is worth discussing the Check SSL Session ID option briefly. Unless you have got SSL enabled on your site, you cannot set this value to true for the moment, but it is worth considering the performance versus security trade-off here. Enabling this setting means that osCommerce must check and validate the customer’s session ID on every page call. This increases security because it helps prevent someone else sneaking in and hijacking a session, but, because of the extra work involved, it slows down your site slightly. However, assuming that the performance degradation is acceptable, it is generally wiser to opt for higher security—it’s really a case of "better safe than sorry!"
Check User Agent is simply another option that adds to the security of your osCommerce transactions. Enabling this forces osCommerce to check the customer’s user agent for each page request. The user agent is simply a string that identifies the requesting browser to the server, so checking this every time can increase security; if you have a hijacked session, it is likely (but not definite) that the user agent of the hijacker is different.
The Check IP Address option does pretty much the same thing as Check User Agent, only this time it looks at the customer’s computer’s IP address. The IP address of a computer is a unique string of digits which identifies a given computer. Due to the way some Internet Service Providers designate IP addresses, enabling this setting may cause some unwanted problems for some people—AOL customers in particular are susceptible to this.
The Prevent Spider Session option is an interesting one. This basically stops automated programs from setting up a working session in osCommerce by not issuing them with a session ID. Obviously an automated program is not a real live customer, so wasting resources on tracking its passage over the site is a pretty futile thing to do; after all, it’s not like it’s going to buy anything. Accordingly, it is recommended that you set this option to true.
Finally, the Recreate Session option will force osCommerce to recreate a session ID whenever a customer performs a logon or a checkout. This can help to prevent customers logging into each others accounts.
For the demo site under development, the following session settings were made:
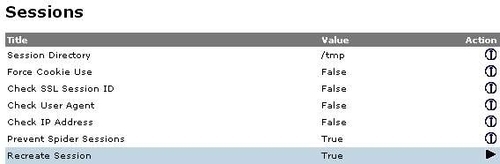
Once you have decided what settings you want, record them in your development notes for later. Once you have looked at some security issues presented in Chapter 7 you will be better equipped to come back and decide exactly what you want here.