
There are six shipping modules currently shipped with osCommerce by default, which give you a fair amount of control over how you handle the delivery of your goods. There are also a huge number of modules available that can augment the default functionality, or provide new facilities altogether. The best thing to do when organizing your site’s shipping is to sit back and think carefully about who will be buying what, and where they are likely to be.
Once you have a good idea about where most of your products are going, you can develop a shipping strategy to suit your needs. For example, if you are only going to be shipping to a relatively small geographical area, and your products are more or less the same in terms of size and weight, then a flat shipping rate may be appropriate. However, it is more than likely that you will want a more fine‑grained level of control over your shipping charges, so let’s take a quick look through the modules that are available (excluding the flat-rate module, which is trivial to install).
Before we do this, though, I should point out that while it is pretty simple to install and control each individual shipping module, it is not so easy to actually obtain precisely what you want in terms of shipping charges. What I mean by this is that you could decide to offer several methods of shipping based on the various locations and zones you are retailing to. If you do this, then you have to ensure that each one will cover your shipping costs wherever the customer is based (or is disabled if that option is not viable).
In other words, a flat rate will always be a set value even if someone is purchasing from overseas, and the customer will more than likely choose the cheapest option available regardless of whether you meant them to choose one option or the other. So be careful you don’t end up with a situation where the customer is offered several shipping options, one of which is not enough to cover the shipping costs.
Having said this, you can use flat rates for several different zones, so don’t feel you are restricted to only implementing flat rates to one area. To do this, make copies of the flat.php file in the includes/modules/shipping/ and includes/languages/english/modules/shipping/ folders. Then edit these copies, replacing each occurrence of the term flat or FLAT with the name of the copied files. For example, I have named the new files flat1.php in both folders, and replaced each occurrence of the term flat or FLAT with flat1 or FLAT1—a simple search and replace will work here. The result is a new flat-rate module, which can be used to ship flat rates to a different zone.
This is incredibly useful if you want to make flat rates to specific countries without having to bother with zone-rate settings or other forms of shipping. Looking at the shipping options available on the demo store, you can see the following:
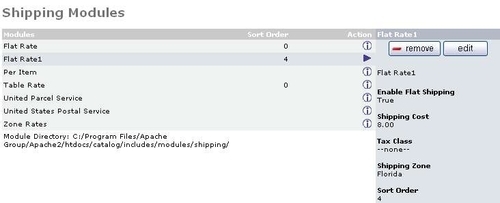
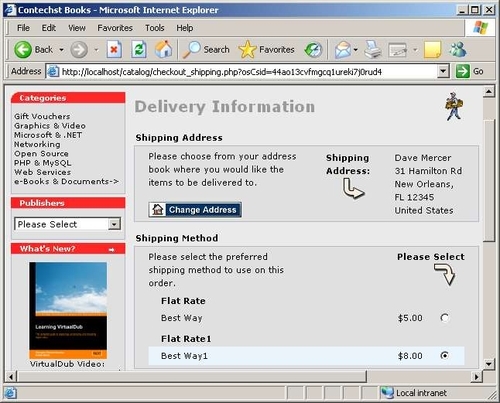
It’s clear that we now have two flat-rate modules, with the new one only being enabled for the Florida shipping zone, with a slightly higher Shipping Cost to distinguish it from the original flat rate module. Looking at the effect this has on customers who are based in Florida (shown in the following screenshot), we can see that they now have two flat‑rate options available (obviously you would only want one rate enabled per zone, but this is left as is to demonstrate the point):
Now, you will probably want to make your new flat-rate modules display more descriptive names such as Flat Rate to Europe or Flat Rate to Australia, and you will need to test to ensure that customers from certain zones, or goods that belong to a certain tax class, get linked to the correct flat-rate shipping method. However, we won’t dwell on this any more because you should be able to add as many flat-rate modules (or any other module for that matter) as you like, given what you have just seen here. Just play around and experiment to find what works for you...
Once again, this is pretty straightforward. Simply install the module and away you go! osCommerce will multiply the number of items in the customer’s shopping cart on checkout and will deliver a total based on that alone. You can set the Shipping Cost you wish to charge per item, as well as a Handling Fee, Tax Class, Shipping Fee, and Sort Order. Of interest here is the handling fee, which applies to all the shipping modules. Adding an amount here allows you to cover other costs such as packaging material and labor, by tacking that amount onto the shipping price.
Of course, this option is probably not ideal if you are selling large number of products per purchase, and packaging them up in one container. Obviously, you need to always think of the most efficient and cost effective way to ship your products so that you can pass those savings on to your customers.
This option gives a lot more control over how you make your charges, through the use of a shipping table. There are two module-specific options here, which you will need to get used to in order to effectively utilize this form of payment.
- Shipping Table: This option determines the total shipping cost based on the total cost or weight of items. You can set the charges using a colon- and comma-delimited list as shown here:
25:8.50,50:5.50,100:3.50,500:1.50
This will cause osCommerce to add a charge of $8.50 for the first 25 units of product (units precede the colon, which is followed by the price), from there to 50 units, we charge $5.50, from 50 to 100 units we charge $3.50, and from 100 to 500 we charge only $1.50.
- Table Method: This allows you to select whether osCommerce should base its calculations on the weight of the products or the total cost.
That’s all well and good so far; we have now looked at several shipping methods that we can offer to customers. However, to reiterate the idea that you need to carefully control where each module is enabled, the following screenshot highlights a couple of points:
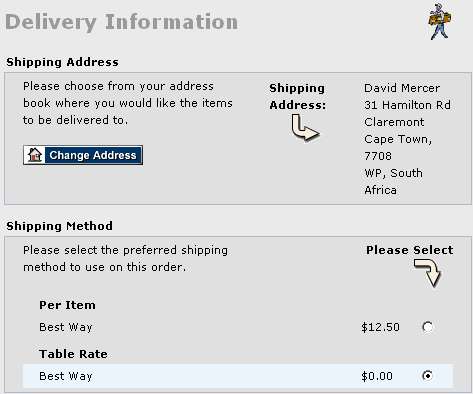
In this figure, there are two options offered to the customer. Now, it is clear that the customer is going for the cheaper option, which is based on the table rate with the Table Method of the Table Rates option, set to Price, defined such that any purchase over $50 gets delivered free. The Per Item option simply adds $2.50 to the delivery price for every item purchased, so it increases while the other decreases.
The unfortunate thing about both these Shipping Methods is that the Shipping Address is in Africa, and will likely cost Contechst Books a lot more to ship than either quote, assuming Contechst is based in the States.
Note
Remember that you can enable free shipping for purchases over a certain value by defining this value in the Shipping section of the Order Total Module page (found below Shipping in the Modules category).
It is recommended that you play around with the settings in the Order Total Modules section in order to get a good idea of what functionality it provides. Since it is fairly straightforward, we won’t cover it all here, and it is left to you as an exercise to familiarize yourself with the various options.
As with the PayPal and credit card modules, you will need to obtain an account with these two service providers before you can go ahead and offer this shipping option—or at least make contact with the provider of the service to confirm orders. Let’s begin with UPS...
The big advantage of using UPS is that they are extremely convenient for you, as the business owner, and the customer alike. They, like other large shipping businesses, pride themselves on their reliability and are certainly justified in doing so. If you enable this module, then using the shipping address you entered in the Configuration section, the payment module contacts the UPS server to obtain a quote for the price of the delivery, and will present all the different relevant options available for the customer to choose from.
Using a service like this takes the responsibility out of your hands because it becomes the responsibility of the shipper to live up to their promises. For example, suppose you were based in the States and a purchase was made on your store from somewhere else in the world. Instead of having to work with a combination of complicated shipping rates, UPS would simply give you its worldwide quote, like so:

Now, when the customer recoils in horror at the price of delivery, they may decide to provide a shipping address in the US where they can pick up the product during their upcoming visit (for sake of argument). In this case, UPS will use its table rates to calculate the cost and present its different options, like this:
This is obviously extremely convenient for everyone concerned because the only thing left for you to do (assuming the customer decides to use UPS) is get in touch with them to confirm this shipping—ideally, you would get an account with UPS so that you can automate pick up along with a host of other advantages.
Before we leave UPS, you should also take a quick look over the editable options for this module to decide on the method of pick up, whether you want to package products yourself or leave it to UPS to provide material, or whether you are delivering to a residential or commercial address. Of course, UPS itself can help you make these decisions if you register with them or look up their site at http://www.ups.com.
So, what’s the disadvantage? Well, let’s face it; you could probably get products to your customers a little cheaper... enough said!
USPS does things slightly differently in that you need to register with them before you can use their servers to automate the shipping process. You can visit them at http://www.uspsprioritymail.com/et_regcert.html in order to find out more about this service. Below is an excerpt from the registration confirmation email, which explains how the service is used:
Your Web Tools User ID and Password to integrate USPS Web Tools are provided above. The User ID and Password are used for testing your implementation of the Web Tools. With these, you may begin sending calls to the test server. The address to the test server is: testing.shippingapis.com and the path is /ShippingAPITest.dll. Use this information in combination with your User ID, Password and your XML string to send a request to the USPS servers. For more details, refer to the programming guides (located at www.usps.com/webtools) for the specific API you are integrating.
A sample test request would look like:
"http://testing.shippingapis.com/ShippingAPITest.dll? API=[API_Name]&XML=[XML_String_containing_User_ID_and_Password]"When you have completed your testing, email the USPS Internet Customer Care Center (ICCC). They will switch your profile to allow you access to the production server and will provide you with the production URL.
Of course, this serves to outline how the service works, but this complexity is hidden from us because osCommerce takes care of all this for us. For example, you can confirm that osCommerce is querying the correct server by inspecting the usps.php file in the includes/modules/shipping folder:
switch (MODULE_SHIPPING_USPS_SERVER) {
case ‘production’: $usps_server = ‘production.shippingapis.com’;
$api_dll = ‘shippingapi.dll’;
break;
case ‘test’:
default: $usps_server = ‘testing.shippingapis.com’;
$api_dll = ‘ShippingAPITest.dll’;
break;
}
From this you can see that the correct server and DLL are targeted by osCommerce. Getting everything working is simply a case of inserting your username and password into the module in the admin tool as well as making a few other standard decisions, which are common to all shipping modules.
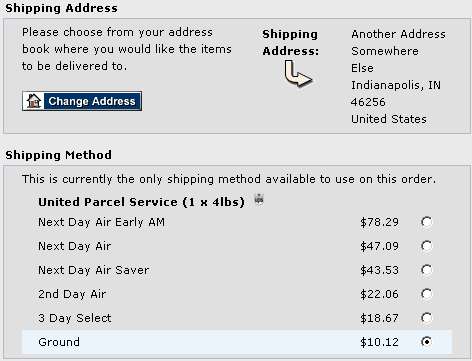
This module is quite interesting in that you can select the price of shipping to a specific zone and for specified package weights. The problem is that this is limited to only one zone at the moment, and so is not effective for anything outside that zone. The following screenshot shows the results of using this module when a customer based outside the US makes a purchase:
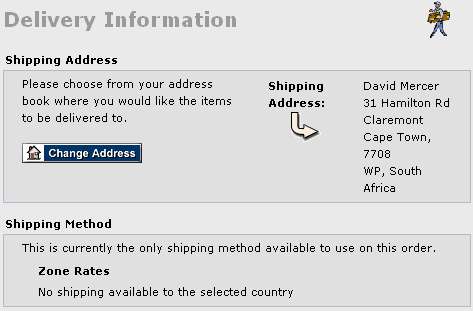
Hmm, none of these options are really ideal by themselves, so what is the solution? The smart money is on a combination of the different modules using zones to enable or disable them. Of course, this won’t quite get us to where we want to be in the case of the demo site, because this is a truly global English-language technical bookstore. Let’s take a look at that now...
The majority of Contechst Books’ sales come from the United States, so we would like to offer an excellent shipping service, with a variety of options to cater for customers who might be willing to pay the extra amount to have their books delivered ASAP. Accordingly, we will use the UPS module to cater to the national market. However, not everyone in the US might want to pay the slightly higher prices of UPS and may be happy for the package to make its way a little slower but proportionally cheaper. So we need another option to cater for these people—it’s easy enough to enable the Table Rate payment module for only the US, so that is what we’ll do.
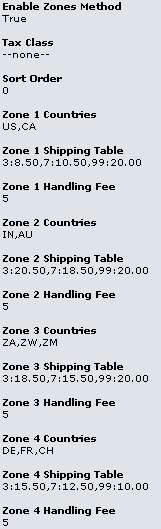
While most of the sales come from the States, areas like Europe, Africa, India, and Australia are also appreciable markets that need to be catered for in our shipping plan. Accordingly, the second shipping method we will make available is the Zone Rates shipping module. But we are still limited to specifying only one zone, which is not sufficient if we want to deliver all over the world, so we need to make a slight modification to the code in order to get the module to allow as many zones as we need.
In the public_html/catalog/includes/modules/shipping/zones.php file, you can simply modify the line that reads:
$this->num_zones = 1;
to something like this (depending on how many zones you need):
$this->num_zones = 4;
Now, of course, comes the slightly tricky bit. In order for the new settings to take effect properly, you need to reinstall the module. If you reinstall the module, you will lose all your current settings, so remember to make backups of whatever info you need before doing this. Now, when you access the module again, you get something like the following:
OK, so the rates aren’t too important for us since this is just a demo, but we have a pretty authoritative shipping policy in place, which you can observe by viewing the options presented to customers coming from different areas around the world. So, as we expect (and require), a customer purchasing from Africa has two options available to them—UPS and Zone Rate, which offer different pricing based on how fast they are going to arrive:
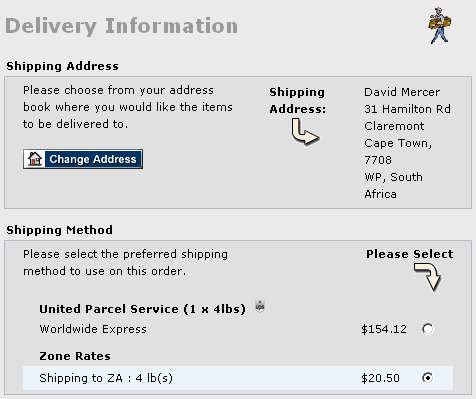
Notice that these customers aren’t offered table rates, which apply only to the States, and that they aren’t offered UPS’s specialized quotes for US-based customers, which is just fine. Don’t worry about the actual numbers involved for now; you will need to work out what is appropriate for you on the basis of your business model and specific costs. To round this off, the following screenshot shows the options available to a US-based customer:
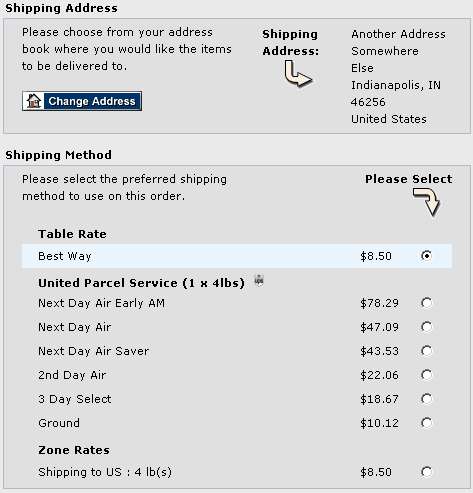
Now you can see why a combination of shipping options is the best solution, because just as we desired, US customers can choose to use UPS, but now they are also offered the table rate, which is slightly cheaper because we are sending it to them directly ourselves.
Notice that there is a Zone Rates option given here, which is the same price as the Table Rates. These values would diverge if, for example, the zone changed, or the weight of the products changed, but this is not really a concern because the Zone Rates module is used mainly for pricing overseas shipping. If you feel it would be wiser not to offer all three options for US customers, then you could simply enable the Zone Rates module for only those overseas areas that you ship to. This would then provide UPS or Table Rates only to US customers.