
A close second in terms of importance is the ability to secure your payments. Why do I say a close second, instead of the highest importance? The answer is simply this: if you wanted to ensure your payments don’t get hacked online, then you could always ask for bank transfers or some other offline form of payment, whereas there is no way you can maintain your site effectively without the use of some form of online admin tool.
The fundamental goal with respect to securing payments is to make the transmission of sensitive data (which occurs during the checkout stages of a purchase), as well as payment tracking after checkout using IPNs, undecipherable in the event that the transmission is intercepted. Luckily for us, this is the easiest thing in the world to do for the front end of the site, so let’s take a look at that first.
Simply open up the configure.php file in the catalog/includes/ folder and make the following SSL-related modifications (read: whatever is appropriate for your domain), if they have not already been set. (Please note that the comments accompanying HTTP_SERVER and HTTPS_SERVER have been moved to the next line for better readability):
// Define the webserver and path parameters
// * DIR_FS_* = Filesystem directories (local/physical)
// * DIR_WS_* = Webserver directories (virtual/URL)
define(‘HTTP_SERVER’, ‘http://www.contechst.com’);
// eg, http://localhost - should not be empty for productive servers
define(‘HTTPS_SERVER’, ‘https://www.contechst.com’);
// eg, https://localhost - should not be empty for productive servers
define(‘ENABLE_SSL’, ‘true’); // secure webserver for checkout procedure?
define(‘HTTP_COOKIE_DOMAIN’, ‘www.contechst.com’);
define(‘HTTPS_COOKIE_DOMAIN’, ‘www.contechst.com’);
define(‘HTTP_COOKIE_PATH’, ‘/catalog/’);
define(‘HTTPS_COOKIE_PATH’, ‘/catalog/’);
define(‘DIR_WS_HTTP_CATALOG’, ‘/catalog/’);
define(‘DIR_WS_HTTPS_CATALOG’, ‘/catalog/’);
Of course, you need to make sure that these changes have taken effect as expected, so navigate to your store—take note of the URL:
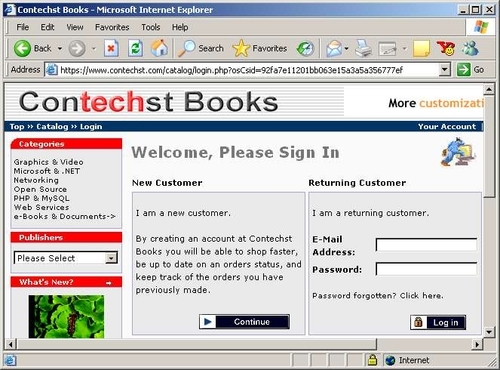
Now try to log in using your customer account. Notice that you are immediately taken to the secure server in order to input your information—this means that customer usernames and logins are as secure as the customer decides to make them. In other words, they hopefully won’t simply leave them lying around where someone can find them and use them:
This is really great news for us because pretty much most of the work is done! If you are a new customer, then your registration (as well as your login, if you are a returning customer) takes place over SSL. Now, just because the login has taken place over SSL, doesn’t mean the rest of the shopping needs to be done securely—in fact, we don’t want it to be secure because it will slow down the site. The next time SSL comes into play is when the customer tries to make a purchase, or to view his or her account information.
What a pleasure! Everything is handled for us automatically by simply making a few settings in the configure.php file on an SSL-enabled site. Now, when a customer decides to check out, the HTTPS server is automatically used to ensure that communication between the browser and the store’s server is secure. This is exactly what we required in our stated goals, and that’s all that is needed on this side of things.
On the other side of the equation, not quite everything has been done.
Knowing that a chain is only as strong as its weakest link, it should come as no surprise that we now have to look at the payment process behind the scenes in order to make absolutely certain that there is no chink in the armor, so to speak. This is where some knowledge of how your payment code is actually working comes in handy because knowing how something works will lend you some clues as to how to ensure it is secure. Let’s begin with the PayPal module...
Having already installed the IPN PayPal module in the previous chapter, it is now time to look at how it goes about ensuring that communications between your store and the PayPal server are secure. A point to bear in mind is the following:
Note
If you have SSL enabled on your site, then you need not worry about encrypting IPN information, because osCommerce will ensure that your secure server is targeted by PayPal!
You can check up on this by looking at the line in your catalog/includes/modules/payment/ paypal_ipn.php file, which reads something like:
$parameters[‘notify_url’] = tep_href_link(‘ipn.php’, ‘’, ‘SSL’, false, false);
This tells osCommerce to use SSL if it is enabled on your site, and assuming you have everything working correctly, it will dutifully use the secure server if it is available. If you still want to encrypt IPN communications, then there’s quite a bit to do in order to ensure that PayPal and your server link up correctly, so the easiest thing to do is make a numbered list of tasks to follow, like so:
- Make sure you have OpenSSL enabled on your website. If not, then you cannot use this module to encrypt your payment data using OpenSSL. We will discuss this situation at the end of this section.
- Ensure your server has cURL installed. If not, your communications will not be sent using this method of transport and may even be sent as unencrypted information over a non-secure line.
- Ensure your site has certificate and key generation tools. If not, ensure that you can obtain a private key and a public certificate.
- Ensure that these keys and certificates are held outside the document root—otherwise you are asking for trouble.
- Go to your PayPal account page and navigate to Encrypted Payment Settings under the Profile tab. If you dont have this option it may be because you are not yet Verified.
- Download and save the PayPal Public Certificate to your
certificatesfolder (or whatever it is called on your site) on your sites file system. - Add your public certificate to the PayPal site and obtain your unique ID.
Once this has all been done, you can now go to the administration tool and finish the settings on the PayPal IPN payment module. The table following shows you the settings used on the Contechst Books site, including a description of what each option does:
|
Property |
Setting |
|---|---|
|
Enable Encrypted Web Payments |
Set this to True if you want data that is passed between your server and PayPal to be encrypted. Set this to False if you do not have access to OpenSSL on your site. |
|
Your Private Key |
Your path will be something like the following: |
|
Your Public Certificate |
Your path will be something like the following: |
|
PayPals Public Certificate |
Save PayPal’s certificate in your certificates folder like so: |
|
Your PayPal Public Certificate ID |
Obtain this from the PayPal site once you have uploaded your certificate successfully. |
|
Working Directory |
The PayPal IPN module needs access to a temporary directory in order to work with files. Set this to be outside the document root: |
|
OpenSSL Location |
The location of the OpenSSL binary file that can be used to sign and encrypt your information. |
Naturally, you will need to test your site to ensure all this works correctly. However, if you do not have access to OpenSSL, then you will not be able to make use of encrypted payment notifications using this module. This is not cause for major concern provided you have the ability to use SSL. The reason for this is that the module has three different methods of operation as follows:
- Use the
openssl_pkcs7_signandopenssl_pkcs7_encryptPHP functions to sign and encrypt information sent to the PayPal server. - Use the OpenSSL tool directly from an
execcommand to perform the same signing and encryption tasks as the previously mentioned PHP functions. - Send the information in unencrypted format.
Now, if you have Encrypted Web Payments enabled on your payment module’s settings, then it will attempt to perform option 1, followed by option 2. If it is not possible to use OpenSSL and you have enabled this setting, it will kick up an error. If you disable this setting, then option 3 is performed.
It may seem on the surface of things that option 3 is not very secure, but recall that it can be just as secure as the first two options provided you are ensure PayPal is targeting a file on your secure server (HTTPS) for its IPN. If you have SSL enabled on your site, which you should have, then this file is only targeted over SSL (in other words, https://www.contechst.com/ext/modules/payment/paypal_ipn/ipn.php or https://www.contechst.com/catalog/ipn.php, depending on which version of the contribution you are using), which means that the information coming from PayPal is sent over SSL and is therefore secure.
If you do not have access to SSL, then unfortunately you will have to do without securing the back end of the PayPal payment module. Remember that this is not a train-smash—no credit card details are transferred between sites at any stage. The next section shows how information can be encrypted quite easily before being sent off by email. This could easily be adapted to encrypt whatever type of information you wish, so if you are feeling bold, perhaps you could try implementing your own secure transactions for your payment modules.
There were two types of credit card payment that were discussed in the previous chapter. The first option, storing credit card details on your site, is really not recommended because it turns your store into a target for credit card fraud. That said, we should still take a look at this particular method to ensure that we can, as an exercise, ensure it is relatively secure—after all, any security practice is a good thing. Following that we will look at the PsiGate payment method to see if there is anything we can do to make this more secure.
Now, the first thing to do is look at the process of accepting credit card payments. For a start we already know that the front end of the store is secure because any checkout transactions are done over SSL, which includes the credit card payment methods. This means we can be fairly confident that the customer details will get to us unmolested.
We can now choose whether or not to email the middle digits of the number to a specified email address, or to keep the whole credit card number in the database. Following that, you would use an EFTPOS merchant account terminal, for example, and process the credit card details away from your store. That being the case, there are three areas of concern; specifically, hackers might:
- Gain access to the administration tool and be able to view credit card details
- Gain access to the database
- Intercept emails
Point number 1 is no longer a concern since the administration tool is password protected and runs over a secure server. This is about as secure as we need it to be. This leaves points 2 and 3, of which the first will fall under a discussion on database security. So that leaves us with the final point to deal with now: what can be done to secure emails sent to us by our online store?
Well, let’s take a look at the code that is used to send the email within the credit card payment module:
function after_process() {
global $insert_id;
if ( (defined(‘MODULE_PAYMENT_CC_EMAIL’)) &&
(tep_validate_email(MODULE_PAYMENT_CC_EMAIL)) ) {
$message = ‘Order #’ . $insert_id . "

" . ‘Middle: ‘ .
$this->cc_middle . "

";
tep_mail(‘’, MODULE_PAYMENT_CC_EMAIL, ‘Extra Order Info: #’ .
$insert_id, $message, STORE_OWNER, STORE_OWNER_EMAIL_ADDRESS);
}
}
You will notice that the $message variable, which contains the middle digits, is simply sent as is with no encryption. Obviously, we would like to be able to encrypt that if at all possible. Of course, it is possible, and only takes a minute or so. For example, I have modified this function like so:
function after_process() {
global $insert_id;
if ( (defined(‘MODULE_PAYMENT_CC_EMAIL’)) &&
(tep_validate_email(MODULE_PAYMENT_CC_EMAIL)) ) {
// Added mcrypt functionality to transmit the middle
// digits of the credit card details in encrypted form.
$message = ‘Order #’ . ‘encrypted’ . "

" . ‘Middle: ‘ .
$this->cc_middle . "

";
$key = "Secret Key";
$encrypted_data = base64_encode(mcrypt_encrypt(MCRYPT_3DES,
$key, $message, MCRYPT_MODE_CBC));
$message = $encrypted_data;
tep_mail(‘’, MODULE_PAYMENT_CC_EMAIL, ‘Extra Order Info: #’ .
$insert_id, $message, STORE_OWNER, STORE_OWNER_EMAIL_ADDRESS);
}
}
Now when you receive an email from an order you will get it in this form:
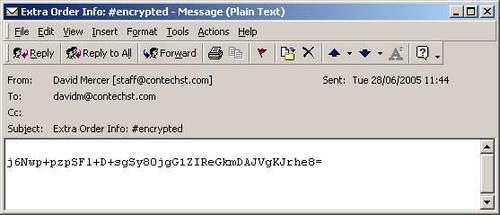
You can now decrypt this using your secret key value quite easily and match the values to the order number that is given in the Subject of the email. Note that there is no point in giving away any information if you are going to use encryption. Passing the order number as clear text gives a potential hacker a interesting piece of information, which is why we haven’t done this.
It is quite possible that your host provides similar functionality, so check with your host if there is already something similar in place that you can use. If not, then you will have to install MCrypt on your machine—this can be obtained at http://mcrypt.sourceforge.net/ for Linux users, or http://ftp.emini.dk/pub/php/win32/mcrypt/ for Windows users. It is pretty simple to do this; simply copy the library file to somewhere in your path (for neatness’ sake, it’s probably best to put it in the ext directory of your PHP installation) and enable the MCrypt module in the php.ini file.
Once you have got this installed, you can make use of the PHP CLI if you are using a recent version of PHP. The script I wrote is shown here:
<?
$key = "Secret Key";
fwrite(STDOUT, "Please enter the encrypted details:
");
$data = base64_decode(fgets(STDIN));
$decrypt = mcrypt_decrypt(MCRYPT_3DES, $key, $data, MCRYPT_MODE_CBC);
echo $decrypt;
?>
This was saved as decrypt.php and held in a secure folder on my personal machine. The file is used as follows from the command line:
C:secure>php decrypt.php
Please enter the encrypted details:
j6Nwp+pzpSGKaijhyxMo7DgG1ZIReGkmDAJVgKJrhe8=
Order #52
Middle: 11111111
As you can see this has reversed the process of encryption and base64 encoding as expected, and spat out the original content of the email, which contains the all‑important order number so that we can match the numbers correctly to the order. For more information on MCrypt, please see the documentation at http://www.php.net/mcrypt. Now you can proceed to use the details as normal. There are, however, several key things to note here:
- The secret key used for encoding is contained within the script page. This means that this method is only as secure as the
cc.phppayment module file. - Base64 encoding was used to prevent the email client on your personal machine from flattening the encrypted string in its raw form. This is why it is necessary to apply base64 decoding to the input string before decryption takes place.
- MCrypt has plenty of different encryption algorithms to offer, and you are not limited to the ones used in this script. You may also get warning from not using the optional final parameter—please look at the documentation for more information on this if it is a concern.
- The method shown here can be improved upon by pulling the secret key value from a secure area of your sites file system, and using a proper key rather than a simple password.
- Decrypting every credit card value may become tedious if you have a large number of orders.
- You need to ensure that your live site has a version of PHP configured to make use of MCrypt.
- You need to ensure that your personal machine has PHP and Mcrypt installed.
- If you dont have access to MCrypt, look at what you do have. It isnt hard to redo this using GnuPG, for example. Make the most of the resources available to you, and remember to always test, test, and test. In this case, you would probably want to be able to catch any errors generated by MCrypt, and store the digits in a secure place instead of emailing them if there is a problem. The administrator would have to sort out the mess manually in this case.
Apart from being able to encrypt information sent within an email, this has also demonstrated how easy it is, with a bit of thought, to implement sufficient security to deter a fair amount of malicious intent. Remember that this is not foolproof just because you now have two files that contain the key used for the decryption—this means that both the server side and the administrator’s machine are now in need of some good security to prevent intrusion.
With that done, let’s turn our attention to the PsiGate payment module. The PsiGate module does not provide encryption facilities when sending its information to PsiGate, but it does target the secure PsiGate server so that the form information is transferred over SSL. Remember, you can also have customers supply their details directly to the PsiGate server by enabling the Remote option in the payment module’s settings. This takes the back-end security responsibilities off your hands entirely.
Let’s move on from the topic of security to look at a few community contributions that help to augment the facilities provide in the default distribution of osCommerce.
By default, osCommerce comes with a few reports, which you can use to monitor your site. However, in all likelihood, at some stage you will find you want either better or different reports and report formats. Because of this, it is a good idea to install one of the report contributions, which is useful for maintaining good inventory control by alerting you to the fact that you might have certain products running out.
You know the drill by now, so make a backup of your site and then navigate to http://www.oscommerce.com/community/contributions,1245/ in your browser to obtain a copy of the contribution. While you are there, you may as well browse around the other report contributions to see if there is anything that might also be of use. The low stock reports contribution is pretty simple to install! Follow these steps:
- Copy the
admin/stats_low_stock.phpcontribution file toadminon your site. - Copy the
admin/includes/languages/english/stats_low_stock.phpcontribution file to theadmin/includes/languages/directory on your site. - Add the following to
/admin/includes/languages/english.php:define(‘BOX_REPORTS_STOCK_LEVEL’, ‘Low Stock Report’);
- Edit
/admin/includes/boxes/reports.phpby replacing:‘<a href="’ . tep_href_link(FILENAME_STATS_CUSTOMERS, ‘’, ‘NONSSL’) . ‘" class="menuBoxContentLink">’ . BOX_REPORTS_ORDERS_TOTAL . ‘</a>’);
with the following:
‘<a href="’ . tep_href_link(FILENAME_STATS_CUSTOMERS, ‘’, ‘NONSSL’) . ‘" class="menuBoxContentLink">’ . BOX_REPORTS_ORDERS_TOTAL . ‘</a><br>’ . ‘<a href="’ . tep_href_link(FILENAME_STATS_LOW_STOCK, ‘’, ‘NONSSL’) . ‘" class="menuBoxContentLink">’ . BOX_REPORTS_STOCK_LEVEL . ‘</a>’);
- Edit
admin/includes/filenames.phpby adding the line:define(‘FILENAME_STATS_LOW_STOCK’, ‘stats_low_stock.php’);
That’s it, you are all done! Now if you go along to the Reports section in the admin tool, you will notice that you have a new Low Stock Report option, which, if clicked, will bring up the following page:
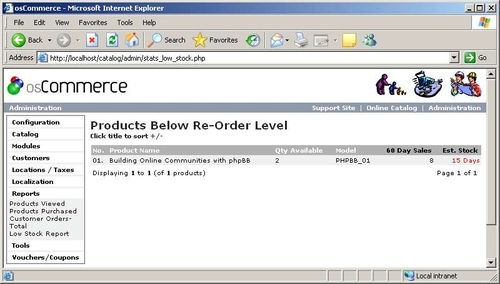
From this screenshot you can see that there is one product that has a stock less than the re-order level, which is set in the Configuration section of the admin tool on the Stock page. Two nice features of this report are that it shows the purchase history of the product for the last 60 days as well as an estimate for the amount of time it will take to deplete the remaining stock. In this case we have made eight sales in the last 60 days, and have about 15 days before we run out of this particular book totally.
Another thing to note is that if you have set up your stock control to allow checkout to go through even if a product is out of stock, then this report can show a negative value for the Qty Available column, meaning that you have these products on back order. Of course, if you have set the Allow Checkout setting to false, then it is not possible to get negative values here.
Some of you may have had a nagging feeling that you shouldn’t be allowing downloadable products to be downloaded until you actually have the payment in your account. You are obviously quite correct to be worried about this, because as it stands, the default behavior of osCommerce’s download functionality will ruin you quite quickly.
Basically, what we want from the store is to only make a download available once a payment (be it PayPal, credit card, or whatever) has a certain order status. Now, what this means is that you need to look closely at all the payment methods you accept, and come up with an integrated policy that will allow you to make a call on whether something is downloadable or not with relative ease.
This probably sounds a bit confusing at the moment. It helps to think about it in terms of how a payment is processed. Recall that in Chapter 6 we used the PayPal IPN payment module to implement payments via PayPal. We had several statuses set for this type of payment, ranging from Denied, to Preparing [PayPal IPN], to Processing, and even Delivered. Recall too that while the status was set to Preparing [PayPal IPN], we had not actually received the funds in our account. It was only once we had accepted the funds that the status changed to Processing. It was then left to us to set the status to Delivered manually.
It should be clear to you that we don’t want to make the download available when the status of the payment is Denied, or even when it is Preparing [PayPal IPN], because it is likely that the customer can download the product without ever forking out the cash. So in this case, we really want the download to be available only once we have reached the Processing or Delivered status.
Thankfully the Download Controller found at http://www.oscommerce.com/community/contributions,135 can be of assistance here.
There are quite a lot of changes to make to your files, so back everything up now. One of the big problems with using this contribution is that it may well affect other contributions you already have installed. As a result, we have to make the modifications to altered files manually instead of replacing the files entirely.
The following instructions will get the controller working on your setup:
- Add the following files:
/catalog/includes/modules/shipping/freeshipper.php
/catalog/includes/languages/english/modules/shipping/freeshipper.php
/catalog/includes/modules/payment/freecharger.php
/catalog/includes/languages/english/modules/payment/freecharger.php
/catalog/images/icons/shipping_free_shipper.jpg
/catalog/languages/english/images/buttons/button_download.gif
/catalog/includes/functions/downloads_controller.php
/catalog/includes/functions/webmakers_added_functions.php
/catalog/includes/languages/webmakers_added_languages.php
/catalog/includes/languages/english/downloads_controller.php
/admin/includes/functions/webmakers_added_functions.php
/admin/includes/languages/english/downloads_controller.php
- Edit the following files:
/catalog/includes/application_top.php:
Replace the line:
// Shopping cart actions
with:
// BOF: WebMakers.com Added: Functions Library
include(DIR_WS_FUNCTIONS . ‘webmakers_added_functions.php’);
// EOF: WebMakers.com Added: Functions Library
// Shopping cart actions
/admin/includes/application_top.php:
Add to the very bottom of the file just before the last ?>:
// BOF: WebMakers.com Added: Functions Library
include(DIR_WS_FUNCTIONS . ‘webmakers_added_functions.php’);
// EOF: WebMakers.com Added: Functions Library
/catalog/includes/languages/english.php:
Add to the very bottom of the file just before the last ?>:
// BOF: WebMakers.com Added: All Add-Ons
require(DIR_WS_LANGUAGES . ‘webmakers_added_languages.php’);
// EOF: WebMakers.com Added: All Add-Ons
/admin/includes/languages/english.php:
Add to the very bottom of the file just before the last ?>:
// BOF: WebMakers.com Added: All Add-Ons
require(DIR_WS_LANGUAGES . ‘webmakers_added_languages.php’);
// EOF: WebMakers.com Added: All Add-Ons
As well as these edits, you will also need to go through the following list of files and implement the changes between the contribution files and your store’s files as shown.
- Modify the following files by comparing the contribution file with the file in your store, and then incorporating the differences. (You may wish to use some sort of comparison software such as Beyond Compare, which you can find at http://www.scootersoftware.com/, for this.)
/catalog/includes/modules/downloads.php
/catalog/checkout_process.php
/catalog/checkout_shipping.php
/admin/orders.php
The actual changes aren’t going to be listed in the text here because they will take up a fair amount of space and won’t mean much to you anyway (you can always look at the files directly if you want to view the code for yourself). You should try to implement the changes, failing which you can view the actual modified files on the demo site.
I will give you the following handy hint though: you will probably get a MySQL error if you don’t remove the following line from the contribution’s code before you make use of the checkout_process.php file:
‘comments’ => $order->info[‘comments’],
This is because there is no comments column in the orders table. Apart from this, it is a case of going through each of the files in the previous list and carefully making changes or replacements as necessary.
Once that is all completed, it is time to get the contribution up and running so that you can start allowing downloadable products onto your site.
In order to make the Download Controller effective, you need to understand how it works. The most important thing to remember here is that a product will be made available depending on the value of its order status. The first thing to do is sort out your order status values by going to Orders Status in the Localization section of the administration tool and adding or removing statuses according to your needs.
Based on the needs of the demo site, the following settings were created by deleting all but Pending, which is the default, and adding the new statuses in order:
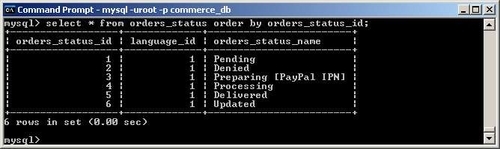
This screenshot shows you the command used to display the order statuses that have been saved on the system, using the MySQL client (you can always use phpMyAdmin or whatever else is available). Depending on what you need, you might decide to use different statuses, or simply different status IDs. As it stands on the demo site, we really want to allow downloads to be made available only for orders that have a status of 4 and above, because all others allow a customer to obtain the download without us first getting payment.
Note
Note that you will need to recheck the settings of your payment modules if you have just added these statuses to your system now. This is because the modules will probably still be picking up the old status ID values and giving you the wrong status!
In order to tell the download controller that it should only allow downloads based on these criteria, open up /catalog/includes/languages/english/downloads_controller.php and implement the following changes:
define(‘DOWNLOADS_AVAILABLE_STATUS’,’4’);
As well as this, we need the Updated status to help the contribution perform a couple of actions needed after updating download settings on an order—the contribution also sends an email to the customer notifying him or her of this. To do this, simply go to /admin/includes/languages/ english/downloads_controller.php and implement the following change:
define(‘ORDERS_STATUS_UPDATED_VALUE’,’6’);
Obviously, if the order_status_id of your Updated status is not 6, then you would change this to reflect the value you have in your orders table. What this means is that if for some reason a customer had a problem with their download and you decided to allow him or her to try download it again, you could update the order status to Updated, and then set it back to whatever status is normal (say Delivered for argument’s sake), and the customer would find that they are able to download the product again because the number of days and downloads that are available to the customer are refreshed.
The last thing we should do in order to make things as easy as possible on us is to remember that downloadable products do not weigh anything. If you have a product that is downloadable, then set its weight to 0 when you add it to your catalog. If a product has zero weight, then the shipping charges are not added to the product, which is exactly what you expect.
With everything set up, it is now time to test out the new download contribution.
The first thing you need to do is add a downloadable product to your database. So, if I wanted to sell an article for download, I would add it as per the instructions in Chapter 3 in the Download section, remembering to set the weight to zero. Once this has been done, we need to try to purchase this downloadable product using each and every one of the available payment methods.
For example, the following result was obtained directly after purchasing a downloadable item using PayPal:
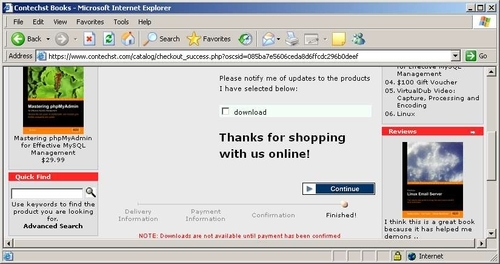
This is perfect because the download is not available yet as we hoped. Note the highlighted message at the bottom of the screen, explaining that the download will not be available until we confirm the transaction. In the case of the demo site, the PayPal IPN module needs to set the status to Processing before the customer can download the product. This in turn only occurs once we have accepted the PayPal payment in PayPal itself.
Of course, you can set your downloads to deal with purchases however you see fit. There is quite a bit more to the download controller contribution that we don’t have time to cover here since it has already provided us with what we initially needed it for. It is left to the reader to poke around and find out what else there is.