
In this chapter, you will learn the techniques of assessing a network when it is flat, that is, when there is nothing between us and the target. This makes our task much easier; furthermore, the inside of the network is usually the place that has the most trusted location, and as such, it offers the least resistance, especially when it comes to layer two and the assignment of the physical Media Access Control (MAC) addresses.
In this chapter, we will discuss the following topics:
- The role of vulnerability scanners
- Dealing with host protection bypassing EMET
This chapter will provide us with details about how, when we are performing internal or white-box testing, we do not have the same challenges that we have when we are trying to conduct an external or black-box test. This does not mean that when the network is flat and we are inside it, we do not have challenges; there are a number of challenges that we may encounter. Furthermore, we have to be prepared for protection such as Host Based Intrusion Prevention, antivirus, host firewalls, and Enhanced Mitigation Experience Toolkit (EMET) that the administrator might have deployed.
When we are testing the network from the inside, the goal is to emulate a number of different threat vectors. Moreover, we want to access the network as an unauthenticated user, a user with normal privileges, and a user with escalated privileges; this works well with our tools that we use inside the network.
So, where do vulnerability scanners play a part in this? Well, this is where they excel: when you provide the scanner with credentials, then the scanner can log in to the machine and check the client-side software. This is something that we cannot do for the most part in an external test environment.
Before we get into the different scanners that are available within the Kali Linux distribution, we will look at two free tools that we can use for our vulnerability assessment for the internal networks.
The first tool we want to look at is from Microsoft, and it is the Microsoft Baseline Security Analyzer (MBSA). You can download the tool from the following link: http://www.microsoft.com/en-us/download/details.aspx?id=7558.
One good thing about the MBSA tool is that it is from Microsoft and it has a pretty good idea about what is missing. It also does a good job of identifying the missing patches and can identify the security configuration mistakes.
Once you have downloaded the tool and installed it, open it and start the program. An example of the opening screen configuration is shown in the following screenshot:

When we use a vulnerability scanner in our internal testing, the first scan will be without credentials, and that means we will not be able to test the client-side software. We will look at the tools within Kali Linux to achieve this. The vulnerability scanners in Kali Linux are found by navigating to Applications | Vulnerability Analysis. Within this location, there are a number of tools we can use for our vulnerability scanning. An example is shown in the following screenshot:
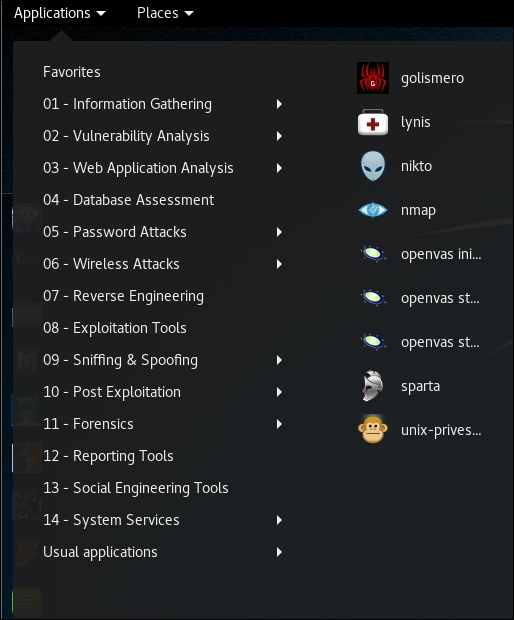
The scanner we will work with is the OpenVAS scanner. When you start working with OpenVAS for the first time, there are a number of steps required. The first step is to navigate to Applications | openvas initial setup. This will download all the plugins required and will take some time to complete. Once the tool is loaded, the system will select a very difficult password for you; the first thing recommended is to change this default password. In a terminal window, enter openvasmd --user=admin --new-password=letmein.
The next thing you need to do is open a browser and connect to the interface of the tool. In the browser, enter https://127.0.0.1:9392 to open OpenVAS. An example is shown in the following screenshot:

Log in to the interface with the username admin and the password you created during the initial setup. This will bring you to the scan configuration page, which in Kali, includes a Quick start area, as shown in the following screenshot:

For our first scan, we will scan the OWASP BWA VM, as it should provide us with a number of findings. As you see in the explanation in the Quick start section, the shortcut saves us the trouble of creating the target and a new task for the scan.
Once we have scanned the machine, we are presented with a report of the findings. An example of the report for the OWASP BWA machine is shown in the following screenshot:

The next tool we will use is Vulnerability Scanner Nessus from Tenable. You can download the tool from http://www.tenable.com/products/nessus/select-your-operating-system.
Once you have downloaded the tool, you need to register for a home registration feed and then install the software. In this book, we are going to use the Windows version of the tool. This is because the web interface uses flash, and this can sometimes cause problems in the Kali Linux distribution, so it is often easier to use the Windows tool. You are welcome to use the one in Kali; just search on the Internet for a tutorial and it will walk you through the process.
At the time of writing of this book, the latest version of Nessus is 6.5.6, and this revision includes a number of features and a redesigned interface for Nessus. Additionally, they have added the capability of creating remediation reports. This is always a nice feature when you are testing, because then you can help the client understand what it will take to fix the findings that you discovered. With this version, it is required that you first select a policy before you perform a scan. An example of the policy options is shown in the following screenshot:
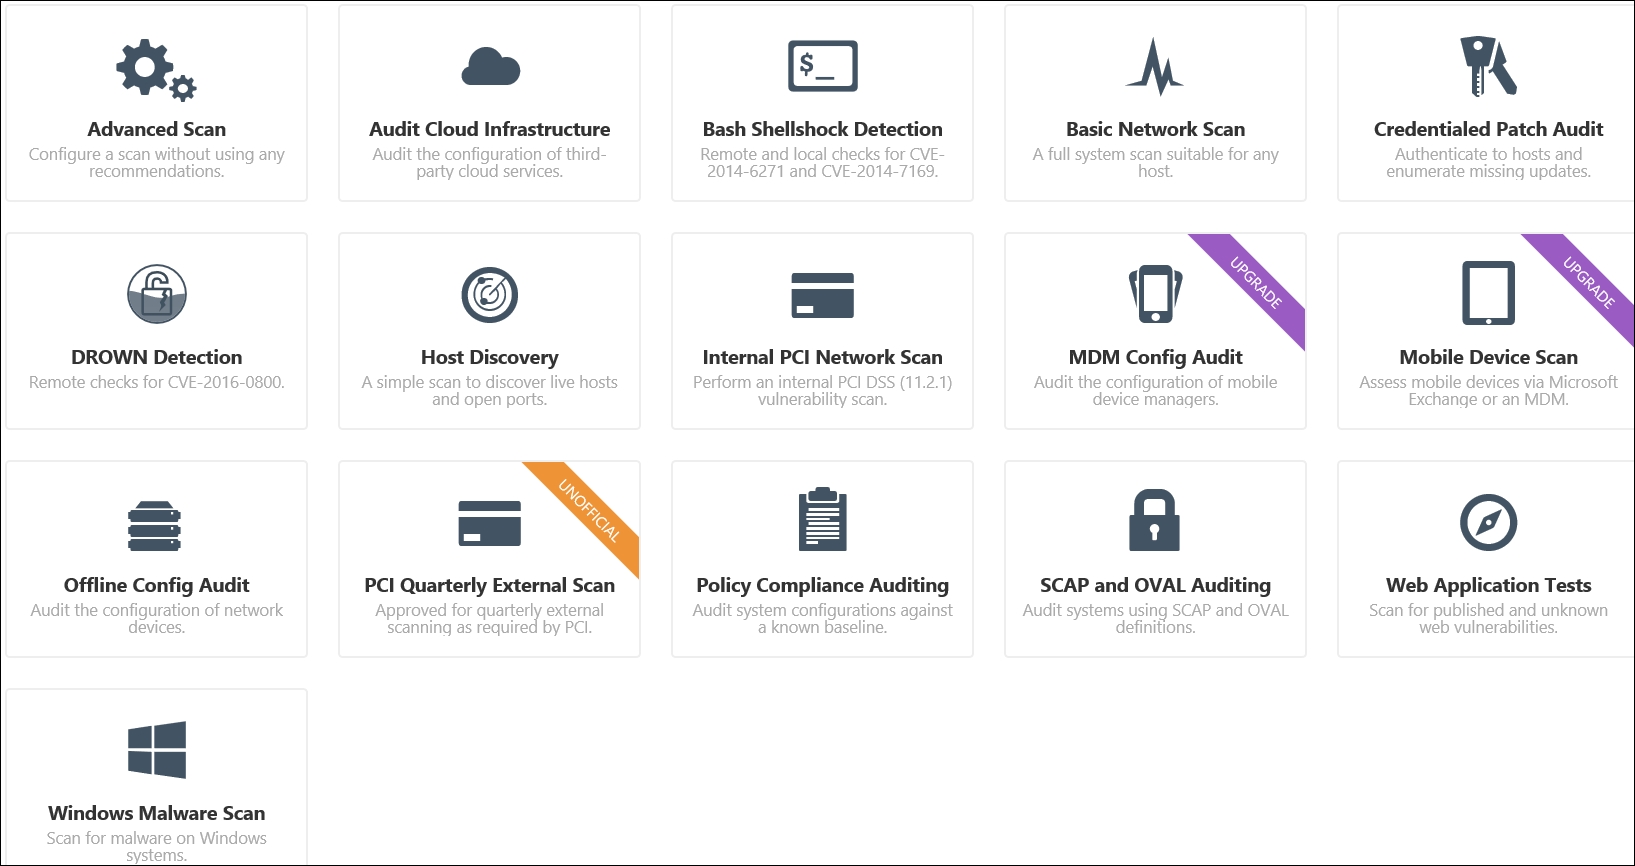
For our policy in our example, we will click on Basic Network Scan and open the configuration form for the policy. We will scan our OWASP BWA machine, but first, we need to enter a name for the scan. We will enter the name as FirstScan. As we are on a flat network, we could enter the credentials for the machine, but for now, we want to leave the scan the same as we conducted using OpenVAS. So, click on Save to save the details of the scan. The next thing we need to do is the scan; click on Scans | New Scan | FirstScan and enter the information required for our scan. An example is shown in the following screenshot:

Once you have entered the settings, click on Save. The next thing to do is click on the arrow and start the scan. It will take some time to finish; once it does, click on the scan and open the results. An example of this is shown in the following screenshot:

As you compare the scan results, you will notice that they are not really the same. This is how it works with vulnerability scanners; furthermore, we do not have a lot of details about the client-side software, and this is because the scan was conducted without credentials. As you review the scan results, you will see that OpenVAS detected the WordPress version, and the problems with it, but it was not detected with the Nessus scan. Does this mean the free OpenVAS scanner is better? Well, not necessarily; there are so many variables that go into vulnerability scanning you really have to do research to determine why a scan does not detect something that another scanner did, or you know is there. Let us investigate this further. First off, some of you reading this are probably wondering why we are using the OWASP BWA for a target, and that is a valid question.
We selected it just as an example, we really could explore the scanning of any of the machines we have used thus far in the book. We will scan Metasploitable at a later point in the chapter for a comparison. For now, we want to see if we can improve the results of the Nessus scan. The next thing we want to do is change the scan policy to that of one that will test for web application types of vulnerabilities; we have this in the Nessus tool, so create a new scan of the OWASP BWA machine, and this time select the Web Application Tests scanner template. An example of the results after this scan is shown in the following screenshot:

This has resulted in more and different findings, but has not discovered the vulnerable version of WordPress, but for our purposes here, we have accomplished what we wanted to do, so we will continue on to scanning the Metasploitable machine. We want to set up and scan the machine with both OpenVAS and Nessus, and then we can compare the results of the scans once again.
We have covered how to do this, so we will not repeat the steps here. Conduct a scan of the Metasploitable machine with OpenVAS. An example of the scan output is shown in the following screenshot:

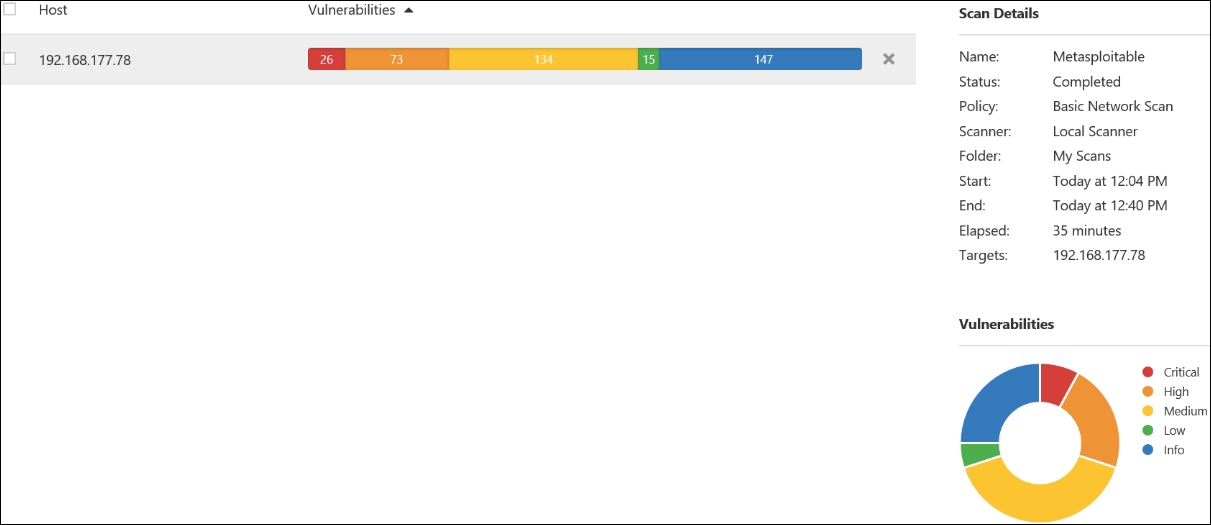
Now that you have reviewed the results from a scan with OpenVAS, conduct another scan, this time with the Nessus scanner. An example of the results from this scan are shown in the following screenshot:
Again, as we have specified, vulnerability scanners work best when they are provided with credentials. Up to this point, we have not provided any credentials. We will do this now. Enter credentials and scan the OWASP BWA machine with Nessus. An example of the results of this scan is shown in the following screenshot:

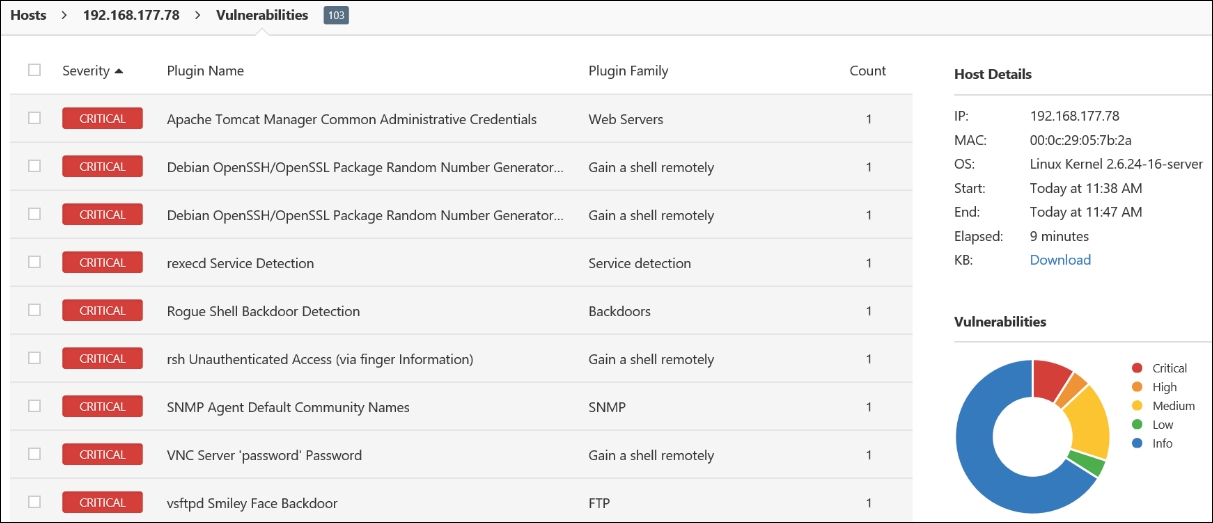
Whoa, look what happened! This shows the power of when you add the credentials to a vulnerability scan; as we have mentioned, we need the credentials to read the local client software versions. Take a few minutes and explore these new-found vulnerabilities; many of them are because of the old version of Linux that is being deployed. It is important for us to test for these, since we know many of our clients will deploy Linux, as it is more cost effective for setting up large environments. Now that we have scanned the machine with credentials, it is time to scan the Metasploitable machine with credentials. Conduct a scan of the Metasploitable machine from Nessus with credentials. An example of the results from this scan is shown in the following screenshot:
As the previous screenshot shows, and what we should have expected, with the credentials, we have a significant number of critical vulnerabilities when compared to the scan without credentials. These are the types of thing you want to ensure your client understands about scanning.