
In this section, we are going to discuss the topic of evasion. This comes from the often-referred-to concept of Never Get Caught! While this does make for good theatre, the reality is that this is rarely asked for in a penetration test. Furthermore, it is highly dependent on how the administrator has configured their environment. There is no guarantee that we will get through, but we can lab it up and at least find some things that might work if it is a part of our scope of work.
What we want to focus on is the fact that all of these tools have to have some form of threshold, and will be sending an alert when they reach this threshold. This is where we can find ways to evade detection. If we revisit our Snort sensor and clear all of the existing alerts, we can attempt a few different things to see when we get detected and when we do not get detected.
Another type of testing we might need to perform against our IDS sensor is stress testing. With this technique, we generate a lot of noise and see whether the attack can be masked by the noise, or alternatively, whether the sensor can be overwhelmed and stop working. Within the Kali distribution, there are a number of tools for this, and you are welcome to try them out. We will leave this testing to you for homework. You will discover that the IDS tools have been around long enough to not be flooded with these attacks. Having said that, there is always a chance and this is why we covered it. One of the tools you might want to have a look at involves fragmentation, and in the early days of IDS this was very successful at causing Denial of Service (DoS) against an IDS. You can review information about a similar tool by entering man fragroute. An example of the beginning of the man page is shown in the following screenshot:

The Hping tool also has the capability to perform stress testing using the --flood option. To learn more in your Kali machine, enter man hping3. An example of the option from the man page is shown in the following screenshot:

Tip
A word of caution about the flooding with Hping: it is a flood, and as such, a DoS. In fact, on most networks, when you run the tool they will become degraded and not responsive. If you want to see it, run Wireshark and then run the Hping tool in flooding mode, and you will notice that Wireshark will perform very slowly, and after a very short time stop working. This is another reason we rarely do DoS types of attacks in professional security testing. Additionally, hackers are not big fans of it, since they lose the ability to control the victim as well.
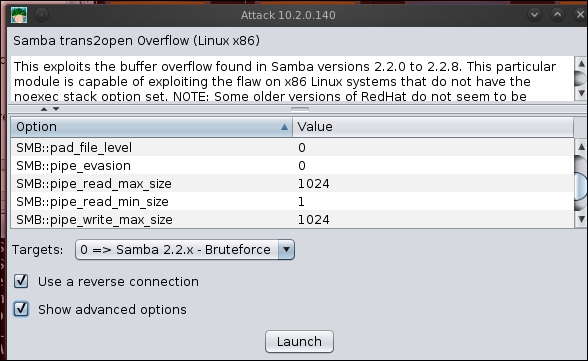
When it comes to the detection of exploits, the data that gets detected is the shell code, furthermore, the signature of that code. As it is a standard, it is easy for the tool to detect it. We will look at this now. You will need your Kioptrix machine, as we are going to exploit it. We have discussed a number of ways to do this, and for our purposes, we are going to exploit it using the Metasploit tool. There are a number of parameters that we can manipulate when we try to avoid detection, and unfortunately, there are no guarantees. If you use the Armitage tool, then you can select Show advanced options to view the additional parameters we can use. An example of this is shown in the following screenshot:
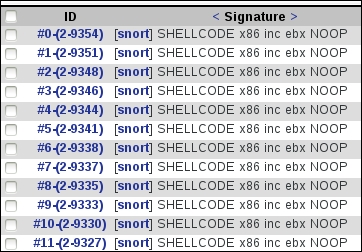
We will conduct the exploit with the default settings first to see what is detected by the BASE tool. Again, there are no guarantees when it comes to evasion, so it is a matter of experimentation and documenting your findings. An example of the exploit attempt is shown in the following screenshot:
As the previous screenshot shows, we have not been successful, so now we will modify the payload and see whether we have any better luck. This is the process: you try different things and find what works and does not work. This is why it is a good thing that evasion is rarely asked for. Included within Metasploit is the capability to generate payloads and encode them to try and avoid detection. To explore this tool more, in your Kali machine, enter man msfvenom. An example of the man page is shown in the following screenshot:

Additionally, in the advanced options, we can modify a number of the parameters, but at the time of writing, we were not able to successfully evade detection with any of these tools. If you want to learn more, you can gather more information at https://community.rapid7.com/community/metasploit/blog/2014/05/02/anti-virus-evasion-makes-vulnerability-validation-more-accurate.
We have one last thing to try with respect to evasion. Sometimes, it is easier to just try different ports that you know are not checked by default by an IDS. This omission is normal because of the fact that the traffic generates too many false positives.
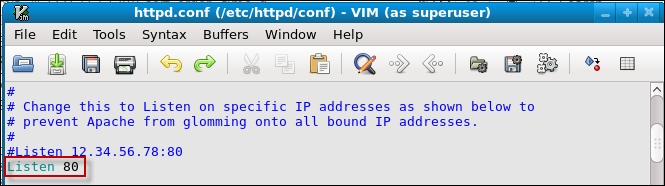
Earlier in the chapter, we conducted a scan against the NST using the Nikto tool and there was nothing detected. We will now take a closer look at this. The scan we did against the NST was against port 9943 and HTTPS protocol. There could be more than one reason why it was not detected. First, we will test whether it was not detected because the attack was directed at port 9943, which in fact would be encrypted traffic and the IDS is blind to that. We have a couple of choices on how we can accomplish this test. We can turn on the web server on the NST virtual machine, or we can activate the HTTPS protocol on the server of the OWASP machine. We will use the NST machine; we have to navigate to the configuration file and uncomment the HTTP line to get it running on the machine. In a terminal window, enter gvim /etc/httpd/conf/httpd.conf to open the configuration file.
Scroll down to the section of the server configuration and remove the # to uncomment Listen 80, as shown in the following screenshot:
Once you have finished editing, exit the editor by navigating to File | Save-Exit. The next thing you have to do is restart the web server. In the terminal window, enter service httpd restart to restart the service. Once the service has restarted, we will scan using Nikto against the NST machine. For the first scan, we will use the option to scan for the SSL port that in the NST machine is 9943, but before you do this, make sure that you clear all of the queries in BASE. Return to your Kali machine and scan the IP address of the NST machine. In our example, the machine address is 192.168.20.132, and this is what we will use. In the terminal window, enter nikto -p 9943 -h 192.168.20.132. When the scan finishes, return to your BASE and see whether the scan was detected. Were you detected? The answer should be no! Why is this? Well, before we answer this, as with all good testing, we will prove it. There should not be any alerts in your BASE display. An example of the dashboard is shown in the following screenshot:

As the previous screenshot shows, we can direct our attacks at the SSL port 9943, but the sensor does not see an alert; however, when we scan the web server directly, not on the SSL port, we do get detected. This is quite common, but there always is a chance that the administrator has turned on the rule to check HTTPS traffic. However, it does give us a potential method to evade detection. Again, your success will vary, but if it is a part of the scope of work, some of these techniques might assist you in evading the monitoring capability of the client. This technique is also the process of tunneling, where we tunnel a protocol over another port, such as the SSH port, so that the IDS might not check it, as it is usually encrypted.
To confirm our theory, conduct the scan against the HTTP service listening at port 80 and see if the scan is detected. Return to your Kali machine and run the scan again without forcing it to go over SSL and port 9943. In the terminal window, enter nikto -h 192.168.20.132. Once the scan finishes, return to the BASE display and see whether the scan was detected. An example of this is shown in the following screenshot:

As the screenshot shows, we are detected, so we have in fact proven our theory; from here it is a matter of experimentation and documenting what works and does not work.