
C H A P T E R 9
![]()
Strolling Through Fields of Gold
I Think... Yes, There It Is... Our Goal Is in Sight
We have been traveling a long time, but we are closer than ever to our destination. Our final trek will take us across a wonderful golden field—or, rather, a whole range of fields, to be precise.
This chapter is all about fields and columns, the minute parts of SharePoint that make up the most basic units of storage.
Now, before we go any further, I should explain the use of the phrase fields of gold, because those few words hold a few secrets. First, mastering fields and columns is very important to understanding how to customize the user experience in SharePoint.
Second, when you think of fields of gold, except perhaps the best song ever written, you may think of massive fields with billions of individual grains of barley. Fields are somewhat like that; there are no less than 100 attributes to the Field element, with a staggering amount of possible child element combinations.
Perhaps handcrafting DNA is not such a bad job after all.
We will focus primarily on the attributes and elements that matter to the user experience, but still this will be a very technically detailed chapter.
Columns and Properties of Gold?
The terms fields, columns, and properties are often used interchangeably, and they often refer to the same thing. All the terms refer to the storage device in which data about an item is actually stored. Examples of this are the Title, Author, Modified, Due Date, and Assigned to columns, as well as other similar pieces of information storage units.
There are minute differences, however, between the three terms. Fields and columns, being the same thing, usually refer to columns in a site, list, or content type. Properties are often used on items or documents. So, your Quarterly Reports library may have a Department column, but the Quarterly report for Q1 2009.pdf file has a Department property.
During the course of this book, I have tried to consistently use the term column when referring to list and content type columns and to use property when referring to item or document metadata. Because of the similarity of the terms field and field type, I have refrained from using the term field at all, but you should know that, in general, field refers to the same thing as column or property.
![]() Caution Throughout the CAML files, the term field is used for columns. For the duration of this chapter I will sometimes use the term field when referring to columns.
Caution Throughout the CAML files, the term field is used for columns. For the duration of this chapter I will sometimes use the term field when referring to columns.
Wait! What Are Field Types?
Ah, yes, field types are the type of data. If you are familiar with database terminology, think data types, such as integers, text, and so on.
Unlike databases, however, SharePoint allows us to create our own data types. In fact, as with may other things, the default field types, such as single line of text, date/time, number, and person, are defined using regular CAML.
This gives us a massive amount of power. If you need to improve on a text field perhaps to add autocomplete or you need to create a drop-down list that retrieves data from an external data source, you can accomplish that by creating a custom field type.
A common scenario is to create cross-list, cross-site, and cross-site collection lookup fields. We will create our very own field type in Chapter 10.
...and Field Type Controls?
A field type has two elements, a storage element and a method of displaying the stored data. The field type control is responsible for handling the visual interface of a field type, such as an HTML text box for the text field type and a calendar for the date/time data type.
You can change the existing field type controls as we briefly saw in Chapter 5, and if you decide to create your own field type, you can do pretty much anything you want.
![]() Note When I say “if,” I really mean “when.” Custom field types are incredibly powerful, and you would do wisely to learn how to create them. If nothing else, we will create custom field types in Part 3 of this book.
Note When I say “if,” I really mean “when.” Custom field types are incredibly powerful, and you would do wisely to learn how to create them. If nothing else, we will create custom field types in Part 3 of this book.
With those definitions out of the way, let's move on to see how columns are used.
Site Columns vs. List Columns
You can define columns on two levels, either on the site level or on the list level. Site columns are useful if you intend to use a column in multiple lists. Rather than having to define all the settings for every list, you can define a site column with all the settings and add that site column to the lists.
Site columns are your only option if you intend to use your columns in content types. List columns are available only for a particular list.
For lists, you can use either site columns or list columns. Or, actually, you can use list columns only. Or, actually, you can add site columns, but they become list columns. Let me explain.
On the list or library settings page, you have the option to either create a new column or add an existing site column. If you choose the latter, a copy of the site column is made using the same field ID as the site column. The copy becomes a list column.
The use of similar ID values for both the site column and the list column maintains the parent-child relationship. This relationship means you can make changes to the site column and optionally have all child columns inherit those changes.
This is a good thing, because it means that the list column is detached from the site column when you want it to be, but it can still maintain its relationship to the parent site column. An example might clarify this.
Let's say you have a site column named Recipient used to store who will receive reports from different departments. You add that field to a new list for a new department, but then the department head comes to you and says that the column needs to be named “Target manager” instead.
In this situation, you can simply go to the list settings and change the name of the column on that list. Had you changed the site columns, every occurrence of the Recipient column would be changed, and other departments might not like that.
What might spin your head a bit later is when we start to consider how content types work in this scenario. As I mentioned, content types use only site columns, so if we want to change a column for a content type on a list, we might be in trouble. And, if content types are so cool and we should use them as often as we can, how can we have such a limitation?
The answer is that content types also create list column copies of their respective site columns. When you add a content type to a list or library, all the site columns of that content type are copied into list columns on a list.
Problem solved.
Site Columns in CAML
To add site columns using the web interface, you simply go to the site where you want to add a column, then go to the Site Settings page, and finally select the site columns. Create your site column by clicking Create, fill in the form, submit it, and live happily ever after. You can do this on any site.
Creating a basic field using a feature is slightly more complex, but not much. First, start with your basic feature as explained in Chapter 3, and make sure your feature scope is set to site, not web.
As with content types, site column features are site scoped, and of course you remember that site in this feature context means site collection. The ID of the field needs to be unique to the entire site collection to support content type inheritance and to allow site columns to be used in child sites.
Yes, that's correct. Columns have scope just like content types. If you define a site column in one site, all child sites will also be able to use that column. Site columns and content types are closely connected.
Let's get back to your feature now—in your elements file, add a Field element as such:
<1?xml version="1.0" encoding="utf-8" ?>

<Elements xmlns="http://schemas.microsoft.com/sharepoint/">
  <Field Name="Recipient" DisplayName="Recipient"

         ID="{053EC00E-D451-4733-8CA0-31532C974E91}" Type="Text" >

  </Field>

</Elements>
![]() Caution Unlike other GUID examples, you must use brackets in the GUID
Caution Unlike other GUID examples, you must use brackets in the GUID ID value when defining site columns. Do not forget this.
All you need to do to deploy your new column now is to deploy the feature and then activate the feature from the Site Collection Features page on the root web in the site collection.
Figure 9-1. Nothing to click
Let's take a look at how this is done in some of the default fields installed with SharePoint. Open the [12]TEMPLATEFEATURESfieldsfieldswss.xml file.
The fieldswss.xml file holds all the default site columns that are installed when you set up SharePoint. The fields feature containing all these fields is activated through the global site definition at [12]GLOBALXMLonet.xml, as you saw in Chapter 4.
Your first impression of the fieldswss.xml file might be “Wow!” It is a huge file, and I bet you never imagined so many columns were installed. When you start to investigate, however, the file is quite manageable. What will really stun you is the sheer amount of options you have when you want to create your columns.
We should investigate some of the common columns used throughout SharePoint, but we can't ignore the lesser known columns either. I'll show you some columns, and then we will explore the different attributes and elements afterward.
ContentType
You know that all items in SharePoint are based on a content type. At least you know that if you have been paying attention, especially in Chapter 7. All items, regardless of content type inheritance, have a ContentType property. This is facilitated through the System root content type, defined in [12]TEMPLATEFEATURESctypesctypeswss.xml, which contains a single field reference to the ContentType site column:
<1ContentType ID="0x"

     Name="$Resources:System"

     Group="_Hidden"

     Sealed="TRUE"

     Version="0">

     <FieldRefs>

      <FieldRef ID="{c042a256-787d-4a6f-8a8a-cf6ab767f12d}" Name="ContentType"/>

     </FieldRefs>

 </ContentType>
The site column referenced in the system root content type is the second column or field defined in fieldswss.xml:
<Field ID="{c042a256-787d-4a6f-8a8a-cf6ab767f12d}"

    Name="ContentType"

    SourceID="http://schemas.microsoft.com/sharepoint/v3"

    StaticName="ContentType"

    Group="_Hidden"

    RowOrdinal="0"

    Type="Text"

    DisplayName="$Resources:core,Content_Type;"

    ReadOnly="TRUE"

    Sealed="TRUE"

    ColName="tp_ContentType"

    PITarget="MicrosoftWindowsSharePointServices"

    PIAttribute="ContentTypeID">

</Field<
Some of the attributes shown here require further explanation. ID is a GUID that uniquely identifies a site column within a site collection. Note the minor detail of being unique with a site collection.
Next, the name attributes—as you can see, there are actually four names in use here: Name, StaticName, DisplayName, and ColName. In addition, there are two more attributes that denote a column's name in different scenarios. Luckily, we need to concern ourselves with only two of these names, the Name and DisplayName attributes.
Name is the internal name of a field and is rarely, if ever, shown to a user. Name cannot be changed for a column; once it is set, that's the name with which you are stuck. This is in contrast to DisplayName, which is shown as the name of the field to users in the web interface. Users, or you, can change the DisplayName attribute without messing up the column.
You should use this distinction to your advantage. When you are working with fields in code, you often reference fields by Name, which makes sense since this value never changes. However, if you have a column titled “Things to do,” the Name value would have to be accessed as Things_0x0020_to_0x0020_do, which is inconvenient. Instead, you can set DisplayName to Things to do and set Name to Tasks or ThingsToDo. That way, you maintain the best of both worlds: you get a descriptive title and a convenient internal name for use in code.
![]() Tip If you create a column with spaces in the name using the web interface, SharePoint autogenerates the name with the
Tip If you create a column with spaces in the name using the web interface, SharePoint autogenerates the name with the 0x0020 notation for spaces. To avoid this, create the column using the name you want to use internally, and then rename the column to the descriptive name you want the user to see. Only the DisplayName will be changed when you modify a column's name in the web interface. This also applies to other special characters that cannot be used by SharePoint internally. My first name, BjØrn, would be translated to Bj_x00f8_rn if I were to use that as a column name.
Here's a quick explanation of the other name attributes. The ColName attribute is used to specify the name that should be used when storing the column in the SharePoint database. A related and similarly seldom used attribute is JoinColName, which is used in place of ColName when doing SQL joins. XName is used only internally and is related to handling changes in XML forms.
You will never use any of these three attributes yourself; they are related to how Share-Point stores your columns in the database, but you should know what they do.
StaticName is a bit bewildering. The documentation states that you can use this attribute to get or set the internal name of a field. Knowing that there is no way we can change the internal name of a column after it has been provisioned, this may seem a bit strange.
The confusing bit here is that StaticName is a semihidden attribute that defaults on get requests to the internal name of a field, which is the Name attribute we must set. However, you can change the StaticName attribute to another value, and in that case, that value is returned instead of the Name value of the column. See Table 9-1.
Table 9-1. StaticName vs. Name Return Values
StaticName |
Name |
SPField.StaticName Returns... |
| [Nothing] | MyField |
MyField |
MyStaticName |
MyField |
MyStaticName |
Most developers (and Microsoft in its default out-of-the-box site columns) just set StaticName to the same value as Name.
Next, the Type attribute defines the field type used to store and optionally display the data stored in the column. There are several built-in types, such as text, integer, computed, date/time, yes/no, and choice, and you can create your own types as well. We will explore this a bit later in Chapter 11. (A bit in that sentence is the same bit as “there is a bit of water in the sea.”) The Group attribute of the Field element serves the same function as the Group attribute in content types in that it is used to group columns in some fashion. The string is completely arbitrary, and you can write whatever value you want. SharePoint will create a new group if no matching groups exist and remove the group if no columns belong to a group anymore.
The grouping serves no technical purpose other than helping you arrange columns in a logical group structure. There are no parent-child groups either. The grouping is most frequently seen on the Site Column Gallery page, as shown in Figure 9-2.
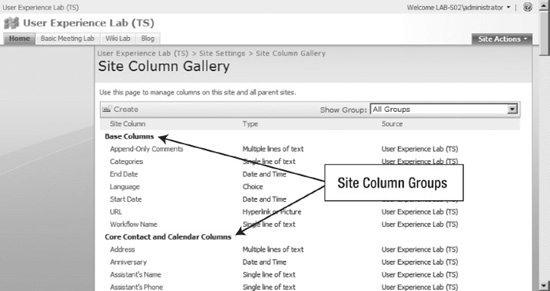
Figure 9-2. Site column groups
The ReadOnly and Sealed attributes work in the same way as with content types. The ReadOnly attribute can be turned off in the interface, while Sealed requires direct object model access from a site collection administrator. See the descriptions for the ReadOnly and Sealed attributes in Chapter 8 for more information.
One more thing requires our attention, and that's the SourceID attribute. This attribute serves two purposes that may be a bit tough to understand right away. First, the SourceID attribute defines the namespace in which the column resides, most often http://schemas.microsoft.com/sharepoint/v3.
Second, the SourceID may hold the GUID of the list in which a list column is defined. When you add a column to a list, the only thing that ties that column to that specific list is that the default namespace is replaced by the GUID of the list in the SourceID property.
So, if you want a site column, leave the SourceID attribute blank, or add http://schemas.microsoft.com/sharepoint/v3namespace, and if you want a list column, add the GUID of the list in which you want to column to appear.
That may not puzzle you now, but consider this question: how would you know the GUID of a list at design time? You can't, since the GUID is autogenerated when the list is created and you have no way of controlling that GUID.
![]() Note This is the same chicken-and-egg problem you face when you want to create lookup columns through a feature: you need to know in advance the GUID of a site or list that doesn't exist yet. We will solve the lookup problem in Chapter 12, though.
Note This is the same chicken-and-egg problem you face when you want to create lookup columns through a feature: you need to know in advance the GUID of a site or list that doesn't exist yet. We will solve the lookup problem in Chapter 12, though.
So, what use can this attribute have for us at design time? I can think of a scenario in which you want to add a specific field to an existing list. However, creating a feature for such a list column would incur massive overhead compared to simply adding the field through the web user interface. In fact, since fields in features require site collection scope, you will never be creating a list column through a feature.
There is one situation where you might want to use this attribute, though, and that is when you are iterating through fields in a custom management or display page. Knowing that the SourceID is what makes a column into a list column may thus be important to you.
![]() Note At this point, you might be thinking that you can manipulate the
Note At this point, you might be thinking that you can manipulate the SourceID through code when you create a list column through code in the object model. The SourceID is set for you, however, so consider this a read-only value that is handled for you.
The remaining attributes in the ContentType site column are not relevant at all to the user experience.
Title
The next site column I want you to see is the Title site column. This is perhaps the most used publicly editable column there is. The Title site column is defined in fieldswss.xml at around line 452:
<Field ID="{fa564e0f-0c70-4ab9-b863-0177e6ddd247}"

    Name="Title"

    SourceID="http://schemas.microsoft.com/sharepoint/v3"

    StaticName="Title"

    Group="_Hidden"

    Type="Text"

    DisplayName="$Resources:core,Title;"

    Required="TRUE"

    FromBaseType="TRUE"<

</Field>
The Title site column is added to every item everywhere by being added to the Item content type in ctypeswss.xml:
<ContentType ID="0x01"

Name="$Resources:Item"

Group="$Resources:List_Content_Types"

Description="$Resources:ItemCTDesc"

Version="0">

  <FieldRefs>

   <FieldRef ID="{fa564e0f-0c70-4ab9-b863-0177e6ddd247}" Name="Title"

Required="TRUE" ShowInNewForm="TRUE" ShowInEditForm="TRUE"/< <!-- Title -->

   </FieldRefs>l

   <XmlDocuments>

(XMLDocuments omitted to save space)

   </XmlDocuments>

</ContentType>
Now that we have investigated the ContentType attributes, most of the attributes here will be simple to understand. Still, a few new attributes require our scrutiny.
The FromBaseType attribute, besides its obvious use of telling us that this column derives from a base type, has one important function. When you set FromBaseType, you also prevent the column type from changing.
Now, BaseType here refers to the columns defined in the list templates in the global site definition. As you may recall from Chapter 4, the global site definition contains a set of base list types, which in turn contains several fields or columns. This is where the Title column and any other column with FromBaseType have their roots.
In the Title case, all the attributes of the base type Title field are overridden, so there is actually nothing left of the root Title column. This was a far more useful technique in WSS 2 where content types did not exist.
More relevant for us, however, is the second effect of FromBaseType. You may have noticed that some columns allow you to slightly modify the type of column, for instance from text to multiline text or from number to text, and so on. If you set FromBaseType to true, it becomes impossible to change the column type. Take a look at Figure 9-3.
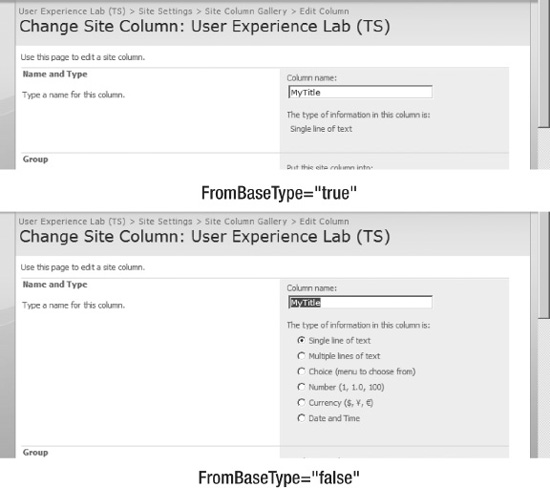
Figure 9-3. Effect of FromBaseType
Finally, notice the reference to the Title site column in the Item content type. This reference includes ShowInNewForm="TRUE" and ShowInEditForm="TRUE". We touched briefly on this in Chapter 8 when you learned how the Document content type modified the behavior of the Title column in list forms.
The ShowInXXXX attributes control when a column is displayed in various list form pages. The “sister” attributes are ShowInDisplayForm, ShowInEditForm, ShowInListSettings, ShowInNewForm, ShowInVersionHistory, and ShowInViewForms. Note that the attributes are relevant only when you use the default methods of creating list forms. If you create your own custom list forms or you use other data input, edit, or display methods such as a Windows application or a custom RSS feed, you must make sure you honor or disregard these settings yourself.
Picking Up the Pace
So far, we have seen simple examples of how columns are defined using a feature. None of these examples should pose much of a challenge, except perhaps by the amount of possible attributes to the Field element.
Now it is time to pick up the pace, because we have only scratched the surface of what fields can do. Remember that cave of monsters called views? Well, we are going back, at least to some extent, to the view schema that we explored in views. This time, we should be much more prepared for what lies ahead.
LinkTitle
The next column I want to show you is a much more complex example—a computed column named LinkTitle. This column is responsible for creating the contents of the EditControlBlock drop-down menu when you hover over the title of an item.
![]() Note That's actually only part of the truth, because the functionality and at least some of the content in the ECB is created using JavaScript. But that's another show….
Note That's actually only part of the truth, because the functionality and at least some of the content in the ECB is created using JavaScript. But that's another show….
In my fieldswss.xml file, it is located at line 535. Search the file for Name="LinkTitle", and you should find it. Figure 9-4 shows the field CAML code.
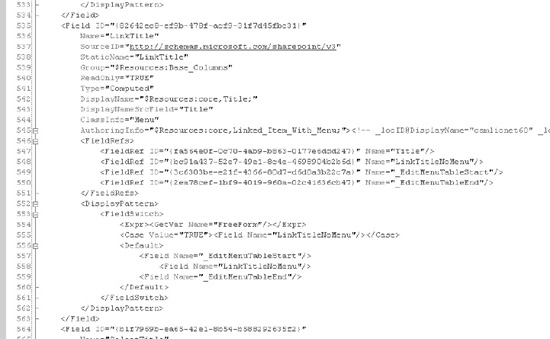
Figure 9-4. LinkTitle field
The first thing you should notice is that there are two child elements to the Field element, FieldRefs (lines 546–551) and DisplayPattern (lines 552–562). FieldRefs references other columns, including the Title column that we explored earlier. These referenced columns are used when rendering the LinkTitle column.
The rendering is done in the DisplayPattern element. You may recognize the look and feel of the code here; it is the same schema as we used in views. Thus, we should have the proper weapons to understand what's happening. Let's take a look.
The DisplayPattern element contains a FieldSwitch (553), which you may remember is the same thing as a Switch, except it is evaluated only once per view. The column here checks whether we are in FreeForm mode (554), meaning we are not in a list view, and if we are, it renders the output of one of the referenced columns, called LinkTitleNoMenu (555). If we are not in FreeForm mode, we should also render two more columns, _EditMenuTableStart and _EditMenuTableEnd, in addition to the LinkTitleNoMenu (lines 556–560).
So, where are these three columns defined? A quick search in fieldswss.xml for Name="_EditMenuTableStart" reveals the answer; they're around line 1001, in the form of a massively complex Field element. It has no less than 16 references to other columns and a DisplayPattern—that would scare even the bravest of developers.
Don't let the complexity overwhelm you. On closer inspection, you will find that most of the FieldRef references are just references to simple elements, and the display pattern is just used to output some extraordinarily ugly HTML in a fairly simple HTML table:
<table height="100%" cellspacing=0 class="ms-unselectedtitle"

onmouseover="OnItem(this)" CTXName="ctx1" Id="1"

Url="/Shared%20Documents/MyDocument.docx" DRef="Shared Documents"

Perm="0x7fffffffffffffff" Type="" Ext="docx"

Icon="icdocx.gif|Microsoft Office Word|SharePoint.OpenDocuments"

OType="0" COUId="" SRed="" COut="0" HCD="" CSrc="" MS="0" CType="Document"

CId="0x0101008AD77C1A367C63479F46C59787295E88" UIS="512" SUrl="">
Now you know where those people who say SharePoint renders noncompliant HTML get their arguments. Most of the attributes here have nothing to do with HTML and will likely make any HTML validator explode. Twice.
Still, there's no need to worry, because we can change this if we like, but for now we should move on.
If we continue to look at the LinkTitleNoMenu column referenced in our original LinkTitle column, starting at around line 502 in my file, we find a much more agreeable sight: two referenced columns and a rather understandable DisplayPattern.
Here's the whole DisplayPattern. Note that I have removed some comments for formatting purposes.
<DisplayPattern>

 <IfEqual<

  <Expr1><LookupColumn Name="FSObjType"/></Expr1>

  <Expr2>1</Expr2>

  <Then><Field Name="LinkFilenameNoMenu"/></Then<

  <Else>

   <HTML><![CDATA[<a onfocus="OnLink(this)" href="]]<>/HTML<>URL/>

   <HTML><![CDATA[" ONCLICK="GoToLink(this);return false;" target="_self">]]>


   </HTML>

   <Column HTMLEncode='TRUE' Name="Title" Default='$Resources:core,NoTitle;'>

   </Column>

   <HTML><![CDATA[</a>]]></HTML>

   <IfNew>

    <HTML><![CDATA[<IMG
SRC="/_layouts/[%=System.Threading.Thread.CurrentThread.CurrentUICulture.LCID%]

/images/new.gif" alt="]]></HTML>

    <HTML>$Resources:core,new_gif_alttext</HTML><HTML><![CDATA["<]]></HTML>

   </IfNew>

  </Else>

 </IfEqual>

</DisplayPattern>
The DisplayPattern uses an IfEqual element that basically checks whether the item is a document and, if so, links to the document file instead of the display form of the item. The link to the display form is rendered using the URL CAML element we used in Chapter 7.
And, to wrap the whole LinkTitle column up, look at the _EditMenuTableEnd column, which is really simple and just finishes up the table that started in _EditMenuTableStart:
<DisplayPattern>

 <HTML><![CDATA[</td><td><img src="/_layouts/images/blank.gif" width=13

 style="visibility: hidden" alt=""></td></tr></table>]]></HTML>

</DisplayPattern>
Columns in List Templates
Columns in list templates are defined in the schema.xml file of a list template feature. There is a Fields element, which you saw briefly during our exploration into lists.
It is time for some good news. Columns in list templates are exactly the same as columns in features, like we have just explored. Really, there is nothing more to learn about columns. Well, that's not exactly true; even with our fairly comprehensive investigation, we have still seen only a fraction of the columns available and what they can do.
However, columns behave the same in features as they do in list templates. The only difference is scope. List template columns are available to a list only, while feature columns are site scoped and available to all sites and subsites from where we deploy the feature.
![]() If you want to use your column with a content type, you must deploy it as a site column using features.
If you want to use your column with a content type, you must deploy it as a site column using features.
Columns in Content Types
As we saw in Chapter 8, you can only use site columns in content types. Also, remember that you do not define columns in content types; you can reference only existing site columns.
Phew, that was quite a ride just to do something as simple as creating a link on an item title. Still, understanding how these columns are built is important for understanding how the complete user experience is built.
When we start creating our own columns in Part 3 of the book, we will use much simpler code, so rest assured that the worst is behind us. Our final stretch in exploring the SharePoint user experience is just ahead: field types.
Field Types
With your newly found knowledge of columns, you can probably see a lot of potential power here. You can use different columns to store basic data and then use a computed column to create vastly complex renderings of that data.
Still, with all that power, there is still one thing you need to learn in order to truly understand the power of SharePoint customization: the field type.
The field type can be considered the atom of a SharePoint solution. It is the smallest piece of storage we can use. When harnessed, we get access to immense power, and although there are smaller pieces still, those smaller pieces belong to a completely different system and are rarely available to us.
Oh, enough of the analogies. I know you are eager to complete our journey. Be patient, and you will be rewarded.
![]() Caution If you open a list with columns based on custom field types in the Datasheet view, the custom field type–based columns will not appear. The same applies for the built-in Excel export. But of course, we can create our own custom views now, and exporting data to an Excel worksheet is not really that difficult.
Caution If you open a list with columns based on custom field types in the Datasheet view, the custom field type–based columns will not appear. The same applies for the built-in Excel export. But of course, we can create our own custom views now, and exporting data to an Excel worksheet is not really that difficult.
Before we start, I would like to get a few basics down first. Field types are the type associated with a certain column, such as text, choice, date/time, or integer. These types define the storage and optionally the rendering of data.
In the object model, all field types eventually inherit from the SPField class, usually through one of its descendant classes such as SPFieldText and SPFieldChoice. In addition to providing storage, a field type also optionally allows you to define how to render a column based on the field type you develop.
![]() Note We will revisit these field types and look at all the default types in Chapter 11. If you are impatient, Table 11-1 lists all the possible values.
Note We will revisit these field types and look at all the default types in Chapter 11. If you are impatient, Table 11-1 lists all the possible values.
The really powerful thing here is that you can create these field types yourself to create your very specific custom type of data, including the visual appearance, storage, validation, and other behavior. In short, the custom development of field types is exceptionally powerful as a customization technique. We will try this in Chapter 11.
To create a custom field type, you need to do two things, and you should do a few more. The absolute requirements are to have a field type definition, which is CAML, and to have a field type class, which is .NET code.
Now, if there are still some nonprogrammers reading the book at this point, you might feel a bit relieved to know that although a field type class is definitely required, several default classes exist in SharePoint, and you can use them for your custom field type.
Field Types in CAML
To start (and since we are already in CAML land), we should look at the field type definition first. These definitions handle the process of telling SharePoint how our field type should be treated.
The field type definitions are stored in [12]TEMPLATEXML and are called fldtypesXXXXX.xml, where XXXXX is anything you like. This works like the webtempXXXXX.xml files—you need to make sure your file name is unique, starts with fldtypes, and ends in .xml. Oh, and remember that when you add or edit .xml files, you need to do an IISReset to have the changes picked up by SharePoint.
The default or out-of-the-box field types are stored in a file called fldtypes.xml. Open that file now, and let's take a look at the text field type. It should be the second FieldType element.
![]() Note The requirements for a custom field type are different from the requirements for a built-in field type. As such, you will see different elements when exploring the out-of-the-box field types than when you create your own field types.
Note The requirements for a custom field type are different from the requirements for a built-in field type. As such, you will see different elements when exploring the out-of-the-box field types than when you create your own field types.
The first thing you may notice is that there are only two types of child elements, the Field and RenderPattern elements. There is one additional child element called PropertySchema that is not present in any of the default field types.
Although the number of child elements may seem simple, the complexity is hidden in the different use of these two elements. It's hardly a perfect XML implementation, but it's what we get.
Field
The Field elements are the most interesting to us at this point, because they define most of the field type properties required to get a field up and running. Each Field element has a Name attribute that defines which property to set, and the value of the Field element defines what value to set to a given property. Here are the Field elements for the Text field type:
<Field Name="TypeName">Text</Field>

<Field Name="TypeDisplayName">$Resources:core,fldtype_text;</Field>

<Field Name="InternalType">Text</Field>

<Field Name="FieldTypeClass">Microsoft.SharePoint.SPFieldText</Field>

<Field Name="SQLType">nvarchar</Field>

<Field Name="FieldTypeClass">Microsoft.SharePoint.SPFieldText</Field>

<Field Name="ParentType"></Field>

<Field Name="Sortable">TRUE</Field>

<Field Name="Filterable">TRUE</Field>
The TypeName property is required and defines a name used when referencing the field type in code. This is not the displayed name of the field type but rather what you would use in the Type attribute of the Field element when creating columns. See Figure 9-5 for an illustration of how these values map.
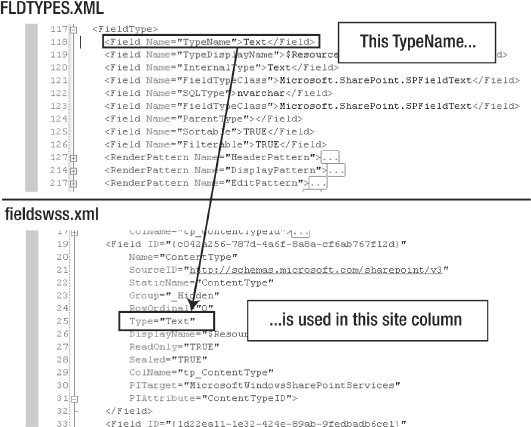
Figure 9-5. TypeName Text used in site column
![]() Note At this point, you might realize that both columns and field type definitions use the element
Note At this point, you might realize that both columns and field type definitions use the element Field. That's OK; it had me confused for a while too.
Although the TypeName is used only in code, the TypeDisplayName is what you would see when you add a new column. And where the TypeName has strict rules for what is allowed, the TypeDisplayName allows more freedom. Just don't confuse them, and you should be OK.
The InternalType property is used only for the out-of-the-box types and refers to the internal base type of a column. When developing your own custom field type, you should never set this value.
The FieldTypeClass, however, is much more important. When creating your own custom field type, you would add your five-part strong-named field type class here. Yes, it's five-part, because you need to add the class name before your normal four-part strong name. So, if your assembly is MyCustomField and your field type class is called MyCustomFieldClass, your FieldTypeClass might look like this:
<Field Name="FieldTypeClass">MyCustomField.MyCustomFieldType, MyCustomField,

Version=1.0.0.0, Culture=neutral, PublicKeyToken=d9d34608fcd1f7a8</Field>
![]() Note Yes, in the built-in
Note Yes, in the built-in Text field type, the FieldTypeClass is added twice. There is no need for that. Microsoft is obviously capable of mistakes too.
The SQLType property is used to define what data type should be used when storing information in SQL Server. You do not need to set this in your custom field type, and, in fact, you should not do so.
The ParentType is used when you inherit from an existing field type, which is always the case when creating your own field types. The base field types, however, do not inherit, and thus this value is empty for the Text field type. It's mandatory in your custom field type; otherwise, it's optional.
The two final values set in the Text field type, Sortable and Filterable, are Boolean values that define whether the columns based on the field type can be sorted and filtered, respectively. You might not want to filter on an image, for instance.
This is only partially true, however. Columns are sortable or filterable only if they are placed in a view that takes sorting and filtering into account. As we saw when creating our own view, if our view does not support sorting, no amount of property setting will make our view sortable.
These Field elements are used in the Text field type, but there are other Field elements we should at least give a cursory glance while we are here. I will just explain these here; they are used in multiple field types throughout.
You may think that the Field elements were too easy, and you are right thinking that. There are many more fields we can use to set properties for a field. I'll cover some of these when we start building our own fields in Part 3, so I will postpone any further mention here.
And I have another surprise in store for you. The documentation for the Field name values is quite good. That's right—I just commended the documentation. No, I am not completely crazy, and the sky isn't going to fall down tomorrow; the documentation on custom field types and especially the Field element states clearly and with good explanations what the different Name attribute values mean.
I highly recommend taking the time to look through the documentation.
RenderPattern
The RenderPattern elements define how the field should appear. Now, before you go ahead and mention that this could be handled with a custom field type control (which is correct and also a bit premature since we haven't covered that yet), check out the “I'll Handle My Rendering in Code, Thanks” sidebar.
Regardless of where you put your rendering logic for displaying or editing a field, there is still some rendering logic that should be placed in a RenderPattern. For example, the header pattern that is responsible for rendering the column header in a list view should be added in CAML.
As with Field, there is no real strongly typed schema for RenderPattern elements, and the single attribute Name controls the usage of the value. The RenderPattern has seven possible values for Name, all referring to a different rendering pattern:
HeaderPattern: Used to render the column header in list viewsDisplayPattern: Used to display the column, either in list views or in display formsEditPattern: Used to render the column for editing an existing itemNewPattern: Used to render the column when adding a new itemPreviewDisplayPattern: Used to preview the display of the column in visual editors such as SharePoint Designer 2007PreviewEditPattern: Used to preview the editing of a column in visual editors such as SharePoint Designer 2007PreviewNewPattern: Used to preview the adding of a column in visual editors such as SharePoint Designer 2007
The RenderPattern contains CAML based on the view schema. Now, if you had not fought the dragon in the cave, you might go “Oh no” just about now, but since we are now enlightened developers, running through the rendering patterns used in the Text field type should be a walk in the park. If you felt like skipping the cave, well, it should still be a walk in the park, but the park will be littered with broken glass and you will be barefooted.
![]() Note See how that dragon keeps coming back? See how important it was to fight our way through to the end of the cave? You can thank me by email to
Note See how that dragon keeps coming back? See how important it was to fight our way through to the end of the cave? You can thank me by email to [email protected].
First, let's take a look at the DisplayPattern, because it is so incredibly simple:
<RenderPattern Name="DisplayPattern">

  <Column HTMLEncode="TRUE" AutoHyperLink="TRUE" AutoNewLine="TRUE"/>

<code></RenderPattern>
This just adds the column value to the output and does some automatic linking magic if the text resembles something that you would normally click, such as a URL or an email address. Also, if present, newlines will be replaced with <br>, and multiple space characters will be replaced with . The latter is facilitated by setting AutoNewLine to TRUE, by the way. We'll also want any HTML code to be translated into HTML entities, meaning, for example, that < is replaced with < to avoid our browser going completely bonkers. This is handled by setting HTMLEncode to TRUE.
OK, that was too easy. No broken glass for the cave-skippers yet. Time to break out the heavy artillery. Open the HeaderPattern.
At first, the HeaderPattern may seem incredibly complex, but once you apply a bit of selective reading and closing of tags, you can see that it is actually fairly simple. The header checks to see whether the column is sortable and filterable and outputs various content depending on these conditions.
One small and curious thing you may learn from reading the header code for the Text field is that it does a switch if a variable called Filter is set to 1:
<Switch>

  <Expr>

    <GetVar Name='Filter'/>

  </Expr>

  <Case Value='1'>

[...]
The variable in question here is set from the query string, but there are no links to the view with Filter=1 as the parameter. If we add that manually, however, we do get something new, except it is really old—filtering in SharePoint 2003 style. See Figure 9-6.
Figure 9-6. Ever seen this before? Old-style filtering from back in the day
You may at this point be a bit confused. Back when we fought dragons, you learned that the header was actually produced using an element called ViewHeader. Why would we have an extra pattern for the fields? You may recall that when we added the column to the ViewHeader, I said to remember Slartibartfast. Now is the time.
When we add the Field to the ViewHeader, we got a whole lot of additional code instead of just the title of the column. When we looked at sorting, we circumvented this by grabbing a Property rather than using the Field, and I promised we would look into what actually went on.
When you add a column to a ViewHeader using the Field element, what is actually added is whatever is defined in the HeaderPattern of the field type. If you go through the code generated when adding the Field element to a ViewHeader and compare that to the HeaderPattern of the field type, you will see exactly how this code is generated.
The remaining DisplayPattern elements follow the same pattern, pun intended, as the HeaderPattern and DisplayPattern, so I will leave it to you to read the rest of the code as an exercise.
We Made It!
Finally, we are here! We have dug through the SharePoint architecture from top to bottom, learning tons of material along the way. Well, at least I did—your mileage may vary.
Now that you have seen how all the various bits and pieces of SharePoint tick, you should take a break and rest a bit before moving on. As such, I have written a short chapter on the mentality of a SharePoint developer that I hope you will enjoy.
We are far from done, however. Now that we have journeyed through SharePoint land and explored, it is now time to begin touching. In the next part of this book, we will begin building and thus get more experience by trying what we have learned in this part.
You have done well! You have my sincerest congratulations for coming a long way.