
P A R T 2
![]()
Dissecting the Default User Experience
C H A P T E R 4
![]()
Excavating the Site
Overview of the Default SharePoint Interface from a Technical Point of View
As our journey to the center of the user experience begins, you'll get an overview of the area we are about to explore. The odd bit here is that we actually create the land to explore ourselves. We do that on a very high level at first, so in order to understand what actually happens during the process, you need to pay attention.
In this chapter, we will start exploring the different aspects of that site and see how and where these elements are defined.
So, without further ado, let's get started.
The Plan for Exploration
The story begins with a little boy named Frank, who wanted nothing more than a new bike for Christmas. Why he wanted a bike in the middle of the winter is beyond me, but Frank dreamed of nothing but riding his new bike down the snowy streets of his hometown.
Oh, sorry, wrong story. Never mind, here's the right one: Figure 4-1 shows you the sights of your journey.
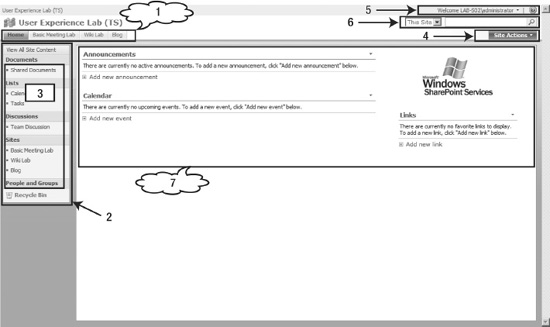
Figure 4-1. The default Team Site front page
Of course, no screenshot with annotations is complete without some descriptive text. Figure 4-1 shows the front page of a Team Site, and each of the numbered elements represents a different part of the user interface that you will explore during the course of this book. They are as follows:
- The top navigation bar
- The QuickLaunch menu
- The lists
- The Site Actions menu
- The personal actions menu
- The search area delegate control
- The content area
The front page is just a single page in the SharePoint site. Other pages, while utilizing many of the visual elements shown here, contain other unique elements. Each page is there- fore a separate “map,” and I could spend days going over each map and pointing to certain visual elements. I won't do that. Instead, you should try to understand the root elements that constitute a site as we go through the chapter. This will give you a far better chance at understanding the architecture of a site rather than just memorizing the positions of elements. In turn, this means you will be better equipped to create a new site or even just modify an existing site.
If you find yourself unsure of where a certain section of this chapter is leading, just bear with me for a few pages. Chances are that all will become crystal clear very soon.
Mission Objective
Our current mission is easily defined. We are going to look at different aspects of the default sites and investigate where and how the different elements of that site are defined. Although simple enough in theory, as you shall soon see, this task may not be as simple as this descrip- tion may indicate.
A site consists of several pieces. There are site definitions, lists, content types, fields, forms, custom application pages, style sheets, images, and templates. And that's not even an exhaustive list. What you see on the front page in Figure 4-1 is just a subset of these elements. What you see when you open a new item form is also a subset of elements. In this part of the book, you'll learn what these elements are, how you can find their definitions, and how you can create your own elements to tailor your own customized user experience.
To understand these elements, you need to learn the basics of SharePoint site definitions, lists, master pages, content types, and fields. Here is a short description of each of these elements:
- A site definition consists of several files and depends on even more files. At the very least, a site definition will have a
webtemp.xmlXML file and anonet.xmlXML file. In a site definition you will find the content of a new site. Think of it as an index to what a site should contain. - Lists make up the primary storage facility of SharePoint and arguably are the most important aspect of SharePoint. At its core, a list is no more than a database table on steroids, but it can be as complex as the cure for cancer. Lists contain columns but can also contain other elements to customize the user experience, such as content types and custom list forms to create or maintain data in a list.
- Master pages in SharePoint are very much like master pages in ASP.NET, with a few noted exceptions that I will cover later in this chapter. I will assume that you know what a master page does, so besides exploring some of the contents of the default master pages, I will not spend a lot of time on this topic.
- If lists are the most important concept of SharePoint, content types are by far the coolest. Basically, a content type is just that, a type of content, such as an article, an item, a document, or just about anything else. Content types encapsulate data, behavior, and visual appearance, and they can have a massive impact on the user experience. I will cover content types in much greater detail in Chapter 8.
- A field is the atomic storage unit of SharePoint. Actually, a field is just the template of a column that does the storage. Fields make it possible to customize the user input and visual representation of information, and I will spend quite a lot of time on this in Chapter 9.
Now that you know where you are going, you can pack up your camp, wave goodbye to your loved ones, and start your trip. My name is Bj⊘rn Furuknap, and I will be your guide on this ride. Please keep your hands inside the vehicle at all times, do not feed the wild animals, and remain seated until the book has come to a full and complete stop.
Exploring Site Definitions
So far, this chapter has been fairly straightforward, but now it is time to get serious.
As you have probably figured by now, this book is not about giving you recipes for a quick fix of SharePoint customization. This book does not trust the official documentation. You are not here to read yet another explanation of how to provision a file, although I will cover that later.
You are here to dig—to find the real truth of how SharePoint works. You want to see solid proof; you want to expose every flaw or implementation mistake. It is time to take your understanding of the SharePoint user experience to the extreme.
The [12] Hive TEMPLATE Folder
Most of what defines the user experience resides in the TEMPLATE folder of the [12] hive (see Figure 4-2). Within that folder lies a wealth of customization options, but there are also lethal traps, so you need to know where to step.
![]() Tip The
Tip The 12 hive, usually located at C:Program FilesCommon FilesMicrosoft Shared web server extensions12, is referred to as [12] in this book.

Figure 4-2. The [12]TEMPLATE folder
You may notice that the folders in Figure 4-2 include a folder named 1044, which may not be present in your [12]TEMPLATE. That 1044 folder contains site template information for a language pack, which in this case is the Norwegian language pack. The number 1044 is the locale identifier (LCID). 1033 is the LCID of English, and you may have other folders that represent the LCID of the language packs you have installed.
More to the point, the LCID-related folders contain three subfolders out of the box, called STS, Workflow, and XML. For now, you want to go into the XML folder to find the starting point of your site exploration, the webtemp.xml file.
![]() Note The
Note The STS folder and the Workflow folder contain templates for documents and some workflow definitions, including the actions for editors such as SharePoint Designer. I will not cover these subfolders in this book.
webtemp.xml
The webtemp.xml file, located in the [12]TEMPLATE[1033]XML directory, is the default site template file that ships with WSS. When you develop your own site later in this book, you will create your own webtemp.xml file, and if you install third-party site definitions, these will typically also create their own webtemp.xml files. These extra webtemp.xml files will be named webtempXXXXX.xml, where XXXXX is anything you like. SharePoint searches for anything begin- ning with webtemp and ending in .xml to find web templates.
![]() Caution If you care about getting support from Microsoft, do not modify the
Caution If you care about getting support from Microsoft, do not modify the webtemp.xml template that comes with SharePoint. The only thing you are allowed to change is the Hidden attribute of Configuration elements. If you don't care about supportability, go bananas, and do what you want.
Just one more thing…
![]() Caution The previous caution applies to all files that ship with SharePoint. With the noted exception of the
Caution The previous caution applies to all files that ship with SharePoint. With the noted exception of the Hidden attribute, Microsoft will refuse to help you if you modify any included file in any fashion.
…and I nearly forgot:
![]() Caution Oh, who am I kidding? You are a developer; you thrive on breaking things to find out how they work. Just don't tell anyone what you do on your unsupported lab environment, and you can go bananas and modify anything you like. Seriously, though, there is a very good reason why you do not want to mess up the files that ship with SharePoint in a production environment. At any time, as part of a product upgrade, patch, or service pack, Microsoft may choose to overwrite any file that ships with SharePoint. If you have made modifications to those files, you'll lose your changes.
Caution Oh, who am I kidding? You are a developer; you thrive on breaking things to find out how they work. Just don't tell anyone what you do on your unsupported lab environment, and you can go bananas and modify anything you like. Seriously, though, there is a very good reason why you do not want to mess up the files that ship with SharePoint in a production environment. At any time, as part of a product upgrade, patch, or service pack, Microsoft may choose to overwrite any file that ships with SharePoint. If you have made modifications to those files, you'll lose your changes.
Open the default webtemp.xml file in your XML editor now. Depending on your LCID, you should see something along the lines of Figure 4-3.
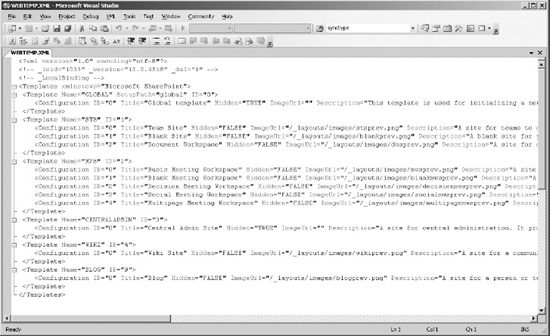
Figure 4-3. Default webtemp.xml
As you can see, webtemp.xml contains only Template elements that in turn contain Configuration elements. Each of these configurations is a site definition. When you used the Team Site, Basic Meeting Workspace, Wiki, and Blog site definitions in earlier chapters, SharePoint found these site definitions in this file.
There is some confusion about terminology when it comes to site templates and site definitions. Basically, a site template is made by selecting the Save Site As Template option of the Site Settings page and is thus based on an existing and customized site. A site definition, by contrast, is the original definition of a site. If you compare the two to programming, think of a site definition as the class and the site template as the object, in other words, an instance of the class.
To make this even more confusing, the Template element of a webtemp.xml file has nothing to do with site templates but is rather a site type, for instance, a team site (STS), a meeting site (MPS), or any number of custom types. The types do not follow any particular pattern, so you can create your own types by just setting the name of one of the Template elements. Yes, this is confusing.
When you want to reference a specific template (for example, if you want to programmat- ically create a new site), you need to use both the template name and the configuration ID and separate them with a number sign (#). The full reference for a Basic Meeting Workspace is MPS#0, which is the parameter you need to pass to a method in code:
SPWeb newWeb = web.Webs.Add("NewMeetingSite",

 "My Basic Meeting Workspace", "My description", 1033, "MPS#0", false, false);
You can hide a specific configuration by setting the Hidden attribute to True. This means the configuration will not appear in the default web interface. You can still create sites based on the configuration by using code or when you create your own site creation web interface. For example, you might want to do this when you want only certain site definitions to be available to users when they are creating new sites.
Setting the Hidden attribute is also the only modification that Microsoft allows without breaking supportability. If you intend to modify the file, at least make a backup and name it something other than webtempXXXXX.xml so that if you need support from Microsoft, you can restore the original file quickly.
Besides Hidden, the other attributes of the Configuration elements in the default webtemp.xml file, the Title, ImageUrl, and Description, should be rather self-explanatory, but several attributes of the Configuration elements are both useful and powerful. One of them, DisplayCategory, is used in the default webtemp.xml file configurations.
If you look toward the end of each Configuration element in Figure 4-3, you will see the DisplayCategory attribute. This attribute determines under which tab of the “Select a template” tabs the site definition should appear (see Figure 4-4).
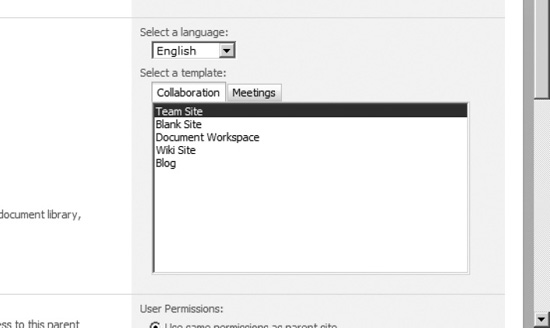
Figure 4-4. Creating a new SharePoint site page
The DisplayCategory values are arbitrary names that you can either create or modify by just changing the value. If you change the value, the site template will move to the new tab, and if the new tab does not exist, then SharePoint will create it for you.
![]() Note If you use the Save Site As Template option of the Site Settings page to create a site template, SharePoint puts your saved template under the Custom tab.
Note If you use the Save Site As Template option of the Site Settings page to create a site template, SharePoint puts your saved template under the Custom tab.
Some attributes of the Configuration elements are not used in any WSS site definitions; they're used in some MOSS definitions, so if you have access to a MOSS site, you can see the attributes in action there. I do want to point out the general usage of these attributes here and provide a few sample scenarios.
ProvisionAssembly, ProvisionClass, and ProvisionData
If you have ever created a MOSS collaboration portal, you may have been puzzled that this actually results in multiple sites created from a single site definition. If you are as adventurous as me, you may even have dug into the webtempsps.xml file to see what happens. What you would have found is that the SPSPORTAL type (template, which isn't a template) and its child Configuration element sets ProvisionAssembly, ProvisionClass, and ProvisionData.
So, what do these attributes do? The short answer is that they create your site. The longer answer is that rather than going to an onet.xml file, which I will cover shortly, to find configuration information from the site, setting ProvisionAssembly and ProvisionClass will cause SharePoint to run that class from that assembly for the provisioning of your site. ProvisionData is just an additional and optional value that you can use to store data for the provisioning.
The cool thing is that you actually get to run code to create your site—or sites, as Microsoft does with its collaboration portal and other site definitions of MOSS.
VisibilityFeatureDependency
This option, again not used in any WSS definitions but used in several MOSS definitions, enables you to display a site definition in the new SharePoint site page only if a certain feature is installed or activated. This means that you can prevent users from creating new sites that depend on a certain feature being installed until that feature is actually available. Now that we have reviewed the webtemp.xml configurations, a few questions should pop into your mind. The configuration section of the default webtemp.xml file is rather minimal, so where is the rest of the configuration? Where are all the lists, the views, the features, and the content?
The answer to that question lies in the SiteTemplates folder of [12]TEMPLATE. In that folder are subfolders that match the template names in webtemp.xml, such as STS, MPS, Blog, and Wiki. These folders hold the actual content of the site definition, so your next step will be to go there.
onet.xml
Open the STS folder under [12]TEMPLATESiteTemplates. You should see two files and an XML folder. Open the XML folder and then the onet.xml file. In Figure 4-5, I have closed the second- level elements to give you a better overview of the onet.xml file.
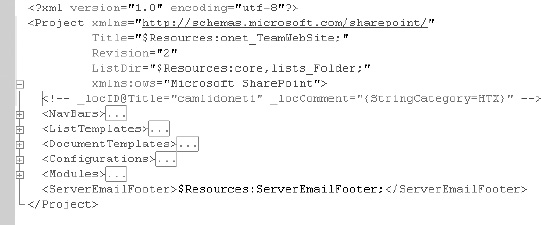
Figure 4-5. onet.xml
![]() Tip Closing the second-level elements makes the file look a lot less scary.
Tip Closing the second-level elements makes the file look a lot less scary.
Now you are getting somewhere. The onet.xml file holds a lot more information about your configurations, although not everything. You need to explore this file in greater detail on your path toward SharePoint enlightenment.
First, however, you need to know how SharePoint finds this file. The rule is that if you create a Template element in a webtemp.xml file, you need to have a folder in the [12]TEMPLATESiteTemplates folder that matches the Name attribute of the Template element, and that folder should contain an XML folder, which in turn should contain an onet.xml file. If you create a Template element called MyDefinition, for example, you need to create a file called [12]TEMPLATESiteTemplatesMyDefinitionXMLonet.xml. Your onet.xml file should contain the main content of your site definition.
![]() Tip I will cover site definitions more in Part 3, but in short, my recommendation is that you should add functionality as features rather than building a site definition so large it will require its own ZIP code. Site definitions can seem like a great idea in the beginning but are tricky and can be very cumbersome.
Tip I will cover site definitions more in Part 3, but in short, my recommendation is that you should add functionality as features rather than building a site definition so large it will require its own ZIP code. Site definitions can seem like a great idea in the beginning but are tricky and can be very cumbersome.
For now you will focus on exploring the existing STS folder's onet.xml.
Project
The Project element contains some very useful attributes that you can use to modify how pages in a site work. These attributes affect every site configuration of the site, which can be a good thing or a bad thing, depending on what you want to do. I will cover site configurations in a moment, but first it is time to discover a little quirk.
The AlternateCSS attribute is extremely useful for the designers of site layouts and thus important to you as a developer. The AlternateCSS attribute defines an extra CSS style sheet URL that will be included after the default core.css of SharePoint.
This is important, and I'll tell you why. SharePoint includes a method of adding CSS URLs to a master page using the CSSLink and CSSRegistration ASP.NET tags. Your master page should always include a CSSLink tag and will render any CSS URLs added with the CSSRegistration tag. And then CSSLink adds the core.css default style sheet. This means trouble if you want to override styles that reside in core.css, since core.css is always rendered last and thus takes precedence over your own shiny new and beautiful CSS styles.
You could instead use the AlternateCSS method to add a CSS URL to your page, and the AlternateCSS URL will be rendered after the core.css link. Another benefit is that you do not need to modify the master page you have created just to change the CSS styles.
Of course, there are other options for getting a CSS file placed where you want, but AlternateCSS is a valuable tool.
With the explanation of AlternateHeader comes that quirk I mentioned. You see, the wss.xsd file contains an error. The Project element in wss.xsd does not have the AlternateHeader attribute defined at all. In fact, several attributes are missing. In turn, you get another attribute that does not serve any purpose, called AlternateUrl. You will notice this if you try to use IntelliSense to create or modify a Project element. Do not despair, because AlternateHeader works even if you get a validation error in Visual Studio.
But what does it do? Ah, an excellent question. You could check the documentation, and you would be promised that AlternateHeader should be set in order to replace the header of a site page with the contents of any ASPX page residing in the [12]LAYOUTS directory. Sadly, that promise would not be fulfilled. Here's what really happens....
AlternateHeader replaces the top navigation of application pages with an ASPX page of your choice. Yup, just set the AlternateHeader to point to any file in the [12]LAYOUTS [LCID] folder, and poof goes the top navigation bar and in goes your ASPX page of choice. This incredible feat of engineering is accomplished using a call to Server. Execute(alternateHeader) in [12]TEMPLATECONTROLTEMPLATESTopNavBar.ascx, so in theory you could add other things than ASPX as well. (Yes, I am being ironic when I refer to this as a great or even useful feature!)
![]() Note Pages that reside in the
Note Pages that reside in the [12]LAYOUTS directory are often referred to as application pages.
I have been working really, really hard to come up with a somewhat useful scenario for this functionality, but frankly, I can't. Actually, it was rather useful in the old version of SharePoint, a.k.a. WSS 2 and SPS 2003, where AlternateHeader would replace the whole header of a page, but for some reason Microsoft chose to put the code to run AlternateHeader inside a control called TopNavBar.ascx.
The only thing I can think of is using it if you create functionality that utilizes this attribute. For instance, you could mimic the TopNavBar.ascx functionality but expand the scope to include both regular pages and probably a wider area than just navigation. That way, you could use a single master page and customize the header by changing only the site definition.
But then again, that would be a very corny way of accomplishing a rather trivial task. Not just that, but changing the site definition after any site has been created from that site definition is not supported, so this would be possible only when you first create your site definition. I vote to place AlternateHeader very high on the “least useful” list of SharePoint features. It may have been a great idea in theory, but it's definitely not so great in practice.
CustomJSUrl, on the other hand, can be quite useful and should hold the URL of a JavaScript file. There is an ASP.NET tag that is present in all default master pages called CustomJSUrl that will render a script tag that adds the value of the CustomJSUrl attribute to the page. If you want to add custom JavaScript to a master page and use a site definition to control which script file should be used, then CustomJSUrl is the way to go.
![]() Note
Note CustomJSUrl is not present in the wss.xsd file either, so it will not show up in IntelliSense. Oh, bother….
I have a strange hobby: I taunt designers. Now, it's not nasty bullying or anything bad like that; it's just some gentle encouragement that they should start doing actual development rather than drawing pretty pictures in Photoshop all the time.
If I am unable to taunt my designer (or when they get fed up with my kind and loving suggestions), I turn to DisableWebDesignFeatures. DisableWebDesignFeatures allows you to specify several features that will be disabled when editing a site using tools such as SharePoint Designer. For instance, I can set DisableWebDesignFeatures to wdfopensite, which will give anyone trying to access the site with SharePoint Designer a nice message that they cannot gain access (see Figure 4-6).
You can set various limitations, and you can set more than one at a time by separating each value with a semicolon. The names and documentation available from MSDN (http://www.understandingsharepoint.com/url/10027) or the SDK are quite good, so I will just refer you to those; however, note that this can be a very useful feature for users, perhaps more from a security perspective than from a user experience perspective.
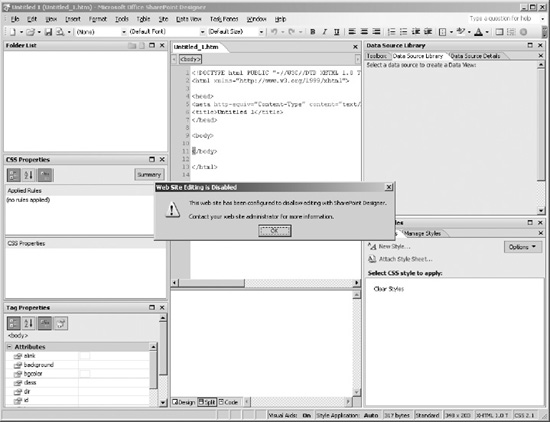
Figure 4-6. Taunting designers
The ListDir attribute defines where new lists get created. Usually this is for lists for English sites, but the value is actually set from a resource value. In any case, this is of little rele- vance to the user experience, so you should just leave it as is. Just know that you could change it if you wanted.
SiteLogoUrl sets the default logo used for new sites. You can always set this manually using the web interface later, but if you want a site to have a certain logo out of the box, then set this attribute to the URL of the image. You could also put the logo in the site definition itself and provision the image file using a module. For more on modules, be patient; I will get to them later in the chapter.
![]() Note I am getting a bit tired of repeating myself, but SiteLogoUrl is not in the wss.xsd file either.
Note I am getting a bit tired of repeating myself, but SiteLogoUrl is not in the wss.xsd file either.
OK, now it is time to investigate the content of the Project element. This is where the really good stuff lives.
NavBars
The NavBars section contains, well, the nav bars. What is a nav bar? you ask. Good question. Nav bars are the main navigational elements of a SharePoint site. You should be familiar with the top nav bar, which is the navigational bar over the main content area of a Team Site that holds links to the subsites of our site collection. It is marked 1 in Figure 4-1.
However, there are plenty of other nav bars as well. In the STS folder's onet.xml file, you'll find six nav bars, which consist of the top nav bar and a nav bar for each of the headings in the QuickLaunch menu. When you add a new library, list, discussion board, or site to your site, SharePoint optionally adds a link to the respective nav bar. You can also add your own links using either declarative syntax or code. You can even modify the nav bars in real time or create an entirely new nav bar if you are so inclined.
Nav bars are cool when you get the hang of them. You have great control over their appearance and behavior, and you can use both the built-in nav bar and your own nav bar to customize and create new navigational options. You will explore modifying the NavBars section in more detail in Chapter 15.
ListTemplates
If you open the ListTemplates section, you will find…nothing? How strange that there are no list templates defined for your site, especially since you know that there must be list templates defined somewhere. The answer to this mystery is that the list templates that are available for the Team Site are defined in features, not in the site definition.
So, what is a list template? Well, as the name implies, it is a template for new lists, defining the fields, views, settings, and forms that a new list should contain. When list templates are defined for a site, either through the site definition or through features, the list template appears on the Create page of SharePoint.
I will cover lists and list templates in much more detail in Chapter 7.
DocumentTemplates
The DocumentTemplates section defined in the onet.xml file contains the list of templates available for a new library. You may have noticed that when you create a new document library you are given an option to attach a default document template. The list from which you choose is composed of the DocumentTemplate elements of the site definition. Figure 4-7 shows the default document templates for the English Team Site definition.
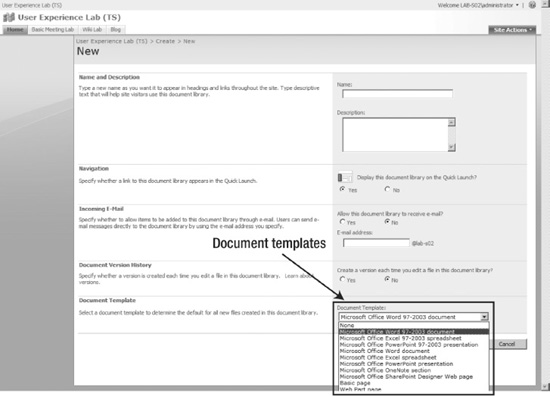
Figure 4-7. Default document templates
Why is this cool? Well, it allows you to create a set of templates customized to your solution; for example, you can have Microsoft Word template documents with your company's letterhead or Microsoft PowerPoint presentation templates that follow a predetermined format, or you can precreate web pages with a custom layout that you use for new pages. You are not limited by the Microsoft Office suite of document templates either—you can add document templates from any application.
Note that if you add a new document template type, for instance a PDF file, you may want to add a document icon so that the new document will not display an unknown document type icon. To do so, go to the [12]TEMPLATEXML folder, and open the docicon.xml file. Here, add an entry under the ByExtension section as such:
<Mapping Key="pdf" Value="pdficon.gif""/>
Exchange the Key and Value values shown here with your specific information. Next, add the .gif file of your document template type to the [12]TEMPLATEIMAGES folder.
![]() Caution Changing any Microsoft-provided file, including the
Caution Changing any Microsoft-provided file, including the docicon.xml file, is not supported. Unfortunately, there are no other solutions. If you decide to change any such file, make sure you back up the original file first.
Configurations
Hang on a minute. This is oddly familiar. Why are there configurations both in webtemp.xml and onet.xml? The short answer is that the configuration section of webtemp.xml is used to describe the site definition on the New SharePoint Site web page as well as provide metainformation about how the site gets provisioned. The configuration of webtemp.xml is what contains the content of the site definition.
For the long answer, read the sidebar “Configuration Shakedown: webtemp.xml vs. onet.xml.”
The configuration section of the onet.xml file is what defines the actual content of your site definition. As such, it warrants closer scrutiny. This is an overview of sites, after all.
The Configuration element has several attributes, and besides reading the documentation and guessing, the easiest way to get an overview of these attributes is by using IntelliSense in Visual Studio. You have gotten that working now, haven't you? If not, this would be a great time to go back to Chapter 1 and set it up.
When you hit Ctrl+spacebar inside an empty Configuration start tag, you should see an IntelliSense pop-up, as shown in Figure 4-8.
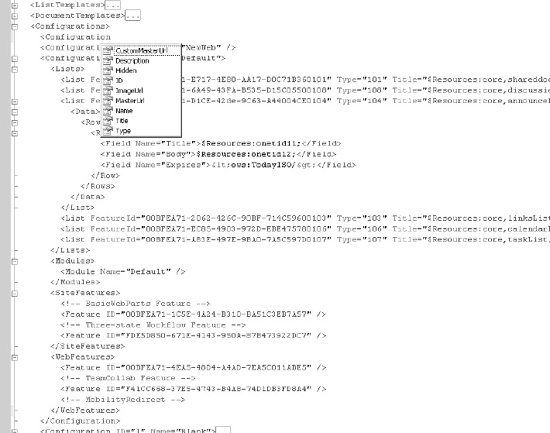
Figure 4-8. IntelliSense for onet.xml configuration
I will go through each of the Configuration attributes now to show how they relate to the user experience.
MasterUrl and CustomMasterUrl are related and behave much in the same way. The concept of master pages in SharePoint is quite similar to that of ASP.NET. There is a notable difference, though, and it relates to how the master pages are being set.
In a SharePoint ASPX page, you can set master pages just like you do with any normal ASP.NET page, but you can also set the master page to the master page for the site. SharePoint handles this using a token that references either the default master page or the custom master page. A SharePoint page might set a master page using either of the following syntaxes:
<%@ Page language="C#" MasterPageFile="~masterurl/default.master" [...]

<%@ Page language="C#" MasterPageFile="~masterurl/custom.master" [...]
The entire string ~masterurl/default.master or ~masterurl/custom.master is replaced with the value of the MasterUrl or CustomMasterUrl attribute set for the site. The cool thing about this is that you can change which master page is used for a site and all the pages using the site master page without changing the pages themselves.
Oh, you may be wondering, “Why is changing the masterpagefile property of a page a bad thing? Why not just modify the master page rather than setting a different master page?” Your questions are valid, and the problem relates to the concept of customizing pages in SharePoint, which is the feature formerly called ghosting and unghosting. An extremely short explanation is that if you modify a page, including a master page, that page is copied from the site definition and into the database (customizing or unghosting it), preventing updates to the page from the site definition.
For a more exhaustive explanation, I recommend reading Andrew Connell's article in the SDK or on MSDN at http://www.understandingsharepoint.com/url/10028. If you are unfamiliar with this feature, I highly recommend you read up on it because it is an important concept of SharePoint.
The Hidden attribute may seem to refer to whether the site should appear on the new SharePoint site page. The Description, Name, and ImageUrl attributes might seem self-explanatory. Unfortunately, this is not the case, leading again to the confusion of how configurations actually work.
You see, setting the Hidden attribute to True in onet.xml doesn't hide the definition, as you might think. Only the webtemp value is actually used in the web interface. Not even if you com- pletely remove the Hidden attribute in webtemp.xml will the onet.xml value be used. The same applies for Name, Description, and ImageUrl. None of these is used in onet.xml, even if the schema allows them. Setting the attributes in webtemp.xml produces expected results for all these attributes. See Figure 4-9 and Figure 4-10 as well as the sidebar “Configuration Shakedown: webtemp.xml vs. onet.xml” for more information.
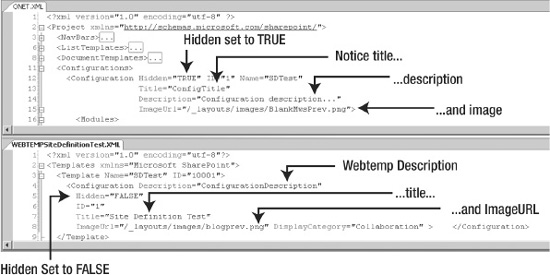
Figure 4-9. Sample configuration attempt in onet.xml
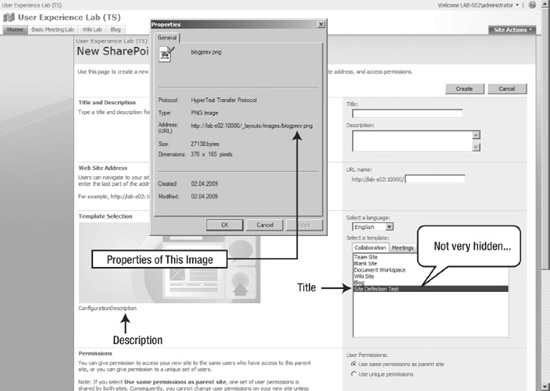
Figure 4-10. Result of attempt to hide configuration in onet.xml
You may have noticed that when you create a Team Site, you also get a bunch of lists and libraries created for you. If you haven't noticed, take a look at the fancy screenshot I made for you earlier in the chapter (Figure 4-1). It's the one with all the notations, remember? Check out element 3 there, which is right in front of the QuickLaunch menu. Those are lists, and the lists there get created using the List elements.
You can also add items to a list using the Data child element of the list. You should see an example of this for the announcements list, the list with a Type attribute of 104 and a FeatureId attribute of 00BFEA71-D1CE-42de-9C63-A44004CE0104. If you ever wondered where the “Get Started with Windows SharePoint Services” message gets created, now you know.
![]() Note You will see several references to values containing the term
Note You will see several references to values containing the term $Resources while you explore the built-in sites. This syntax is used to get information from a resource file. (Resource files were covered in Chapter 3 in case you haven't read that yet.)
I will cover lists and list templates in much more detail in the next chapter, so if you are wondering where that Guid and the type are defined, you will learn that there.
Modules are collections of files, such as master pages, web pages, images, templates, and other files you want to put into your SharePoint site. Within the Configuration element, you usually only reference and customize modules that are defined elsewhere, either in the onet.xml file itself or in features. You can, however, define and customize complete modules within each Configuration element.
![]() Note Modules require a bit of explaining, so I will cover them in greater depth in the “Modules” section a bit later in the chapter.
Note Modules require a bit of explaining, so I will cover them in greater depth in the “Modules” section a bit later in the chapter.
ExecuteUrl is another often overlooked feature. ExecuteUrl allows you to send a user to a page after the site has been created. If it's omitted, you are just sent to the default.aspx page of your new site, but you can override this with the ExecuteUrl attribute.
The thing to note, however, is that the address is relative to the site you create, so the page you want to display must be provisioned with the site. Also, for very natural reasons, the page gets displayed only when a site is created through the web interface, not through code.
Besides that, I think this is a very powerful feature, and I use it to create special instruction pages for new sites that get displayed when a site is created. I do this by creating a module that provisions the instruction pages into a library and then sends the user to the first page of that library.
WebFeatures and SiteFeatures state which features should be activated with the site definition. The only difference between these two elements is whether they refer to features that are web- or site-scoped. Each of these elements contains one or more feature elements that reference an existing and installed feature. Note that if you try to activate a feature that is not installed, you will get an error on site creation.
If you look at the configuration with ID 0 in the STS folder's onet.xml, you will see that it activates four features. One of these features in turn activates other features. And because these features are important to understanding the default out-of-the-box experience, I'll cover them in a bit more depth.
![]() Note The commenting is a bit off in the
Note The commenting is a bit off in the STS folder's onet.xml file because the descriptive comments appear above the feature element for site features and below the feature element for web features.
Team Site Default Features
The default features that are activated in the default Team Site definition are responsible for setting up quite a lot of the content that you would normally consider built in. The truth, how-ever, is that there are extremely few built-in features at all; most of what you see in a Team Site is added using features.
Table 4-1 lists the four features in the default Team Site configuration.
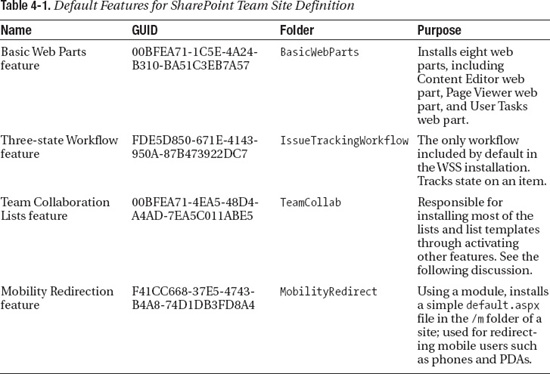
One of these features is worth a bit of extra attention, and that is the TeamCollab feature. That feature is responsible for creating all the default list templates that you normally see when you go to the Create page of a site. The TeamCollab feature does not create anything, but it does contain several ActivationDependency elements that activate a range of features.
To investigate this, go to the [12]TEMPLATEFEATURESTeamCollab folder, and open the Feature.xml file there (see Figure 4-11).
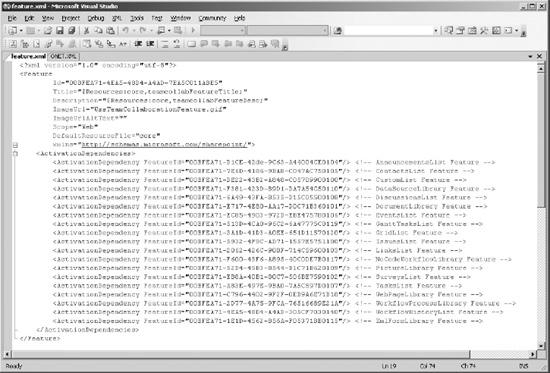
Figure 4-11. TeamCollab feature.xml
As you can see, there are ActivationDependencies elements for most of what are considered standard list templates, such as the announcements list, the document library, the links list, and the tasks list templates. So, when you activate the TeamCollab feature, you also acti- vate features to install all these templates and make them, at least some of them, available from the Create page.
Several of the list templates that are activated here are not visible, however. That is because the list template is set to be hidden. That means the list must be created using other means, usually through code or another feature.
![]() Note I will cover lists and list templates in much greater detail in Chapter 6.
Note I will cover lists and list templates in much greater detail in Chapter 6.
And that concludes your exploration of the configuration section. That wasn't so bad, was it? You will return to the configuration section and get plenty of exercise when you build your own site in the last part of this book. For now, let's move onward.
Modules
As I mentioned earlier in this chapter, modules are collections of files that are provisioned together with the site. They are also very strange beasts, but once you get to know them, modules are friendly and powerful helpers.
A module is the primary method of adding one or more files to a site. For instance, the default.aspx page that is the default startup page is provisioned using a module. That module is named…take a guess…Default.
Just for a second, go back to the Configuration element with the Id attribute set to 0, and check under the Modules element. You will see a single Module element with a single attribute, Name="Default". That Module element is just a reference to a complete module definition. This means that you can define a module to instantiate the default.aspx page and then reference that module in many other site configurations without having to re-create the module each time.
The module definition is usually placed either in the site definition itself (if so, it is placed in the Modules section of the Project root element) or in features, which means you can use features to install files to libraries or elsewhere on a site after you have set up a site. So if you want to create an application page or add some report templates to a library, you can create a feature with a module to accomplish that task. We will try that in Part 3 of this book.
The module syntax requires a bit of explanation. The Module element has several attributes that are used to determine how files should be provisioned, where they are stored before the install, and where they should be stored on the site. Let's start with an example:
<Module Name="Default" Url="" Path="">

  <File Url="default.aspx" NavBarHome="True">

  </File>

</Module>
There are at least two parts to a module: the Module element itself and one or more file elements. As I mentioned in the beginning of this section, modules are collections of files, so you can add more than one File element as well.
A Module element has several attributes that affect the entire file set. The Name attribute gives the module a name and is the only required attribute. You use this name when you want to reference the module from a configuration where you want the module provisioned.
RootWebOnly tells the module to provision the files only if the module is provisioned on the root web of a site collection. This is useful to create files that should be available for an entire site collection, such as design elements, common master pages, or templates.
The Path and SetupPath attributes are similar in behavior. Both attributes let the module know where to look for the source files used in provisioning the site. The difference is that Path is relative to the site definition itself, while SetupPath is relative to the [12]TEMPLATE folder.
The URL attribute tells the module where to store the files on the site. You would typically set this to a list or library or just leave it empty to store files in the root of the site. Note that if you do not specify a Path or SetupPath attribute, then Url behaves like Path and is used to find the files to be provisioned relative to the site definition folder.
![]() Tip You can use the Url attribute to create folders in your libraries. When you add a Module element with a Url attribute set to a folder within a library, SharePoint ensures that the folder exists. If you just add an empty
Tip You can use the Url attribute to create folders in your libraries. When you add a Module element with a Url attribute set to a folder within a library, SharePoint ensures that the folder exists. If you just add an empty Module element, you get an empty folder.
File
The simple point here is that each File element in a given Module element represents one file that will be installed when the module is activated either in a site definition or as part of a feature. For each of the File elements, you need to specify at least the Url attribute, which will be the path to which the file will be provisioned.
Each File element can contain a set of subelements that can be used to set properties for the file as well as install web parts to the file if the file is a web part page. The subelements of the file modules are AllUsersWebPart, View, NavBarPage, and Property. We will return to these a bit later in the chapter.
As is the case for Module, the Url attribute serves a double purpose if it is the only attribute set, setting both the final URL of the file in the site and the path and name of the file to be installed. Thus, in the previous example, the file will be named default.aspx on the site and is also called default.aspx in the site definition installation folder. You can verify this if you look in the site definition folder of the STS definition at [12]TEMPLATESiteTemplatesSTS. You'll see a file named default.aspx there.
Although this is usually sufficient for simple scenarios, you may want more control over the naming of the files in the site definition folder. To accomplish this, you may specify the file installation path using the attribute Path of the File element. This Path attribute may include folders, so if you want to put your pages in a folder named ApplicationPages and give the file a descriptive name, you could do something like this:
<File Path="ApplicationPages/EMailForm.aspx" Url="Mail.aspx" NavBarHome="True">
Note that the name of the file in Path and the name of the final URL are different. You must also be aware that the Path attribute is relative to the site template folder or the feature folder, depending on whether the module of the file is defined in a site definition or in a feature.
If you want your page to be provisioned to a specific folder on the site, you can also include the folder name in the Url attribute as such:
<File Path="ApplicationPages/EMailForm.aspx" Url="Myfolder/Mail.aspx"

NavBarHome="True">
If the folder, Myfolder in this case, does not exist, then SharePoint will create it for you. If the folder does exist, then your file will be added to that folder. This is useful if you want to have a feature add a new page to an existing library, for instance. You will use this technique in Chapter 7 to create a new view page for a list.
![]() Note A folder is not the same as a list. Although most lists have a folder, not all folders correspond to a list.
Note A folder is not the same as a list. Although most lists have a folder, not all folders correspond to a list.
So, what happens if you add a file that already exists, for instance, if you attempt to add an AllItems.aspx to an existing document library or list? Luckily, there is a setting in the File element called IgnoreIfAlreadyExists that, when set to True, will prevent a file overwrite.
The final attribute of the File element that requires a bit of explaining is the Type attribute. You can set this attribute to one of two values, Ghostable or GhostableInLibrary. Although they do behave somewhat similarly, there are important distinctions. If you set the Type attribute to GhostableInLibrary, you tell SharePoint that the file should be cached in a library and that you should be able to work with the file as you would any other file in a library. If you go to the master page gallery of a site, you will notice that each master page is a file like any other in a library. This is because they are provisioned as GhostableInLibrary rather than just Ghostable.
A Ghostable file, like default.aspx, is not part of a library. GhostableInLibrary files have version history, have Created By and Modified By columns, and can have any other column that the library provides. A Ghostable file does not. A GhostableInLibrary file can be checked out, approved, deleted, and anything else a library file can. A Ghostable file cannot. Basically, if you want to work with a module-provisioned file through the web interface, use GhostableInLibrary.
As I mentioned earlier, the File element can also have subelements. These are all optional, and some work only with web part pages. Since working with web parts is such an important aspect of SharePoint user experience development, I want you to fully understand how these subelements work. There is a whole separate section on working with web parts in site definitions later, called “Working with Web Parts in a Site Definition.” The knowledge gained from that section is applicable to many other situations, so although you think you may never add web parts in a site definition, read the section.
Oh, but you're not getting away from the other subelements either. You will now look briefly at the NavBarPage and Properties elements.
NavBarPage is one of the elements that causes quite a bit of confusion in online forums, so I will explain here how the element actually works. The element has three attributes: Id, Name, and Position. The documentation from Microsoft states, at least at the time of this writing, that Id refers to the ID of the page. Rubbish, I say! Rubbish!
The Id attribute actually refers to the nav bars defined in the site definition, not the page. The top link nav bar has an Id attribute of 1002, meaning that if you want to add a link from the file to the top link nav bar, you set the Id attribute of NavBarPage to 1002. If you want to add the link to the Lists nav bar in the QuickLaunch menu, that Id attribute is 1003. If you create your own nav bars, and you will do that later, then you add your own nav bar's Id attribute. It's as simple as that.
The Name attribute is the name of the link, for instance Home, so no big mysteries there. The Position attribute is also quite simple in theory, but it doesn't quite work as expected, or at all, for that matter. The MSDN and SDK documentation state that Position is simply an ordering number that goes from 1000 (the first position; can also be substituted by Start) to 2000 (or End). Take a look at the following code for an example of how to use NavBarPage to set multiple links to the same page:
<!-- Link to Home (default.aspx) as the first (leftmost) link in top navbar -->

<NavBarPage Name="First" ID="1002" Position="Start" />

<!-- Extra link to Home as the last link in top navbar -->

<NavBarPage Name="Last" ID="1002" Position="End" />

<!-- Extra link to default.aspx as the second link in top navbar -->

<NavBarPage Name="Second" ID="1002" Position="1002" />

<!-- Link to default.aspx as the last (bottom) link in Lists in quicklaunch -->

<NavBarPage Name="List last" ID="1003" Position="End" />

<!-- Link to default.aspx as the middle link in Lists in quicklaunch -->

<NavBarPage Name="List middle" ID="1003" Position="1001" />

<!-- Link to default.aspx as the first (top) link in Lists in quicklaunch -->

<NavBarPage Name="List first" ID="1003" Position="Start" />
Now, wouldn't it be nice if the order of the links in the top bar would be First, Second, Last? And if the links in the lists section of the QuickLaunch menu would be List First, List Middle, and List Last?
Turns out, it won't, at least not from this code. The Position attribute does not behave as you would expect. The End position refers to the last element at the time the NavBarPage element is created. In the previous example, End refers to the first element after Start when it is created.
You can use the Properties element of a file to set custom properties on the file, such as columns if you're storing the file in a library.
Working with Web Parts in a Site Definition
AllUserWebPart will add a web part to a web part page. It is deceptively simple on the surface, exposing only two rather self-explanatory attributes, WebPartOrder and WebPartZoneId. The WebPartZoneId attribute is the ID of the web part zone in the web part page. If you take a look at the Default.aspx file that resides in the site definition folder for STS, or Figure 4-12, you will see two web part zones defined in the Main placeholder, one with the ID Left and one with the ID Right. If you were to insert an AllUserWebPart element into the Default.aspx file via the File element, one of these IDs would fit snugly in the WebPartZoneId attribute.
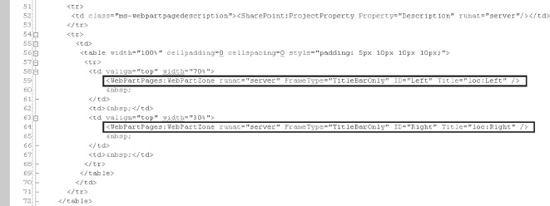
Figure 4-12. WebPartZone setup in STS Default.aspx
The WebPartOrder attribute states where in the WebPartZone the web part should be placed. Although 1 is usually the first web part in the zone, if you have more than one web part with the same WebPartOrder, they will be added in the sequence they are defined.
That was the easy part. You, being an observant reader, will likely have noticed a rather important omission: the actual web part code. You know where the web part should go and in which order, but frankly you have no idea what web path should be added. And the answer may be a bit different from what you'd expect.
If you have tried adding a subelement to the AllUsersWebPart element already, you may have noticed there are no subelements defined in the WSS schema. That is because, amazingly enough, there are no subelements to AllUsersWebPart defined in the schema. So, to add your actual web part code, you need to do something else. If you have looked at the module definitions of the STS site definition, you already know the answer. You need to put your code in a CDATA element.
![]() Tip If you forgot what a
Tip If you forgot what a CDATA element is or you didn't read Chapter 2, you should read that chapter now. Basically, it is character data that is not parsed as XML even though it resides in an XML file.
Once you know what to put in the CDATA, then adding web parts using AllUserWebPart is a breeze, and when I tell you that it is quite simple in theory, then you might be tempted to just skip ahead. You know you will regret it, so please, read on.
Simply put, what you put into the AllUsersWebPart CDATA element is just the web part markup needed, but it's ASP.NET. It can be as simple as adding a WebPart tag, which is what is done in the following code, which was taken from the STS default module, or it can be as complex as rocket science, depending on the requirements of the web part:
<WebPart xmlns="http://schemas.microsoft.com/WebPart/v2"

xmlns:iwp="http://schemas.microsoft.com/WebPart/v2/Image">

 <Assembly<Microsoft.SharePoint, Version=12.0.0.0, Culture=neutral,

 PublicKeyToken=71e9bce111e9429c</Assembly>

 <TypeName>Microsoft.SharePoint.WebPartPages.ImageWebPart</TypeName>

 <FrameType>None</FrameType>

 <Title>$Resources:wp_SiteImage;</Title>

 <iwp:ImageLink>/_layouts/images/homepage.gif</iwp:ImageLink>

 <iwp:AlternativeText>$Resources:core,sitelogo_wss;</iwp:AlternativeText>

</WebPart>
If you ignore the iwp: tags for a moment, you will recognize fairly common properties of an assembly as well as FrameType and Title. The latter two are web part properties, while Assembly and TypeName should be familiar to any .NET developer, even though TypeName has replaced Class.
![]() Note The
Note The FrameType property is considered obsolete in WSS 3. Use ChromeType instead.
This syntax works only for WSS 2 web parts, meaning you can use it only with web parts that inherit from a class such as Microsoft.SharePoint.WebPartPages.WebPart. If you want to add WSS 3 web parts, which are nothing more than ASP.NET 2.0 web parts, you must use a dif- ferent syntax. All this gets very confusing, and I can understand if you get a bit frustrated. There is a simple solution, however.
You see, the code you need to add to AllUsersWebPart is the same code that resides in a .dwp file from WSS 2 or a .webpart file from WSS 3. Not only that, but if you have the web part installed, there is an easy way to get the XML from within SharePoint. Go to the web part gallery of your root site—you know, the one you set up earlier in this chapter. You will see several web parts in the library, similar to Figure 4-13.
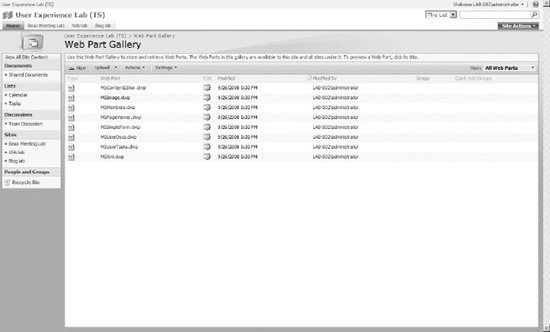
Click the Edit icon, and you will get the properties for the web part, as shown in Figure 4-14.
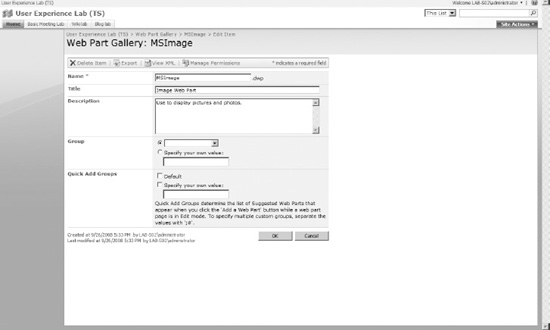
Figure 4-14. Web part properties
Now, click the View XML link in the toolbar, and you will be given the XML you need to add the web part to the AllUsersWebPart element. You can use the same technique regardless of whether you have a WSS 2–style .dwp web part or a WSS 3–style .webpart file.
This will only get you a nonconfigured web part, however, meaning that although you can add an ImageWebPart, you will not get to set which image should be displayed unless you add the markup yourself. Again, there is a simple solution.
You can export a complete web part file if you add the web part to a web part zone. That export will include custom configurations, such as which image is displayed in an ImageWebPart. To do this, start by adding the web part to a web part page, and configure it as you want it to be in your AllUsersWebPart element. Then, from the web part menu—you know, the little arrow in the top right of the web part—click Export. You will get a web part file that you can open in your favorite editor and insert into the AllUsersWebPart CDATA section.
If you do not see an Export option in the web part menu, there may be at least two reasons. The first is that the web part is marked as not exportable. The second is that your web application does not allow exporting. You can solve the first problem by setting the ExportMode property of the web part to All or NonSensitiveData. How? Use SharePoint Manager 2007, write a code snippet to do it, use the web interface, and modify the web part from there. You have a ton of options; just pick the one you like.
To fix the second problem, open the web.config file, usually stored in C:Inetpub wwwrootwssVirtualDirectories[portnumber]. In that file, locate the system.web element and then the webParts element. To the webParts element, add an attribute called enableExport="True". Then reset your web application.
We still have one web part element to explore, the View element. Views can be very simple but can also be very complex. The basic functionality is to add a view of data in a list. If you check out the Default module for the STS folder's onet.xml, you will see some really simple samples.
Views can be much more than simple displays, but because they are so tightly coupled to lists, I will postpone the deep dive into views for now and return to them when I talk about lists in Chapters 7 and 8.
Components
Two more elements in the site definition deserve at least a mention. These elements both reside in the Components section, but they are very rarely used, so a thorough examination is beyond the scope of this book.
ExternalSecurityProvider is used to return security information to a crawler.
FileDialogPostProcessor could have been a really nice feature, but its implementation is quite complex. FileDialogPostProcessor references a component that will be triggered, for the entire site, when a file open or file save dialog box is used to show a web interface to the user. For instance, when you save a Word document to a SharePoint site, you get a minimal web view of that site to allow you to browse to different libraries and select folders where you want to store the file.
FileDialogPostProcessor is used to modify that web interface. Unfortunately, you can modify only an existing interface, and even if you wanted to go in that direction, I wouldn't be able to take the time here to go over a detailed enough scenario and implementation. Sorry!
What's the Global Site Configuration?
You need to explore one more concept to fully understand what makes up a site. You see, even with all the details you have seen so far, there are still things I have not explained. For example, from where do you get the default master page? You know you get a default master page, but you have found no trace of it in either the webtemp.xml or onet.xml file. And speaking of master pages, how does the actual master page library get created? Or the web part library, for that matter?
The answer to these questions, and more, is in what is called the global site configuration. The global site configuration is a “hidden” base configuration that is applied to all new sites. The global site configuration is applied before your selected and visible site configuration and contains settings that are required by all sites, regardless of how complex or simple your own site configuration may be.
The global site configuration is stored in [12]TEMPLATEGLOBALXMLonet.xml, so open that file now. In Figure 4-15 I have closed the BaseTypes element, but it should show you the outline of the site configuration.
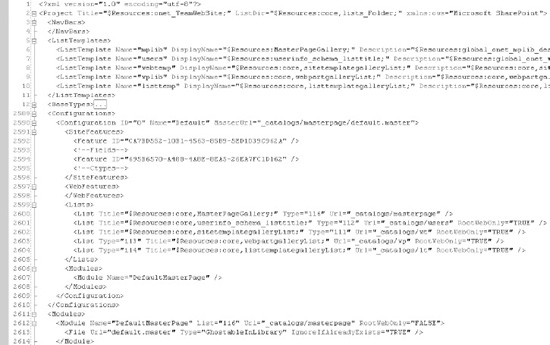
Figure 4-15. Global site configuration onet.xml
You will recognize most of the elements in the global onet.xml file, with the noted exception of the BaseTypes element. I will talk more about BaseTypes a bit later, so for now, let's go over the elements you have seen before to learn how the global site configuration fits into the big picture.
In the ListTemplates element, you'll find all the list templates for required lists such as the master page library (mplib), users list (users), and web template library. As you will learn in Chapter 6, the actual schemas of these lists and libraries are stored in files called schema.xml that are stored in directories named after the Name attribute of the ListTemplate element. In the case of the global site definition, these directories reside in the [12]TEMPLATEGLOBAL directory, so if you ever need to explore these schemas, that is where you will find them.
The actual global site configuration is the single Configuration element in the onet.xml file. This configuration is responsible for setting up the default fields and content types required by all SharePoint lists, as well as generating the actual lists and libraries to hold the master pages, users and groups, site templates, web parts, and list templates. In addition, the configuration provisions a Module element that contains the default master page. From the Module definition further down (line 2612 in Figure 4-15), you can see that the default.master file is deployed to the master page gallery from the same directory as the root of the global site definition, in other words, [12]TEMPLATEGLOBAL. If you open that directory, you will see the default.master file.
Oh, yeah, you can wreak havoc in that file if you want, and changes will be immediately applied to all default master pages, but such changes are not supported. Then again, you are still a developer, so I'm not going to imagine that you will leave that file alone in your lab or development environment.
BaseTypes
In the rather bulky BaseTypes element, you find the root definitions for lists. Every list must inherit from a BaseTypes element, either from the generic list, document library, discussion forum, vote or survey, or issues list, and this is where those base types are defined.
Inside each of the BaseTypes elements, you will find a schema resembling the normal list template schema. You will explore that schema in much more detail in Chapters 7 and 8, so for now I just want to point you to where the base type definitions are stored.
![]() Note The
Note The BaseTypes element can be used only in the global site configuration, and since modifying that file is not supported, you are stuck with the default base types. No, you cannot work around this issue. Yes, I know you want to.
Mostly the base types contain columns, defined in the schema using the Fields element. These columns are the required columns such as Created By, Title, Version, and list-specific columns for the different base types. When you create a new list, you always get these columns added unless you explicitly remove them. You will learn how to do so in later chapters.
Resources, Helpful Hints, and the Future
OK, so where are we? Ah, yes, we have covered the site definitions and explored the options available to you when constructing new site definitions. If there has been a bit too much theory, rest assured you will get plenty of chances to do exercises when you get to Chapter 11.
In the meantime, I would like to share with you some tips and tricks for getting the most out of your site definition adventures:
- Explore by touch: When you work with an
onet.xmlfile, you should try to add elements to see what options IntelliSense gives you. Try adding attributes to an element to see what values are acceptable. You could just memorizewss.xsd, but chances are you'll get much less headache from just playing around withonet.xml. Just remember to save a copy first in case you break something. - Explore by test: Make yourself a new site definition, and use it to test the effects of different elements, attributes, and values. Feel free to copy one of the default
webtemp.xmlandonet.xmlfiles and customize it to your heart's content. You will do plenty of that later, but I have found that trying while reading yields immediate results and knowledge. - Explore by search: If you are wondering how a feature works, there is a big chance that the included site definitions include examples of how that feature should be implemented. If you search the
[12]TEMPLATEfolder for files containing a certain element, you might find that ready-to-use examples exist in one of the built-in site definitions or features. - Explore by Google: With the entire world at your fingertips, an online search may be just what you need if you still haven't figured out a certain syntax or feature. Chances are that someone else has experienced the exact same problem and blogged or written an article about it.
- Explore by inquiry: If you are really stuck, a whole range of online communities has experts that can help you. Feel free to come to the
UnderstandingSharePoint.com/justasksite and ask a question. I will be there and can help you out as well.
So, I have covered site definitions, but there is still a ton of things I need to cover before you can claim to understand the user experience. I will continue to dig down, and here are some of the things to come in the next few chapters:
- Lists galore: Chapter 6 will cover lists, list templates, and list forms, your ticket to user experience nirvana.
- Content types: These are really the coolest feature of SharePoint, especially to control behavior of information.
- Fields and columns: These are tiny pieces of information capable of ruining or creating the perfect user experience.
Next up, however, you will explore some of the options you have to modify the default user experience and what will break your supportability. In the next chapter, I will cover topics such as CustomAction, delegate controls, feature stapling, and control templates.