
Chapter 23
ADO.NET
What’s in This Chapter
- Connecting to databases
- Bound controls
DataGridView,DataGrid, and detail interfacesDataSets- ADO.NET
Wrox.com Downloads for This Chapter
Please note that all the code examples for this chapter are available as a part of this chapter’s code download on the book’s website at www.wrox.com/go/csharp5programmersref on the Download Code tab.
Databases play an important role in many software applications. A large percentage of business applications use databases to store, arrange, and otherwise manipulate data.
Because databases play such an important role in so many programs, companies such as Microsoft have spent a huge amount of time building database tools. As a consequence, there are several methods you can use to work with databases. Some of the most recent methods include the Entity Framework and LINQ to ADO.NET, which includes LINQ to SQL, LINQ to Entities, and LINQ to DataSet. Those techniques were covered briefly in Chapter 8, “LINQ.”
This chapter provides a brief introduction to ADO.NET, a set of classes that provide more direct access to the underlying database. It also shows how you can use bound database components and controls to quickly build simple applications that let you create, edit, and delete database records.
The examples in Chapter 8 also worked with databases built inside the program’s code so they didn’t work with databases stored on the computer’s hard drive. The examples in this chapter show how you can load and query databases stored on disk. When you know how to load data from a database, you can modify the examples described in Chapter 8 to select data from the database. This chapter won’t make you a database expert, but it will at least get you started writing database programs and enable you to use LINQ to query databases.
Selecting a Database
Because database applications are so important, a lot of companies have created databases and database tools. A small sampling of databases includes Microsoft SQL Server, Microsoft SQL Server Express, Microsoft Access, MySQL, MariaDB, PostgreSQL, SQLite, Oracle, SAP, dBASE, FoxPro, IBM DB2, LibreOffice Base, and FileMaker Pro. Some of these are expensive, whereas others are free. Some are designed for large volumes of data and many concurrent users, whereas others are designed for more limited use by a single user. You can search the Internet for database comparisons and recommendations.
Four databases that I’ve used in C# programs are SQL Server, SQL Server Express, MySQL Community Edition, and Access. SQL Server and MySQL are designed to handle large amounts of data and concurrent users. Both have free versions with limited features (SQL Server Express and MySQL Community Edition). The full-featured versions are similar to the free editions, so many developers start with the free editions and later upgrade if necessary.
Access is more suited for smaller desktop applications. One advantage it has over SQL Server is that Access databases are stored in simple files, and a C# program can open them without any additional tools (other than database drivers, which are needed for any database). In contrast, to use a SQL Server database, you need to have the database server installed and running on your computer. SQL Server can store data in a separate file, but you can’t distribute it to other computers unless they have SQL Server installed.
You can use the Microsoft Access database product to create Access database files and modify their structures. For example, Access lets you build tables, add fields to tables, and create relational constraints between tables. A C# program can use those database files even if you don’t have Access installed. You can write programs to manipulate the data and copy the program and its Access files to another computer without needing to install Access on the destination computer.
For those reasons, the examples in this chapter use Access database files. You can download them from this book’s website and use them in your programs. You do need database drivers to let your program connect to the database, but they may have already been installed by Visual Studio and are relatively easy to install if they’re missing. The feature “Connecting Rejection” in the section “Making a Data Source later in this chapter says more about installing missing drivers.
Using Bound Controls
One approach to using a database is to use controls bound to the data. As you move through the data, the bound controls update to display pieces of the data. For example, when the program visits an Employee record, bound TextBoxes might display the employee’s first name, last name, employee ID, and other values.
Before you can use bound controls, you need to create a data source that can connect to the database. The following section explains how you can make that data source. The sections after that explain how you can quickly build some simple programs that use bound controls.
Making a Data Source
You can use Visual Studio to make a data source at design time. This has the advantage that you can test the connection right away to make sure the program can connect to the database. It also lets you define a DataSet to hold data loaded from the data source. You can then bind data components to the DataSet. This lets you quickly build simple database applications with very little code.
The following steps explain how to create a data source, database connection, and DataSet.
- Start a new C# project. (This example assumes you’re making a Windows Forms application.)
- Open the Data Sources window. (If you can’t find it, select View ⇒ Other Windows ⇒ Data Sources.)
- Click the Add New Data Source button (in the upper-left corner) to open the Data Source Configuration Wizard.
- The wizard’s first page lets you select a data source type from the choices Database, Service, and Object. Select Database and click Next.
- The wizard’s next page lets you pick a database model from the choices Dataset and Entity Data Model. Select Dataset and click Next.
- The wizard’s next page, which is shown in Figure 23-1, lets you pick a database connection. If Visual Studio already knows about database connections, you can select one from the drop-down list.
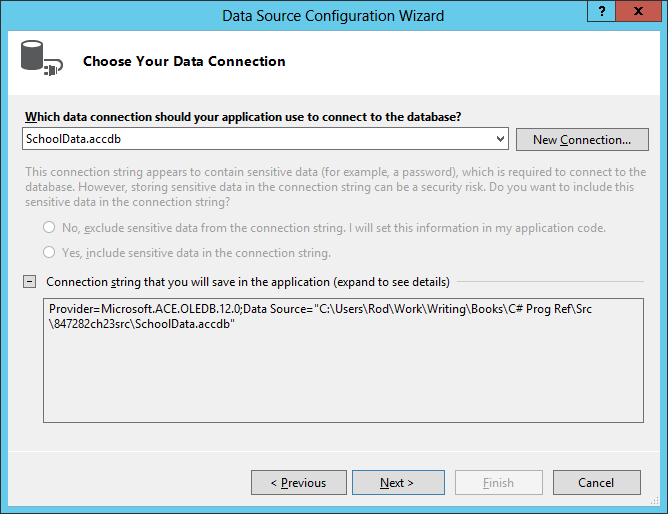
Figure 23-1: This page in the Data Source Configuration Wizard lets you select a data connection.
- If you need to create a new connection, follow these steps.
- Click New Connection to display the dialog shown in Figure 23-2. Select the data source type you want to use.
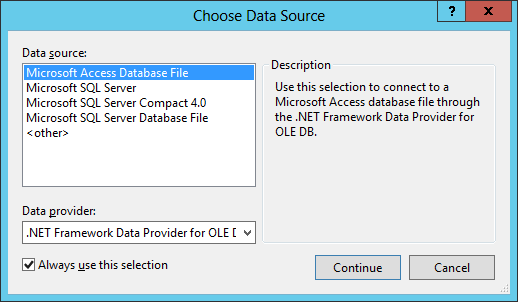
Figure 23-2: The Choose Data Source dialog lets you select the kind of database you will use.
- For this example, select Microsoft Access Database File. (Note that the description says this data source will use an OLE DB data provider.) Click Continue to display the dialog shown in Figure 23-3.
- Enter or select the database file’s name. If the database is password protected, enter a username and password.
- Click Test Connection to see if Visual Studio can connect to the database.
- If the connection test works, click OK.
- Click New Connection to display the dialog shown in Figure 23-2. Select the data source type you want to use.
- After you create the connection, a dialog displays the following self-explanatory message.
The connection you selected uses a local data file that is not in the current project. Would you like to copy the file to your project and modify the connection?
If you copy the data file to your project, it will be copied to the project’s output directory each time you run the application. Press F1 for information on controlling this behavior.
Copying the database file into the project’s executable location can be helpful for testing. Your program can modify the data, and when you run it again, it starts with a fresh copy of the database.
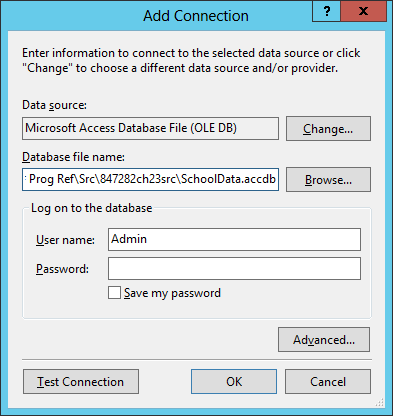
Figure 23-3: The Add Connection dialog lets you select the kind of database you will use.
- Next the Data Source Configuration Wizard asks if you want to save the connection string in the application’s configuration file. This makes it easier to change the location of the database later. For this example, check the Yes, Save the Connection As box and click Next.
- Now the wizard displays the screen shown in Figure 23-4 to let you select the database objects you want to include in the data source. Check the tables and views (if they are defined by the database) that you want to include. Enter the name you want to give the new
DataSetand click Finish.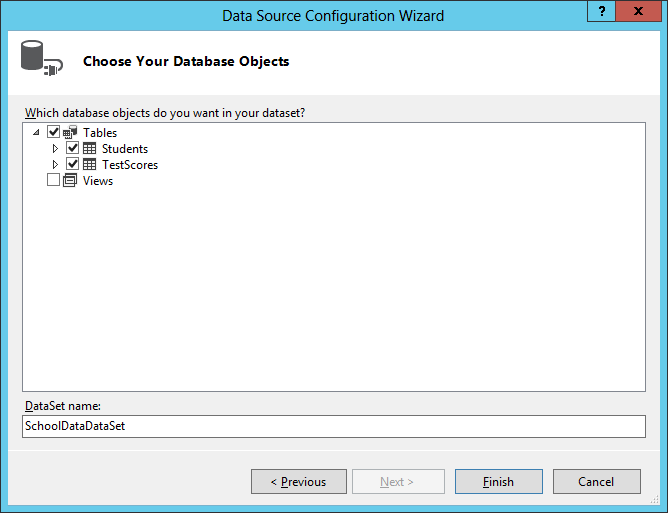
Figure 23-4: This screen lets you pick the database objects that will be included in the data source.
Figure 23-5 shows the Data Sources window after I created a data source to work with the SchoolData.accdb database that is included in this chapter’s downloads. The DataSet shows the tables that it contains, and the tables show the fields they contain.

Figure 23-5: The Data Sources window shows the new DataSet and its selected tables.
Now that you’ve created a data source, you can use it to build simple data-bound user interfaces. The following two sections explain how you can use drag-and-drop to build DataGridView and detail style interfaces. The section after that describes a third approach that lets you view multiple tables in a DataGrid.
Making a DataGridView Interface
To make a DataGridView display, open the Data Sources window, right-click the table you want to display, and select DataGridView, as shown in Figure 23-6.
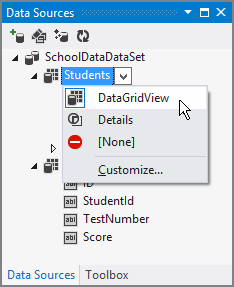
Figure 23-6: The Data Sources window can create DataGridView or Details views for a table.
Now click and drag the table onto the form to make Visual Studio automatically add the following components to the form.
- A
DataGridViewto display and edit the data. - A
DataSetto hold the data. - A
BindingSourceto bind theDataSetto theDataGridView. - A
TableAdapterto move data between theDataSetand the database. - A
TableAdapterManagerto manage the table adapter. - A
BindingNavigatorto provide a user interface allowing simple navigation through the data.
Many of these components sit in the component tray below the form designer. Only the DataGridView control and the BindingNavigator are visible on the form itself.
Together these components create the user interface shown in Figure 23-7. (I rearranged the DataGridView so it fills the form.) You can use the DataGridView to modify the data. You can use either the DataGridView or the BindingNavigator at the top of the form to navigate through the data and add or delete records. Click the BindingNavigator’s Save Data button (which looks like a floppy disk) to save changes.
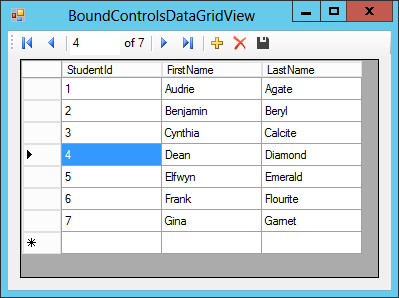
Figure 23-7: You can drag-and-drop a table from the Data Sources window onto a form to quickly build a grid-style program to edit a table’s data.
Visual Studio also automatically adds code behind the scenes to load the data when the program starts and to save any changes when you click the BindingNavigator’s Save Data button.
If the database defines constraints, it verifies those constraints when you try to save changes. For example, if a field must contain a value between 0 and 100 and you try to set its value to 200, the program throws an exception when you try to save the data.
This program is rather primitive and is missing some features that you would want to include if you were going to give it to a customer. For example, if you close the program without saving changes, the changes are lost. The program also doesn’t provide validation to prevent you from entering invalid values, and it doesn’t handle the exceptions that occur if you try to save changes that violate the database’s constraints
Still this program is easy to build. You might not want to give this program to a customer, but if you just need an easy way to edit the records in a table, this program may suffice.
Making a Details Interface
To make a details view interface, create the data source as before. Open the Data Sources window and right-click the table you want to display. This time select the Details option shown in Figure 23-6.
Now click and drag the table onto the form as before. Visual Studio automatically adds the same components as it did for the DataGridView display, but this time it includes a series of Labels and TextBoxes instead of a DataGridView control. Figure 23-8 shows the result.
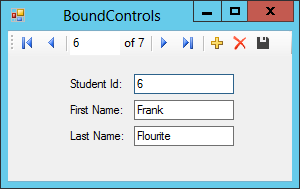
Figure 23-8: Use the BindingNavigator to navigate through the records in a details view.
Use the BindingNavigator’s buttons to navigate through the records or to add and remove records. Use the TextBoxes to view and edit the records’ field values.
This simple program has the same advantages and disadvantages that the grid view does. It’s missing some important features (such as warning you if you try to close when there are unsaved changes) and doesn’t handle exceptions, but it’s also easy to create. You might not want to give it to a customer, but it may be good enough to let you manage a database table.
Making a DataGrid Interface
The two previous techniques have the disadvantage that they let you view data from only one table at a time. There are ways you can make a form work with multiple tables (the section “Using ADO.NET” later in this chapter describes one method), but they’re more work.
Another approach that can be useful is to display a DataSet’s data in a DataGrid control. The DataGrid control can display data from multiple tables linked by the relationships defined by the database. To use this method, follow these steps.
- Create the data source and
DataSetas before. - Add some controls and components that you will need to the Toolbox.
- Open the form and the Toolbox window.
- In the General section at the bottom of the Toolbox, right-click and select Choose Items.
- On the .NET Framework Components tab, select
DataGrid(System.Windows.Forms) andOleDbDataAdapter. Then click OK to add those components to the Toolbox.
- Create a data adapter for the
Studentstable.- Double-click the
OleDbDataAdaptertool in the Toolbox to start the Data Adapter Configuration Wizard shown in Figure 23-9. Select the connection you created earlier and click Next.
Figure 23-9: Select or create the database connection that you want to use.
- On the wizard’s next page, shown in Figure 23-10, select Use SQL Statements and click Next.
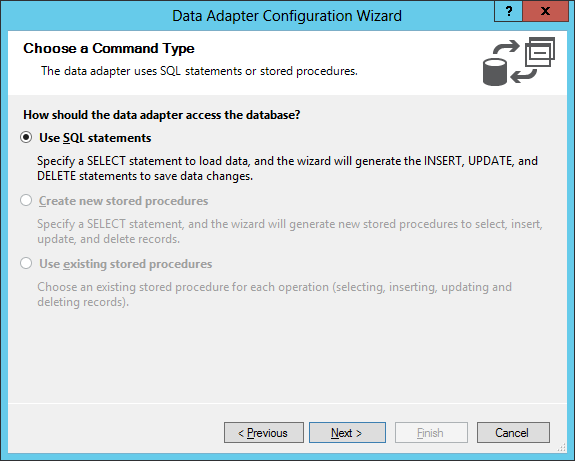
Figure 23-10: Select the method you want the adapter to use to access the database.
- On the wizard’s next page, shown in Figure 23-11, enter the SQL query that you want to use to select data from the table. To select all the
Studenttable’s data, use the querySELECT * FROM Students. (You can also use Query Builder to create the SQL query if you like. Query Builder isn’t described here, but it’s fairly easy to use, so you can probably figure it out with some experimentation.)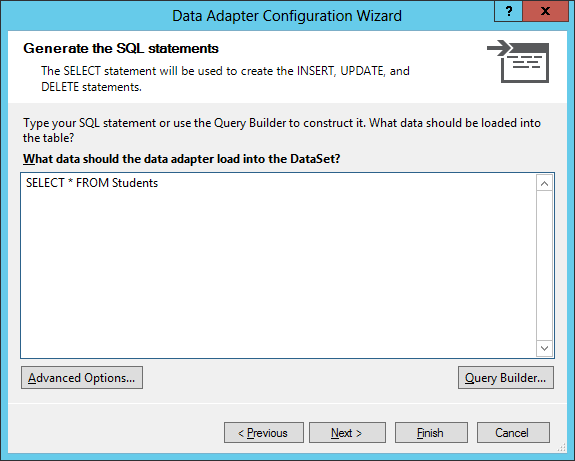
Figure 23-11: Enter a SQL select statement or click Query Builder and use the Query Builder to create a select statement.
- After you enter the SQL select statement, you can click Finish to finish creating the data adapter, or you can click Next to see the summary shown in Figure 23-12. In this case the summary indicates that the wizard configured the adapter to give it the tools it needs to modify the data. After you view the summary, click Finish to create the data adapter and close the wizard.
- Use the Properties window to change the new data adapter’s name to studentsDataAdapter.
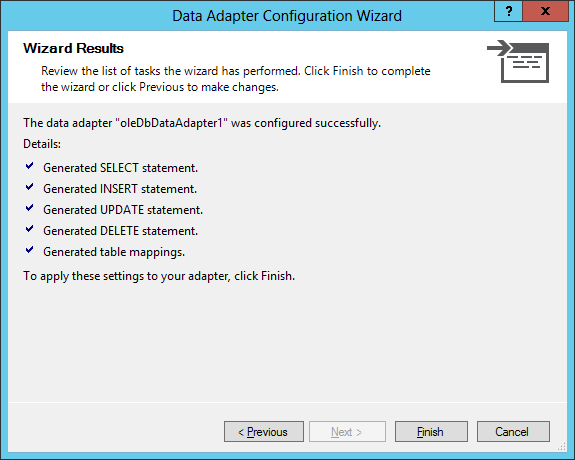
Figure 23-12: The Data Adapter Configuration Wizard’s summary screen tells you what the wizard will do when it creates a data adapter.
- Double-click the
- Repeat the previous steps to create a data adapter for the
TestScorestable namedtestScoresDataAdapter. - Add a
DataSetto the form.- Expand the Toolbox’s Data section and double-click the
DataSettool. - On the Add Dataset dialog shown in Figure 23-13, click the “Typed dataset” option and select the
DataSettype you created while making the original data source, and click OK.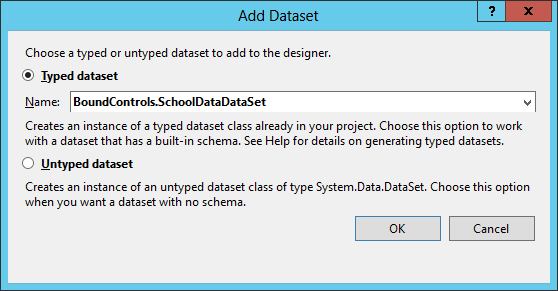
Figure 23-13: Use the Add Dataset dialog to create an instance of a
DataSet.
- Expand the Toolbox’s Data section and double-click the
- Create the
DataGridcontrol.- In the Toolbox’s General section, double-click the
DataGridcontrol. - Arrange the control as you want it, perhaps docking it to fill the form or setting its
Anchorproperty. - In the Properties window, select the
DataGrid’sDataSourceproperty and open the drop-down, as shown in Figure 23-14. Expand the drop-down’s options until you find theDataSetand select it. (This actually sets theDataSourceto a new binding source for theDataSet, not to theDataSetitself. This is just another layer between the control and theDataSet.)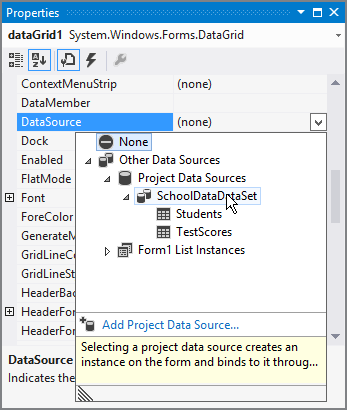
Figure 23-14: Use the Properties window to set the
DataGrid’sDataSourceproperty.
- In the Toolbox’s General section, double-click the
- Give the form a
Loadevent handler and add the following code to it.private void Form1_Load(object sender, EventArgs e) { // Use the connection string stored in App.config. oleDbConnection1.ConnectionString = Properties.Settings.Default.SchoolDataConnectionString; studentsDataAdapter.Fill(schoolDataDataSet1.Students); testScoresDataAdapter.Fill(schoolDataDataSet1.TestScores); }This code starts by setting the OLE DB connection object’s connect string to the value saved in the App.config file. You don’t need to do this if the database is at the same location it was when you built the program, but it enables you to easily change the database’s location.
Next the code makes the data adapters load the data from their respective database tables into the
DataSet. - Give the form a
FormClosingevent handler and add the following code to it.private void Form1_FormClosing(object sender, FormClosingEventArgs e) { studentsDataAdapter.Update(schoolDataDataSet1.Students); testScoresDataAdapter.Update(schoolDataDataSet1.TestScores); }This code makes the data adapters save any changes in the
DataSetback into the database.
Figure 23-15 shows the finished program. You can click the links to navigate from a Students record to the corresponding records in the TestScores table.
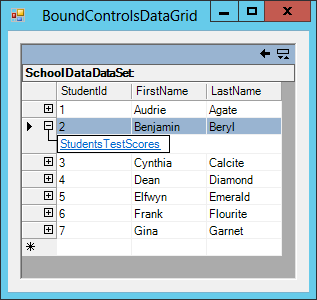
Figure 23-15: A DataGrid control provides links between records in related tables.
These examples show only a few ways you can bind controls to data in a Windows Forms application. There are so many other ways to use data binding that you would need a whole book to cover them all. For more information about data binding, look through some books on database programming or search the Internet. The following links can help get you started.
- “Displaying Data Overview” at
msdn.microsoft.com/library/2b4be09b(v=vs.90).aspx - “Binding Controls to Data in Visual Studio” at msdn.microsoft.com/library/ms171923.aspx
Loading DataSets
The previous examples displayed data in bound controls. Sometimes, you might want a program to use data without binding it to controls. For example, you might want to loop through a customer database and print out invoices for customers with outstanding balances. In that case, there’s no need to display the data in bound controls. You can write this kind of program by loading the data into a DataSet and then examining it there.
The example described in the preceding section, which displays from multiple tables in a DataGrid control, does almost exactly what you need for this kind of program. When the program starts, it loads data into a DataSet and displays the data in a DataGrid control. The only difference is that the new type of program doesn’t need the DataGrid.
To build the new kind of program, follow the same steps described in the previous section but skip step 6, which creates the DataGrid control. If you don’t need to save any changes to the database, you can also skip step 8, which uses the form’s Closing event handler to save changes when the program is closing.
After the form’s Load event handler loads the data, the program can use the DataSet and the tables it contains to examine the data. For example, you can use the LINQ to DataSet techniques described in Chapter 8 to select data from the DataSet and display the results.
The ListStudentNames program, which is available for download on this book’s website, uses a DataSet and data adapter to load the Students table in the SchoolData.accdb database. It uses the following code to load and display the students’ names.
private void Form1_Load(object sender, EventArgs e)
{
    // Load the data.
    studentsDataAdapter.Fill(schoolDataDataSet1);

    // Display the students' names.
    ListStudents();
}

// List the students.
private void ListStudents()
{
    studentsListBox.Items.Clear();

    // Display the students' names.
    foreach (DataRow row in schoolDataDataSet1.Students.Rows)
    {
        string name =
            row.Field<string>("FirstName") + " " +
            row.Field<string>("LastName");
        studentsListBox.Items.Add(name);
    }
}
The code starts by calling the data adapter’s Fill method to load data into the DataSet’s Students table. It then calls the ListStudents method to display the students’ names.
The ListStudents method loops through the table’s rows. The code gets each row’s FirstName and LastName values and concatenates them to form the student’s name. It then adds the name to the studentsListBox control.
Using similar techniques you can write programs that load and manipulate data. If you need to save changes, simply call the data adapters’ Update methods.
The AddStudent example program, which is shown in Figure 23-16 and available for download on this book’s website, lets you add new students to the Students table.
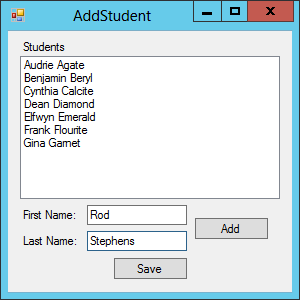
Figure 23-16: This example adds new students to the Students table.
When the program starts, its Form_Load event handler loads the student data and displays student names just as the ListStudentNames example program did.
If you enter a new first and last name and click Add, the following code executes.
// Add the new student.
private void addButton_Click(object sender, EventArgs e)
{
    // Create the new row.
    DataRow row = schoolDataDataSet1.Students.NewRow();
    row.SetField<string>("FirstName", firstNameTextBox.Text);
    row.SetField<string>("LastName", lastNameTextBox.Text);

    // Add the new row to the Students table.
    schoolDataDataSet1.Students.Rows.Add(row);

    // Clear the TextBoxes.
    firstNameTextBox.Clear();
    lastNameTextBox.Clear();

    // Redisplay the data.
    ListStudents();
}
This code uses the Students table’s NewRow method to create a new DataRow object that has the right fields to make a row in that table. It sets the row’s FirstName and LastName values and adds the new row to the table’s Rows collection.
The code finishes by clearing the TextBoxes and redisplaying the list of students.
If you click Save, the following code saves any new rows into the database.
// Save the data.
private void saveButton_Click(object sender, EventArgs e)
{
    studentsDataAdapter.Update(schoolDataDataSet1);
}
This code simply uses the data adapter’s Update method to save the changes.
Using ADO.NET
This chapter’s examples so far used wizards to create and configure data adapters and DataSets to load, manipulate, and save data. Behind the scenes, the wizards created ADO.NET code to handle all the details. (ADO.NET is the .NET version of ADO, which stands for ActiveX Data Objects.) Instead of using the wizards and the objects they create, you can use ADO.NET directly.
The program first makes a database connection that it can use to interact with the database. It then creates a command object associated with the connection. The command’s methods let the program execute SQL commands that manipulate the database.
The TestScoreListBoxes example program, which is shown in Figure 23-17 and available in this chapter’s downloads, uses ADO.NET to display student and test score data.
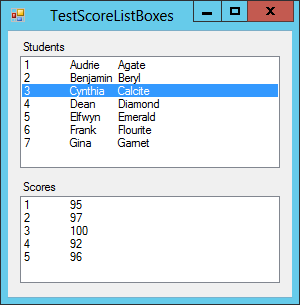
Figure 23-17: The TestScoreListBoxes example program uses ADO.NET to display student and test score data.
The program uses classes in the System.IO and System.Data.OleDb namespaces, so it includes using directives for them.
When the program starts, it uses the following code to display the students’ names.
// The database connection.
private OleDbConnection Connection = null;

// Load the data.
private void Form1_Load(object sender, EventArgs e)
{
    // Use a relative path to the database.
    string dbPath = Path.GetFullPath(Path.Combine(
        Application.ExecutablePath,
        @"........"));
    string connectString =
        @"Provider=Microsoft.ACE.OLEDB.12.0;" +
        @"Data Source='" + dbPath + @"SchoolData.accdb';" +
        @"Persist Security Info=True;";

    // Create the database connection.
    Connection = new OleDbConnection(connectString);

    // Create a command object to select student names.
    string query =
        "SELECT StudentId, FirstName, LastName " +
        "FROM Students " +
        "ORDER BY FirstName, LastName";

    // Open the connection.
    Connection.Open();

    // Execute the command.
    using (OleDbCommand command = new OleDbCommand(query, Connection))
    {
        // Execute the command.
        using (OleDbDataReader reader = command.ExecuteReader())
        {
            while (reader.Read())
            {
                int studentId = reader.GetInt32(0);
                string firstName = reader.GetString(1);
                string lastName = reader.GetString(2);
                studentsListBox.Items.Add(studentId.ToString() + "	" +
                    firstName + "	" + lastName);
            }
        }

        // Close the connection.
        Connection.Close();
    }
}
The code first declares an OldDbConnection object. It declares this object outside of any method so all the form’s code can use it.
The form’s Load event handler defines a connection string that it can use to connect to the database. Figuring out exactly what needs to be in this string can be tricky because the requirements vary depending on the type of database you are using. One method for building this string is to make a data source at design time and use the connection string created by the Data Source Configuration Wizard. If you refer to Figure 23-1, you can see a connecting string that works with this example’s database. I modified the code slightly to make the database’s location relative to the example program’s executable directory.
After defining the connection string, the program uses it to initialize the connection object. That gives the new connection the information it needs to connect to the database, but it doesn’t yet open the connection.
The program then defines the SQL query it will execute. In this example the query selects the StudentId, FirstName, and LastName fields from the Students table and orders the result by FirstName and LastName.
Next, the code opens the database connection. It then makes a new OleDbCommand object, passing its constructor the query string and the connection.
This query selects multiple rows of data, so the program uses the command’s ExecuteReader method to execute the query and retrieve an object that can read the returned results.
The program now uses the reader to loop the returned results. The reader’s Read method advances the reader to the next row of results and returns true if such a row exists. (In other words, it returns true if the reader has not reached the end of the results.)
For each returned row, the program gets the row’s StudentId, FirstName, and LastName values. It concatenates them and adds the result to the studentsListBox.
When it finishes processing the returned results, the program closes the database connection.
When you select a student from the upper ListBox, the following event handler displays that student’s test scores in the lower ListBox.
// Display the selected student's scores.
private void studentsListBox_SelectedIndexChanged(object sender, EventArgs e)
{
    // Clear the ListBox.
    scoresListBox.Items.Clear();

    // Get the selected student's ID.
    string studentId = studentsListBox.SelectedItem.ToString().Split('	')[0];

    // Create a command object to select student names.
    string query =
        "SELECT TestNumber, Score " +
        "FROM TestScores " +
        "WHERE StudentId=" + studentId.ToString() + " " +
        "ORDER BY TestNumber";

    // Open the connection.
    Connection.Open();

    // Execute the command.
    using (OleDbCommand command = new OleDbCommand(query, Connection))
    {
        // Execute the command.
        using (OleDbDataReader reader = command.ExecuteReader())
        {
            while (reader.Read())
            {
                int testNumber = reader.GetInt32(0);
                int score = reader.GetInt32(1);

                scoresListBox.Items.Add(testNumber.ToString() + "	" +
                    score.ToString());
            }
        }
    }

    // Close the connection.
    Connection.Close();
}
This code is similar to the code the program uses to display the students’ names. The biggest difference is that it uses a different query to select a specific student’s test scores. For example, if you select the student with StudentId equal to 1, the program uses the following query.
SELECT TestNumber, Score FROM TestScores WHERE StudentId=1 ORDER BY TestNumberThe code follows these steps:
- Open the database connection.
- Create a command to use the query on the connection.
- Execute the query and get a reader to fetch the returned records.
- For each record, display the record’s data in a
ListBox. - Close the database connection.
This technique of using ADO.NET directly is more work than using drag-and-drop to build simple interfaces. It’s also more work to debug and maintain over time, but it gives you a lot more control and flexibility.
Summary
Because database programming is such an important topic for so many businesses, there are a huge number of tools, databases, and books available. No book, not even one solely dedicated to database programming, can cover everything there is to know about databases and database programming. This chapter barely scratches the surface. It doesn’t include enough material to make you an expert, but it explains some techniques you can use to build a quick interface to let you manage a database. It also explains how you can use ADO.NET to build more complicated database programs. You can use the Internet and database programming books to learn more.
The databases used in this chapter are relational databases that store data in tables containing rows, but there are other kinds of databases. For example, hierarchical databases store data that is arranged in tree-like structures (such as an organizational chart).
XML files can also store hierarchical data. Related technologies such as XPath and XSL provide additional database-like features such as searching and the capability to transform XML data into other forms such as HTML, text documents, or rearranged XML. The next chapter provides an introduction to XML and explains how you can use it to store and manipulate XML data in your C# programs.
Exercises
- Write a program similar to the one shown in Figure 23-18 that uses a
DataSetand LINQ to display test score data. Hint: Follow the steps described in the section “Making aDataGridViewinterface” to make aDataSetand data adapters. When the program starts, use data adapters to load aDataSet. Then use LINQ code similar to the code used by the LinqToDataSetScores example program in Chapter 8 to select and display the required data.
Figure 23-18: This program uses LINQ to select and display test score data.
- In the AddStudent example program described in the section “Loading
DataSets,” what happens if you add a student and then close the program without clicking Save? - Programs that use data adapters to load and save data in
DataSets load all the data when the program starts and save changes before the program ends (or when the user clicks a Save button). The ADO.NET examples described in this chapter load data as it is needed. Does one approach seem better than the other? Does the size or location of the database matter? What about the number of users? - An ADO.NET program can execute many more SQL statements than just
SELECT. For example, it can create tables, insert new records, modify or delete existing records, and drop tables.Write a program that connects to the SchoolData.accdb database and performs the following tasks by using the indicated SQL statements.
- Create an
Instructorstable.CREATE TABLE Instructors (InstructorId int, FirstName varchar(255), LastName varchar(255), Department varchar(255)) - Insert a new record into the
Instructorstable.INSERT INTO Instructors (InstructorId, FirstName, LastName, Department) VALUES (1001, 'Fred', 'Flourite', 'Mathematics') - Fetch and display the data in the
Instructorstable.SELECT InstructorId, FirstName, LastName, Department FROM Instructors - Update the record in the
Instructorstable.UPDATE Instructors SET FirstName='Fran' WHERE InstructorId=1001 - Fetch and display the data in the
Instructorstable again.SELECT InstructorId, FirstName, LastName, Department FROM Instructors - Drop the
Instructorstable.DROP TABLE Instructors
Hints: Use the command object’s
ExecuteNonQuerymethod to execute commands that don’t fetch data.Does the database warn you when you try to drop a table that isn’t empty?
- Create an
- What happens if a program tries to open a database connection that is already open? How does this affect programs that create a connection at the module level and then use the connection in multiple methods?
- Modify the program you wrote for Exercise 4 so that it inserts three records into the
Instructorstable. What happens if you omit theUPDATEstatement’sWHEREclause? Hint: You can simplify the program by creating anInsertInstructorsRecordmethod. - Write a program that lets the user enter an SQL
SELECTstatement and execute it to see results in aListBox. Test the program by executing the following queries:SELECT * FROM Students, TestScores WHERE Students.StudentId = TestScores.StudentId SELECT FirstName, LastName, AVG(Score) FROM Students, TestScores WHERE Students.StudentId = TestScores.StudentId GROUP BY FirstName, LastNameHints: Use error handling in case the SQL statement is incorrectly formed. Use the
OleDbDataReader’sGetValuesmethod to fetch all the values for a row. Use those values’ToStringmethods to convert the values into text.Note that you generally shouldn’t execute SQL statements entered by the user because the user could enter malicious code that damages the database. For example, the user could enter a
DROP TABLEstatement. This sort of tool should be available only to trusted users who understand SQL.