Chapter 22
Parallel Programming
What’s in This Chapter
- Advantages of multithreading
- PLINQ,
BackgroundWorker, TPL, tasks, and threads - Interacting with the UI thread
- Race conditions and deadlock
- Thread-safe classes and collections
Wrox.com Downloads for This Chapter
Please note that all the code examples for this chapter are available as a part of this chapter’s code download on the book’s website at www.wrox.com/go/csharp5programmersref on the Download Code tab.
One way to improve a program’s performance is to run it on a faster computer, but there’s a limit to how many instructions per second even a fast CPU can execute.
Another approach is to run different parts of the program on different processors. Some computers have multiple processors and many these days have multiple cores, separate central processing units (CPUs) on a single chip. Two core systems are the norm these days and processors with four, eight, or even more cores are available.
To execute commands on different CPUs, a .NET application creates multiple threads. A thread is the smallest unit of code to which an operating system allocates CPU time. In multithreading, a single process has multiple threads of execution. If the system has multiple CPUs, the threads can run in parallel on different CPUs.
The .NET Framework provides several methods for multithreading including the following.
- PLINQ—You saw this in Chapter 8, “LINQ.”
BackgroundWorker—This component executes code on a separate thread. It uses events to communicate with the main user interface thread (the UI thread).- Task Parallel Library (TPL)—These tools let you easily run multiple methods in different threads or run multiple instances of the same method with different parameters.
- Tasks—The
Taskclass lets you create and run threads. TheTaskclass defines some methods to make certain typical operations easier such as creating and starting a task in a single step, waiting for a group of tasks to finish, or waiting until any one of a group of tasks finishes. - Threads—The
Threadclass gives you lower level access to threads. These are more complicated that using other methods but they provide greater control.
This chapter explains how you can use BackgroundWorker, TPL, threads, and tasks to execute code on multiple threads simultaneously. (See the section “PLINQ” in Chapter 8 for information about PLINQ.)
Multiprocessing is a big topic so this chapter provides only an overview of the most common parallel programming techniques. Threads are particularly complicated, so this chapter doesn’t cover them exhaustively. PLINQ, the BackgroundWorker component, TPL, and the Task class are much simpler than threads and provide much of the same basic functionality.
Before you can learn how to use those tools, however, you need to learn a bit about how threads can interact with the user interface’s controls. The following section explains those interactions. The sections after that describe BackgroundWorker, TPL, and threads.
Interacting with the User Interface
Windows Forms controls are not thread-safe. That means they can safely be manipulated only by the thread that created them: the UI thread. If a program runs multiple threads, only the UI thread can safely interact with the controls. If a non-UI thread tries to manipulate a control, it might succeed sometimes but often it crashes the program.
Sometimes, a thread might need to interact with the user interface to provide information to the user. For example, a thread that monitors stock prices might need to display a new price or draw a graph showing prices over time.
A non-UI thread cannot directly modify the UI controls, but it can modify them indirectly. To interact with the UI controls, a thread should follow these steps.
- Check the
InvokeRequiredproperty for a control that was created in the UI thread. This property istrueif that control was created on a thread other than the thread that is callingInvokeRequired. (Typically a thread checks the form’sInvokeRequiredproperty, so the property istrueif the thread is not the UI thread.) - If
InvokeRequiredistrue, the thread should call the control’sInvokemethod, passing it a delegate. TheInvokemethod then executes the delegate on the thread that created the control. (Again the control is typically the form, soInvokeexecutes the delegate on the UI thread because it created the form.) - The delegate executes on the control’s thread. Because it is running in the control’s thread, the delegate can safely interact with the control. (Typically, the control was created in the UI thread, so the delegate can interact with all the UI controls.)
If this seems a bit confusing, that’s because it is. The Invoke example program, which is available for download on this book’s website, provides a simple example that uses two techniques to update two different labels. (Unfortunately, even a simple example such as this one can be fairly confusing.)
This example uses a Timer component created at design time to update a label to show the current time. At design time I set the Timer’s Enabled property to true so that the Timer starts running automatically. I also set its Interval property to 500 so that it fires its Tick event every 500 milliseconds (every one-half second).
The following code shows the Timer’s Tick event handler.
// Update the first clock.
private void clock1Timer_Tick(object sender, EventArgs e)
{
    clock1Label.Text = DateTime.Now.ToString("T");
}
The Tick event handler runs in the UI thread so that it can access the clock1Label control directly. That makes this nice and simple.
The following code shows how the program creates and launches a thread to update its second clock label.
// Start a thread to update the second clock.
private void Form1_Load(object sender, EventArgs e)
{
    // Create the thread.
    Thread thread = new Thread(UpdateClock2);

    // Start the thread.
    thread.Start();
}
The form’s Load event handler declares and instantiates the thread variable, passing its constructor the method that the thread should execute: UpdateClock2. It then calls the object’s Start method to start the thread.
The following code shows the UpdateClock2 method that the thread executes.
// The method that the thread executes.
private void UpdateClock2()
{
    // Loop forever.
    for (; ; )
    {
        // This doesn't work.
        //clock2Label.Text = DateTime.Now.ToString("T");

        // This works.
        if (this.InvokeRequired)
            this.Invoke(new Action(DoUpdateClock2));

        // Sleep for 1/2 second.
        Thread.Sleep(500);
    }
}
The method enters an infinite loop. Inside the loop, commented code tries to directly set the text displayed by the clock2Label control. Because that control was created by the UI thread, this code fails. If you uncomment this statement, you’ll get the following exception message.
An unhandled exception of type ‘System.InvalidOperationException’ occurred in System.Windows.Forms.dll.
Additional information: Cross-thread operation not valid: Control ‘clock2Label’ accessed from a thread other than the thread it was created on.
After the commented code, the method checks InvokeRequired to see if the code is executing on a non-UI thread. (Actually in this example we know for certain that the code is executing on a non-UI thread, so you could skip this check and just call Invoke.) If InvokeRequired is true, the program calls Invoke, passing it the method that should be invoked, in this case DoUpdateClock2.
After invoking DoUpdateClock2, the loop sleeps for one-half a second before the next update.
The following code shows the DoUpdateClock2 method that updates the second clock label on the UI thread.
// Perform the update for the second clock.
private void DoUpdateClock2()
{
    clock2Label.Text = DateTime.Now.ToString("T");
}
This method runs on the UI thread, so it simply sets the clock2Label control’s Text property directly.
There’s one more complication to using the thread in this way. When you close the main form, the thread keeps running. The form closes but the application doesn’t end.
There are a couple ways you can handle this. First, you can stop the thread in either the form’s Closing or Closed event handler. If you declare the thread variable at the class level, the event handler can call the thread’s Abort method to make it stop.
You can also make the Closing or Closed event handler call Environment.Exit. This ends the application immediately, stopping all threads.
A better solution is to set the thread’s IsBackground property to true. When all foreground threads end, the application stops any background threads and terminates. Initially the main form’s UI thread is the only foreground thread. If you don’t create any others, then when you close the main form, its UI thread stops, so the application stops.
The following code shows the full version of the Invoke example program’s Load event handler. The code that sets the IsBackground property is highlighted in bold.
// Start a thread to update the second clock.
private void Form1_Load(object sender, EventArgs e)
{
    // Create the thread.
    Thread thread = new Thread(UpdateClock2);
thread.IsBackground = true;

    // Start the thread.
    thread.Start();
}
BackgroundWorker
Understanding how to use InvokeRequired and Invoke is one of the harder parts of using threads. Compared to accessing UI controls from other threads, using BackgroundWorker is relatively simple.
The BackgroundWorker component provides a relatively simple way to run a separate thread of execution. The basic process follows.
- Create a
BackgroundWorker. Because this is a component, you can place one on a form at design time if you want. - To make the worker start running, call its
RunWorkerAsyncmethod. This starts a new thread and raises the worker’sDoWorkevent handler on that thread. - The worker must catch its
DoWorkevent. This event handler is where the worker executes its code. This event handler runs on a separate thread, so it and the UI thread may run on different processors.
If you like, the BackgroundWorker can provide feedback to the main UI thread. To do that, add these steps to those described in the preceding list.
- Before starting the
BackgroundWorker, set itsWorkerReportsProgressproperty totrue. - Catch the worker’s
ProgressChangedevent. This event handler runs in the UI thread, so it can manipulate the user interface controls without messing withInvokeRequiredandInvoke.
If you want the main program to stop the worker, follow these steps.
- Before starting the
BackgroundWorker, set itsWorkerSupportsCancellationproperty totrue. - To stop the worker, call its
CancelAsyncmethod. - In the
DoWorkevent handler, periodically check the worker’sCancellationPendingproperty. If that property istrue, the event handler should exit. If you like, the code can set thee.Cancelparameter to indicate that the work was canceled.
If you declare the BackgroundWorker in code instead of adding it to a form at design time, you must keep a reference to it at the class level so that the code can call its CancelAsync method in step 2.
The worker raises its RunWorkerCompleted event if the DoWork event handler ends, if the DoWork event handler throws an exception, or if the worker is stopped by a call to its CancelAsync method.
If the DoWork event handler exits, the worker stops. The event handler can set its e.Result parameter to return a value to the RunWorkerComplete event handler.
TPL
The BackgroundWorker component uses events to interact with the UI thread without the hassle of using InvokeRequired and Invoke. Because it uses event handlers, it breaks the code up into pieces that cannot be easily run in a sequence.
For example, suppose you want to perform several complicated calculations and display the results to the user. You could use a separate BackgroundWorker to calculate each of the results. Unfortunately, the main method that created the workers would then need to end. The program would later catch the workers’ RunWorkerCompleted events. It would then need to figure out when all the workers had finished and display the combined result. If the program needed to use the results to calculate further results, the whole process might start again. The finished code would be filled with event handlers and code to coordinate them.
TPL provides much better methods for performing multiple calculations on separate threads and waiting for them all to complete. Those methods are Parallel.For, Parallel.ForEach, and Parallel.Invoke.
Parallel.For
The Parallel.For method takes as parameters a starting value, an ending value, and a delegate. It invokes the delegate for each of the values between the starting value (including that value) and the ending value (not including that value). The method blocks until all the calls to the delegate have completed and then the code continues.
The ParallelFor example program, which is available for download on this book’s website, uses the following code to calculate Fibonacci numbers.
// Use recursion (the slow way) to calculate Fibonacci(N).
private long Fibonacci(long N)
{
    if (N <= 1) return 1;
    return Fibonacci(N - 1) + Fibonacci(N - 2);
}
This code simply implements the following recursive definition of Fibonacci numbers.
F0 = 1
F1 = 1
FN = FN-1 + FN-2
This isn’t the most efficient way to calculate Fibonacci numbers. This example uses it because it’s simple and slow enough to show a benefit from multithreading.
The program uses the following code to calculate four Fibonacci numbers at the same time.
// Arrays for holding N and results.
private long[] Numbers = new long[4];
private long[] Results = new long[4];

// Calculate a Fibonacci number and save it in Results[index].
private void FindFibonacci(int index)
{
    Results[index] = Fibonacci(Numbers[index]);
}
First, the code declares the Numbers array to hold the index of the Fibonacci numbers to calculate. For example, if Numbers[0] is 10, the program should calculate F10. (The code that initializes the Numbers array isn’t shown here.)
Next, the code declares the Results array to hold results. If Numbers[0] is 10, the program will store the value F10 in Results[0].
The FindFibonacci method takes as a parameter the index of the value in the Numbers and Results arrays that it should calculate. It calls the Fibonacci method described earlier to perform the calculation and saves the result in the correct position in the Results array.
The following code shows how the example program calculates four Fibonacci numbers in parallel.
Parallel.For(0, 4, FindFibonacci);The Parallel.For method calls the FindFibonacci method four times, passing it the parameters 0, 1, 2, and 3. Each call receives 0, 1, 2, or 3 as a parameter and looks in the appropriate Numbers array entry to see which value it should calculate. It performs its calculations and save its results in the Results array.
After the call to Parallel.For finishes, the program resumes execution as it would if it had called FindFibonacci four times in sequence.
If the computer has multiple CPUs available, the four calls to FindFibonacci may run on separate threads, possibly saving time.
Figure 22-1 shows the ParallelFor program after it has calculated four Fibonacci numbers sequentially and then in parallel. If you look at the figure you’ll see that calculating the values sequentially took 12.39 seconds and calculating them in parallel took 7.57 seconds.
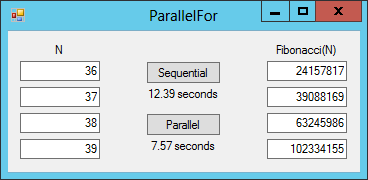
Figure 22-1: The ParallelFor example program uses Parallel.For to calculate Fibonacci numbers in parallel.
My computer has two cores, so performing the calculations on separate threads did save some time. The parallel trial used a bit more than one-half as long as the sequential trial because the system uses some time starting and coordinating the threads. Still the parallel trial took only 61 percent as long as the sequential trial.
Parallel.ForEach
The Parallel.For method invokes a method passing it the values between starting and ending values. This is analogous to how a for loop works, assuming the loop uses a simple integer as a looping variable.
The Parallel.ForEach method is analogous to a foreach loop. It also invokes a method several times in different threads. Instead of passing the method different integer values in each call, Parallel.ForEach passes the method different items from some sort of group of objects.
The ParallelForEach example program, which is available for download on this book’s website, uses this technique to calculate Fibonacci numbers in parallel.
Because Parallel.ForEach passes the method items from a collection, the example program must create some sort of item to hold information about the Fibonacci calculations. This example uses the following simple class to hold that information.
private class FibInfo
{
    public long N, Result;
}
The N field holds the index of the Fibonacci number to calculate. When the program performs the calculation, it stores the Fibonacci number in the object’s Result field.
The following code shows this example’s version of the FindFibonacci method.
private void FindFibonacci(FibInfo info)
{
    info.Result = Fibonacci(info.N);
}
This method takes a FibInfo object as a parameter. It calls the Fibonacci method, which is the same as the version used in the ParallelFor example program, passing it the FibInfo object’s N field. It stores the result in the object’s Result field.
The following code shows the part of the program that uses Parallel.ForEach.
// Save the numbers N.
FibInfo[] infos = new FibInfo[4];
for (int i = 0; i < OutputTextBoxes.Length; i++)
{
    infos[i] = new FibInfo() { N = long.Parse(InputTextBoxes[i].Text) };
}

// Calculate.
Parallel.ForEach(infos, FindFibonacci);

// Display the results.
for (int i = 0; i < OutputTextBoxes.Length; i++)
{
    OutputTextBoxes[i].Text = infos[i].Result.ToString();
}
The code creates an array of FibInfo objects and sets their N fields from the values in the TextBoxes in the InputTextBoxes array. (That array is initialized when the program starts.)
The code then calls Parallel.ForEach, passing it the array of FibInfo objects and the FindFibonacci method that it should call.
The code then displays the results in the TextBoxes in the OutputTextBoxes array (which is also initialized when the program starts).
Parallel.Invoke
The Parallel.For and Parallel.ForEach methods invoke the same delegate for different parameters. Sometimes you might want to invoke several different methods. The Parallel.Invoke method lets you do that. Simply pass the method one or more action delegates for the method to execute.
The ParallelInvoke example program, which is available for download on this book’s website, uses the following code to calculate four Fibonacci values in parallel.
Parallel.Invoke(
    FindFibonacci0,
    FindFibonacci1,
    FindFibonacci2,
    FindFibonacci3
);
The following code shows the FindFibonacci0 method.
private void FindFibonacci0()
{
    Results[0] = Fibonacci(Numbers[0]);
}
The other methods are similar.
Tasks
The System.Threading.Tasks.Task class lets you create threads and run them asynchronously. If the system has multiple CPUs, then Tasks may run simultaneously.
The following table summarizes the Task class’s most useful properties.
| Property | Purpose |
Exception | Returns an AggregateException object containing information about any exceptions that caused the Task to end early. |
Factory | Provides access to TaskFactory class methods that you can use to create Tasks. (This is explained in more detail shortly.) |
IsCanceled | Returns true if the Task was canceled. |
IsCompleted | Returns true if the Task has finished processing. |
IsFaulted | Returns true if the Task stopped because of an unhandled exception. |
Status | Returns the Task’s status. This can be one of Canceled, Created, Faulted, RanToCompletion, Running, WaitingForActivation, WaitingForChildrenToComplete, or WaitingToRun. |
The following table lists the Task class’s most useful methods.
| Method | Purpose |
ConfigureAwait | Configures an “awaiter” object that you can use with the await keyword to wait for the Task to complete. |
ContinueWith | Creates a continuation Task that executes when a target Task finishes. |
Delay | Creates a Task that completes after a specified amount of time has passed. |
Run | This static method creates a Task and queues it to start running. (This is basically a simplified version of Task.Factory.StartNew, which is described later in this section.) |
RunSynchronously | Runs a Task synchronously. |
Start | Starts a Task that was previously created. |
Wait | Waits for the Task to complete. |
WaitAll | This static method waits until all the Tasks in a set complete. |
WaitAny | This static method waits until any one of the Tasks in a set completes. |
WhenAll | Creates a Task that completes when all the specified Tasks complete. |
WhenAny | Creates a Task that completes when any one of the specified Tasks completes. |
There are several ways you can create and start a Task. First, you can use a Task class constructor to create a Task and then call its Start method to start it.
Second, you can use a TaskFactory object. The Task class’s Factory method returns a TaskFactory object that you can use to create different kinds of Tasks. The Task.Factory.StartNew method creates and starts a Task in a single step. This method has many overridden versions that let you specify various options.
Third, you can call Task.Run. This is basically a simplified version of Task.Factory.StartNew. It has fewer options so it is less flexible, but the reduced number of options also makes it a bit less confusing.
In addition to the StartNew method, the TaskFactory class provides two methods that create continuation Tasks that start running when other Tasks complete. The ContinueWhenAll method creates a Task that starts when all of a set of Tasks completes. The ContinueWhenAny method creates a Task that starts when any one of a set of Tasks completes.
The FiboTasks example program demonstrates the more cumbersome method for using Tasks. The following code shows how the program creates four tasks and then waits for them to complete.
// Start four tasks.
Task task0 = new Task(FindFibonacci, 0);
task0.Start();
Task task1 = new Task(FindFibonacci, 1);
task1.Start();
Task task2 = new Task(FindFibonacci, 2);
task2.Start();
Task task3 = new Task(FindFibonacci, 3);
task3.Start();

// Wait for the tasks to complete.
task0.Wait();
task1.Wait();
task2.Wait();
task3.Wait();
The code creates each Task and calls its Start method to start it running. After it starts the fourth Task, the program calls each Task’s Wait method to wait for the Task to complete.
The rest of the example program is similar to the Fibonacci number examples described in the earlier section “TPL.”
Threads
The System.Threading.Thread class gives you more control over threads than you can get from the other techniques described in this chapter. Using threads is more complicated, however, so normally you should try to use one of the other methods first. In most cases a Task object is a better choice than a thread.
The following table lists the Thread class’s most useful properties.
| Property | Meaning |
IsAlive | Returns true if the thread has been started and has not ended or aborted. |
IsBackground | Determines whether the thread is a background thread. |
Priority | Determines the thread’s priority. This can be Highest, AboveNormal, Normal, BelowNormal, or Lowest. |
ThreadState | Returns the thread’s state. This can be a combination of the values Aborted, AbortRequested, Background, Running, Stopped, StopRequested, Suspended, SuspendRequested, Unstarted, and WaitSleepJoin. |
The following table lists the Thread class’s most useful methods.
| Method | Purpose |
Abort | Raises a ThreadAbortException on the thread to make it terminate. |
Join | Blocks the thread on which the method is called until the thread terminates. (This is how programs normally wait for a thread to finish.) |
ResetAbort | Cancels an Abort for the current thread. |
Sleep | This static method suspends a thread for a specified amount of time. |
Start | Starts the thread. |
Yield | Yields execution to another thread if one is ready to run. |
Using a simple thread typically involves the following steps.
- Create the
Threadobject. - Call the
Startmethod to start the thread. - To stop the thread, call its
Abortmethod. - To wait for the thread, call its
Joinmethod.
Creating and managing Threads takes some overhead, so you should use only Threads if you have multiple large calculations that you want to run on multiple CPUs.
Coordinating Tasks
All the examples used so far in this chapter have been rigged for success. Each computation running in parallel worked only with its own data and never tried to look at the data used by any other computation. Each computation used InvokeRequired and Invoke to safely interact with the UI thread.
If you can arrange your computations in this way so that they never interfere with each other, then concurrent programming is relatively simple. Unfortunately in some applications different computations must access the same resources. In that case several conflicts can arise. Two of the most common of these are race conditions and deadlocks.
Race Conditions
A race condition can occur when two concurrent computations try to read and update the same value at roughly the same time. For example, suppose threads A and B each perform a random search trying to find the best possible solution to some difficult problem. When they finish their calculations, they must check variable BestSolution and update it if they find a better solution (one that is a larger integer).
The following code shows how a thread might perform this operation in C#.
if (mySolution > BestSolution)
{
    BestSolution = mySolution;
}
For this example, suppose BestSolution is initially 10, thread A finds a solution with value 15, and thread B finds a solution with value 20. Now consider the sequence of events shown in the following table.
| Thread A Steps | Thread B Steps |
Get BestSolution value (10) | |
Get BestSolution value (10) | |
20 > 10 so set BestSolution = 20 | |
15 > 10 so set BestSolution = 15 |
Thread A starts execution and gets the value of BestSolution, which is initially 10.
The system then switches execution to thread B. Thread B gets the value of BestSolution, which is still 10. Thread B compares its solution value 20 to BestSolution. Because 20 > 10, thread B’s solution is an improvement, so it saves its solution and sets BestSolution to 20.
Next, the system switches execution back to thread A. Thread A compares its solution value 15 to the value it saved for BestSolution, which is 10. Because 15 > 10, thread A thinks its solution is an improvement, so it updates BestSolution to 15.
In this example, thread B has the better solution, but thread A overwrites thread B’s solution. Thread A “wins” the race by setting its value second.
You can avoid race conditions by ensuring that the critical sequence of steps is performed atomically. In this example if each thread reads and updates variable BestSolution atomically, the other thread cannot interfere and cause a race condition.
You can use the lock statement to prevent race conditions. The lock statement marks a section as a critical region that cannot be interrupted by other concurrent paths of execution.
The lock statement uses an instance of an object to mark the region. When a thread enters the region, it obtains an exclusive lock on the object. Other threads cannot lock that object until it is released so they cannot enter a similar critical region until the first thread has finished and released its lock.
The following code shows how you might revise the preceding code to use the lock statement.
// Create and initialize BestSolution.
private int BestSolution = 10;

// Create the lock object.
private object UpdateLock = new object();

...

// Thread A updates BestSolution
lock (UpdateLock)
{
    if (mySolution > BestSolution)
    {
        BestSolution = mySolution;
    }
}
When the program starts, it creates and initializes BestSolution. It also creates an object named UpdateLock to use for locking critical regions of code. This object is declared at the class level so all code in the class can use it.
Later when thread A needs to update BestSolution, it uses a lock statement to obtain an exclusive lock on the object UpdateLock. Now thread B cannot enter its critical section of code because it cannot lock the object until thread A is done with it.
Deadlocks
A deadlock occurs when two or more threads are all stuck waiting for resources that are held by the other threads. For example, suppose thread A and thread B both need to access resources M and N. The resources might be files that the threads need to lock, variables that must be accessed within critical regions to prevent race conditions, or anything else that the threads must access exclusively.
Now suppose thread A has locked resource M and thread B has locked resource N. Thread A cannot continue because it cannot get resource N and thread B cannot continue because it cannot get resource M. The two are deadlocked and neither can continue.
In this simple example there’s a simple solution: Both threads can try to lock the resources in the same order. When both try to lock resource M, one succeeds and one is blocked waiting. Whichever succeeds can then lock resource N and continue. When that thread has finished, it releases its locks, the other thread locks both resources, and it can continue.
If you can, you should structure the code so deadlocks are impossible. That’s not hard in this example. If you have many threads possibly written by different programmers all trying to update a large set of objects in different orders, it can sometimes be hard to figure out if a deadlock might occur.
One way to break deadlocks is to use a timeout on operations that might cause trouble. For example, the Monitor class’s TryEnter method tries to obtain an exclusive lock on an object much as the lock statement does, but the TryEnter method also allows you to specify a timeout period. If the method acquires the lock, it returns true. If the method times out, it returns false.
When a thread is finished with a critical region, it should call the Monitor class’s Exit method to release its lock on the lock object.
The following code shows how a thread could attempt to enter a critical section of code that might cause a deadlock with other threads.
// Create the lock object.
private object UpdateLock = new object();
...
// Try to lock the lock object.
if (Monitor.TryEnter(UpdateLock, 500))
{
    try
    {
        // Critical code goes here ...
    }
    finally
    {
        Monitor.Exit(UpdateLock);
    }
}
else
{
    // Do something if we time out.
}
The code creates the lock object UpdateLock as before. Later it uses Monitor.TryEnter to try to enter the critical region of code. If TryEnter succeeds, the thread enters its critical region and does whatever it needs to do with the resources. The finally section of the try finally block ensures that the code calls Monitor.Exit when it is done with the critical region.
If the call to TryEnter returns false, the thread timed out and failed to obtain the lock. In that case the code should do something to recover, possibly trying again to obtain the lock.
The following table lists the most useful Monitor class methods.
| Method | Purpose |
Enter | Acquires an exclusive lock on an object. |
Exit | Releases an exclusive lock on an object. |
IsEntered | Returns true if the current thread has a lock on a specific object. |
TryEnter | Tries to acquire an exclusive lock on an object. |
Wait | Releases the lock on an object and then blocks until it reacquires a lock on that object. This is useful if the thread needs to allow another thread to take some action before it can continue. |
Thread-Safe Objects
An object is thread-safe if it is safe for it and other objects of that class or other classes to run on different threads at the same time. For example, in the race condition example described earlier, the objects running in threads A and B were not thread-safe because they tried to read and update the same variable in an unsafe manner.
If a class accesses only its own instance variables and no other class accesses those variables, then it is thread-safe.
At some point most threads need to somehow get information from the main program or send the main program results. To be thread-safe, you need to ensure that those operations are performed safely. If each thread interacts with the main program through variables assigned to it alone, then they are probably safe, as long as the main program doesn’t interfere with those variables.
If multiple threads (including the main program’s thread) need to manipulate the same variables, you should use locking mechanisms to coordinate them.
Writing your own thread-safe classes isn’t too hard if you’re careful to write the classes so that objects won’t interfere with each other when running on other threads. One situation that some programmers overlook is the case in which their class uses another class that is not thread-safe.
For example, the List<> class is not thread-safe. That means if two threads try to share information in the same List<>, they may cause race conditions.
The System.Collections.Concurrent namespace defines several collection classes that are thread-safe. The following table lists these concurrent classes.
| Collection | Purpose |
BlockingCollection<T> | A thread-safe collection. |
ConcurrentDictionary<TKey, TValue> | A thread-safe dictionary class. |
ConcurrentQueue | A thread-safe queue. |
ConcurrentStack | A thread-safe stack. |
ConcurrentBag | A thread-safe bag (unordered collection of objects). |
Summary
This chapter explained several classes that you can use to perform different kinds of tasks in parallel. The BackgroundWorker component performs a task and uses events to return progress and completion information. If you set its WorkerSupportsCancellation property to true, the program can interrupt a worker before it finishes.
TPL provides methods that let you easily perform operations in parallel and wait for them to finish. The Task class lets you perform multiple tasks simultaneously with greater flexibility than the BackgroundWorker or TPL. Finally, the Thread class provides even more options and flexibility; although, it’s more complicated than the Task class.
These classes let you write programs that perform operations separately. Treating each operation individually often makes the code simpler than it would be if you tried to handle every operation in a single piece of code. These classes also let you run pieces of code truly in parallel, if the computer has multiple CPUs.
Parallel programming is a huge topic, and this chapter scratched only the surface. For more information on parallel programming, find a good book on the subject or search the Internet. You can start with the following links.
- “Parallel Programming in the .NET Framework” at msdn.microsoft.com/library/dd460693.aspx
- “Parallel Programming with .NET blog” at blogs.msdn.com/b/pfxteam
Parallel programming can sometimes make a program faster if it is CPU-bound. Distributing calculations across multiple CPUs can improve performance. However, that won’t work if the program is limited by resources other than CPU power.
For example, if the program spends most of its time reading and writing to disk, multiple threads of execution probably won’t improve performance much. Database applications are often disk-bound in this manner. The program spends most of its time waiting for user input or reading and writing data to the database. The next chapter provides an introduction ADO.NET, one of the tools you can use to write database programs in C#.
Exercises
- The
System.Threading.Timerclass provides a timer similar to theSystem.Windows.Forms.Timercomponent that you can place on a form. Write a program that uses the former to display an updating clock.Hint: Create the
Timeras in the following code.System.Threading.Timer timer = new System.Threading.Timer(TimerTick, null, 0, 500);Here
TimerTickis the name of the callback method theTimershould invoke periodically;nullis a parameter that theTimerwill pass to the callback method; 0 is the delay in milliseconds before the callback method is first invoked; and 500 is the delay in milliseconds between calls to the callback method. - Modify the FiboTasks example program so that it uses the
Task.WaitAllmethod to wait for all the tasks to complete. - The
Task.Factory.StartNewmethod creates a newTaskand starts it. Modify the program you wrote for Exercise 2 so that it uses this method to create and start its tasks instead of performs those actions in two steps. - Modify the program you wrote for Exercise 3 so that it uses
Task.WaitAnyinstead ofTask.WaitAll. Run the program several times to find different Fibonacci values until you understand the program’s behavior. When one of the tasks finishes, what happens to the other tasks? - Modify the ParallelFor example program so that it uses lambda expressions instead of the
FindFibonaccimethod. - Suppose a program creates four
Tasks (or threads) and then waits for them all to complete. Does it matter in what order the program waits for theTasks? - The
Taskclass has a generic version that takes as a parameter the kind of result the task returns. For example, aTask<long>represents a thread that executes a method that returns alongresult. When you use this kind ofTask, itsResultproperty returns the result.Modify the program you wrote for Exercise 3 so that it uses
Task<long>.Factory.StartNewto run the Fibonacci function without using theFindFibonaccimethod or theResultsarray. - Modify the FiboTasks example program so that it uses
Threads instead ofTasks. Is there a difference in performance? - The DeadLock example program, which is available for download on this book’s website, uses two
Taskobjects to execute the following two methods at the same time.// Task A. private void TaskA() { Console.WriteLine("TaskA: Locking A"); lock (LockObjectA) { Thread.Sleep(500); Console.WriteLine("TaskA: Locking B"); lock (LockObjectB) { // Update the value. BestValue = ValueA; } } } // Task B. private void TaskB() { Console.WriteLine("TaskB: Locking B"); lock (LockObjectB) { Thread.Sleep(500); Console.WriteLine("TaskB: Locking A"); lock (LockObjectA) { // Update the value. BestValue = ValueB; } } }The following text shows the program’s Console window output.
TaskA: Locking A
TaskB: Locking B
TaskA: Locking B
TaskB: Locking A
Explain briefly why the
Tasks are now in deadlock and how they got into that state. Then download and rewrite the program so that it uses theMonitorclass to avoid the deadlock. Use theConsole.WriteLinemethod to indicate when eachTaskattempts to get a lock, fails to get a lock, and updates the variableBestValue.How many times do the
Tasks fail to obtain a lock? Can you think of a way to reduce the number of failures?Can you think of better ways to avoid the deadlock?
- Modify the program you wrote for Exercise 9 so that the two
Tasks try to lock objects in the same order. What is the result? - What happens if a
TaskcallsMonitor.Exitfor an object that it didn’t lock? - What happens if a
Taskdoesn’t callMonitor.Exitfor an object that it locked?