
Chapter 26
Reflection
What’s in This Chapter
- Learning about assemblies
- Enumerating fields, properties, methods, and events
- Getting and setting property values
- Creating add-ins
- Compiling and executing scripts at run time
Wrox.com Downloads for This Chapter
Please note that all the code examples for this chapter are available as a part of this chapter’s code download on the book’s website at www.wrox.com/go/csharp5programmersref on the Download Code tab.
Reflection is a process by which a program can examine and manipulate program objects at run time. For example, serialization (described in the preceding chapter) uses reflection to figure out what values an object has and what their data types are so that it can save and restore them. IntelliSense also uses reflection to describe the parameters that a method takes while you are entering those parameters.
Reflection is a fairly advanced technique that isn’t necessary for most programs. Usually, when you write a program, you know what you want it to do and what methods you need to call to do it. It’s unusual, for example, to be working with an Invoice class and not know what properties, methods, and events that class defines. Even if you don’t know what’s in a class and you use reflection to find out, it would be quite hard to make the program use those discovered items effectively.
Still there are a few situations in which reflections can be useful. Some of the more common uses of reflection include
- Load assemblies at run time.
- Learn what assembly defines a particular item such as a class or enumeration.
- List a class’s fields and properties.
- List a class’s constructors and other methods.
- List a class’s events.
- Get information about a property such as its type and whether it is read-only.
- Get and set a property’s value.
- Get information about the parameters passed to a method.
- Get information about an item’s attributes.
Some reflection classes even let you create new types and execute code at run time.
This chapter describes some of the more useful things you can do with reflection. It explains how to learn about classes, get and set property values, invoke methods, and compile and execute scripts.
Learning About Classes
A class’s type provides properties and methods that provide a wealth of information about the class. You can get a class’s type by using typeof(TheClass) or by calling the GetType method on an instance of the class.
The System.Type class provides many properties and methods that give information about a type. Most of these are reasonably self-explanatory. One detail that may not be obvious is that some of these properties and methods return objects that describe the information you want rather than the information itself. The reason they do that is many of these items are more complicated than you might at first realize.
For example, suppose the MusicalInstrument class is defined in some DLL. You can use reflection to determine the module that defines the class. You might think of the module as simply the name of the DLL containing the class, but the Type class’s Module property returns a Module object that includes lots of information about the module including its name, assembly (which is also an object containing a lot of information), custom attributes, fully qualified name, global fields, and types (which includes classes, enumerations, delegate types, and any other types defined in the module).
Some of the more useful informational classes include the obviously named FieldInfo, PropertyInfo, ConstructorInfo, MethodInfo, and EventInfo classes. Two other classes that are returned by some reflection methods are MethodBase (the parent class of MemberInfo and ConstructorInfo) and MemberInfo (the parent class of FieldInfo, PropertyInfo, MethodBase, and EventInfo).
The CustomerClassInformation example program, which is available for download on this book’s website, demonstrates many useful reflection properties and methods to display information about a Customer class. This class is derived from the Person class and contains a list of Order objects. The following code shows the Person, Customer, and Order classes.
public class Person
{
    public string FirstName, LastName;
}

public sealed class Customer : Person
{
    public struct Address
    {
        public string Street, City, State, Zip;
    }

    public string EmailAddress { get; set; }
    public Address MailingAddress { get; set; }
    public List<Order> Orders = new List<Order>();

    public Customer() { }
    public Customer(string firstName, string lastName, params Order[] orders)
    {
        FirstName = firstName;
        LastName = lastName;
        foreach (Order order in orders) Orders.Add(order);
    }

    public delegate void PaymentReceivedDelegate(decimal amount);
    public event PaymentReceivedDelegate PaymentReceived;

    public void SendEmail(string message) { }
}

public class Order
{
}
The Person class is almost empty. It’s just there to be the Customer class’s parent class.
The Customer class contains a nested Address structure, properties (EmailAddress and MailingAddress), fields (Orders and the inherited FirstName and LastName fields), two constructors, a delegate type, an event, and the SendEmail method.
The Order class is empty. It’s just there so that the Customer class can contain a List<Order>.
The program uses the following code to display information about the Customer class.
// Display information about the Customer class.
private void Form1_Load(object sender, EventArgs e)
{
    Type type = typeof(Customer);
    AddItem("Name: ", type.Name);
    AddItem("Assembly: ", type.Assembly.FullName);
    AddItem("Attributes: ", type.Attributes.ToString());
    AddItem("BaseType: ", type.BaseType.Name);
    AddItem("FullName: ", type.FullName);
    AddItem("IsAbstract: ", type.IsAbstract.ToString());
    AddItem("IsAutoLayout: ", type.IsAutoLayout.ToString());
    AddItem("IsClass: ", type.IsClass.ToString());
    AddItem("IsNested: ", type.IsNested.ToString());
    AddItem("IsNotPublic: ", type.IsNotPublic.ToString());
    AddItem("IsPrimitive: ", type.IsPrimitive.ToString());
    AddItem("IsPublic: ", type.IsPublic.ToString());
    AddItem("IsSealed: ", type.IsSealed.ToString());
    AddItem("IsSerializable: ", type.IsSerializable.ToString());
    AddItem("IsSubclassOf(Person): ",
        type.IsSubclassOf(typeof(Person)).ToString());
    AddItem("IsValueType: ", type.IsValueType.ToString());
    AddItem("IsVisible: ", type.IsVisible.ToString());
    AddItem("Module: ", type.Module.Name);
    AddItem("Namespace: ", type.Namespace);

    AddItem("NestedTypes:", "");
    foreach (Type nestedType in type.GetNestedTypes())
    {
        AddItem("    ", nestedType.ToString());
    }

    AddItem("Fields:", "");
    foreach (FieldInfo info in type.GetFields())
    {
        AddItem("    ", info.ToString());
    }
    AddItem("Properties:", "");
    foreach (PropertyInfo info in type.GetProperties())
    {
        AddItem("    ", info.ToString());
    }

    AddItem("Constructors:", "");
    foreach (ConstructorInfo info in type.GetConstructors())
    {
        AddItem("    ", info.ToString());
    }
    AddItem("Methods:", "");
    foreach (MethodInfo method in type.GetMethods())
    {
        AddItem("    ", method.Name);
    }

    AddItem("Events:", "");
    foreach (EventInfo info in type.GetEvents())
    {
        AddItem("    ", info.ToString());
    }

    // Size the ListView's columns.
    infoListView.Columns[0].Width = -1;
    infoListView.Columns[1].Width = -1;
}
The program first gets an object representing the Customer class’s type. It then invokes a series of that object’s properties to display various pieces of information about the Customer class. The code uses the AddItem method (described shortly) to display the values in the program’s ListView control.
Next, the program calls several Type methods to get information about features of the Customer class. Those methods include GetNestedTypes, GetFields, GetProperties, GetConstructors, GetMethods, and GetEvents. All these methods return objects (such as MethodInfo or EventInfo objects) providing detailed information about particular Customer class features. This example simply lists the features’ names.
The following code shows the AddItem method.
// Add an item and value to the ListView.
private void AddItem(string item, string value)
{
    ListViewItem newItem = infoListView.Items.Add(item);
    newItem.SubItems.Add(value);
}
This method simply adds a new item and subitem to the program’s ListView control.
Figure 26-1 shows the CustomerClassInformation example program scrolled down to display information about the Customer class’s properties, constructors, and methods.
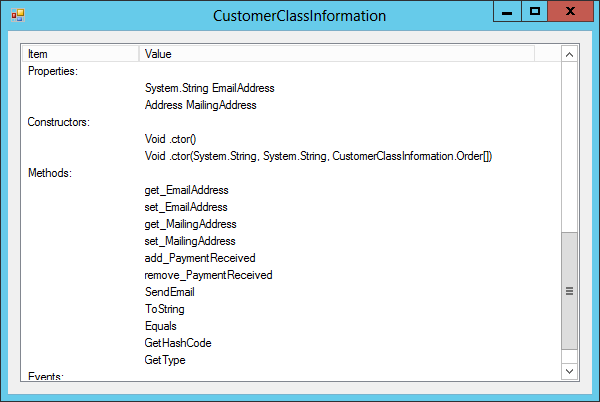
Figure 26-1: The CustomerClassInformation example program uses reflection to display information about a Customer class.
Getting and Setting Properties
The CustomerClassInformation example program just lists the names of the fields, properties, methods, and other complex items that it finds. However, a program can do much more with those items. For example, it can use a PropertyInfo object to get or set the value of its property, or it can use a MethodInfo object to invoke its method.
The GetSetPersonProperties example program, which is shown in Figure 26-2 and available for download on this book’s website, uses reflection to get and set a Person class’s fields and properties.
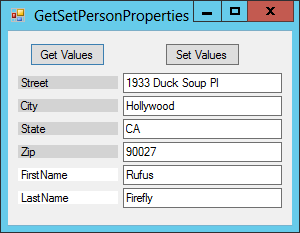
Figure 26-2: The GetSetPersonProperties example program uses reflection to get and set property and field values.
The program uses the following simple Person class.
public class Person
{
    public string FirstName { get; set; }
    public string LastName { get; set; }
    public string Street, City, State, Zip;
}
Most of the program’s code creates the Labels and TextBoxes that it uses to display property and field values. The following code shows how the program gets values. To save space, I removed the code that creates the Labels and TextBoxes. Download the example to see all the details.
// The Person object.
private Person ThePerson = new Person()
{
    FirstName = "Rufus",
    LastName = "Firefly",
    Street = "1933 Duck Soup Pl",
    City = "Hollywood",
    State = "CA",
    Zip = "90027"
};

// The Labels and TextBoxes we create.
private List<Label> Labels;
private List<TextBox> TextBoxes;

// Display the object's fields and properties.
private void getValuesButton_Click(object sender, EventArgs e)
{
    // List fields and properties.
    foreach (MemberInfo info in ThePerson.GetType().FindMembers(
        MemberTypes.Field | MemberTypes.Property,
        BindingFlags.Public | BindingFlags.Instance,
        new MemberFilter((x, y) => true),
        null))
    {
        // Create a Label and TextBox.
        ...
        Labels.Add(label);
        ...
        textBox.Tag = info;
        TextBoxes.Add(textBox);
        ...

        // Get the value.
        if (info is FieldInfo)
        {
            FieldInfo fieldInfo = info as FieldInfo;
            textBox.Text = fieldInfo.GetValue(ThePerson).ToString();
            label.BackColor = Color.LightGray;
        }
        else if (info is PropertyInfo)
        {
            PropertyInfo propertyInfo = info as PropertyInfo;
            textBox.Text = propertyInfo.GetValue(ThePerson).ToString();
            label.BackColor = Color.White;
        }
    }

    setValuesButton.Enabled = true;
}
The code starts by creating a Person object and declaring lists to hold Labels and TextBoxes.
When you click the Get Values button, the program uses ThePerson.GetType().FindMembers to get information about the Person class’s fields and properties. That method takes four parameters, which in this example have the following values:
MemberTypes.Field | MemberTypes.Property—This tells the method to select information about fields and properties.BindingFlags.Public | BindingFlags.Instance—This makes the method return information about members that arepublicinstance members (as opposed to privateorstaticmembers).new MemberFilter((x, y) => true)—This parameter is aMemberFilterdelegate that examines objects discovered byFindMembersand returnstrueto select the ones you want to select. It takes as parameters aMemberInfoobject and an object that you can set to give the method some extra information. This example uses a lambda expression that returnstruefor any input so it selects every field and property.null—This is the extra value passed into the method provided in the third parameter. In this example, this value means the lambda expression receivesnullas its second parameter.
The program loops over the MemberInfo objects returned by the call to FindMembers. For each item, it creates a Label and TextBox. It stores the new controls in the Labels and TextBoxes lists. It also stores the MemberInfo object in the TextBox’s Tag property for later use.
Next, the code displays the member’s value in the TextBox. It also changes the Label’s background color to indicate whether the member is a field (darker) or property (lighter).
After the program displays the values, you can modify them by typing in the TextBoxes. If you then click the Set Values button, the following code executes.
// Set the values.
private void setValuesButton_Click(object sender, EventArgs e)
{
    // Delete the Labels.
    foreach (Label label in Labels) label.Parent = null;

    // Save the TextBox values.
    foreach (TextBox textBox in TextBoxes)
    {
        // See if this TextBox represents a field or property.
        MemberInfo info = textBox.Tag as MemberInfo;
        if (info is FieldInfo)
        {
            // Save the field's value.
            FieldInfo fieldInfo = info as FieldInfo;
            fieldInfo.SetValue(ThePerson, textBox.Text);
        }
        else
        {
            // Save the property's value.
            PropertyInfo propertyInfo = info as PropertyInfo;
            propertyInfo.SetValue(ThePerson, textBox.Text);
        }

        // Remove the TextBox.
        textBox.Parent = null;
    }

    setValuesButton.Enabled = false;
}
This code starts by looping through the Labels it created and removing them from the form. It then loops through the TextBoxes and gets each TextBox’s MemberInfo object. It converts the object into the appropriate subclass, FieldInfo or PropertyInfo, and uses that object’s SetValue method to update the member’s value. The code then removes the TextBox from the form.
Getting Assembly Information
An assembly is the fundamental unit of deployment and version control in Visual Studio. An assembly can contain an executable application, a dynamic-link library (DLL), or a control library. Usually, a project is contained in a single assembly.
The Assembly Information dialog box shown in Figure 26-3 lets you define information that should be associated with the assembly, including the assembly’s company name, description, copyright, trademark, name, product name, title, and version (which includes major, minor, revision, and build values).
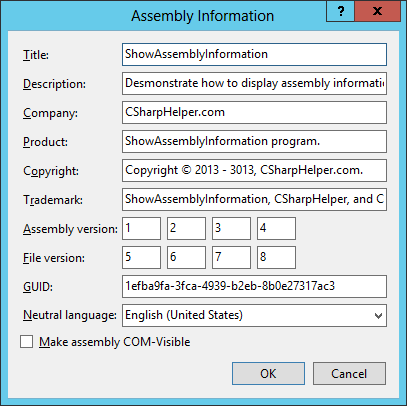
Figure 26-3: The Assembly Information dialog lets you set a project’s assembly information.
Most of the items in this dialog box, such as the application’s title and description, are self-explanatory. They are simply strings that the assembly carries around for identification. The assembly and file versions are used by the Visual Studio run time to verify compatibility between an application’s components. The GUID (which stands for globally unique identifier and is pronounced to rhyme with “squid”) uniquely identifies the assembly and is generated by Visual Studio. The Make Assembly COM-Visible check box lets you determine whether the assembly should make types defined in the assembly visible to COM applications. For more information on this dialog box, see msdn.microsoft.com/1h52t681.aspx.
Unfortunately, learning these values at run time isn’t easy. To get most of these values, you need to follow these steps:
- Use
Assembly.GetExecutingAssemblyto get anAssemblyobject representing the currently running assembly. - Call the
Assemblyobject’sGetCustomAttributesmethod, passing it as a parameter an assembly attribute type such asAssemblyTitleAttribute. TheGetCustomAttributesmethod returns an array of attribute objects of the requested type. - Use the appropriate property for the returned attribute. For example, use an
AssemblyTitleAttributeobject’sTitleproperty.
Unfortunately, some of the attribute objects may not always be defined, so your code must watch out for null object references.
A C# program uses a different method to obtain the assembly version information. To get that information, the program calls the Assembly object’s GetName method and then uses the returned object’s Version property.
The ShowAssemblyInformation example program uses the following GetAssemblyAttribute method to make fetching assembly attributes a little easier.
// Return a particular assembly attribute value.
public static T GetAssemblyAttribute<T>(Assembly assembly) where T : Attribute
{
    // Get attributes of this type.
    object[] attributes = assembly.GetCustomAttributes(typeof(T), true);

    // If we didn't get anything, return null.
    if ((attributes == null) || (attributes.Length == 0)) return null;

    // Convert the first attribute value into the desired type and return it.
    return (T)attributes[0];
}
The method takes a type as a generic parameter. That should be the type of attribute that you want to retrieve. The method also takes as a parameter the assembly that you want to use.
The code calls the Assembly object’s GetCustomAttributes method to fetch an array containing the assembly’s attribute objects that have the right type. If the result is null or an empty array, the method returns null.
If the code gets a nonempty array, it converts the first element in it into the desired attribute type and returns it.
The following code shows how the ShowAssemblyInformation program uses the GetAssemblyAttribute method to display attribute information.
private void Form1_Load(object sender, EventArgs e)
{
    // Get the running assembly.
    Assembly assembly = Assembly.GetExecutingAssembly();

    // Get values from the assembly.
    AssemblyTitleAttribute titleAttr =
        GetAssemblyAttribute<AssemblyTitleAttribute>(assembly);
    if (titleAttr != null) titleTextBox.Text = titleAttr.Title;

    AssemblyDescriptionAttribute descrAttr =
        GetAssemblyAttribute<AssemblyDescriptionAttribute>(assembly);
    if (descrAttr != null) descriptionTextBox.Text = descrAttr.Description;

    ... Code omitted ...

    assemblyVersionTextBox.Text = assembly.GetName().Version.ToString();

    ... Code omitted ...
}
The code uses Assembly.GetExecutingAssembly to get an object representing the executing assembly. It then uses the GetAssemblyAttribute method to get attribute objects representing the assembly’s attributes. After checking that each result isn’t null, the code displays the attribute values.
The one exception is the assembly version information. To get that value, the code simply calls assembly.GetName().Version.ToString().
Invoking Methods
Reflection provides objects that let you load and examine assemblies. After you load an assembly, you can dig through the types it defines and use the properties, methods, and other features defined by those types.
This section describes the InvokeEchoer example program, which is available for download on this book’s website. That example demonstrates several important techniques for working with an assembly loaded at run time.
The tasks performed by the InvokeEchoer program include
- Load an assembly at run time.
- Get information about the
Echoerclass defined by the assembly. - Create an instance of the
Echoerclass. - Set a field value for the instance.
- Invoke the object’s
ShowMessagemethod.
The EchoDll example, which is also available for download on this book’s website, creates a control library (DLL) that the InvokeEchoer program can load. (The EchoDll example must be compiled for the InvokeEchoer example to work properly.) It uses the following code to define the Echoer class.
public class Echoer
{
    // The objexct's message.
    public string Message = "Message not set";

    // Display the message in a MessageBox.
    public void ShowMessage(string caption)
    {
        MessageBox.Show(Message, caption);
    }
}
This class has a public string field named Message and a public method named ShowMessage.
The following code shows how the InvokeEchoer program loads and uses the EchoDll library.
// Load the DLL, create an Echoer, and invoke the ShowMessage method.
private void invokeButton_Click(object sender, EventArgs e)
{
    // Load the DLL assembly.
    Assembly dll = Assembly.LoadFile(dllTextBox.Text);

    // Find the Echoer class's Type.
    Type echoer = dll.GetType("EchoDll.Echoer");

    // Create an Echoer object.
    object myEchoer = Activator.CreateInstance(echoer);

    // Set the Message field.
    FieldInfo fieldInfo = echoer.GetField("Message");
    fieldInfo.SetValue(myEchoer, messageTextBox.Text);

    // Get a MethodInfo for the ShowMessage method.
    MethodInfo methodInfo = echoer.GetMethod("ShowMessage");

    // Invoke the method on the object.
    object[] args = { captionTextBox.Text };
    methodInfo.Invoke(myEchoer, args);
}
The program first uses the Assembly.LoadFile method to load the EchoDll assembly.
It then uses the Assembly’s GetType method to get a Type object that represents the Echoer class’s type.
Next, the code uses the System.Activator class to create an instance of the Echoer type. If you pass the Activator class’s CreateInstance method additional parameters, it invokes the class’s constructor that best fits the parameters. In this example, the Echoer class has no constructors, so the code doesn’t pass any extra parameters to the CreateInstance method.
The program then sets the value of the Echoer object’s Message field. It uses the Echoer type’s GetField method to get a FieldInfo object representing the field. It then uses the FieldInfo object’s SetValue method to set the field’s value for the Echoer instance.
The last task the program must perform is invoking the Echoer object’s ShowMessage method. To do that, it calls the Echoer type’s GetMethod method to get a MethodInfo object representing the ShowMessage method. It creates an array of objects to hold the parameters that should be passed to the ShowMessage. Finally, it calls the MethodInfo object’s Invoke method, passing it the Echoer instance for which it should invoke the method and the argument array.
This is an awful lot of work to simply display a message box, but the techniques used by the InvokeEchoer program show how to load and explore an assembly at run time. With a little more work and experimentation, you could modify the program to perform other tasks such as
- Discover the classes defined by an assembly.
- Create instances of a class.
- Learn what fields, properties, and methods are defined by each class.
- Get and set field and property values.
- Invoke static methods and instance methods.
Running Scripts
Reflection lets a program learn about existing code. The classes in the System.CodeDom.Compiler namespace enable a program to compile completely new code at run time. You can then use refection to execute the methods defined by the newly compiled code.
To compile code, the program creates a code provider. It sets any parameters needed by the provider and adds references to any assemblies the script uses. It then calls the provider’s CompileAssemblyFromSource method to compile the script. If the compilation succeeds, the program can use reflection to find and use the classes, methods, and other items defined by the script.
The TurtleScript example program, which is shown in Figure 26-4 and available for download on this book’s website, lets the user write scripts that control a drawing turtle similar to the one described in Chapter 3, “Program and Code File Structure.”

Figure 26-4: The TurtleScript example program compiles and executes code entered at run time.
The script you enter can include using directives just as any other C# program can. It should define a static Scripter class. That class should provide a static Draw method that takes a Turtle object as a parameter and uses it to draw something. The code can include loops, if-then tests, other classes, methods, and most anything else you can put in a C# program. The following code shows a script’s basic structure.
using TurtleLib;
using System.Drawing;
using System;

public static class Scripter
{
    public static void Draw(Turtle turtle)
    {
        // Draw stuff here...
    }
}
The following code shows how the TurtleScript program compiles and executes the script.
// Run the script.
private void RunScript()
{
    // Make a C# code provider.
    CodeDomProvider codeProvider = CodeDomProvider.CreateProvider("C#");
    // Generate a non-executable assembly in memory.
    CompilerParameters parameters = new CompilerParameters();
    parameters.GenerateInMemory = true;
    parameters.GenerateExecutable = false;

    // Add references to the assemblies used by the program.
    var query =
        from Assembly assembly in AppDomain.CurrentDomain.GetAssemblies()
        where !assembly.IsDynamic
        select assembly.Location;
    parameters.ReferencedAssemblies.AddRange(query.ToArray());

    // Compile the code.
    CompilerResults results =
        codeProvider.CompileAssemblyFromSource(parameters, scriptTextBox.Text);

    // See if there are errors.
    if (results.Errors.Count > 0)
    {
        string errors = "";
        foreach (CompilerError error in results.Errors)
        {
            errors +=
                "Error:
" +
                "    Line: " + error.Line + "
" +
                "    Error Number: " + error.ErrorNumber + "
" +
                "    Text: " + error.ErrorText + "
";
        }
        throw new ApplicationException(errors);
    }

    // Get the Scripter class.
    Type scripterType = results.CompiledAssembly.GetType("Scripter");
    if (scripterType == null)
        throw new MissingMethodException("Cannot find class Scripter");

    // Get a MethodInfo object describing the Draw method.
    MethodInfo methodInfo = scripterType.GetMethod("Draw");
    if (methodInfo == null)
        throw new MissingMethodException(
            "Cannot find method Draw(Turtle turtle)");

    // Make sure the method takes a single Turtle as a parameter.
    ParameterInfo[] paramInfos = methodInfo.GetParameters();
    if ((paramInfos.Length != 1) ||
        (paramInfos[0].ParameterType.Name != "Turtle"))
            throw new ArgumentException(
                "The Draw method must take a single Turtle parameter.");

    // Make the parameter list.
    object[] methodParams = new object[] { TheTurtle };

    // Execute the method.
    methodInfo.Invoke(null, methodParams);
}
The code starts by creating a CodeDomProvider for C#. (The .NET Framework also includes JScript and Visual Basic compilers.) It then creates a CompilerParameters object and sets its properties to indicate that the compiler should compile the script into memory (as opposed to into a DLL file) and that it should not create an executable program.
Next, the program must add references to any assemblies that the script needs. You could write code to add specific references one at a time. This example takes a somewhat heavier-handed approach and simply adds references to every assembly that the main program references. To do that, it uses a LINQ query that selects from the assemblies returned by AppDomain.CurrentDomain.GetAssemblies. It picks nondynamic assemblies (those not loaded at run time) and selects their locations.
The program then adds the selected assemblies to the CompilerParameters object’s ReferencedAssemblies collection.
The program then calls the code provider’s CompileAssemblyFromSource method to compile the script with the selected compiler parameters. If the compilation has errors, the program composes an error message and displays it to the user.
Next, the program uses reflection to find the script’s Scripter class and that class’s Draw method, which must take a Turtle object as a parameter. If it successfully finds this method, the program invokes it, passing it the class-level TheTurtle variable as a parameter.
Summary
Most programs can do without reflection. Usually, you know what a program needs to do, so you can write the necessary code at design time. However, reflection is occasionally useful for exploring assemblies. It lets you find properties, fields, and methods at run time. It lets you discover what’s hidden in undocumented libraries. It even lets you implement add-ins by allowing you to search for add-in classes and methods inside DLLs. Together add-ins and the ability to compile and execute scripts at run time let you make applications that are extensible even after they have been compiled.
One problem with add-ins and scripts is that a hacker could use them to make your program execute code that isn’t safe. In general, you shouldn’t allow nontrusted users to install DLLs or write and execute scripts.
Even without add-ins and scripting, many applications have problems with hackers. One of the biggest of those problems occurs when a hacker gets hold of crucial data. Every year millions (if not hundreds of millions) of customer records are stolen, often including sensitive information such as usernames, passwords, or credit card numbers.
One way you can protect this kind of data is to encrypt it. If a data thief steals your password file, your data is still safe if the file is properly encrypted.
The .NET Framework includes tools that you can use to encrypt and decrypt files, calculate hash values for files, digitally sign documents, and perform other cryptographic tasks. The next chapter describes some of the most useful of those tools and explains how you can use them to protect your data.
Exercises
- The
PropertyGridcontrol uses reflection to let a user view and edit the properties of an object much as the Properties window lets you view and edit properties at design time. Write a program that uses thePropertyGridto let the user view and edit aPersonobject’s properties.Create a
Personclass with the propertiesFirstName,LastName,Street,City,State,PostalCode, andEmailAddress. Give each property aDescriptionattribute explaining its purpose and aCategoryattribute to group it with other related properties. For example, the following code shows how you might declare thePostalCodeproperty.[Category("Address")] [Description("The address's postal code.")] public string PostalCode { get; set; }Hint: The
DescriptionandCategoryattribute classes are defined in theSystem.ComponentModelnamespace.When the program starts, create and initialize a
Personobject. Then set aPropertyGridcontrol’sSelectedObjectproperty to thatPersonobject.When you run the program, what do the
DescriptionandCategoryattributes do? What happens when you click thePropertyGrid’s Alphabetical button? - Modify the program you wrote for Exercise 1 by adding a
ContactTypesenumeration to thePersonclass. Give it the valuesPersonal,Billing,Shipping, andAdmin. Then give the class a newContactTypeproperty that has this type. How does thePropertyGriddisplay the new property? - Write a program similar to the one shown in Figure 26-5. (If you don’t want to write a graphics program, create different tools that do something like display messages so that you know which tool has been invoked.)
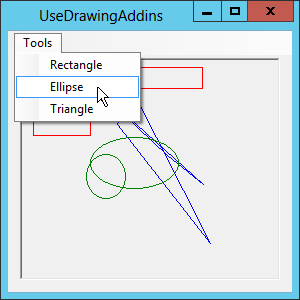
Figure 26-5: The DrawingAddIns example program loads add-in methods at run time.
At run time, this program should do the following:
- Search its current directory for DLLs.
- Search each DLL for classes that have a static
Drawmethod that takes aGraphicsobject as a parameter. - For each such class, the program should add an item to the Tools menu. The name of that item should be specified by the class’s
DisplayNameattribute. (If the class doesn’t have that attribute, use the class’s name.) - Each
Drawmethod should draw something on theGraphicsobject it is passed.
Hint: To get a class’s
DisplayNameattribute value, get the class’s type and use the type’sGetCustomAttributemethod. Cast the returnedAttributeinto aDisplayNameAttributeand use itsDisplayNameproperty.The following code shows an example add-in method.
[DisplayName("Rectangle")]
public static class RectangleDrawer
{
    public static void Draw(Graphics gr)
    {
        // Draw something...
    }
}
Hint: When you find an appropriate
Drawmethod, store itsMethodInfoobject in theTagproperty of its menu item. That way when the user clicks that item, you can find the correspondingMethodInfoto invoke the method. - The program you built for Exercise 3 looks for DLLs that hold classes that define a single
Drawmethod. Alternatively, you could allow the classes to hold any number of add-in methods. Modify the program you wrote for Exercise 3 so it does that. It should use any method that takes aGraphicsobject as a parameter and that has aDisplayNameattribute. - The program you built for Exercise 4 assumes that any method that takes a
Graphicsobject as a parameter and that has aDisplayNameattribute is a drawing add-in. That works but is somewhat restrictive because it prevents you from having any other similar methods that are not add-ins. Another approach is to define your own custom attribute class and apply it to methods that are add-ins.Modify the program and DLL(s) you wrote for Exercise 4 to use this approach. In the DLL(s), create a
DrawingAddInAttributeattribute class. Place it inside theDrawingAddInnamespace. (The rest of the DLL doesn’t need to be in that namespace.) The following code shows how you can create this attribute.namespace DrawingAddIn { // An attribute that flags a method as a drawing add-in tool. [AttributeUsage(AttributeTargets.Method)] public class DrawingAddInAttribute : Attribute { } }The important things here are the
AttributeUsageattribute (which indicates that the new attribute applies only to methods) and the fact that the class is inside theDrawingAddInnamespace.Next, modify the program that uses the DLL(s). When it processes a DLL, make it use the following code to get the new attribute’s type from the DLL.
Type addInType = dll.GetType("DrawingAddIn.DrawingAddInAttribute");(This is why you need the
DrawingAddInAttributeclass to be in theDrawingAddInnamespace, so this statement can find the class’s type.)When the code considers a method, have it use code similar to the following to see if the method has this attribute.
// Make sure the method has DrawingAddIn attribute. Attribute drawingAttribute = methodInfo.GetCustomAttribute(addInType); if (drawingAttribute == null) continue; - 6. The description of Exercise 5 says the
DrawingAddInAttributeclass should be defined in theDrawingAddInnamespace so you can find it later. Can you avoid that restriction?