
Chapter 17
Configuration and Resources
What’s in This Chapter
- Environment variables
- The registry
- Configuration files
- Resource files
- Localization
Wrox.com Downloads for This Chapter
Please note that all the code examples for this chapter are available as a part of this chapter’s code download on the book’s website at www.wrox.com/go/csharp5programmersref on the Download Code tab.
Most applications can take different actions depending on circumstances. Some applications decide how to act based on input provided by the user. Other applications use configuration information to determine how to behave.
For example, an application might display different kinds of data for different kinds of users. Data entry clerks, supervisors, managers, and billing specialists would all see different views of the same database. Similarly, you might configure an application for different levels of support. You might have different configurations for trial, basic, professional, and enterprise versions.
An application may also need to save state information between sessions. It might remember the types of forms that were last running, their positions, and their contents. The next time the program runs, it can restore those forms so that the user can get back to work as quickly as possible.
The .NET Framework provides many tools for storing and using application configuration and resource information. This chapter describes some of the most useful of those tools. It explains how an application can use environment variables, the registry, configuration files, resource files, and the Application object to save and restore configuration information.
Environment Variables
Environment variables give information about the operating system environment in which the program runs. They hold information such as the computer’s name, the user’s login name, the location of the system’s temporary directory, the number of processors the system has, and the program’s current working directory. You can also store configuration information in environment variables for your programs to use.
There are three types of environment variables that apply at the system, user, and process levels. System-level variables apply to all processes started on the system; user-level variables apply to processes started by a particular user; and process-level variables apply to a particular process and any other processes that it starts.
Environment variables are loaded when a process starts, and they are inherited by any process launched by the initial process. During program development, variables are loaded when you start Visual Studio. Their values are inherited by the program you are working on when you start it. If you make changes to the system’s environment variables, you need to close and reopen Visual Studio before your program can see the changes.
A program can also create temporary process-level variables that are inherited by any processes you launch. Those values disappear when the original process ends.
A C# program can use the System.Environment class to read and write environment values. Before you learn how to use that class, however, you should learn how the operating system sets environment variables’ values.
Setting Environment Variables
Environment variables are normally set on a systemwide basis before the program begins. In older operating systems, batch files such as autoexec.bat set these values. More recent systems provide Control Panel tools to set environment variables.
Newer systems also use an autoexec.nt file to set environment variables that apply only to command-line (console) applications, so they don’t affect GUI applications. Sometimes, you can use this fact to your advantage by giving different kinds of applications different environment settings.
To set environment variables in newer versions of Windows, open the Control Panel, and search for the keyword “environment.” In Windows 8, open the search tool, and search the Settings category for “environment.” This search should produce two matches.
If you click the Edit the System Environment Variables choice, you should see the System Properties tool’s Advanced tab. Now click the Environment Variables button to see the dialog, as shown in Figure 17-1.
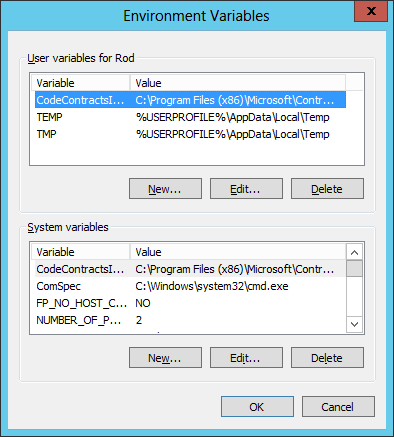
Figure 17-1: You can use system tools to set environment variables.
If you click the Edit Environment Variables for Your Account choice, you should see a dialog similar to the one shown in Figure 17-1 except the bottom controls that modify the system’s environment variables are disabled.
Use system variables when a value should apply to all processes started by all users. User user-level variables when a value should apply to all processes started by a particular user.
Using System.Environment
The System.Environment class provides methods for getting and setting process-level environment variables. It also provides properties and methods for working with many other items in the application’s environment. The following table describes the Environment object’s most useful properties.
| Property | Purpose |
CommandLine | Returns the process’s command line. |
CurrentDirectory | Gets or sets the fully qualified path to the current directory. |
ExitCode | Gets or sets the processes’ exit code. |
HasShutdownStarted | Returns true if the Common Language Runtime is shutting down. |
Is64BitOperatingSystem | Returns true if this is a 64-bit operating system. |
Is64BitProcess | Returns true if the current process is a 64-bit process. |
MachineName | Returns the computer’s NetBIOS name. |
NewLine | Returns the environment’s defined new line string. For example, this might be a carriage return followed by a line feed. |
OSVersion | Returns an OperatingSystem object containing information about the operating system. This object provides the properties ServicePack (name of the most recent service pack installed), Version (includes Major, Minor, Build, and Revision; ToString combines them all), VersionString (combines the operating system name, version, and most recent service pack), and Platform, which can be UNIX, Win32NT (Windows NT or later), Win32S (runs on 16-bit Windows to provide access to 32-bit applications), Win32Windows (Windows 95 or later), or WinCE. |
ProcessorCount | Returns the number of processors on the computer. |
StackTrace | Returns a string describing the current stack trace. |
SystemDirectory | Returns the system directory’s fully qualified path. |
TickCount | Returns the number of milliseconds that have elapsed since the system started. |
UserDomainName | Returns the current user’s network domain name. |
UserInteractive | Returns true if the process is interactive. This only returns false if the application is a service process or web service. |
UserName | Returns the name of the user who started the process. |
Version | Returns a Version object describing the Common Language Runtime. This object provides the properties Major, Minor, Build, and Revision. Its ToString method combines them all. |
WorkingSet | Returns the amount of physical memory mapped to this process in bytes. |
The following table describes the System.Environment object’s most useful methods.
| Method | Purpose |
Exit | Ends the process immediately. FormClosing and FormClosed event handlers do not execute. |
ExpandEnvironmentVariables | Replaces environment variable names in a string with their values. For example, the following code displays the name of the user and the computer:
MessageBox.Show(Environment.ExpandEnvironmentVariables("I am %username% on %computername%.")) |
GetCommandLineArgs | Returns an array of strings containing the application’s command-line arguments. The first entry (with index 0) is the name of the program’s executable file. |
GetEnvironmentVariable | Returns an environment variable’s value. |
GetEnvironmentVariables | Returns an IDictionary object containing the names and values of all environment variables. An optional parameter lets you determine whether you want to list variables defined for the machine, user, or process. |
GetFolderPath | Returns the path to a system folder. This method’s parameter is a SpecialFolder enumeration value such as Cookies, Desktop, SendTo, or Recent. See the online help for a complete list of available folders. |
GetLogicalDrives | Returns an array of strings containing the names of the logical drives on the current computer. |
SetEnvironmentVariable | Creates, modifies, or deletes an environment variable. |
The SetEnvironmentVariable method lets you set environment variables at the system, user, and process levels. If you set a variable’s value to null, this method deletes the variable. For system and user values, it updates the registry appropriately to set the values. For more information on the SetEnvironmentVariable method, see msdn.microsoft.com/library/96xafkes.aspx.
Registry
The system registry is a hierarchical database that stores values for applications on the system. The hierarchy’s root is named Computer and is divided into the several subtrees called hives. Which hives are available depends on your operating system. The following table summarizes the most commonly available hives. (The “HKEY” part of each name stands for “hive key.”)
| Registry Branch | Contains |
| HKEY_CLASSES_ROOT | Definitions of types of documents and properties associated with those types. |
| HKEY_CURRENT_CONFIG | Information about the system’s current hardware configuration. |
| HKEY_CURRENT_USER | The current user’s preferences (such as environment variable settings, program group information, desktop settings, colors, printers, network connections, and preferences specific to applications). Each user has a separate HKEY_CURRENT_USER hive. |
| HKEY_DYN_DATA | Performance data for Windows 95, 98, and Me. (Yes, this is a bit outdated but this hive is still there.) |
| HKEY_LOCAL_MACHINE | Information about the computer’s physical state including bus type, system memory, installed hardware and software, and network logon and security information. |
| HKEY_USERS | Default configuration information for new users and the current user’s configuration. |
Depending on your operating system, the registry may also contain the unsupported keys HKEY_PERFORMANCE_DATA, HKEY_PERFORMANCE_NLSTEXT, and HKEY_ PERFORMANCE_TEXT.
Many applications store information in the registry. The HKEY_CURRENT_USER subtree is particularly useful for storing individual users’ preferences and other configuration information.
Lately, the registry has gone out of style for saving configuration information. Microsoft now recommends that you store this kind of data locally within a user’s data storage area. This makes sense because it makes it easier to copy the settings (they’re just files), helps reduce clutter in the registry, and reduces the chances that mistakes will corrupt the registry. (If the registry is corrupted badly enough, the system may become unbootable.) Instead of using the registry, you can store this information in configuration files (see the section “Configuration Files” later in this chapter) or XML files (see Chapter 24, “XML”).
The keys to manipulating the registry are the Registry and RegistryKey classes in the Microsoft.Win32 namespace.
The Registry class provides static fields that return RegistryKey objects representing the registry’s hives. The following list describes the Registry class’s hive fields.
| Field | HKEY Equivalent |
ClassesRoot | HKEY_CLASSES_ROOT |
CurrentConfig | HKEY_CURRENT_CONFIG |
CurrentUser | HKEY_CURRENT_USER |
DynData | HKEY_DYN_DATA |
LocalMachine | HKEY_LOCAL_MACHINE |
PerformanceData | HKEY_PERFORMANCE_DATA |
Users | HKEY_USERS |
Each registry key can contain values, subkeys, both, or neither. The RegistryKey class provides properties and methods that you can use to manipulate the key’s values and subkeys. The following table summarizes the most useful RegistryKey properties and methods.
| Property or Method | Purpose |
Close | Closes the key and flushes its data to the disk if it was modified |
CreateSubKey | Creates a new subkey or opens an existing subkey for writing |
DeleteSubKey | Deletes a subkey |
DeleteSubKeyTree | Deletes a subkey and its subtree |
DeleteValue | Deletes a value from the key |
Dispose | Frees the object’s resources |
Flush | Writes the key’s data to the disk |
GetAccessControl | Returns access control security information for the key |
GetSubKeyNames | Returns an array holding the key’s subkey names |
GetValue | Returns a value |
GetValueKind | Returns a RegistryValueKind enumeration that indicates a value’s type such as binary, multistring, or string |
GetValueNames | Returns an array holding the key’s value names |
OpenSubKey | Opens a subkey |
Name | Returns the key’s name |
SetAccessControl | Changes the key’s access control security settings |
SetValue | Sets a value for the key |
SubKeyCount | Returns the key’s number of subkeys |
ValueCount | Returns the key’s number of values |
Using the Registry and RegistryKey classes is reasonably easy. Use a Registry field to get the hive you want to use. Use the OpenSubKey and CreateSubKey methods to create or open existing keys. Use GetValue and SetValue to get and set values. When you finish modifying a key, use its Close method to close it and ensure that the changes are written to disk.
Although the process is easy, it’s also fairly awkward. You can make the process easier if you write GetRegistryValue and SetRegistryValue methods as shown in the following code.
public static class RegistryTools
{
    // Get a registry value.
    public static T GetRegistryValue<T>(RegistryKey hive,
        string subkeyName, string valueName, T defaultValue)
    {
        using (RegistryKey subkey = hive.OpenSubKey(subkeyName, false))
        {
            if (subkey == null) return defaultValue;
            T result = (T)subkey.GetValue(valueName, defaultValue);
            subkey.Close();
            return result;
        }
    }

    // Set a registry value.
    public static void SetRegistryValue<T>(RegistryKey hive,
        string subkeyName, string valueName, T value)
    {
        RegistryKey subkey = hive.OpenSubKey(subkeyName, true);
        if (subkey == null) subkey = hive.CreateSubKey(subkeyName);

        subkey.SetValue(valueName, value);
        subkey.Close();
        subkey.Dispose();
    }
}The following code uses the GetRegistryValue method to retrieve the value Left from the SoftwareC# ProjectsSaveRegistrySettingsSettings key in the HKEY_CURRENT_USER hive.
int left = RegistryTools.GetRegistryValue(Registry.CurrentUser,
    @"SoftwareC# ProjectsSaveRegistrySettingsSettings",
    "Left", 0);
Notice that the code specifies the complete path to the key. The code doesn’t need to slowly move down through the registry hierarchy one key at a time.
Here I picked the location SoftwareC# ProjectsSaveRegistrySettingsSettings somewhat arbitrarily. The HKEY_CURRENT_USER hive already contains a Software key. I added the subkey C# Projects to hold values saved by my C# projects. Inside that the subkey SaveRegistrySettings holds values saved by the SaveRegistrySettings example program, which is available for download on this book’s website. The final subkey, Settings, holds setting values for the program.
Even the preceding code is somewhat more verbose than really needed by the example program because every call to get or set a registry value will use the same hive and key. To make things even easier, the program defines the following two helper methods.
// Get a registry value.
private T GetValue<T>(string name, T defaultValue)
{
    return RegistryTools.GetRegistryValue(Registry.CurrentUser,
        @"SoftwareC# ProjectsSaveRegistrySettingsSettings",
        name, defaultValue);
}

// Save a registry value.
private void SetValue<T>(string name, T value)
{
    RegistryTools.SetRegistryValue(Registry.CurrentUser,
        @"SoftwareC# ProjectsSaveRegistrySettingsSettings",
        name, value);
}
These methods simply call the methods defined in the RegistryTools class, passing them the correct hive and subkey path.
The program provides two buttons that let you set the form’s foreground and background colors. Then when the program starts and stops, it gets and sets the saved colors plus the form’s size and position. The following code shows how the program saves these values when the form is about to close.
// Save the current settings.
private void Form1_FormClosing(object sender,
    System.Windows.Forms.FormClosingEventArgs e)
{
    SetValue("Width", this.Width);
    SetValue("Height", this.Height);
    SetValue("Left", this.Left);
    SetValue("Top", this.Top);
    SetValue("BackColor", this.BackColor.ToArgb());
    SetValue("ForeColor", this.ForeColor.ToArgb());
}
The following code shows how the program restores those values when it next starts.
// Restore saved settings.
private void Form1_Load(object sender, EventArgs e)
{
    // Allow the form to position itself.
    this.StartPosition = FormStartPosition.Manual;

    this.Width = GetValue("Width", this.Width);
    this.Height = GetValue("Height", this.Height);
    this.Left = GetValue("Left", this.Left);
    this.Top = GetValue("Top", this.Top);
    this.BackColor = Color.FromArgb(
        GetValue("BackColor", this.BackColor.ToArgb()));
    this.ForeColor = Color.FromArgb(
        GetValue("ForeColor", this.ForeColor.ToArgb()));
}Configuration Files
A configuration file stores information for a program to use at run time. You can change the values in the configuration file and restart the program to make it use the new values. That lets you modify the application’s behavior without needing to recompile the executable program.
The easiest way to use configuration files is through dynamic properties. Your program automatically loads dynamic properties at run time from the configuration file.
To define the settings you need to bind to the dynamic properties, use Project ⇒ Properties, and click the Settings tab to see the property page shown in Figure 17-2. Use this page to define the configuration settings to load at run time.
If you give a setting the Application scope, its value is shared by all users. Settings with User scope are stored separately for each user, so different users can use and modify their own values.
After you define the settings, add a control to a form and select it. In the Properties window, expand the ApplicationSettings entry at the top, click the PropertyBinding subitem, and click the ellipsis to the right to display a list of the control’s properties.
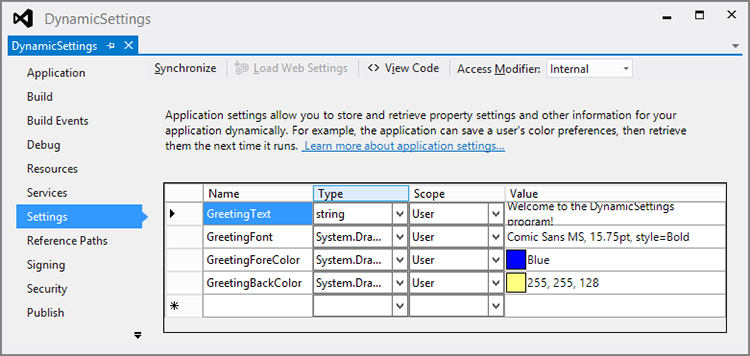
Figure 17-2: Use the Settings page to define values that are stored in a configuration file.
Select a property that you want to load dynamically, and click the drop-down arrow on the right to see a list of defined settings that you might assign to the property. Figure 17-3 shows the Application Settings dialog box with this drop-down list displayed for a control’s ForeColor property. From the list, select the setting that you want to assign to the property.
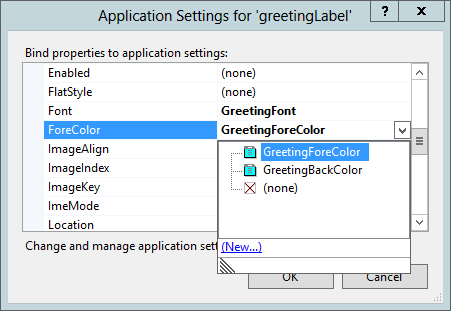
Figure 17-3: Use the drop-down list to assign a setting to a dynamic property.
Visual Studio adds the setting to the program’s configuration file. If you open Solution Explorer and double-click the app.config entry, you see the dynamic properties.
The following text shows the configuration setting sections of an App.config file. The userSettings section defines the settings shown in Figure 17-2.
<?xml version="1.0" encoding="utf-8" ?>
<configuration>
    <configSections>
        ...
    </configSections>
    <startup>
        <supportedRuntime version="v4.0" sku=".NETFramework,Version=v4.5" />
    </startup>
    <userSettings>
        <DynamicSettings.Properties.Settings>
            <setting name="GreetingText" serializeAs="String">
                <value>Welcome to the DynamicSettings program!</value>
            </setting>
            <setting name="GreetingFont" serializeAs="String">
                <value>Comic Sans MS, 15.75pt, style=Bold</value>
            </setting>
            <setting name="GreetingForeColor" serializeAs="String">
                <value>Blue</value>
            </setting>
            <setting name="GreetingBackColor" serializeAs="String">
                <value>255, 255, 128</value>
            </setting>
        </DynamicSettings.Properties.Settings>
    </userSettings>
</configuration>
When you build the program, Visual Studio copies the App.config file into the executable directory and gives it the same name as the program with .config added at the end. For example, the config file for the DynamicSettings example program, which is available for download on this book’s website, is called DynamicSettings.config. When the program starts, it loads the config file if it is present, reads the settings, and assigns their values to any properties bound to them.
So far, this is just a roundabout way to set the control’s property values. The real benefit of this method comes later when you want to change a setting. Simply edit the config file in the program’s executable directory and make any changes you want. Now when you run the program, it uses the new settings. Instead of recompiling the whole application, you only need to change the config file. If you have distributed the application to a large number of users, you only need to give them the revised configuration file and not a whole new executable.
Your program can also access the program’s settings as shown in the following code.
MessageBox.Show(Properties.Settings.Default.GreetingText);All the settings you defined are available in Properties.Settings.Default, and all are strongly typed, so you don’t need to convert them from strings or objects into their correct types.
The Properties.Settings.Default object provides two other methods that can be useful for working with settings. First, the Reload method reloads the settings from the config file. This is useful if the program has modified the settings and you want to reload their original values.
Second, the Save method saves any changes the program has made into the config file. This method can save only settings that have User scope. Settings with Application scope are read-only.
When a program closes, it automatically saves any changes to User scope settings. However, if the program crashes, it does not have a chance to save any changes. If you want to be sure changes are saved, call Properties.Settings.Default.Save after the settings have been changed.
Resource Files
Like config files, resource files contain values that the application loads at run time. Config files are intended to let you tweak one or two settings. The intent of resource files is to let you easily replace a whole set of resources with another without recompiling.
One of the most common uses of resource files is to provide different resources for different languages. To create installation packages for different languages, you simply ship the executable and a resource file that uses the right language. Alternatively, you can ship resource files for all the languages you support and then let the application pick the appropriate file at run time based on the user’s computer settings.
Resource files are not intended to store application configuration information and settings. They are intended to hold values that you might want to change, but only infrequently. You should store frequently changing data in configuration files or the system registry rather than in resource files.
The distinction is small and frankly somewhat arbitrary. Both configuration files and resource files store data that you can swap without recompiling the application. Rebuilding resource files can be a little more complex, however, so perhaps the distinction that configuration and setting data changes more frequently makes some sense.
Resource files can also be embedded within a compiled application. In that case, you cannot swap the resource file without recompiling the application. Although this makes embedded resource files less useful for storing frequently changing information, they still give you a convenient place to group resource data within the application. This is particularly useful if several parts of the application must use the same pieces of data. For example, if every form should display the same background image, it makes sense to store the image in a common resource file that they can all use.
The following sections describe the three most common types of resources: application, embedded, and localization.
Application Resources
To create application resources in C#, select Project ⇒ Properties, and click the Resources tab. Use the drop-down on the left to select one of the resource categories: Strings, Images, Icons, Audio, Files, or Other. Figure 17-4 shows the application’s Resources tab displaying the application’s images.
To add an existing file to the program’s resources, click the Add Resource drop-down list, and select Add Existing File. Use the drop-down’s Add New String, Add New Icon, or Add New Text File commands to add new items from scratch. The drop-down’s New Image item opens a cascading submenu that lets you create new PNG, BMP, GIF, JPEG, and TIFF images.
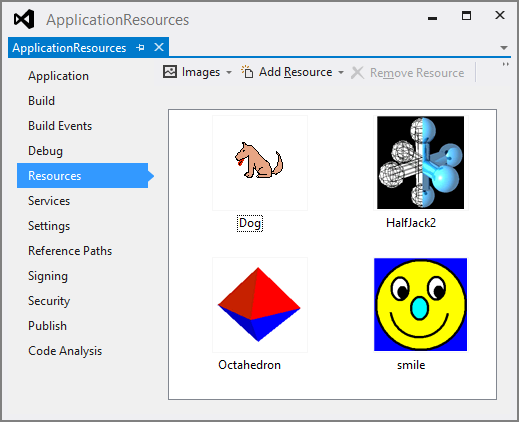
Figure 17-4: Use the Resources tab to define images and other resources used by the application.
When you create application resources, Visual Studio automatically generates code that adds strongly typed resource properties to the Properties.Resources class. Your program can use those resources as needed. For example, the ApplicationResources example program, which is available for download on this book’s website, uses the following code to make its form display the image resource named HalfJack2.
private void Form1_Load(object sender, EventArgs e)
{
    this.BackgroundImage = Properties.Resources.HalfJack2;
}
Embedded Resources
Normally, when you add a resource to a program, Visual Studio stores it in the file Resources.resx. (You can see that file in Project Explorer if you expand the Properties entry. Double-clicking that file opens the Resources property page.)
You can also add other resource files to the application. Select Project ⇒ Add New Item. Pick the Resources File template, give the file a meaningful name, and click OK.
After you add a resource file to the project, you can double-click it in Solution Explorer to open it in the resource editor. Then you can add resources to the file exactly as you do for the application’s resource file.
Just as it generates strongly typed properties for application resources, Visual Studio generates similar code for other embedded resource files. You can access these properties by adding the resource file’s name after the resource file’s name. For example, to use the image resource named Logo from the Images resource file, the program would use Images.Logo.
Localization Resources
One of the most important reasons for inventing resource files was to allow localization: supporting different text, images, and other items for different languages and cultures. Resources make localization in Visual Studio .NET easy.
First, create a form using whatever language you typically use from day to day. For me, that’s English as spoken in the United States. Open the form in the form designer and give it whatever controls you need. Set the form’s and controls’ properties as usual.
Next, set the form’s Localizable property to true and set the form’s Language property to the first language you want to support other than the default language that you have been working with so far. Modify the controls’ properties for the new language.
As you modify a form, Visual Studio saves the changes you make to a new resource file attached to the form. If you open Solution Explorer and expand the form’s entry, you can see these resource files below the form’s file.
Example program Localized uses default settings for United States English. It also includes localizations for generic German (as opposed to German as spoken in Switzerland, Germany, Liechtenstein, or some other country). If you expand the form’s entry in Solution Explorer, you’ll find the files Form1.resx holding the default settings and Form1.de.resx holding the German settings.
When you build the program, Visual Studio compiles the resources and saves them in a DLL file named Localized.resources.dll in a directory named after the locale. (The “Localized” part of the file’s name comes from the program’s name.) At run time, the application automatically checks the computer’s regional settings and selects the resource file that matches most closely.
For example, suppose your computer is configured for the German/Switzerland (de-CH) locale. The program first looks for Localized.resources.dll in a subdirectory named de-CH. If it doesn’t find the DLL, it looks for the generic German resources DLL in the subdirectory de (the code for generic German). If the program still can’t find a resource DLL, it uses the default implementation that is included in the form itself.
Later, if you need to modify the resources for a locale, you can rebuild the application and then copy the new Localized.resources.dll into the appropriate subdirectory.
Normally, you should let the application pick the appropriate resource file automatically, but you can explicitly select a resource file for testing purposes. To do that, open the form’s code file and add the following using directives.
using System.Threading;
using System.Globalization;
Next, find the form’s constructor and add the bold lines shown in the following code.
public Form1()
{
    // Set the culture and UI culture to German.
    Thread.CurrentThread.CurrentCulture = new CultureInfo("de-DE");
    Thread.CurrentThread.CurrentUICulture = new CultureInfo("de-DE");

    InitializeComponent();
}
Now when the form is created, it loads the resources for the German de-DE localization. (The Localized example program includes these lines commented out. Uncomment them to make the program load the German localization.)
For a list of culture codes, see msdn.microsoft.com/library/ee825488.aspx.
Summary
Visual Studio provides many ways to store application configuration and resource information. Some of the most useful of these methods include environment variables, the registry, configuration files, and resource files.
The registry and configuration files generally hold user-specific information that changes relatively often. You can use them to store information such as user preferences and form layout.
You can store less volatile resources that determine the application’s appearance in resource files. You can use embedded resource files to hold images, strings, audio, and other resources.
If you will distribute the application in multiple languages, localized resource files make displaying locale-appropriate resources easier. If necessary, you can change the data stored in configuration and resource files and redistribute them to your users without rebuilding the entire application.
Using all these techniques, you can make your application easily configurable. You can satisfy the needs of different kinds of users and customize the application without recompiling it.
This chapter explained ways that a program can save configuration and resource information using tools such as the registry, environment variables, and resource files. Generally, these kinds of data are of relatively limited size. If an application needs to store larger amounts of data, it should probably use a database or file.
The next chapter explains classes that a C# application can use to work with stream data in general and files in particular. Using streams attached to files, a program can read and write large amounts of data without cluttering up the registry, environment variables, or resource files.
Exercises
- Write a program that lists all the environment variables at the machine, user, and process levels.
- Write a program that displays the version of Visual Studio that it is running. (Hint: Look through the environment variables until you find the one you need.) What happens if you run the program by double-clicking the compiled executable? Why does that happen?
- If you type the name of a program at a command prompt, the operating system checks the locations defined by the
PATHenvironment variable to try to find the program. Write a program that displays the paths listed in thePATHvariable. - Write a program that has
TextBoxes for first name, last name, street, city, and ZIP code. Also give it aComboBoxfor selecting a state. Make the program load and save the controls’ values when it starts and stops. (Hint: You don’t need to save and restore each value separately. Instead loop through the form’sControlscollection and save and restore the value forTextBoxes andComboBoxes.) - Write a program that displays a label with the font loaded from a configuration file. Initially, use 20-point Times New Roman and run the program. Then manually edit the config file to use 30-point Comic Sans MS and run the compiled executable. What happens if you then run the program from Visual Studio? What happens if you delete the config file and run the compiled executable? What happens if you then run the program from Visual Studio?
- Localization lets you localize control properties, but you can use a similar technique to localize resources that are not stored in control properties. Create a program, add a new resource file named
MyStrings.resx, and give it a string resource named Greeting with value “Hello.” Now create a second resource file namedMyStrings.fr.resx, and give it a string resource named Greeting with value Salut. In the form’s Load event handler, display the value in a message box. What happens when your program loads the French locale (fr-FR)? What localization directories and files does Visual Studio create? - Setting the current thread’s culture does more than make the program load the right localized resources. It also makes locale-aware methods such as those that use standard number, currency, and date formats display results that are appropriate for the locale.
Write a program that displays the locale, current date, and the currency amount 12,345.67 in each of the following locales: fr-FR, de-DE, de-CH, es-MX, es-ES, en-US, and en-GB. (Hint: Set the
CurrentCultureas shown in the section “Localization Resources.” Use theToShortDateStringmethod to format the date. UseToString("C")to format the currency value.)