
Chapter 12
Classes and Structures
What’s in This Chapter
- Defining classes and structures
- Value and reference types
- Memory requirements, and heap and stack performance
- Boxing and unboxing
- Constructors and destructors
- Garbage collection and
Dispose
Wrox.com Downloads for This Chapter
Please note that all the code examples for this chapter are available as a part of this chapter’s code download on the book’s website at www.wrox.com/go/csharp5programmersref on the Download Code tab.
A variable holds a single value. It may be a simple value, such as an int or string, or a reference to a more complex entity such as a class or structure.
Classes and structures are both container types. They group related data values and methods into a convenient package that you can manipulate as a group.
For example, a Recipe class would contain fields or properties holding information about a recipe such as ingredients, temperature, instructions, and number of servings. It could also include methods to convert measurements between English and metric, to scale the recipe for different numbers of servings, and to print the recipe.
If you make an instance of the Recipe class and fill it with the data for a particular recipe, you can move the object around as a single unit instead of passing around separate variables holding the ingredients, temperature, instructions, and number of servings. The object also contains methods for manipulating the recipe, so you don’t need to write a separate module containing methods to convert measurements, scale the recipe, and print. The class keeps all these things together, so they’re easy to find.
This chapter explains how to define and instantiate classes and structures. It explains the key differences between classes and structures and provides some recommendations about which to use under different circumstances.
Classes and structures provide almost exactly the same features. For example, both can have properties, methods, and events. The following sections start by describing classes. As you read about classes, be aware that most of those features also apply to structures. Sections later in the chapter explain where the two differ.
Classes
A class packages data and related behavior. The Recipe class described earlier is an example. It contains information about a recipe and methods for manipulating its data.
Here’s the syntax for declaring a class.
«attributes» «accessibility» «abstract|sealed|static» «partial»
    class name «inheritance»
{
    statements
}
The only thing all class declarations require is the class clause (including the class’s name). Everything else is optional. The following code describes a valid (albeit not very interesting) class.
class Person
{
}
The following sections describe the pieces of the general declaration in detail.
attributes
The optional attributes section is a list of attributes that apply to the class. An attribute further refines the definition of a class to give more information to the compiler and the runtime system.
Attributes are rather specialized and address issues that arise when you perform specific programming tasks. For example, if you need to copy instances of the class from one application to another, you can mark the class with the Serializable attribute. This isn’t something you need to do for every class. Actually, some attributes are so specialized that you may never use them.
Because attributes are so specialized, they are not described in detail here. (Although Chapter 25, “Serialization,” says more about serialization.) For more information, consult the Internet and the online help.
For more information on attributes, go to these web pages:
- Attributes (C# and C#) (msdn.microsoft.com/library/z0w1kczw.aspx)
- Attributes Tutorial (msdn.microsoft.com/library/aa288454.aspx)
For a list of 578 attributes that you can use, go to Microsoft’s “Attribute Class” web page at msdn.microsoft.com/system.attribute.aspx and look at the “Inheritance Hierarchy” section at the bottom.
accessibility
If a class is declared directly within a namespace, its accessibility clause must be either public or internal. You can also omit accessibility, in which case the default is internal.
If a class is declared inside a structure, its accessibility clause can be public, private, or internal. If the class is declared within a class, the clause can also take the values protected and protected internal.
The following table summarizes the meanings of these values and when they are allowed.
| Keyword | Allowed In | Meaning |
public | namespace structure class | The class is visible to all code inside or outside of the class’s assembly. |
internal | namespace structure class | The class is visible only to code inside the class’s assembly. |
private | structure class | The class is visible only to code inside the containing namespace, structure, or class. |
protected | structure class | The class is visible only to code inside the containing structure or class, or in a class derived from the containing class. |
protected internal | structure class | Combines protected and internal. |
For example, the following code defines a Person class.
namespace OrderProcessor
{
    public class Person
    {
        internal struct Address
        {
            public string Street, City, State, Zip;
        }

        public string FirstName, LastName;
        internal Address PostalAddress;
    }
}
The Person class is defined at the namespace level. It is declared public, so all code can see its definition.
The Person class defines the Address structure. It is declared internal, so this structure is visible only to code within the assembly. If you use the Person class from code in another assembly, that code won’t see the definition of the Address structure.
After defining the Address class, the Person class defines FirstName, LastName, and PostalAddress fields. The PostalAddress field is declared internal, so it’s not visible to code outside the assembly. If you use the Person class from code in another assembly, that code won’t see the PostalAddress field.
abstract | sealed | static
If a class’s declaration includes the abstract keyword, you cannot make instances of the class. To make use of the class’s features, you must derive another class from it. You can then make instances of the derived class.
If a class’s declaration includes the sealed keyword, you cannot derive other classes from it.
If a class’s declaration includes the static keyword, you cannot derive other classes from it or create instances of it. You invoke the members of a static class by using the class’s name instead of an instance. Note that all members of a static class must also be declared static.
For example, consider the following LogTools class.
public static class LogTools
{
    public static void RecordMessage(string message)
    {
        Console.WriteLine(message);
    }
}
This static class defines a static RecordMessage method. In this example, the method writes a message to the Console window, although, you could modify it to write the message into a log file.
The following code shows how a program can invoke the RecordMessage method.
LogTools.RecordMessage("Started " + DateTime.Now.ToString());Notice how the code invokes the method by using the class’s name (highlighted in bold).
partial
The partial keyword tells C# that the current declaration defines only part of the class. The following code shows the Person class broken into two pieces.
partial class Person
{
    public string FirstName, LastName;
}

partial class Person
{
    public string Street, City, State, Zip;
}
You can break a class into any number of pieces. (If you do break a class into pieces, all of them must include the partial keyword.) At compile time, C# finds the pieces and combines them to define the class.
Normally, you wouldn’t break a class into pieces within a single module. In fact, it’s not a good idea to break a class into pieces unless you must. Keeping all the class’s code in one piece makes it easier to find.
Keeping all the pieces together makes it easier to find the pieces, but there are a few circumstances in which splitting a class may make sense. Some of those times include
- To separate automatically generated code from code written by developers
- To split a large class so that multiple developers can work on it simultaneously
- To break the class into pieces that each focus on some aspect of the class’s behavior
- To place the implementations of different interfaces in different files
All the pieces of a class must have the same accessibility and parent class. You only need to declare those in one of the pieces, but if you declare them multiple times, they must agree. For example, you cannot make one piece of the HonorStudent class inherit from Student while another piece inherits from Person.
You can make different pieces of the class implement different interfaces. For example, the following code is legal.
public partial class Student : Person, Interface1
{
    ...
}

partial class Student : Interface2
{
    ...
}inheritance
If it is included, the class’s inheritance clause can include a parent, one or more interfaces, or both a parent class and interfaces. If the declaration includes a parent class and interfaces, the parent class must come first.
For example, the following code defines a Student class that inherits from the Person class and that implements the IComparable and IFormattable interfaces.
class Student : Person, IComparable, IFormattable
{
    ...
}
The class automatically inherits its parent’s properties, methods, and events but is responsible for providing implementations for its interfaces. (For more information on implementing interfaces, see the section “Implementing Interfaces” in Chapter 6.)
Recall from Chapter 11, “OOP Concepts,” that C# allows a class to inherit from at most one parent class and to implement any number of interfaces. See the sidebar “Multiple Inheritance” in Chapter 11 for more information.
Structures
In many respects, structures are similar to classes. They let you group properties, methods, events, fields, and other members in a package that you can manipulate as a group.
One of the most obvious differences between structures and classes is that structures do not support inheritance. You cannot derive one structure from another. (You also cannot derive a structure from a class or vice versa.)
Structures can implement interfaces much as classes can.
The fact that structures don’t support inheritance is reflected in the following declaration syntax.
«attributes» «accessibility» «partial» struct name «interfaces»
{
    statements
}
The structure’s attributes and accessibility clauses and the partial keyword work the same way they do for classes. The interfaces section is similar to a class’s inheritance section except it supports only interfaces not inheritance. See the earlier sections discussing these pieces of the class declaration for details.
There is one other huge difference between structures and classes: structures are value types but classes are reference types. This is an important but confusing issue, so the following sections spend quite a bit of time explaining what that difference means.
Value Versus Reference Types
The biggest difference between a structure and a class is in how each allocates memory for its data. Classes are reference types. That means an instance of a class is actually a reference to the object’s storage in some other part of memory.
In contrast, structures are value types. An instance of a structure contains the data inside the structure rather than simply points to it. Figure 12-1 illustrates the difference.
The following sections describe some of the more important consequences of the way value and reference types allocate memory.
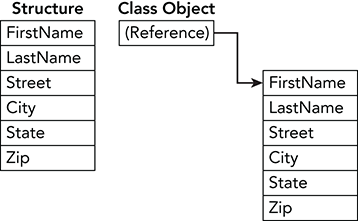
Figure 12-1: A structure holds its data, but a class holds a reference to its data.
Memory Requirements
The difference in the amount of memory required by classes and structures is small when you consider only a single object. In Figure 12-1, the class needs to allocate only one additional memory location to hold the reference. (The reference takes 4 bytes on 32-bit systems or 8 bytes on 64-bit systems.)
However, the difference can add up in an array. An array of structures contains only the data in the structures. An array of objects requires references in addition to the memory used by the objects. If the array contains 1,000 items, then it uses 4,000 more bytes of memory (assuming a 32-bit system).
When an array is first allocated, however, its entries are initially set to null, so they don’t refer to any objects. At that point the array uses only the memory required by its references. Figure 12-2 compares an array of structures to an empty array of objects.
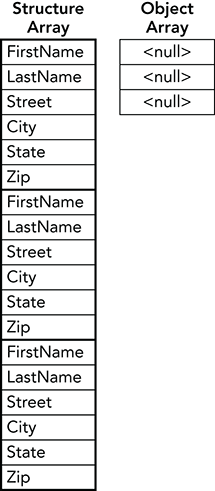
Figure 12-2: An array of structures uses lots of memory even before it is initialized. An array of objects uses little memory until its entries refer to objects.
For example, suppose a structure or object requires 1 KB of memory. An array containing 1,000 structures occupies 1 MB. When an array of objects is first created, it occupies 4 KB for its null references. When the array is full, it occupies 1 MB for its data plus 4 KB for its (no longer null) references.
Suppose a program needs to use a large array of items. If relatively few of the items will be allocated at any given moment, an array of objects will use relatively little memory. If the program needs many of the items to be allocated at the same time, an array of structures will use slightly less memory because it doesn’t need to allocate references.
Heap and Stack Performance
C# programs allocate variables from two pools of memory called the stack and the heap. Memory for value types (such as int and double) comes from the stack. Memory for reference types comes from the heap.
Any number of references can point to the same piece of memory in the heap. That complicates garbage collection and other heap-management issues, so working with reference types can be slightly slower than working with value types.
Note that arrays are themselves reference types derived from the Array class. That means all arrays are allocated from the heap even if the values they contain are allocated from the stack.
Object Assignment
One of the most important functional differences between structures and objects lies in object assignment.
When you set a value variable equal to another value variable, the program copies the data in one variable into the other. If you change the data in one variable, the other variable is unchanged because it is a copy residing in its own memory.
Figure 12-3 shows this situation. Initially, variable A holds the values Sherlock and Holmes. Variable B holds blank values. When you execute the statement B = A, the program copies the values stored in variable A into variable B.

Figure 12-3: When you set one value type variable equal to another, the program copies the data.
In contrast, when you set a reference variable equal to another reference variable, the program makes both variables point to the same memory. If you change the data in one reference, the change is reflected in the other because they both point to the same object.
Figure 12-4 shows this situation. Initially variable A holds the values Sherlock and Holmes. Variable B is null. When you execute the statement B = A, the program makes variable B point to the same object pointed to by variable A.
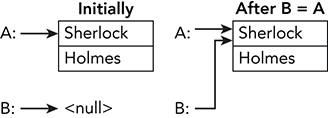
Figure 12-4: When you set one reference type variable equal to another, the program makes them both refer to the same object.
Parameter Passing
The difference between value and reference type variables can be particularly confusing when you consider parameter passing methods. For example, assume Employee is a class and consider the following method declaration.
public void SelectEmployee(Employee employee)
{
    ...
}
The parameter employee is passed by value, so it is a copy of the argument used in the calling code. (Here parameter refers to the value inside the method and argument refers to the value passed into the method in the calling code.) The parameter has type Employee, so the argument and parameter are reference types. That means the parameter employee contains a copy of the reference to the actual Employee object. Figure 12-5 shows conceptually how the argument and parameter are arranged in memory.
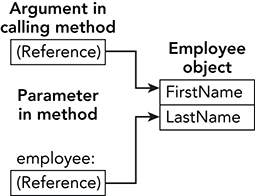
Figure 12-5: When you pass a reference type by value, the parameter contains a copy of the reference.
In this example, the parameter refers to the same object as the argument. If you use the parameter to change the Employee object’s properties (for example, if you execute the statement employee.FirstName = "Linda"), the calling code sees that change because the argument points to the same object.
If you change the parameter to make it point to a new Employee object, the parameter and the argument will refer to two separate objects. The calling code will not see that change.
Now consider the following modified version of the SelectEmployee method.
public void SelectEmployee(ref Employee employee)
{
    ...
}
Here the ref keyword means the argument is passed into the method by reference. (The out keyword would also pass the argument by reference.) Now the employee parameter is a reference to the argument, which is a reference to an Employee object. Figure 12-6 shows this situation conceptually.
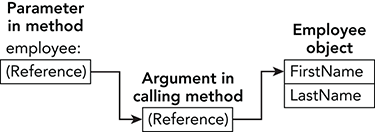
Figure 12-6: When you pass a reference type by reference, the parameter is a reference to a reference to the object.
Now the parameter is a reference to the argument not to the Employee object. If you use the parameter to change the Employee object’s properties (for example, if you execute the statement employee.FirstName = "Linda"), the calling code sees that change as before.
If you change the parameter to make it point to a new Employee object, you are actually changing the argument. That means the calling code sees the change.
Because structures are value types, they behave differently than objects when you pass them into a method by reference or by value. For example, suppose Address is a structure and consider the following code.
public void PrintAddress(Address address)
{
    ...
}
The parameter address is passed by value, so it is a copy of the argument used in the calling code. Because structures are value types, all the data in the structure is copied into the parameter. Figure 12-7 shows conceptually how the argument and parameter are arranged in memory.
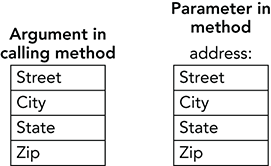
Figure 12-7: When you pass a structure by value, the parameter contains a copy of the structure and all its data.
The parameter holds a completely separate copy of all the argument’s data. If you change the parameter’s data (for example, if you execute the statement address.Street = "1337 Leet St"), the argument is unaffected, so the calling code doesn’t see the change. If you set the parameter equal to a new Address structure, the argument is still unaffected, so the calling code doesn’t see that change either.
Basically, nothing you do to the parameter will affect the calling code. This is different from the behavior you get when you pass an object into the method. In that case changes to the object’s properties are visible to the calling code.
Now consider the following modified version of the PrintAddress method.
public void PrintAddress(ref Address address)
{
    ...
}
Here the ref keyword means the argument is passed into the method by reference. Now the address parameter is a reference to the argument. Figure 12-8 shows this situation conceptually.
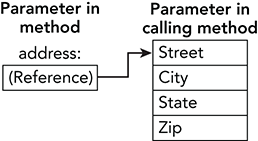
Figure 12-8: When you pass a structure by reference, the parameter is a reference to the structure.
The parameter is a reference to the argument. If you use the parameter to change the Address structure’s properties (for example, if you execute the statement address.Street = "1337 Leet St"), the calling code sees that change.
If you change the parameter itself to make it point to a new Address structure, you are actually changing the argument. That means the calling code sees the change.
Remember that arrays are reference types. An array variable is a reference to the block of memory that contains the items in the array. If those items are also reference types, for example, in an array of Employee objects, then you have a reference to a block of memory containing references. If you then pass the array by references, you get a reference to a reference to a block of memory containing references. Figure 12-9 shows conceptually how the memory is arranged when you pass an array of Employee objects named employees into a method by reference.
Fortunately, you usually don’t need to worry about the mess shown in Figure 12-9. The only thing you need to remember is that any changes to the employees parameter are reflected in the argument.
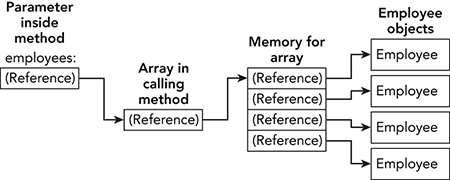
Figure 12-9: An array passed by reference is actually a reference to a reference to a block of memory containing references.
The following table summarizes how changes to a parameter affect the argument in the calling code for reference and value types passed by value or by reference.
| Argument Type | Passed By | Effects |
Value type (int) | Value | Changing the parameter does not change the argument. |
Value type (int) | Reference | Changing the parameter changes the argument. |
Structure (Address) | Value | Changes to the structure’s properties are not seen in the calling code. Setting the parameter to a new value does not change the argument in the calling code. |
Structure (Address) | Reference | Changes to the structure’s properties are seen in the calling code. Setting the parameter to a new object changes the argument in the calling code. |
Reference type (Employee) | Value | Changes to the object’s properties are seen in the calling code. Setting the parameter to a new value does not change the argument in the calling code. |
Reference type (Employee) | Reference | Changes to the object’s properties are seen in the calling code. Setting the parameter to a new object changes the argument in the calling code. |
Array (Employee[]) | Value | Changes to an array entry’s properties are seen in the calling code. Setting an entry in the array to a new value affects the values in the array in the calling code. Setting the parameter to point to a new array or null does not affect the array in the calling code. |
Array (Employee[]) | Reference | Changes to an array entry’s properties are seen in the calling code. Setting an entry in the array to a new value affects the values in the array in the calling code. Setting the parameter to point to a new array or null changes the array in the calling code. |
Passing objects and structures by value or reference can also affect performance. When you pass an object by value, the program passes only a copy of a reference to the method. When you pass a structure by value, the program must copy all the structure’s data. If the structure is large, that will take a bit longer.
Boxing and Unboxing
C# allows a program to treat any variable as if it were an object. For example, consider the following method.
public void ShowStringValue(object obj)
{
    Console.WriteLine(obj.ToString());
}
This method can take any kind of object as a parameter.
Now suppose you call this method with the statement ShowStringValue(13). The number 13 is an int, not an object. To allow the method to work, the program wraps the value 13 in an object and passes the object to the method.
The process of wrapping a value type such as an int in an object is called boxing. Later, if the program needs to use the int as a value type again, the program unboxes it.
Because structures are value types, the program must box and unbox them whenever it treats them as objects.
Some operations that require boxing and possibly unboxing include assigning a structure to an object variable, passing a structure to a routine that takes an object as a parameter, or adding a structure to a collection class that holds objects. Note that this last operation includes adding a structure to a collection used by a control or other object. For example, adding a structure to a ListBox control’s Items collection requires boxing.
Because arrays are reference types, treating an array as an object doesn’t require boxing.
Boxing and unboxing add some overhead to a program. If the program needs to box and unbox only a few items, the difference is small. If the program must box and unbox a huge number of items, the extra time can add up.
Constructors
Chapter 4, “Data Types, Variables, and Constants,” briefly mentioned constructors. A constructor is special method that has no name and that returns the type of the class or structure that contains it. (Alternatively, you can think of a constructor as having the same name as its class and returning no type, not even void.)
You can overload constructors by giving different versions different signatures, just as you can overload any other method. For example, the following code shows a simple Person class with two constructors highlighted in bold.
public class Person
{
    string FirstName { get; set; }
    string LastName { get; set; }
public Person()
    {
        FirstName = "unknown";
        LastName = "unknown";
    }
public Person(string firstName, string lastName)
    {
        FirstName = firstName;
        LastName = lastName;
    }
}Whenever the program creates a new instance of a class or structure, the program invokes a constructor. The program uses the parameters in the new statement to determine which constructor to use. For example, the following code creates a new Person object. Because the new statement uses two string parameters, the program uses the previous code’s second constructor.
Person person = new Person("Rufus", "Firefly");If you do not provide any constructors for a class or structure, C# automatically provides a default parameterless constructor. If you create any constructors of your own, C# does not create a default constructor.
You can use that fact to ensure that the program initializes new objects or structures with required values. For example, if the previous version of the Person class did not include a parameterless constructor, then the program would be forced to use the other constructor, which takes first and last names as parameters. The program could not create a Person object without giving it first and last name values. (Although it could still mess things up by setting those values to blank strings or null. You could modify the constructor to check for that.)
You can define your own parameterless constructors for classes. Structures cannot have explicitly defined parameterless constructors.
As is the case with other methods, you can give constructors optional parameters. For example, the following constructor can take zero, one, or two parameters.
public Person(string firstName = "unknown", string lastName = "unknown")
{
    FirstName = firstName;
    LastName = lastName;
}
Constructors have two additional options that are not available to methods in general. First, a constructor can use the this keyword to automatically invoke another constructor. For example, consider the following code.
public Person(string firstName, string lastName)
{
    FirstName = firstName;
    LastName = lastName;
}

public Person()
: this("(Unknown)", "(Unknown)")
{
}
This code defines a constructor that takes first and last names as parameters. That constructor saves its input parameters in the object’s FirstName and LastName properties.
The code then defines another constructor. The this clause highlighted in bold invokes the first constructor, passing it the values (Unknown) and (Unknown) as parameters.
In the second option that is unavailable to other methods, a constructor uses the base keyword to invoke a constructor in the parent class. For example, consider the following Employee class derived from the Person class.
public class Employee : Person
{
    public int EmployeeId { get; set; }

    public Employee(string firstName, string lastName, int employeeId)
        : base(firstName, lastName)
    {
        EmployeeId = employeeId;
    }

    public Employee(string firstName, string lastName)
        : this(firstName, lastName, 0)
    {
    }
}
The first constructor takes a first name, last name, and employee ID as parameters. The base clause highlighted in bold invokes a Person class constructor, passing it the first and last names as parameters. The constructor then saves the employee ID.
The Employee class’s second constructor uses this to invoke the first constructor, passing it the first and last names, and the employee ID 0.
Structure Instantiation Details
Structures handle instantiation somewhat differently from classes. When you declare a reference variable, C# does not automatically allocate the object to which the variable points. In contrast, when you declare a value type such as a structure, C# automatically allocates space for the variable’s data. That means you don’t need to use the new keyword to instantiate a structure.
For example, the following code creates an Address structure and initializes its Street property.
Address address;
address.Street = "711 Maple Street";
Although you don’t need to use the new keyword to instantiate a structure, you can if you want. That’s a useful way to reinitialize a structure and set its data to default values. For example, consider the following code.
// Create an Address.
Address address;
address.Street = "711 Maple Street";
...
// Reinitialize the Address.
address = new Address();
address.Street = "742 Evergreen Terrace";
...
This code creates an Address structure and sets its Street property. It works with the structure for a while and then uses new to reinitialize the structure. It then sets the Street property to a new value and continues using the structure.
You can also use the new keyword if you want to use initialization syntax to initialize the structure. For example, the following code uses new to create an Address structure and set its Street property.
Address address = new Address() { Street = "1313 Mockingbird Lane" };Garbage Collection
When a program starts, the system allocates a chunk of memory for the program called the managed heap. When it allocates data for reference types (class objects), C# uses memory from this heap.
Suppose your program creates a Person object and then later sets the only reference to that object equal to null. The program can no longer access the object, so its heap memory is “lost.”
The garbage collector (GC) is in charge of recycling that lost memory. At some later point, the garbage collector’s optimizing engine may decide that there is too much lost memory in the heap, so it decides to clean house.
Exactly how garbage collection works is fairly complicated and not terribly important for most applications, so this section provides only an overview. For more precise details, see the web page “Garbage Collection” at msdn.microsoft.com/library/0xy59wtx.aspx.
Basically when it runs, the garbage collector marks all the heap memory as not in use. It then examines all the program’s reference variables, parameters that are object references, CPU registers, and other items that might point to heap objects. For each of those references, the garbage collector marks the object to which the reference points as in use.
Next, the garbage collector compacts heap memory that is still in use and updates program references so that they can find any items that it moved. The garbage collector then updates the heap itself so that the program can allocate memory from the unused portion.
When it destroys an object, the garbage collector frees the object’s memory and any managed resources it contains. It may not free unmanaged resources, however. You can determine when and how an object frees its managed and unmanaged resources by using destructors and the Dispose method.
Destructors
When it destroys an object, the garbage collector automatically frees any managed resources used by that object. For example, suppose an unused object contains a reference to an open file stream. When the garbage collector runs, it notices that the file stream is inaccessible to the program, so it destroys the file stream, as well as the object that refers to it.
However, suppose that the object uses an unmanaged resource that is outside of the scope of objects that C# understands. For example, suppose the object holds an integer representing a file handle, network connection, or channel to a hardware device that C# doesn’t understand. In that case, the garbage collector doesn’t know how to free that resource.
In that case, you can give the class a destructor, a method that runs when objects are destroyed. Before it permanently destroys an object, the garbage collector calls that object’s destructor so the destructor can clean up unmanaged resources.
Note that there are no guarantees about exactly when the garbage collector calls this method, or the order in which different objects’ destructors are called. Two objects’ destructors may be called in either order even if one contains a reference to the other or if one was freed long before the other. That means a destructor cannot use any references to objects created outside of the destructor because those objects may no longer exist.
To create a destructor, create a method named after the class with a ~ character in front of it. For example, the following code shows a destructor for the Person class.
~Person()
{
    // Free unmanaged resources here.
    ...
}When a program ends normally, it calls the destructors for all the objects that were created. If the program crashes or you halt it abnormally, for example, by using the Debug menu’s Stop Debugging command, the program doesn’t run the destructors. Sometimes that may leave unmanaged resources locked or otherwise unavailable to the operating system. For example, a file editing program may leave open files locked if it crashes.
Dispose
Because C# doesn’t keep track of whether an object is reachable at any given moment, it doesn’t know when it can permanently destroy the object until the program ends or the garbage collector reclaims it. That means the object’s memory and resources may remain unavailable for quite a while.
Unavailable memory itself isn’t a big issue. If the program’s heap runs out of space, the garbage collector runs to reclaim the unused memory. However, if an object contains a reference to a resource (managed or unmanaged), that resource isn’t freed until the object is destroyed, and that can sometimes have dire consequences. You generally don’t want control of a file, network connection, scanner, or other scarce system resource left to the whims of the garbage collector.
By convention, the Dispose method frees an object’s resources. Before a program frees an object that contains important resources, it can call that object’s Dispose method to free the resources explicitly.
To handle the case in which the program doesn’t call Dispose, the class should also free any unmanaged resources that it holds in its destructor. Because the destructor is executed regardless of whether the program calls Dispose, the class must be able to execute both the Dispose method and the destructor without harm. For example, if the program shuts down some piece of unusual hardware, it probably should not shut down the hardware twice.
To make Dispose methods a little more consistent, C# defines the IDisposable interface, which declares the Dispose method. If a class implements this interface, then the using statement will automatically call an object’s Dispose method, so you don’t need to do it explicitly.
Finally, if the Dispose method has freed all the object’s resources, there’s no need to invoke the destructor when the object is eventually destroyed. You can make destruction a bit more efficient by having the Dispose method call GC.SuppressFinalize to tell the garbage collector to skip the object’s destructor.
The following list summarizes the key destruction issues.
- The destructor is called automatically when an object is destroyed.
- The destructor cannot refer to managed objects because they may have already been destroyed. In particular, the destructor cannot free managed resources because they may have already been destroyed.
- The destructor must free unmanaged resources. This is the last chance the object has for freeing those resources.
- Instead of making the program wait an unknowable amount of time for the destructor to execute, you can provide a
Disposemethod that disposes of all resources when the object is done with them. - If you implement the
IDisposableinterface, theusingstatement callsDisposeautomatically. - Either it must be safe for the
Disposemethod and the destructor to both run, or you can ensure that they both can’t run by making theDisposemethod callGC.SuppressFinalize.
The following code defines a UseResources class that uses both managed and unmanaged resources.
// A class with managed and unmanaged resources.
public class UseResources : IDisposable
{
    // Code to initialize and use resources.
    ...

    // Destructor.
    // Cannot free managed resources.
    // Must free unmanaged resources.
    ~UseResources()
    {
        // Free unmanaged resources here.
        ...
    }

    // Dispose.
    // Frees managed and unmanaged resources.
    // Suppresses the destructor.
    public void Dispose()
    {
        // Free managed resources here.
        ...

        // Free unmanaged resources here.
        ...

        // Suppress the destructor.
        GC.SuppressFinalize(this);
    }
}
The class implements IDisposable so the using statement will automatically call the Dispose method.
The bulk of the class’s code, which initializes and uses the resources, isn’t shown here.
The class’s destructor frees the unmanaged resources.
The Dispose method frees both managed and unmanaged resources. It then calls GC.SuppressFinalize to prevent the destructor from running and freeing the unmanaged resources again.
The parameter to GC.SuppressFinalize is the object for which the destructor should not be called. The code passes this to that method so the current object’s destructor isn’t called.
In this class, either the Dispose method or the destructor is called but not both.
Events
Chapter 4 explained how to create properties, and Chapter 6 explained how to make methods. In some sense properties and methods let program code outside of a class communicate with an object. Properties let the program view and modify the object’s data. Methods let the program make the object do something.
Events do the reverse: They let the object send information back to the program when something interesting occurs. The object raises an event to tell the main program about a situation so the main program can decide what to do about it.
For example, some of the most common events are button and menu Click events. When the user selects a menu item or clicks a button, the menu item or button raises a Click event. The main program catches that event and takes appropriate action.
The following sections describe events. They explain how a class declares events and how other parts of the program can catch them.
Declaring Events
An object can raise events whenever it needs to notify the program of changing circumstances. The class declares the event using the event keyword. The following text shows the event statement’s syntax.
«attributes» «accessibility» «new|virtual|override|abstract|sealed» «static»
    event delegate name;
The following list describes the declaration’s pieces.
- attributes—Attributes provide extra information about the event for use by the compiler, the runtime system, and other tools.
- accessibility—This can be
public,private,protected,internal, orprotected internaland is similar to the accessibility for other items such as classes, properties, and methods. The keywords have the following meanings:public—The event can be caught by any code.private—The event can be caught only by code inside the class.protected—The event can be caught only by code inside the class or a derived class.internal—The event can be caught only by code inside the class’s assembly.protected internal—The event can be caught only by code inside the class or a derived class within the class’s assembly.
new|virtual|override|abstract|sealed—These are similar to the keywords used by methods described in Chapter 6. They have the following meanings:new—Hides an event with the same name defined in an ancestor class.virtual—If you mark an event as virtual, you can later replace it in a derived class by overriding it.override—If an ancestor class defines a virtual event, you can use theoverridekeyword to override it.abstract—This keyword indicates the event is abstract, so derived classes must override the event to give it an implementation. As is the case withabstractmethods, a class that contains anabstractevent must beabstractand cannot be instantiated.sealed—This keyword indicates the event is no longervirtualso it cannot be overridden in derived classes.
static—This indicates the class itself raises the event rather than instances of the class.- delegate—This is a delegate type that defines the parameters that will be passed to event handlers for the event.
- name—This is the name you want to give the event.
Much of this should seem familiar to you from similar keywords used with methods. In fact, events seem a lot like methods. The class that defines the event “invokes” it much as you invoke a method, and the event handler that catches the event is just a method.
However, there are some major differences between events and methods. The following sections provide some more detail about events and explain the reasons why events are more than simply methods in disguise. Those sections also include some examples that show how to declare, raise, and catch events.
Raising Events
To raise an event, the code must first determine whether any other pieces of code have registered to catch the event. It does that by comparing the event to null. (This is a fairly odd syntax but that’s the way C# does it.)
If the event handler isn’t null, the code “invokes” it, passing it any required parameters. The program then invokes each of the registered event handlers in turn, passing them those parameters.
For example, suppose the Student class defined a GradeChanged event. Then the following snippet inside the Student class raises the event, passing it the current Student object as a parameter.
if (GradeChanged != null) GradeChanged(this);Catching Events
To subscribe to an event, a program uses the += operator to “add” the event handler to the event.
For example, suppose the Person class defines a NameChanged event. Suppose the main program creates an instance of the Person class named MyPerson. Finally, suppose the main program defines an event handler named MyPerson_NameChanged to handle that event. Then the main program could use the following code to subscribe to the event.
MyPerson.NameChanged += MyPerson_NameChanged;If the program executes this code multiple times, then when the event is raised, the event handler will be called multiple times.
To unsubscribe from an event, use the -= operator. The following code shows how a program might unsubscribe from the Person class’s NameChanged event.
MyPerson.NameChanged -= MyPerson_NameChanged;(This example is described further in the next section.)
Using Event Delegate Types
The delegate part of the event declaration is a delegate type that defines the parameters that the event handler takes when it catches the event. You can create your own delegate type, use a predefined Action delegate type, or use the special EventHandler delegate type.
The EventHandler type defines an event that gives the handler two parameters. The first is an object that represents the object that raised the event. The second parameter is another item that gives information about the event. Microsoft recommends that you make the second parameter an object with a name that starts with the name of the event and ends in EventArgs.
For example, the PersonEvent example program, which is available for download on this book’s website, defines a Person class with a Name property. When the Name property changes, the Person object raises a NameChanged event. That event handler’s second parameter is a NameChangedEventArgs object.
Figure 12-10 shows the PersonEvent program in action. Enter a new name in the text box and click Set Name. This displays a message box asking you to confirm the name change. If you click Yes, the program updates the name and displays the new name in the bottom text box.
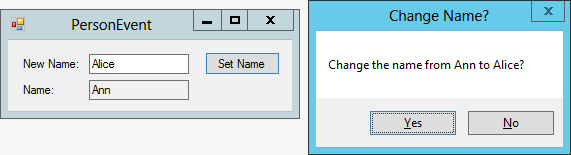
Figure 12-10: The PersonEvent example program demonstrates event handling.
The following code shows the example’s NameChangedEventArgs class.
public class NameChangedEventArgs
{
    public string OldName, NewName;
    public bool Cancel;

    public NameChangedEventArgs(string oldName, string newName)
    {
        OldName = oldName;
        NewName = newName;
        Cancel = false;
    }
}
This class has three fields. The OldName and NewName fields tell the main program what the Person object’s name is being changed from and to. The Cancel property lets the main program cancel the name change.
The NameChangedEventArgs class also defines a constructor that the Person class can use to initialize the old and new name values.
The following code shows the Person class.
class Person
{
    // Raised when the person's name changes.
    public event EventHandler<NameChangedEventArgs> NameChanged;
    // The Name property.
    private string _Name = "";
    public string Name
    {
        get { return _Name; }
        set
        {
            // Prepare the argument object.
            NameChangedEventArgs args =
                new NameChangedEventArgs(_Name, value);

            // If any code is registered to receive the event, raise the event.
            if (NameChanged != null) NameChanged(this, args);

            // If the code didn't cancel the change, make the change.
            if (!args.Cancel) _Name = value;
        }
    }
}
The class starts by declaring its NameChanged event. The EventHandler<NameChangedEventArgs> part of the declaration indicates that this event will pass its event handlers the object that is raising the event and a NameChangedEventArgs object.
Next, the class defines a Name property. The set accessor starts by creating a NameChangedEventArgs object and initializing its name values.
To raise an event, the code must first determine whether any other pieces of code have registered to catch the event. It does that by comparing the event to null.
If the event handler isn’t null, the code “invokes” it, passing it a reference to the object raising the event (this) and the NameChangedEventArgs object. That makes the program raise the event for each of the program elements that are registered to catch it. The same NameChangedEventArgs object is passed to each of the registered event handlers in turn.
Next, the accessor checks the NameChangedEventArgs object’s Cancel field to see if the event handlers set that value to true. If Cancel is false, the accessor sets the property’s backing field _Name to the new name value.
The program’s main form uses the following code to declare and initialize a Person object.
// A Person.
private Person MyPerson = new Person();
The following code shows the program’s NameChanged event handler.
// The event handler.
private void MyPerson_NameChanged(object sender, NameChangedEventArgs e)
{
    e.Cancel =
        MessageBox.Show(
            "Change the name from " + e.OldName + " to " + e.NewName + "?",
            "Change Name?",
            MessageBoxButtons.YesNo)
                == System.Windows.Forms.DialogResult.No;
}
The event handler takes two parameters. The first is an object named sender that refers to the Person object that is raising the event. The second parameter is the NameChangedEventArgs object created by the Person object when it raises the event.
The event handler displays a message box telling the user the NameChangedEventArgs object’s old and new names, and asking if the change should be allowed. It sets the NameChangedEventArgs object’s Cancel value to indicate whether the user clicks Yes or No.
The following code shows the program’s Load event handler.
private void Form1_Load(object sender, EventArgs e)
{
    // Set and display an initial name.
    MyPerson.Name = "Ann";
    nameTextBox.Text = MyPerson.Name;

    // Register the event handler.
    MyPerson.NameChanged += MyPerson_NameChanged;
}
This code initializes the Person object’s Name property and displays the name in the nameTextBox. At that point, no event handler is registered with the object so the event isn’t raised.
The code then registers the MyPerson_NameChanged method to catch the NameChanged event.
The final piece to the program is the following Click event handler, which executes when the user clicks the Set Name button.
// Change the person's name.
private void setNameButton_Click(object sender, EventArgs e)
{
    MyPerson.Name = newNameTextBox.Text;
    nameTextBox.Text = MyPerson.Name;
}
When the user clicks the button, this code sets the Person object’s Name property to the value entered in the nameTextBox.
The following list shows the complete sequence of events that occur when you click the button.
- The main program sets the
Personobject’sNameproperty to a new value. - The
Personobject’ssetaccessor raises theNameChangedevent. - The main program’s
MyPerson_NameChangedevent handler catches the event and displays a message box asking you to confirm the change. - The
Personobject’ssetaccessor checks theNameChangedEventArgsobject’sCancelvalue to see whether it should cancel the name change. IfCancelisfalse, the accessor saves the new name value.
Using Static Events
Static events are mostly like nonstatic events except the event is provided by the class itself rather than an instance of the class.
The StaticEvent example program, which is available for download on this book’s website, defines a ReportManager class that provides a static ReportError event.
The main program uses the following code to subscribe to the event. Notice how it uses the class instead of an instance to identify the event.
ReportManager.ReportError += MyReportManager_ReportError;One important difference between static and nonstatic events has to do with the way objects are destroyed and recycled by the garbage collector. When one object registers for a second object’s event, the second object keeps a reference to the first object. For example, suppose the Form1 class’s code registers to catch a Person object’s NameChanged event. In that case, the Person object holds a reference to the Form1 object.
Now if the program removes all references to those Form1 and Person objects, the garbage collector can reclaim them as usual.
However, suppose NameChanged is a static event provided by the Person class. In that case, when the Form1 object registers to receive the event, the Person class receives a reference to the Form1 object. Later if the program doesn’t need the Form1 object any more, the garbage collector cannot reclaim it because the Person class still holds a reference to it. The Form1 object’s memory is lost forever.
You can avoid this situation by using the -= operator to unregister the event handler before releasing the Form1 object. (You can also avoid this problem if you don’t use static events.)
Hiding and Overriding Events
Events are a bit unusual because they are not inherited the same way properties and methods are. A derived class cannot raise the events declared by its ancestors.
For example, suppose the BankAccount class defines the Overdrawn event, and suppose the OverdraftAccount class is derived from the BankAccount class. Then the code in the OverdraftAccount class cannot raise the Overdrawn event.
The OverdraftAccount class can use the new keyword to hide the Overdrawn event with a new version.
If the BankAccount class declares the event with the virtual keyword, then the OverdraftAccount class can use the override keyword to override the event with a new version.
The new, virtual, and override keywords work much as they do for methods. See the sections “new” and “virtual and override” in Chapter 6 for more information.
Raising Parent Class Events
As the previous section mentioned, a derived class cannot raise an event declared by one of its ancestors. However, sometimes you might like to do just that. The derived class cannot invoke the ancestor class’s event, but it can invoke code in the ancestor class and that code can invoke the event.
The solution is to give the ancestor a method that raises the event. The derived class can then call that method. By convention that method is usually named after the event with On added at the beginning.
To continue the previous example, you might like the OverdraftAccount class to raise the Overdrawn method defined by the BankAccount class instead of create a new event of its own that hides or overrides the BankAccount version. It cannot raise that event directly, but you can add an OnOverdrawn method to raise the event.
For example, you could create the following OnOverdrawn method.
protected void OnOverdrawn(decimal value)
{
    if (Overdrawn != null) Overdrawn(this, value);
}
Now when it needs to raise the Overdrawn event, the OverdraftAccount class invokes the OnOverdrawn method.
Implementing Custom Events
You can use code similar to the following to create an auto-implemented property.
public string Name { get; set; }Behind the scenes, Visual Studio creates get and set accessors to support the property.
Similarly, the following statement declares a simple event.
public event EventHandler<NameChangedEventArgs> NameChanged;This time Visual Studio creates event accessors that add and remove event handlers from a list of event handlers. These are similar to the get and set accessors provided for auto-implemented properties except they are named add and remove.
You can explicitly implement a property if you want to add extra features beyond those provided by auto-implemented properties. Similarly, you can explicitly implement add and remove event accessors if you want. If you take that approach, you must also write code to invoke any registered event handlers.
For example, consider the following code.
// A private event to represent the public event.
private EventHandler<VoteEventArgs> VoteEvent;

// The event.
public event EventHandler<VoteEventArgs> Vote
{
    add
    {
        VoteEvent += value;
    }
    remove
    {
        VoteEvent -= value;
    }
}
This code declares a private event named VoteEvent. It then defines a Vote event. That event’s add and remove accessors delegate their jobs to the private event.
Later, the class can use code similar to the following to raise the event.
// Make the event args object.
VoteEventArgs args = new VoteEventArgs(this.Description);

// Call the event handlers.
if (VoteEvent != null) VoteEvent(this, args);
This code creates a VoteEventArgs object to provide information about the event. (Don’t worry about the details. What’s important is that it creates the object.) It then raises the private event named VoteEvent. Because the add and remove accessors simply passed add and remove requests to the private event, that event invokes any registered event handlers.
This example simply passes event requests to a private event so it actually doesn’t add anything. It does basically the same thing as an auto-implemented public Vote event.
However, you could modify the program to do other things. For example, the custom event could delegate to an object contained in this class. Suppose the Car class has a Crashed event and suppose the Driver class has a Car property that represents the driver’s car. Then the Driver class could make its own Crashed event that delegates to the Car object’s event.
Static Methods
Static methods are a bit less intuitive than static variables. Like static variables, you access static methods by using the class itself rather than an instance of the class. For example, consider the following Student class.
public class Student
{
    public int StudentId { get; set; }
    public string FirstName { get; set; }
    public string LastName { get; set; }
    ...

    // Make a Student.
    public static Student LookupStudent(int id)
    {
        // Look up the student ID in the database and create object theStudent.
        ...

        return theStudent;
    }
}
The class starts with some property declarations. It then defines the static LookupStudent method. This method takes a student’s ID as a parameter, looks the student up in a database (that code isn’t shown), and returns a Student object representing the student.
This kind of method that creates a new instance of a class is called a factory method because it acts as a factory that creates objects on demand.
The following code shows how a program might use the LookupStudent method.
// Get the ID.
int id = int.Parse(lookupIdTextBox.Text);

// Get the student.
Student student = Student.LookupStudent(id);
if (student == null)
{
    firstNameTextBox.Clear();
    lastNameTextBox.Clear();
    idTextBox.Clear();
}
else
{
    firstNameTextBox.Text = student.FirstName;
    lastNameTextBox.Text = student.LastName;
    idTextBox.Text = student.StudentId.ToString();
}
This code gets an ID from a text box. It calls the LookupStudent method to find the student in the database and then either clears its result text boxes or displays the student’s ID and name properties.
You could use a constructor instead of a factory method. In this example, the constructor would take the student’s ID as a parameter, look up the student’s record in the database, and initialize the Student object’s properties.
Unfortunately, if the student didn’t appear in the database, the constructor could throw an exception, but it couldn’t return a null value. A factory method can return null if appropriate.
Even if you define a factory method, the main program could still create a Student object that didn’t represent a student in the database. You can prevent that by giving the class a private constructor. Then code outside of the class cannot create an instance of the class, so it must use the factory method. (Because the factory method is inside the class, it can use the constructor if that helps.)
One restriction on static methods is that they cannot use instance properties or methods. That makes sense because a static method doesn’t depend on a particular instance, so what instance’s properties or methods would it use?
For example, the static LookupStudent method couldn’t access the FirstName property because that property is defined only for instances of the class and not for the class itself. (Of course, the method could make an instance of the class and then use that instance’s FirstName property. That’s how the factory method creates a new Student object.)
Summary
Classes and structures are similar. Both are container types that group related variables, methods, and events in a single entity.
Many developers use only classes, mostly because they are more familiar with classes, but there are some important reasons why you might pick one over the other. For example, structures don’t support inheritance.
Structures are also value types and classes are reference types. This makes them behave differently when you define, initialize, and pass values into methods. The concepts described in this chapter should help you decide which of the two types is better in different situations.
Whether you use structures or classes, if you build large enough programs or collections of programs, you may run into naming conflicts. Names such as Person, Customer, and Order are so intuitive that developers working on different parts of the application may want to use the same names. Having two Customer classes around can cause confusion and lead to programs that don’t work well together.
Namespaces help solve this problem by letting you categorize code and differentiate classes with the same names. For example, if you define separate billing, personnel, and order processing namespaces, all those namespaces can define their own Person, Employee, and Customer classes without conflict.
The next chapter describes namespaces in detail. It explains how to create namespaces and how to use them to refer to classes created in different assemblies.
Exercises
- Draw a diagram similar to Figure 12-9 showing the memory layout used by the following
Customerclass, assumingAddressandOrderare structures.public class Customer { public Address MailingAddress, BillingAddress; public Order[] Orders; }(You don’t need to show how it would be passed into a method. Just show how an object is laid out.)
- Repeat Exercise 1 assuming
AddressandOrderare classes instead of structures. - Consider the
Customerclasses used in Exercises 1 and 2. How large is the difference between the two structures if you pass aCustomerobject into a method by value? By reference? Would the differences be larger or smaller ifCustomerwere a structure instead of a class? - Download the PersonEvent example program. What happens if the
Personclass’sNameproperty’ssetaccessor doesn’t check whetherNameChangedisnulland simply “invokes” the event handler? - Create a
BankAccountclass that has aBalanceproperty. IfBalanceis set to a negative amount, thesetaccessor should raise anOverdrawnevent and not save the new value. Write a program to test the class. If the program tries to reduce the balance to less than $0.00, display a message box. - Create an
OverdraftAccountclass that is derived from theBankAccountclass you built for Exercise 5. Override theOverdrawnevent. Also override theBalanceproperty so that thesetaccessor only raises the event if the balance is set to a value less than –$100.00. - Modify the program you wrote for Exercise 6 so that the
OverdraftAccountclass raises theBankAccountclass’sOverdrawnevent instead of overrides that event. - Modify the program you wrote for Exercise 6 so that the
OverdraftAccountclass hides theOverdrawnevent. Make the main program use code similar to the following to create itsOverdraftAccountobject.private BankAccount Account = new OverdraftAccount();What happens when you run the program? Why does it do that?
- Write a program that uses the custom event handler described in the section “Implementing Custom Events.” Make a
BallotIssueclass that provides theVoteevent. That event passes the event handlers aVoteEventArgsobject that has a boolean field namedIsVetoed.Also give the
BallotIssueclass a booleanIsVetoedmethod. When the program calls that method, the class should raise itsVoteevent. The idea is that any of the registered event handlers could veto theBallotIssue.Give the main program three different event handlers that use a message box to ask if you want to veto the issue.
Unfortunately, the way the
BallotIssueclass delegates the event requires it to invoke every event handler even if one vetoes the issue. That means a later event handler could resete.Canceltofalseeven if an earlier event handler set it totrue.To prevent that, make each event handler check
e.Cancel. If the value istrue, the event handler should return without doing anything. - The problem with the program you wrote for Exercise 9 is that a later event handler can override the veto choice of an earlier event handler, essentially vetoing the veto.
Write a program that avoids this problem by making the
BallotIssueclass store its event handlers in a privateList<EventHandler<VoteEventArgs>>instead of delegating to a private event.To raise the event, the new version should loop through the list of event handlers. After it calls each, the code can check
e.Cancel. Ife.Cancelistrue, it can break out of the loop so later event handlers cannot resete.Cancel. - Make a program that defines a
Studentclass that has aLookupStudentfactory method similar to the one described in the section “Static Methods.” Instead of using a database, place arrays containing first and last names in the method and use the student’s ID as an index into the arrays. If the user enters an ID that is outside of the arrays’ bounds, returnnull. Finally, give the class a private constructor and make the factory method use it.