Chapter 24
XML
What’s in This Chapter
- XML syntax
XmlWriter,XmlReader, and the DOM- XPath and XSLT
Wrox.com Downloads for This Chapter
Please note that all the code examples for this chapter are available as a part of this chapter’s code download on the book’s website at www.wrox.com/go/csharp5programmersref on the Download Code tab.
Relational database engines such as SQL Server, Access, and MySQL let you store data that includes records grouped into tables. They use indexes to let you select records based on criteria, join records from multiple tables, and order the results.
Sometimes you might not need the features a relational database provides. If you just want to store some data and you don’t need to search, join, or sort it, then a relational database is overkill.
eXtensible Markup Language (XML) is a data storage language that uses a hierarchical collection of elements to represent data. You can write data into an XML file. Later you can read the file to recover the data. Because this is an industry-standard language, other programs possibly running on different operating systems can read, write, and share XML files.
Like all the topics in this part of the book, XML is a big topic. In fact, entire books have been written about it. (I even coauthored one: Visual Basic .NET and XML: Harness the Power of XML in VB.NET by Rod Stephens and Brian Hochgurtel, Wrox, 2002.)
There isn’t room in this chapter to cover every detail of XML, so I won’t try. This chapter explains the basics of XML, so you can use it in your programs to save and restore data and to read data stored by other programs. For additional details, find a good book about these languages or search the Internet.
The following section explains XML syntax. The sections after that explain how you can use XML in your C# programs.
Basic XML Syntax
Each element is represented by an opening tag and a corresponding closing tag. Opening tags are enclosed in brackets < and >. Closing tags look like opening tags except they begin with </ instead of just <.
For example, the following XML code stores information about two students.
<Students>
    <Student>
        <FirstName>Larry</FirstName>
        <LastName>Liverpool</LastName>
    </Student>
    <Student>
        <FirstName>Miranda</FirstName>
        <LastName>McQuaid</LastName>
    </Student>
</Students>Elements are sometimes called nodes, particularly when you want to emphasize the hierarchical tree-like nature of the data.
Elements must be properly nested. For example, the following is not valid XML because the FirstName and LastName elements overlap.
<Student>
    <FirstName>
        Larry
    <LastName>
        Liverpool
    </FirstName>
    </LastName>
<Student>
Note that the names of the elements are completely up to you. You can define them on the fly as you build the file if you like. There’s nothing special about the elements Students, Student, FirstName, and LastName used in the previous examples. They can use Pascal case as in this example, be all lowercase, or use whatever casing scheme you like.
An element’s value is whatever is contained inside its opening and closing tags. In addition to a value, an element can have attributes. An attribute gives additional information about an element. To make an attribute, insert its name, an equal sign, and the value it should have within quotes all inside the opening tag.
For example, consider the following XML.
<Students>
    <Student StudentId="128977">
        <FirstName>Larry</FirstName>
        <LastName>Liverpool</LastName>
        <StudentId>3981</StudentId>
    </Student>
    <Student StudentId="348722">
        <FirstName>Miranda</FirstName>
        <LastName>McQuaid</LastName>
        <StudentId>2711</StudentId>
    </Student>
</Students>
In this code, the Student elements have nested FirstName and LastName elements. The StudentId attribute gives each Student’s ID number.
You can mix and match nested elements and attributes in any way you like to make the XML code easier to read and process.
If an element contains no nested elements, you can omit the closing tag if you end it with /> instead of the usual >. For example, the following code shows a Contact element with no nested subelements.
<Contact Phone="800-555-1234" />You can include a comment in XML code by starting it with <!-- and ending it with --> as in the following code.
<!-- This is an XML comment -->Because XML is a hierarchical language, all the data in an XML file must be contained within a single top-level node that has no parent node called the root node. However, there is one important exception to this rule. Many XML files begin with a single XML declaration that gives information about the file itself. That declaration begins with <? and ends with ?>. For example, the following code shows the App.config file for a C# program.
<?xml version="1.0" encoding="utf-8" ?>
<configuration>
    <startup>
        <supportedRuntime version="v4.0" sku=".NETFramework,Version=v4.5" />
    </startup>
</configuration>
The directive at the top of the code indicates that this file uses XML version 1.0 and contains characters from the UTF-8 character encoding.
Just as you sometimes want to include special characters such as in a C# string as in
, you might want to include special characters in XML code. XML defines the five special characters listed in the following table.
| Character | Code |
< | < |
> | > |
& | & |
' | ' |
" | " |
For example, the following code represents the equation 17 < 21.
<equation>17 < 21</equation>There’s one other way you can include special characters inside XML code: a CDATA section. A CDATA section begins with <![CDATA[ and includes all the following text until it reaches the closing sequence ]]>. The CDATA can include carriage returns, ampersands, quotes, and other special characters.
That’s all there is to basic XML. There are plenty of other details, some of which will be explained later in this chapter, but this is enough to let you save and restore data in XML files.
The following text shows an XML file that demonstrates the features described so far.
<?xml version="1.0" encoding="utf-8" ?>
<Students>
  <Description>
    <![CDATA[This is some text that describes the XML file.
It's a multi-line description.
< > ' " &
This is its last line.]]>
  </Description>
  <!-- This Student's data is stored in sub-elements. -->
  <Student>
    <FirstName>Arthur</FirstName>
    <LastName>Andrews</LastName>
    <StudentId>83746</StudentId>
  </Student>
  <!-- This Student's data is stored in attributes. -->
  <Student FirstName="Bethany" LastName="Bechtold" StudentId="12653" />
</Students>The code is relatively straightforward so I won’t describe it line by line.
One thing worth mentioning is that the CDATA element contains special characters and multiple lines. The content starts right after the <![CDATA[. If the content began on the following line, it would contain the initial new line after the <![CDATA[.
Similarly, the CDATA content ends immediately before the ]]>. If the ]]> were on the following line, the content would include a final new line.
The following sections explain several ways you can write XML data into a file. The sections after that explain how you can read XML data from files or strings.
Writing XML Data
The .NET Framework provides two main ways to write XML data: the XmlWriter class and the XML Document Object Model. The following two sections describe these approaches.
XmlWriter
The XmlWriter class provides methods for writing the pieces of an XML file. To use an XmlWriter to write XML data into a file, call the class’s Create method to create the file. Then use the other methods to write the pieces of the XML document into the file. For example, the WriteComment method adds a comment to the file and the WriteStartElement method writes an element’s starting tag into the file.
The following table lists the most useful XmlWriter methods.
| Method | Purpose |
Close | Closes the writer’s underlying stream. |
Create | Creates an XmlWriter associated with a file, stream, StringBuilder, or other object. |
Dispose | Frees the writer’s resources. (You can use the using statement to ensure that the writer is disposed.) |
Flush | Flushes output to the underlying stream. |
WriteAttributeString | Writes an attribute with a specified name and value. |
WriteCData | Writes CDATA. |
WriteComment | Writes a comment. |
WriteElementString | Writes an element with a specified name and text value. |
WriteEndAttribute | Ends an attribute started with WriteStartAttribute. |
WriteEndDocument | Ends the document. |
WriteName | Writes a name. |
WriteStartAttribute | Starts an attribute. |
WriteStartDocument | Starts the document. |
WriteStartElement | Starts an element. |
WriteString | Writes a string, escaping special characters such as < and > if necessary. |
WriteValue | Writes a value such as a bool, int, or double. |
The UseXmlWriter example program, which is available for download on this book’s website, uses the following code to create an XML file holding the student data shown earlier.
    // Create the writer.
    using (XmlWriter writer = XmlWriter.Create(fileTextBox.Text))
    {
        // Write the start element.
        writer.WriteStartDocument();

        writer.WriteStartElement("Students");       // <Students>
        writer.WriteStartElement("Description");    // <Description>

        // Write the Description's content.
        string cdata = @"This is some text that describes the XML file.
It's a multi-line description.
< > ' "" &
This is its last line.";
        writer.WriteCData(cdata);

        writer.WriteComment("This Student's data is stored in sub-elements.");
        writer.WriteStartElement("Student");        // <Student>
        writer.WriteElementString("FirstName", "Arthur");
        writer.WriteElementString("LastName", "Andrews");
        writer.WriteElementString("StudentId", "83746");
        writer.WriteEndElement();                   // </Student>

        writer.WriteComment("This Student's data is stored in attributes.");
        writer.WriteStartElement("Student");        // <Student>
        writer.WriteAttributeString("FirstName", "Bethany");
        writer.WriteAttributeString("LastName", "Bechtold");
        writer.WriteAttributeString("StudentId", "12653");
        writer.WriteEndElement();                   // </Student>

        writer.WriteEndElement();                   // </Description>
        writer.WriteEndElement();                   // </Students>
    }
This code is fairly straightforward. The only thing worth special mention is the way the program uses a multiline string to create CDATA. Recall that a C# string literal begins with @" and includes all characters including new lines up to the closing " character. Because this example needs to include a " character within the CDATA, the code doubles the character in the string literal to place a single instance of the character in the string.
Figure 24-1 shows the UseXmlWriter program displaying the resulting XML file in a TextBox. Notice that the file’s text is all run together with no whitespace except the whitespace included within strings such as the Description element’s CDATA content. Other programs can read the file with no problems but this is hard for a human to read.

Figure 24-1: The UseXmlWriter example program builds and displays an XML file.
The XmlTextWriter class, which inherits from XmlWriter, works much as XmlWriter does, but it can produce nicely indented output.
The FormatXml example program, which is available for download on this book’s website, is shown in Figure 24-2.
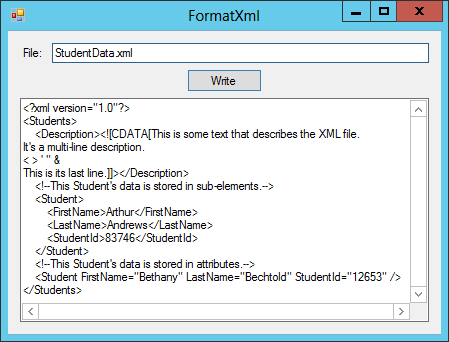
Figure 24-2: The FormatXml example program uses an XmlTextWriter object to produce nicely indented XML code.
To produce indented XML code, the FormatXml example program creates an XmlTextWriter instead of an XmlWriter. It sets the XmlTextWriter’s Formatting property to Indented and then creates the XML file exactly as before.
The following code shows the statements that create the XmlTextWriter and set its Formatting property.
// Create the writer.
using (XmlTextWriter writer = new XmlTextWriter(fileTextBox.Text, null))
{
    // Make it pretty.
    writer.Formatting = Formatting.Indented;

    // Generate the XML code as before...
}
The XmlWriter class is a fast tool for writing XML output. It works “forward only” so after it has written something, you can’t go back and change it.
It’s also noncached so it doesn’t remember what it wrote in the past. The writer keeps track of the path it took to get to its current position but that’s all. For example, it might know that it took the following path to get to a LastName element.
<Students>
    <Student>
        <LastName>
The writer doesn’t remember any other elements that it might have written along the way such as other Student elements or other elements within this Student element.
Document Object Model
The XmlWriter and XmlTextWriter classes let you build XML data but they’re rather cumbersome. For example, they require you to end each element that you start and to do so in the proper sequence. Ending an element in the wrong place can mean the difference between this:
<Student>
    <FirstName>
        Bethany
    </FirstName>
    <LastName>
        Bechtold
    </LastName>
</Student>
And this:
<Student>
    <FirstName>
        Bethany
        <LastName>
            Bechtold
        </LastName>
    </FirstName>
</Student>Another way to build an XML document is to use the XML Document Object Model (DOM). The DOM uses objects to create an in-memory model of an XML document. After you build such a model, you can use its methods to manipulate the model and save the result into an XML file or string.
The WriteDom example program, which is available for download on this book’s website, uses the following code to create an XML file holding the student data shown earlier.
// Write a text file.
private void writeButton_Click(object sender, EventArgs e)
{
    // Create the document.
    XDocument document = new XDocument();

    // Create the root element
    XElement students = new XElement("Students");           // <Students>
    document.Add(students);

    XElement description = new XElement("Description");     // <Description>
    students.Add(description);

    // Write the Description's content.
    string cdata = @"This is some text that describes the XML file.
It's a multi-line description.
< > ' "" &
This is its last line.";
    description.Add(new XCData(cdata));

    students.Add(new XComment(                              // Comment.
        "This Student's data is stored in sub-elements."));

    XElement student = new XElement("Student");             // <Student>
    students.Add(student);

    student.SetElementValue("FirstName", "Arthur");         // <FirstName>
    student.SetElementValue("LastName", "Andrews");         // <LastName>
    student.SetElementValue("StudentId", "83746");          // <StudentId>

    students.Add(new XComment(                              // Comment.
        "This Student's data is stored in attributes."));

    student = new XElement("Student");                      // <Student>
    students.Add(student);

    student.SetAttributeValue("FirstName", "Bethany");      // FirstName
    student.SetAttributeValue("LastName", "Bechtold");      // LastName
    student.SetAttributeValue("StudentId", "12653");        // StudentId
    // Save the document in a file.
    using (XmlTextWriter writer = new XmlTextWriter(fileTextBox.Text, null))
    {
        // Make it pretty.
        writer.Formatting = Formatting.Indented;

        document.WriteTo(writer);
    }

    // Display the file.
    resultTextBox.Text = File.ReadAllText(fileTextBox.Text);
}
The code first creates an XDocument object to represent the XML code.
Next, it creates an XElement object to represent the file’s Students element and uses the document’s Add method to add it to the document’s child collection.
The code creates another XElement to represent the Description element and adds it to the Students element. It then adds a new XCdata object to hold the Description’s data.
The rest of the code follows a similar pattern, creating new objects and adding them to the child collections of the objects that should contain them.
After it finishes building the document, the program creates an XmlTextWriter much as the FormatXml example program did. It sets the writer’s Formatting property and then uses the document object’s WriteTo method to make the document write its XML code into a file.
The program finishes by displaying the resulting XML file.
Two of the most important classes for manipulating the DOM are XDocument and XElement.
The XDocument class’s most useful properties are Declaration, which gets or sets the document’s XML declaration, and Root, which returns the document’s root element. The following table lists the XDocument class’s most useful methods.
| Method | Purpose |
Add | Adds an item to the document’s child collection. (Note that you can add only one child, the root element, to the document.) |
DescendantNodes | Returns a collection of XNode objects that are descendants of the document. |
Descendants | Returns a collection of XElement objects that are descendants of the document. If you specify a name, the method returns only elements with that name. |
Load | Loads the document from a filename, stream, or XmlReader. |
Parse | Creates a new XDocument from an XML string. |
Save | Saves the document into a file, stream, or writer. |
ToString | Returns the document’s indented XML code. |
WriteTo | Writes the document into an XmlWriter. |
The following table lists the XElement class’s most useful properties.
| Property | Purpose |
Document | Returns the XDocument that contains the element. |
FirstAttribute | Gets the element’s first attribute. |
FirstNode | Gets the element’s first child node. |
HasAttributes | Returns true if the element has attributes. |
HasElements | Returns true if the element has child elements. |
IsEmpty | Returns true if the element contains no content. (It still might have attributes.) |
LastAttribute | Gets the element’s last attribute. |
LastNode | Gets the element’s last child node. |
Name | Gets or sets the element’s name. |
NextNode | Returns the next node in the element’s parent’s child list. |
NodeType | Gets the node’s type. |
Parent | Gets the element’s parent element. |
PreviousNode | Returns the previous node in the element’s parent’s child list. |
Value | Gets or sets the node’s text contents. |
The following table lists the XElement class’s most useful methods.
| Method | Purpose |
Add | Adds an item at the end of the element’s child collection. |
AddAfterSelf | Adds an item to the parent’s child collection after this element. |
AddBeforeSelf | Adds an item to the parent’s child collection before this element. |
AddFirst | Adds an item at the beginning of the element’s child collection. |
Ancestors | Returns a collection of XElement objects that are ancestors of the element. If you specify a name, the method returns only elements with that name. |
Attribute | Returns an attribute with a specific name. |
Attributes | Returns a collection containing this element’s attributes. If you specify a name, the collection includes only attributes with that name. |
DescendantNodes | Returns a collection of XNode objects that are descendants of the element. |
Descendants | Returns a collection of XElement objects that are descendants of the element. If you specify a name, the method returns only elements with that name. |
DescendantsAndSelf | Returns a collection of XElement objects that includes this element and its descendants. If you specify a name, the method returns only elements with that name. |
Element | Returns the first child element with a specified name. |
Elements | Returns a collection holding the element’s children. If you specify a name, the method returns only elements with that name. |
ElementsAfterSelf | Returns a collection holding the element’s siblings that come after this element. If you specify a name, the method returns only elements with that name. |
ElementsBeforeSelf | Returns a collection holding the element’s siblings that come before this element. If you specify a name, the method returns only elements with that name. |
IsAfter | Returns true if this node comes after another specified node in document. |
IsBefore | Returns true if this node comes before another specified node in document. |
Load | Loads the element from a filename, stream, or reader. |
Nodes | Returns a collection holding this element’s child nodes. |
NodesAfterSelf | Returns a collection holding the node’s siblings that come after this node. |
NodesBeforeSelf | Returns a collection holding the node’s siblings that come before this node. |
Parse | Creates an XElement from an XML string. |
Remove | Removes this element from its parent. |
RemoveAll | Removes all nodes and attributes from this element. |
RemoveAttributes | Removes this element’s attributes. |
RemoveNodes | Removes this element’s child nodes. |
ReplaceAll | Replaces the element’s child nodes and attributes with specified new ones. |
ReplaceAttributes | Replaces the element’s attributes with specified new ones. |
ReplaceNodes | Replaces the element’s child nodes with specified new ones. |
ReplaceWith | Replaces this node with new specified content. |
Save | Saves the element into a file, stream, or writer. |
SetAttributeValue | Sets, adds, or removes an attribute. |
SetElementValue | Sets, adds, or removes a child element. |
SetValue | Sets the element’s value. |
ToString | Returns the element’s indented XML code. |
WriteTo | Writes the element into an XmlWriter. |
An object model is handy if you need to roam through its structure to examine data and make changes, but the XmlWriter class still has its uses. A document model must contain all the elements that make up the XML data. If you’re building an enormous model, the DOM structure will take up a lot of memory.
In contrast an XmlWriter doesn’t remember what it wrote in the past so it can write even huge XML documents without using up a lot of memory. However, many programmers find XmlWriter more cumbersome than the DOM so they prefer the DOM.
XML Literals
The XmlWriter class and the DOM both let a program build an XML document, but both require a fairly large amount of code. They’re a lot easier to use if you can loop through an array, list, or other data structure containing objects and generate XML data for the objects.
However, sometimes you might simply want to create an XML object hierarchy within a program. Visual Basic allows you to use string literals as in the following code.
Dim arthur As XElement =
    <Student>
        <FirstName>Arthur</FirstName>
        <LastName>Andrews</LastName>
        <StudentID>83746</StudentID>
    </Student>
C# doesn’t support XML literals. (Although I wouldn’t be surprised if it did some day.) Fortunately, C# does support multiline string literals and that works almost as well. Simply use the XElement.Parse method to parse a multiline string holding the XML code. The following code shows an example.
XElement student = XElement.Parse(
    @"<Student>
        <FirstName>Arthur</FirstName>
        <LastName>Andrews</LastName>
        <StudentID>83746</StudentID>
    </Student>");
The XML string can include any amount of nested XML code, so you can use this technique to build an XML document of arbitrary complexity.
Reading XML Data
The previous sections explained how you can use XmlTextWriter and DOM classes to create XML documents. The .NET Framework provides corresponding techniques to read XML documents. The following two sections explain how you can use the XmlTextReader class and the document object model to read XML code.
XmlTextReader
The XmlWriter class and subclasses such as XmlTextWriter provide fast, forward-only, noncached methods for writing XML data. Similarly, the XmlTextReader class provides fast, forward-only, noncached methods for reading XML data. It provides methods to move through an XML file one node at a time and to examine the data provided by each node.
To use an XmlTextReader, use the class’s constructor or the XmlReader class’s static Create method to create an object associated with the file or input stream that you want to read. Use the object’s Read method to read the next node from the XML data. After you read a node, you can use the reader’s properties and methods to determine the node’s name, type, attributes, content, and other properties.
The following table lists the most useful XmlReader properties.
| Property | Meaning |
AttributeCount | Returns the number of attributes the node has. |
Depth | Returns the depth of the current node in the XML hierarchy. |
EOF | Returns true when the reader is at the end of the XML data. |
HasAttributes | Returns true if the node has attributes. |
HasValue | Returns true if the node can have a value. |
IsEmptyElement | Returns true if the node is an empty element as in <Overdue />. |
Item | Gets a node attribute by index or name. (This is the class’s indexer, so you use it as in reader[0] instead of invoking the Item property explicitly.) |
Name | Returns the node’s name. |
Value | Returns the text value of the current node. |
The following table lists the XmlReader class’s most useful methods.
| Method | Purpose |
Create | Creates a new reader associated with a string, stream, file, or other data source. |
Dispose | Frees the object’s resources. You can include a using statement to automatically call Dispose. |
GetAttribute | Gets an attribute for the current node by index or name. (Similar to the Item property.) |
IsName | Returns true if its parameter is a valid XML name. |
MoveToAttribute | Moves the reader to an attribute specified by index or name. |
MoveToContent | Moves the reader to the current node’s content. |
MoveToElement | Moves the reader to the element containing the reader’s current position. For example, if you move the reader to examine an element’s attributes, the method moves the reader back to the element’s node. |
MoveToFirstAttribute | Moves the reader to the current node’s first attribute node. |
MoveToNextAttribute | Moves the reader to the current node’s next attribute node. |
Read | Reads the next node from the XML data. |
ReadInnerXml | Returns the current node’s descendants as an XML string. |
ReadOuterXml | Returns the current node’s subtree (including the current node) as an XML string. |
ReadToDescendant | Moves the reader to a subelement with a specified name. |
ReadToNextSibling | Moves the reader past the rest of the current node to its next sibling. |
Skip | Skips the current node’s children. |
The ReadXml example program, which is available for download on this book’s website, uses the following code to read an XML file.
// Read the XML data.
private void readButton_Click(object sender, EventArgs e)
{
    string result = "";

    // Open a reader for the XML file.
    using (XmlReader reader = XmlReader.Create(fileTextBox.Text))
    {
        // Read tags from the file.
        while (reader.Read())
        {
            switch (reader.NodeType)
            {
                case XmlNodeType.Element:
                    result += "Element: " + reader.Name + "
";
                    if (reader.HasAttributes)
                    {
                        for (int i = 0; i < reader.AttributeCount; i++)
                            result += "    Attribute: " + reader[i] + "
";
                    }
                    break;
                case XmlNodeType.EndElement:
                    result += "EndElement: " + reader.Name + "
";
                    break;
                case XmlNodeType.Text:
                    result += "Text: " + reader.Value + "
";
                    break;
                case XmlNodeType.CDATA:
                    result += "CDATA: [" +
                        reader.Value.Replace("
","
") + "]
";
                    break;
                case XmlNodeType.Comment:
                    result += "Comment: " + reader.Value + "
";
                    break;
            }
        }
    }
    resultTextBox.Text = result;
}
The code uses XmlReader.Create to create an XmlReader associated with an XML file. It then enters a loop that continues as long as the Read method returns true to indicate that there is more data to read.
Within the loop, the code checks the reader’s NodeType property to see what kind of node it is reading. If the node is an element (such as <Student>), the code displays its name and its attributes if it has any.
If the node is the end of an element (such as </Student>), the code displays its name.
If the node is a text node, the code displays the text it contains. For example, in the XML code <FirstName>Arthur</FirstName>, the FirstName element contains a text element that holds the text Arthur.
If the node is a CDATA node, the code displays its data. Within the data, the code replaces the
character with the string
so newlines will be displayed correctly in the result TextBox.
Finally, if the node is a comment, the code displays its value.
After it has processed all the file’s nodes, the program displays the results in a TextBox.
Figure 24-3 shows the UseXmlReader program after it has read the students XML data shown earlier in this chapter. If you look closely, you can see the pieces of the data in the result.
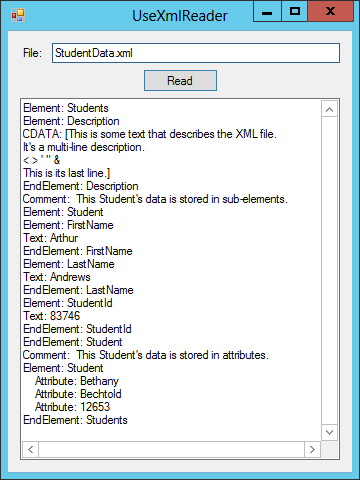
Figure 24-3: The UseXmlReader example program reads an XML file and displays information about the nodes it contains.
Document Object Model
The XmlReader and XmlTextReader classes are fast but somewhat awkward because they let you move only forward through the data. They can be efficient if you know the structure of the data or if you are looking for specific nodes, but they don’t let you explore the structure of an XML file.
Just as you can use the DOM to build an XML file, you can also use the DOM to study an existing XML file. Then your program can move over its nodes to examine its structure, find values, copy subtrees, and use the document’s full structure to otherwise study and manipulate the data.
To load an object model from XML data, simply call the XDocument class’s static Load method passing it a filename, stream, or XmlReader.
The ReadDom example program, which is available for download on this book’s website, uses the following code to read and display an XML file holding the student data shown earlier.
// Load the XML file into a DOM.
XDocument document = XDocument.Load(fileTextBox.Text);

// Display the document's XML text.
resultTextBox.Text = document.ToString();
It doesn’t get much simpler than that! Of course, in a real program you would need to use the XDocument object’s properties and methods to find the data you want and do something with it.
Related Technologies
By itself, an XML file simply holds data. It doesn’t select, sort, rearrange, or otherwise manipulate the data. Those operations are often useful, however, so lots of related technologies have sprung up to work with XML data. Some of those technologies include the following.
- XSL (Extensible Style Sheet Language)—This refers to a family of languages and tools for reformatting XML data. It includes the following.
- XSLT (XSL Transform)—A language for transforming XML data into other formats such as plain text, HTML, rearranged XML documents, or XSL FO.
- XSL FO (XSL Formatting Objects)—A language for formatting XML data for output for screen, PDFs, printers, and so forth.
- XPath—This is a query language used by XSL and other XML tools to find and identify items within XML data.
- XQuery—A somewhat SQL-like language for querying XML data.
- DTD (Document Type Definition)—An XML data file validation language. You use DTD to define the required structure of an XML file. Then you can validate a particular XML file to see if it satisfies those requirements.
- XSD (XML Schema Definition)—Another XML data file validation language. See DTD.
- XLink—A language for defining hyperlinks in XML data.
- SOAP (Simple Object Access Protocol)—A protocol that lets applications (often running on different computers) exchange data.
- WSDL (Web Services Definition Language)—A language for describing web services.
- RSS (Really Simple Syndication)—A format for XML news feeds and sites that post news-like items.
There isn’t room to cover all these technologies here, but I would like to provide at least a brief introduction to two of these: XPath and XSLT.
XPath
XPath is a language for identifying items in XML data. For example, you can use XPath to select nodes with a particular name, nodes that have certain attributes, and nodes that have certain relationships with other nodes.
To use XPath in C#, you first define an XPath query to identify the elements that you want to select. You then call an XDocument or XElement object’s XPathSelectElement or XPathSelectElements method to find the wanted elements.
The XPath query looks vaguely like a file’s pathname in a directory hierarchy. The query can also include operators that work as wildcards, filter the results, and specify relationships among nodes. For example, the following statement selects XElement objects representing Student elements that have a GradePointAverage attribute with value less than 2.5.
IEnumerable<XElement> students =
    document.XPathSelectElements("//Student[@GradePointAverage < 2.5]");
The following table lists the most useful operators that you can use in an XPath query.
| Operator | Meaning |
/ | Selects an immediate child. |
// | Selects descendants. |
. | The current node. |
.. | The current node’s parent. |
* | Matches anything. |
@ | Attribute prefix for matching an attribute. For example, @Cost matches an attribute named Cost. |
@* | Selects all attributes. |
() | Groups operations. |
[ ] | Applies a filter. For example, //Planet[@Name="Earth"] matches Planet elements that have a Name attribute with value Earth. |
[ ] | Subscript operator for accessing items in a collection. |
+ | Addition. |
- | Subtraction. |
div | Floating-point division. |
* | Multiplication. |
mod | Modulus. |
When a query filters results, it can include the boolean and comparison operators listed in the following table.
| Operator | Meaning |
and | Logical AND |
or | Logical OR |
not() | Logical NOT |
= | Equals |
!= | Not equals |
< | Less than |
<= | Less than or equal |
> | Greater than |
>= | Greater than or equal |
The UseXPath example program, which is available for download on this book’s website, uses XPath to display information about planets. The program gets its data from the file Planets.xml, which has the following structure.
<SolarSystem>
  <Planets>
    <Planet>
      <Name>Mercury</Name>
      <Distance>57.91</Distance>
      <Radius>2340</Radius>
      <LengthOfYear>0.24085</LengthOfYear>
      <Day>88</Day>
      <Mass>0.054</Mass>
    </Planet>
    ... Other planets omitted ...

  </Planets>
</SolarSystem>
When the program starts, it uses the following code to load the XML file and to fill a ComboBox with the names of the planets defined in the file.
// The DOM.
XDocument Document = XDocument.Load("Planets.xml");

// Load the XML data.
private void Form1_Load(object sender, EventArgs e)
{
    // Load the XML file.
    Document = XDocument.Load("Planets.xml");

    // List planets.
    foreach (XElement element in Document.XPathSelectElements("//Planet/Name"))
    {
        planetComboBox.Items.Add(element.Value);
    }

    // Select the first planet.
    planetComboBox.SelectedIndex = 0;
}
The Load event handler first loads the XML document. It then calls the document’s XPathSelectElements method, passing it the XQuery //Planet/Name. The // operator allows the query to descend to any depth in the document. The Planet/Name piece makes the query select Name elements that are direct children of Planet elements.
The code loops through the returned XElement objects and adds each object’s Value property to the ComboBox.
When the user selects a planet from the ComboBox, the program executes the following code.
// Display the selected planet's data.
private void planetComboBox_SelectedIndexChanged(object sender, EventArgs e)
{
    string name = planetComboBox.Text;
    string query = "//Planet[Name="" + name + ""]";
    XElement planet = Document.XPathSelectElement(query);
    string info = "";
    foreach (XElement child in planet.Elements())
    {
        info += child.Name.ToString() + ": " + child.Value + "
";
    }
    infoTextBox.Text = info;
}
This code gets the selected planet’s name and uses it to build an XPath query with the following format.
//Planet[Name="Mercury"]This query selects Planet elements at any depth in the document where the Planet’s Name child has value Mercury.
The program then calls the XDocument object’s XPathSelectElement method to get the first (and in this case the only) element that satisfies the query. The code then loops through the Planet element’s children and adds their names and values to a result string. When it is finished, the program displays the result.
Figure 24-4 shows the UseXPath example program displaying information for Mercury.
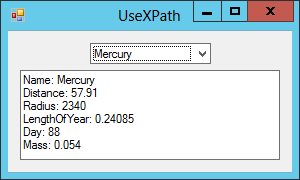
Figure 24-4: The UseXPath example program uses XPath queries to display information about planets.
For more information on XPath, see the following links.
- “XPath Reference” at msdn.microsoft.com/library/ms256115.aspx
- “XPath Examples” at msdn.microsoft.com/library/ms256086.aspx
XSLT
XSLT is a language that you can use to transform XML data into a new format. It’s a fairly complicated language, so there isn’t room to cover it in any depth here. To really learn the language, see the following links.
- “XSLT Tutorial” at www.w3schools.com/xsl/default.asp
- “XSLT Elements Reference” at www.w3schools.com/xsl/xsl_w3celementref.asp
- “XSL Transformations (XSLT) Version 1.0” at www.w3.org/TR/xslt
Rather than explaining the whole XSLT language, the rest of this section explains an example. The TransformPlanets example program uses XSLT to transform the Planets.xml file described in the preceding section into an HTML file.
Recall that the Planets.xml file has the following structure.
<SolarSystem>
  <Planets>
    <Planet>
      <Name>Mercury</Name>
      <Distance>57.91</Distance>
      <Radius>2340</Radius>
      <LengthOfYear>0.24085</LengthOfYear>
      <Day>88</Day>
      <Mass>0.054</Mass>
    </Planet>

    ... Other planets omitted ...

  </Planets>
</SolarSystem>
The following code shows the XSLT file PlanetsToHtml.xslt.
<?xml version="1.0" encoding="utf-8"?>
<xsl:stylesheet version="1.0"
    xmlns:xsl="http://www.w3.org/1999/XSL/Transform"
    xmlns:msxsl="urn:schemas-microsoft-com:xslt"
    exclude-result-prefixes="msxsl"
>
    <xsl:output method="html" indent="yes"/>

    <xsl:template match="Planets">
      <HTML>
        <BODY>
          <TABLE BORDER="2">
            <TR>
              <TH>Planet</TH>
              <TH>Distance to Sun</TH>
              <TH>Length of Year</TH>
              <TH>Length of Day</TH>
            </TR>
            <xsl:apply-templates select="Planet"/>
          </TABLE>
        </BODY>
      </HTML>
    </xsl:template>
    <xsl:template match="Planet">
      <TR>
        <TD>
          <xsl:value-of select="Name"/>
        </TD>
        <TD>
          <xsl:value-of select="Distance"/>
        </TD>
        <TD>
          <xsl:value-of select="LengthOfYear"/>
        </TD>
        <TD>
          <xsl:value-of select="Day"/>
        </TD>
      </TR>
    </xsl:template>
</xsl:stylesheet>
The xsl:output element indicates that the resulting output file should be in HTML format and that it should include indenting.
This file contains two templates. The first matches Planets nodes. When the XSLT processor works through the XML input file and encounters a Planets element, this template executes. (In this example, the Planets.xml file has only one Planets element so this template executes only once.)
The body of the template makes the processor emit the following text.
      <HTML>
        <BODY>
          <TABLE BORDER="2">
            <TR>
              <TH>Planet</TH>
              <TH>Distance to Sun</TH>
              <TH>Length of Year</TH>
              <TH>Length of Day</TH>
            </TR>
<xsl:apply-templates select="Planet"/>
          </TABLE>
        </BODY>
      </HTML>
This is ordinary HTML code except for the line highlighted in bold. That line uses the xsl:apply-templates element to tell the processor to apply the templates for Planet child nodes.
In this example, the first template finds the Planets element and applies the template that matches Planet elements to that element’s children.
The second template matches Planet elements and emits the following text for them.
      <TR>
        <TD>
<xsl:value-of select="Name"/>
        </TD>
        <TD>
<xsl:value-of select="Distance"/>
        </TD>
        <TD>
<xsl:value-of select="LengthOfYear"/>
        </TD>
        <TD>
<xsl:value-of select="Day"/>
        </TD>
      </TR>
Again this is plain HTML text except for the bold statements. Those statements use the xsl:value-of element to select values from the Planet element’s children.
The following HTML code shows the result.
  <HTML>
  <BODY>
    <TABLE BORDER="2">
      <TR>
        <TH>Planet</TH>
        <TH>Distance to Sun</TH>
        <TH>Length of Year</TH>
        <TH>Length of Day</TH>
      </TR>
      <TR>
        <TD>Mercury</TD>
        <TD>57.91</TD>
        <TD>0.24085</TD>
        <TD>88</TD>
      </TR>
      <TR>
        <TD>Venus</TD>
        <TD>108.21</TD>
        <TD>0.61521</TD>
        <TD>230</TD>
      </TR>

      ... Other planets omitted ...

      <TR>
        <TD>Pluto</TD>
        <TD>5910</TD>
        <TD>247.687</TD>
        <TD>6.39</TD>
      </TR>
    </TABLE>
  </BODY>
</HTML>
The following code shows how the TransformPlanets program uses the XSLT file to transform the XML file.
// Transform Planets.xml.
private void Form1_Load(object sender, EventArgs e)
{
    // Load the style sheet.
    XslCompiledTransform xslt = new XslCompiledTransform();
    xslt.Load("PlanetsToHtml.xslt");

    // Transform the file.
    xslt.Transform("Planets.xml", "Planets.html");

    // Display the result.
    string filename = Path.GetFullPath(
        Path.Combine(Application.StartupPath, "Planets.html"));
    planetsWebBrowser.Navigate(filename);
}
The program creates and initializes an XslCompiledTransform object. It then uses its Load method to load the XSLT file. Next, the program calls the object’s Transform method to transform the input XML file and save the result in the new HTML file.
That’s all that’s needed to perform the transformation. The program finishes by displaying the HTML file in a WebBrowser control.
Figure 24-5 shows the TransformPlanets example program displaying its HTML output file.
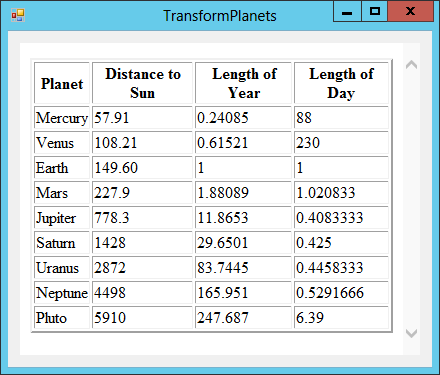
Figure 24-5: The TransformPlanets example program uses XSLT to transform an XML file into an HTML file and then displays the result in a WebBrowser control.
Summary
XML is a hierarchical data storage language. Using the tools provided by the .NET Framework, you write C# programs that read and write XML data. Because XML is standardized, your program can exchange XML data with other programs, possibly running on different computers or even operating systems.
By itself, an XML file just holds data. Other related technologies such as XPath and XSLT let you search and transform XML data. This chapter didn’t have room to cover those technologies in detail but it did provide some examples that you can use to start with XPath and XSLT.
Often XML files are used to hold data such as information about employees, customer orders, plants, or planets. XML files can also be used to hold representations of objects. In a process called serialization, a program can write information describing an object into an XML file. Later, it or another program can read that data to re-create (or deserialize) the object. The next chapter explains how a C# program can serialize and deserialize objects.
Exercises
- Use an
XmlTextWriterto create an XML file containing random plant data. The file should have the following structure.<?xml version="1.0" encoding="utf-8"?> <Plants> <Plant> <Name>ut nibh morbi</Name> <Zone>3</Zone> <Light>Shade</Light> </Plant> ... Other Plant elements omitted ... </Plants>Follow these steps to prepare to generate random plant names.
- Place a
TextBoxon the form so that the user can enter the number ofPlantelements to create. - Place a multiline
TextBoxon the form. Fill it with a few hundred words fromwww.lipsum.com/feed/html. - Get the text from the
TextBoxand convert it to lowercase. - Use regular expressions to remove periods and commas from the text.
- Use
string.Splitto split the text into words using spaces,
The following code shows two methods you can use to create random plant names and light values.
// Return a random name.
private Random Rand = new Random();
private string RandomName(string[] words)
{
    return
        words[Rand.Next(0, words.Length)] + " " +
        words[Rand.Next(0, words.Length)] + " " +
        words[Rand.Next(0, words.Length)];
}

// Return a random light value.
private string RandomLight()
{
    string[] values =
    {
        "Shade", "Partial Shade", "Partial Sun", "Full Sun"
    };
    return values[Rand.Next(0, values.Length)];
}
The program should pass the array of words it built during preparation into the
RandomNamemethod. - Place a
- Modify the program you wrote for Exercise 1 so that it uses the DOM instead of an
XmlTextWriter. Which version of the program do you prefer? Are there situations in which one would be better than the other? - Write a program similar to the one shown in Figure 24-6 to display the plant data generated by the program you wrote for Exercise 1 or 2.
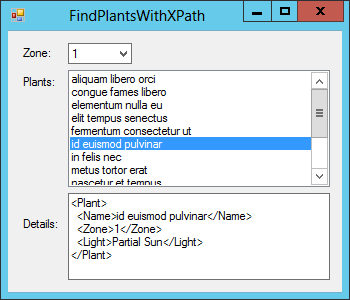
Figure 24-6: For Exercise 3, write a program that displays the plant data you generated in Exercises 1 and 2.
When it starts, the program should load the plant XML file into a DOM. It should use the
XDocumentobject’sDescendantsmethod to findZoneelements and use LINQ and to display a sorted list of the distinctZonevalues in the form’sComboBox.When the user selects a zone, the program should display the names of the plants in that zone in the Plants
ListBox. (Hints: Use theDescendantsmethod to findZoneelements. Use LINQ to select the elements with the selected zone. Loop through the selected elements. Use each element’sParentproperty to get to itsPlantelement. Then use the parent’sElementmethod to get theNamesubelement.)When the user clicks a plant in the Plants
ListBox, display the information about that plant. (Hints: UseDescendantsagain to findNameelements and use LINQ to select the one with the selected name. Get the first selected element’s parent and call the parent’sToStringmethod.) - Write a program that reads the plant data generated by the program you wrote for Exercise 1 or 2 and displays a list of the plant records’ names. (Hints: Scan the file to find
Nameelements. With those elements, use the reader’sReadElementContentAsStringorReadInnerXmlmethod to get the element’s content.)Compare this program with the one you wrote for Exercise 3. Under what circumstances is one better than the other?
- Modify the program you wrote for Exercise 3 so that it uses XPath instead of LINQ to find the elements it needs.
- Modify the TransformPlanets example program so that it transforms the
Plants.xmlfile created by the program you wrote for Exercise 1 or Exercise 2 and displays it in an HTML page. - Write a program that uses XSLT to transform the
Planets.xmlfile into thePlanets2.xmlfile that has the following format.<?xml version="1.0" encoding="utf-8"?> <Planets> <Planet Name="Mercury" Distance="57.91" LengthOfYear="0.24085" LengthOfDay="88" /> <Planet Name="Venus" Distance="108.21" LengthOfYear="0.61521" LengthOfDay="230" /> ... Other planets omitted ... <Planet Name="Pluto" Distance="5910" LengthOfYear="247.687" LengthOfDay="6.39" /> </Planets>Hints: In the XSLT file, use the child nodes’ names in braces to set an attribute’s value as in
Name="{Name}". Also note that the new format uses the nameLengthOfDayvalue instead ofDay. Finally, don’t worry about indenting.