
Appendix A
Solutions to Exercises
All the programmatic exercise solutions are available for download in the downloads for their chapters. For example, the ConsoleShowArgs example program that solves Exercise 1 in Chapter 2, “Writing a First Program,” is contained in the downloads for Chapter 2.
This appendix shows the most interesting parts of many of the programs, but to save space some of the less interesting details are omitted. Download the examples from www.wrox.com/go/csharp5programmersref to see all the code.
Chapter 1
- Figure A-1 shows the major steps that Visual Studio performs when you write a C# program and press F5 to run it.
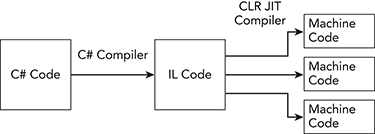
Figure A-1: The C# compiler converts C# code into IL code. Then the CLR’s JIT compiler converts the IL code into machine code. The JIT compiler compiles only methods as they are needed.
- In the first application, there will be a small delay because each method is compiled the first time the user selects the corresponding tool. The delay is small, so the user probably won’t notice anything.
In the second application, all the compilation delays occur when the program starts. It is possible that those delays could add up to enough time for the user to notice. However, the time spent by the methods’ code will probably be far larger, so the user would notice a delay in any case.
If you precompile the programs and install them in the GAC, they would run slightly faster because their methods wouldn’t need to compile to machine code on first use. The difference will probably be small, however. This is probably not worth doing for the first application because the user will see any compilation delay as part of the time needed to click a button. It’s questionable whether it’s worth the effort for the second program, either.
- Using NGen and the GAC will be most useful for the code library and the control library. Their code would be precompiled and ready to run for any application that uses those libraries.
- Calling all the methods when the program starts would force the CLR to compile them, so they would be ready to run if they were called again later. However, this technique would make the code more confusing, and it’s not clear that it would save enough time to be noticeable to the user, so it may be best to not do this.
Chapter 2
- The ConsoleShowArgs example program does this.
The first time you run the program, a console window appears and displays the text
Press Enter to continue. When you press Enter, it closes.When you run the program after entering the command-line arguments, the window displays the following text.
Red Green Blue Press Enter to continue. - When you run the program from Windows Explorer, a console window appears and displays the text
Press Enter to continue. The command-line arguments you entered for Exercise 1 are passed to the program only when you run it from inside Visual Studio. - When you run the program from the shortcut, a console window appears displaying the following text.
Apple
Banana
Cherry
Press Enter to continue.
This technique enables you to easily start a program with command-line arguments.
- The first time you run the program, the console window displays
Press Enter to continue. When you press Enter, the window displays a command prompt and doesn’t disappear.When you run the program again with the program’s name followed by command-line arguments, the window displays the following text.
Ant Bear Cat Press Enter to continue - The WindowsFormsShowArgs example program does this.
If you worked through the previous exercises, you may think the program will show nothing because you haven’t specified any command-line arguments for it. Actually, the
Environment.GetCommandLineArgsmethod treats the program’s name as an argument, so the program lists that. In this example, the name should include the path to the executable and then end in WindowsFormsShowArgs.vshost.exe. This is the program that Visual Studio is actually executing.After you set the command-line arguments Red, Green, and Blue, the program displays the executable program’s name and those three values.
- On the basis of the results of Exercises 2 and 5, you probably think the program will display only the executable program’s name. This time you’re right.
- On the basis of the results of Exercises 3 and 5, you probably think the program will display the executable program’s name followed by the command-line arguments Apple, Banana, and Cherry. You’re right again.
- As in Exercise 5, the program initially displays the executable program’s name (the vshost.exe version). After you define the command-line arguments, the program displays the executable program’s name and the arguments.
- As in Exercises 2 and 6, the program displays only the executable program’s name.
- As in Exercises 3 and 7, the program displays the executable program’s name followed by the command-line arguments Apple, Banana, and Cherry.
Chapter 3
For Exercises 1 through 5, see the program Ex03-01.
- Initially the button is centered.
- When you resize the form, the button remains centered on the form.
- If
AnchorisTop,Left, the button remains the same distance from the form’s upper and left sides. - If
AnchorisBottom,Right, the button remains the same distance from the form’s lower and right sides. - If
AnchorisTop,Bottom,Left,Right, the button remains the same distance from all the form’s sides. That makes it grow to use any available new size.
- When you resize the form, the button resizes, too.
- If you make the form very small, the button shrinks until it disappears.
- Yes, if the button has focus, then you can still “click” it by pressing Enter or Space.
- If the button’s
MinimumSizeproperty is50, 15and you make the form small, the button will not shrink below the minimum size.
- When you click the button, the picture displays on the form’s background.
- Initially the form tiles with copies of the picture.
- If
BackgroundImageLayoutisNone, a single copy of the picture displays in the form’s upper-left corner. - If
BackgroundImageLayoutisCenter, a single copy of the picture displays centered on the form. If the image doesn’t fit, it is placed in the upper-left corner. - If
BackgroundImageLayoutisStretch, a copy of the picture stretches to fill the form. This can distort the image if the picture’s and form’s aspect ratios are different. - If
BackgroundImageLayoutisZoom, a copy of the picture stretches as large as possible without distorting it.
- The button’s background becomes yellow and its text becomes red.
- When you click the button, its text becomes blue. This code sets the form’s
ForeColorandBackColorproperties to red and blue, respectively. Some controls inherit certain properties from the control that contains them. TheButtoncontrol inheritsForeColorbut notBackColorbecause it has its own ideas about what a button’s background should look like.The form doesn’t display a red background because it is already displaying a background image. If you comment out the code that sets the image, the form’s background becomes red.
- A
/*begins a comment that extends to the next*/. In this case, that means the bold lines in the following code are commented out./* Comment. /* Inner comment. */ */The remaining
*/is not commented out, so Visual Studio complains. - Visual Studio ignores any text on the line after the
#regionand#endregiondirectives, so the region names don’t actually matter to Visual Studio. It simply matches each#endregionwith the most recent#region. That means the code is equivalent to the following.#region Region1 // Code Block 1 ... #region Region2 // Code Block 2 ... #endregion Region2 // Code Block 3 ... #endregion Region1- If you collapse Region1, all this code is hidden.
- If you collapse Region2, only Code Block 3 is hidden.
Chapter 4
- The equivalent statement is
if (person is Student) student = (Student)person; else student = null; - The following statement creates and initializes the
fibonacciarray.int[] fibonacci = { 1, 1, 2, 3, 5, 8, 13, 21, 33, 54, 87 }; - The following statement creates an 8×8 array of
Personobjects.Person[,] board = new Person[8, 8]; - The following statement creates an array of eight arrays each holding eight
Personobjects.Person[][] board = { new Person[8], new Person[8], new Person[8], new Person[8], new Person[8], new Person[8], new Person[8], new Person[8], }; - The smallest number type that can hold large five-digit ZIP codes is
int, so theZipfield must be anint. The following code defines thePersonclass.public class Person { public string FirstName, LastName, Street, City, State; public int Zip; } - The following code creates the necessary array.
Person[,] people = { { new Person() { FirstName=”Ann”, LastName=”Archer”}, new Person() { FirstName=”Ben”, LastName=”Baker”}, }, { new Person() { FirstName=”Cindy”, LastName=”Cant”}, new Person() { FirstName=”Dan”, LastName=”Deevers”}, }, }; - The following code declares and initializes the required three-dimensional array.
string[, ,] values = { { { "000", "001", "002" }, { "010", "011", "012" }, }, { { "100", "101", "102" }, { "110", "111", "112" }, }, }; - Visual Studio flags the method call with an error similar to “Use of unassigned local variable ‘value’.”
- The code works whether the calling method initializes the value or not. The method doesn’t assume the value is initialized but doesn’t mind if it is.
- Visual Studio flags the statement that tries to double the parameter with as error similar to “Use of unassigned out parameter ‘number’.”
- Visual Studio flags the method with an error similar to “The out parameter ‘number’ must be assigned to before control leaves the current method.”
- If you try to pass an expression into a method for a
refparameter, Visual Studio flags the method call with the error “A ref or out argument must be an assignable variable.” - The following
Ovenclass shows one possible solution.public class Oven { // Backing field for temperature in degrees Celsius. private float DegreesCelsius = 0; // Get and set the temperature in degrees Fahrenheit. public float TempFahrenheit { get { return DegreesCelsius * 5f / 9f + 32f; } set { DegreesCelsius = (value - 32f) * 5f / 9f; } } // Get and set the temperature in degrees Celsius. public float TempCelsius { get { return DegreesCelsius; } set { DegreesCelsius = value; } } } - The following code shows the two methods.
private string Combine1(int row, int column)
{
    return "(" + row + ", " + column + ")";
}

private string Combine2(int row, int column)
{
    return "R" + row + "C" + column;
}
The following code declares a delegate variable to refer to the methods and tests them.
Func<int, int, string> combiner;

combiner = Combine1;
Console.WriteLine(combiner(1, 2));
combiner = Combine2;
Console.WriteLine(combiner(1, 2));
Alternatively, the program could use the following code to define a delegate type.
public delegate string CombinerType(int row, int column);It would then declare the delegate variable as in the following code.
CombinerType combiner;
Chapter 5
- You cannot use both the pre- and post-increment operators on the same variable as in
++x++. Because the post-increment operator has higher precedence than the pre-increment operator, this is equivalent to++(x++). The post-increment operator returnsx’s original value. The pre-increment operator would then try to increment the result. But the result isn’tx; it’s basically a copy ofx’s value. The pre-increment operator can work only on items such as variables that it can increment, so it fails.If you enter
++x++in the code, Visual Studio flags it with this error:The operand of an increment or decrement operator must be a variable, property or indexer
- The following code uses
ifstatements instead of?:and??.if (amount < 0) amountLabel.ForeColor = Color.Red; else amountLabel.ForeColor = Color.Blue; Customer orderedBy; if (customer != null) orderedBy = customer; else orderedBy = new Customer();The following code shows a slightly more concise way to set
orderedBy.Customer orderedBy = customer; if (customer == null) orderedBy = new Customer(); - The code starts by using
System.Object.ReferenceEqualsto see if the operands refer to the same object. If they are bothnull, then they refer to the samenullobject, so the method returnstrue. - The following code shows a subtraction operator for the
Complexclass.public static Complex operator -(Complex operand1, Complex operand2) { return new Complex() { Re = operand1.Re - operand2.Re, Im = operand1.Im - operand2.Im }; }Alternatively, because the class already defines addition and unary negation, you could use the following simpler subtraction operator.
public static Complex operator -(Complex operand1, Complex operand2) { return operand1 + (-operand2); } - The following code shows a simple
Fractionclass with*and/operators.public class Fraction { public double Numerator = 0; public double Denominator = 0; public static Fraction operator *(Fraction operand1, Fraction operand2) { return new Fraction() { Numerator = operand1.Numerator * operand2.Numerator, Denominator = operand1.Denominator * operand2.Denominator }; } public static Fraction operator /(Fraction operand1, Fraction operand2) { return new Fraction() { Numerator = operand1.Numerator * operand2.Denominator, Denominator = operand1.Denominator * operand2.Numerator }; } } - Any fraction can be represented as a
double, possibly with the loss of some precision, so this is a widening conversion. That means this should be an implicit conversion. The following code shows the conversion operator.public static implicit operator double(Fraction fraction) { return fraction.Numerator / fraction.Denominator; } - If you provide the
>operator, then you must also provide the<operator. The following code uses thedoubleconversion operator defined in Exercise 6 to implement those operators for theFractionclass.public static bool operator <(Fraction operand1, Fraction operand2) { return (double)operand1 < (double)operand2; } public static bool operator >(Fraction operand1, Fraction operand2) { return (double)operand1 > (double)operand2; } - If you provide the
==operator, then you must also provide the != operator and you must override theEqualsandGetHashCodemethods. The following code uses thedoubleconversion operator defined in Exercise 6 to do this for theFractionclass.public override bool Equals(object obj) { if (obj == null) return false; if (!(obj is Fraction)) return false; Fraction fraction = obj as Fraction; return (double)this == (double)fraction; } public override int GetHashCode() { double value = (double)this; return value.GetHashCode(); } public static bool operator ==(Fraction operand1, Fraction operand2) { // If both refer to the same object (reference equality), return true. if ((object)operand1 == (object)operand2) return true; // If one is null but not the other, return false. if (((object)operand1 == null) || ((object)operand2 == null)) return false; // Compare the values. return (double)operand1 == (double)operand2; } public static bool operator !=(Fraction operand1, Fraction operand2) { return !(operand1 == operand2); } - The results of the statements are
1 + 2 * 3 - 4 / 5 = 79 * 5 / 10 = 42 * 5 / 10 = 12 / 10 * 5 = 112 / 6 * 4 / 8 = 1
- The following parenthesized statements are true.
4 * 4 - 4 / 4 + 4 = 194 * 4 - 4 / (4 + 4) = 164 * 4 - (4 / 4 + 4) = 114 * (4 - 4) / 4 + 4 = 44 * (4 - 4) / (4 + 4) = 0
- The following table shows the values of
xandyafter each statement.Statement xyint y = x / 4;11 2 int y = x++ / 4;12 2 int y = ++x / 4;12 3 float y = x / 4;11 2.0 double y = x / 4f;11 2.75 - 12. The following statements make
yequal3.5.float y = x / 2f;float y = (float)x / 2;float y = x / (float)2;
- In the statement
float y = x / 2.0, the value2.0is adouble, sox / 2.0is also adouble. Storing adoublevalue in thefloatvariableyis a narrowing conversion, so it cannot be done implicitly. This statement tries to perform the conversion implicitly, so it raises an error.One way to fix the statement is to explicitly cast the result to a
floatas infloat y = (float)(x / 2.0). - If
||=existed, it would be a conditionalOroperator. SupposeAandBarebools. ThenA ||= Bwould examineA. IfAistrue, then it would be left alone. IfAisfalse, the program would setA = A | B.If
&&=existed, it would be a conditionalAndoperator. SupposeAandBarebools. ThenA &&= Bwould examineA. IfAisfalse, then it would be left alone. IfAistrue, the program would setA = A & B.These would provide some benefit because they wouldn’t evaluate
Bunless necessary. IfBis a slow method call instead of a variable, that could save some time.
Chapter 6
- The following code shows the
IContactableinterface.interface IContactable { bool Contact(string message); } - The following code shows an
Emailableclass that implicitly implements theIContactableinterface.class Emailable : IContactable { public bool Contact(string message) { return true; } } - The following code shows an
Emailableclass that explicitly implements theIContactableinterface.class Textable : IContactable { bool IContactable.Contact(string message) { return true; } } - To define a method without providing any implementation, the method’s declaration must include the
abstractkeyword. If the class contains anabstractmethod, its declaration must also include theabstractkeyword. The following code shows theContactableclass.abstract class Contactable { abstract public bool Contact(string message); } - The following code shows a
Mailableclass that inherits fromContactableand implements theContactmethod.class Mailable : Contactable { public override bool Contact(string message) { return true; } } - The following code shows an implementation of the
Rootextension method.static class DoubleExtensions { public static double Root(this double number) { return (Math.Sqrt(number)); } } - The following code shows an overloaded version of the
Rootextension method. (In the sameDoubleExtensionsclass used in Exercise 6.)public static double Root(this double number, int rootBase) { return (Math.Pow(number, 1.0 / rootBase)); } - If the program is going to use
Piecevariables to representPieces andKings, theCanMoveTomethod must bevirtualand theKingclass mustoverridethe method. Then if the program uses aPiecevariable to invokeCanMoveTofor aKingobject, it executes theKing’s version of the method.The following code shows the
Piececlass.class Piece { public virtual bool CanMoveTo(int row, int column) { return false; } }The following code shows the
Kingclass.class King : Piece { public override bool CanMoveTo(int row, int column) { return true; } } - The following statement defines the
ManagersFromEmployeesDelegatetype.delegate Manager[] ManagersFromEmployeesDelegate(Employee[] employees);The following code shows the
Promotemethod that matches the delegate type.private Manager[] Promote(Employee[] employees) { return null; }The following statement creates a variable that holds a reference to the
Promotemethod.ManagersFromEmployeesDelegate del = Promote; - Covariance lets a method return a more derived type than the delegate. In this example, the delegate returns
Manager[], so the new method should return the more derived typeExecutive[].Contravariance lets a method take parameters that are a less derived type than those taken by the delegate. In this example, the delegate takes an
Employee[]as a parameter, so the new method should take the less derived parameter typePerson[].The following code shows the new version of the
Promotemethod.private Executive[] Promote2(Person[] people) { return null; }The following statement creates a variable that holds a reference to the new version of the
Promotemethod.ManagersFromEmployeesDelegate del2 = Promote2; - The ColorizeImage program, which is available for download on this book’s website, does this. Download the program to see how it works. In one test on my dual-core computer, processing an image took roughly 1.78 seconds synchronously and 0.92 seconds asynchronously.
Because the computer has two cores, you might expect the asynchronous version to take one-half the time used by the synchronous version, but there is some overhead in setting up and coordinating the threads. The result is still an impressive reduction in time, however, and would be even greater on a computer with more cores.
- There would not be a big advantage to using callbacks or
asyncandawait. Those techniques would allow the program’s user interface to respond to the user while the program was processing images. The only things the user could do at that time, however, would be to load a new image, close the program, or start more threads processing the images. Letting the user do those things while the program is processing images doesn’t seem like it would be useful.
Chapter 7
- The first block of code uses
elsestatements, so the program skips all the tests after it finds a match. For example, ifperson.TypeisCustomer, then it skips the tests that compareperson.TypetoEmployeeandManager.The second block of code performs all three comparisons even if
person.Typematches one of the early ones. That makes the second block of code slightly less efficient than the first. In this example, where the conditions are simple comparisons, the difference will be small. If the tests called complicated methods, then the difference in speed could be significant. - The following code uses a
switchstatement instead ofifstatements.switch (person.Type) { case PersonType.Customer: //... break; case PersonType.Employee: //... break; case PersonType.Manager: //... break; } - A series of
if-elsestatements would call theGetBirthMonthmethod 12 times. Aswitchstatement would call the method only once. BecauseGetBirthMonthaccesses a database, it would be inefficient to call it 12 times instead of once, so theswitchstatement is better. - The following code uses a
switchstatement to determine the person’s birthstone.string birthstone=""; switch (person.GetBirthMonth()) { case 1: birthstone = "Garnet"; break; case 2: birthstone = "Amethyst"; break; case 3: birthstone = "Aquamarine"; break; case 4: birthstone = "Diamond"; break; case 5: birthstone = "Emerald"; break; case 6: birthstone = "Alexandrite"; break; case 7: birthstone = "Ruby"; break; case 8: birthstone = "Peridot"; break; case 9: birthstone = "Sapphire"; break; case 10: birthstone = "Tourmaline"; break; case 11: birthstone = "Topaz"; break; case 12: birthstone = "Zircon"; break; }The problem with the series of
if-elsestatements is that the most obvious version calls theGetBirthMonthmethod 12 times, once for eachifstatement. You can avoid those calls if you call the method once and save the result to use in theifstatements. The following code shows this version.string birthstone=""; int month = person.GetBirthMonth(); if (month == 1) birthstone = "Garnet"; else if (month == 2) birthstone = "Amethyst"; else if (month == 3) birthstone = "Aquamarine"; else if (month == 4) birthstone = "Diamond"; else if (month == 5) birthstone = "Emerald"; else if (month == 6) birthstone = "Alexandrite"; else if (month == 7) birthstone = "Ruby"; else if (month == 8) birthstone = "Peridot"; else if (month == 9) birthstone = "Sapphire"; else if (month == 10) birthstone = "Tourmaline"; else if (month == 11) birthstone = "Topaz"; else if (month == 12) birthstone = "Zircon";This version is more concise and easier to read than the
switchstatement. (Actually you can place thecasekeyword, the line of code, and thebreakkeyword all on one line to make theswitchversion more concise. It looks a bit crowded but which version you prefer is mostly a matter of personal preference.) - To do this in a
switchstatement, you would need 100 separatecasestatements, one for each possible test score. You could reduce that number to 40casestatements if you let the default case handle all the values less than 60 (which give the grade F).In contrast, an
ifstatement can evaluate boolean expressions so that eachifstatement can handle a range of test scores. That makes it much more concise.The following code uses a series of
ifstatements to assign grades.int score = 89; string grade = ""; if (score >= 90) grade = "A"; else if (score >= 80) grade = "B"; else if (score >= 70) grade = "C"; else if (score >= 60) grade = "D"; else grade = "F"; - The following code shows the rewritten loop.
int a = 0; int b = 1; int c = 1; for (; a < 1000; ) { Console.WriteLine("a: " + a); a = b; b = c; c = a + b; } - The following
forloop adds up the numbers in the arrayvalues.int total = 0; for (int i = 0; i < values.Length; i++) total += values[i]; - The following
whileloop adds up the numbers in the arrayvalues.int total = 0; int i = 0; while (i < values.Length) { total += values[i]; i++; } - The following
doloop adds up the numbers in the arrayvalues.int total = 0; int i = 0; do { total += values[i]; i++; } while (i < values.Length); - The following
forloop displays the letters A through Z.for (char ch = 'A'; ch <= 'Z'; ch++) Console.WriteLine(ch); - The following code sets the
Billobject’sPenaltyproperty without using the?:operator.if (bill.Status == BillStatus.Overdue) { if (bill.Balance < 50m) bill.Penalty = 5m; else bill.Penalty = bill.Balance * 0.1m; } else { bill.Penalty = 0m; } - The following code initializes the
studentvariable without using the??operator.Student student = GetStudent("Steward Dent"); if (student == null) student = new Student("Steward Dent"); - The following code displays the multiples of 3 between 0 and 100 in largest-to-smallest order.
for (int i = 99; i >= 0; i -= 3) Console.WriteLine(i); - Each time the loop executes, the increment statement doubles the looping variable
i, so the loop displays the powers of 2 between 1 and 100: 1, 2, 4, 8, 16, 32, and 64. - The following code displays Friday the 13ths a year at a time until the user stops it.
// Start at the beginning of this year. int year = DateTime.Now.Year; // Loop until stopped. do { for (int month = 1; month <= 12; month++) { DateTime date = new DateTime(year, month, 13); if (date.DayOfWeek == DayOfWeek.Friday) Console.WriteLine(date.ToShortDateString()); } year++; } while (MessageBox.Show("Continue for " + year.ToString() + "?", "Continue?", MessageBoxButtons.YesNo) == DialogResult.Yes); - The following code shows the
foreachloop without acontinuestatement.foreach (Employee employee in employees) { if (!employee.IsExempt) { // Process the employee. ... } }This code uses an
ifstatement to avoid using acontinuestatement. That causes an extra level of indentation, which makes the code a bit harder to read than the version with thecontinuestatement.If the code contained several tests that allowed it to skip processing an employee, then it would need several
iftests. That could increase the level of indentation quite a bit. (Alternatively, you could use a singleifstatement with a complicated test.) Thecontinuestatement avoids that.The
continuestatement is also useful if there are several places inside the loop where you may discover that you don’t need to continue that iteration of the loop.
Chapter 8
Note that there may be many solutions to these exercises depending on what kind of information is selected in the LINQ queries and what kind of information is generated in foreach loops.
- Example program FunctionalVolleyballData does this. The code is fairly long, so it isn’t shown here. Download the example to see the solution.
- Simply add the following two lines at the beginning of the example program’s
Mainmethod.XElement root = XElement.Parse(XmlString()); Console.WriteLine(root.ToString()); - There are a couple of ways you can do this. The following code shows one method.
// Select the teams.
var teams =
    from team in root.Element("Teams").Descendants("Team")
    select team;

// Loop through the teams displaying them and their players.
foreach (var team in teams)
{
    // Display the team's name.
    Console.WriteLine(team.Attribute("Name").Value);

    // Display the team's players.
    foreach (var player in team.Descendants("Player"))
        Console.WriteLine("    " +
            player.Attribute("FirstName").Value + " " +
            player.Attribute("LastName").Value);
}
This code uses LINQ to start at the
rootelement, finds that element’sTeamschildren (in this case there’s only one), and then looks forTeamdescendants of that element. Moving intoElement("Teams")makes the query only consider elements in theTeamssubtree. That prevents the query from selecting theTeamelements that are inside theMatchessubtree.After selecting the
Teamelements inside theTeamssubtree, the code loops through those elements. For eachTeam, the code displays theTeam’s name and then loops through theTeam’sPlayerelements, displaying their names.Another approach uses the following code to select objects with an anonymous type holding the
Teams and theirPlayers.// Select the teams. var teams = from team in root.Element("Teams").Descendants("Team") select new { Team = team, Players = team.Descendants("Player") }; // Loop through the teams displaying them and their players. foreach (var team in teams) { // Display the team's name. Console.WriteLine(team.Team.Attribute("Name").Value); // Display the team's players. foreach (var player in team.Players) Console.WriteLine(" " + player.Attribute("FirstName").Value + " " + player.Attribute("LastName").Value); }Like the preceding solution, this query searches for
Teamelements that are in theTeamssubtree. It then selects thoseTeams plus theirPlayerdescendants. The code loops through the selected objects displaying eachTeam’s name and itsPlayers.Example program VolleyballTeamsAndPlayers demonstrates both of these approaches. (These two solutions use similar loops to display their results. The second version feels more LINQ-like, but the first seems more intuitive so I prefer the first solution.)
- Example program VolleyballTeamsAndScores does this. It uses the following code to match the appropriate team and match score records.
// Join teams and match results.
var teamResults =
    from team in root.Element("Teams").Descendants("Team")
    join result in root.Element("Matches").Descendants("Team")
        on team.Attribute("Name").ToString()
            equals result.Attribute("Name").ToString()
    select new
    {
        Team = team.Attribute("Name").Value,
        Score = int.Parse(result.Attribute("Score").Value)
    };

string format = "{0,-20}{1,10}";
Console.WriteLine(string.Format(format, "Team", "Points"));
Console.WriteLine(string.Format(format, "====", "======"));
foreach (var obj in teamResults)
{
    Console.WriteLine(string.Format(format, obj.Team, obj.Score));
}
The query matches
Teamelements inside theTeamssubtree withTeamelements inside theMatchessubtree. For each selected pair, the query selects the team’sNameattribute and the match result’sScoreattribute.Notice that the code compares the team and match
Nameattributes after converting them into strings. The attributes themselves areXAttributeobjects. They hold the same value but theXAttributeobjects are different, so if you compare those objects you’ll never find any matches.After selecting the corresponding records, the program loops through the query’s results and displays the team names and scores.
- Example program VolleyballTeamsAndTotals does this. It uses the following code to calculate and display the teams’ total wins and points.
// Select the teams and their results.
// Total each team's wins and points.
var teamResults =
    from team in root.Element("Teams").Descendants("Team")
    join result in root.Element("Matches").Descendants("Team")
        on team.Attribute("Name").Value
            equals result.Attribute("Name").Value
    group result by team into teamMatches
    orderby teamMatches.Count(r => r.Attribute("Score").Value == "25") descending,
            teamMatches.Sum(r => (int)r.Attribute("Score")) descending
    select new
    {
        Team = teamMatches.Key.Attribute("Name").Value,
        Wins = teamMatches.Count(r => r.Attribute("Score").Value == "25"),
        Points = teamMatches.Sum(r => (int)r.Attribute("Score"))
    };

string format = "{0,-20}{1,10}{2,10}";
Console.WriteLine(string.Format(format, "Name", "Wins", "Points"));
Console.WriteLine(string.Format(format, "====", "====", "======"));
foreach (var results in teamResults)
{
    Console.WriteLine(string.Format(format,
        results.Team, results.Wins, results.Points));
}
Like the solution to Exercise 4, this program joins teams with match results. It groups the results by team and calls the groups
teamMatches.To determine the number of matches a team won, the query counts the matches where the
Scoreattribute has value 25.To determine a team’s total number of points, the query takes the sum of the match values’
Scoreattribute values converted into integers.The query orders its results by both the number of wins and the total number of points. Finally, it selects the team’s name together with the number of wins and total number of points.
Next, the program loops through the query and displays the results. Because the query selects simple string and integer values, displaying the results is easy.
- Example program CreateVolleyballDataSet does this. The code is fairly long, so it isn’t shown here. Download the example to see the solution.
- Example program VolleyballTeamsAndPlayersDataSet does this.
The program demonstrates two approaches. The following code shows the first approach.
// Loop through the teams displaying them and their players.
foreach (DataRow team in teamsTable.AsEnumerable())
{
    // Display the team's name.
    Console.WriteLine(team.Field<string>("TeamName"));

    // Select the team's players.
    string teamName = team.Field<string>("TeamName");
    var players =
        from player in playersTable.AsEnumerable()
        where player.Field<string>("TeamName") == teamName
        select player;

    // Display the players.
    foreach (var player in players)
        Console.WriteLine("    " +
            player.Field<string>("FirstName") + " " +
            player.Field<string>("LastName"));
}
This code loops through the records from the
Teamstable. (Note that the items returned by the table’sAsEnumerablemethod areDataRowobjects. Note also that you could loop over the table’sRowscollection instead of usingAsEnumerable.)For each team, the program displays the team’s name, selects the corresponding records in the
Playerstable, and displays the selected players.The program’s second approach uses the following code.
// Select the teams joined with the players.
var teams =
    from team in teamsTable.AsEnumerable()
    join player in playersTable.AsEnumerable()
        on team.Field<string>("TeamName") equals player.Field<string>("TeamName")
    group player by team into teamPlayers
    select teamPlayers;

// Loop through the teams displaying them and their players.
foreach (var team in teams)
{
    // Display the team's name.
    Console.WriteLine(team.Key.Field<string>("TeamName"));
    // Display the team's players.
    foreach (var player in team)
    {
        Console.WriteLine("    " +
            player.Field<string>("FirstName") + " " +
            player.Field<string>("LastName"));
    }
}
This code selects records from the
TeamsandPlayerstables, joined on theirTeamNamefields. It groups the players by team.The program loops through the selected team groups. For each group, it displays the group’s team name and then loops through the team’s players displaying their names.
- Example program VolleyBallTeamsAndScoresDataSet uses the following query to select its data.
// Join teams and match results.
var teamResults =
    from team in teamsTable.AsEnumerable()
    join result in matchesTable.AsEnumerable()
        on team.Field<string>("TeamName") equals result.Field<string>("TeamName")
    select new
    {
        Team = team.Field<string>("TeamName"),
        Score = result.Field<int>("Score")
    };
This query selects data from the
TeamsandMatchestables and joins them byTeamName. It selects the team names and scores so the program can later display those values. - Example program VolleyballTeamsAndTotalsDataSet uses the following query to select its data.
// Select the teams and their results.
// Total each team's wins and points.
var teamResults =
    from team in teamsTable.AsEnumerable()
    join result in matchesTable.AsEnumerable()
        on team.Field<string>("TeamName") equals
            result.Field<string>("TeamName")
    group result by team into teamMatches
    orderby teamMatches.Count(r => r.Field<int>("Score") == 25) descending,
            teamMatches.Sum(r => r.Field<int>("Score")) descending
    select new
    {
        Team = teamMatches.Key.Field<string>("TeamName"),
        Wins = teamMatches.Count(r => r.Field<int>("Score") == 25),
        Points = teamMatches.Sum(r => r.Field<int>("Score"))
    };
This is similar to the code used in Exercise 5 except it selects its data from tables instead of
XElementobjects. - Example program VolleyballTeamsRankings does this. It uses a query named
pointsForthat is similar to the one used by the solution to Exercise 9 to select team name, number of wins, and points “for.”Next, the program uses a second query named
pointsAgainstto select team name, number of losses, and points “against.” This query is similar to the first except it matches theTeamstable’sTeamNamefield to theMatchestable’sVersusTeamNamefield.The program then uses the following query to join the results of the
pointsForandpointsAgainstqueries.// Join the win and loss data. var combined = from dataFor in pointsFor join dataAgainst in pointsAgainst on dataFor.Team equals dataAgainst.Team orderby 100 * (dataFor.Wins / (float)dataAgainst.Losses) descending, dataFor.PointsFor - dataAgainst.PointsAgainst descending select new { Team = dataFor.Team, Wins = dataFor.Wins, Losses = dataAgainst.Losses, WinPercent = 100 * (dataFor.Wins / (float)(dataFor.Wins + dataAgainst.Losses)), PointsFor = dataFor.PointsFor, PointsAgainst = dataAgainst.PointsAgainst, PointDifferential = dataFor.PointsFor - dataAgainst.PointsAgainst };Finally, the program loops through the selected data and displays the results.
- Example program AddStandingsToXml does this in two different ways.
The first method uses the same queries as the solution to Exercise 10. After it builds the
combinedquery, the program uses the following code to build the new XML elements.// Add the results to a new Standings XML element. XElement standings = new XElement("Standings"); root.Add(standings); foreach (var results in combined) { standings.Add( new XElement("Team", new XAttribute("Name", results.Team), new XAttribute("Wins", results.Wins), new XAttribute("Losses", results.Losses), new XAttribute("WinPercent", results.WinPercent), new XAttribute("PointsFor", results.PointsFor), new XAttribute("PointsAgainst", results.PointsAgainst), new XAttribute("PointDifferential", results.PointDifferential) ) ); }This code starts by creating a new
Standings XElementand adding it to therootelement. It then loops through thecombinedquery. For each item in the query’s results, the program uses the item’s properties to create a newTeamelement and adds that element to theStandingselement.The program’s second approach uses the following code.
// Join the win and loss data.
var combined =
    from dataFor in pointsFor
    join dataAgainst in pointsAgainst
        on dataFor.Team equals dataAgainst.Team
    orderby
        100 * (dataFor.Wins / (float)dataAgainst.Losses) descending,
        dataFor.PointsFor - dataAgainst.PointsAgainst descending
    select new XElement("Team",
        new XAttribute("Name", dataFor.Team),
        new XAttribute("Wins", dataFor.Wins),
        new XAttribute("Losses", dataAgainst.Losses),
        new XAttribute("WinPercent",
            100 * (dataFor.Wins / (float)(dataFor.Wins + dataAgainst.Losses))),
        new XAttribute("PointsFor", dataFor.PointsFor),
        new XAttribute("PointsAgainst", dataAgainst.PointsAgainst),
        new XAttribute("PointDifferential",
            dataFor.PointsFor - dataAgainst.PointsAgainst)
    );

// Add the results to a new Standings XML element.
root.Add(new XElement("Standings", combined));
This version makes the LINQ query create
XElementobjects to represent the standings data. It then creates theStandingselement and passes that element’s constructor the query. Because the query returns anIEnumerablecontainingXElements, the constructor makes those elements children of theStandingselement.The first approach uses a query that selects the data the program needs and then loops through the query’s result to create the
XElements. The second approach makes the LINQ query create theXElements. In general you should use whichever approach you find more intuitive.
Chapter 9
- To allow the program to detect changes to the classes’ values, all the values must be converted into properties. The properties’
setaccessors can then validate new values for the properties. The following code shows the revised class.public class Student { private string _Name; public string Name { get { return _Name; } set { Debug.Assert(value != null, "Name must not be null"); Debug.Assert(value.Length > 0, "Name must have non-zero length"); _Name = value; } } private List<Course> _Courses = new List<Course>(); public List<Course> Courses { get { return _Courses; } set { Debug.Assert(value != null, "Courses list must not be null"); _Courses = value; } } // Constructor. public Student(string name) { Name = name; } }Note that the constructor doesn’t need to do any validation because it uses the
Nameproperty to set the new object’s name, and that property performs validation.(You can find this code in the StudentTest example program in this chapter’s downloads.)
- The following code shows the revised class.
public class Student
{
    private string _Name;
    public string Name
    {
        get { return _Name; }
        set
        {
            Contract.Requires(value != null, "Name must not be null");
            Contract.Requires(value.Length > 0, "Name must have non-zero length");
            Contract.Ensures(_Name != null, "Name must not be null");
            Contract.Ensures(_Name.Length > 0, "Name must have non-zero length");
            _Name = value;
        }
    }

    private List<Course> _Courses = new List<Course>();
    public List<Course> Courses
    {
        get { return _Courses; }
        set
        {
            Contract.Requires(value != null, "Courses list must not be null");
            Contract.Ensures(_Courses != null, "Courses list must not be null");
            _Courses = value;
        }
    }

    // Constructor.
    public Student(string name)
    {
        Name = name;
    }
}
Could you remove the postconditions? Of course, you could. The preconditions guarantee that the postconditions are satisfied.
That’s exactly the sort of thinking that makes developers assume their code is correct when it actually isn’t. This is also why it’s good to write contracts before writing the code inside the method. Knowing what these property
setaccessors do, you can convince yourself that the postconditions are unnecessary. In a nontrivial method, the same pressures may lead you to omit the postconditions.Note that the postconditions are not exactly the same as the preconditions. The preconditions test the inputs to the accessors (if the accessors made other assumptions, the preconditions would verify them, too) and the postconditions check the wanted results.
(You can find this code in the StudentTest example program in this chapter’s downloads.)
- The following code shows the revised class.
public class Student
{
    public string Name { get; set; }
    public List<Course> Courses { get; set; }

    // Constructor.
    public Student(string name)
    {
        Name = name;
        Courses = new List<Course>();
    }

    [ContractInvariantMethod]
    private void CheckValuesNotNull()
    {
        Contract.Invariant(this.Name != null);
        Contract.Invariant(this.Name.Length > 0);
        Contract.Invariant(this.Courses != null);
    }
}
In this version, the
NameandCoursesvalues are auto-implemented properties. Because theirsetaccessors are public methods, they invoke the class’s invariant method after they set their values.Because an auto-implemented property cannot be initialized in its declaration, this version’s constructor initializes the object’s
Coursesproperty so that property is notnullwhen the constructor finishes.(You can find this code in the StudentTest example program in this chapter’s downloads.)
- The following code shows the revised class.
public class Student
{
    private string _Name;
    public string Name
    {
        get { return _Name; }
        set
        {
            if (value == null) throw new ArgumentNullException("Name",
                "Name must not be null");
            if (value.Length <= 0) throw new ArgumentOutOfRangeException("Name",
                "Name must have non-zero length");
            _Name = value;
        }
    }

    private List<Course> _Courses = new List<Course>();
    public List<Course> Courses
    {
        get { return _Courses; }
        set
        {
            if (value == null) throw new ArgumentNullException("Courses",
                "Courses list must not be null");
            _Courses = value;
        }
    }

    // Constructor.
    public Student(string name)
    {
        Name = name;
    }
}
(You can find this code in the StudentTest example program in this chapter’s downloads).
- The program will throw an exception if you enter a non-numeric value such as “ten” or “weasel” in the console window. Also if you enter numeric values other than 1, 2, or 3, the program ignores them.
- The ConsoleUnexpectedInputs example program in this chapter’s downloads uses the following code to handle unexpected inputs. The new lines are highlighted in bold.
static void Main(string[] args) { // Install the event handler. AppDomain.CurrentDomain.UnhandledException += UnhandledException; // Loop forever. for (; ; ) { Console.WriteLine("1 - Continue, 2 - Throw exception, 3 - Exit"); Console.Write("> "); string text = Console.ReadLine(); // If the input cannot be parsed, set choice to 0. int choice; if (!int.TryParse(text, out choice)) choice = 0; switch (choice) { case 1: // Continue. Console.WriteLine("Continuing... "); break; case 2: // Throw an exception. Console.WriteLine("Throwing exception... "); throw new ArgumentException(); case 3: // Exit. return; default: // Handle other inputs. Console.WriteLine("Unexpected input: " + text + " "); break; } } } - The ConsoleTryCatch example program in this chapter’s downloads uses the following code to avoid using the
UnhandledExceptionevent handler.static void Main(string[] args) { // Loop forever. for (; ; ) { // Catch all exceptions. try { Console.WriteLine("1 - Continue, 2 - Throw exception, 3 - Exit"); Console.Write("> "); string text = Console.ReadLine(); int choice = int.Parse(text); switch (choice) { case 1: // Continue. Console.WriteLine("Continuing... "); break; case 2: // Throw an exception. Console.WriteLine("Throwing exception... "); throw new ArgumentException(); case 3: // Exit. return; } } catch (Exception ex) { Console.WriteLine("Caught exception:"); Console.WriteLine(ex.Message); Console.WriteLine(" "); } } }One advantage of this method is that it can prevent the program from closing. An
UnhandledExceptionevent handler cannot.One disadvantage of this method is that the program could get stuck in an infinite loop. This example doesn’t have this problem (at least if you wrote it correctly), but a program could throw an exception, display an error message, and then throw the same exception again when it resumes its main loop. An
UnhandledExceptionevent handler cannot stop the program from ending, so it doesn’t have this problem. (Although that’s a bit like saying you don’t have trouble parking because your car got repossessed. You don’t have the problem because you have a worse problem.) - The main program calls the
Factorialmethod with values entered by the user. TheDebug.Assertstatement and code contracts help flush out bugs during testing, but the user may still enter invalid values in the release build. You could use those methods to look for bugs, but the program needs to handle invalid inputs and run correctly in any case, so it would be more useful to handle problems intry-catchblocks.There are two places the original code can fail: in the
calculateButton_Clickevent handler and in theFactorialmethod. The event handler can fail to parse the user’s input. TheFactorialmethod can fail if its input is negative or too big. Each of those pieces of code should protect itself.The Factorial example program in this chapter’s downloads uses the following code to protect itself from invalid inputs.
// Calculate the entered number's factorial.
private void calculateButton_Click(object sender, EventArgs e)
{
    try
    {
        // Clear the result label in case we fail.
        resultLabel.Text = "";

        // Try to parse the number entered by the user.
        long number;
        if (!long.TryParse(numberTextBox.Text, out number))
        {
            MessageBox.Show("Please enter a number.");
            numberTextBox.Select(0, numberTextBox.Text.Length);
            numberTextBox.Focus();
            return;
        }

        // Display the factorial.
        resultLabel.Text = Factorial(number).ToString();
    }
    catch (OverflowException)
    {
        MessageBox.Show("Please enter a number between 0 and 20.");
    }
    catch (ArgumentOutOfRangeException)
    {
        MessageBox.Show("Please enter a number between 0 and 20.");
    }
    catch (Exception ex)
    {
        Console.WriteLine("Exception: " + ex.GetType().Name);
        MessageBox.Show(ex.Message);
    }
}

// Return number!
private long Factorial(long number)
{
    // Make sure the number is non-negative.
    if (number < 0)
        throw new ArgumentOutOfRangeException("number",
            "Argument number must be non-negative.");

    // Check for overflow.
    checked
    {
        long result = 1;
        for (long i = 2; i <= number; i++) result *= i;
        return result;
    }
}
The button’s event handler does all its work inside a
try-catchblock. The first twocatchsections display messages that the user can understand. The thirdcatchsection handles unexpected exceptions. Because it doesn’t know what kinds of exceptions to expect, it can’t display a user-friendly message. Instead it just writes the exception’s name into the Console window (so you can add acatchsection for it) and displays the exception’s message to the user.The
Factorialfunction throws anArgumentOutOfRangeExceptionif its parameter is negative. It then uses acheckedblock to watch for arithmetic errors and calculates the factorial. (See the section “Casting Numbers” in Chapter 4, “Data Types, Variables, and Constants,” for a review ofcheckedblocks.)
Chapter 10
- The TraceFactorial example program, which is available in this book’s downloads, includes code for Exercises 1, 2, and 4. It uses the following code to solve Exercise 1. (Notice how the code needs to separate the recursive call from the
returnstatement so that it can display the method’s result before returning.)private long Factorial(long number) { Debug.WriteLine("Factorial(" + number.ToString() + ")"); Debug.Indent(); long result; if (number <= 1) result = 1; else result = number * Factorial(number - 1); Debug.Unindent(); Debug.WriteLine("Result: " + result.ToString()); return result; } - The TraceFactorial example program uses the following code to solve Exercise 2.
private long Factorial(long number) { long result; if (number <= 1) result = 1; else result = number * Factorial(number - 1); Debug.WriteLine("Factorial(" + number.ToString() + ") = " + result.ToString()); return result; } - You can’t do this efficiently with
Debugstatements alone because each call to theFactorialmethod would need to know its result so that it can display it before it calls itself recursively. But it needs to call itself recursively to find out its result. - One solution is to build a string holding the entire trace and then display it at the end. The TraceFactorial example program uses the following version of the
Factorialmethod to solve Exercise 4.private long Factorial(long number, ref string trace) { long result; if (number <= 1) result = 1; else result = number * Factorial(number - 1, ref trace); // Add our information at the beginning of the trace. trace = "Factorial(" + number.ToString() + ") = " + result.ToString() + ' ' + trace; return result; }The method takes a second
refparameter that holds a string containing the methodtrace. When the method is called, it calculates its value by calling itself recursively. The recursive call setstraceequal to the trace for the recursive call (and any further recursive calls it makes).When the recursive call returns, the current method call adds its information to the beginning of the
tracestring.The program uses the following code to call the
Factorialmethod.string trace = ""; resultLabel.Text = Factorial(number, ref trace).ToString(); // Display the trace. Debug.WriteLine(trace);This code initializes a blank
tracestring, calls theFactorialmethod and then displaystrace. - The DebugLevels example program, which is available in this book’s downloads, uses the following code to write appropriate messages.
        // Display the message if the debug level is low enough.
        private void PrintMessage(int level, string message)
        {
#if DEBUG1
            if (level <= 1) Console.WriteLine(message);
#elif DEBUG2
            if (level <= 2) Console.WriteLine(message);
#elif DEBUG3
            if (level <= 3) Console.WriteLine(message);
#elif DEBUG4
            if (level <= 4) Console.WriteLine(message);
#elif DEBUG5
            if (level <= 5) Console.WriteLine(message);
#endif
        }
An obvious advantage of this method is that it gives as many debugging levels as you like instead of just the two provided by the
DebugandTraceclasses.One disadvantage is that it requires you to write a separate line of code for each possible debug level. It also doesn’t support trace listeners, so you can’t use multiple listeners to send the message to multiple locations the way the
DebugandTraceclasses can.You can solve the first problem if you use a variable instead of preprocessor symbols to determine the program’s current debugging level. That also lets you load the value in different ways that may be more convenient that recompiling. For example, the program can load the value at run time from a text file, configuration file, or registry setting. Then you could change the debug level and rerun the program without needing to recompile it.
If you make the method use the
Traceclass to display its results, you can also take advantage of trace listeners.The following code shows an improved version of the method.
// The debug level. Load it from a text file, config file, registry setting, etc. private int DebugLevel = 2; // Display the message if the debug level is low enough. private void PrintMessage(int level, string message) { if (level <= DebugLevel) Trace.WriteLine(message); } - The MessageLog example program, which is available in this book’s downloads, uses the following code to write messages into the message file.
static void Main(string[] args) { // Remove the default Debug listener and // add a new TextWriterTraceListener. Debug.Listeners.RemoveAt(0); Stream stream = File.Open("Messages.txt", FileMode.Append, FileAccess.Write, FileShare.Read); Debug.Listeners.Add(new TextWriterTraceListener(stream)); // Make Debug and Trace autoflush. Debug.AutoFlush = true; Trace.AutoFlush = true; // Write some messages. Debug.WriteLine(DateTime.Now.ToString() + ": Debug message 1"); Trace.WriteLine(DateTime.Now.ToString() + ": Trace message 1"); Console.WriteLine(DateTime.Now.ToString() + ": Console message 1"); Debug.WriteLine(DateTime.Now.ToString() + ": Debug message 2"); Trace.WriteLine(DateTime.Now.ToString() + ": Trace message 2"); Console.WriteLine(DateTime.Now.ToString() + ": Console message 2"); // Make the user press Enter before exiting. Console.WriteLine("Press Enter to exit."); Console.ReadLine(); // Close the logs. Debug.Close(); Trace.Close(); } - The DebugAndTraceLogs example program, which is available in this book’s downloads, uses the following code to write messages into the message files.
static void Main(string[] args)
{
    // Write some messages.
    LogMessage("DebugLog.txt", "Debug message 1");
    LogMessage("TraceLog.txt", "Trace message 1");
    Console.WriteLine(DateTime.Now.ToString() + ": Console message 1");

    LogMessage("DebugLog.txt", "Debug message 2");
    LogMessage("TraceLog.txt", "Trace message 2");
    Console.WriteLine(DateTime.Now.ToString() + ": Console message 2");

    // Make the user press Enter before exiting.
    Console.WriteLine("Press Enter to exit.");
    Console.ReadLine();

    // Close the logs.
    Debug.Close();
    Trace.Close();
}

// Append a message to a text file.
private static void LogMessage(string filename, string message)
{
    System.IO.File.AppendAllText(filename,
        DateTime.Now.ToString() + ": " +
        message + '
'),
}
Chapter 11
- You could add a new
PartTimeProgrammerbut it would duplicate features of theSecretaryclass. The solution is to abstract those two classes to give them a commonHourlyEmployeeparent class. Figure A-2 shows the new hierarchy.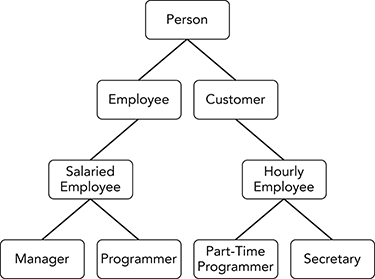
Figure A-2: The
HourlyEmployeeclass is an abstraction of thePartTimeProgrammerandSecretaryclasses. - The following code avoids using the
isstatement.foreach (Person person in AllPeople) { Employee employee = person as Employee; if (employee != null) { // Do something Employee-specific with the person... ... } }Which version is better is a matter of personal preference and style. There isn’t much difference.
- Figure A-3 shows the inheritance hierarchy.
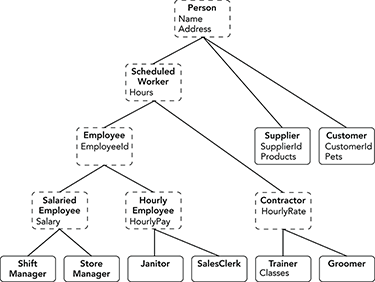
Figure A-3: This inheritance hierarchy represents classes used to represent people for a pet store application. Classes with dashed outlines show abstract classes.
The classes with dashed outlines can be abstract because they don’t represent concrete real-world objects. For example, the program will never need to create an
Employeeobject. Instead it can create an instance of the appropriate kind ofEmployee:ShiftManager,StoreManager,Janitor, orSalesClerk. The program can still treat the objects as if they wereEmployeeobjects if that is convenient.In fact, the program should make those classes abstract so that no one tries to instantiate them. Trying to create an
Employeeobject is probably an indication of a bug. (You can always make a class concrete later if you decide you need to instantiate it.)You would make the classes abstract by including the
abstractkeyword, but they don’t need to contain any abstract members. - The PetStoreHierarchy example program shows one way to define the classes shown in Figure A-3. In this solution, each property is defined in only one class and is inherited by other classes.
- The “is-a” and “has-a” relationships lead to a good solution. A player “is-a”
Human,Elf, orDwarf, and a player “has-a” weapon. That means thePlayerclass should be part of an inheritance hierarchy that includes the races. It should have a property that is an instance of a weapon.Figure A-4 shows the program’s inheritance hierarchies.
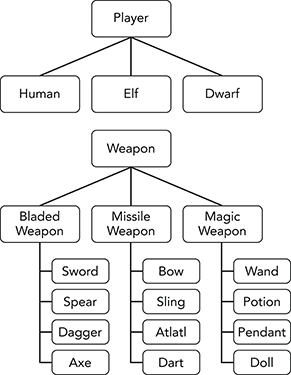
Figure A-4: The role-playing game needs two inheritance hierarchies, one for race and one for weapon.
- This situation is a bit tricky because a player “is-a” race and also “is-a” profession. For example, a specific player “is-a”
Dwarfand “is-a”Chemist. This might suggest that you should use multiple inheritance (implemented with interface inheritance).The problem with that approach is it would lead to lots of classes to cover all the possible combinations:
Human/Fighter,Human/MagicUser,Dwarf/Illusionist,Elf/Witch, and so forth. If you have N races and M professions and specialties, you would need to make N × M classes to cover every possible combination. For the example so far, there would be 3 × 8 = 24 such combinations.A better approach is to think a player “has-a” profession. Then you can give the
Playerclass a property to hold the player’s profession.Figure A-5 shows the
Professioninheritance hierarchies.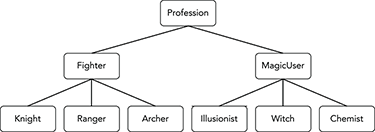
Figure A-5: Players can have the generic class
FighterorMagicUser, so those classes are not abstract. - This situation is actually fairly simple as long as you don’t try to use inheritance. A developer “is-not-a” department, so there’s no inheritance relationship between the developer and the department. Similarly, developer “is-not-a” project, so there’s no inheritance relationship between the developer and the project.
In this case, you can simply make the department and any assigned projects be properties of the
Developerclass. - The tricky part of this problem is that there are two key inheritance paths: one for students and one for employees. The problem arises from the fact that
TeachingAssistants andResearchAssistants are both students and employees. (TheStudentIdandEmployeeIdproperties are the clues.)Figure A-6 shows the inheritance hierarchy. Dashed lines represent multiple inheritance. Alternatively, you could make the lines from
ResearchAssistantandTeachingAssistanttoStudentsolid and make the lines from those classes toEmployeedashed.This hierarchy changes the names of the
InstructorpropertiesCurrentClassesandPastClassestoCurrentClassesTaughtandPastClassesTaughtto make them the same as the corresponding properties in theTeachingAssistantclass. That clarifies the differences between a class that is being taken and a class that is being taught.Because C# doesn’t allow multiple inheritance, you should implement the hierarchy with interface inheritance. The program should define an
IStudentinterface for theStudent,ResearchAssistant, andTeachingAssistantclasses to implement.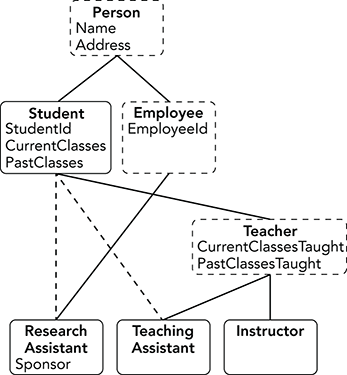
Figure A-6: The
ResearchAssistantandTeachingAssistantclasses use multiple inheritance. - The StudentHierarchy example program defines the hierarchy. The most interesting classes are those that implement the
IStudentinterface. The following code shows theIStudentinterface andTeachingAssistantclass, which implements it.// A student interface. public interface IStudent { int StudentId { get; set; } string CurrentClasses{ get; set; } string PastClasses{ get; set; } } public class TeachingAssistant : Person, IStudent { public int StudentId { get; set; } public string CurrentClasses { get; set; } public string PastClasses { get; set; } } - The StudentHierarchy2 example program defines the revised hierarchy. It includes a
StudentImplementerclass that implementsIStudent. The following code shows the updatedStudentImplementerandTeachingAssistantclasses.// A class that implements IStudent. public class StudentImplementer : IStudent { public int StudentId { get; set; } public string CurrentClasses { get; set; } public string PastClasses { get; set; } } public class TeachingAssistant : Teacher, IStudent { // Delegate IStudent to a private Student object. private Student MyStudent = new Student(); public int StudentId { get { return MyStudent.StudentId; } set { MyStudent.StudentId = value; } } public string CurrentClasses { get { return MyStudent.CurrentClasses; } set { MyStudent.CurrentClasses = value; } } public string PastClasses { get { return MyStudent.PastClasses; } set { MyStudent.PastClasses = value; } } }This version has the disadvantage that it is much longer than the previous one. It has the advantage that all the classes that implement
IStudentshare the same code in theStudentImplementerclass because they delegate their properties to an object of that class. That means if you need to debug or modify that code, you can do it in one place. - You could do that but the
Studentclass inherits fromPerson. TheTeachingAssistantandResearchAssistantclasses also inherit fromPersonvia a different path through the tree. If you make those classes delegate toStudent, they essentially have thePersonclass in their ancestry twice. In this example, thePersonclass definesNameandAddressproperties, soTeachingAssistantandResearchAssistanthave two different ways to define those values. You could simply ignore one, but it would introduce a possible source of confusion and error.(Languages that allow multiple inheritance have methods for determining which inherited version of a multiply defined property to use.)
- The new
LabAssistantclass wouldn’t need to worry about theIStudentinterface. TheResearchAssistantclass already implements that interface, soLabAssistantwould inherit its implementation.
Chapter 12
The example programs that solve these exercises are fairly long, so their code isn’t shown here. Download them to see how they work.
- Figure A-7 shows this memory arrangement.
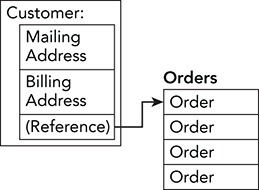
Figure A-7: The
Customerclass contains two embeddedAddressstructures and an array ofOrderstructures. - Figure A-8 shows this memory arrangement.
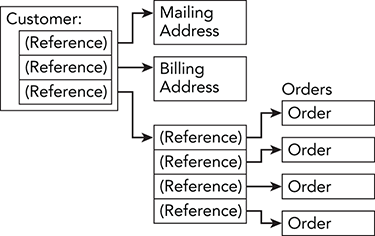
Figure A-8: The
Customerclass contains two references toAddressobjects and an array of references toOrderobjects. - Because
Customeris a class, there is little difference when passing either version of the class. When passing by value, the program sends the method a copy of theCustomerobject’s reference. When passing by reference, the program sends the method a reference to the original reference to theCustomerobject. In either case, the method receives only a reference, so the program doesn’t need to send much data to the method.If
Customerwere a structure passed by reference, the program would still need to pass only a reference into the method, so there would be little difference between the two structures.If
Customerwere a structure passed by value, the program would need to copy theCustomerinstance and send the copy to the method. The version ofCustomerused in Exercise 1 would require the program to copy twoAddressstructures and a reference to theOrdersarray. The version ofCustomerused in Exercise 2 would require the program to copy only references to the twoAddressobjects and a reference to theOrdersarray. If theAddressstructure or class is large, the version used by Exercise 2 would be more efficient because it would pass only references toAddressobjects instead of copyingAddressstructures entirely. (However, unless theAddressstructure or class is really large, the practical difference will be small. In that case, you should pick the design that makes the most logical sense instead of worrying about a tiny performance difference.) - If you “invoke” an event handler and no object is registered to receive it, the program throws a
System.NullReferenceException. - The BankAccount example program does this.
- The OverdraftAccount example program does this.
- The OnOverdrawn example program does this.
- The OverdraftAccount2 example program does this. When you run the modified program and try to reduce the account balance to a value less than –$100.00, the program does not display a message box, but it doesn’t update the balance either.
The program behaves this way because this version of the
OverdraftAccountclass hides theOverdrawnevent but overrides theBalanceproperty.The main program uses this code to create its account object.
private BankAccount Account = new OverdraftAccount();This code creates an
OverdraftAccountobject but saves it in aBankAccountvariable.Later, the program uses the following code to register to receive the
Overdrawnevent.Account.Overdrawn += Account_Overdrawn;Because the variable
Accounthas typeBankAccount, this registers the event handler to catch theBankAccountversion of theOverdrawnevent. (If theOverdraftAccountclass overrode the event instead of hid it, this statement would register the event handler to catch theOverdraftAccountversion of the event.)Finally, the
OverdraftAccountclass overrides theBalanceproperty. When the program tries to set the account’s balance to a value below –$100.00, thesetaccessor raises theOverdrawnevent and refuses to update the balance. But it raises theOverdraftAccountversion of the event and the main program registered to receive theBankAccountversion. Because no code registered to receive theOverdraftAccountversion of the event, the event handler doesn’t execute.(This example shows the difference between hiding and overriding an event.)
- The DelegatedCustomEvent example program does this.
- The CustomEvent example program does this.
- The StudentFactory example program does this.
Chapter 13
- First, you can use the following directive to define an alias for the
System.Security.Cryptographynamespace.using Crypto = System.Security.Cryptography;Then, you can refer to the class as
Crypto.SHA512Managed.Second, you can use the following directive.
using System.Security.Cryptography;Then, you can refer to the class as
SHA512Managed.The second solution is more concise but the first is more self-documenting because it tells you where the class is defined. That can be useful when the class has such a non-intuitive name.
- First, you could use the fully qualified namespaces for each of the classes. This would be explicit but verbose.
Second, you could include a
usingdirective such as the following to allow easy use of one of the namespaces.using System.Windows.Controls;Now you can use the
System.Windows.Controlsversion of the class without any namespace prefix. You would need to fully qualify theSystem.Globalizationversion of the class. This approach is more concise than the previous version but using theSystem.Windows.Controlsversion of the class with no namespace might be confusing because you would need to remember which namespace had ausingdirective.Third, you could use the following code to define aliases for both namespaces.
using Global = System.Globalization;
using Control = System.Windows.Controls;
Now you can use the abbreviations to refer to both classes. This is more concise than fully qualified namespaces but still reminds you of each class’s namespace.
The OrderTracker example program demonstrates the solutions to Exercises 3 through 8. Note that there may be more than one valid solution to each exercise.
- Code in the
Algorithmsnamespace could use the following code.public OrderClasses.Order order1; public CustomerTools.Fulfillment.Order order2; - Code in the
OrderToolsnamespace could use the following code.public CustomerTools.Fulfillment.Order order1; public OrderClasses.Order order2; - You could include the following
usingdirectives to define the aliases. (You could use different names for the aliases.)using Ord = OrderTracker.OrderTools.OrderClasses; using Ful = OrderTracker.CustomerTools.Fulfillment;Code in the
Algorithmsnamespace could then use the following code to define objects with those aliases.public Ord.Order order1; public Ful.Order order2; - You could define an alias for the
OrderTracker.CustomerTools.Fulfillmentclass as in Exercise 5. The code could use the otherOrderclass without any namespace or alias. The following code shows how theCustomerclass could define both kinds of objects.public Order order1; public Ful.Order order2; - The
Billingnamespace doesn’t define any classes with names that are used elsewhere in the hierarchy, so you can add the followingusingdirective.using OrderTracker.CustomerTools.Billing;Now all code can use the
Invoiceclass without including any namespace information. - The most obvious improvement would be to rename the classes so that there are no duplicate names. Perhaps you could change the name of the
Fulfillmentnamespace’sOrderclass toShipmentorPackingList(depending on the purpose of that class).A second improvement would be to flatten the namespace hierarchy. The hierarchy doesn’t actually help developers keep the code separate. You can do that just as easily by placing different pieces of code in separate modules.
Often namespace hierarchies arise because pieces of an application are implemented in different libraries. The libraries have different namespaces to protect them from name collisions with the other libraries. In this example, however, it’s unlikely that each namespace represents a separate library. For example, it’s unlikely that the
FulfillmentandBillingcode can work without theCustomerclass, so they probably weren’t developed as separate libraries.A final simplification might be to merge the two
Orderclasses into a single class. Whether that would be better than leaving them as two separate classes depends on how much they overlap. If they are practically the same class, then merging them would simplify the application. If they serve different purposes, then it may be better to keep them as separate classes.
Chapter 14
- The PalindromeChecker example program uses the following code to do this. The key code is highlighted in bold.
private void palindromeTextBox_TextChanged(object sender, EventArgs e)
{
    string text = palindromeTextBox.Text.ToLower().Replace(" ", "");
    string reverse = new string(text.Reverse().ToArray());
    if (text == reverse)
    {
        isAPalindromeLabel.Text = "is a palindrome";
        isAPalindromeLabel.ForeColor = Color.Green;
    }
    else
    {
        isAPalindromeLabel.Text = "is not a palindrome";
        isAPalindromeLabel.ForeColor = Color.Red;
    }
}
The highlighted code uses the
Reversemethod to reverse the string’s characters and get anIEnumerable<char>holding the string’s characters reversed. Next, it usesToArrayto convert theIEnumerable<char>into achar[]. It then passes thechar[]to thestringclass’s constructor to get a string holding the reverse of the original string.Finally, the program compares the original and reversed strings and updates its display to indicate whether they are the same.
- The BookLists example program uses the following code to create and initialize its dictionary of lists.
// The book data.
private Dictionary<string, List<string>> Books =
    new Dictionary<string, List<string>>()
    {
        {"Stephen King",
            new List<string>()
            {"Carrie", "The Shining", "The Stand"}
        },
        {"Tom Clancy",
            new List<string>()
            {"The Hunt for Red October", "Red Storm Rising", "Patriot Games"}
        },
        {"Agatha Christie",
            new List<string>()
            {"The Mysterious Affair at Styles", "The Thirteen Problems"}
        },
    };
The dictionary’s initialization code contains three key/value pairs. The keys are author names. The values are
List<string>objects initialized to hold book titles.When it loads, the program uses the following code to display the author names.
// Display the authors.
private void Form1_Load(object sender, EventArgs e)
{
    var authors =
        from entry in Books
        orderby entry.Key
        select entry.Key;
    authorListBox.DataSource = authors.ToArray();
}
This code uses LINQ to select the keys (author names). It converts the result into an array and displays the names by setting the author
ListBox’sDataSourceproperty.When the user clicks on an author, the following code displays that author’s book titles.
// Display the books by the selected author.
private void authorListBox_SelectedIndexChanged(object sender, EventArgs e)
{
    string author = authorListBox.SelectedItem.ToString();
    List<string> books = Books[author];
    booksListBox.DataSource = books;
}
This code gets the selected author’s name and then uses it to get the value for that author. The value is a
List<string>containing the author’s book titles. The program converts that into an array and displays the result in the bookListBox. - The BookNameValueCollection example program uses the following code to create and initialize its
NameValueCollection.// The book data. private NameValueCollection Books = new NameValueCollection { {"Stephen King", "Carrie,The Shining,The Stand"}, {"Tom Clancy", "The Hunt for Red October,Red Storm Rising,Patriot Games"}, {"Agatha Christie", "The Mysterious Affair at Styles,The Thirteen Problems"}, };The collection’s initialization code contains three name/value pairs. The keys are author names. Each of the values is a string holding an author’s book titles separated by commas.
When it loads, the program uses the following code to display the author names.
// Display the authors.
private void Form1_Load(object sender, EventArgs e)
{
    var authors =
        from name in Books.AllKeys
        orderby name
        select name;
    authorListBox.DataSource = authors.ToArray();
}
This code uses LINQ to select the
NameValueCollection’s keys (author names). It converts the result into an array and displays the names by setting the authorListBox’sDataSourceproperty.When the user clicks on an author, the following code displays that author’s book titles.
// Display the books by the selected author.
private void authorListBox_SelectedIndexChanged(object sender, EventArgs e)
{
    string author = authorListBox.SelectedItem.ToString();
    string value = Books[author];
    string[] books = value.Split(','),
    booksListBox.DataSource = books;
}
This code gets the selected author’s name and then uses it to get the value for that author. It uses the
Splitmethod to split the value string into an array of book titles and sets the booksListBox’sDataSourceproperty to the resulting array. - The CarList example program does this. Download the example to see how it works.
- The ReverseList example program uses the following code to create and reverse its list of characters.
private void Form1_Load(object sender, EventArgs e) { // Make the original list. List<char> original = new List<char>() { 'A', 'B', 'C', 'D', 'E' }; originalListTextBox.Text = new string(original.ToArray()); // LINQ. var linq = from char letter in original orderby letter descending select letter; linqTextBox.Text = new string(linq.ToArray()); // Reverse. List<char> reversed = new List<char>(original); reversed.Reverse(); reverseTextBox.Text = new string(reversed.ToArray()); // Stack. Stack<char> stack = new Stack<char>(); // Add the characters to the stack. foreach (char ch in original) stack.Push(ch); // Remove the characters from the stack. List<char> result = new List<char>(); while (stack.Count > 0) result.Add(stack.Pop()); // Display the result. stackTextBox.Text = new string(result.ToArray()); } - A method that returns a collection is similar to an iterator, and you can use a
foreachloop to enumerate the items returned by either.One difference is that a method returning a collection would need to generate all the items at once and add them to the collection before the
foreachloop started. In contrast, the iterator generates items only as they are needed by theforeachloop. That can save some work if the program doesn’t know how many items it must examine before it can stop.For example, suppose the program must loop through
Employeeobjects until it finds one that hasn’t used 40 hours of work yet this week. A method that returned a collection would have to build a collection containing everyEmployee. An iterator would only yieldEmployeeobjects until the program found one that worked. The program could then exit itsforeachloop. (Exercise 8 gives you a chance to try this.) - The ListPrimes example program does this. It uses the following
Primesiterator.// Enumerate prime numbers between startNumber and stopNumber. public IEnumerable Primes(int startNumber, int stopNumber) { // Define a lambda method that tests // primality of odd numbers at least 3. Func<int, bool> isPrime = x => { for (int i = 3; i * i <= x; i += 2) if (x % i == 0) return false; return true; }; // Return 2 if it is between startNumber and stopNumber. if ((2 >= startNumber) && (2 <= stopNumber)) yield return 2; // Make sure startNumber is positive and odd. if (startNumber < 3) startNumber = 3; if (startNumber % 2 == 0) startNumber++; // Loop through odd numbers in the range. for (int i = startNumber; i <= stopNumber; i += 2) { // If this number is prime, enumerate it. if (isPrime(i)) yield return i; } }The program uses the following code to display the primes.
// List primes between the two numbers. private void listPrimesButton_Click(object sender, EventArgs e) { int startNumber = int.Parse(startNumberTextBox.Text); int stopNumber = int.Parse(stopNumberTextBox.Text); primesListBox.Items.Clear(); foreach (int i in Primes(startNumber, stopNumber)) primesListBox.Items.Add(i); } - The ListAllPrimes example program does this. It uses the following
AllPrimesiterator.// Enumerate prime numbers indefinitely. public IEnumerable AllPrimes() { // Define a lambda method that tests // primality of odd numbers at least 3. Func<int, bool> isPrime = x => { for (int i = 3; i * i <= x; i += 2) if (x % i == 0) return false; return true; }; // Return 2. yield return 2; // Loop through odd numbers. for (int i = 3; ; i += 2) { // If this number is prime, enumerate it. if (isPrime(i)) yield return i; } }The main program uses the following code to list primes.
// List primes between the two numbers.
private void listPrimesButton_Click(object sender, EventArgs e)
{
    int stopNumber = int.Parse(stopNumberTextBox.Text);

    primesListBox.Items.Clear();
    foreach (int i in AllPrimes())
    {
        if (i > stopNumber) break;
        primesListBox.Items.Add(i);
    }
}
Chapter 15
- The PriorityQueue example program does this. The most interesting part of the program is the following
PriorityQueueclass.public class PriorityQueue<TKey, TValue> where TKey : IComparable<TKey> { // The list to hold the keys and values. List<KeyValuePair<TKey, TValue>> List = new List<KeyValuePair<TKey, TValue>>(); // Add an item to the queue. public void Enqueue(TKey key, TValue value) { List.Add(new KeyValuePair<TKey, TValue>(key, value)); } // Remove an item from the queue. public void Dequeue(out TKey key, out TValue value) { if (List.Count == 0) throw new InvalidOperationException("The PriorityQueue is empty"); // Find the item with the lowest valued key. int bestIndex = 0; TKey bestKey = List[0].Key; for (int index = 1; index < List.Count; index++) { // See if this key is less than the previous best key. TKey testKey = List[index].Key; if (testKey.CompareTo(bestKey) < 0) { // Save this key. bestIndex = index; bestKey = testKey; } } // Return the best pair. key = bestKey; value = List[bestIndex].Value; // Remove the pair we are returning. List.RemoveAt(bestIndex); } // Return the number of items in the list. public int Count { get { return List.Count; } } }The class’s declaration includes generic type parameters for the keys and values that the program will store. To find the key with the lowest value, the class must compare keys so the
TKeytype must implementIComparable<TKey>.The class uses a
List<KeyValuePair<TKey, TValue>>to hold the keys and values. TheEnqueuemethod simply adds a newKeyValuePairobject to the list.The
Dequeuemethod loops through the list to find the pair with the lowest key. It sets its return values and then removes that pair from the list.The
PriorityQueueclass’sCountproperty returns the number of items in the list. The example program uses that property to determine when the list is empty, so the Dequeue button should be disabled.Download the example to see other details.
- The IncreasingQueue example program does this. The following code shows the
IncreasingQueueclass.public class IncreasingQueue<T> where T : IComparable<T> { // The queue that holds the items. private Queue<T> Items = new Queue<T>(); // The previously added item. private T LastValue; // Constructor. public IncreasingQueue(T lowerBound) { LastValue = lowerBound; } // Enqueue. public void Enqueue(T value) { // If this isn't the first item, make sure // it's bigger than the previous value. if (value.CompareTo(LastValue) <= 0) throw new ArgumentOutOfRangeException("value", "New value was not larger than the previous value"); // Add the item. Items.Enqueue(value); // Save this value. LastValue = value; } // Dequeue. public T Dequeue() { return Items.Dequeue(); } // Return the number of items. public int Count { get { return Items.Count; } } }This class takes a single generic type parameter. Like the previous example, this program needs to compare items, so the type
Tmust implementIComparable<T>.The class starts by declaring a
Queue<T>to hold the queue’s items. It then declares variableLastValueto keep track of the last value added to the queue.The class’s constructor sets
LastValueto the lower bound it receives as a parameter.The
Enqueuemethod does the most interesting work. It compares the new value to the last value added to the queue and throws an exception if the new value is not larger. If the new value is okay, the method adds it to the queue and updatesLastValue.The rest of the class simply delegates the
Dequeuemethod and theCountproperty to its internal queue.Download the example to see other details.
- The following code shows one possible
BoundValuesmethod.public static class NumberMethods { // Make sure all values are between lowerBound and upperBound. public static void BoundValues<T>(T[] values, T lowerBound, T upperBound) where T : IComparable<T> { for (int i = 0; i < values.Length; i++) { if (values[i].CompareTo(lowerBound) < 0) values[i] = lowerBound; if (values[i].CompareTo(upperBound) > 0) values[i] = upperBound; } } }Notice that the
NumberMethodsclass isn’t generic but theBoundValuesmethod is. The method simply loops through the array setting any values that are out of bounds to the upper or lower bound. - The following code shows one possible
BoundValuesmethod.public static class NumberMethods { // Make sure all values are between lowerBound and upperBound. public static List<T> BoundValues<T>(IEnumerable<T> values, T lowerBound, T upperBound) where T : IComparable<T> { List<T> result = new List<T>(); foreach (T value in values) { if (value.CompareTo(lowerBound) < 0) result.Add(lowerBound); else if (value.CompareTo(upperBound) > 0) result.Add(upperBound); else result.Add(value); } return result; } }This code creates a
List<T>. Then for each item in theIEnumerable<T>, it adds one of the item, the lower bound, or the upper bound to the result list. After it finishes its loop, the method returns the list. - The following code shows one possible
MiddleValuemethod.public static class NumberMethods { public static T MiddleValue<T>(T value1, T value2, T value3) where T : IComparable<T> { T[] values = new T[] { value1, value2, value3 }; Array.Sort(values); return values[1]; } }This method saves the three values into an array, sorts the array, and returns the middle value.
- The following code shows one possible
CircularQueueclass.public class CircularQueue<T> { // A list to hold items. private List<T> List = new List<T>(); // The index of the current item. private int CurrentItem = -1; // Add an item to the queue. public void Enqueue(T value) { List.Add(value); } // Return the next item in the queue. public T NextItem() { if (List.Count == 0) throw new InvalidOperationException("The CircularQueue is empty"); // Move to the next item, wrapping around to 0 if necessary. CurrentItem = (CurrentItem + 1) % List.Count; // Return the item. return List[CurrentItem]; } } - The following code shows one possible
Bundleclass.public class Bundle<T> { List<T> List = new List<T>(); public void Add(T value) { List.Add(value); } public override string ToString() { string result = ""; foreach (T value in List) result += ";" + value.ToString(); if (result.Length > 0) result = result.Substring(1); return result; } } - The following code shows one possible revised
Bundleclass.public class Bundle<T> : List<T> { public override string ToString() { string result = ""; foreach (T value in this) result += ";" + value.ToString(); if (result.Length > 0) result = result.Substring(1); return result; } }
Chapter 16
- The PrintStars example program does this. The following code shows the program’s
BeginPrintevent handler.// The number of pages printed. private int NumPagesPrinted = 0; // Start at the first page. private void starsPrintDocument_BeginPrint(object sender, PrintEventArgs e) { NumPagesPrinted = 0; }This code declares the
NumPagesPrintedvariable to keep track of the number of pages that have been printed. TheBeginPrintevent handler simply sets that value to 0 before starting a new print job.The following code shows the program’s
PrintPageevent handler.// Draw stars on three pages. private void starsPrintDocument_PrintPage(object sender, PrintPageEventArgs e) { switch (++NumPagesPrinted) { case 1: DrawStar(5, e); break; case 2: DrawStar(7, e); break; case 3: DrawStar(9, e); break; } e.HasMorePages = (NumPagesPrinted < 3); }This code simply increments the page number and calls the following
DrawStarmethod, passing the number of points the star should have and thePrintPageEventArgsobject.// Draw a star with a given number of points. private void DrawStar(int numPoints, PrintPageEventArgs e) { // Find the center of the page. double cx = (e.MarginBounds.Left + e.MarginBounds.Right) / 2; double cy = (e.MarginBounds.Top + e.MarginBounds.Bottom) / 2; // Calculate the radius. double radius = e.MarginBounds.Width / 2; // Get the points. List<PointF> points = StarPoints(cx, cy, radius, numPoints); // Draw the star. e.Graphics.SmoothingMode = SmoothingMode.AntiAlias; using (Pen pen = new Pen(Color.Blue, 20)) { e.Graphics.DrawPolygon(pen, points.ToArray()); } }The
DrawStarmethod does all the interesting work. First, it calculates the center of the printed page and the radius it will use to find the points on the star. It uses one-half of the page’s width for that radius.Next, the code calls the
StarPointsmethod shown in the exercise’s statement to get the points that make up the star. It finishes by drawing a polygon that connects the points. - The PrintName example program does this. The following code shows the program’s
PrintPageevent handler.// Draw the name. private void namePrintDocument_PrintPage(object sender, PrintPageEventArgs e) { // Insert your name here. const string name = "Rod Stephens"; // Loop through bigger and bigger fonts until the name won't fit. int bestSize = 10; for (int fontSize = 10; ; fontSize++) { // Make a font if this size. using (Font font = new Font("Times New Roman", fontSize)) { // See if the name will fit. SizeF size = e.Graphics.MeasureString(name, font); if (size.Width > e.MarginBounds.Width) { // Use this size. bestSize = fontSize - 1; break; } } } // Print the name with the best font size. using (Font font = new Font("Times New Roman", bestSize)) { // Measure the text at this font size. SizeF size = e.Graphics.MeasureString(name, font); // Center the text. float x = e.MarginBounds.Left + (e.MarginBounds.Width - size.Width) / 2; float y = e.MarginBounds.Top + (e.MarginBounds.Height - size.Height) / 2; // Draw the name. e.Graphics.DrawString(name, font, Brushes.Green, x, y); } // We're done. e.HasMorePages = false; }This code starts with a font size of 10 points and loops through bigger and bigger font sizes. For each size, it uses
e.Graphics.MeasureStringto see how big the string will be when printed at that size. When it reaches a size that’s too big, the code saves the previous size (that last one that let the name fit) and breaks out of its loop.The code then makes a font with the best size and draws the name centered.
- The PrintPrimes example program does this. The following code shows the program’s
PrintPageevent handler.// Print primes. private void primesPrintDocument_PrintPage(object sender, PrintPageEventArgs e) { // Draw the margin bounds. e.Graphics.DrawRectangle(Pens.Red, e.MarginBounds); // Keep track of the next available X coordinate. float x = e.MarginBounds.Left; float y = e.MarginBounds.Top; // Make the font. using (Font font = new Font("Times New Roman", 12)) { // Measure a line's height. SizeF size = e.Graphics.MeasureString("M", font); // Print primes. foreach (int prime in AllPrimes()) { // Draw this prime. e.Graphics.DrawString(prime.ToString(), font, Brushes.Black, x, y); // Move to the next line. y += size.Height * 1.2f; // See if we're out of room. if (y + size.Height > e.MarginBounds.Bottom) break; } } // We're done. e.HasMorePages = false; }The event handler starts by drawing the margin bounds. It then sets the
xandyvariables to the coordinates of the margin bounds’ upper-left corner.The code makes a 12-point font. It measures the M character in the font to calculate line height.
The event handler then loops indefinitely through the values generated by the
AllPrimesiterator. See the solution to Chapter 14, “Collection Classes,” Exercise 8 for information about that iterator.For each prime, the program draws the prime and increases
yby the height of a line. It then checks to see if there is enough room to draw the next line of text. If the program has run out of room, it exits itsforeachloop and is done. - The WpfStars example program does this. Download the example to see the details.
- The WpfFixedStars example program does this. The following code shows the most interesting parts of the program.
// Create the FixedDocument's pages.
private void window_Loaded(object sender, RoutedEventArgs e)
{
    // Add the pages.
    starsFixedDocument.Pages.Add(MakePage(5));
    starsFixedDocument.Pages.Add(MakePage(7));
    starsFixedDocument.Pages.Add(MakePage(9));
}

// Make a PageContent object with a star on it.
private PageContent MakePage(int numPoints)
{
    // Build this hierarchy:
    //  PageContent
    //      FixedPage
    //          Grid
    //              Polygon
    PageContent pageContent = new PageContent();
    pageContent.Width = 850;
    pageContent.Height = 1100;

    FixedPage fixedPage = new FixedPage();
    fixedPage.Width = 850;
    fixedPage.Height = 1100;
    pageContent.Child = fixedPage;

    Grid grid = new Grid();
    fixedPage.Children.Add(grid);

    Polygon star = new Polygon();
    star.Stroke = Brushes.Blue;
    star.StrokeThickness = 20.0;
    star.Points = StarPoints(425, 550, 300, numPoints);
    grid.Children.Add(star);

    // Return the PageContent object.
    return pageContent;
}
At design time, I gave the XAML code a
FixedDocumentelement namedstarsFixedDocument. When the program’s window loads, thewindow_Loadedevent handler executes. It calls theMakePagemethod three times to generate three pages of content and adds those pages to thestarsFixedDocumentelement’sPagescollection.The
MakePagemethod creates aPageContentelement that contains aFixedPageelement. It sets the sizes of those elements to 850 by 1100 (8.5” by 11”).Next, the method adds a
Grid. It then adds aPolygonto theGrid. It uses theStarPointsmethod to generate the polygon’s points. This method is based on the code given as a hint for Exercise 1.Finally, the method returns the
PageContentobject that contains all the content. (Download the solution for additional details.)
Chapter 17
- Example program SystemEnvironment does this. The program uses the following code to display the values in a dictionary returned by a call to
GetEnvironmentVariables.// Display the values in this dictionary. private void ShowValues(ListBox lst, IDictionary values) { foreach (string key in values.Keys) lst.Items.Add(key + " = " + values[key].ToString()); }The program uses this method as in the following code, which adds the machine-level environment variables to the
valuesListBox.ShowValues(valuesListBox, System.Environment.GetEnvironmentVariables( EnvironmentVariableTarget.Machine)); - Example program VisualStudioVersion uses the following code to do this.
versionLabel.Text = "Visual Studio version " +
    System.Environment.GetEnvironmentVariable(
        "VisualStudioVersion");
This is a process-level variable defined by Visual Studio when it starts. It is inherited by the executing program because Visual Studio starts that program. If you run the program outside of Visual Studio, the variable hasn’t been defined, so the program cannot display the version.
- Example program ShowPaths uses the following code to do this.
// Display the paths in the Path variable. private void Form1_Load(object sender, EventArgs e) { string paths = System.Environment.GetEnvironmentVariable("PATH"); pathsListBox.DataSource = paths.Split(new char[] { ';' }); } - Example program SaveControlValues does this. It uses the
RegistryToolsclass andSetValueandGetValuemethods similar to those described in the chapter. The following code shows how the program saves and restoresTextBoxandComboBoxvalues.// Load TextBox and ComboBox values. private void Form1_Load(object sender, EventArgs e) { foreach (Control ctl in Controls) { if (ctl is TextBox) ctl.Text = GetValue(ctl.Name, ctl.Text); else if (ctl is ComboBox) ctl.Text = GetValue(ctl.Name, ctl.Text); } } // Save TextBox and ComboBox values. private void Form1_FormClosing(object sender, FormClosingEventArgs e) { foreach (Control ctl in Controls) { if (ctl is TextBox) SetValue(ctl.Name, ctl.Text); else if (ctl is ComboBox) SetValue(ctl.Name, ctl.Text); } } - Example program ConfigLabel uses the following code to make its label use the font specified in the config file.
private void Form1_Load(object sender, EventArgs e)
{
    greetingsLabel.Font = Properties.Settings.Default.GreetingFont;
}
(Alternatively, you could bind the label’s font to the dynamic setting. Then you wouldn’t need to use code to set it at run time.)
If you modify the config file and run the compiled executable, you see the new font. In fact, if you run the program from Visual Studio, you still see the new font because the modified config file is in the same directory as the executable being run by Visual Studio.
If you delete the config file and run the compiled executable, you get the original font back. Next, if you run the program from Visual Studio, you get the original font and Visual Studio replaces the original config file.
- Example program LocalizedStrings uses the following code to do this.
public Form1()
{
    // Set the culture and UI culture to French.
    Thread.CurrentThread.CurrentCulture = new CultureInfo("fr-FR");
    Thread.CurrentThread.CurrentUICulture = new CultureInfo("fr-FR");

    InitializeComponent();
}

// Display a greeting.
private void Form1_Load(object sender, EventArgs e)
{
    MessageBox.Show(MyStrings.Greeting);
}
When the program loads the fr-FR locale, it displays the message Salut. Visual Studio creates a subdirectory named fr and puts the localized resource file LocalizedStrings.resources.dll in it.
- Example program ShowCurrency uses the following code to do this.
private void Form1_Load(object sender, EventArgs e)
{
    DateTime date = DateTime.Now;
    decimal amount = 12345.67m;
    string[] cultures =
        { "fr-FR", "de-DE", "de-CH", "es-MX", "es-ES", "en-US", "en-GB" };

    foreach (string culture in cultures)
    {
        Thread.CurrentThread.CurrentCulture = new CultureInfo(culture);
        resultsListBox.Items.Add(culture + "	" +
            date.ToShortDateString() + "	" +
            amount.ToString("C"));
    }
}
The following text shows sample results.
fr-FR    21/04/2014    12 345,67 €
de-DE    21.04.2014    12.345,67 €
de-CH    21.04.2014    Fr. 12'345.67
es-MX    21/04/2014    $12,345.67
es-ES    21/04/2014    12.345,67 €
en-US    4/21/2014     $12,345.67
en-GB    21/04/2014    £12,345.67
Chapter 18
- The WriteIntoMemoryStream example program contains the following commented out code to do this.
// Create the stream.
using (MemoryStream stream = new MemoryStream())
{
    // Write into the stream.
    using (BinaryWriter writer = new BinaryWriter(stream))
    {
        writer.Write(textTextBox.Text);

        // Read from the stream.
        stream.Seek(0, SeekOrigin.Begin);
        using (BinaryReader reader = new BinaryReader(stream))
        {
            MessageBox.Show(reader.ReadString());
        }
    }
}
Which version seems easier to read is a matter of personal preference. The way the parentheses nest the
BinaryReaderinside theBinaryWriter’susingstatement seems odd to me, but you should use whichever technique seems most natural to you. - If you don’t free a stream attached to a file, the file may remain locked until the program ends. While it is locked, you may be unable to read, edit, or delete the file.
In contrast, if you don’t free a memory stream, the stream’s memory remains allocated until the program ends.
A locked file can affect other programs and can be annoying if you try to read or delete the file with Windows Explorer. Locked memory doesn’t actually affect other programs, so in some sense failing to free a file stream is worse than failing to free a memory stream. (Both are sloppy programming, however.)
- The LoadAndSaveFile example program uses the following code to do this.
// Load the file, if it exists. private void Form1_Load(object sender, EventArgs e) { // See if the file exists. if (File.Exists("Notes.txt")) { // Read the file. using (StreamReader reader = new StreamReader("Notes.txt")) { notesTextBox.Text = reader.ReadToEnd(); } } } // Save the file. private void Form1_FormClosing(object sender, FormClosingEventArgs e) { using (StreamWriter writer = File.CreateText("Notes.txt")) { writer.Write(notesTextBox.Text); } } - The
WriteLinemethod adds a new line after the text it is writing into the file. When the program starts, it reads that new line as part of the text it displays in theTextBox. If the program usesWriteLineto save the text, it will write the original new line plus another one into the file. The result is the program adds another new line every time it starts and stops. (Try it and see.)You can avoid that by using the
Writemethod instead ofWriteLine. - The LoadAndSaveFileWithPrompt example program uses the following
Form_Closingevent handler to prompt the user if the text file exists.// Save the file. private void Form1_FormClosing(object sender, FormClosingEventArgs e) { // See if the file exists. if (File.Exists("Notes.txt")) { // Prompt the user. DialogResult result = MessageBox.Show("The file exists. Do you want to overwrite it?", "Overwrite?", MessageBoxButtons.YesNoCancel, MessageBoxIcon.Question); // If the user clicked No, exit without saving. if (result == DialogResult.No) return; // If the user clicked Cancel, cancel. if (result == DialogResult.Cancel) { e.Cancel = true; return; } // If the user clicked Yes, continue to overwrite the file. } // Save the text. using (StreamWriter writer = File.CreateText("Notes.txt")) { writer.Write(notesTextBox.Text); } } - The IsFileSorted example program uses the following
FileIsSortedmethod to determine whether a file’s contents are sorted.// Return true if the file's lines are sorted. // This method throws an exception if the file doesn't exist. private bool FileIsSorted(string filename) { // Open the file. using (StreamReader reader = new StreamReader(filename)) { // Start with a line <= any string. string previousLine = ""; // Read the lines. while (!reader.EndOfStream) { string nextLine = reader.ReadLine(); if (nextLine.CompareTo(previousLine) < 0) return false; previousLine = nextLine; } } // If we get here, the file is sorted. return true; } - The StreamPrimes example program uses the following code to display primes and write them in the text file. The modified code is highlighted in bold.
// List primes between the two numbers.
private void listPrimesButton_Click(object sender, EventArgs e)
{
    int stopNumber = int.Parse(stopNumberTextBox.Text);

    primesListBox.Items.Clear();
    using (StreamWriter writer = new StreamWriter("Primes.txt"))
    {
        foreach (int i in AllPrimes())
        {
            if (i > stopNumber) break;
            primesListBox.Items.Add(i);
            writer.Write(i.ToString() + " ");
        }
    }
}
The code that defines the
AllPrimesiterator is the same as in the earlier program, so it isn’t shown here. See the solution to Exercise 14-8 for that code. - The StreamPrimesBinary example program uses the following code to display primes and write them in the data file.
// List primes between the two numbers.
private void listPrimesButton_Click(object sender, EventArgs e)
{
    int stopNumber = int.Parse(stopNumberTextBox.Text);

    primesListBox.Items.Clear();

    // Generate and list the primes.
    foreach (int i in AllPrimes())
    {
        if (i > stopNumber) break;
        primesListBox.Items.Add(i);
    }

    // Create a file stream.
    using (FileStream stream = new FileStream("Primes.dat", FileMode.Create))
    {
        // Create an associated BinaryWriter.
        using (BinaryWriter writer = new BinaryWriter(stream))
        {
            // Save the number of primes.
            writer.Write(primesListBox.Items.Count);

            // Save the primes.
            for (int i = 0; i < primesListBox.Items.Count; i++)
            {
                writer.Write((int)primesListBox.Items[i]);
            }
        }
    }
}
This version is different in two main ways. First, it uses a
BinaryWriterinstead of aStreamWriter. Because it uses aBinaryWriter, it needs to create a file stream first for theBinaryWriterto manipulate.The second main difference is that it enumerates the primes before it starts writing the file. Because it needs to save the number of primes at the beginning of the file, it needs to have generated the primes before it writes the file so it knows how many there are.
The following code shows how the program loads the saved primes when the program starts.
// Load the saved primes.
private void Form1_Load(object sender, EventArgs e)
{
    if (File.Exists("Primes.dat"))
    {
        // Create a file stream.
        using (FileStream stream = new FileStream("Primes.dat", FileMode.Open))
        {
            // Create an associated BinaryReader.
            using (BinaryReader reader = new BinaryReader(stream))
            {
                // Get the number of primes.
                int numPrimes = reader.ReadInt32();

                // Read the primes.
                for (int i = 0; i < numPrimes; i++)
                {
                    primesListBox.Items.Add(reader.ReadInt32());
                }
            }
        }
    }
}
If the file exists, the program creates a
FileStreamand an associatedBinaryReader. The reader first reads the number of primes the file holds and then reads that many primes.
Chapter 19
- The GetDirectoryTimes example program uses the following code to display a directory’s times.
private void getTimesButton_Click(object sender, EventArgs e) { string dirname = directoryTextBox.Text; creationTimeTextBox.Text = Directory.GetCreationTime(dirname).ToString(); accessTimeTextBox.Text = Directory.GetLastAccessTime(dirname).ToString(); writeTimeTextBox.Text = Directory.GetLastWriteTime(dirname).ToString(); } - The GetSetFileTimes example program does this. The code that gets the file’s times is similar to the code shown for the solution to Exercise 19-1 except it works with a file instead of a directory. The following code shows how the program sets the file’s times.
private void setTimesButton_Click(object sender, EventArgs e) { string filename = fileTextBox.Text; Directory.SetCreationTime(filename, DateTime.Parse(creationTimeTextBox.Text)); Directory.SetLastAccessTime(filename, DateTime.Parse(accessTimeTextBox.Text)); Directory.SetLastWriteTime(filename, DateTime.Parse(writeTimeTextBox.Text)); MessageBox.Show("Done"); } - The GetSetFileAttributes example program does this. The following code shows how the program gets a file’s attributes. The program gets all of the attributes in the same way, so only a few are shown here.
private void getAttributesButton_Click(object sender, EventArgs e)
{
    string filename = fileTextBox.Text;
    FileAttributes attributes = File.GetAttributes(filename);

    archiveCheckBox.Checked =
        (int)(attributes & FileAttributes.Archive) != 0;
    compressedCheckBox.Checked =
        (int)(attributes & FileAttributes.Compressed) != 0;
    deviceCheckBox.Checked =
        (int)(attributes & FileAttributes.Device) != 0;
    ...
}
The following code shows how the program sets a file’s attributes. The program sets all of the attributes in the same way, so only a few are shown here.
private void setAttributesButton_Click(object sender, EventArgs e)
{
    string filename = fileTextBox.Text;
    FileAttributes attributes = 0;

    if (archiveCheckBox.Checked) attributes |= FileAttributes.Archive;
    if (compressedCheckBox.Checked) attributes |= FileAttributes.Compressed;
    if (deviceCheckBox.Checked) attributes |= FileAttributes.Device;
    ...

    File.SetAttributes(filename, attributes);
    MessageBox.Show("Done");
}
Note that the filesystem won’t allow certain combinations of attributes. For example, the
Normalattribute means the file has no other associated attributes. If the program tries to set conflicting attributes, theSetAttributesmethod silently fixes them.Also the program cannot set some attributes. For example, setting the
Compressedattribute does not magically compress a file and setting theDirectoryattribute cannot turn a file into a directory. If the program tries to set one of these attributes, theSetAttributesmethod silently ignores them. - The LoadAndSaveFile2 example program uses the following code to do this.
// Load the saved file.
private void Form1_Load(object sender, EventArgs e)
{
    if (File.Exists("Notes.txt"))
        notesTextBox.Text = File.ReadAllText("Notes.txt");
}

// Save the text.
private void Form1_FormClosing(object sender, FormClosingEventArgs e)
{
    File.WriteAllText("Notes.txt", notesTextBox.Text);
}
This is much simpler than the solution to Exercise 18-3, which uses file streams to read and write the notes file. (Unless you noticed the
Fileclass’sReadAllTextandWriteAllTextmethods while you were working on Exercise 18-3. In that case, well done! But you might want to repeat the exercise using streams just to see what they’re like.) - The SortFileLines example program uses the following code to do this.
private void sortFileButton_Click(object sender, EventArgs e) { string filename = fileTextBox.Text; string[] lines = File.ReadAllLines(filename); Array.Sort(lines); File.WriteAllLines(filename, lines); // Display the result. resultTextBox.Text = File.ReadAllText(filename); } - The ListDriveProperties example program uses the following code to do this.
private void Form1_Load(object sender, EventArgs e) { string results = ""; foreach (DriveInfo info in DriveInfo.GetDrives()) { results += info.Name + " DriveType: " + info.DriveType.ToString() + " IsReady: " + info.IsReady.ToString() + " RootDirectory: " + info.RootDirectory.ToString() + " "; if (info.IsReady) { results += " AvailableFreeSpace: " + info.AvailableFreeSpace.ToString() + " DriveFormat: " + info.DriveFormat.ToString() + " TotalFreeSpace: " + info.TotalFreeSpace.ToString() + " TotalSize: " + info.TotalSize.ToString() + " VolumeLabel: " + info.VolumeLabel + " "; } resultsTextBox.Text = results; } } - The ListDrivePropertiesWithSizes example program does this. This version of the program uses the following
ToFileSizemethod to format a file size.public static string ToFileSize(long value) { string[] suffixes = { "bytes", "KB", "MB", "GB", "TB", "PB", "EB", "ZB", "YB" }; for (int i = 0; i < suffixes.Length; i++) { if (value <= (Math.Pow(1024, i + 1))) { return ThreeNonZeroDigits(value / Math.Pow(1024, i)) + " " + suffixes[i]; } } return ThreeNonZeroDigits(value / Math.Pow(1024, suffixes.Length - 1)) + " " + suffixes[suffixes.Length - 1]; }This code finds the first power
iwhere value ≤ 1024i+1. It then divides the value by 1024i and returns the value’s first three digits with the appropriate suffix: KB, GB, and so forth.For example, suppose the value is 10,000,000. Then 10243 = 1,073,741,824 is greater than 10,000,000, so the code divides 10,000,000 by 10242 = 1,048,576 and gets 9.54. The method returns 9.54 MB.
The following code shows the
ThreeNonZeroDigitsmethod, which returns a value’s first three digits.private static string ThreeNonZeroDigits(double value) { if (value >= 100) { // No digits after the decimal. return value.ToString("0,0"); } else if (value >= 10) { // One digit after the decimal. return value.ToString("0.0"); } else { // Two digits after the decimal. return value.ToString("0.00"); } }If the value is at least 100, then it has three digits before the decimal point. In that case the method simply returns the value with any digits after the decimal point removed.
If the value is less than 100 but at least 10, the method returns the value formatted with one digit after the decimal point.
If the value is less than 10, the method returns the value formatted with two digits after the decimal point.
- The ShowGrandparent example program uses the following code to do this.
private void Form1_Load(object sender, EventArgs e)
{
    grandparentTextBox.Text = Path.GetFullPath(
        Path.Combine(Application.StartupPath, "..\.."));
}
If you run the program near the top of the directory hierarchy, the result is simply the top of the hierarchy. For example, if you run the program in the directory
C:, the program displaysC:. - The FindFiles example program uses the following code to do this.
private void searchButton_Click(object sender, EventArgs e) { filesListBox.Items.Clear(); foreach (string filename in Directory.GetFiles( directoryTextBox.Text, patternTextBox.Text, SearchOption.AllDirectories)) { filesListBox.Items.Add(filename); } } - The FindFilesAndSizes example program uses the following code to do this.
private void searchButton_Click(object sender, EventArgs e) { string results = ""; foreach (string filename in Directory.GetFiles( directoryTextBox.Text, patternTextBox.Text, SearchOption.AllDirectories)) { FileInfo info = new FileInfo(filename); results += info.Name + " "; results += " " + ToFileSize(info.Length) + " "; } filesTextBox.Text = results; } - The WatchForChanges example program uses the following event handlers to display information about directory changes in the
resultsTextBox.private void myFileSystemWatcher_Changed(object sender, FileSystemEventArgs e) { resultsTextBox.AppendText( DateTime.Now.ToShortDateString() + ": Changed " + e.Name + " "); } private void myFileSystemWatcher_Created(object sender, FileSystemEventArgs e) { resultsTextBox.AppendText( DateTime.Now.ToShortDateString() + ": Created " + e.Name + " "); } private void myFileSystemWatcher_Deleted(object sender, FileSystemEventArgs e) { resultsTextBox.AppendText( DateTime.Now.ToShortDateString() + ": Deleted " + e.Name + " "); } private void myFileSystemWatcher_Renamed(object sender, RenamedEventArgs e) { resultsTextBox.AppendText( DateTime.Now.ToShortDateString() + ": Renamed " + e.Name + " "); } - The MoveToRecycleBin example program uses the following code to move a file into the recycle bin.
// Move the file into the recycle bin.
private void recycleButton_Click(object sender, EventArgs e)
{
    FileSystem.DeleteFile(fileTextBox.Text,
        UIOption.OnlyErrorDialogs,
        RecycleOption.SendToRecycleBin);
    MessageBox.Show("Done");
}
Chapter 20
- The DownloadFile example program uses the following code to do this.
try { using (WebClient client = new WebClient()) { client.DownloadFile(urlTextBox.Text, fileTextBox.Text); } MessageBox.Show("Done"); } catch (Exception ex) { MessageBox.Show(ex.Message); } - The DownloadString example program uses the following code to do this.
try { using (WebClient client = new WebClient()) { webBrowser1.Document.Body.InnerHtml = client.DownloadString(urlTextBox.Text); } } catch (Exception ex) { MessageBox.Show(ex.Message); } - The DownloadStringTaskAsync example program does this. The main change is to the Download button’s
Clickevent handler shown in the following code. Notice theasyncandawaitkeywords highlighted in bold.// Start downloading. async private void downloadButton_Click(object sender, EventArgs e) { // Get ready to give feedback. webBrowser1.Navigate("about:blank"); downloadProgressBar.Value = 0; downloadStatusLabel.Text = "0%"; downloadButton.Enabled = false; cancelButton.Enabled = true; Cursor = Cursors.WaitCursor; // Make a Uri. Uri uri = new Uri(urlTextBox.Text); // Start the download. Client = new WebClient(); Client.DownloadProgressChanged += Client_DownloadProgressChanged; try { // Start the download. string result = await Client.DownloadStringTaskAsync(uri); // Display the result in the WebBrowser. webBrowser1.Document.Body.InnerHtml = result; } catch (WebException ex) { if (ex.Status == WebExceptionStatus.RequestCanceled) MessageBox.Show("Canceled"); else MessageBox.Show(ex.Message); } catch (Exception ex) { MessageBox.Show(ex.Message); } Client.Dispose(); // Remove the feedback. downloadProgressBar.Value = 0; downloadStatusLabel.Text = ""; downloadButton.Enabled = true; cancelButton.Enabled = false; Cursor = Cursors.Default; }The code is the same as the previous version up to the point where the program calls
DownloadStringTaskAsync. In the DownloadStringAsync program, theDownloadStringCompletedevent handler performs error handling. This program doesn’t have aDownloadStringCompletedevent handler so error handling must occur here. (Even if you do use aDownloadStringCompletedevent handler, the code that callsDownloadStringTaskAsyncmust perform error handling.)If the call to
DownloadStringTaskAsyncthrows aWebException, the code determines whether the request was canceled and displays an appropriate message if it was. If any other exception occurred, the code displays its message text.After the
try-catchblock, the code performs the tasks that were in the previous program’sDownloadStringCompletedevent handler. - Removing the
DownloadStringCompletedevent handler is nice but the program still needs to declare itsWebClientobject at the module level so that the Cancel button’sClickevent handler can use it. The code also has a separateDownloadProgressChangedevent handler. That means the code managing the download is still split into several pieces and the program cannot dispose of theWebClientwith ausingstatement.If you don’t provide download progress and you don’t allow the user to cancel the download, then only the Download button’s
Clickevent handler needs to use theWebClient. That means you can declare and create theWebClientin that event handler inside ausingstatement. You also don’t need any event handlers. The code is much simpler but it is also less powerful because it doesn’t provide progress reports or allow canceling. - The DownloadStream example program uses the following code to do this.
using (WebClient client = new WebClient()) { using (Stream stream = client.OpenRead(urlTextBox.Text)) { // Use the stream to create a Bitmap. Bitmap bitmap = new Bitmap(stream); // Display the result. imagePictureBox.Image = bitmap; } } - The DownloadStreamAsync example program uses the following code to do this.
// The WebClient. private WebClient Client; // Download the image file. private void downloadButton_Click(object sender, EventArgs e) { imagePictureBox.Image = null; // Request the data stream. Uri uri = new Uri(urlTextBox.Text); Client = new WebClient(); Client.OpenReadCompleted += Client_OpenReadCompleted; Client.OpenReadAsync(uri); } // Cancel the request. private void cancelButton_Click(object sender, EventArgs e) { Client.CancelAsync(); } // Process the stream. private void Client_OpenReadCompleted(object sender, OpenReadCompletedEventArgs e) { // See what the result was. if (e.Error != null) { MessageBox.Show(e.Error.Message); } else if (e.Cancelled) { MessageBox.Show("Canceled"); } else { // Get the data from the stream. // (You must close the stream when finished.) using (Stream stream = e.Result) { // Use the stream to create a Bitmap. Bitmap bitmap = new Bitmap(stream); // Display the result. imagePictureBox.Image = bitmap; } } // Make the form big enough. Size size = new Size( Math.Max(imagePictureBox.Right + 12, ClientSize.Width), Math.Max(imagePictureBox.Bottom + 12, ClientSize.Height)); ClientSize = size; } - The DownloadData example program uses the following code to do this.
using (WebClient client = new WebClient()) { byte[] bytes = client.DownloadData(urlTextBox.Text); // Make a stream associated with the bytes. using (MemoryStream stream = new MemoryStream(bytes)) { // Make a bitmap from the stream. Bitmap bitmap = new Bitmap(stream); // Display the result. imagePictureBox.Image = bitmap; } } - The WebRequestDownloadData example program uses the following code to do this.
try { // Make the WebRequest. WebRequest request = WebRequest.Create(urlTextBox.Text); // Use the Get method to download the file. request.Method = WebRequestMethods.Http.Get; // Get the response. WebResponse response = request.GetResponse(); // Get the image from the response stream. // (You must close the stream when finished.) using (Stream stream = response.GetResponseStream()) { Bitmap bitmap = new Bitmap(stream); // Display the result. imagePictureBox.Image = bitmap; } } catch (Exception ex) { MessageBox.Show(ex.Message); } - The UploadFile example program uses the following code to do this.
try { WebClient client = new WebClient(); client.Credentials = new NetworkCredential( usernameTextBox.Text, passwordTextBox.Text); client.UploadFile(urlTextBox.Text, fileTextBox.Text); MessageBox.Show("Done"); } catch (Exception ex) { MessageBox.Show(ex.Message); } - The UploadString example program uses the following code to do this.
try { WebClient client = new WebClient(); client.Credentials = new NetworkCredential( usernameTextBox.Text, passwordTextBox.Text); client.UploadString(urlTextBox.Text, stringTextBox.Text); MessageBox.Show("Done"); } catch (Exception ex) { MessageBox.Show(ex.Message); } - The WebRequestUploadFile example program uses the following code to upload a
bytearray.// Upload an array of bytes into a file. private void UploadBytesIntoFile(byte[] bytes, string url, string username, string password) { // Make the WebRequest. WebRequest request = WebRequest.Create(url); // Use the UploadFile method. request.Method = WebRequestMethods.Ftp.UploadFile; // Set network credentials. request.Credentials = new NetworkCredential(username, password); // Write the bytes into the request stream. using (Stream stream = request.GetRequestStream()) { stream.Write(bytes, 0, bytes.Length); } }The program then uses the following method to upload files.
// Upload a file.
private void UploadFile(string filename, string url, string username,
    string password)
{
    // Read the file's contents into a byte array.
    byte[] bytes = File.ReadAllBytes(filename);

    // Upload the bytes into a file.
    UploadBytesIntoFile(bytes, url, username, password);
}
This method uses
File.ReadAllBytesto read the file’s contents into abytearray. It then callsUploadBytesIntoFileto upload the array. - The WebRequestUploadString example program uses the same
UploadBytesIntoFilemethod used by the solution to Exercise 11. The followingUploadStringmethod usesUploadBytesIntoFileto upload a string.// Upload a string into a file. private void UploadString(string text, string url, string username, string password) { // Convert the text into a byte array. byte[] bytes = Encoding.UTF8.GetBytes(text); // Write the bytes into the file. UploadBytesIntoFile(bytes, url, username, password); }This code uses
Encoding.UTF8.GetBytesto convert the string into abytearray. It then callsUploadBytesIntoFileto upload the array. - The FtpListDirectory example program uses the following
FtpGetShortDirectoryListingmethod to get a directory listing.// Use FTP to get a directory's file list. private List<string> FtpGetShortDirectoryList(string url, string username, string password) { // Make the FtpWebRequest. WebRequest request = WebRequest.Create(url); request.Method = WebRequestMethods.Ftp.ListDirectory; // Set network credentials. request.Credentials = new NetworkCredential(username, password); using (WebResponse response = request.GetResponse()) { using (StreamReader streamReader = new StreamReader(response.GetResponseStream())) { // Read the response's lines. List<string> files = new List<string>(); while (!streamReader.EndOfStream) { files.Add(streamReader.ReadLine()); } return files; } } }This method creates the
WebRequest, sets itsMethodandCredentialsproperties, callsGetResponse, and callsGetResponseStreamas usual. Each line of text in the response stream gives information about one file.The main program calls
FtpGetShortDirectoryListand displays the files’ information in aListBox. - The FtpListDirectoryDetail example program does this. The only difference between this version and the solution to Exercise 13 is the following statement that sets the
WebRequestobject’sMethodproperty.request.Method = WebRequestMethods.Ftp.ListDirectoryDetails; - The FtpListDirectoryBySize example program lists files ordered by file size. It assumes the directory listing has a format similar to the one returned for the directory ftp://nssdcftp.gsfc.nasa.gov/photo_gallery/hi-res/astro.
The program stores information about the files in instances of the following
FileDataclass.// A class to hold file size information. private class FileData : IComparable<FileData> { public string Info; public long Length; public FileData(string info) { Info = info; string lengthString = info.Split(new char[] { ' ' }, StringSplitOptions.RemoveEmptyEntries)[4]; Length = long.Parse(lengthString); } public override string ToString() { return Info; } // Compare to another FileData. public int CompareTo(FileData other) { return Length.CompareTo(other.Length); } }The class provides an initializing constructor to make creating new instance easier. The program displays
FileDataobjects in aListBox, so it overrides the class’sToStringmethod so theListBoxcan display the files’ data.The class implements the
IComparable<FileData>interface so the program can sortFileDataobjects.To get the directory listing, this program uses a method similar to the one used by the solution to Exercise 14. The difference is the new version returns a list of
FileDataobjects representing the files instead of a list ofstrings.The following code shows how the program invokes that method, sorts the result, and displays the sorted
FileDataobjects in itsListBox.try { // Get the directory's file data. FileData[] files = FtpGetDetailedDirectoryList( urlTextBox.Text, usernameTextBox.Text, passwordTextBox.Text).ToArray(); // Sort the data. Array.Sort(files); // Display the result. filesListBox.DataSource = files; } catch (Exception ex) { MessageBox.Show(ex.Message); } - The SendEmailWithCc example program does this. The main difference between this program and the SendEmail example program is that this program uses the following code to add the CC e-mail name address to the
MailMessage.// Add the CC address. if ((ccEmail.Length > 0) && (ccName.Length > 0)) message.CC.Add(new MailAddress(ccEmail, ccName)); - The SendEmailWithBcc example program does this. The main difference between this program and the solution to Exercise 16 is that this program uses the following code to add the BCC e-mail addresses to the
MailMessage.// Add the BCC addresses. if (bccEmails.Length > 0) message.Bcc.Add(bccEmails);Here the string
bccEmailsis a comma-delimited list of e-mail addresses. - The SendSms example program does this. The code to send the SMS e-mail is included in the SendEmail example program, so it isn’t repeated here. Download the SendSms program to see the details.
Chapter 21
- The CompressSpaces example program uses the following code to do this.
// Replace multiple whitespace with single spaces.
private void FixString()
{
    string text = inputTextBox.Text;

    // Remove initial and trailing whitespace.
    text = Regex.Replace(text, @"^s*", "");
    text = Regex.Replace(text, @"s*$", "");

    // Replace multiple whitespace with single spaces.
    text = Regex.Replace(text, @"s+", " ");
    // Display the result.
    resultTextBox.Text = "[" + text + "]";
}
The code uses the
Regexclass’sReplacemethod three times. First, it matches any number of whitespace characters at the beginning of the string and replaces them with an empty string. It then does the same for whitespace characters at the end of the string.Next, the code searches for one or more occurrences of whitespace anywhere in the string and replaces those with a single space. It then displays the result.
- The ListWords example program uses the following code to do this.
// List the words.
private void listWordsButton_Click(object sender, EventArgs e)
{
    string text = inputTextBox.Text;

    // Remove apostrophes. (They don't separate words.)
    text = text.Replace("'", "");

    // Split using groups of non-word characters as delimiters.
    string[] words = Regex.Split(text, @"W+");

    // Display the words.
    wordsListBox.DataSource = words;
}
The code first removes apostrophes because they don’t represent the beginning of a new word. It uses
Regex.Splitto split the string into pieces delimited by strings of one or more nonword characters and displays the result in itsListBox. - The ListMatches example program uses the following code to do this.
// Display matches in the ListBox.
private void FindMatches()
{
    matchesListBox.Items.Clear();
    try
    {
        // Make the regex object.
        Regex regex = new Regex(patternTextBox.Text);

        // Find the matches.
        foreach (Match match in regex.Matches(inputTextBox.Text))
        {
            // Display the matches.
            matchesListBox.Items.Add(match.Value);
        }
    }
    catch (Exception ex)
    {
        matchesListBox.Items.Add(ex.Message);
    }
}
This code calls the
Regexobject’sMatchesmethod and loops through the result, adding each match to theListBox.The reason it produces more than just three strings is the regular expression
w*matches zero or more occurrences of word characters. For example, the spot between two semicolons matches the expression because it contains zero or more word characters.You can fix this by changing the regular expression to
w+so that it matches one or more word characters. - The following text shows a regular expression that allows the program to parse phone numbers with or without area codes. The bold characters show the changes that make the area code optional.
^((?<NPA>[2-9][0-8]d)-)?(?<NXX>[2-9][0-9]{2})-(?<XXXX>d{4})$If a phone number is missing an area code, the program simply leaves the NPA value blank.
- The ParsePhoneNumbers example program uses the following code to do this. The code that gives the
Regexobject theMultilineoption is highlighted in bold.// Find matching groups. private void parseButton_Click(object sender, EventArgs e) { groupsListBox.Items.Clear(); Regex regex = new Regex(patternTextBox.Text, RegexOptions.Multiline); foreach (Match match in regex.Matches(inputTextBox.Text)) { groupsListBox.Items.Add( "NPA: " + match.Groups["NPA"] + ", NXX: " + match.Groups["NXX"] + ", XXXX: " + match.Groups["XXXX"]); } }The following text shows a regular expression that works for this example. The code that removes the trailing [Return] character on each line is highlighted in bold.
^(?<NPA>[2-9][0-8]d)-(?<NXX>[2-9][0-9]{2})-(?<XXXX>d{4})s*$ - The following text shows a regular expression that matches this kind of integer.
^[-+]?d{1,3}(,d{3})*$The
[-+]?matches a-or+sign zero or one times.The
d{1,3}matches between one and three digits.The next group contains
,d{3}, which matches a comma followed by exactly three digits. The group is followed by*so it can appear zero or more times. - The following text shows a regular expression that matches this kind of floating-point number.
^[-+]?d+(.d+)?$The
[-+]?matches a-or+sign zero or one times.The
d+matches one or more digits.The
.d+matches a decimal point followed by one or more digits. That group is followed by?so it can appear zero or one times, so the expression won’t match strings with multiple decimal points. - The following text shows a regular expression that matches this kind of floating-point number.
^[-+]?d{1,3}(,d{3})*(.d+)?$The
[-+]?matches a-or+sign zero or one times.The
d{1,3}matches between one and three digits.The next group contains
,d{3}, which matches a comma followed by exactly three digits. The group is followed by*so it can appear zero or more times.The
.d+matches a decimal point followed by one or more digits. That group is followed by?so it can appear zero or one times. - The RearrangeNames example program uses the following code to do this.
// Rearrange the names.
private void rearrangeButton_Click(object sender, EventArgs e)
{
    resultTextBox.Text = Regex.Replace(
        namesTextBox.Text,
        @"^(w*)s*(w*)(s*)$",
        @"$2, $1$3",
        RegexOptions.Multiline);
}
The following text shows the matching expression.
^(w*)s*(w*)(s*)This expression contains three groups. The first uses
w*to match zero or more word characters. (This is the person’s first name.)After the first group the expression uses
s*to match zero or more whitespace characters. This is not in a group so anything matched here is lost.The second group uses
w*again to match zero or more word characters. (This is the person’s last name.)The final group uses
s*to match zero or more whitespace characters at the end of the line. (This is the [Return] character.)The following text shows the replacement expression.
$2, $1$3This replaces the entire match with the second group, followed by a comma and space, followed by the first group, followed by the third group. The result is last name, comma and space, first name, trailing [Return].
Chapter 22
- The ThreadTimer example program uses the following code to do this.
// Create a timer to update the clock.
private void Form1_Load(object sender, EventArgs e)
{
    System.Threading.Timer timer =
        new System.Threading.Timer(TimerTick, null, 0, 500);
}

// Update the clock.
private void TimerTick(object state)
{
    // Invoke to the UI thread.
    this.Invoke((Action)UpdateClockLabel);
}

// Update the clock's label on the UI thread.
private void UpdateClockLabel()
{
    clockLabel.Text = DateTime.Now.ToString("T");
}
The only trick here is that the callback method
TimerTickmust useInvoketo update the clock label because it is not running in the UI thread. - The FiboTasksWaitAll example program does this. The program uses the following code to create its
Tasks and store them in an array.Task[] tasks = { new Task(FindFibonacci, 0), new Task(FindFibonacci, 1), new Task(FindFibonacci, 2), new Task(FindFibonacci, 3) };The program then uses the following code to start the
Tasks.foreach (Task task in tasks) task.Start();Finally, the program uses the following code to wait for all the
Tasks to finish.Task.WaitAll(tasks); - The FiboTasksStartAndWaitAll example program uses the following code to create and start its
Tasks.Task[] tasks = { Task.Factory.StartNew(FindFibonacci, 0), Task.Factory.StartNew(FindFibonacci, 1), Task.Factory.StartNew(FindFibonacci, 2), Task.Factory.StartNew(FindFibonacci, 3), };This makes the program’s code slightly simpler.
- The FiboTasksWaitAny example program does this. The following code shows the call to
Task.WaitAny.Task.WaitAny(tasks);When one of the
Tasks finishes, the others remain running. When the program displays its results, some of theTasks may not have finished.The program uses the following code to display results only for any tasks that have finished.
for (int i = 0; i < OutputTextBoxes.Length; i++)
{
    if (tasks[i].IsCompleted)
        OutputTextBoxes[i].Text = Results[i].ToString();
}
The other
Tasks continue running and their results are ignored. (You can also cancel aTask. See “Task Cancellation” atmsdn.microsoft.com/library/dd997396.aspxfor more information.) - The FiboLambdaTPL example program uses the following code to start four threads calculating Fibonacci numbers.
Parallel.For(0, 4,
    index => Results[index] = Fibonacci(Numbers[index])
);
This simplifies the code somewhat by removing the need for the
FindFibonaccimethod. - Not really. If you need to wait for all the
Tasks to complete, it doesn’t matter in what order you wait. - The FiboTaskWithResults example program does this. The program uses the following code to start its
Tasks.Task<long>[] tasks = { Task<long>.Factory.StartNew(Fibonacci, Numbers[0]), Task<long>.Factory.StartNew(Fibonacci, Numbers[1]), Task<long>.Factory.StartNew(Fibonacci, Numbers[2]), Task<long>.Factory.StartNew(Fibonacci, Numbers[3]), };This code creates four
Task<long>objects that execute theFibonaccimethod (which returns alongresult). TheFibonaccimethod receives as an argument the valuesNumbers[0],Numbers[1],Numbers[2], andNumbers[4]. (You could even make theNumbersarray local to the event handler that creates theTasks. Its only purpose in this program is to pass the values into theStartNewmethod.)Because the
StartNewmethod passes the delegate an object as an argument, theFibonaccimethod must be revised to take an object as a parameter. The following code shows the new method.private long Fibonacci(object data) { long N = (long)data; if (N <= 1) return 1; return Fibonacci(N - 1) + Fibonacci(N - 2); }This version of the program is somewhat simpler because it doesn’t need the
FindFibonaccimethod or aResultsarray, and theNumbersarray can be stored locally in the method that creates theTasks. - The FiboThreads example program does this. The following code shows the key code that creates, starts, and waits for the threads.
// Launch four threads.
Thread thread0 = new Thread((ParameterizedThreadStart)FindFibonacci);
thread0.Start(0);
Thread thread1 = new Thread((ParameterizedThreadStart)FindFibonacci);
thread1.Start(1);
Thread thread2 = new Thread((ParameterizedThreadStart)FindFibonacci);
thread2.Start(2);
Thread thread3 = new Thread((ParameterizedThreadStart)FindFibonacci);
thread3.Start(3);

// Wait for the threads to complete.
thread0.Join();
thread1.Join();
thread2.Join();
thread3.Join();
This code creates and starts four
Threads. It then calls eachThread’sJoinmethod to wait for theThreadto complete.In my tests, there was no significant difference in performance between programs FiboTasks and FiboThreads.
- The
Tasks are in deadlock because each is waiting for a lock on an object that is already locked by the otherTask. They got there becauseTaskA locksLockObjectAand then sleeps soTaskB has a chance to run. It locksLockObjectBsoTaskA is blocked.TaskA already lockedLockObjectAsoTaskB is also blocked.The DeadUnlock example program uses the following code for
TaskA.// Task A. private void TaskA() { for (int attempts = 0; attempts < 10; attempts++) { Console.WriteLine("TaskA: Locking A"); if (Monitor.TryEnter(LockObjectA)) { try { Thread.Sleep(1); Console.WriteLine("TaskA: Locking B"); if (Monitor.TryEnter(LockObjectB)) { try { // Update the value. BestValue = ValueA; // We're done. Break out of the retry loop. Console.WriteLine("Task A: Done"); return; } finally { Console.WriteLine("Task A: Releasing lock B"); Monitor.Exit(LockObjectB); } } else { Console.WriteLine("Task A: Lock B failed"); } } finally { Console.WriteLine("Task A: Releasing lock A"); Monitor.Exit(LockObjectA); } } else { Console.WriteLine("Task A: Lock A failed"); } } }The code used by
TaskB is similar so it isn’t shown here. The only difference is thatTaskB tries to lockLockObjectBfirst andLockObjectAsecond.When you run this program, the
Tasks still have trouble obtaining the locks they need. The twoTasks march along almost synchronized, so they often run through the following sequence of events:TaskA locksLockObjectA.TaskB locksLockObjectB.TaskA fails to lockLockObjectB.TaskA releases its lock onLockObjectA.TaskA relocksLockObjectA.TaskB fails to lockLockObjectA.TaskB releases its lock onLockObjectB.TaskB relocksLockObjectB.
At this point the objects each have one resource locked so the whole thing repeats from step 3.
This situation in which tasks perform actions that are synchronized enough so that they are not in a deadlock but they still cannot get anywhere is called a livelock.
Eventually, the
Tasks get a bit out of sync, so one can grab its second resource between the otherTask’s releasing and relocking it. Then the livelock is broken.One way to prevent a livelock is to ensure that the
Tasks cannot march along almost in synch. In this example, if you make the twoTasks sleep for different amounts of time, the livelock goes away fairly quickly.In this example, an even more effective solution is to make the
Tasks sleep a different amount of time before trying to acquire the first lock. Then theTaskthat sleeps for less time can grab both locks quickly before the otherTaskeven starts.An even better solution is to make both
Tasks attempt to lock their objects in the same order as explained in Exercise 11. - Example program NoDeadlock does this. In this case, whichever
TasklocksLockObjectAfirst can then lock objectLockObjectBand finish its calculation. The otherTaskblocks until the firstTaskfinishes. It can then proceed without interference.(You could also create a single lock object to represent locking both resources A and B. Then each
Taskneeds to acquire only one lock, so they cannot deadlock.) - In this case the program throws the following exception.
An exception of type ‘System.Threading.SynchronizationLockException’ occurred in NoDeadlock.exe but was not handled in user code.
Additional information: Object synchronization method was called from an unsynchronized block of code.
If there is a handler for this exception, the program may be safely continued.
- In that case the object remains locked. If another
Taskneeds to lock that object, it will never obtain the lock.
Chapter 23
- The LinqTestScores example program does this. The code is similar to the code used by the LinqToDataSetScores example program in Chapter 8 so it isn’t shown here. Download the example to see how it works.
- If you don’t click Save, the program doesn’t call the data adapter’s
Updatemethod so no new student records are saved to the database. If you restart the program you won’t find the new records. - Round trips to the database are relatively expensive, particularly if the database is located on the other side of a network, so it’s often better to fetch or save as much data as you will need all at once. That means using data adapters to load and save changes to
DataSets can be reasonably efficient in terms of communications costs.However, that approach can lead to problems if the database has multiple simultaneous users. For example, suppose two users start the program and edit the same record. Whichever user clicks Save second overwrites the changes made by the first user and the first user’s changes are lost.
You could try to avoid that problem by locking the record so both users cannot edit it at the same time. That works well if you use ADO.NET to fetch one record at a time, but it doesn’t work well if you use a data adapter to load an entire table all at once. If one user loads and locks the entire table, the other user can’t do anything.
Another problem with the data adapter approach arises if the database is very large. If the
Studentstable contains thousands of records, the program may be loading far more data than it will ever need.In general, using data adapters to load entire tables works well if the tables aren’t too big and there is a single user or users who won’t try to edit the same records. For really large tables or users who may conflict frequently, it’s often better to fetch data in more limited chunks.
- The CreateAndDropTable example program does this. The code is relatively straightforward but it’s long so it isn’t shown in its entirety here. The following code shows how the program executes the
DROP TABLEcommand, which doesn’t fetch data.string drop = "DROP TABLE Instructors"; using (OleDbCommand command = new OleDbCommand(drop, connection)) { // Execute the command. command.ExecuteNonQuery(); }No the database doesn’t warn you when you try to drop a table that isn’t empty. It simply drops the table and any data it contains is lost.
- If a program tries to open a connection that is already open, it throws a
System.InvalidOperationExceptionwith the message:Additional information: The connection was not closed. The connection’s current state is open.
If a program creates a connection at the module level and uses the connection in multiple methods, each method must be certain that it closes the connection before it exits. You can use the
finallysection of atry-catch-finallyblock to ensure that the connection is closed.Alternatively you could use the following code to open the connection.
if (connection.State == ConnectionState.Closed) connection.Open(); - The InsertThreeRecords example program does this. The following code shows its
InsertInstructorsRecordmethod.// Insert an Instructors record. private void InsertInstructorsRecord(OleDbConnection connection, int instructorId, string firstName, string lastName, string department) { string insert = "INSERT INTO Instructors (InstructorId, FirstName, LastName, Department)" + "VALUES (" + instructorId.ToString() + ", '" firstName + "', '" + lastName + "', '" + department + "')"; using (OleDbCommand command = new OleDbCommand(insert, connection)) { // Execute the command. command.ExecuteNonQuery(); } }Download the example to see the other details.
If you omit the
UPDATEstatement’sWHEREclause, it updates all of the records in the table. In this example, that means every instructor’s first name is changed to Fran. - The AdHocQuery example program does this. The following code shows how the program displays a row’s values.
// Get the values.
object[] values = new object[reader.FieldCount];
reader.GetValues(values);

// Add the values to a string.
string result = "";
for (int i = 0; i < reader.FieldCount; i++)
{
    result += values[i].ToString() + " ";
}

// Display the result.
resultsListBox.Items.Add(result);
Download the example for other details.
Chapter 24
- The RandomPlantsWithWriter example program uses the following code to generate a random XML plant data file.
private void createButton_Click(object sender, EventArgs e) { // Get the words to use in building names. string text = namesTextBox.Text.ToLower(); // Remove periods and commas. text = Regex.Replace(text, @"[.,]", ""); // Split into words. char[] chars = { ' ', ' ', ' ' }; string[] words = text.Split( chars, StringSplitOptions.RemoveEmptyEntries); // Create the writer. using (XmlTextWriter writer = new XmlTextWriter("Plants.xml", null)) { // Make it pretty. writer.Formatting = Formatting.Indented; // Write the start element. writer.WriteStartDocument(); writer.WriteStartElement("Plants"); // <Plants> // Make the plants. int numPlants = int.Parse(numPlantsTextBox.Text); for (int i = 0; i < numPlants; i++) { writer.WriteStartElement("Plant"); // <Plant> writer.WriteElementString("Name", RandomName(words)); writer.WriteElementString("Zone", Rand.Next(1, 10).ToString()); writer.WriteElementString("Light", RandomLight()); writer.WriteEndElement(); // </Plant> } writer.WriteEndElement(); // </Plants> } MessageBox.Show("Done"); } - The RandomPlantsWithDom example program uses the following code to generate random XML plant data file.
private void createButton_Click(object sender, EventArgs e)
{
    // Get the words to use in building names.
    string text = namesTextBox.Text.ToLower();

    // Remove periods and commas.
    text = Regex.Replace(text, @"[.,]", "");
    // Split into words.
    char[] chars = { ' ', '
', '
' };
    string[] words = text.Split(
        chars, StringSplitOptions.RemoveEmptyEntries);

    // Make the document.
    XDocument document = new XDocument();

    // Make the root node.
    XElement plants = new XElement("Plants");
    document.Add(plants);

    // Make the plants.
    int numPlants = int.Parse(numPlantsTextBox.Text);
    for (int i = 0; i < numPlants; i++)
    {
        XElement plant = new XElement("Plant");
        plant.SetElementValue("Name", RandomName(words));
        plant.SetElementValue("Zone", Rand.Next(1, 10));
        plant.SetElementValue("Light", RandomLight());
        plants.Add(plant);
    }

    // Save the file.
    document.Save("Plants.xml");

    MessageBox.Show("Done");
}
Which version of the program is better is mostly a matter of personal preference.
If you were generating a huge file, perhaps hundreds of thousands or millions of plant records, then the version that uses
XmlTextWriterwould probably be better because, unlike the version that uses the DOM, it would not need to store the entire XML document in memory all at the same time. - The FindPlantsWithDom example program uses the following code to do this.
// The DOM. private XDocument Document; // Load the XML data. private void Form1_Load(object sender, EventArgs e) { // Load the XML file. Document = XDocument.Load("Plants.xml"); // Get the zones. var zones = from XElement zone in Document.Descendants("Zone") orderby zone.Value select zone.Value; zoneComboBox.DataSource = zones.Distinct().ToArray(); } // Display plants from the selected zone. private void zoneComboBox_SelectedIndexChanged(object sender, EventArgs e) { string selectedZone = zoneComboBox.SelectedItem.ToString(); // Find the selected ZONE elements. var zones = from XElement zone in Document.Descendants("Zone") where zone.Value == selectedZone select zone; // Loop through the selected ZONE elements. plantsListBox.Items.Clear(); foreach (XElement element in zones) { // Find the corresponding PLANT element's COMMON element. plantsListBox.Items.Add(element.Parent.Element("Name").Value); } } // Display this plant's details. private void plantsListBox_SelectedIndexChanged(object sender, EventArgs e) { // Get the selected name. string plantName = plantsListBox.SelectedItem.ToString(); // Find the Name element with this value. var plants = from XElement name in Document.Descendants("Name") where name.Value == plantName select name; // Get the first plant's element. XElement plant = plants.First().Parent; // Display the Plant element's data. detailsTextBox.Text = plant.ToString(); } - The FindPlantNamesWithReader example program uses the following code to do this.
// Display plant names.
private void Form1_Load(object sender, EventArgs e)
{
    // Open the file.
    using (XmlReader reader = XmlReader.Create("Plants.xml"))
    {
        // Scan the XML file's elements.
        while (reader.Read())
        {
            // See if this is a Name element.
            if (reader.Name == "Name")
            {
                // Display the name.
                //plantsListBox.Items.Add(reader.ReadElementContentAsString());
                plantsListBox.Items.Add(reader.ReadInnerXml());
            }
        }
    }
}
This program and FindPlantsWithDom have different purposes, so you can’t compare them exactly. FindPlantsWithDom is interactive and displays information when the user selects zones or plant names. Because it might need to display data about any plant, it needs to keep the data around. It can store it in the DOM, or it could reread the XML file every time it needed a value. If the file were big, that would be slow. If the file were extremely big (millions of records), rereading the file would be extremely slow, but that might be necessary to avoid loading the entire file into memory all at once.
The FindPlantNamesWithReader program is not interactive. It needs to scan the data only once to get the information it needs. It doesn’t need to keep the zone or light information, so it doesn’t need to load all of the data at once.
In summary, FindPlantsWithDom needs to use the DOM because it’s interactive and will need to use the data later. FindPlantNamesWithReader is not interactive and can get what it needs by running through the file once.
- The FindPlantsWithXPath example program does this. The following code shows how it loads its XML data and populates its
ComboBox.// The DOM. private XDocument Document; // Load the XML data. private void Form1_Load(object sender, EventArgs e) { // Load the XML file. Document = XDocument.Load("Plants.xml"); // Get the distinct zones. List<string> zones = new List<string>(); foreach (XElement zone in Document.XPathSelectElements("//Zone")) { if (!zones.Contains(zone.Value)) zones.Add(zone.Value); } // Sort the zones. zones.Sort(); // Display the zones. zoneComboBox.DataSource = zones; }The code loads the XML document as before. It then uses the XPath query
//Zoneto find allZoneelements. Because the program wants distinct zones, it checks itszoneslist and adds only the values that are not already in the list. (You could also use a LINQ query to select the distinct zones, but I’m trying to avoid LINQ in this example.)The code then sorts the zones and displays them in the
ComboBox.When the user selects a zone from the
ComboBox, the program uses the following code to display the plants in that zone.// Display plants from the selected zone. private void zoneComboBox_SelectedIndexChanged(object sender, EventArgs e) { string selectedZone = zoneComboBox.SelectedItem.ToString(); // Find Plant elements with the selected Zone children. plantsListBox.Items.Clear(); // Find Plants that have the selected Zone as a child. string query = "//Plant[Zone="" + selectedZone + ""]"; foreach (XElement plant in Document.XPathSelectElements(query)) { // Add the Plant's name to the list. plantsListBox.Items.Add(plant.Element("Name").Value); } }This code composes an XPath query similar to the following.
//Plant[Zone="1"]This query selects
Plantelements that have aZonechild with the value matching the value selected by the user.The code uses
XPathSelectElementsto find elements that satisfy the query and loops through them. For eachPlantelement, the code adds the value of the element’sNamechild to the plantsListBox.The following code shows an even more effective query.
// Find Names with parents that have the selected Zone as a child.
string query = "//Plant/Name[../Zone="" + selectedZone + ""]";
foreach (XElement name in Document.XPathSelectElements(query))
{
    // Add the Plant's name to the list.
    plantsListBox.Items.Add(name.Value);
}
This query has the following format.
//Plant/Name[../Zone="1"]The
//Plant/Namepart of the query selectsNameelements that havePlantparents at any depth in the document.The brackets place a filter on the selected elements. The
..part of the filter moves to the element’s parent, in this case theName’sPlantelement. The/Zone="1"part of the filter means the parent element must have a child namedZonewith value 1.Taken all together this query means:
Find
Nameelements that have parents that arePlantelements, and thePlanthas aZonechild with the value 1.With this new query, the program needs to loop through the selected
Nameelements and display their values. The previous query required the program to start atPlantelements and find theirNameelements. (Both versions of the query are in the example program, so you can experiment with them.)When the user selects a plant from the
ListBox, the program uses the following code to display information about the plant.// Display this plant's details. private void plantsListBox_SelectedIndexChanged(object sender, EventArgs e) { // Get the selected name. string plantName = plantsListBox.SelectedItem.ToString(); // Find the Plant with a Name child that has this value. string query = "//Plant[Name="" + plantName + ""]"; XElement plant = Document.XPathSelectElement(query); // Display the Plant element's data. detailsTextBox.Text = plant.ToString(); }This code composes a query similar to the following.
//Plant[Name="id euismod pulvinar"]It then calls
XPathSelectElementto select the firstPlantelement with the selected name. The code then displays that element’s data. - The TransformPlants example program does this. The following code shows the XSLT file.
<?xml version="1.0" encoding="utf-8"?>
<xsl:stylesheet version="1.0"
    xmlns:xsl="http://www.w3.org/1999/XSL/Transform"
    xmlns:msxsl="urn:schemas-microsoft-com:xslt"
    exclude-result-prefixes="msxsl"
>
  <xsl:output method="html" indent="yes"/>

  <xsl:template match="Plants">
    <HTML>
      <BODY>
        <TABLE BORDER="2">
          <TR>
            <TH>Name</TH>
            <TH>Zone</TH>
            <TH>Light</TH>
          </TR>
          <xsl:apply-templates select="Plant"/>
        </TABLE>
      </BODY>
    </HTML>
  </xsl:template>
  <xsl:template match="Plant">
    <TR>
      <TD>
        <xsl:value-of select="Name"/>
      </TD>
      <TD>
        <xsl:value-of select="Zone"/>
      </TD>
      <TD>
        <xsl:value-of select="Light"/>
      </TD>
    </TR>
  </xsl:template>
</xsl:stylesheet>
The following code shows how the program performs the transformation.
// Transform Plants.xml. private void Form1_Load(object sender, EventArgs e) { // Load the style sheet. XslCompiledTransform xslt = new XslCompiledTransform(); xslt.Load("PlantsToHtml.xslt"); // Transform the file. xslt.Transform("Plants.xml", "Plants.html"); // Display the result. string filename = Path.GetFullPath( Path.Combine(Application.StartupPath, "Plants.html")); planetsWebBrowser.Navigate(filename); } - The TransformPlanetsIntoAttributes example program does this. The following code shows the XSLT file.
<?xml version="1.0" encoding="utf-8"?>
<xsl:stylesheet version="1.0" xmlns:xsl="http://www.w3.org/1999/XSL/Transform"
    xmlns:msxsl="urn:schemas-microsoft-com:xslt" exclude-result-prefixes="msxsl"
>
  <xsl:output method="xml" indent="yes"/>

  <xsl:template match="Planets">
    <Planets>
      <xsl:apply-templates select="Planet"/>
    </Planets>
  </xsl:template>
  <xsl:template match="Planet">
    <Planet Name="{Name}"
            Distance="{Distance}"
            LengthOfYear="{LengthOfYear}"
            LengthOfDay="{Day}" />
  </xsl:template>
</xsl:stylesheet>
The program uses the following code to transform the XML file.
// Transform Planets.xml.
private void Form1_Load(object sender, EventArgs e)
{
    // Process without indenting.
    // Load the style sheet.
    XslCompiledTransform xslt = new XslCompiledTransform();
    xslt.Load("PlanetsToAttributes.xslt");

    // Transform the file.
    xslt.Transform("Planets.xml", "Planets2.xml");

    // Display the result.
    resultTextBox.Text = File.ReadAllText("Planets2.xml");
    resultTextBox.Select(0, 0);
}
The program also contains code to produce a nicely indented result. Download the example to see how it works.
Chapter 25
- The SerializeStudentArray example program does this. The following code shows the heart of the program.
// Display the students.
originalListBox.DataSource = students;

// Create a serializer that works with Student[].
XmlSerializer serializer = new XmlSerializer(typeof(Student[]));

// Create a TextWriter to hold the serialization.
string serialization;
using (TextWriter writer = new StringWriter())
{
    // Serialize the students array.
    serializer.Serialize(writer, students);
    serialization = writer.ToString();
}

// Display the serialization.
serializationTextBox.Text = serialization;

// Create a stream from which to read the serialization.
using (TextReader reader = new StringReader(serialization))
{
    // Deserialize.
    Student[] newStudents = (Student[])serializer.Deserialize(reader);

    // Display the deserialization.
    deserializedListBox.DataSource = newStudents;
}
This code is reasonably straightforward. Its most interesting feature is that it works with the
Student[]type instead of a class as the SerializeCustomer example does. - The ClassroomEditor example program uses the following code to save and load serializations of its
Studentlist.// The Students. private List<Student> Students; // Load saved Students. private void Form1_Load(object sender, EventArgs e) { // See if the serialization file exists. if (File.Exists("Students.xml")) { // Deserialize the file. // Create a serializer that works with Student[]. XmlSerializer serializer = new XmlSerializer(typeof(List<Student>)); // Create a stream from which to read the serialization. using (FileStream reader = File.OpenRead("Students.xml")) { // Deserialize. Students = (List<Student>)serializer.Deserialize(reader); } } else { // Create an empty student list. Students = new List<Student>(); } // Display the Students. studentsListBox.DataSource = Students; } // Save Students. private void Form1_FormClosed(object sender, FormClosedEventArgs e) { // Create a serializer that works with Student[]. XmlSerializer serializer = new XmlSerializer(typeof(List<Student>)); // Create a StreamWriter to hold the serialization. using (StreamWriter writer = File.CreateText("Students.xml")) { // Serialize the student list. serializer.Serialize(writer, Students); } }This code is reasonably straightforward. The code that lets the user create, edit, and delete
Studentobjects is also straightforward (and it’s unrelated to the discussion of serialization) so it isn’t shown here. Download the example to see how it works. - The XmlSerializeToString example program uses the following code to serialize and deserialize objects as XML strings.
public static class XmlTools
{
    // Return obj's serialization as a string.
    public static string Serialize<T>(T obj)
    {
        // Create a serializer that works with the T class.
        XmlSerializer serializer = new XmlSerializer(typeof(T));

        // Create a TextWriter to hold the serialization.
        string serialization;
        using (TextWriter writer = new StringWriter())
        {
            // Serialize the object.
            serializer.Serialize(writer, obj);
            serialization = writer.ToString();
        }

        // Return the serialization.
        return serialization;
    }

    // Deserialize a serialization string.
    public static T Deserialize<T>(string serialization)
    {
        // Create a serializer that works with the T class.
        XmlSerializer serializer = new XmlSerializer(typeof(T));

        // Create a reader from which to read the serialization.
        using (TextReader reader = new StringReader(serialization))
        {
            // Deserialize.
            T obj = (T)serializer.Deserialize(reader);

            // Return the object.
            return obj;
        }
    }
}
This code should work with any object that the
XmlSerializerclass can understand. (For example, it won’t work with images.) - The SerializeStudentWithPicture example program does this. The only trick (aside from the
PictureBytesproperty that was given as a hint) is that theStudentclass uses theXmlIgnoreattribute to prevent the serializer from trying to serialize thePictureproperty.The following code shows the
Studentclass (with some code omitted).public class Student { public string FirstName, LastName; [XmlIgnore] public Image Picture; // Return the Picture as a byte stream. public byte[] PictureBytes { ... Code omitted ... } ... Constructors omitted ... }The following text shows a small part of the serialization for a
Studentwith a 143 × 170 pixel picture.<?xml version="1.0" encoding="utf-16"?> <Student xmlns:xsi="http://www.w3.org/2001/XMLSchema-instance" xmlns:xsd="http://www.w3.org/2001/XMLSchema"> <FirstName>Rod</FirstName> <LastName>Stephens</LastName> <PictureBytes>iVBORw0KGgoAAAANSUhEUgAAAI8AAACqCAYAAACUAhwWAAAABG ...96,130 characters omitted ... </PictureBytes> </Student> - The SerializeFriends example program does this. A
Personobject contains references to otherPersonobjects, which may contain references to the firstPerson, so the data may contain cycles. That means you need to use a binary serialization.The program uses the following code to load the serialization and prepare itself when it starts.
// The people.
private List<Person> People = null;

// The currently selected person.
private Person SelectedPerson = null;

// Reload saved data.
private void Form1_Load(object sender, EventArgs e)
{
    if (File.Exists("Friends.dat"))
    {
        // Deserialize the data.
        BinaryFormatter formatter = new BinaryFormatter();
        using (FileStream stream = new FileStream("Friends.dat", FileMode.Open))
        {
            People = (List<Person>)formatter.Deserialize(stream);
        }
    }
    else
    {
        // Create some initial people.
        People = new List<Person>();
        People.Add(new Person() { Name = "Archibald" });
        People.Add(new Person() { Name = "Beatrix" });
        People.Add(new Person() { Name = "Charles" });
        People.Add(new Person() { Name = "Delilah" });
        People.Add(new Person() { Name = "Edgar" });
        People.Add(new Person() { Name = "Francine" });
    }

    // Add all people to the friends list.
    foreach (Person person in People)
        friendsCheckedListBox.Items.Add(person);

    // Display the people.
    personListBox.DataSource = People;
}
The only non-obvious thing here is that the program uses the variable
SelectedPersonto keep track of thePersonwho is currently selected in theListBoxon the left.When the user selects a person from the
ListBoxon the left, the following code executes.// Select this person's friends. private void personListBox_SelectedIndexChanged(object sender, EventArgs e) { // Update the currently selected person's friends. UpdateFriends(); // Update the selected person. SelectedPerson = (Person)personListBox.SelectedItem; // Check the newly selected person's friends. for (int i=0; i<friendsCheckedListBox.Items.Count; i++) { bool isFriend = SelectedPerson.Friends.Contains(friendsCheckedListBox.Items[i]); friendsCheckedListBox.SetItemChecked(i, isFriend); } }The code first calls
UpdateFriends(described shortly) to save any changes to the previously selected person’sFriendslist.Next, the code saves a reference to the newly selected person in the
SelectedPersonvariable. It then loops through the items in the friendsCheckedListBoxon the right. The program checks or unchecks the people in theCheckedListBoxdepending on whether they are in the newly selected person’sFriendslist.The following code shows the
UpdateFriendsmethod.// Update the currently selected person's friends. private void UpdateFriends() { if (SelectedPerson != null) { SelectedPerson.Friends = new List<Person>(); foreach (object friend in friendsCheckedListBox.CheckedItems) SelectedPerson.Friends.Add((Person)friend); } }If the selected person is not
null, the code sets that person’sFriendslist to a newList<Person>. It then adds the checked items in theCheckedListBoxon the right to the person’s newFriendslist.The following code shows how the program saves the friend data when it closes.
// Save the friend data.
private void Form1_FormClosed(object sender, FormClosedEventArgs e)
{
    // Update the currently selected person's friends.
    UpdateFriends();

    // Save the data.
    BinaryFormatter formatter = new BinaryFormatter();
    using (FileStream stream = new FileStream("Friends.dat", FileMode.Create))
    {
        formatter.Serialize(stream, People);
    }
}
The code calls
UpdateFriendsto save any changes to the currently selected person. It then creates aBinaryFormatterand uses it to save thePeoplelist.
Chapter 26
- The EditPerson example program does this. Download the example to see the details.
When you select a property in the
PropertyGrid, it displays theDescriptionattribute’s value to give the user information about the property.By default, the
PropertyGridgroups properties by theirCategoryattributes. If you click the Alphabetical button, the grid displays the properties alphabetically instead of by category. - The EditPerson example program does this. Download the example and search for the following directive to see the new code.
#if Exercise2 - The UseDrawingAddIns example program does this. The following code shows how the program searches for DLLs and classes within any DLLs it finds.
// Load available tools.
private void Form1_Load(object sender, EventArgs e)
{
    // Create a Bitmap.
    Picture = new Bitmap(
        imagePictureBox.ClientSize.Width,
        imagePictureBox.ClientSize.Height);
    imagePictureBox.Image = Picture;

    // Look for assemblies.
    foreach (string filename in
        Directory.GetFiles(Application.StartupPath, "*.dll"))
    {
        // Load this assembly.
        Assembly dll = Assembly.LoadFile(filename);

        // Look for classes that have Draw methods.
        foreach (Type type in dll.GetTypes())
        {
            // Make sure this is a class.
            if (!type.IsClass) continue;

            // Find the Draw method.
            MethodInfo methodInfo = type.GetMethod("Draw");
            if (methodInfo == null) continue;

            // Make sure it's a static method.
            if (!methodInfo.IsStatic) continue;

            // Make sure it takes a Graphics object as a parameter.
            ParameterInfo[] parameters = methodInfo.GetParameters();
            if (parameters.Length != 1) continue;
            if (parameters[0].ParameterType != typeof(Graphics)) continue;

            // We can use this method!

            // Get the class's DisplayName atttribute.
            Attribute attribute =
                type.GetCustomAttribute(typeof(DisplayNameAttribute));
            string toolName;
            if (attribute == null) toolName = type.Name;
            else
            {
                DisplayNameAttribute attr = attribute as DisplayNameAttribute;
                toolName = attr.DisplayName;
            }

            // Create a menu item for this method.
            ToolStripItem item = toolsMenu.DropDownItems.Add(toolName);
            item.Tag = methodInfo;

            // Set a Click event handler for the menu item.
            item.Click += item_Click;
        }
    }
}
The following code shows how the program invokes a tool.
// The bitmap we are displaying.
private Bitmap Picture;

// Invoke a menu item's method.
private void item_Click(object sender, EventArgs e)
{
    using (Graphics gr = Graphics.FromImage(Picture))
    {
        // Get the menu item's MethodInfo.
        ToolStripMenuItem item = sender as ToolStripMenuItem;
        MethodInfo methodInfo = item.Tag as MethodInfo;

        // Invoke the method.
        object[] args = { gr };
        methodInfo.Invoke(null, args);
    }

    imagePictureBox.Refresh();
}
The UseDrawingAddIns program uses DLLs built by the DrawingAddIns and MoreDrawingAddIns example projects.
- The UseDrawingAddIns2 example program does this. The MultipleDrawingAddIns project creates a DLL that this program can load. Download the examples to see how they work.
- The UseDrawingAddIns3 example program uses this approach. The MultipleDrawingAddIns2 project creates a DLL that this program can load. Download the examples to see how they work.
- There are a couple ways you can avoid the restriction of putting the
DrawingAddInAttributeclass in theDrawingAddInnamespace.If you allow the class to be defined in any namespace, you can search the DLL to find the class. That takes more effort but should work. It has problems, however, if the DLL defines a
DrawingAddInAttributeclass in more than one namespace. In that case, an add-in method could use any of the defined classes and you wouldn’t know which of the attribute types to use.Another approach would be to use
GetCustomAttributesto iterate through the method’s attributes. You could then use each attribute’sToStringmethod to see if its name wereDrawingAddInAttribute.
Chapter 27
- The EncryptWithRandom example program does this. The following code shows how the program gets the user’s inputs.
// Encrypt.
private void encryptButton_Click(object sender, EventArgs e)
{
    // Get the plaintext converted to uppercase.
    string plaintext = plaintextTextBox.Text.ToUpper();

    // Remove non-alphabetic characters.
    plaintext = Regex.Replace(plaintext, "[^A-Z]", "");

    // Get the key.
    int key = int.Parse(keyTextBox.Text);

    // Encrypt.
    ciphertextTextBox.Text = Encrypt(key, plaintext);
}
The program gets the plaintext and uses the
ToUpperstring method to convert it into uppercase. It then uses theRegexregular expression class to remove all non-alphabetic characters.The code gets the user’s key and calls the following
Encryptmethod to encrypt the message.private string Encrypt(int key, string plaintext, bool encrypting = true) { // Make the Random object. Random rand = new Random(key); // Encrypt. string ciphertext = ""; foreach (char ch in plaintext) { int chNum = ch - 'A'; // Add or remove a random number between 0 and 26. if (encrypting) chNum += rand.Next(0, 26); else chNum -= rand.Next(0, 26) - 26; chNum = chNum % 26; ciphertext += (char)('A' + chNum); } return ciphertext; }This method uses the key to initialize a
Randomobject. It then loops through the message characters.It converts each character into a number between 0 and 25 where A = 0, B = 1, and so forth. If it is encrypting, the method adds a random value between 0 and 25 to each character. If it is decrypting, the method subtracts a random value between 0 and 25 from each character. It takes the new value modulo 26 and converts the result back into a letter.
The oddest trick here is that the code adds 26 to the character’s number if it is decoding. For example, if the ciphertext letter is B = 1 and the random value subtracted is 10, then 1 – 10 = –9. In C# the modulus operator
%doesn’t care if its result is negative, so it leaves this value –9, which does not convert back into a letter. The code adds 26, so the program calculates(–9 + 26) % 26 = 17 % 26 = 17, which converts to the letter R. - The BreakRandomCipher example program does this. It’s mostly straightforward, so download the example to see how it works. The following code shows the trickiest part, which uses LINQ to find the largest letter frequency.
// Get the letter frequencies.
var query =
    from char ch in plaintext
    group ch by ch into g
    select g.Count();

// See how big the largest frequency is.
if (query.Max() / (float)plaintext.Length > maxFrequency)
{
    // Hopefully this is it.
    ...
}
This code uses LINQ to get the letter counts in the plaintext. It then divides the largest count by the number of letters in the message and compares that to the test frequency.
- This approach doesn’t work well for short messages because the letter frequencies in short messages may not match normal language usage. For example, in English the letter E appears most often, but it doesn’t appear at all in the message “All good plans will bring victory!”
- You could look at a measure of the distribution of the letters in the plaintext to see if it matches what you expect for a correct decryption. For example, you could see if the top three letters have frequencies around 12 percent, 9 percent, and 8 percent, the frequencies of the letters E, T, and A in English, respectively. Or you could see if the standard deviations of the letters are large. Unfortunately, both of those techniques are relatively time-consuming. The method described in the exercise is less reliable, so it won’t work well with short messages, but it is much faster.
You might make the test a bit more reliable if you look at the largest and smallest frequencies.
- This program looks only at relative letter frequencies, so it should work with any language where messages have uneven frequency distributions. The biggest change would be to allow the program to work with characters that don’t lie between A and Z such as ö and ß.
- The RandomIntegers example program uses the following code to provide the
GetIntmethod.public static class MyRandom { // The RNG. private static RNGCryptoServiceProvider Rand = new RNGCryptoServiceProvider(); // Return a random int. public static int GetInt() { // A buffer to hold random bytes. byte[] bytes = new byte[4]; // Get 4 random bytes. Rand.GetBytes(bytes); // Convert the bytes into an integer. return BitConverter.ToInt32(bytes, 0); } } - The RandomFloats example program uses the following code to return random
doublevalues between 0 and 1.public static double NextDouble() { byte[] bytes = new byte[8]; Rand.GetBytes(bytes); UInt64 randomInt = BitConverter.ToUInt64(bytes, 0); return randomInt / (1.0 + UInt64.MaxValue); } - The RandomInRange example program uses the following code to provide the
NextDoublemethod and the new version of theGetIntmethod.// Return a random integer within a range. // Includes min and excludes max. public static int GetInt(int min, int max) { return (int)(min + (NextDouble() * (max - min))); } // Return a double between 0 (inclusive) and 1 (exclusive). public static double NextDouble() { byte[] bytes = new byte[8]; Rand.GetBytes(bytes); UInt32 randomInt = BitConverter.ToUInt32(bytes, 0); return randomInt / (1.0 + UInt32.MaxValue); } - The DefaultKeyAndIVMethods example program does this. The code in the encryption and decryption methods is similar to the code used by the original DefaultKeyAndIV program, so it isn’t shown here.
- The DefaultKeyAndIVExtensions example program does this. The encryption and decryption code is similar to the code used by the original DefaultKeyAndIV program, so it isn’t shown here.
- The EncryptWithPassword example program does this. Download it to see how it works.
If you try to decrypt a message with the wrong password, even a password that is wrong by a single character, the decryption operation throws an exception.
- The RSAReceiver and RSASender example programs do this. They’re relatively straightforward, so download them to see how they work.