
It’s very likely you are reading this book because you have some great ideas for games and want to learn how to turn those ideas into programs. This chapter offers general advice on game creation and covers some challenges that particular game genres experience and how to approach them.
This is a very broad whirlwind tour of game creation, touching on some of the more interesting problems you’ll encounter as you start programming. There are some suggested steps for writing games, code snippets for algorithms, and on the CD, you’ll find a list of resources and further reading for all the game types listed here.
Writing games is fun and rewarding, but finishing a game project is much harder. This section will cover the approach to take when developing a project. It’s important to know when to abandon a game project and when to soldier on and finish it.
A game can’t start without an idea, so consider carrying a small notebook around with you and jotting down any sudden bolt of inspiration that strikes you during the day. A second tip for generating game ideas is to take a critical look at the games you enjoy playing; try to break down the games into systems and note any gameplay features that you like. If you see a nice GUI, special effect, puzzle, or game interaction, try to re-create it. Re-creating parts of existing games is an excellent way to improve your skills.
When you get your great game idea, then it’s time to move on to the next stage: the feasibility test. Do you have the resources to create this game? If it requires hours of full-motion video, hundreds of hours of gameplay, and thousands of fully animated monsters, then unless you are surrounded by some extremely talented friends or are very well-funded, you may have to tone down your ambition. The ideal game will be something that pushes your abilities but is still achievable. If you are very new to game development, start with small projects that can be achieved in a few days (such as Pong or Space Invaders) and slowly work your way up to more demanding projects.
Once you’ve decided on a game idea that’s passed your feasibility test, it’s time to break it down into manageable chunks. This is the fun, high-level design bit. You have a vague idea of this great game, but now you need to solidify the idea and work out how it’s going to fit together. A good idea is to sketch out the classes and systems of the game on paper with boxes and then indicate relationships and interactions with arrows. This rough high-level plan is a great thing to pin to a wall or keep in your development area. It’s a map that will help guide you as you starting digging into the details of the project. If you still don’t feel you’re quite at the boxes and arrows stage, then try playing your vision of the game in your head using your imagination. What happens when you first start the game? When you begin the first level? What actions can you perform? How does the world respond to those actions?
Let’s say you want to create a game in which you must sing different songs to make characters on the screen perform actions and interact with the environment. When breaking down this design, the first big system that jumps out is the player input; being able to detect if the player is singing and then determine which song the player is singing is an area that will require research. The singing section needs a small project all to itself. At the very least, one system will have to get the voice input from the player via the microphone, and another system will have to be able to identify the different songs the player is singing. Each creature will have to be checked to see if the current song being sung is important to them. The actions the creatures can perform need to be defined. The win/lose state of the game needs to be defined. How the world is represented needs to be defined. These are some of the questions this one line game design brings up. By the time you’re done thinking through your game on paper, you should have many questions that need to be answered and a list of items to research.
The next phase is prioritizing the questions and tasks that this early design phase has uncovered. Not every game will have features that require researching, but if there are any research tasks that the game relies on then they need to be done first; this might be as simple as a quick Google search or it may require asking people who are better informed or reading books and articles on the subject. Small toy programs are a great place to try out different research ideas, which if successful can be cleaned up and incorporated into the final project.
Once you think you have finished all the research, ask yourself “What is the very least I can do to get a basic working game?” Then do that and if possible try to do it in one sitting. Once you have a first iteration of your game, it’s much easier to come back to it and slowly refine it. A half finished game is harder to pick up if you’ve had a few days break from development.
Game programming requires time; usually a period of four or so hours is required for a minimum session, especially if you want to get into that state of flow when you stop noticing the passage of time and become entirely focused on the task at hand. To-do lists are a good way to direct your development efforts. A good tip is to write the to-do item and then just below it, write the smallest step you need to do to start this to-do item, for example.
Set up the development environment and get a basic window and game loop up
– Open Visual Studio, create a new project and call it “Project Minstrel”
Build Simple Song Classifier skeleton class
– Add SongClassifier.cs file and add System.Speech library
The little sentence after the to-do point is something you can do right now; it’s almost easier to take that first step than not, and once you’ve taken the first step, you’re obliged to finished the full to-do point. Don’t collect a backlog of unfinished to-do items each time you begin developing your project, then throw away the last to-do list and start again. Anything that’s super-important you can copy across.
Don’t be afraid to stop working on a project if it doesn’t seem to be going anywhere. Every project, even those that don’t get completed, imparts some kind of lesson (even if that lesson is of the “Well, I won’t do that again” variety, it’s still useful!). You will get a lot more done on a project you want to work on than a project you feel obligated to work on just because you’ve invested a lot of time in it.
If you are looking for feedback or help, there are lots of game programming communities on the Internet that will be happy to try out your game and offer suggestions and advice (such as The Independent Game Source http://forums.tigsource.com/index.php. For other communities please see the accompanying CD). Online communities also host regular game programming competitions and usually have services if you wish to find another programmer or artist to team up with.
Games, for the most part, fall neatly into two categories: 2D games like Super Mario, Tetris, and Pokémon and 3D games like Quake, Fallout 3, and Grand Theft Auto. 2D games tend to be easier to program.
2D games have been covered quite extensively in this book so you should already have a good head start if your game idea is 2D based. 2D games often suggest pixel art style graphics, but this doesn’t have to be the case; there is still a lot of room for innovation in presenting a 2D game. The graphics could appear like cut-out pieces of paper, crayon drawings, vector graphics (using OpenGL’s GL_LINE drawing mode), abstract, or silhouette graphics. (Silhouette graphics have the great advantage that they are much easier to draw.) The math involved with 2D games tends to be simpler than a 3D game, but it really depends on the specific game. Most programmers experiment with 2D games before learning about 3D game programming, and a lot of game development knowledge is independent of whether the game is developed in 3D or 2D.
One of most important skills for a game programmer is the ability to independently research and learn about new programming and development techniques. Sometimes a game idea demands a new unfamiliar technology (for instance you may wish to have a rope in your game in which case you need to research a way for this to be simulated); other times you may learn a new technology just for the fun or the challenge and in so doing, you discover a new idea for a game. The vast majority of big budget modern games are 3D and this alone makes learning 3D game development appealing.
3D graphics programming is a vast, intimidating heap of mathematics, techniques, and terminology, and it’s important to approach it in a measured, achievable manner. To aim to compete with the latest FPS shooter with your first project is only setting yourself up for disappointment. A better goal is something that can be achieved quite quickly and is a stepping stone to more ambitious projects. For 3D graphics, getting a box to display on the screen is an achievable first step–even better if the box rotates. A later intermediate step might be to re-create the side-scrolling shooter game covered in the last chapter, but use 3D models instead of sprites.
The code examples in this book have often made use of a function called Setup2DGraphics in the Form.cs file. It’s quite trivial to write an equivalent Setup3DGraphics.
private void Setup3DGraphics(double width, double height)
{
  double halfWidth = width / 2;
  double halfHeight = height / 2;
  Gl.glMatrixMode(Gl.GL_PROJECTION);
  Gl.glLoadIdentity();
  Glu.gluPerspective(90, 4 / 3, 1, 1000);
  Gl.glMatrixMode(Gl.GL_MODELVIEW);
  Gl.glLoadIdentity();
}
This code is nearly identical to the Setup2DGraphics call, but it uses the function gluPerspective instead of glOrtho. The gluPerspective function takes in a field of view as the first argument, the aspect ratio as the second, and the near and far planes as the last two arguments. This describes something similar to the lens of a camera for viewing the 3D scene.
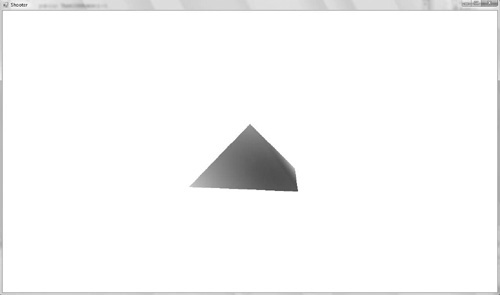
If Setup3DGraphics is called instead of Setup2DGraphics then that’s nearly all that’s needed to start 3D game programming. Here’s a game state that renders a pyramid in 3D using OpenGLs immediate mode producing an image similar to Figure 11.1. Make sure that you have replaced all Setup2DGraphics calls with Setup3DGraphics calls before running this state.
class Test3DState : IGameObject
{
  public Test3DState(){}
  public void Update(double elapsedTime){ }

  public void Render()
  {
    Gl.glDisable(Gl.GL_TEXTURE_2D);
    Gl.glClearColor(1, 1, 1, 0);
    Gl.glClear(Gl.GL_COLOR_BUFFER_BIT);

    // This is a simple way of using a camera
    Gl.glMatrixMode(Gl.GL_MODELVIEW);
    Gl.glLoadIdentity();
    Vector cameraPosition = new Vector(-75, 125, -500); // half a meter back
     on the Z axis
    Vector cameraLookAt = new Vector(0, 0, 0); // make the camera look at the
     world origin.
    Vector cameraUpVector = new Vector(0, 1, 0);
    Glu.gluLookAt( cameraPosition.X, cameraPosition.Y,
     cameraPosition.Z,
                 cameraLookAt.X,   cameraLookAt.Y,
     cameraLookAt.Z,
                 cameraUpVector.X, cameraUpVector.Y,
     cameraUpVector.Z);

    Gl.glBegin(Gl.GL_TRIANGLE_FAN);
    {
     Gl.glColor3d(1, 0, 0);
     Gl.glVertex3d(0.0f, 100, 0.0f);

     Gl.glColor3d(0, 1, 0);
     Gl.glVertex3d(-100, -100, 100);

     Gl.glColor3d(0, 0, 1);
     Gl.glVertex3d(100, -100, 100);

     Gl.glColor3d(0, 1, 0);
     Gl.glVertex3d(100, -100, -100);

     Gl.glColor3d(0, 0, 1);
     Gl.glVertex3d(-100, -100, -100);

     Gl.glColor3d(0, 1, 0);
     Gl.glVertex3d(-100, -100, 100);
    }
    Gl.glEnd();
  }
}
The function call to Glu.gluLookAt is new and it sets up the positioning of a 3D camera to view the scene through. The position of the camera is made of three vectors: the first is the position of the camera in the world, the second is the position of what the camera should point at, and the final vector points upwards. If the up vector were reversed by setting the Y component to –1 then the scene shown in Figure 11.1 would appear upside down.
If you wish to learn more about using 3D graphics in games, then I suggest the following steps.
Set up a 3D scene and draw a cube using OpenGL’s immediate mode and
GL_QUADS.Write out the vertices of the box to a file and then load them in. This is your first simple file format.
Update the code so that it uses vertex buffers and not immediate mode.
Research index buffers and update the code and your file format to use these index buffers.
Research the .obj file format. It’s a plain text format. Write a simple program to load .obj files into a set of index and vertex buffers. Ignore the materials and parametric surface information. (Tip: Remember that OpenGL expects surfaces to come in clockwise order.)
Those steps are enough to get started with 3D game programming. Once you can load simple .obj files then you can move and transform them using the existing matrix class.
When you are ready to move on to animating 3D models, start with the .MD2 file format. This is the file format used by Quake II to store its enemies and characters. There are hundreds of free test files available to download from the internet that can be used to test your loader. Once you get to this stage, you will probably have a much better idea of what part of 3D graphics programming you want to learn next.
Games come in many different shapes and sizes, which can be roughly categorized into genres. Games in the same genre will generally need to be programmed in a similar way.
Text games are some of the simplest games to get started with as no graphics are required. The programmer can focus entirely on the story. There are a large variety of different text games but the most common are interactive fiction games. Here is a sample of an interaction with a simple interactive fiction game.
You are in a dark room, you can see nothing.
>Search
You search around in the dark, your fingers brush against something
  metallic.
>Examine metallic thing
It's hard to make out in the dark but it seems to be a flashlight.
>Turn on flashlight.
The flashlight flickers to life.
An interactive fiction game has two main parts: a data structure holding the description of the world and a parser that interprets the users input. The data structure describing the world can be quite simple.
class Room
{
  public string Description {get; set;}
  public List<Room> Exits{get; set;}
  public Room(string description, List<Room> exits)
  {
    Exits = exits;
    Description = description;
  }
}
The Room class is a single place in the game world; it has a string of text that describes it and a list of exits to different rooms. The player can be given a description of each room and use the exits to travel around the map. Exits can be added and removed as puzzles are solved.
The parser is a piece of code that matches patterns. The user might type “Look” into the console and then press enter to look around a room; in code this would be handled like so:
if (_input == "look")
{
  // The look function writes the description to the console.
  _currentRoom.Look();
}
A more complicated statement would require more parsing; for example, “use hammer on doorstep.” The following code is a little idealized but gives an idea of how the user commands could be broken down.
if(_input.StartsWith("use"))
{
  _input = _input.RemoveSubstring("use")
  int result = _input.Find("on")

  if( result == -1) break; // pattern not recognized

  string firstParameter = input.SubString(0, result)
  string secondParameter = input.SubString(result + "on".Length(),
    input.Length());

  // the use function will use these strings to look up objects
  Use(firstParameter, secondParemeter);
}
This code snippet assumes that all the input text is lowercase; if the player capitalizes any letter then the function won’t work! A fix for this is to process the input string like this:
_input = _input.ToLower()
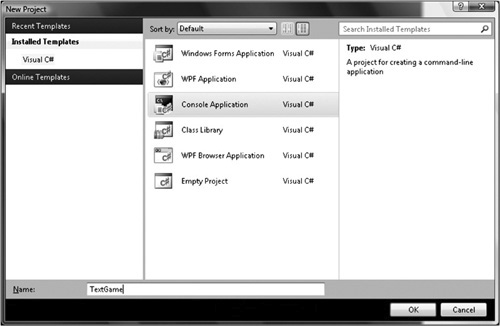
To begin a Visual Studio project for a text-adventure game, choose Console Application rather than Windows Form Application, as is shown in Figure 11.2.
Once the console project is started, input can be read from the console using Windows.Console.ReadLine() and output to the console using Windows.Console.WriteLine().
A good resource for creating interactive fiction is the Inform Programming language http://inform7.com/. It allows the user to type in almost natural English to describe an interactive fiction world.
Puzzle games are a good choice for a first game; they tend to need only a few resources and they are usually relatively simple to understand. Popular puzzle games include games such as a jigsaw, Sudoku, Boggle, Tetris, and Bejeweled. A lot of very popular games are based around collections of puzzle games such as the PC game 7th Guest, the Professor Layton games on the DS, and even Brain Training. All these games are simple to understand and play but are still challenging and fun to create.
Tetris is a good first game to program; at first glance it appears simple, but when you start to break it down you will find some interesting challenges. In case you are not familiar with Tetris the aim is to create a horizontal line of blocks without gaps. Once such a line is created, the line disappears and the blocks above drop down to replace the line. Different colored and shaped blocks fall from the top of the game area and the player must rotate and move the blocks to maximize the number of lines completed. As the game progresses, the speed of the falling blocks increases.
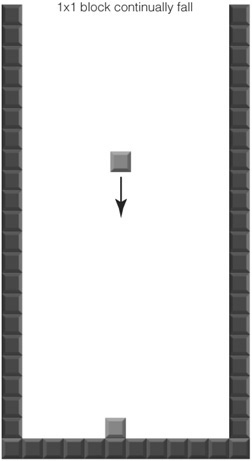
A first goal for creating a Tetris is to make small 1×1 blocks fall from the top of the playing area to the bottom and then stop. Additional blocks should stack up on top of the ones that have fallen before them. This starting goal can be seen in Figure 11.3. Once you’ve got this code working, then you’ve really broken the back of writing a Tetris game.
The next stage in developing the game is to detect when the game is lost. This is when the number of blocks stacks so high it reaches the top of the playing area. Basic player input should be implemented next allowing the blocks to be moved a unit left or right. The player shouldn’t be able to move the block once it’s finished falling and neither should they be able to move the block outside of the playing area. Tetris has no end game, it’s one of those classic era games where you can never win but only hope to delay your inevitable failure. There is no explicit win state to model but one of the major goals in Tetris is to get a complete row of bricks. Your program should detect completed rows and remove the row. Any blocks above the row should drop down a level. This is also a good point to introduce a scoring system and display the player’s score on screen.
The next step is to make the Tetris pieces, which are called tetrominoes; I would suggest designing them so they are a collection of the smaller 1×1 blocks that have been used in the earlier stage. The user must be able to rotate these tetrominoes but rather than try to rotate all the sprites 90° around the center of the tetrominoe, I would just cheat and store four versions of each tetrominoe for each direction it can be rotated. When the player presses the rotate button, the current tetrominoe can be replaced with another new tetrominoe piece that is its next rotation. Instead of 1×1 blocks continually falling from the top of the play area to the bottom, random tetrominoes should be created.
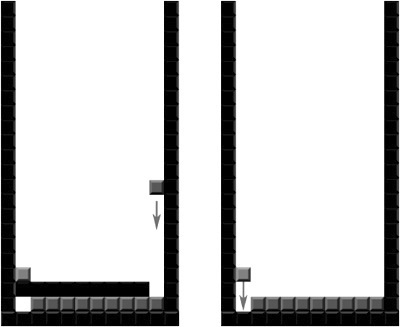
The final challenge regarding Tetris is the chain reaction rule. This rule is shown in Figure 11.4. Sometimes completing a row in Tetris leaves some blocks immediately above the row hanging in space. These blocks need to fall down. When these blocks do fall down they, in turn, may trigger the completion of another row and this may cause a chain reaction.
The chain rule can be quite tricky; after a row is completed, the Tetris board needs to be searched for any free pieces that can move down. All free pieces are then moved down, and before the game resumes, all the rows need to be checked to see if any have been completed. If you follow this rough road map, you should have a reasonable Tetris without too much hair pulling.
First-person shooter games may seem a little intimidating as they require familiarity with a lot of complex mathematics. A lot of the complexity of 3D games comes from the algorithms that work out what the player can currently see. If the program knows what the player can see, then it doesn’t need to render any objects that are hidden. This can produce massive speed improvements. These algorithms are usually a type of space partitioning, but you only need to learn about them if you’ve already got to the stage where you can write a basic FPS.
Here is a list of steps to start you on your way to FPS game creation.
Create a simple 3D scene with a camera class (use
Glu.gluLookAt)that can change its position.Draw a large quad under the camera so that it appears like a floor. Optionally, texture this quad.
Make it so the arrows keys move the position and look-at position of the camera.
If you successfully follow these steps, you will have something that feels like an FPS game, but you can’t move the camera around with the mouse, and there is no real level. To develop the game further than this requires quite a lot more mathematics; here are some of the major formulas to research.
Ray-Triangle, Ray-Plane, Ray-Sphere, and Ray-Quad collision checks need to be researched and implemented. Each of these checks should return one or more positions where the intersection occurred. (A Ray is a position and a direction. It’s useful for representing lasers and determining if the character’s feet are currently touching the floor.)
Line-segment-Triangle, Line-segment-Plane, Line-segment-Sphere, and Line-segment-Quad intersection checks can be created from the Ray checks. Line segments are used to check if the player or player’s bullet has passed through a wall or enemy. A line segment is made by drawing a line from the player’s position in the last frame to the player’s position in the current frame. If the line segment crosses a wall, that means the player is trying to walk through the wall. Walking through walls is a bad thing, so the player’s position needs to be pushed back along the line segment until the player is no longer passing through the wall.
For the camera movement, you may wish to research polar coordinates because they are usually used to translate the movement of the mouse to the movement of the camera in the game world. You may also wish to investigate BSP (Binary Space Partitioning) trees as these render the 3D levels more efficiently. The best way to research this type of game is to take each element on its own and create a simple test program to make sure that everything is working as you expect. Once you have all of the technology down, you can bring all the elements together to make a more complicated game.
Strategy games come in two general types: turn-based games that have a close relationship with traditional tabletop war games, and real-time games, which have a far more distant relationship to tabletop games. Turn-based games are easier to program. The player has a number of possible actions he can carry out each turn, and once no more actions can be done, the turn can end. Real-time games allow the player to perform as many actions as fast as he can, but each action takes a certain amount of time before it completes. Turn-based games tend to favor 2D representational graphics, sticking close to their board game roots, whereas real-time games usually use 3D graphics.
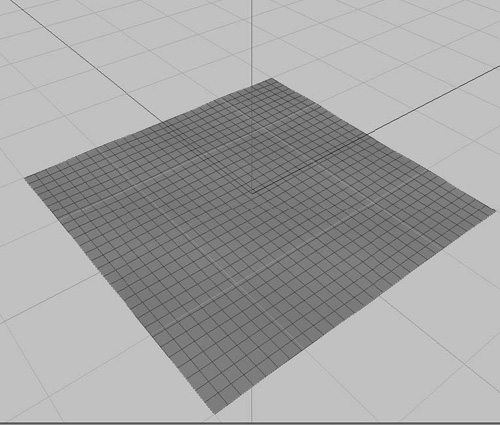
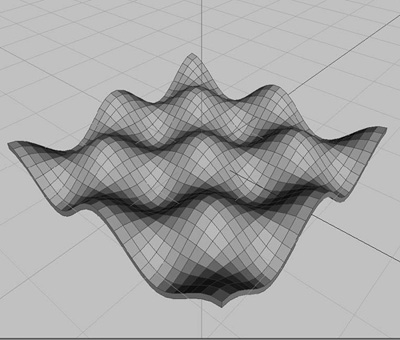
Strategy games tend to favor a top-down view, allowing the player to view as much of the game world as possible. If the graphics are 2D, then tiles and sprites are often used to represent the different types of land, unit, and characters. 3D games usually use a 3D height map. In the Engine class, a sprite was a 2D quad; imagine if that quad was subdivided many times so its surface was more like a grid. An example height map can be seen in Figure 11.5. Each of the vertices can be moved up or down on the Y axis to give the impression of terrain, as can be seen in Figure 11.5. Height maps are often specified by grayscale images. Each pixel of the image corresponds to each vertex in the grid-mesh, the height depending on the intensity of the pixel. A gray pixel value halfway between black and white might represent no movement of the vertex; a black pixel would move the vertex negative one, and a white pixel would move the vertex positive one.
The advantage of using a bitmap to represent the height is that it allows the height map to be painted in a paint package. Height maps get a lot of use in computer games, and after reading this description, they will probably be very easy to spot! Real-time strategy games often use height maps for the terrain and 3D models for each of the units in the game.
The difficulty with strategy games, especially strategy games that are war-based, is the artificial intelligence. There are two different AI systems: the first is the AI of your own units; if you tell a tank to go from one location to another, it should take the shortest route and avoid running over civilians. This type of problem is generally known as path finding, and the easiest solution is to research the A-Star algorithm and implement a suitable variant of it. Not all games use A-Star for path finding, but it is a very popular method that is quite easy to understand.
The second type of AI in real-time strategy games is the AI that controls the computer component. This AI must provide a challenge to the player, but it shouldn’t appear to cheat, and it should be beatable. There are all sorts of novel solutions to this problem using exotic sounding things like neural networks, but the usual solution is the slightly more mundane state machine and a few rules. A strategy game AI might have a number of states such as build-up-units, attack, and defend. Each state has some associated rules; for instance, the build-up-units state might have a rule “if the numbers of units are greater than ten, then move to the attack state.” The attack state might have rules such as “if the offensive unit isn’t near enemy base, then move to enemy base.” It may also have rules about what should be attacked first and what priorities certain targets should be given. These rules can usually be defined in a data file, and then they are refined with a lot of tweaking and play testing.
Role-playing games are very popular with game developers, but they are also very challenging. Role-playing games have many items, locations, enemies, and characters; these all require text and art. There are also several systems that need to be developed to create a full game: the conversation system, world exploration, inventory management, a leveling system, and combat.
Roguelike games get their name from their similarity to an early dungeon crawling game called Rogue. Roguelikes nearly always use the ASCII characters instead of graphics. Like text games, this means more of the programmer’s time can be focused on the game instead of developing graphics. Some of the more popular Roguelikes are ADoM (http://www.adom.de/), Nethack (http://www.nethack.org/), and Crawl (http://crawl.develz.org/wordpress/). ASCII is also used for Dwarf Fortress (http://www.bay12games.com/dwarves/), a large-scale generic fantasy world creator and simulator that allows the user to control a number of dwarves as they build an underground lair. ASCII games do not have to be simple; Dwarf Fortress includes a detailed weather simulator, fluid physics, psychological models, and much more.
Creating an ASCII game in C# is similar to creating a text-based game. A console application should be created. Unlike the text game, ASCII games need a game loop. Each update, the world is output as text to the console. After the world is printed, the console cursor needs to be moved back to the start of the console window. The console cursor is a position that dictates where text will be printed when the program writes to the console. The next world update is printed over the earlier one, updating it. Here is some code that renders a small ASCII map with an @ character representing the player.
static void Main(string[] args)
{
  int _mapWidth = 10;
  int _mapHeight = 10;
  int _playerX = 0;
  int _playerY = 0;
  bool _playerIsAlive = true;
  while (_playerIsAlive)
  {
    for (int i = 0; i < _mapHeight; i++)
    {
     for (int j = 0; j < _mapWidth; j++)
     {
       if (j == _playerX && i == _playerY)
       {
        Console.Write('@'),
       }
       else
       {
        Console.Write('.'),
       }
     }
     Console.WriteLine();
    }
     Console.WriteLine();
    }
    Console.SetCursorPosition(0, 0);
  }
}
Even though this code snippet is quite short, it demonstrates the basics of a Roguelike. The next step is to read the input from the arrow keys and move the character around the small world.
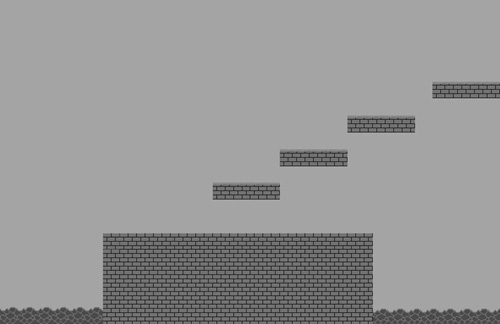
Tile-based games build a 2D world from small sprites called tiles. Tiles are used in all sorts of different games, not just role-playing, but they were a very popular technique with the early Japanese-style RPGS such as the Final Fantasy games (prior to the seventh), Chrono Trigger, the early Zelda games, and many other titles. Tiled graphics are still very common on handheld devices such as the DS and PlayStation portable. An example of a tile-based game can be seen in Figure 11.6. All the tiles describing the world are packed together in one or more textures called a tilemap. The tilemap used to build Figure 11.7 can be seen in Figure 11.8.

A good starting point for a tile-based game is to create a text file that represents the world. For example:
############
#          #
#          #
#S        E#
############
Here each pound sign represents a wall that blocks the character. The S character represents the start of the level, and the E represents the end. Here is some rough code to demonstrate how a level could be built up.
double startX = 0;
double startY = 0;
double tileWidthHeight = 32;

Dictionary<char, TileData> tileLookUp = LoadTileDefinitions();
string levelDef =
  "############
" +
  "#          #
" +
  "#          #
" +
  "#S        E#
" +
  "############
";
TileMap tileMap = new TileMap();
double currentX = startX;
double currentY = startY;
int xPosition = 0;
int yPosition = 0;
foreach (char c in levelDef)
{
  if (c == '
')
  {
    xPosition = 0;
    yPosition = yPosition + 1;
    currentX = startX;
    currentY -= tileWidthHeight;
    continue;
  }
  Tile t = tileLookUp[c].CreateTile();
  t.SetPosition(currentX, currentY);
  tileMap.AddTile(xPosition, yPosition, t);
  xPosition++;
  currentX += tileWidthHeight;
}
The text-based tile definition is iterated through, and each character is transformed into a tile. Each tile is a type of sprite and is carefully positioned so it is flush with its neighboring tile. ASCII characters are used to index a dictionary that contains a set of tile definitions containing tile data. This tile data will probably contain a texture; it will also have some flags that determine if the player can walk on the tile, and it may have some special properties such as ending the game when the player steps on it. The tile definition is used to create a tile, which uses a sprite to draw itself. Once the tile is created, it’s positioned and added to the tilemap. In the game loop, the tilemap is used to render all the tiles. The player is rendered after the tiles and is free to walk around.
A common feature for tile-based games is to layer the tiles. Several tilemaps are created and laid on top of each other. This can be used to provide a parallax effect, where the background moves slowly compared to the progress of the player. It also allows the player to pass behind certain elements on the map.
There is a wide variety of ways to make a 3D role-playing games, Fallout 3, Oblivion, and Bioshock use an FPS approach. Other 3D games emulate the more traditional tile-based approach by using an overhead camera that looks down on the players and game world. Diablo 3 and Twilight are two good examples of this style. The third option is the third-person camera that one might see in Zelda since the N64 era, or the Mass Effect games.
The FPS-based approach puts you inside the eyes of the character, encouraging immersion in the game world. To start this kind of game, you would first need to be able to make a simple FPS game. FPS games tend to take place in tight buildings separated into missions or levels; RPGs tend to have big open areas and a large game world. Open worlds that allow a character to seamlessly walk from one city to another are very hard to program; data must be loaded and unloaded dynamically as the character walks around the world. This is very hard in an FPS game because if the player manages to climb somewhere quite high, then he expects to be able to look out onto the world and see where he has come from. This means a low-detail version of the world needs to be present in memory most of the time, and areas need to become more detailed as the player approaches. If this kind of algorithm interests you, then I suggest searching for papers on ROAM (Real-time Optimally Adapting Meshes). As with other games, it’s a good idea to start small and simple and take small steps to something more complicated.
An easier approach to the open-world problem is to confine the player to small areas that can be loaded in memory all at once. Games such as System Shock and Bioshock use this limitation to drive the story. In System Shock, you are confined to a space station, and you can only move to different levels using a central elevator. While the elevator is moving, the old level is unloaded and the new level is loaded in. Bioshock works in a very similar way, but it’s an underwater base.
Third-person games are very similar to FPS games, but the camera is pulled back allowing the player character to be seen on screen at all times. There are still the same problems with representing a vast dynamic world on only a limited amount of memory and computer resources. The Mass Effect games split up the world by scattering the levels over different planets. While the player is disembarking from his ship to the planet surface, the level is loaded. Zelda games have either an explicit loading screen as one area is loaded and another unloaded, or sometimes a dog leg is used. A dog leg is a stretch of level where nothing can be seen apart from the narrow corridor the player is walking down. The shape of the corridor is roughly like a dog’s leg, or a very relaxed L shape. The corridor is long enough that it gives just enough time for the new level to be loaded before the player emerges from it. Dog legs don’t have to be corridors; they can also be mountain passes or a narrow alleyway between tall buildings.
A top-down camera doesn’t suffer as much from the vast world problems as an FPS or third-person camera view, because the camera only looks at a small chunk of the world. A player with an FPS camera can look to the horizon and see vast trails of the land; this is not the case with the top-down camera. There is always quite a small fixed area around the player. This makes loading and unloading chunks of a level easier. Top-down views also do quite well with a tile-based approach, but instead of each tile being a sprite, each tile is a 3D mesh that matches its surrounding 3D tiles. This makes it much faster to make levels; a few chunks can be modeled and then attached together to form a level fairly quickly.
Platform games are very popular for amateur and independent game developers. There is a little math involved, but it tends to be quite simple, and there are a lot of different gameplay ideas that can be explored in the 2D platformer world. Most platformer games use a tile approach quite similar to the approach discussed in the role-playing section.
Platform games usually require a small degree of physics modeling; gravity nearly always needs modeling. The physics can be written using the basic equations for velocity and acceleration, or by using a third-party physics library, such as a Box2d (there is a C# port called Box2dx). If you decide to code everything by hand, then you can get something up and running quite quickly with the sprite classes and simple rectangle-rectangle collision tests.
Here is a very simple game state that moves a red square around with the arrow keys, and it can be made to jump with the up arrow key.
class PlatfomerTestState : IGameObject

{
  class PlatformEntity
  {
    const float _width = 16;
    const float _height = 16;
    RectangleF bounds = new RectangleF(-_width, -_height, _width,
     _height);
     public void Render()
     {
       Gl.glBegin(Gl.GL_LINE_LOOP);
       {
        Gl.glColor3f(1, 0, 0);
        Gl.glVertex2f(bounds.Left, bounds.Top);
        Gl.glVertex2f(bounds.Right, bounds.Top);
        Gl.glVertex2f(bounds.Right, bounds.Bottom);
        Gl.glVertex2f(bounds.Left, bounds.Bottom);

       }
       Gl.glEnd();
       Gl.glEnable(Gl.GL_TEXTURE_2D);
     }

     public Vector GetPosition()
     {
       return new Vector(bounds.Location.X + _width, bounds.Location.
        Y + 16, 0);
     }

     public void SetPosition(Vector value)
     {
       bounds = new RectangleF((float)value.X - _width, (float)value.
        Y - _height, _width, _height);
     }
    }

    PlatformEntity _pc = new PlatformEntity();
    Input _input;
    double _speed = 1600;
    Vector _velocity = new Vector(0, 0, 0);
    bool _jumping = false;
    double _gravity = 0.75;
    double _friction = 0.1;

public PlatfomerTestState(Input input)
    {
     _input = input;
    }
    #region IGameObject Members
public void Update(double elapsedTime)
{
  if (_input.Keyboard.IsKeyHeld(Keys.Left))
  {
    _velocity.X -= _speed;
  }
  else if (_input.Keyboard.IsKeyHeld(Keys.Right))
  {
    _velocity.X += _speed;
  }

  if (_input.Keyboard.IsKeyPressed(Keys.Up) && !_jumping)
  {
    _velocity.Y += 500;
    _jumping = true;
  }

  _velocity.Y -= _gravity;
  _velocity.X = _velocity.X * _friction;

  Vector newPosition = _pc.GetPosition();
  newPosition += _velocity * elapsedTime;

  if (newPosition.Y < 0)
  {
    newPosition.Y = 0;
    _velocity.Y = 0;
    _jumping = false;
  }
  _pc.SetPosition(newPosition);
}

public void Render()
{
  Gl.glDisable(Gl.GL_TEXTURE_2D);
  Gl.glClearColor(1, 1, 1, 0);
  Gl.glClear(Gl.GL_COLOR_BUFFER_BIT);

  Gl.glEnable(Gl.GL_LINE_SMOOTH);
  Gl.glLineWidth(2.0f);
    Gl.glPointSize(10.0f);
    Gl.glColor3d(0, 0, 0);
    _pc.Render();
  }
  #endregion
}
There is a small class here called PlatformEntity, and this draws a simple red line box and provides methods to move it about. There is some very simple cartoon-like physics modeling in the Process loop. The new position for the entity is calculated and then it’s checked to see if the entity has fallen below zero on the Y axis; if so, it’s pushed back up. This is a good starting point to play around with different control methods, and sprites can be added to give the scene much more character. Additional collision code needs to be added to handle free hanging platforms
By now, you should not only have some great game ideas, but also know how to realize these ideas. Remember to start small, create a rough working version as early as possible, and then refine it. If you follow these steps, you will soon have a fun game that you are proud of and eager to release into the world! Good luck and happy coding!