Chapter 7. Attack Vectors and Mitigation Techniques
One of the biggest problems in network security today is that network managers think of security as something to implement after a network is designed. Security, therefore, tends to be an afterthought at best and, in most cases, is often forgotten completely. This has led to many insecure network designs and solutions.
An attack vector is a vulnerability, exploit, or mode that is open to abuse. Vulnerabilities, threats, and exploits lead to network attacks and are problems that have no easy solution, mainly because they are native to the design of the TCP/IP suite. Understanding how and why these attacks are launched, coupled with the proactive prevention mechanisms, can help you protect the network from these malicious cloaking and cracking techniques.
Effective mitigation of such attacks is an especially pressing problem on the Internet, and experts have researched and proposed various methods to prevent them. This chapter provides insight into technologies and techniques available on Cisco devices to combat network attacks on Layer 3 and Layer 2 devices.
The chapter also covers details of how to use the Security Incident Response Framework to respond to a security incident and to understand and be prepared for any security event by using an incident response methodology and the formation of an Incident Response Team (IRT).
Vulnerabilities, Threats, and Exploits
It is disconcerting to realize that it is difficult, if not impossible, to track down and eliminate all possible security holes, because intruders need only one security hole to break in. In certain cases, an intruder can take advantage of the design of a particular piece of software, a misconfiguration or loosely configured device, or perhaps an inherent flaw in a protocol. The TCP/IP protocol is a good example. The protocol was developed a long time ago when designers did not pay particular attention to the security concerns we observe today. Examples of leveraging flaws in protocols include IP spoofing, source routing, SYN floods, smurf attacks, application tunneling, and much more. Before we take a closer look at the mitigation techniques, however, we will begin with a quick overview of some of the attack vectors.
Classes of Attacks
Three major types of attacks follow:
• Reconnaissance: Reconnaissance attacks are the first step in the process of intrusion and involve unauthorized discovery and mapping of systems, services, or vulnerabilities. These discovery and mapping techniques are commonly known as scanning and enumeration. Common tools, commands, and utilities that are used for scanning and enumeration include ping, Telnet, nslookup, finger, rpcinfo, File Explorer, srvinfo, and dumpacl. Other third-party public tools include Sniffer, SATAN, SAINT, NMAP, and netcat. In addition, custom scripts are used in this process.
• Access: Access attacks refer to unauthorized data manipulation that gives the attacker system access or privilege escalation on a victim or compromised host. Unauthorized data retrieval is simply the act of reading, writing, copying, or moving files that are not allowed or authorized to the intruder. Some common activities performed in this phase include exploiting passwords, accessing confidential information, exploiting poorly configured or unmanaged services, accessing a remote registry, abusing a trust relationship, and IP source routing and file sharing.
• Denial of Service: A DoS attack takes place when an attacker intentionally blocks, degrades, disables, or corrupts networks, systems, or services with the intent to deny the service to authorized users. The attack is geared to impede the availability of the resource to the authorized user by crashing the system or slowing it down to the point where it is unusable. Common examples of DoS attacks include TCP SYN floods, ICMP ping floods, and buffer overflow, to name a few.
A typical attack pattern consists of gaining access to a user account, escalating privilege, exploiting the victim’s system, or using it as a launch platform for attacks on other systems or sites.
Attack Vectors
Attack vectors are routes or methods used to get into computer and network systems to leverage unexpected openings for misuse. Attack vectors can be generally classified as follows:
• Viruses: A virus is a malicious software program or piece of code that causes an unanticipated negative event and usually is capable of causing damage to data or other programs on the infected system.
• Worms: A computer worm is a self-replicating malicious software program, similar to a computer virus. Worms are viruses that can reside in the active memory of a system and are capable of self-duplicating and self-propagating from one computer system to the next over a network. Worms are often designed to exploit the file transmission capabilities, such as e-mail found on many computer systems.
• Trojans: A Trojan horse is a malicious program that pretends to be a benign application. Trojans are seemingly harmless programs that hide a malicious activity, such as a keystroke logger that could capture all passwords or any other sensitive information entered, without the knowledge of the user.
• Password cracking: Password attacks can be implemented using several methods, including brute force attacks, Trojan horse programs, IP spoofing, and packet sniffers. Generally, password attacks refer to repeated attempts to identify a valid user account or password. These repeated attempts are called brute force attacks.
• Buffer overflows: Buffers are memory locations in a system that are used to store data and generally hold a predefined amount of finite data. A buffer overflow occurs when a program attempts to store data in a buffer, when data is larger than the size of the allocated buffer. An analogy is filling an empty glass (buffer) of 1 liter capacity with 1.5 liters of liquid (data). The initial 1 liter will be held with no problem, with the 0.5 liters spilling over, just as with buffer overflow.
• IP spoofing: An IP spoofing attack occurs when an intruder attempts to disguise itself by pretending to have the source IP address of a trusted host to gain access to specified resources on a trusted network. IP spoofing is one of the most common acts of online camouflage.
• Address Resolution Protocol (ARP) spoofing: ARP spoofing occurs when an intruder attempts to disguise its source hardware address (MAC address) to impersonate a trusted host. This is one of the primary steps that aids many of the other attacks.
• Man-in-the-middle attack (TCP hijacking): The man-in-the-middle (MITM), also known as a TCP hijacking attack, is a well-known attack in which an intruder intercepts legitimate communication between two points and can modify or control the TCP session without the knowledge of either the sender or the recipient of the session. TCP hijacking is an exploit that targets the victims’ TCP-based applications such as Telnet, FTP, SMTP (e-mail), or HTTP sessions. An intruder can also be “inline” in an ongoing TCP session between the sender and the receiver while using a sniffing program to watch the conversation.
• Ping sweeps: A ping sweep, also known as an Internet Control Message Protocol (ICMP) sweep, is a scanning technique used to determine live hosts (computers) in a network. A ping sweep, consists of ICMP ECHO requests sent to multiple hosts (one at a time, unless a broadcast IP address is used). If a given address is live, it will return an ICMP ECHO reply confirming a legitimate live host. Ping sweeps are widely used in the reconnaissance phase of the attack process.
• Port scanning: Port scanning is a method used to enumerate what services are running on a system. An intruder sends random requests on different ports, and if the host responds to the request, the intruder confirms that the port is active and in listening mode. The attacker can then plan exploits to any known vulnerabilities by targeting these ports. A port scanner is a piece of software designed to search a network host for open ports. Port scanning is also one of the primary reconnaissance techniques attackers use to discover services that can be exploited.
• Sniffing: A packet sniffer is software that uses a network adapter card in promiscuous mode to passively capture all network packets that are being transmitted across the network.
• Flooding: Flooding occurs when an excessive amount of unwanted data is sent, resulting in disruption of data availability.
• DoS/DDoS Attacks: In most cases, the objective of a DoS attack is to deprive legitimate user access to services or resources. DoS attacks do not typically result in intrusion or the illegal theft of information, but are geared to prevent access to authorized users by means of flooding the victim with an excessive volume of packets.
Distributed DoS (DDoS) attacks amplify DoS attacks in that a large number of compromised systems coordinate collectively to flood the victim, thereby causing denial of service for users of the targeted systems. Common forms of DoS/DDoS attacks include SYN flood attacks, smurf attacks, land attacks, viruses, and worms.
Attackers Family
It is important to identify the attackers responsible for all computer and network abuse, as this identification assists in characterizing the attack and the level of damage it can cause. It is also useful to track them down by understanding their motives and actions. Attackers can be classified in three broad categories:
• Script kiddies (aspiring hackers): These are amateur members of the attacker community with no deep knowledge of the technology. They use readily available programs and tools developed by others for the purpose of intrusive activities. They are movtivated to test limits and to be noticed.
• True hackers: This group of attackers is well versed and has thorough knowledge of the technology with well-developed competence to perform intrusions. Hackers in this category are motivated by the pursuit of recognition and notoriety. They often see hacking as a challenge and a competition.
• Professionals (the elite): This type is a small group of attackers also known as the elite. Members of this group are highly motivated and in most cases remunerated for their services that include organized crime, as well as attacks on the military, intelligence organizations, law enforcement, and other groups. The main motivation for these types of hackers is remuneration.
Risk Assessment
It is imperative to audit the network and evaluate its security posture for the risks and threats in an environment to be able to preemptively determine the likelihood and ramifications of a security breach. This should be an iterative process in which you evaluate and rank each threat and identify an appropriate mitigation technique accordingly. As you face the risk assessment process, keep in mind the following facts about common network attacks:
• 75% to 80% go undetected.
• 15% to 20% are instigated by outsiders.
• 80% to 85% are launched by insiders—people with authorized trust.
• 80% to 90% are vindictive script kiddy attacks. 10% are of a more serious DDoS type.
• 1% to 5% hit the infrastructure directly.
Threat modeling involves identifying and ranking threats according to their likelihood and the damage they could potentially cause. The following steps can help identify potential attack vectors in a network.
Step 1. Identify vulnerabilities, threats, potential attack vectors, and their potential impact on the network and performance.
Step 2. Categorize each threat by criticality—that is, how much damage an attack of this nature could cause and the likelihood of occurrence. For example, assign a number between 1 and 10 for criticality, with 10 being the most severe.
Step 3. Using the following formula, calculate the assumed risk by dividing the criticality by the chance of occurrence:
Assumed Risk = Criticality / Likelihood
Step 4. Identify an appropriate technique or technology to mitigate each threat. Each threat has specific mitigation techniques with varied options. Choose the solution wisely, understanding its pros and cons.
Step 5. Repeat from Step 1 as you move on. Making only one pass through this process can potentially leave the network vulnerable to other unidentified risks and attacks.
There are no magic knobs, silver bullets, or super vendor technology features that will solve all security problems.
The fundamental law of the Internet drives the design of security into the network and how to respond to security incidents. It is all about the packet. After a packet is on the network wire, someone or something somewhere has to either deliver or drop the packet.
In the context of an intrusion or attack, the question is who will drop the packet and where will the packet be dropped?
Mitigation Techniques at Layer 3
This section highlights some of the most common mitigation techniques available on Cisco platforms and commonly applied on specific Layer 3 devices, such as routers or Layer 3 switches.
Traffic Characterization
The first and most essential step in the attack mitigation process is gathering relevant information about the characteristics of an attack to determine the type of attack and to devise a relevant threat-mitigation strategy based on attack vectors.
The Cisco IOS Access Control List (ACL) is the most commonly adopted technique to classify the packets into various attack streams, and it is valuable for characterizing both known and unknown attacks and for tracing packet streams back to their point of origin.
Other features such as debugging, logging, and IP accounting can also be used. However, with recent versions of Cisco IOS Software, access lists and access list logging are predominant in characterization and tracing network attacks.
An ACL with a series of permit statements is used to characterize traffic flows of interest. ACL extends the capability of checking packets based on various options in the packet header as more sophisticated attacks emerge. ACL counters are further used to determine which flows and protocols are potential threats because of their unexpected high volume. After the suspect flows are identified, a logging option can be used to capture additional packet characteristics.
Using an ACL to Characterize ICMP Flood or Smurf Attack
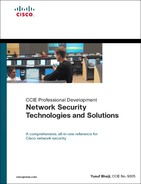
The smurf attack, also commonly known as ICMP flooding, has two victims: a target victim and a reflector or amplifier. The attacker sends a large number of ICMP echo requests (pings) to the broadcast address of the reflector subnet. The source addresses of these packets are forged (spoofed) to be the address of the target victim. For each packet sent by the attacker, hosts on the reflector subnet respond to the target victim, thereby flooding the victim network and causing congestion that results in a denial of service as shown in Figure 7-1.
A similar attack called fraggle uses directed broadcasts in the same technique, sending UDP echo requests instead of ICMP echo requests. Fraggle usually achieves a smaller amplification factor than smurf and is much less popular.
Figure 7-1 illustrates how a smurf attack works. In such an attack, a large number of ICMP echo request packets are sent to the reflectors (using the IP broadcast address) with a spoofed source IP address of the victim host. When the reflector hosts receive the ICMP echo packet, they respond with an ICMP echo-reply packet to the victim address, thereby causing an ICMP flood situation.
Example 7-1 shows an extended access list with permit statements to identify smurf or fraggle attacks.
Example 7-1. Characterizing a Smurf Attack
access-list 101 permit icmp any any echo
access-list 101 permit icmp any any echo-reply
access-list 101 permit ip any any
!
interface <suspected interface>
ip access-group 101 in
Note
Characterization ACLs do not filter out traffic; all the ACL entries are permit statements because the objective is to categorize the traffic.
As shown in Figure 7-1, two possible victims are affected in this attack and need to be identified accordingly:
• Possibility of being a smurf target victim
• Possibility of being a smurf reflector
Use the show ip access-list command to display the access-list packet match statistics to identify the potential threat.
The show ip access-list command output in Example 7-2 shows a large number of ICMP echo reply packets, which is an indication of a potential ICMP flood or smurf attack on the ultimate target victim rather than the reflector.
Example 7-2. Output of Smurf Target Victim Attack
Router# show ip access-list
Extended IP access list 101
permit icmp any any echo (5 matches)
permit icmp any any echo-reply (2198 matches)
permit ip any any (11205 matches)
When the show ip access-list command output indicates a large number of ICMP echo requests instead of echo replies, as shown in Example 7-3, this indicates that the network is being used as a reflector (amplifier). The same output could also mean that the network is experiencing a simple ICMP ping flood, not a smurf. In either case, if the attack is successful, both the egress and the ingress interfaces will be experiencing congestion with large packet counts on the interface. Furthermore, because of the amplification factor, the egress side will be more overloaded than the ingress side.
Example 7-3. Output of Smurf Reflector Attack
Router# show ip access-list
Extended IP access list 101
permit icmp any any echo (5432 matches)
permit icmp any any echo-reply (2 matches)
permit ip any any (1904 matches)
There are several ways to distinguish the smurf attack from the simple ping flood:
• Smurf packets are sent to a directed broadcast address, rather than to a unicast address, whereas ordinary ping floods almost always use unicast. This can be checked in the addresses with the log-input keyword on the appropriate access list entry.
• When experiencing a smurf reflector attack, a disproportionate number of output broadcasts in the show interface counters is displayed, and usually a disproportionate number of broadcasts are sent in the show ip traffic display. A standard ping flood does not increase the background broadcast traffic.
• When experiencing a smurf reflector attack, there is more outbound traffic toward the uplink, as compared to the inbound traffic from the uplink. In general, there are more output packets than input packets on the suspected interface.
When a smurf reflector is closer to the intruder than the ultimate target, it is much easier to trace the attack. ISPs need to be closely involved in tracing such attacks. However, in other situations, the reflector may not be closer to the attacker than the target. The target could be on your own subnet with the reflector on the other side of the network. (The broadcast address does not determine the unicast destination that has been spoofed.)
To stop Cisco routers from being reflectors in such attacks, use the no ip directed-broadcast interface configuration command. This should be configured on each interface of all routers. Note that no ip directed-broadcast is now the default on all interfaces, beginning with Cisco IOS Software Version 12.0. This command drops any packets on the router that are sent to a directed broadcast address that causes multiple hosts to respond to the ICMP echo request.
You can use several techniques to prevent or minimize the impact of smurf and similar ICMP flood attacks, such as rate-limiting (Committed Access Rate [CAR]), a filter using access lists, and Unicast Reverse Path Forwarding (uRPF) and IP Source Guard features, as discussed in the “IP Spoofing Attacks” section later in this chapter.
Using an ACL to Characterize SYN Attacks
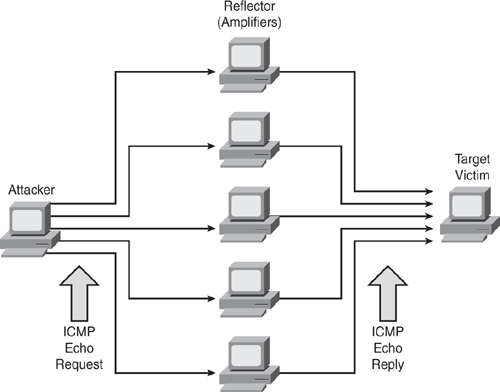
There are many variations of SYN flood attacks, with the most common being a situation in which a target machine is flooded with TCP SYN connection requests. In most cases, the source addresses and source TCP ports of the connection request packets are randomized and spoofed. The objective is to force the target host to maintain TCP state information for a large number of incomplete connections (half-open connections), also called embryonic connections, which are illustrated in Figure 7-2.
Figure 7-2. Unfinished Half-Open TCP Connection (Also Called Embryonic Connection)
SYN flood attacks are sometimes easy to identify because the target host (such as the HTTP or SMTP server) becomes extremely slow, crashes, or hangs. SYN floods are not the only vector; several other vectors exist that are aimed in a similar flooding attack. Most people focus on SYN floods as a critical security attack vector. In reality, some SYN flood mitigation paths open the door for other TCP-based attack vectors.
TCP attack vectors are varied and include the following:
• SYN Flood
• ACK Flood
• SYN+ACK Flood
• SYN+RST Flood
• RST Flood
• Established Flood
• FIN Flood
• TCP Options Flood
• X-Tree Flood
There are two major types of SYN-flood attacks:
• Nonspoofed source addresses: Easy to trace, usually launched from compromised hosts (user workstations, servers, and the like)
• Spoofed source addresses: Difficult to trace, when spoofing invalid addresses from Bogon space (unallocated address range) or valid addresses from someone else’s address blocks
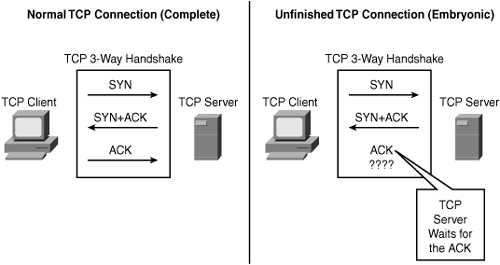
SYN Round Trip Time (RTT) is the interval between the sending of SYN+ACK and reception of the corresponding ACK from the other host (receiver). A successful SYN flood occurs when the number of simultaneous SYNs exceeds the capacity of the victim’s TCP Listen queue and the rate of SYNs exceeds the victim’s ability to clear the SYN_RCVDs in an interval less than the SYN+ACK RTT. The objective of the attack is to crowd out valid SYN_RCVDs before the client’s ACK has a chance to get to the server. If an ACK is received, and there is no available SYN_RCVD waiting, the connection fails and the DoS is successful, as depicted in Figure 7-3.
In summary, to successfully SYN-flood, the attacker must achieve the following:
• Fill and overflow the TCP server’s memory so that the oldest SYN_RVCD entries are flushed.
• Fill the TCP queue faster than the typical SYN+ACK RTT so that valid customer SYN_RVCD entries are crowded out.
Example 7-4 shows an extended access list with permit statements to identify a TCP SYN attack. The TCP permit statement has several other options, such as matching FIN, URG, RST flags or established connections, or checking fragment packets.
Example 7-4. Characterizing a TCP SYN Attack
access-list 101 permit tcp any any syn
access-list 101 permit ip any any
!
interface <suspected interface>
ip access-group 101 in
Use the show ip access-list command to display the access-list packet match statistics to identify the SYN attack.
The output in Example 7-5 shows a large number of TCP SYN packets, an indication of a potential SYN flood to a target victim. The only nonattack condition that creates this signature is a massive overload of genuine TCP connection requests.
Example 7-5. Output of Smurf Target Victim Attack
Router# show ip access-list
Extended IP access list 101
permit tcp any any syn (13174 matches)
permit ip any any (438 matches)
Many features are available that you can use to reduce the impact of SYN floods. The effectiveness of these features depends on the environment; therefore, you should carefully examine these solutions. Some techniques available to prevent or minimize the impact of SYN flood attacks include the following:
• Rate-limiting (CAR).
• Context-Based Access Control (CBAC).
• TCP Intercept.
• On security appliances such as PIX firewalls, static and nat commands provide an option to monitor and control half-open embryonic connections. For more details, refer to static command in PIX documentation.
• Antispoofing: Do not allow traffic claiming to be sourced from customer IP blocks to ingress from the uplink or Internet.
• Anti-bogon: Do not allow traffic claiming to be sourced from reserved addresses or from an IPv4 block that has yet to be allocated by the Internet Assigned Numbers Authority (IANA).
• A source-based remote triggered black hole (RTBH) filtering technique can also be used as a SYN flood mitigation tool. This feature provides real-time defense against DDoS attacks by using a combination of IP routing features. To learn more about this technique, refer to the following white paper: www.cisco.com/warp/public/732/Tech/security/docs/blackhole.pdf.
IP Source Tracker
Source tracking is the process of tracing packet streams from the victim back to the point of origin to find the source of the attack through the network path. Although an ACL is a common tool and can be leveraged to trace back attacks, it has a potential performance impact when applied in a production network environment. IP source tracker provides an easier, more scalable alternative to ACLs for tracking DoS attacks, and it generates all the required information to trace the ingress point of an attack into the network with minimal performance penalty.
How IP Source Tracker Works
The following steps illustrate how IP source tracker works for tracking DoS attacks.
Step 1. After a host is identified as under attack, enable the IP source tracker feature concurrently to track multiple destination IP addresses on the router by using the ip source-track command from the global configuration mode.
Step 2. The router creates a special Cisco Express Forwarding (CEF) entry for the destination address being tracked.
Step 3. The CPU collects all the necessary data in the context of the traffic flow for each tracked IP address in an easy-to-use format and periodically exports this data.
Step 4. The periodically exported data can be viewed by using the show ip source-track <ip-address> command to display detailed information for each input interface, including detailed statistics of the traffic destined to each IP address. To display a summary of the flow information, use the show ip source-track summary command.
Step 5. Detailed statistics provide a breakdown of the traffic to each tracked IP address. This information allows you to determine which upstream router to analyze next and makes a hop-by-hop traceback to the attacker possible.
Step 6. These steps are repeated on each upstream router until the source of the attack is identified.
Step 7. Apply appropriate mitigation techniques to stop or minimize the attack.
Configuring IP Source Tracker
Example 7-6 shows how to enable IP source tracking on a router to collect traffic flow statistics to host address 10.1.1.1 for two minutes, create an internal system log entry, and export packet and flow information for viewing to the route processor every 30 seconds.
Example 7-6. Configuring IP Source Tracker
Router(config)# ip source-track 10.1.1.1
Router(config)# ip source-track syslog-interval 2
Router(config)# ip source-track export-interval 30
Example 7-7 shows detailed information of the flows per-destination IP address being tracked.
Example 7-7. IP Source Tracker Statistics
Router# show ip source-track 10.1.1.1
Address SrcIF Bytes Pkts Bytes/s Pkts/s
10.1.1.1 PO0/0 119G2553M 5619921 156821
Note that the previously listed output indicates that interface POS 0/0 is the potential upstream attack path from which the attack is originating. After the next-hop is determined, it is highly recommend to disable ip source-track on the current router and enable it on the upstream router to track the next preceding hop.
Note
The IP source tracker feature was introduced in Cisco IOS Release 12.0(21)S and was integrated into Cisco IOS Release 12.3(7)T and later. Use the Feature Navigator tool to check platform support and corresponding Cisco IOS Software image at www.cisco.com/go/fn.
IP Spoofing Attacks
As discussed earlier, many network attacks rely on an intruder falsifying, forging, or spoofing the source addresses in IP datagrams. It is very important and best practice to implement antispoofing mechanisms to prevent spoofing wherever feasible.
Antispoofing measures should be taken at every point in the network where practical, but they are usually easiest to implement and most effective at the borders among large address blocks or among domains of network administration.
Apply antispoofing controls described in RFC 2827, “Network Ingress Filtering: Defeating Denial of Service Attacks Which Employ IP Source Address Spoofing,” and in Best Current Practices (BCP 38). The RFC dictates that no IP packets should be sent out to the Internet with a source address other than the addresses that have been allocated to your network.
Note
RFC 2827 obsoletes RFC 2267.
In summary, the antispoofing implementation is used to
• Deny incoming packets if source address is allocated to your network
• Deny outbound packets if source address is not allocated to your network
Antispoofing with Access Lists
Unfortunately, there is no simple list of commands to provide as a template to configure antispoofing access lists, because networks vary and configuration depends on the network boundaries and address space allocations. However, the basic objective is to drop packets that arrive on interfaces that are not viable paths from the supposed source addresses of those packets. For example, on a two-interface router connecting a corporate network to the Internet, any datagram that arrives on the Internet interface whose source address field claims it originates from a host on the corporate network should be discarded. Similarly, any datagram exiting the corporate network whose source address field claims to be anything other than the allocated address space of the corporate network should be discarded. Figure 7-4 depicts a basic guideline to configure antispoofing access lists.
In Figure 7-4, ACL 101 is applied inbound and ACL 199 is applied outbound on the external interface. ACL 101 drops any inbound packets with forged (spoofing) source addresses as the internal allocated address space or trusted hosts. ACL 199 ensures that none of the outgoing packets change their IP addresses to one not belonging to the internal allocated address space. In addition to the antispoofing entries, Figure 7-4 shows ACL 101 with additional deny statements that drop datagrams with broadcast or multicast source addresses, and datagrams with the reserved loopback address and the RFC1918 addresses as a source address.
It is usually appropriate for an antispoofing access list to filter out all ICMP redirects regardless of source or destination address. These are just basic guidelines and can be further fine-tuned with other filtering such as anti-bogon, traffic claiming to be sourced from reserved addresses, or from an IPv4 block that has yet to be allocated by IANA.
Figure 7-4. Preventing IP Spoofing Using ACL
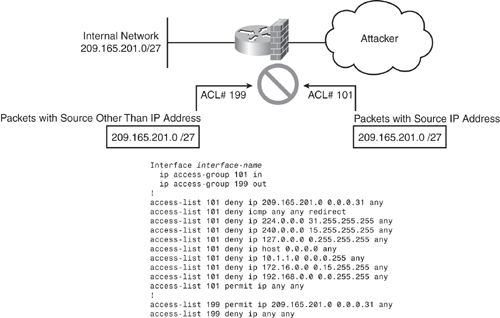
In general, antispoofing filters are best deployed as input access lists; that is, packets must be filtered at the arriving interfaces, not at the interfaces through which they exit the router. The input access list also protects the router itself from spoofing attacks, whereas an output list protects only devices behind the router.
Antispoofing with uRPF
Unicast Reverse Path Forwarding (uRPF) is another common technique used to mitigate source address spoofing. When uRPF is used, the source address of IP packets is checked to ensure that the route back to the source uses the same interface that the packet arrived on. If the input interface is not a feasible path to the source network, the packet will be dropped. The uRPF feature is discussed later in this chapter.
Antispoofing with IP Source Guard
IP Source Guard is a Layer 2 security feature that prevents IP spoofing attacks by restricting IP traffic on untrusted Layer 2 ports to clients with an assigned IP address. This feature works by filtering IP traffic with a source IP address other than that assigned via Dynamic Host Configuration Protocol (DHCP) or static configuration on the untrusted Layer 2 ports. The IP Source Guard feature works in combination with the DHCP snooping feature available on Catalyst switches and is enabled on untrusted Layer 2 ports. (DHCP snooping is discussed in Chapter 4, “Security Features on Switches” with configuration examples.)
As shown in Figure 7-5, when you are using the IP Source Guard feature in a DHCP-enabled environment, all traffic is blocked on the switch port except for the DHCP packets that are captured by the DHCP snooping process. The DHCP packets flowing between the DHCP client and the server are monitored, and the monitoring creates a binding table that lists IP-to-MAC mapping on each switch port. This allows the switch to know which port is connected with what source MAC address and the assigned IP address. If DHCP is not used, a static IP source binding map can be configured by the user. With the help of this IP-to-MAC binding table, a per-port VLAN Access Control List (PACL) is installed (PACL is a security ACL applied on Layer 2 switch ports) that denies traffic other than spoofed source, based on the binding table. This filtering mechanism protects against IP and MAC address spoofing.
Figure 7-5. Preventing IP Spoofing Using IP Source Guard
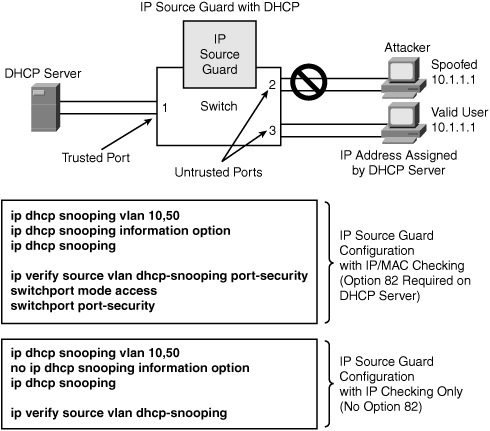
Note
The IP Source Guard feature will not prevent an MITM type of attack. Use Dynamic ARP Inspection (DAI) to prevent MITM, as discussed in the section “ARP Spoofing Attack” later in this chapter.
Packet Classification and Marking Techniques
Cisco IOS provides an unparalleled and comprehensive set of Quality of Service (QoS) features. These tools can be leveraged in the context of security implementations and mitigating network attacks. QoS technologies are becoming increasingly important and critical to maintaining network availability and security.
Several QoS techniques exist for various types of application protocols because not all techniques work for all protocols. These methods apply in different phases of a protocol transition; for example, packets are first characterized (classified) using classification and marking techniques, then policed and dropped, or other action is taken depending on the requirement. With the QoS technology framework, a proactive approach (explicitly protecting critical traffic) is more effective than a reactive approach (trying to identify and squelch bad traffic). It is recommended that the minimum first step when deploying QoS techniques to protect a network against DoS attacks should be to explicitly protect core routing, infrastructure devices, and mission-critical data traffic.
Traffic classification is a method used to partition traffic into groups or classes of service (CoS) dividing network traffic into different categories. Traffic classification is followed by traffic marking, which is a method of identifying certain traffic types for unique handling and allowing the marking (that is, set or change) of a value (attribute) for the traffic belonging to a specific class. Traffic classification and traffic marking are closely related and can be used together. Traffic marking can be viewed as an additional action, specified in a policy map, to be taken on a traffic class.
As mentioned earlier, various QoS techniques are available for traffic classification and marking. Examples of classification and marking techniques include Class-Based Weighted Fair Queuing (CBWFQ), Committed Access Rate (CAR), Modular QoS CLI (MQC), and Network-Based Application Recognition (NBAR). These QoS mechanisms can also be effectively used in combination. For example, MQC and NBAR with policing techniques can be used in combination to give more granular control while regulating normal traffic flows. Using tools already available in Cisco IOS Software, these solutions help provide proactive mitigation solutions.
Committed Access Rate (CAR)
CAR is a multifaceted feature that embodies a rate-limiting feature for policing traffic, in addition to its packet classification and marking feature. CAR can be used to mark packet streams, for example, setting different IP precedence for selected packets entering or exiting the network. As the packet traverses through the network, devices within the path can then use the adjusted IP precedence to determine how to treat the marked traffic.
The policing feature of CAR controls the maximum rate of traffic sent or received on an interface (bandwidth management) for a network specifying traffic handling policies, when the traffic either conforms to or exceeds the specified rate limits. This is achieved by ensuring that traffic falling within specified rate parameters is sent; however, packets that exceed the acceptable amount of traffic are dropped or sent with a different level of priority. By default, the action for traffic exceeding the specified rate limits is to drop or mark down packets.
Simple techniques such as CAR sometimes produce the best results. CAR propagates bursts. It does not perform traffic shaping, and therefore does no buffering and adds no delay. CAR can be applied to all traffic or a subset of the traffic selected by an access-list. CAR performs best when configured on interfaces at the edge of a network to limit traffic into or out of the network.
How CAR Works
CAR provides several fundamental capabilities, as depicted in Figure 7-6. CAR examines traffic received on an interface or a subset of selected traffic by using access list criteria, or all IP traffic, or traffic group by a classification tag such as IP precedence. It then compares the rate of the traffic to a configured token bucket and executes the action policy based on the result. For example, CAR will drop the packet or rewrite the IP precedence by resetting the type of service (ToS) bits.
CAR utilizes a token bucket measurement. Token bucket parameters include the committed rate, the normal burst size (to handle temporary bursts over the rate limit without penalty), and the excess burst size. Tokens are filled into the bucket at the committed rate; that is, if the committed rate is 1 MB, this is the number of tokens inserted into the bucket. Think of it as advance token deposit or token repository. The depth of the bucket is the burst size. When traffic arrives at the bucket and sufficient tokens are available, the traffic is said to conform, and the corresponding number of tokens are removed from the bucket (tokens spent are gone). If sufficient tokens are not available (repository is empty), the traffic is said to exceed.
Figure 7-6. Committed Access Rate (CAR)
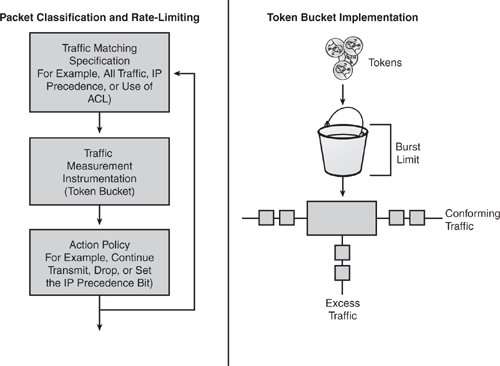
The information in Figure 7-6 is taken from Cisco security presentation on “Committed Access Rate.”
Configuring Committed Access Rate (CAR)
Example 7-8 shows how CAR can be used to limit the rate for specific types of protocols to ensure sufficient capacity for other traffic, including mission-critical applications. Two access lists are created to classify the web and ICMP traffic, so that they can be handled separately by CAR. Note that multiple rate-limit statements can be configured in each direction, and they will be processed top down. The following example shows outbound rate limiting. Inbound rate limiting can also be added.
Router(config)# access-list 101 permit tcp any any eq www
Router(config)# access-list 102 permit icmp any any
Router(config)# interface <interface>
Router(config-if)# rate-limit output access-group 101 10000000 24000 32000 conform-
action set-prec-transmit 5 exceed-action set-prec-transmit 0
Router(config-if)# rate-limit output access-group 102 50000 25000 30000 conform-
action set-prec-transmit 0 exceed-action drop
Router(config-if)# rate-limit output 4000000 16000 24000 conform-action continue
exceed-action drop
Let’s look more closely at the steps involved in Example 7-8:
• The first rate-limit policy dictates that all World Wide Web traffic is sent. However, the IP precedence for web traffic that conforms to the first rate policy is set to 5. For nonconforming web traffic, the IP precedence is set to 0 (best effort).
• The second rate-limit policy dictates that ICMP traffic be sent with an IP precedence of 0 if it conforms. If the traffic exceeds the rate policy, it is dropped.
• The third rate-limit policy dictates that any remaining traffic is limited to 4 Mbps, with a normal burst size of 16,000 bytes and an excess burst size of 24,000 bytes. Traffic that conforms is transmitted, and traffic that does not conform is dropped.
Use the show interfaces <interface> rate-limit command to verify the configuration and monitor CAR statistics.
Modular QoS CLI (MQC)
Cisco modular QoS command-line interface (CLI), referred to as MQC, provides a modular and highly extensible framework that allows users to create hierarchical traffic policies to deliver extremely powerful and scalable solutions. A traffic policy contains a traffic class and one or more QoS features. A traffic class is used to classify (partition) traffic, whereas the QoS features determine how to treat the classified traffic. With the scalability and hierarchical policies, MQC can deliver security and attack mitigation solutions that can virtually be used for any type of attack mitigation.
MQC provides comprehensive classification and marking solutions with a complete set of capabilities to classify and mark traffic based on any Layer 2 or Layer 3 fields. MQC extends the capability to intelligently classify Layer 4 through Layer 7 protocols, using the integrated Network Based Application Recognition (NBAR) technology in the IOS. MQC offers a single-rate and two-rate policer, which allows for packet re-marking (Layer 2 and Layer 3) or dropping policies to control traffic at the network edges/aggregation points.
The MQC allows for the Unconditional Packet Discard feature in which traffic that matches certain criteria can be unconditionally dropped. This feature allows discarding (drop action inside a traffic class in a policy map) without any further system processing and almost no performance impact. This function is very useful in the security context because it allows the user to discard any packets for nonessential applications (such as Internet browsing applications or unauthorized file-sharing P2P applications) while allocating system resources to more essential applications.
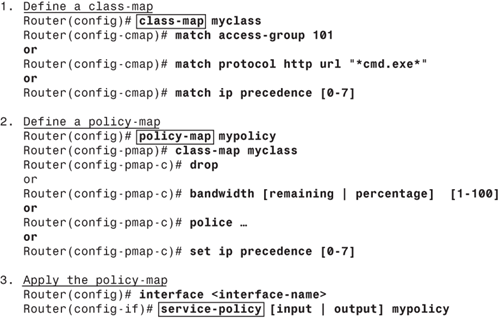
Configuring MQC is a three-step process, which is outlined in the list that follows and depicted in Figure 7-7.
1 Define a class-map: The first step in MQC deployment is to identify the interesting traffic (classifying the packets). This step defines groupings of network traffic by using various classification tools, such as ACLs, IP addresses, IP precedence, IP Differentiated Services Code Point (DSCP) values, IEEE 802.1p, MPLS EXP, and Cisco Network-Based Application Recognition (NBAR) technology.
2 Define a policy-map: After the traffic has been identified, a policy-map dictates what action is to be taken. This step can be considered the actual construction of an MQC through use of a policy-map to perform specific functions. Examples of functions are queuing, dropping, policing, shaping, bandwidth control, or marking IP precedence or DSCP values.
3 Apply the policy-map: The final step is to apply the policy-map to the desired interfaces or subinterfaces. Each interface can have up to two policy-maps applied, each in one direction (inbound and outbound).
Figure 7-7. Configuring Modular QoS CLI (MQC)
The show policy-map interface <interface-name> command can be used to display the packet statistics of all classes that are configured for all service policies on the specified interface.
Traffic Policing
The Cisco IOS Traffic Policing features allow the control and filtering of the incoming and outgoing traffic rate on an interface, as well as network bandwidth management through the token bucket algorithm. Traffic that falls within the defined parameters is sent, whereas traffic that exceeds or violates the parameters is dropped or sent with a different priority.
Several policing techniques are available within the Traffic Policing technology:
• Traffic Policing (Single-Rate Policer): Single-Rate Policer controls the input or output traffic rate for class-based user-defined criteria.
• Two-Rate Policer: Two-Rate Policer enforces Traffic Policing according to two separate rates: committed information rate (CIR) and peak information rate (PIR). These two rates can be specified along with their corresponding values by using the cir and pir keywords in the police command.
• Policer Enhancements—Multiple Actions: This feature further extends the functionality of the Traffic Policing feature (Single-Rate Policer) and the Two-Rate Policer feature. With both features, there is a limitation to specify only one conform action, one exceed action, and one violate action. With the new Policer Enhancement “Multiple Actions” feature, multiple conform, exceed, and violate actions for the marked packets can now be specified.
• Percentage-Based Policing and Shaping: This feature provides the capability to configure Traffic Policing and traffic shaping based on a percentage of bandwidth available on the interface by using the police (percent) and shape (percent) commands.
• Color-Aware Policer: The Color-Aware Policer feature is a method of Traffic Policing using an enhanced “color-aware” technique. The packet color classification is based on packet-matching criteria defined for two user-specified traffic classes—the conform-color class and the exceed-color class. These two traffic classes are created using the conform-color command, and the metering rates are defined using the police command. This feature is not available on all platforms. Use Feature Navigator to check platform and IOS support.
Configuring Traffic Policing is similar to configuring MQC, as described in the previous section. The tasks of configuring each of the Traffic Policing features that are listed previously are essentially the same; that is, you configure by using the MQC (as shown in the previous section) to create a class-map and policy-map. Then, using the police command, you configure the various traffic-policing features previously discussed under a specific class within that policy-map, as shown in Figure 7-7, and attach the policy-map to the interface. Traffic Policing can be configured at any level of the policy-map hierarchy—that is, at the primary level, the secondary level, or the tertiary level. Example 7-9 shows a basic configuration applying Traffic Policing (Single-Rate Policing).
Example 7-9. Configuring Traffic Policing
Router(config)# class-map myclass
Router(config-cmap)# match access-group 101
Router(config-cmap)# exit
Router(config)# policy-map mypolicy
Router(config-pmap)# class-map myclass
Router(config-pmap-c)# police 8000 1000 1000 conform-action transmit exceed-action
drop violate-action drop
Router(config-pmap-c)#exit
Router(config-pmap)#exit
Router(config)# interface <interface-name>
Router(config-if)# service-policy [input | output] mypolicy
Network-Based Application Recognition (NBAR)
The NBAR feature adds application-level intelligent classification capability to the network infrastructures. NBAR is a classification engine that recognizes a variety of applications and protocols from Layer 4 through Layer 7, including web-based and other difficult-to-classify protocols that utilize static and dynamically assigned TCP and UDP port numbers. NBAR classification extends by looking beyond the TCP/UDP port numbers of a packet and packet headers. This capability is called subport classification. NBAR looks into the TCP/UDP payload and classifies packets on the basis of the content within the payload, such as transaction identifier, message type, or other similar data.
NBAR classifies the following three types of protocols:
• TCP and UDP protocols that use statically assigned port numbers
• TCP and UDP protocols that use dynamically assigned port numbers, requiring stateful inspection
• Non-TCP and non-UDP IP protocols such as IPsec (ESP/AH) or ICMP
Protocol Discovery
NBAR includes a special Protocol Discovery feature that provides an easy way to discover application protocols traversing a network at any given time. Protocol Discovery can be applied to interfaces by using the ip nbar protocol-discovery command under the interface configuration mode and can be used to monitor both input and output traffic. The Protocol Discovery feature captures important per-protocol statistics supported by NBAR, such as total number of input and output packets and bytes, and input and output bit rates. These statistics assist in developing traffic classes and policies. The show ip nbar protocol-discovery command displays the statistics for all interfaces on which Protocol Discovery is enabled.
Packet Description Language Module (PDLM)
An external PDLM can be loaded on the router at runtime using the ip nbar pdlm <pdlm-name> command from the global configuration mode, extending and enhancing the classification engine for the many existing and emerging application protocols in the NBAR list of protocols. PDLMs can also be used to enhance an existing protocol recognition capability. PDLMs allow NBAR to recognize new protocols without requiring a new Cisco IOS image or a router reload. The show ip nbar pdlm command displays all currently loaded PDLMs. Example 7-10 shows the current PDLM loaded from flash memory.
Router# show ip nbar pdlm
The following PDLMs have been loaded:
flash:gnutella.pdlm
flash:kazaa2.pdlm
flash:edonkey.pdlm
Configuring NBAR
Similar to the other techniques discussed earlier in this chapter, NBAR is configured through the MQC framework. Example 7-11 shows a class-map “myclass” using the NBAR technique to classify peer-to-peer (P2P) file-sharing network traffic as its matching criterion using the match protocol commands. P2P traffic is bandwidth intensive, and most networks would like to manage them. The example shows that P2P can be blocked using the drop command or policed down to the average rate of 8000 bits per second with a normal burst size of 1000 bytes and an excess burst size of 1000 bytes.
The long list of supported protocols available in the match protocol command includes HTTP, HTTPS, FTP, IMAP, POP3, SMTP, BGP, RIP, EIGRP, ICMP, KAZAA, NAPSTER, and PCANYWHERE.
Example 7-11. Configuring NBAR
Router(config)# class-map myclass
Router(config-cmap)# match protocol fasttrack
Router(config-cmap)# match protocol napster
Router(config-cmap)# match protocol gnutella
Router(config-cmap)# match protocol edonkey
Router(config-cmap)# match protocol kazaa2
Router(config-cmap)# exit
Router(config)# policy-map mypolicy
Router(config-pmap)# class-map myclass
! Define Drop action
Router(config-pmap-c)# drop
! OR Perform Class-based Policing
Router(config-pmap-c)# police 8000 1000 1000 conform-action transmit exceed-action
drop
Router(config-pmap-c)#exit
Router(config-pmap)#exit
Router(config)# interface <interface-name>
Router(config-if)# service-policy [input | output] mypolicy
The show ip nbar port-map [protocol-name] command can be used to display the TCP/UDP port numbers used by NBAR to classify a given protocol.
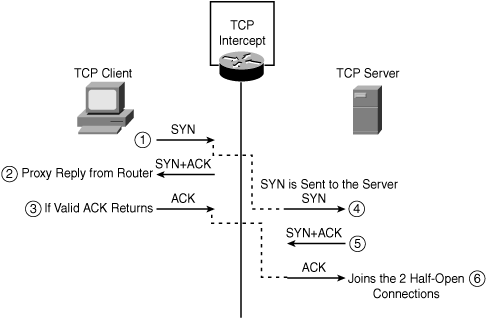
TCP Intercept
TCP Intercept is another important security feature integrated into Cisco IOS software, which is used to protect TCP servers from SYN-flooding attacks. As discussed earlier in this chapter, a SYN-flooding attack occurs when an attacker attempts to flood a TCP server with requests for connection. Because these messages have unreachable or spoofed return addresses, the connections are not able to fully establish. The resulting volume of incomplete half-open connections eventually overwhelms the TCP server and can cause it to deny regular service to valid user requests, thereby preventing legitimate users from connecting to a website, accessing e-mail, using FTP service, or any other TCP-based application.
How TCP Intercept Works
Figure 7-8 illustrates how the TCP Intercept feature works by intercepting and validating all incoming TCP connection requests flowing between a TCP client and TCP server. In the intercept mode, the TCP Intercept engine intercepts TCP synchronization (SYN) packets from clients to servers that match an extended access list. The software establishes a connection with the client on behalf of the destination server (proxying the SYN) and, if successful, establishes the connection with the server on behalf of the client, thereby transparently knitting together the two half-connections. This mechanism protects against any connection attempts from unreachable or spoofed hosts. The software continues to intercept and forward packets (inline) throughout the duration of the connection.
In the event of illegitimate requests, the aggressive timeouts on half-open connections and thresholds on TCP connection requests protect destination servers while continuing to forward legitimate requests.
TCP intercept operates in two modes: the passive watch mode or the default active intercept mode. In watch mode, all connection requests are allowed to pass through the router with the software passively watching the connection that is being established. If a connection fails to establish in a configurable interval, the software then intervenes and terminates the connection attempt. Whereas in intercept mode, the software actively intercepts all incoming connection SYN requests and responds on behalf of the server with an SYN-ACK waiting for an ACK from the server. When an ACK is received from the TCP server, the original SYN is sent to the server and the software performs a three-way handshake with the server. When this is complete, the two half-connections are joined.
Figure 7-8. TCP Intercept
Configuring TCP Intercept
To configure the TCP Intercept feature, you need to first define an access list that instructs the intercept engine to intercept and validate either all requests or only specific networks or specific destination servers. Generally, the access list should have the source as any and define specific destination networks or servers. This will provide protection for destination host(s) and not the source. If no access list match is found, the router allows the request to pass with no further action.
Example 7-12 defines extended IP access list 101, instructing the TCP Intercept engine to intercept packets for all TCP servers on the 10.1.1.0/24 subnet. The example also tunes the aggressive threshold trigger values to 400 and 500 for low and high incomplete connections, respectively.
Example 7-12. Configuring TCP Intercept on Router
Router(config)# access-list 101 permit tcp any 10.1.1.0 0.0.0.255
Router(config)# ip tcp intercept list 101
Router(config)# ip tcp intercept max-incomplete low 400
Router(config)# ip tcp intercept max-incomplete high 500
The ip tcp intercept mode {intercept | watch} command in global configuration mode can be used to set the TCP intercept mode.
The show tcp intercept connections command displays incomplete connections and established connections, and show tcp intercept statistics displays TCP intercept statistics.
TCP Intercept on Firewall
The TCP Intercept feature is also available on the PIX 500, ASA 5500, and FWSM firewall software to help protect servers behind the firewall from SYN-flood attacks. The feature allows for configuring two parameters:
• The maximum number of established connections allowed to a TCP server
• The maximum number of incomplete half-open (embryonic) connections to a TCP server
When the embryonic connection limit is reached, the firewall responds to every SYN packet sent to the server with a SYN+ACK and does not pass the SYN packet to the internal server. If the external device responds with an ACK packet, the firewall knows it is a valid request and not part of a SYN attack. The firewall then establishes a connection with the internal server and joins the client connections passively. If the firewall does not get an ACK back from the server, it aggressively times out that embryonic connection. Figure 7-8 illustrates how this works.
Example 7-13 shows a static translation on PIX for an internal TCP server with the embryonic limit set to 100 and the Max Connection limit set to 1000. Most Windows platforms allow a maximum of 128 half-open (embryonic) connections, so when setting the embryonic limit on the static, use a value less than the maximum embryonic limit allowed by the server operating system.
Example 7-13. Configuring TCP Intercept on PIX/ASA Firewall Using the Static Command
PIX(config)# static (inside, outside) 209.165.201.1 10.1.1.1 netmask
255.255.255.255 1000 100
The nat command offers the same feature. Example 7-14 shows how configuring the nat command is similar to configuring the TCP Intercept.
Example 7-14. Configuring TCP Intercept on PIX Using the NAT Command
PIX(config)# nat (inside) 1 10.1.1.0 255.255.255.0 1000 100
Policy-Based Routing (PBR)
Policy-based routing (PBR) provides a method for overriding the information available in the IP routing table and can be configured to forward (route) packets based on other criteria defined in policies, such as IP addresses, port numbers, application, and the length/size of the packet. PBR can also be used for packet classification and marking with IP precedence values in the Type of Service (ToS) field of the IP header. PBR gives more granular control over routing of packets by extending and complementing the existing mechanisms provided by routing protocols.
With the capability to control a data path, in the event of an attack, PBR can be used as a security tool to divert traffic and for scrubbing or managing congestion. PBR can also be used as a mitigation tool to match the attack traffic and drop it. Example 7-15 shows sample configurations for both these scenarios.
PBR allows performing the following tasks:
• Classifying traffic based on the extended access list to identify the match criteria
• Rewriting or changing header options such as IP precedence, DF, or ToS bits, influence the next-hop address or interface
• Routing packets to specific traffic-engineered paths
Example 7-15 shows configuration of a PBR and provides details on how to route traffic from different sources to different next-hops. Traffic can be routed by overwriting the path devised by an IP routing table and setting various parameters in the packet header, such as the IP precedence or the ToS bit. All packets arriving on the specified interface matching the match clauses will be subject to the action defined in the set command.
The example shows that all packets arriving from source 1.1.1.1 are forwarded to the next-hop address at 11.11.11.11 with the Precedence bit set to priority, whereas packets arriving from source 2.2.2.2 are forwarded to a different next-hop address at 22.22.22.22 with the max-throughput TOS (4) bit set. The example also shows that all TCP packets that arrive with a minimum and maximum packet length of 100 are sent to the Null 0 interface (black holing the packets). PBR is then applied on a particular interface.
Example 7-15. Configuring Policy-Based Routing (PBR)
Router(config)# access-list 1 permit ip 1.1.1.1
Router(config)# access-list 2 permit ip 2.2.2.2
Router(config)# access-list 101 permit tcp any any
Router(config)# route-map mymap permit 10
Router(config-route-map)# match ip address 1
Router(config-route-map)# set ip precedence priority
Router(config-route-map)# set ip next-hop 11.11.11.11
Router(config-route-map)# exit
Router(config)# route-map mymap permit 20
Router(config-route-map)# match ip address 2
Router(config-route-map)# set ip tos max-throughput
Router(config-route-map)# set ip next-hop 22.22.22.22
Router(config-route-map)# exit
Router(config)# route-map mymap permit 30
Router(config-route-map)# match ip address 101
Router(config-route-map)# match length 100 100
Router(config-route-map)# set interface null 0
Router(config-route-map)# exit
Router(config)# interface <interface-name>
Router(config-if)# ip policy route-map mymap
Note that PBR is applicable for inbound traffic when configured on the specified interface. By default, packets generated by the router are not policy routed. To enable local PBR for such packets, the additional ip local policy route-map <map-name> command from the global configuration mode is required.
The show ip policy and show route-map commands can be used to verify PBR configuration and display packet statistics for each policy.
Unicast Reverse Path Forwarding (uRPF)
The uRPF feature is a security tool that helps mitigate source IP address spoofing by discarding IP packets that lack a verifiable IP source address in the IP routing table. Several DoS/DDoS attacks employ forging or rapidly altering source IP addresses to navigate around threat detection and filtering mechanisms. uRPF technique thwarts any attempts of DoS attacks by relying on IP spoofing. uRPF should be deployed at the network edge or the border/gateway device on the network.
There are two flavors of uRPF implementation:
• Strict Mode complying with RFC 2827 filters on Network Ingress Edge and Best Current Practices (BCP 38)
• Loose Mode for ISP to ISP Edge, for RTBH filtering
How uRPF Works
As illustrated in Figure 7-9, the router examines all arriving packets received on the uRPF-enabled interface and will only forward packets that pass the uRPF check; that is, the source address appears in the routing table and matches the interface on which the packet was received. In other words, source IP packets are checked to ensure that a packet’s return path uses the same interface it arrived on. If the source IP address is unknown and not reachable through the interface on which the packet was received, the packet is dropped by default. Because the lookup relies on the presence of the Forwarding Information Base (FIB), this “look backward” capability works only when Cisco Express Forwarding (CEF) is enabled on the router. CEF generates the FIB as part of its operation.
Figure 7-9. Unicast Reverse Path Forwarding (uRPF) Strict Mode

The information in Figure 7-9 is taken from the Cisco security presentation on “Unicast Reverse Path Forwarding.”
Note
Source Address must match the FIB and Adjacency Information in the CEF Table.
The uRPF enhances with the ACL logging capability by enabling reverse path forwarding (RPF) check in a pass-through mode. In this mode, all RPF violations are logged using the ACL log-input feature. If a packet fails RPF check, the ACL is checked to determine whether the packet should be dropped (using a deny ACL) or forwarded (using a permit ACL). The ACL logging counter and match counter statistics are incremented to reflect statistics for packets with spoofed IP addresses.
Configuring uRPF
Example 7-16 shows how to configure uRPF on an interface with the ACL logging feature. Packets sourced from 10.1.1.0/24 subnet arriving at serial0/0 and failing the uRPF check are logged by the ACL log statement and dropped by the ACL deny action. Packets sourced from 172.16.1.0/24 subnet arriving at serial0/0 and failing the uRPF check are logged by the ACL log statement and forwarded by the ACL permit action.
Example 7-16. Configuring uRPF (Strict Mode) with ACL
Router(config)# access-list 101 deny ip 10.1.1.0 0.0.0.255 any log-input
Router(config)# access-list 101 permit ip 172.16.1.0 0.0.0.255 any log-input
Router(config)# interface <interface-name>
Router(config-if)# ip verify unicast reverse-path 101
The show ip interface <interface-name> command displays uRPF statistics for dropped or suppressed packets for the specified interface and can be used with the show ip access-list command to detect IP address spoofing. If ACL logging is enabled, the data logs can be reviewed to gather additional information about the network attack, as shown in Example 7-17.
Example 7-17. Verifying uRPF Configuration and Statistics
Router# show ip interface <interface-name>
...
IP verify source reachable-via RX, allow default, ACL 101
56 verification drops
192 suppressed verification drops
!
Router# show ip access-lists 101
Extended IP access list 101
deny ip 10.1.1.0 0.0.0.255 any log-input (56 matches)
permit ip 172.16.1.0 0.0.0.255 any log-input (192 matches)
To verify whether uRPF is operational, use the show cef interface <interface-name> command, as shown in Example 7-18.
Example 7-18. Verifying uRPF Is Operational
Router# show cef interface <interface-name>
Serial0/0 is up (if_number 3)
...
IP unicast RPF check is enabled
IP CEF switching enabled
The show ip traffic command can be further used to display additional packet counter information for packets dropped because of uRPF checks, as shown in Example 7-19.
Example 7-19. Verifying Drop Packet Counters
Router# show ip traffic
IP statistics:
...
Drop: 3 encapsulation failed, 0 unresolved, 0 no adjacency
0 no route, 0 unicast RPF, 0 forced drop
NetFlow
NetFlow is a Cisco IOS feature that captures statistics on IP packets flowing through the router and is emerging as a primary security technology. Cisco is the pioneer in the NetFlow technology and the leader in IP traffic flow technology. NetFlow provides numerous applications and services: network traffic accounting, user and application monitoring, usage-based billing, link-usage, network planning, traffic profiling, traffic engineering, capacity planning, anomaly detection, and security and DoS monitoring capabilities.
As shown in Figure 7-10, Cisco NetFlow can be used primarily as a security analysis tool to identify and classify DoS attacks, viruses, worms, and network anomalies in real-time. The data can further be invaluable in forensic processes to gather details and comprehend security incidents. NetFlow is completely transparent to the existing network, including end stations, application software, and any devices on the network.
Figure 7-10. Using NetFlow for Security Analysis
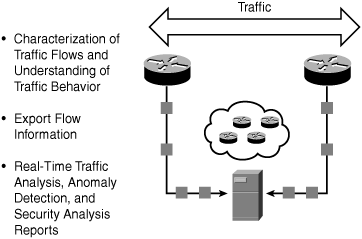
NetFlow is supported on most Cisco platforms via ASICs, Cisco IOS, and Cisco Catalyst Operating System (CatOS) software.
How NetFlow Works
NetFlow classifies packets by the direction of their flow and identifies packet flows for both ingress and egress IP packets. Each flow is defined by its unique seven-key characteristics: ingress interface, IP protocol type, type-of-service (ToS), source and destination IP addresses, and source and destination port numbers, as shown in Example 7-21. The information gathered with NetFlow is like a phone bill that provides all the required information for traffic profiling and determining the “who, what, when, where, and how” of network traffic. NetFlow is usually deployed across the edge of a network to monitor peer interfaces, because these are the potential ingress points for most attacks.
Configuring NetFlow
Example 7-20 shows you how to enable NetFlow Switching for IP on a Cisco Router.
Example 7-20. Configuring NetFlow on a Router
Router(config)# interface <interface-name>
Router(config-if)# ip flow ingress <or>
Router(config-if)# ip flow egress
The ip flow ingress command is used to capture traffic being received by the interface, whereas the ip flow egress command is used to capture traffic being transmitted by the interface.
Note
For Cisco IOS prior to releases 12.2(14)S, 12.0(22)S, or 12.2(15)T, the ip route-cache flow command was used to enable NetFlow on an interface.
For Cisco IOS release 12.2(14)S, 12.0(22)S, 12.2(15)T, or later, the ip flow ingress command is used to enable NetFlow on an interface.
If CEF is not configured, NetFlow enhances the existing switching path (optimum switching).
If CEF is configured, NetFlow becomes a flow information gatherer and feature acceleration tool.
The router maintains current NetFlow cache to track all the flows passing through the device. The show ip cache flow command or the show ip flow interface command can be used to view a snapshot of the current flows stored in the router cache.
Example 7-21 shows a sample snapshot using the show ip cache flow command taken from the NetFlow cache. Note the large amount of ICMP flood (Protocol 01) and other valuable flow statistics and flow details (Src/Dest interface, Src/Dest IP and port, and so on).
Example 7-21. NetFlow Captured Statistics
Router# show ip cache flow
IP packet size distribution (72014968 total packets):
1-32 64 96 128 160 192 224 256 288 320 352 384 416 448 480
.003 .000 .000 .118 .000 .000 .000 .000 .000 .004 .000 .005 .000 .000 .000
512 544 576 1024 1536 2048 2560 3072 3584 4096 4608
.013 .000 .022 .067 .231 .000 .000 .000 .000 .000 .000
IP Flow Switching Cache, 53988 bytes
12 active, 2324 inactive, 66 added
364 ager polls, 0 flow alloc failures
Active flows timeout in 30 minutes
Inactive flows timeout in 15 seconds
last clearing of statistics never
Protocol Total Flows Packets Bytes Packets Active(Sec) Idle(Sec)
-------- Flows /Sec /Flow /Pkt /Sec /Flow /Flow
TCP-Telnet 3 0.0 1 44 0.0 0.6 15.3
TCP-BGP 1 0.0 1 59 0.0 0.0 15.0
UDP-other 13 0.0 48 586 0.0 138.5 14.2
ICMP 6720 143.7 17 592 252.6 6.7 10.6
SrcIf SrcIPaddress DstIf DstIPaddress Pr SrcP DstP Pkts
Fa0/0 10.1.1.1 Local 1.1.1.1 01 0000 0800 42K
Fa0/0 0.0.0.0 Null 255.255.255.255 11 0044 0043 360
Fa0/0 10.17.10.1 Local 192.168.5.161 01 0000 0000 423K
Additionally, NetFlow data can be exported from the NetFlow cache to an external collector for further analysis and can be used to map and identify the nodes under attack and also to determine the attack characteristics. To export NetFlow data, use the ip flow-export global configuration command.
NetFlow Ecosystem
Cisco has developed a robust ecosystem of NetFlow partners that have developed value-added functionality and reporting specialties, including accounting, traffic analysis, security, billing, network planning, and network monitoring. Many freeware tools are available that can analyze NetFlow data, including cflowd, flow-tools, and autofocus. Several GUI-based applications are available, such as Arbor, Mazu, and Adlex, which leverage NetFlow data for DoS attack detection and centralized reporting. Threat correlation tools such as Panoptis, used for anomaly detection, also take advantage of NetFlow data to detect, characterize, and mitigate DoS attacks.
Mitigation Techniques at Layer 2
One of the biggest challenges in securing the network is the OSI Layer 2—the data-link layer. The OSI reference model was built to allow different layers to work without the knowledge of each other. The data-link layer provides the functional and procedural means to transfer data among network entities with interoperability and interconnectivity to other layers, but from a security perspective, it presents its own challenges.
Layer 2 attacks are difficult to achieve from outside the network. The attacker needs to be inside the network to be able to abuse Layer 2. Some very serious Layer 2 attacks are possible that can cause damage to the network. If Layer 2 is compromised, it can in turn compromise all other layers in succession.
Network security implementations, in most cases, are highly focused on securing Layer 3 and above with firewalls, intrusion detection systems, and encryption technologies. Little to no attention is given to secure Layer 2. It is often said that network security is only as strong as the weakest link, and that may well be Layer 2 of the OSI model. Several Layer 2 attacks exist that pose major threats to other layers in the OSI layered-model (Layer 3 and above). These include MAC spoofing, MAC flooding, ARP spoofing, Spanning-Tree attacks, and VLAN hopping. These attacks and others are discussed in this section with appropriate mitigation techniques.
CAM Table Overflow—MAC Attack
Content Addressable Memory (CAM) tables are storage locations that contain lists of MAC addresses available on physical ports of the switch along with their associated VLAN parameters. CAM tables are analogous to the routing tables on a Layer 3 device.
Background
All frames arriving on the switch are checked against the CAM table. If an entry is found corresponding to the destination MAC address of the frame, the switch forwards the frame to the designated outgoing port. If the destination MAC address is not found in the CAM table, the switch forwards the frame out of every port, effectively acting like a hub. When the target device returns the frame, this knowledge is captured, and the CAM table is updated for subsequent frames with the same destination MAC address.
The Problem
Switches do not have unlimited memory; hence, the CAM table has a fixed allocated memory space. This makes the switch vulnerable to exploitation from sniffing by flooding the switch with a large number of randomly generated invalid source and destination MAC addresses, until the CAM table fills up and no new entries can be accepted. When this happens, the switch cannot handle any further frames and acts in a hub mode, in which it broadcasts all received frames to all the ports on the switch, essentially turning it into one big broadcast domain. CAM table overflow floods traffic only within the local VLAN; hence, the attacker is limited to receive traffic within the VLAN to which it is connected. Popular DoS tools such as MACOF and DSNIFF are available to launch this type of attack. The switch eventually times out older MAC address entries from the CAM table and reverts back to acting like a switch again.
CAM Table Overflow Attack Mitigation
The CAM table overflow attack can be effectively mitigated by configuring the Port Security feature on the switch. Port security can be enabled for static MAC addresses seen on a particular switch port or dynamic MAC addresses by specifying the number of MAC addresses that can be learned by a switch port. Switch ports can be configured for port violation when an invalid source MAC address is detected, to either block the offending MAC address or shut down the port.
Port security is discussed in detail in Chapter 4, with configuration examples.
MAC Spoofing Attack
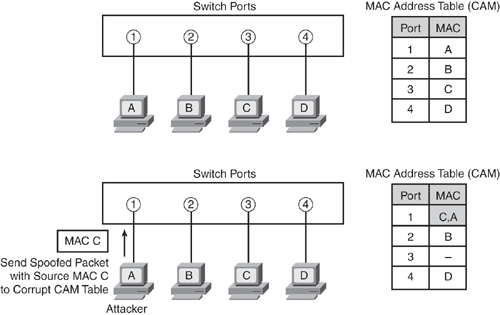
MAC spoofing is a technique used to spoof source MAC addresses to impersonate other hosts or devices in a network. This is different from an ARP spoofing attack. In ARP spoofing, the switch is misguided by poisoning the ARP cache, whereas with MAC spoofing, the switch is confused to believe two ports have the same MAC address, thereby forcing the switch to attempt to forward frames destined for the trusted host to the attacker. This is illustrated in Figure 7-11.
Background
As discussed earlier, when a frame is received on the switch, the switch looks up the destination MAC address in the CAM table and forwards the frame to the corresponding egress port designated in the MAC table.
The Problem
As illustrated in Figure 7-11, the switch has built its MAC address table (also called CAM table) by mapping Host A on port 1, Host B on port 2, Host C on port 3, and Host D on port 4. An attacker crafts an Ethernet frame forging (spoofing) the source MAC address of another host (for example, Host C in the diagram), causing the switch to overwrite the CAM table entry to point the MAC address to the attacker physical port 1 instead of the port connecting the real Host C on port 3. When Host D (or any other host) sends a packet destined to the MAC address of Host C, the switch will forward all packets destined for Host C to the attacker, because the CAM table entry is poisoned, as highlighted in Figure 7-11.
When the real host sends traffic to the switch, the switch rewrites the CAM table entry, once more moving back to the original port connected to the real host. This tug-of-war continues between the intruder and the real host that is claiming the same MAC address, thereby confusing the switch CAM table and causing repetitive rewrites of MAC table entries. This not only causes a denial of service to the real host, but also has a performance impact on the switch because the intruder sends a large number of forged MAC addresses.
Figure 7-11. MAC Spoofing Illustrated
MAC Spoofing Attack Mitigation
Using a technique that is similar to the CAM table overflow mitigation technique, you use the Port Security feature to mitigate MAC spoofing attacks. Port security is discussed in detail in Chapter 4, with configuration examples.
ARP Spoofing Attack
An ARP spoofing attack is a method in which an intruder attempts to disguise its source MAC address by impersonating another host on the network. In ARP spoofing, the switch is misguided by poisoning the ARP cache. ARP spoofing is generally motivated to aid in making other DoS and MITM-type attacks possible.
Background
One of the fundamental operations of the Ethernet protocol is based on the ARP protocol for sending and receiving ARP messages. ARP is a Layer 2 protocol that is used by the IP protocol to map network addresses (32-bit IP address) to the hardware addresses (48-bit MAC address), providing IP-to-MAC resolution. When Host A needs to communicate with Host B on a network, Host A sends an ARP request, and Host B returns its MAC address with an ARP reply message. The ARP requests are broadcast requests sent to all hosts on the network.
The Problem
In the process of ARP request and reply messaging between two legitimate Host A and Host B communication systems, the intruder can inject an unsolicited fake ARP reply message with its own MAC address, sending this message to the requestor, Host A, masquerading as the victim, Host B. The requestor Host A now has a poisoned ARP entry sending all packets destined for Host B to the attacker. This technique is commonly used in many MITM-type attacks.
The ARP function can also be misused to steer traffic to the attacker host that should normally be destined for the legitimate target host. This can be accomplished with gratuitous ARP (gARP). Gratuitous ARP (gARP) is an unsolicited ARP broadcast containing the IP address of the target host and the attacker’s MAC address. The gARP causes all receiving hosts to incorrectly update their ARP table (ARP poison) with an entry that pairs the target’s IP address with the attacker’s MAC address. Similarly, the switch will incorrectly update its MAC-address-table (CAM table); thus, when any host needs to send a packet to the target’s IP, the switch will forward the packet to the attacker. This causes an MITM condition.
Tools such as the DSNIFF and ETTERCAP can be used in these types of attacks.
ARP Spoofing Attack Mitigation
A simple technique for mitigating ARP spoofing attacks is to configure the hold-down timers on the interface by specifying the duration of time (lifetime) for an ARP entry to remain in the ARP cache. This method is not scalable even in the smallest network, because all systems on the network are required to modify the ARP cache expiration time plus static ARP entries.
Another solution can be to use private VLANs to mitigate these attacks.
The best defense mechanism for mitigating these types of attacks is to enable the Dynamic ARP Inspection (DAI) feature available on Cisco Catalyst switches. The DAI security feature determines the validity of packets by performing an IP-to-MAC address binding inspection that is stored in a trusted database (the DHCP snooping binding database) before forwarding the packet to the appropriate destination. The DAI feature is discussed in detail in Chapter 4, with configuration examples.
VTP Attack
The VLAN Trunking Protocol (VTP) is a Layer 2 protocol used to distribute VLAN configuration information among switches over a trunk port. In VTP attacks, the intruder can impersonate as a trunk port and be able to receive all VLAN information via the VTP.
Background
VTP is a data link layer messaging protocol for centralized VLAN management functions, such as adding a VLAN, deleting a VLAN, or renaming a VLAN. A VTP management domain is created with all the switches joining the domain grouped together in a trusted zone to allow trusted exchange of VTP messages containing VLAN information. The switches are configured in different modems such as server, client, or transparent mode. Server mode switches are able to perform any VLAN management function, and the changes are propagated to all the switches in the VTP domain. Switches in client mode are passive switches that inherit settings from the server switch. Transparent mode does not influence changes to other nontransparent mode switches. Any VLAN changes made on a transparent mode switch are locally significant and not propagated to other switches.
The Problem
As of this writing, no known VTP vulnerabilities have been identified or published.
In theory, the intruder can send falsified VTP messages on a trunk port, posing as a VTP server, and thereby gaining privilege to add or remove VLANs from the VTP domain as well as to create Spanning Tree Protocol loops. Other malicious VTP advertisements can be sent with no VLANs configured. When a nontransparent mode switch receives such a VTP message with no VLANs defined over a trunk port, it inherits the configuration-revision number of the sending switch resulting in a DoS attack that deletes all VLANs configured in the VLAN database across the entire VTP domain.
Note that launching this type of attack is very difficult and requires high-level skills as well as inside information (such as knowledge of VTP domain name, password, and trunk port details). This information can be gained through social engineering or a network reconnaissance process. Although the difficulty of launching such an attack makes it unlikely, it can occur.
VTP Attack Mitigation
A VTP domain can be tightly secured with the built-in password functionality that is configured on all the switches in the VTP domain. VTP passwords are entered into the VTP database and used to authenticate VTP advertisements. Configure a unique VTP domain name with a strong VTP password throughout the VTP domain to prevent the possibility of forging VTP messages. However, note that the VTP password will not be shown in the switch configuration file (the password is stored in the VLAN database), and it should not be considered confidential because it can be determined using the show vtp status or show vtp password commands.
Caution
Do not configure passwords such as “cisco,” “cisco123,” or other passwords that are easily guessable and prone to brute force. In addition, create long passwords—for example, a minimum of six to eight characters in length. For guidelines on creating strong passwords, refer to Chapter 3, “Device Security,” in the section titled “Creating Strong Passwords.”
VLAN Hopping Attack
As the name implies, VLAN hopping attacks are methods in which an intruder tries to bypass a Layer 3 device to communicate from one VLAN to another in an attempt to compromise a device on another VLAN. VLANs are logical groups of hosts that are created to limit the broadcast domains. VLAN hopping is a network attack whereby an intruder system sends out packets destined to a host on a different VLAN that cannot normally be reached by the intruder.
Background
When a host in a particular VLAN requires communication with a host in another VLAN, a Layer 3 device is required to route packets between two different VLANs. This is commonly known as inter-VLAN routing. A VLAN hopping attack is the technique of jumping VLANs without traversing a Layer 3 device.
Dynamic Trunking Protocol (DTP) is a Layer 2 protocol used to automate ISL and 802.1Q trunk configurations between switches and supports autonegotiation of both ISL and 802.1Q trunks. DTP synchronizes the trunking mode on both sides of the link. DTP states can be configured to ON, OFF, DESIRABLE, AUTO, or NON-NEGOTIATE. Most Cisco switches default to AUTO mode.
The Problem
Two primary methods are used to perform VLAN hopping attacks:
• Switch spoofing
• Double tagging
In the switch-spoofing technique, the intruder impersonates a switch. (Note that this requires that the intruder be capable of emulating either ISL or 802.1Q signaling along with DTP signaling.) The intruder can make itself appear to be a switch with a trunk port (in AUTO mode) on the other side. If successful, the intruder’s system then becomes a member of all VLANs. When the intruder learns all the VLAN information, it can take advantage of the incorrectly configured trunk port to route traffic for multiple VLANs encapsulated with ISL or 802.1Q across the same physical link, generally between switches.
In a multiple switch environment, a trunk implementation can be exploited. Trunk ports by default are implicitly set to a native VLAN-ID. (The default native VLAN-ID for a trunk is VLAN 1 on Cisco switches.) Therefore, when a user port (access port) sends a packet to a destination located in a distant switch, and that very packet is encapsulated into 802.1Q format with the native VLAN-ID, it will be successfully forwarded to the distant switch without crossing a Layer 3 device.
Note
Trunk ports have access to all VLANs by default unless pruning is configured.
Another variation of this attack is double tagging, also called a double encapsulated VLAN hopping attack, which involves tagging the frame with two 802.1Q headers to forward the frames to a different VLAN. The embedded hidden 802.1Q tag inside the frame allows the frame to traverse a VLAN that the outer 802.1Q tag did not specify. This attack will work even if the trunk port is set to OFF.
The first switch to encounter the double-tagged frame strips the first tag off the frame and forwards the frame. This results in the frame being forwarded with the inner 802.1Q tag out all the switch ports, including the trunk ports configured with the native VLAN-ID of the network intruder. The second switch then forwards the packet to the destination based on the VLAN identifier in the second 802.1Q header.
VLAN Hopping Attack Mitigation
Mitigating VLAN hopping attacks requires a good understanding of the Layer 2 switching and the network topology because several modifications to the VLAN configuration may be required.
To prevent a basic switch spoofing VLAN hopping attack involves explicitly turning off DTP on all user ports (by placing the port in access mode using the switchport mode access command) except the ports that specifically require DTP, such as the trunk ports. In addition, it involves disabling all unused switch ports by placing them in an unused VLAN (separate VLAN).
To prevent a double tagging, a double encapsulated VLAN hopping attack, ensure that the native VLAN-ID on all the trunk ports is different from the native VLAN-ID of the user ports. It is best to use a dedicated VLAN that is specific for all the trunk ports, and not the default native VLAN-ID either. Using VLAN 1 should always be avoided. Configuring the native VLAN to tag all traffic prevents the vulnerability of double dot1Q-tagged packets hopping VLANs. Enable the vlan dot1q tag native command from the global configuration mode on the edge switch to tag all packets on all the 802.1Q trunk ports, including the native VLAN egress traffic, and drop untagged native VLAN ingress traffic. This command was introduced in Cisco Catalyst IOS release 12.1(9)EA1. For older versions, the native VLAN should be changed to an unused VLAN number on both sides of the trunk.
PVLAN Attack
Chapter 4 discussed the details of private VLANs (PVLANs). PVLAN is a feature that prevents interhost communication by providing port-specific security between adjacent ports within a VLAN across one or more switches. PVLANs restrict communications between systems on the same logical IP subnet. A proxy-based attack can be used to bypass access restrictions that are enforced by PVLAN.
Background
Private VLANs work by restricting ports within a VLAN from communicating with other ports in the same VLAN by using the following three types of ports:
• Promiscuous: A promiscuous port can communicate with all interfaces, including the isolated and community ports within a PVLAN. The function of the promiscuous port is to move traffic between ports in community or isolated VLANs. Access lists can be used to identify which traffic can pass between these VLANs. Only one promiscuous port is allowed per single Private VLAN, and that one port serves the entire community as well as isolated VLANs in the Private VLAN.
• Isolated: An isolated PVLAN port has complete Layer 2 segregation from all other ports within the same PVLAN, but not from the promiscuous ports. Traffic from the isolated port is forwarded only to the promiscuous ports and none other.
• Community: Community ports are logically combined groups of ports in a common community that can pass traffic among themselves and with promiscuous ports. Ports are separated at Layer 2 from all other interfaces in other communities or isolated ports within their PVLAN.
The Problem
The Proxy Attack includes an attack against private VLANs, in which frames are forwarded to a host on the network that is connected to a promiscuous port, such as a router. Note that this attack is primarily used to defeat PVLAN configuration by avoiding the promiscuous port. Both source and destination systems are on the same IP subnet whose communications have been restricted by enforcing the PVLAN technology.
As shown in Figure 7-12, the intruder crafts the malicious packet with header parameters set as follows:
• Its own source IP and MAC address
• Destination IP address of the target victim
• Destination MAC address of the upstream router
As per the switch default behavior, the switch checks all the arriving packets’ destination MAC addresses in the CAM table, and in this case, the switch forwards the frame to the router’s switch port instead of the victim.
The router receives this packet, checks the destination IP address in the packet with the routing table, and in this case routes the packet to the target victim by rewriting the destination MAC address and sending the packet back out on the interface (like a U-turn), thereby making the attack successful, as shown in Figure 7-12.
This type of attack allows only for unidirectional traffic, because any attempt by the target victim to send traffic back to the intruder source IP/MAC address will be blocked by the private VLAN configuration as expected. The only way to achieve bidirectional traffic is to compromise both hosts and poisoning ARP entries or with static ARP entries. Note that this would not be considered as PVLAN vulnerability, because all the rules of PVLAN are still enforced. The ARP was poisoned by bypassing other network security mechanisms that were in place.
Figure 7-12. Compromising PVLAN Implementation

PVLAN Attack Mitigation
A simple technique to mitigate PVLAN attacks is to configure ACLs on the default gateway router facing the victim. Virtual ACLs (VACL) can also be used to mitigate the effects of PVLAN attacks. The ACL on the router can be configured to block any arriving packets that have the same source and destination IP address. (The intruder and victim are on the same IP subnet in this type of attack.)
Figure 7-13 shows how to prevent PVLAN attacks by using an Extended ACL configured inbound on the router interface facing the target victim and the intruder on IP subnet 10.1.1.0/24. The router will drop any packets arriving from the source/destination on the 10.1.1.0/24 subnet, thereby thwarting this type of attack and logging all offending packets.
Figure 7-13. Preventing PVLAN Attacks
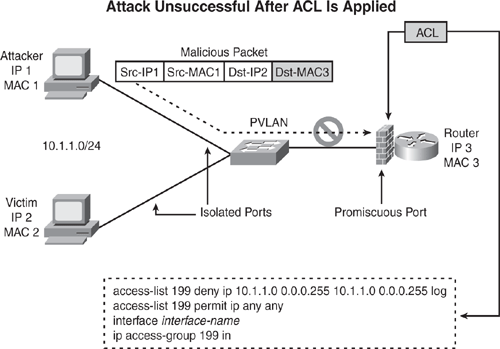
Spanning-Tree Attacks
Spanning Tree Protocol attacks are methods whereby the intruder assumes the identity of a root bridge in the topology by broadcasting forged Bridge Protocol Data Unit (BPDU) messages in an attempt to force spanning-tree recalculations and thereby disrupt the network data flow.
Background
Spanning Tree Protocol (STP) is a link management protocol that provides path redundancy by preventing loops in a network of switches that are interconnected via multiple paths. Spanning Tree Protocol implements the 802.1D IEEE algorithm by exchanging BPDU messages with other switches to detect and remove any loops by shutting down selected bridge interfaces. Spanning Tree implements a unique root switch to maintain a stable network topology to guarantee that there is only one active path between two network devices.
The Problem
The intruder can possibly force all the switches in a network to forward packets to the intruder switch by injecting falsified BPDU with a priority zero and thereby forcing spanning-tree recalculations so that the intruder switch can become the new root bridge. A priority zero bridge is the root bridge in the spanning-tree topology. When this happens, traffic that should normally go through a distant link is now transmitted across the attacker switch.
Spanning-Tree Attacks Mitigation
Spanning Tree Protocol attacks can be mitigated using the BPDU Guard and the ROOT Guard features available on Cisco Catalyst switches. These features are designed to enforce the placement of the root bridge in the spanning-tree topology and can also be used to prevent rogue switch network extensions. BPDU Guard and the ROOT Guard features are discussed in detail in Chapter 4 with configuration examples.
DHCP Spoofing and Starvation Attacks
DHCP spoofing and starvation attacks are methods to exhaust the DHCP address pool on the DHCP server, resulting in resource starvation where no DHCP addresses are available to be assigned to legitimate users.
Background
DHCP provides a framework for offering information to clients on a network. DHCP is client-server architecture, in which designated DHCP servers allocate IP addresses and other network information (WINS, DNS, default gateway) delivering configuration parameters to dynamically configured hosts (DHCP clients) on the network.
As stated in RFC 2131, “The client collects DHCPOFFER messages over a period of time, selects one DHCPOFFER message from the (possibly many) incoming DHCPOFFER messages (for example, the first DHCPOFFER message or the DHCPOFFER message from the previously used server) and extracts the server address from the ‘server identifier’ option in the DHCPOFFER message. The time over which the client collects messages and the mechanism used to select one DHCPOFFER are implementation dependent.”
The Problem
This is a simple resource starvation attack that works on MAC address spoofing by flooding a large number of DHCP requests with randomly generated spoofed MAC addresses to the target DHCP server, thereby exhausting the address space available for a period of time. The underlying principals of this attack are similar to the SYN flooding attack.
After successfully flooding the DHCP server, the intruder introduces a “rogue” DHCP server responding to new DHCP requests from clients with the intent of providing incorrect configuration information to the client, such as IP addresses and other falsifying network information, such as WINS, DNS, and default gateways. This forged injected information will assist the attacker in launching other types of attacks on the clients, such as man-in-the-middle. Attacking tools such as MACOF and GOBBLER can aid in the success of these types of attacks.
DHCP Spoofing and Starvation Attacks Mitigation
Similar to the CAM table overflow mitigation technique, the Port Security feature can be used to mitigate DHCP spoofing and starvation attacks by limiting the number of MAC addresses on the switch port. Port security is discussed in detail in Chapter 4.
As described in RFC 3118, “Authentication for DHCP Messages,” implementation can also assist in mitigating a DHCP starvation attack.
VLAN ACLs (VACL) can also be used to mitigate “rogue” DHCP servers by preventing the rogue server from responding to DHCP requests. VACL may not completely eliminate this threat, because IP spoofed DHCP messages are still possible but more difficult to successfully implement.
The best defense mechanism to mitigate these types of attacks is to enable the DHCP Snooping feature available on Cisco Catalyst switches. The DHCP Snooping security feature filters untrusted DHCP messages by maintaining a DHCP snooping binding table. The DHCP snooping feature is discussed in detail in Chapter 4.
802.1x Attacks
The IEEE 802.1x is a framework for passing the Extensible Authentication Protocol (EAP) messages over a wired or wireless network. EAP over LAN (EAPoL) offers a framework for authentication and control of user traffic to a protected network. A critical flaw in the EAPoL protocol was identified that can be exploited by an intruder to hijack an existing session and thereby gain access to a wireless network resulting in a MITM-type of attack.
Background
The IEEE 802.1x is a device authentication standard originally targeted for use in an Ethernet LAN but that later gained widespread uptake in wireless networks when the vulnerabilities of WEP in the IEEE 802.11 standard were identified. The 802.1x framework defines the guidelines for packaging EAP messages by using EAPoL protocol (Ethernet frames using the EAP encapsulation over LANs).
The basic framework of 802.1x has three components:
• A supplicant: The user or client that requires authentication on the wireless LAN
• An authentication server: Typically a RADIUS server
• The authenticator: A device that sits between the supplicant and the authentication server (such as wireless access point)
The Problem
Two critical vulnerabilities were discovered in the EAPoL 802.1x protocol:
• The first vulnerability is the injection of a forged (spoof) EAP-Success message toward the end of the EAPoL authentication sequence, resulting in an MITM attack. The EAP-Success message is sent from the authenticator to the supplicant, and this message does not have any integrity check to preserve the information before the authenticator and the supplicant transition to the next state in the authentication sequence—that is, the AUTHENTICATED state. The attacker can send an unsolicited forged EAP-Success message to the supplicant that appears to come from the authenticator, allowing the intruder to passively establish itself in the network path between the supplicant and the authenticator.
• The second vulnerability exists when an intruder can hijack an existing session that is already established. After the supplicant has successfully authenticated with the authentication server, the authenticator and the supplicant state both move to the authenticated state. An intruder can send a maliciously crafted dissociate frame to the supplicant spoofing the authenticator source MAC address. This causes the supplicant to believe that the message comes from the authenticator instructing it to terminate the session and dissociate from the wireless network. Note that the authenticator is still maintaining an authenticated and associated state for this session. The attacker then forges the source MAC address of the dissociated system to assume its identity, gaining successful access to the network impersonating the victim. The authenticator has no way to reconfirm this, and therefore the session is hijacked.
802.1x Attacks Mitigation
There is no integrity mechanism available in the EAPoL protocol that can mitigate an 802.1x attack in a wireless network. The recommended workaround is to use the Protected EAP (PEAP) protocol instead, and thereby deploy 802.1x on wireless access points. The PEAP authentication protocol was developed to address these and other concerns about 802.1x, in particular its use in a wireless network. The PEAP structure offers integrity by implementing the authentication sequence in two parts:
• A TLS session is established between the supplicant and the PEAP authentication server.
• EAP exchange is carried out over the TLS session to authenticate the supplicant that is using a defined EAP authentication protocol.
As of this writing, there are no known vulnerabilities identified in PEAP.
Security Incident Response Framework
Before wrapping up this chapter’s presentation of attack vectors and mitigation techniques, it is important to consider the importance of having an incident response framework. For any organization, having such a framework is essential when dealing with attacks.
Security is a growing problem, and securing an infrastructure is a critical, complex task of balancing business needs against security risks. As we saw in the sections earlier, it is an alarming fact that gaining unauthorized access to information in an insecure heterogeneous networked environment or launching a DoS-type attack is remarkably easy, and often it is difficult to track the offenders. A network intrusion can cause a broad range of consequences, including network outage, required recovery time, decreased productivity, significant loss in revenue or man-hours, devastating loss of credibility, and legal liability. Effective response and collective actions are required to counteract security violations and activities that lead to security breaches.
This section focuses on how to respond to a security incident and how to understand and prepare for any security event using an incident response framework.
What Is a Security Incident?
A security incident is any network or system-related intrusive activity with negative security implications to the computer, network, or information systems in general. These incidents are usually in direct or indirect breach of the security policy. A security incident can originate anywhere, including the local trusted network, shared customer network, intranet, extranet, Internet, or from any other network part.
The impact of an intrusion varies depending on the damage it can cause; it can be a relatively trivial incident or a major catastrophe. Each type of attack is unique and is defined by the intent of the intruder, the level of technical sophistication, and the vulnerability exploited.
Security Incident Response Process
Security incident response is the process of building an awareness and proactive function into an organization system for managing security events, such as intrusions, cyber thefts, or denial of service (DoS).
Most organizations are not prepared when dealing with security incidents and do not test the appropriate response actions to better evaluate their safeguard options. Such organizations risk a maximum loss in an event of a security incident. A well-documented incident response procedure ensures the speedy recovery of the system and the prompt restoration of an organization’s normal operations.
The International Organization for Standard (ISO) has recognized the importance of the incident response mechanism and therefore built a code of practice for incident response into the Information Security Management standard ISO/IEC 17799:2005. Another standard that is widely recognized and popular in Europe is the Information Technology Infrastructure Library (ITIL), which was developed in 1992 and is maintained by the United Kingdom (UK) Office of Government Commerce.
Incident Response Team (IRT)
Incident Response Team (IRT) has a number of names that are commonly used: CSIRT (Computer Security Incident Response Team); CERT (Computer Emergency Response Team); and ISIRT (Information Security Incident Response Team). IRT is a team within an organization that is charged with responding to security-related issues. Forming IRT without a goal is like implementing computer security measures without a security policy. If the goal is unclear, functions by the IRT will always be performed on an ad-hoc basis, without a clear idea of the overall security framework.
An IRT can most easily be described by using the analogy of a fire department. Just as a fire department has an emergency number that you call if you have or suspect a fire, an IRT has a number and an e-mail address that you can contact for help if you have or suspect a computer security incident. An IRT service does not necessarily provide response by showing up on your doorstep; it may provide a range of other services in addition to the incident handling service, such as vulnerability handling or the provision of an intrusion detection services.
As shown in Figure 7-14, members of the IRT team should be carefully selected. Various members from the organization across all functional groups should be involved and become part of this team, such as members from the technical security team, network operations team (NOC), operations security (OPSEC), system admin, management, legal, human resources, and public affairs. As you can see from the wide range of organizations included in the IRT, incident response involves much more than knowledge of products and technologies.
Figure 7-14. Incident Response Team (IRT) Members
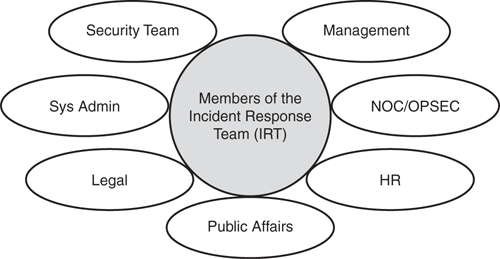
Note
Refer to the following comprehensive 200+ page handbook, which provides guidance on the formation and operation of an IRT:
Security Incident Response Methodology
Effective integration of a security incident response function requires a clear methodology and an understanding of the organization’s business functions, assets, teams, responsibilities, and threat modeling. A security incident framework should be approached holistically, by employing the necessary disciplines from physical, logical, and organizational security to form the best response function. As shown in Figure 7-15, an IRT reaction to a security incident can typically be categorized by five steps:
1 Planning and preparation
2 Identification and classification
3 Reaction
4 Postmortem and follow-up
5 Archiving
Figure 7-15. Incident Response Methodology
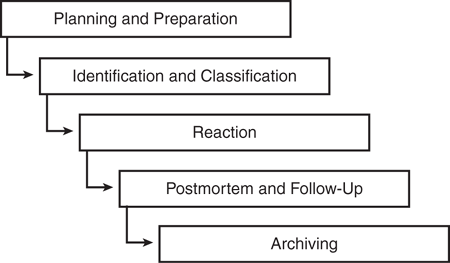
Note
The steps shown in Figure 7-15 are merely a guideline and should be used as a general template. You should tune the template to the organization’s specific needs and requirements.
Step 1—Planning and Preparation
The most important aspect in a security incident handling is the preemptive preparation phase that handles events that can occur. An IRT must be formed with clearly defined roles and responsibilities and high-level management support.
Knowledge of the incidents that could occur and details on how they are to be handled should be developed and tested to ensure an efficient response mechanism. Ideal responses should be proactively identified and defined, and the tools used to respond should be created and validated through test scenarios. In addition, teams should be trained to deal with the security incident.
One of the major problems seen in the preparation phase is that the security operation teams do not have a security plan and procedure and are not trained in the effective use of the tools.
Another major issue is the dependence and reliance on vendors. Operators who use their vendors as Tier 2 and higher support endanger their network to a security risk. When operators today observe a problem on a device, they immediately call the vendor support center for a resolution. Vendors are partners with an operator. Note that vendors are not responsible for maintaining and troubleshooting the entire network; they facilitate and provision the network devices. The IRT of an organization armed with proper procedures and planning outlined by the security policy should drive the incident process.
In the event of a security incident, the general user community and teams that could be affected by the incident need to be informed of the incident by a predefined notification mechanism (such as e-mail notification, fax, or pager). In some cases, e-mail or other primary communication tools, such as IP phones, may not be the best communication tool, because they may have been compromised. Fax, cell phones, and other out-of-band tools are more appropriate in this situation. Clear instructions should be given to the end users on what needs to be done during the incident. Correct roles, skills, and communication techniques need to be identified to knit the notification procedures into a seamless process.
Step 2—Identification and Classification
After an incident is detected or reported, the IRT needs to conduct a detailed analysis to identify the predefined incident resolution process that should be followed. As much as possible, the organization should have agreed on an incident classification, have defined traps, and have mapped the processes that should be followed. In addition, the organization should understand the type of attack and the damage being caused.
As discussed earlier in this chapter, you should use the various classification tools and techniques available (such as NetFlow, NBAR, and MQC) to characterize the attack. In addition, monitor the CPU load, SYSLOG, and SNMP alerts, and monitor protocol and interface statistics such as Input/Output queues, drops on the device interfaces for link saturations, and other traffic flow statistics.
Step 3—Reaction
This phase represents the heart of the incident response strategy. Reaction is the response process used to counter the attack. A process that quickly and flexibly contains and eradicates the incident is executed followed by full recovery of business systems to ensure the responses have been effective. The IRT should prepare a detailed report to update both management and the staff that is managing specific security incidents to a successful conclusion. Evidence of misuse needs to be collected swiftly and accurately, with full integrity and provenance.
As discussed earlier, several techniques can be used in this phase to mitigate various types of attack vectors and restore normal business operation. Contact details for appropriate upstream providers (ISPs) need be defined and identified to block the offender.
Step 4—Postmortem and Follow-Up
After the incident is mitigated, the IRT, in conjunction with other relevant teams that were involved during the incident response process, should conduct a review on the technical components of the incident to determine what can be done to build resistance and reduce the risk of reoccurrence. This could include risk assessments, understanding the root cause, reviewing of security policies, identifying trends and patterns of the incident, as well as applying practical safeguards and compensating measures. The process should identify options to tighten or reposition security controls and enact enforcement where needed.
Based on the post-incident review findings, the organization also needs to agree on final closure actions. These could include dissemination of new policy, realignment of asset ownership, running awareness campaigns, implementing patches or new countermeasures, and also disciplinary/legal repercussions where necessary. In addition, the need to review responsibility in the organization needs to be identified to ensure an effective incident management process.
Step 5—Archiving
At this stage, all incident information should be archived and saved for future referencing, and of course that means the information related to the incident should be documented. Archiving saves you time in the future. For example, if a phone call conversation was not documented and logged, there is a good chance that a significant portion of the information is either forgotten or misinterpreted, resulting in the repetitive task of contacting the source of the information again.
In the early stages of handling an incident, it is often infeasible to determine whether prosecution of intruders is viable and if the incident is going to be prosecuted. Recording details will provide evidence for prosecution efforts, if the case moves in that direction. Therefore, gather information in a form that is submissible to law enforcement and the court of law.
Documenting an incident will also help with the final assessment of damage that can be reported back to the management; it can also be used to claim insurances where applicable.
Note
Refer to the following site security and incident response-related RFCs:
• RFC 2196, “Site Security Handbook” (replaces RFC 1244)
• RFC 2350, “Expectations for Computer Security Incident Response” (BCP 21)
• RFC 2504, “Users Security Handbook”
• RFC 2828, “Internet Security Glossary”
• RFC 3013, “Recommended Internet Service Provider Security Services and Procedures” (BCP 46)
Summary
Networks today are vulnerable because of security technologies being implemented as an afterthought and not during the planning and design phase of building the network. This has led to many insecure network designs and solutions.
This chapter identified some of the most common attack vectors, such as IP spoofing, SYN flooding, MAC flooding, DoS, ARP spoofing, and how an intruder can exploit these to their advantage. Several mitigation techniques, such as packet classification and marking techniques, Traffic Policing, TCP Intercept, NBAR, ARP and DHCP spoofing mitigation, Spanning Tree Protocol features, and several other Layer 2 and Layer 3 features are discussed.
The chapter concludes with a discussion on how to respond in a security incident using a set of methodological steps to prepare readiness for any security event.
References
http://www.cisco.com/en/US/tech/tk648/tk361/technologies_tech_note09186a0080120f48.shtml
http://www.cisco.com/en/US/products/ps6350/products_configuration_guide_chapter09186a0080465b25.html
http://www.cisco.com/en/US/products/ps6350/products_configuration_guide_chapter09186a00808029ea.html
http://www.cisco.com/en/US/products/ps6350/products_configuration_guide_chapter09186a008046589d.html
http://www.cisco.com/warp/public/63/car_rate_limit_icmp.html
http://www.cisco.com/en/US/tech/tk59/technologies_tech_note09186a0080149ad6.shtml
http://en.wikipedia.org/wiki/Bogon_filtering
http://www.completewhois.com/bogons/
http://www.cisco.com/warp/public/732/Tech/security/docs/blackhole.pdf
http://en.wikipedia.org/wiki/ISO/IEC_17799