
![]()
![]() Note Too many modern developers are overlooking the power of vector graphics both for image generation and as a display solution.
Note Too many modern developers are overlooking the power of vector graphics both for image generation and as a display solution.
Introduction to the SVG Format
Scalable Vector Graphics (SVG) is an XML format for defining vector-based graphics. Like HTML, CSS, and JavaScript, SVG is one of the many projects of the W3C. It’s not a new project either—it’s been underway since 1999.
SVG has had a difficult time gaining traction though, and I think there are a few different reasons for that. One reason is that vector graphics are not nearly as familiar to people as bitmaps. A lot of people know graphics packages like Adobe Photoshop, but far fewer have dug into Adobe Illustrator or any of the other excellent options for working with vector graphics. If you’re new to vector image editing altogether, then let me clarify.
First, consider how bitmap images are stored as a two-dimensional matrix of color values. When the square color values (pixels) are small enough, the human eye is tricked into seeing an image. Vector images, on the other hand, are stored altogether differently. In a vector illustration, instead of a collection of pixels, we are working with a collection of objects that may be familiar shapes (like rectangles and ellipses) or may be complex lines defined by a number of points and curve values. In turn, these objects are made up of vertices (or other primitive shape descriptors). It is these vertices or shape descriptors that are stored instead of the matrix of pixels.
When you compare bitmap and vector graphics, SVG has some big advantages. Some of these advantages affect the creation of graphics (when you’re starting from scratch or editing an existing graphic) and others affect the use of a vector image in a running application.
For graphics creation, some notable advantages of SVG are:
- Illustrations created and stored in vector format are scalable. That means that it doesn’t matter what size you store a vector illustration because you will always be able to generate a bitmap from it as large as you like. You could use the same vector image to print a postage stamp or a road-side billboard.
- Vector illustrations are easier to modify. All of the component objects that make up the composite image exist individually and can be modified individually. You could open a vector image of a motorcycle, select just the headlight, and modify its shape. This feat would be much more difficult for a bitmap image.
- Consuming vector-based stock imagery is often much easier since modifications can be made to match your own project’s color scheme.
Some other notable advantages of using vector images in your running app are:
- For just about every image, the vector version will be much smaller. It doesn’t take nearly as much information to describe a circle’s shape as it does to explicitly paint it with pixels.
- Vector illustrations, being composed of described object shapes, are much easier to animate. Software can calculate intermediate steps between two points, differences in color values, or even the mathematical model for morphing one shape into another. It’s all but impossible to animate pixels in the same ways.
- Vector illustrations can resize to adapt to whatever size screen your user happens to be using. Windows 8 automatically scales all assets in your app. To keep your bitmap images looking good, you have to provide multiple versions of it. If an asset is a vector image, however, you don’t need to do this and can be sure it will look great at any size.
I find too many developers (and even designers!) still trying to do all of their graphics work in bitmap editors like Photoshop. Bitmap editors are excellent for photographs, for painting, and for many other things, but in many graphics creation use cases, learning and switching to a vector package will dramatically boost your productivity.
My vector editor of choice is CorelDRAW. I’ve been using Corel’s vector package for many years and find its interface very precise and intuitive. There are a few other professional vector design applications that you can research, but if you’re looking for a free one that still offers a lot of bang, try InkScape at inkscape.org. This open-source vector graphics editor is very well done. InkScape doesn’t have its own vector file format, but instead relies entirely on the SVG format.
Another major advantage of vector images is the possibility of animating them. Because vector images are described objects (instead of just pixels), they can be dynamically reshaped and because a vector image is made up of discreet elements, those elements can be moved rather easily. Think about the lower jaw of a vector-based dog moving to simulate speaking.
SVG is just XML and HTML is almost XML, so the two languages fit together quite well and SVG can be embedded into an HTML document with little trouble. The two languages being XML-like is also why CSS is naturally able to style and layout them both.
It used to be much more difficult to embed SVG in HTML, but HTML5 has made it much easier. HTML is not strictly XML, but SVG is, so embedded SVG needs to be clearly delimited and given a proper namespace. Listing B-1 shows what it looks like to put some SVG in your HTML.
Listing B-1. A simple circle in SVG with a fill attribute
<!-- HTML snippet -->
<!DOCTYPE html>
<head>
<title>SVG</title>
<meta charset="utf-8" />
</head>
<body>
<h2>SVG in HTML5</h2>
<svg id="mySvg" height="200" xmlns=" http://www.w3.org/2000/svg ">
    <circle id="graycircle" r="75" cx="75" cy="75" fill="gray" />
</svg>
</body>
</html>
The code in Listing B-1 describes the circle with a radius of 75 pixels that you see in Figure B-1. It does so inside of an svg tag that has a xmlns (XML namespace) attribute equal to http://www.w3.org/2000/svg. If namespaces are new to you, just know that this doesn’t actually link out to the w3.org website. It just uses this URL as a namespace to uniquely identify the contents of this tag as being SVG.
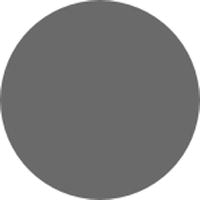
Figure B-1. A gray circle
In Listing B-1, we ended up with a gray circle because we used the fill attribute with a value of gray. You can use various attributes like this on SVG elements to style them, but I don’t recommend this approach. It’s better for all of your styling to be done in CSS so it can be modified later. Listing B-2 results in the same gray circle as Listing B-1 except the gray fill this time is provided using a CSS style property in a separate style sheet instead of using the fill attribute.
Listing B-2. The same gray circle except using a CSS property
<!-- HTML snippet -->
<!DOCTYPE html>
<head>
<title>SVG</title>
<meta charset="utf-8" />
</head>
<body>
<h2>SVG in HTML5</h2>
<svg id="mySvg" height="200" xmlns=" http://www.w3.org/2000/svg ">
    <circle id="graycircle" r="75" cx="75" cy="75" />
</svg>
</body>
</html>

/* CSS snippet */
#graycircle {
    fill: gray;
}
This is the foundation of everything I’ll cover in this appendix. We will explore the various style properties that can be specified in CSS to affect our SVG graphics. Many of these properties you’ll find to be in common with HTML, but others are unique to SVG. I will cover a few of the more common properties. For more information about all of the available properties visit http://www.w3.org/TR/SVG11/propidx.html where you’ll find an exhaustive reference.
In HTML, you use the color property to specify the foreground color of things like text, and you use the background color to specify the color that should fill the background of an element. In SVG, you use the fill property to specify the color of a graphics element. You saw this already in Listing B-2 where our circle was filled with a gray color.
Beyond specifying the color that an element should be filled with, you can specify the opacity as well. In Listing B-3, I am using a CSS grid to stack an SVG element on top of a paragraph of text. The addition of a fill-opacity property set to 0.5 (50%) then makes the paragraph visible through the SVG as you can clearly see in Figure B-2.
Listing B-3. A gray circle with a partial opacity making it transparent over a paragraph of text
<!-- HTML snippet -->
<div id="parent">
    <p id="text">Lorem ipsum dolor sit amet . . . </p>
    <svg id="mySvg" height="200" xmlns=" http://www.w3.org/2000/svg ">
        <circle id="graycircle" r="75" cx="75" cy="75" />
    </svg>
</div>

/* CSS snippet */
.lstb03 #parent {
    display:-ms-grid;
}

.lstb03 #text {
    width:300px;

}
.lstb03 #graycircle {
    fill: gray;
    fill-opacity: 0.5;
}
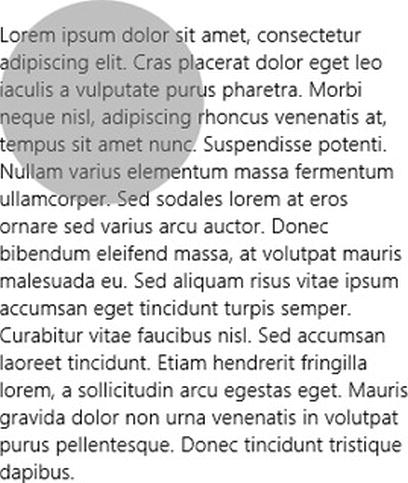
Figure B-2. A partially transparent circle reveals the paragraph text below it
The fill-rule property determines the algorithm used when the styling engine is applying fill to determine what parts of the shape get filled. The two options are nonzero and evenodd. You shouldn’t need to know the details of how these algorithms work. I always just try both and see which one gives me the result I’m looking for. The graphics in Figure B-3 are how the W3C illustrate some of the differences between the two algorithms.

Figure B-3. Two different ways that closed shapes can be filled
Strokes are the lines that either stand on their own (as straight or curved lines) or surround a shape. You’ll use the stroke properties to set a stroke’s color, width, opacity, and a lot more.
The first two stroke-related properties you might want to know are stroke and stroke-width. The stroke property controls the color of the stroke and the stroke-width controls the thickness. Listing B-4 sets both of these properties to add a black line around the gray circle we’ve been working with.
Listing B-4. Adding a thick, black outline to our gray circle
<!-- HTML snippet -->
<svg id="mySvg" height="200" xmlns=" http://www.w3.org/2000/svg ">
    <circle id="graycircle" r="75" cx="75" cy="75" />
</svg>
/* CSS snippet */
.lstb04 #graycircle {
    fill: gray;
    fill-opacity: 0.5;
    stroke:black;
    stroke-width: 4px;
}
The circle described in Listing B-4 will have a 4-pixel, black border as you see in Figure B-4.

Figure B-4. The stroke property adds an outline around our element
Besides these two simple properties, there are a lot more stroke-related properties. They are: stroke-dasharray, stroke-dashoffset, stroke-linecap, stroke-linejoin, stroke-miterlimit, and stroke-opacity. These properties allow you to control a lot of the other aspects of the lines on your SVG elements like the dashing/dotting of the line and the behavior of the line around corners and at the end of the line.
More in-depth information about these extended properties and all aspects of SVG element strokes can be found on W3.org at http://www.w3.org/TR/SVG11/painting.html#StrokeProperties.
Markers are the glyphs that appear at either end or in the middle of a line. Markers are most often used for creating an arrow head on the end of an element, but actually markers can be used to show any custom shape and have it appear at any vertex.
Creating a marker is a two-step process. First you define the shape of the marker and then you apply that marker definition to any of your SVG elements. You can find a detailed explanation of markers at http://www.w3.org/TR/SVG11/painting.html#Markers.
Filters are like lenses that can cause a lot of different effects to apply to some region of an SVG graphic. You could add a filter to the contents of an SVG circle for example that applied a Gaussian blur to the circle and its contents. Figure B-5 is a good example (again from W3C) of a filter in action.

Figure B-5. A W3C example of an applied filter
Of course, the same effect that this filter provides could be achieved using your favorite graphics application, but there are huge advantages to having this filter applied at run time. Filters applied at run time can be targeted by your app’s logic and so be applied conditionally. A filter could only take effect when a user hovers over an image, for instance. Again, this would be possible by conventional means by providing multiple bitmap images, but there’s certainly a limit that applies to that technique. Image you wanted a filter’s effect to be animated. There would be virtually no way to do that by conventional means.
Filter effects are added to an element in two phases. First you create a filter using the filter element, and then you apply that filter to an element using the filter property.
Filters are relatively involved, so for the sake of brevity I won’t go in to more depth. I did want to mention their general function, however, and let you know that they are available. When you want to dive in to the topic of filters, start by visiting http://www.w3.org/TR/SVG11/filters.html#FilterProperty.
A mask is a way to apply a transparency layer (also called an alpha channel) to any SVG element(s) by providing an explicit mask and then applying it. Masks are potentially a very lengthy topic too, but once again you should know at least generally what they are.
A quick note about properties like masks, markers, and filters that are relatively verbose in application: you’d be crazy to attempt to define these properties manually because it’s prohibitive to memorize the syntax and spend the time typing them in. Normally, these are applied automatically for you when you use vector editing graphics software like Adobe Illustrator, CorelDRAW, or InkScape.
You can find more information about masks at http://www.w3.org/TR/SVG/masking.html.
As you’ve already seen, SVG shapes have an interior (the fill) and an exterior (the stroke). Either or both of the fill or stroke may have a value of none, and will thus render invisible. This implies an interesting choice that needs to be made regarding when the user clicks on your element. If you create a circle that has no fill and ends up over the top of another element, you may or may not want that circle to capture click events. The same is true for the stroke.
The pointer-events property is your chance to specify the behavior in this case. By default, the value is visiblePainted, which is a pretty intuitive choice, so you might not need to change this property very often.
The available values for the pointer-events property are: visiblePainted, visibleFill, visibleStroke, visible, painted, fill, stroke, all, and none. With visiblePainted (the default) set, the element will capture clicks (and other pointer events) on the fill only if your element is filled and visible and on the stroke only if the stroke is set and visible. With visibleFill set, the element will capture clicks on the fill if your element is visible (even if your element isn’t filled!). With visibleStroke set, element will capture clicks on the stroke if it’s visible (even if you didn’t set a stroke) and it will not capture clicks on the fill. Using painted, fill, and stroke values have cause similar functionality except that they disregard whether or not the element is actually visible. The all value will cause a click always—even if you have no fill or stroke set and both are set to invisible! Finally, the none value will not pass on the pointer events.
If the idea of adding programming logic to a dynamic, vector-based graphics language like SVG excites you, then spend some time researching pointer events at http://www.w3.org/TR/SVG/interact.html#PointerEventsProperty.
Just like HTML elements, the visibility of SVG elements can be manipulated to show or hide individual elements, and just like HTML the values for the visible property are visible, hidden, and collapse. The collapse value, however, acts just like hidden and hides the element. The visible value obviously allows the element to show.
That’s all I’m going to include in this brief introduction to using CSS for SVG in your HTML apps, but I want to take a look at a few practical applications of these concepts in Windows 8.
Applying What You’ve Learned
Let’s implement some of the SVG CSS concepts that we’ve learned so far in a few examples. We’ll look first at using an SVG image as a watermarked image in the background of an app. Next we’ll create some custom SVG images to appear behind the main item tiles for a ListView. Finally, we’ll dynamically build a timeline graphic using JavaScript to generate SVG.
An SVG-Watermarked Background Image
The goal here is to find a good SVG image of a sailboat, and then place it in the background of our app light enough so that it doesn’t obstruct the visual elements and text that appear on top of it.
When I’m looking for good vector images, I usually start at office.microsoft.com. If you do an image search you can specify that you’re looking for illustrations and that you want their size to be resizable, and this will indicate that vector images should be returned. These images are usually in another vector image format—WMF (Windows Metafile). To get that image saved as SVG, you can simply copy the image from the website, paste it into your software package, and then save it out as an SVG file.
I found a sailboat image that I’d like to use (Figure B-6), saved it as SVG, and Listing B-5 shows the resulting SVG code. I’ve purposefully left the entire contents of the SVG file in the listing so you can get an idea how much SVG code it takes to describe this simple sailboat.

Figure B-6. A simple sailboat image
As a point of comparison, this sailboat in SVG format takes up 7,098 bytes of disk space uncompressed or 3,505 bytes compressed. That 7kb file could be used to create a sailboat 75 feet high if we wanted to. The same sailboat rendered as an uncompressed, full-color (though I realize it’s not necessary) bitmap at 768 pixels high takes up 1,983,798 bytes. Compressing the bitmap in a lossless format (PNG) brings that down to 35,410 bytes, but you can certainly see the size advantage that vector format has over bitmaps.
Listing B-5. The entire SVG file that makes up a simple sailboat
<?xml version="1.0" encoding="UTF-8"?>
<!DOCTYPE svg PUBLIC "-//W3C//DTD SVG 1.1//EN" " http://www.w3.org/Graphics/SVG/1.1/DTD/svg11.dtd ">
<!-- Creator: CorelDRAW X6 -->
<svg xmlns=" http://www.w3.org/2000/svg " xml:space="preserve" width="509px" height="571px"
version="1.1" style="shape-rendering:geometricPrecision;
text-rendering:geometricPrecision; image-rendering:optimizeQuality; fill-rule:evenodd; clip-rule:evenodd"
viewBox="0 0 50900 57045"
 xmlns:xlink=" http://www.w3.org/1999/xlink ">
 <defs>
  <style type="text/css">
   <![CDATA[
    .fil0 {fill:black}
   ]]>
  </style>
 </defs>
 <g id="Layer_x0020_1">
  <metadata id="CorelCorpID_0Corel-Layer"/>
  <g id="_695569408">
   <polygon class="fil0" points="22632,2398 22872,2368 23112,2308 23292,2188 23472,2038 23621,1859
23741,1679 23801,1439 23831,1199 23801,959 23741,719 23621,540 23472,360 23292,210 23112, 90
22872,30 22632,0 22392,30 22153,90 21973,210 21793,360 21643,540 21523,719 21463,959 21433,1199
21463,1439 21523,1679 21643,1859 21793,2038 21973,2188 22153,2308 22392,2368 "/>
   <polygon class="fil0" points="23741,5845 23681,6865 23561,9562 23352,13399 23142,17896
22932,22482 22782,26649 22722,29857 22752,31595 22932,32015 23382,32375 24011,32704 24850,33004
25840,33244 26919,33484 28118,33634 29347,33783 30606,33843 31865,33903 33094,33873 34263,33813
35312,33694 36212,33514 36961,33304 37531,33004 37890,32554 38100,31835 38160,30906 38070,29827
37890,28568 37590,27189 37201,25720 36781,24191 36271,22662 35762,21163 35192,19665 34653,18286
34113,16997 33604,15858 33154,14898 32734,14149 32315,13399 31775,12500 31146,11481 30456,10342
29707,9203 28957,8034 28178,6895 27398,5875 26649,4976 25960,4227 25300,3717 24761,3447 24311,3507
23981,3867 23771,4646 "/>
   <polygon class="fil0" points="8843,28178 9652,28687 10522,29167 11451,29587 12440,29946
13429,30246 14419,30516 15378,30726 16307,30936 17206,31086 18046,31205 18795,31295 19425,31385
19964,31415 20384,31445 20624,31475 20714,31475 20504,8933 20324,9113 19844,9652 19065,10462
18106,11511 16967,12800 15738,14239 14449,15798 13160,17446 11901,19125 10732,20774 9742,22392
8933,23921 8393,25300 8184,26499 8303,27458 "/>
   <polygon class="fil0" points="29017,35372 27968,35312 26949,35282 25960,35192 24970,35132
24041,35042 23112,34953 22213,34833 21313,34743 20414,34623 19515,34503 18615,34383 17686,34233
16757,34113 15828,33963 14838,33843 13849,33694 12860,33544 11811,33304 10702,33034 9562,32704
8393,32345 7254,31985 6115,31595 5036,31205 3987,30816 3058,30456 2188,30126 1439,29827 839,29587
390,29377 90,29257 0,29227 570,30186 989,31265 1319,32375 1589,33544 1829,34743 2068,35912
2338,37051 2668,38130 3088,39149 3627,40079 4347,40858 5216,41517 6325,41997 7674,42267 9323,42357
11271,42177 12740,41997 14149,41847 15468,41727 16727,41667 17896,41637 19035,41637 20084,41667
21073,41727 22033,41817 22932,41937 23771,42057 24581,42177 25330,42327 26050,42477 26739,42627
27398,42776 28028,42926 28628,43076 29197,43226 29767,43346 30306,43466 30846,43556 31385,43646
31895,43676 32435,43706 32944,43706 33484,43676 34023,43586 34563,43466 35132,43316 35702,43106
36301,42866 36931,42567 37560,42237 38190,41877 38819,41517 39479,41098 40108,40708 40738,40288
41338,39869 41907,39449 42477,39029 43016,38610 43496,38220 43945,37860 44365,37531 44755,37231
45055,36961 45384,36691 45744,36421 46104,36182 46493,35942 46853,35732 47243,35522 47633,35342
48022,35162 48412,35012 48802,34863 49191,34713 49551,34593 49911,34443 50270,34323 50600,34203
50900,34083 50360,34173 49791,34263 49191,34353 48562,34443 47872,34533 47183,34623 46434,34683
45684,34743 44935,34833 44125,34893 43346,34953 42537,34983 41727,35042 40888,35102 40079,35132
39269,35162 38460,35222 37650,35252 36841,35282 36092,35312 35312,35312 34593,35342 33873,35372
33184,35372 32524,35372 31895,35402 31295,35402 30756,35402 30246,35402 29797,35402 29377,35372 "/>
   <polygon class="fil0" points="32464,48442 31745,48322 31056,48232 30336,48112 29617,47992
28867,47902 28088,47782 27219,47663 26319,47513 25330,47393 24281,47243 23112,47093 21823,46943
20444,46763 18915,46583 17266,46404 15438,46194 13729,45984 12350,45774 11301,45564 10552,45384
10042,45204 9802,45025 9742,44845 9862,44695 10132,44575 10522,44425 11031,44335 11571,44245
12170,44155 12770,44095 13340,44065 13879,44065 14359,44065 14838,44065 15318,44095 15768,44095
16277,44125 16817,44185 17386,44245 18016,44305 18735,44365 19545,44485 20444,44575 21433,44725
22572,44875 23831,45055 25240,45264 26829,45474 28418,45714 29887,45894 31205,46044 32345,46164
33304,46254 34053,46314 34623,46314 34983,46254 35072,46164 34953,46044 34563,45834 33903,45594
32944,45294 31685,44965 30126,44545 28238,44065 27219,43826 26199,43616 25180,43436 24161,43286
23172,43166 22213,43076 21223,42986 20294,42926 19365,42896 18436,42896 17566,42866 16697,42896
15858,42926 15048,42956 14239,43016 13489,43076 12770,43136 12081,43196 11421,43286 10821,43376
10252,43436 9712,43526 9203,43616 8753,43676 8363,43766 8004,43826 7704,43886 7434,43945 7254,44005
7104,44035 7014,44065 6985,44065 6355,44755 5995,45324 5905,45834 6055,46224 6415,46553 6955,46823
7674,47003 8543,47153 9503,47273 10582,47333 11751,47393 12920,47423 14149,47453 15348,47483
16547,47543 17686,47603 18705,47693 19605,47752 20384,47842 21073,47902 21703,47992 22302,48052
22932,48142 23561,48232 24251,48352 25030,48472 25900,48592 26949,48712 28148,48862 29527,49041
31146,49221 33004,49431 34803,49611 36242,49791 37321,49911 38100,50031 38610,50121 38879,50181
38939,50241 38819,50270 38550,50300 38190,50300 37770,50300 37321,50300 36841,50300 36421,50270
36062,50270 35822,50270 35582,50270 35282,50300 34923,50300 34473,50330 33963,50360 33424,50390
32824,50450 32195,50480 31505,50510 30816,50570 30126,50600 29407,50630 28687,50660 27968,50660
27249,50690 26559,50690 25840,50690 25090,50720 24311,50720 23502,50750 22632,50810 21793,50840
20924,50900 20054,50960 19185,51020 18316,51080 17476,51140 16637,51230 15858,51290 15108,51380
14389,51440 13729,51530 13130,51619 12590,51679 12081,51769 11631,51859 11211,51949 10851,52039
10522,52159 10192,52309 9892,52459 9622,52639 9383,52848 9113,53088 8873,53358 8633,53628 8393,53988
8124,54347 7944,54737 7914,55097 8004,55426 8214,55726 8513,55996 8873,56236 9263,56446 9682,56626
10102,56775 10492,56895 10821,56985 11061,57045 11241,57045 11301,57045 11181,56985 10941,56895
10282,56685 9712,56446 9293,56146 9083,55846 9083,55456 9353,55037 9982,54527 10941,53928
11541,53628 12140,53388 12800,53148 13489,52968 14209,52789 15018,52639 15858,52549 16787,52429
17806,52369 18885,52309 20084,52249 21403,52219 22812,52189 24341,52159 25990,52129 27788,52099
29557,52069 31086,52009 32405,51949 33574,51859 34563,51799 35432,51679 36152,51589 36811,51470
37381,51350 37920,51230 38400,51110 38909,50990 39389,50870 39929,50750 40528,50660 41188,50540
41757,50420 42057,50330 42117,50181 41967,50061 41607,49941 41098,49791 40438,49641 39659,49491
38819,49371 37890,49221 36931,49071 35942,48922 35012,48802 34083,48682 33214,48562 "/>
  </g>
 </g>
</svg>
Now it’s time to get that SVG file included behind some HTML. There are actually a few ways to display SVG in our HTML.
- We could actually paste the SVG code from Listing B-5 right into our page or we could append it to our DOM using JavaScript.
- The img tag supports SVG files directly, so we could just use something like <img src="sailboat.svg"/>.
- We could also set the background-image property of the element we want it to show up behind.
In this case, there’s no reason not to use the img tag or set the background-image property. It’s easier and serves our case. We would need to append the SVG code into our DOM (either manually or using JavaScript) if we were going to be manipulating, styling, or animating that SVG. In this case we’re not, so we’ll keep it simple. Listing B-6 sets the sailboat graphic behind the main div element by putting them both into a grid. You can see the result in Figure B-7.
Listing B-6. Adding a sailboat watermark behind a paragraph of text
<!-- HTML snippet -->
<div class="grid">
    <img id="sailboat" src="sailboat.svg"/>
    <div id="main">
        Ut commodo consequat leo . . .
    </div>
</div>

/* CSS snippet */
.lstb06 #sailboat {
    opacity:0.05;
}

.lstb06 .grid {
    display:-ms-grid;
}

.lstb06 #main {
    border:solid 1px gray;
    font-size:large;
    width:500px;
    height:500px;
    padding:10px;
}
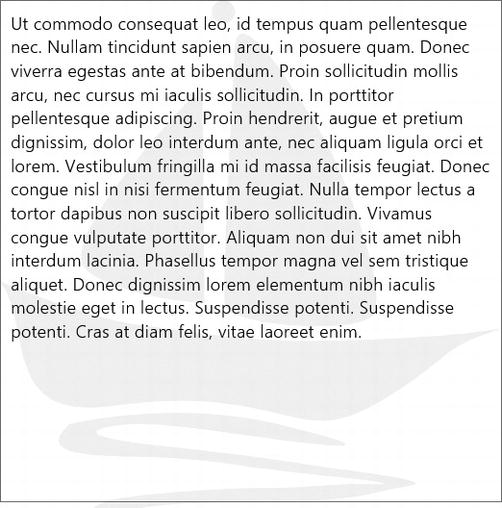
Figure B-7. A mostly transparent black sailboat appears very dim behind the paragraph text
Many Windows 8 apps use the built-in ListView control to show a grid of items. Typical Windows 8 grid items are rectangular and look like tiles. You’re not stuck to that look, though the minimalism and efficiency it implements is a powerful design feature that should be considered.
Let’s imagine you’re creating a painting app and one section of your grid shows all of the users painting documents and you want those items to be represented in a shape that looks roughly like a rectangle except made from a few paint strokes. In this case, we still want to have tiles—except a bit fancier. You could, in this case, render out a bitmap and underlay it behind each item, but you would lose the advantages of SVG that I’ve mentioned. So let’s use SVG and let’s create the graphic ourselves.
I jumped over to CorelDRAW and quickly found a brush that allowed me to create the graphic in Figure B-8.
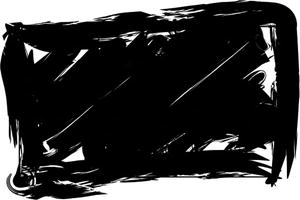
Figure B-8. A graphic generated using CorelDRAW that we want to use for our hub tiles
CorelDRAW can save that graphic out as SVG. I won’t list that code because it’s rather lengthy—still only about 125kb uncompressed though.
Our next step is to get that graphic behind the tiles of a ListView. Listing B-7 should do the trick.
Listing B-7. A ListView with CSS that places the paint strokes graphic behind each item
<!-- HTML snippet -->
<section aria-label="Main content" role="main">
    <div id="listview" data-win-control="WinJS.UI.ListView"></div>
</section>

<!--Templates-->
<div id="itemtemplate" data-win-control="WinJS.Binding.Template">
    <h2 data-win-bind="innerText:name"></h2>
</div>

/* CSS snippet */
.lstb07 #listview .win-item {
    display:-ms-grid;
    -ms-grid-columns:1fr;
    -ms-grid-rows:1fr;
    width:250px;
    height:174px;
    background: url(paint.svg) no-repeat;
    background-size:250px auto;
}

    .lstb07 #listview .win-item h2 {
        -ms-grid-column-align:center;
        -ms-grid-row-align:center;
        color:white;
        font-family:'Segoe WP';
        font-size:40px;
        font-weight:bold;
        position:relative;
        top:-10px;
    }

// JavaScript snippet
var list = new WinJS.Binding.List(
    [{ name: "Doc1" }, { name: "Doc2" }, { name: "Doc3" }]
);
var listview = element.querySelector("#listview").winControl;
listview.itemDataSource = list.dataSource;
listview.itemTemplate = element.querySelector("#itemtemplate");
listview.onloadingstatechanged = function (e) { debugger; };
And the result of all of that code is a ListView like the one you see in Figure B-9 complete with custom item shapes and overlaid text.
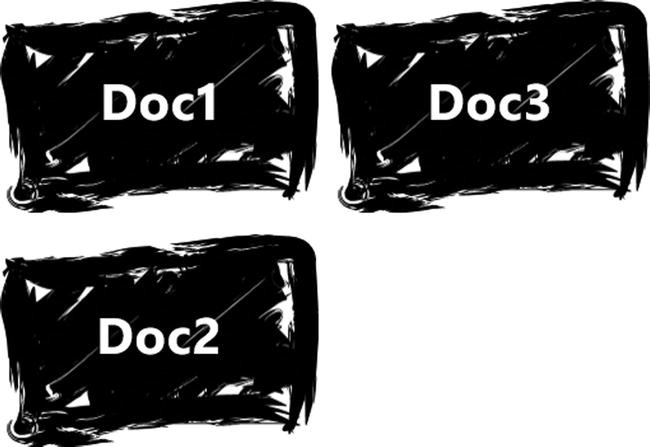
Figure B-9. The resulting paint stroke items give the items some character
A Timeline Graphic Built Using SVG
The previous two applications used the easy way of including SVG—that is using the img tag and the background-image CSS property and simply referencing an SVG file. Now let’s take a little bit more difficult approach that gives us finer control over our vector image.
Imagine that we want to create a simple timeline graphic that contains a gray bar representing some length of time and then white dots for each time point. To accomplish this, we will create the SVG image, and then look at it to see how it is composed.
I started out again in CorelDRAW. This time I created a very simple, gray timeline with white dots marking points in time. Again, this particular graphic is simple enough that I certainly could have composed it by writing the SVG manually in Notepad, but in real life you would likely be working with a more complex graphic. The simple timeline graphic that I created can be seen in Figure B-10.
![]()
Figure B-10. The timeline that we want to build dynamically with JavaScript
I then generated the SVG, tweaked it a bit, and then looked at it using Notepad (Listing B-8).
Listing B-8. The SVG code generated by CorelDRAW for the timeline graphic in Figure B-10.
<svg xmlns=" http://www.w3.org/2000/svg " width="1000px" height="200px" >
 <defs>
  <style type="text/css">
   <![CDATA[
    .str0 {stroke:black;stroke-width:2}
    .fil0 {fill:gray}
    .fil1 {fill:white}
   ]]>
  </style>
 </defs>
 <g>
  <rect class="fil0" x="30" y="90" width="940" height="20"/>
  <circle class="fil1 str0" cx="30" cy="100" r="10"/>
  <circle class="fil1 str0" cx="70" cy="100" r="10"/>
  <circle class="fil1 str0" cx="400" cy="100" r="10"/>
  <circle class="fil1 str0" cx="970" cy="100" r="10"/>
 </g>
</svg>
The elements themselves are inside the g element. The styles for those elements are in an embedded style sheet. We’re going to use what this document tells us about how to create that timeline graphic and create it ourselves using JavaScript. That will give us the flexibility to place the points programmatically. We’ll also pull the CSS styles out, put them in our document’s style sheet, and give them more meaningful class names. It’s nice to have all of our styles together in one spot. Just like with HTML, we want the SVG to be a definition of the graphics structure and let the style sheet deal with colors and such. Listing B-9 and Figure B-11 show how to dynamically create this timeline.
Listing B-9. The HTML, CSS, and JavaScript for building the timeline
<!-- HTML snippet -->
<div id="container"></div>

/* CSS snippet */
.lstb09 .circle {
    stroke:black;
    stroke-width:2;
    fill:white;
}

.lstb09 .line {
    fill:gray;
}

// JavaScript snippet
var points = [0,1,3,7,10];
var container = element.querySelector("#container");

//transform the points and generate SVG
var result;
points.forEach(function (p) {
    result += format("    <circle class='circle' cx='{0}' cy='100' r='10'/>", (p * 94) + 30);
});

//add resulting SVG to the DOM
container.innerHTML = format(
    "<svg xmlns=' http://www.w3.org/2000/svg ' width='1000px' height='200px' >" +
    "  <g>" +
    "    <rect class='line' x='30' y='90' width='940' height='20'/>" +
    "    {0}" +
    "  </g>" +
    "</svg>", result);
![]()
Figure B-11. The resulting timeline is just what we were looking for and now the values can be changed easily
It would be a good idea to turn this into a WinJS custom control so you can create them anywhere you want in your code with using <div data-win-control="MyApp.Controls.Timeline"></div>.
By the way, if you want to dig more into using JavaScript to generate and manipulate SVG graphics, there’s a great post at http://www.farinspace.com/top-svg-javascript-libraries-worth-looking-at/ that will introduce you to eleven JavaScript libraries that will help you on this venture.
You’ve been introduced to the exciting SVG space and seen how it can enhance your Windows 8 app. We looked at a number (though certainly not all) of CSS style properties that affect SVG elements, and we walked through three robust applications of SVG within Windows 8 apps.
I hope you learned a bit reading this, but more importantly I hope you’re inspired to go try it out and research the areas you don’t know so you can master weaving SVG into your apps and styling it using CSS.