
9. User Interface and Generated Content Properties
The user interface cannot, for the most part, be controlled by CSS. It is dependent on the specific operating system and browser in use. Objects such as the scroll bars are out of your control. However, CSS does provide some control over the appearance of the mouse pointer and style of quotes.
Additionally, CSS includes several properties that let you specify content to be placed on the page (generated) for specific instances. For example, you might want all chapter titles to include the word “Chapter” before them. Although you’ll usually want to place all of your Web page content directly into the HTML code, on occasion you’ll find it useful to have some redundant content generated for you or have it tailored to a specific language.
Getting Started
For this chapter, we’ll be using our Chapter 5 content from Alice’s Adventures in Wonderland (Code 9.1). The HTML imports the final CSS from Chapters 5, 6, 7, and 8, as well as a new file you will be building in this chapter, ui-generatedcontent-properties.css. I’ve also converted all quote marks within paragraphs to use the <q> tag, allowing us to specify the quote style for different languages. Technically, this is how all quotations other than block quotes should be tagged, but it’s rare to see them used ![]() .
.
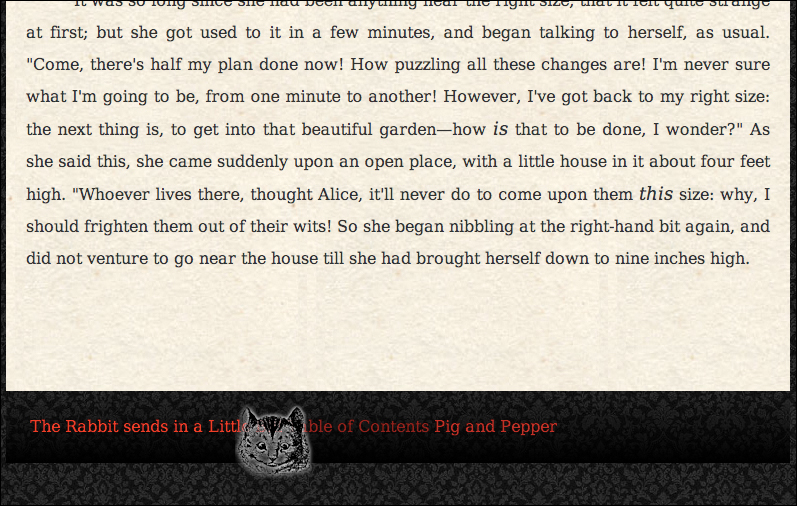
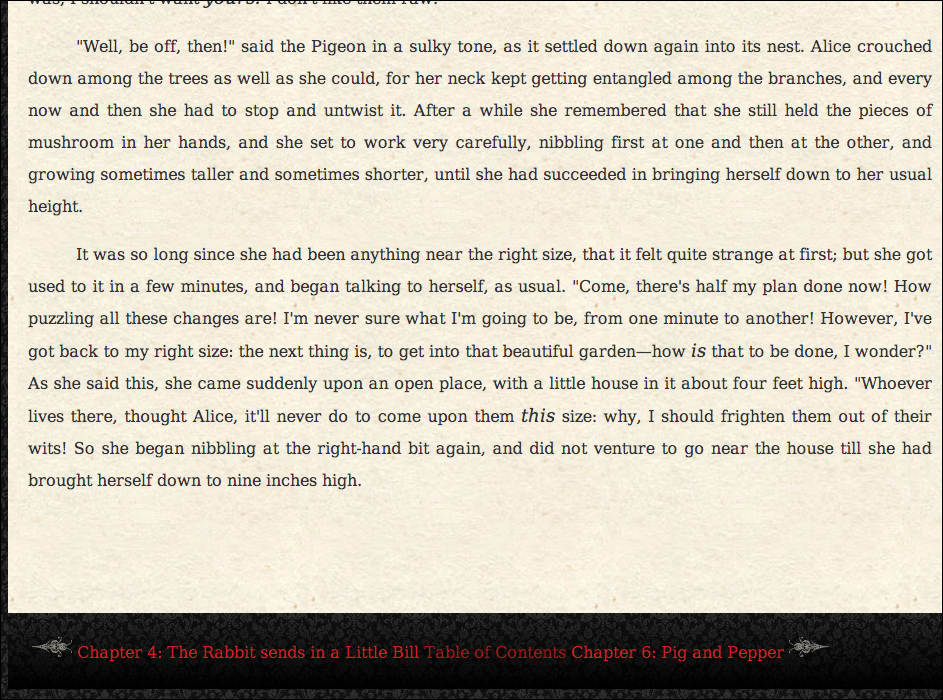
![]() The Web page for this chapter as it looks before adding any of the generated content.
The Web page for this chapter as it looks before adding any of the generated content.
Code 9.1. The HTML5 code used in the examples in this chapter.
<!DOCTYPE html>
<html lang="en">
<head>
<meta charset="utf-8">
<title>Alice’s Adventures In Wonderland | Chapter V</title>
<link href="../css/font-properties.css" type="text/css" rel="stylesheet" media="all">
<link href="../css/text-properties.css" type="text/css" rel="stylesheet" media="all">
<link href="../css/color-background-properties.css" type="text/css" rel="stylesheet" media="all">
<link href="../css/list-table-properties.css" type="text/css" rel="stylesheet" media="all">
<link href="../css/ch09/01a.css" type="text/css" rel="stylesheet" media="all">
</head>
<body id="chapter5" class="book aaiw chapter">
<header class="page">
<hgroup>
<h1>Alice’s Adventures in Wonderland</h1>
<h2>By <cite>Lewis Carroll</cite></h2>
</hgroup>
</header>
<article>
<h2>CHAPTER V
<span class="chaptertitle">Advice from a Caterpillar</span>
</h2>
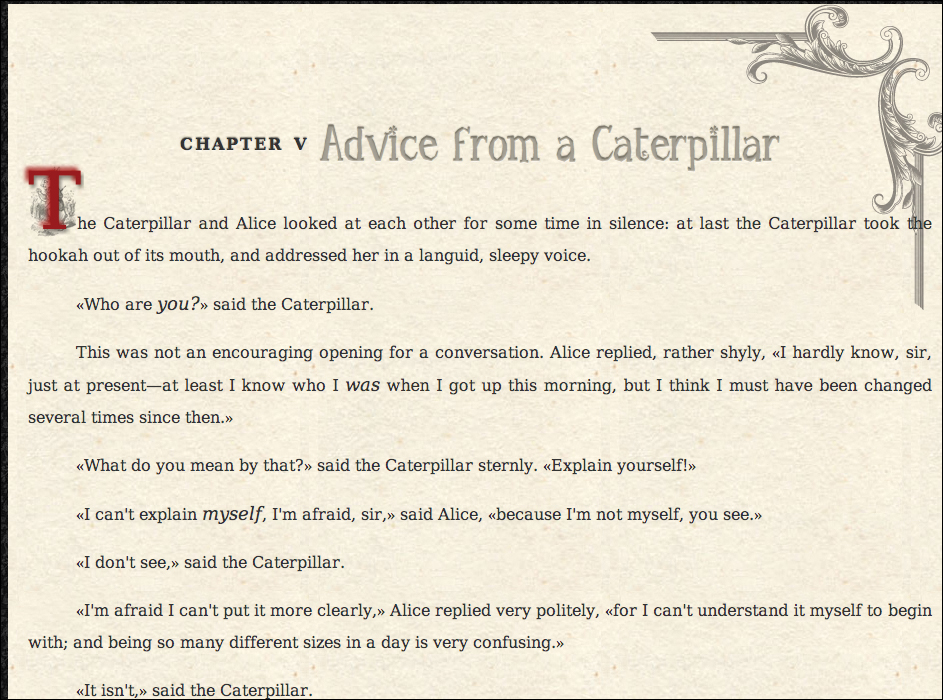
<p>The Caterpillar and Alice looked at each other for some time in silence: at last the Caterpillar took the hookah out of its mouth, and addressed her in a languid, sleepy voice.</p>
<p><q>Who are <em>you?</em></q> said the Caterpillar.</p> <p>This was not an encouraging opening for a conversation. Alice replied, rather shyly, <q>I hardly know, sir, just at present—at least I know who I <em>was</em> when I got up this morning, but I think I must have been changed several times since then.</q></p>
<p><q>What do you mean by that?</q> said the
Caterpillar sternly. <q>Explain yourself!</q></p>
</article>
<footer>
<a href="AAIWL-ch04.html" class="prev">The Rabbit sends in a Little Bill</a>
<a href="EB9780133132762_6.html">Table of Contents</a>
<a href="AAIWL-ch06.html" class="next">Pig and Pepper</a>
</footer>
</body>
</html>
Changing the Mouse Pointer Appearance
Normally, the browser determines the appearance of the mouse pointer according to the content currently under it. If the pointer is over text, for example, the pointer becomes a text selector. Or, if the browser is working and the visitor can’t do anything, the pointer becomes a timer, indicating that the visitor needs to wait.
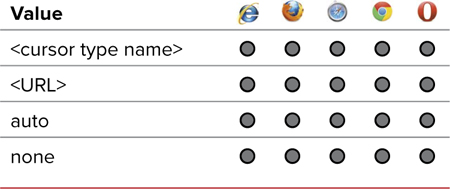
Sometimes, it’s useful to override the browser’s behavior and set the appearance of the pointer yourself using the cursor property (Table 9.1). This can be applied to any element on the screen, not just links. Also, you do not have to associate it with the dynamic hover state for it to work; just apply it directly to the element’s CSS rule.
To set the mouse pointer’s appearance
1. Add the cursor property to your CSS declarations. Type cursor in the CSS declaration block, followed by a colon (:) (Code 9.2).
cursor:
2. Specify the mouse pointer. Type one of the mouse pointer names listed in Table 9.2 to specify the pointer’s appearance.
crosshair;
Alternatively, type one of these values for cursor:
• auto to have the browser choose which mouse pointer to use.
• none to hide the pointer altogether.
Code 9.2. Added to ui-generatedcontent-properties.css—I set up different pointer types that depend on the type of object or link over which the pointer is hovering ![]() .
.
/*** ui-generatedcontent-properties.css ***/
h1 {
cursor: crosshair; }
footer a {
cursor: url('../images/chrome/cursor-02.png') 20 20, help; }
![]() Code 9.2 applied to Code 9.1: the pointer turns into the Cheshire Cat’s head when over the book title.
Code 9.2 applied to Code 9.1: the pointer turns into the Cheshire Cat’s head when over the book title.
3. Add a graphic mouse pointer. You can also create your own pointer by adding the URL reference to an image file (generally in PNG format) to use as a custom cursor. You can specify the complete Web address or the local filename of the image.
cursor: url(../images/chrome/cursor-02.png) 20 20, crosshair;
![]() Hotspot: CSS3 adds the ability to define the pointer’s hotspot (the point at which the active click will happen) as determined from the upper-left corner of the image. Always include a backup pointer type.
Hotspot: CSS3 adds the ability to define the pointer’s hotspot (the point at which the active click will happen) as determined from the upper-left corner of the image. Always include a backup pointer type.
Firefox, Safari, Opera, and Chrome allow you to use CUR, ANI, GIF, PNG, or JPEG images as a custom pointer by specifying the URL for the image file. Unfortunately, Internet Explorer supports only CUR and ANI file formats for custom pointers.
Remember that the exact appearance of the pointer depends on the operating system and the Web browser in use.
Although it’s fun to play around with switching the mouse pointers, I’ve tested this feature on my own Web site and have received several emails asking me to cut it out. Most Web users have learned to recognize the common functions of specific pointers and when they should appear. Breaking these conventions tends to confuse users.
Adding Content Using CSS
For the purposes of search engine optimization and accessibility, it is usually best to keep all content within the <body> element of your Web page. If it is dynamically generated, then it will not be seen by Web crawlers and many screen readers. However, at times you might have repetitive content that will not help (or may even hinder) your placement in a search index.
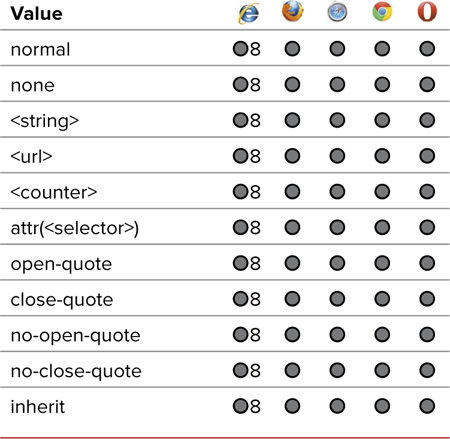
To add content, you can use the content property (Table 9.3), which allows you to specify a text string, image or sound file URL, counter, quote, or even an attribute value that should be displayed on the page.
To define generated content
1. Specify whether the content should go before or after the element. Type a selector with the :before or :after pseudo-class (see “Setting content before and after an element” in Chapter 4) to define where the content will be positioned in relation to the selector (Code 9.3).
footer a.prev:before {...}
2. Add the content property to your CSS. In your declaration block, type the content property name, followed by a colon (:) and one of the values listed in Step 3.
content:
Code 9.3. Added to ui-generatedcontent-properties.css—The left arrow image (bullet-02) is inserted along with the word “Chapter,” before the title of the previous chapter. Next, the word “Chapter” is inserted before the next chapter title with a right-pointing arrow (bullet-01) after ![]() .
.
/*** ui-generatedcontent-properties.css ***/
footer a.prev:before {
content: url('../images/chrome/bullet-02.png')' ' Chapter 'counter(chapterNum) ': '; }
footer a.next:before {
content: 'Chapter ' counter(chapterNum) ': '; }
footer a.next:after {
content: ' ' url('../images/chrome/bullet-01.png'),
}
![]() Code 9.3 applied to Code 9.1: The previous and next chapters now have back and forth arrows.
Code 9.3 applied to Code 9.1: The previous and next chapters now have back and forth arrows.
Because the content property was not supported until Internet Explorer 8, it is best not to rely on this property for critical information.
Information rendered using the content property will not be searchable by search engine spiders, so never use it to insert information that defines your page.
Content added this way is also invisible to screen readers, so don’t include anything that they will miss.
One idea is to use content to add figure captions pulled from the image’s alt tag. Because this is visible to screen readers and search engines, it’s a good way to cut down on repetitive content.
3. Specify the content to be added.
url('../images/chrome/bullet-01.png') 'Chapter 'counter(chapterNum) ': ';
To define the content that is being added, type one or more of the following values, separating each value with a space:
• Type a string value, such as Chapter, within single or double quotes. Anything within the quotes will be displayed just as you typed it, including HTML code, although spaces are collapsed (that is, more than two spaces are collapsed into a single space when displayed).
• url(), with an absolute or relative URL within the parentheses pointing to an external file, such as an image or sound file. For example, url(bg_flourish.png) will load an image.
• counter(), with a counter name in parentheses. For example, counter(chapterNum) adds the counter number for the chapterNum counter. (Counters are explained in the next section.)
• open-quote or close-quote to add a quotation mark using the current quotation style. (See “Specifying the Quote Style” later in this chapter.)
• no-open-quote or no-close-quote to increase the level of quoting by one level.
• attr() to display the value of the indicated attribute. For example, attr(alt) will display the value for the alt attribute of the element being styled.
• inherit, which will use the content defined for the parent element.
• normal or none, which will not add any content or apply any other values.
Teaching the Browser to Count
Browsers can automatically create sequentially numbered lists, starting at 1 and counting by ones. You will explore this later in the chapter. However, what if you need to start numbering from 6 instead of 1? Or, what if you need to create two sequential lists that are nested inside each other?
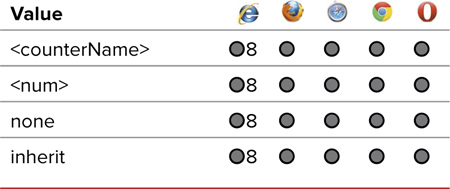
CSS allows you to set up multiple counter lists to be used with the counter value of the content property (see the previous section). The counter-reset property (Table 9.4) is used to set the initial value for the count, and the counter-increment property (Table 9.5) is used to increase the counter by a specific value (Code 9.4).
Table 9.4. Counter-Reset Values
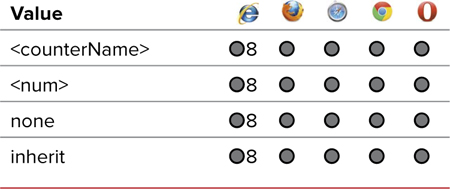
Table 9.5. Counter-Increment Values
To use a counter
1. Add the counter-reset property to your declaration block.
counter-reset: chapterNum 4;
Type counter-reset, a colon (:), and then the name of the counter identifier you are defining (which can be any name you want). Then insert a space and the number you want to start the list.
Code 9.4. Added to ui-generatedcontent-properties.css—The numbering in the footer is reset to 4 (the previous chapter) in Chapter 5 and then incremented by two to show the next chapter ![]() .
.
/*** ui-generatedcontent-properties.css ***/
footer a.next:before {
content: 'Chapter ' counter(chapterNum) ': ';
counter-increment: chapterNum 2; }
#chapter5 footer{
counter-reset: chapterNum 4; }
![]() Code 9.4 applied to Code 9.1: The chapters number themselves correctly.
Code 9.4 applied to Code 9.1: The chapters number themselves correctly.
2. Add the counter-increment property to the declaration block and include the name of the counter identifier.
counter-increment: chapterNum 2;
Insert a space and then enter a value to indicate how much you want to increase the count for each instance. The default is 1, but you can increase the count by any desired value.
Again, be very careful when using counter-reset because it can hamper accessibility. In fact, the example I use here is not really very good from the standpoint of universal accessibility. Shame on me!
Specifying the Quote Style
Although most writers will use the keyboard to add quotation marks to text, HTML includes the quotation tag: <q>...</q>. This tag places browser-default quotation marks around the indicated text. With CSS, you can define the exact characters to be used as quotation marks using the quotes property (Table 9.6). Although English uses single (‘...’) or double (“...”) quotation marks, this is by no means the norm for all languages.
To define the bullet style
1. Add the quotes property to your declaration block. Type quotes, followed by a colon (:).
quotes:
You can add this to any specific element, or you can key it off of a specific language as explained in “Styling for a particular language” (Chapter 4).
Code 9.5. Added to ui-generatedcontent-properties.css—In this example ![]() , the quotation marks are set to use « ... », which is standard for many European languages, including French.
, the quotation marks are set to use « ... », which is standard for many European languages, including French.
/*** ui-generatedcontent-properties.css ***/
* { quotes: '«' '»' '‹' '›'; }
![]() Code 9.5 applied to Code 9.1: The quotes are now set using angle quotation marks, which is standard for many European languages. I’ve magnified the image so that you can get a better look.
Code 9.5 applied to Code 9.1: The quotes are now set using angle quotation marks, which is standard for many European languages. I’ve magnified the image so that you can get a better look.
2. Set one of the values or value pairs listed in Table 9.6 within standard single or double English quotation marks (Code 9.5).
'« ' ' »'
3. After a space, you can add another grouping of quotation styles for the second level quotes (quotes that occur within quotes).
'‹ ' ' ›';
4. For the quote style to work, you will actually need to use the quote tag (<q>) to indicate quotes in your HTML document.
<q>...</q>
This property can come in handy even for English. UK and US English use the same quotes, but reversed in order. The US uses double quotes for a main quote and single for second level quotes, whereas in the UK, this is reversed.
Putting It All Together
Code 9.6 shows the final code for ui-generatedcontent-properties.css created in this chapter. Notice that I’ve had to add individual cases for each chapter in the book so that they are all numbered correctly in the footer.
Code 9.6. Final ui-generatedcontent-properties.css
/*** ui-generatedcontent-properties.css ***/
* {
quotes: '«' '»' '‹' '›'; }
h1 {
cursor: crosshair; }
footer a {
cursor: url('../images/chrome/cursor-02.png') 20 20, help; }
footer a.prev:before {
content: url('../images/chrome/bullet-02.png') ' Chapter ' counter(chapterNum) ': '; }
footer a.next:before {
content: 'Chapter ' counter(chapterNum) ': ';
counter-increment: chapterNum 2; }
footer a.next:after {
content: ' ' url('../images/chrome/bullet-01.png'), }
#chapter1 footer{
counter-reset: chapterNum 0; }
#chapter2 footer{
counter-reset: chapterNum 1; }
#chapter3 footer{
counter-reset: chapterNum 2; }
#chapter4 footer{
counter-reset: chapterNum 3; }
#chapter5 footer{
counter-reset: chapterNum 4; }
#chapter6 footer{
counter-reset: chapterNum 5; }
#chapter7 footer{
counter-reset: chapterNum 6; }
#chapter8 footer{
counter-reset: chapterNum 7; }
#chapter9 footer{
counter-reset: chapterNum 8; }
#chapter10 footer{
counter-reset: chapterNum 9; }
#chapter11 footer{
counter-reset: chapterNum 10; }
#chapter12 footer{
counter-reset: chapterNum 11; }