Now that you have a basic understanding of the Swift language, let's take a look at how it is used in Cocos2d.
Creating a Cocos2d-Swift project is very easy. While creating a project, you have to specify the language used as Swift instead of Obj-C while creating a project using SpriteBuilder, as follows:
You will see that the project structure is different now. Instead of the MainScene.h and MainScene.m files, we just have a MainScene.swift file.
Now, to load the MainScene.swift file, we have to make some changes to the AppDelegate.m file, just as we did for Obj-C projects.
In the AppDelegate.m file, we will add an import at the top. This should be projectName-Swift.h; so, in my case, as the name of the project is test, the header is test-Swift.h. Take a look at the following:
#import "test-Swift.h"
Now, in the startScene function, we will edit it as follows so that it returns the Swift MainScene class:
- (CCScene*) startScene
{
  //return [CCBReader loadAsScene:@"MainScene"];

  CCScene* scene = [MainScene node];
  return scene;
}
Now, we can use the MainScene.swift class to add our game objects to the scene.
Just as in the Obj-C class we would always start by getting viewSize and writing in the init function, the same will be done in Cocods2d-Swift, as follows:
import Foundation

class MainScene: CCNode {

  let viewSize: CGSize = CCDirector.sharedDirector().viewSize();


  override init(){

    super.init()


  }

}
Now, we can start populating the scene with our game objects.
First, let's take a look at how to add a sprite. Make sure that the assets are copied into the Published-iOS folder. Also, we will make sure you open up the CCBReader file and change it accordingly so that we can use extensions instead of folders for the source images.
So, now we will add the sprite as follows:
        let bg: CCSprite = CCSprite(imageNamed: "Bg.png");
        bg.position = CGPoint(x: viewSize.width/2,
          y: viewSize.height/2);
        addChild(bg);
The semicolon at the end of the sentence is not needed, but I always include it so that when I move back to Obj-C, I don't get errors. It is a good habit to add semicolons at the end.
However, you can notice that the classes are still the same. We still need to call the CCSprite and CGPoint classes to create a sprite and position it. Also, we will use the same addChild function to add the sprite object to display the list.
In a similar fashion, we can add labels as well; take a look at the following:
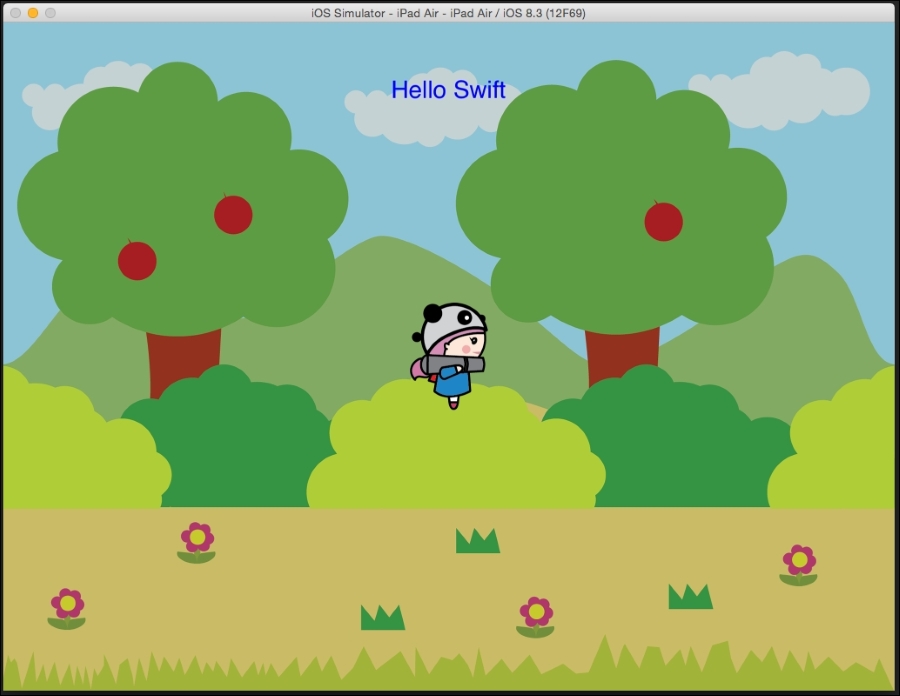
        let label:CCLabelTTF = CCLabelTTF(string: "Hello Swift", fontName: "Helvetica", fontSize: 14.0);
        label.position = CGPoint(x: viewSize.width * 0.5, y: viewSize.height * 0.9);
        label.color = CCColor.blueColor();
        addChild(label);
Let's additionally take a look at how to add touch input to the scene.
Add the following two lines in the init function:
        self.userInteractionEnabled = true
        self.contentSize = viewSize;
If you remember, these are used to enable touch in the scene. Next, we will add touch functions as follows:
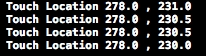
    override func touchBegan(touch: CCTouch, withEvent event: CCTouchEvent) {

      var touchLocation: CGPoint = touch.locationInNode(self)

      println("Touch Location (touchLocation.x) , (touchLocation.y) ");

    }

    override func touchMoved(touch: CCTouch, withEvent event: CCTouchEvent) {
      var touchLocation: CGPoint = touch.locationInNode(self)

    }

    override func touchEnded(touch: CCTouch, withEvent event: CCTouchEvent) {

    }

    override func touchCancelled(touch: CCTouch, withEvent event: CCTouchEvent) {

  }
Now, if we click on the screen, we can see the location of the touches printed.