Our template level needs a catapult to hurl the fish across the screen, a few bodies that will form the scaffolding, and the cats. For the catapult, we will create a simple rectangular body joined to the ground by a revolute joint. We will also customize the properties of the revolute joint to make the catapult as realistic as we can.
Since you already know how to create the bodies of various fixtures, I'm sure you can whip up the world within the following screenshot in no time. However, you can find the basic template file named Level00.rube in the Resources folder of the source bundle for this chapter. This is what the bodies within the template look like in the editor:
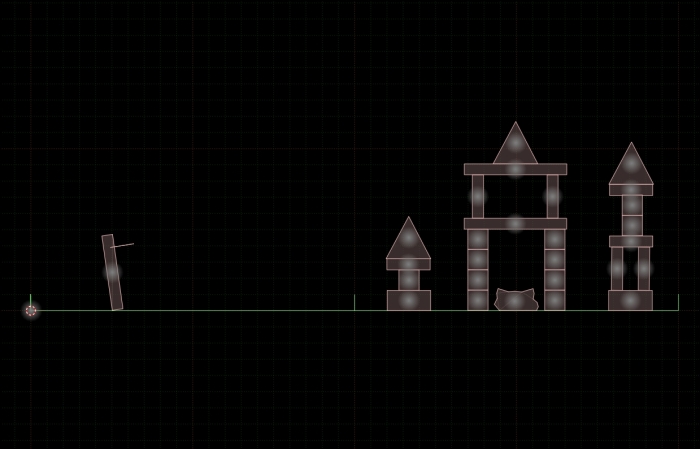
Open the Level00.rube file, run the simulation, drag the catapult on the left side of the screen, and release it. Rest assured, we will create the catapult in the next section and you will see how we achieved the behavior that you will see in the simulation. For now, add a circle fixture body near the catapult's ledge (refer to the following screenshot), then run the simulation again and have some fun!
Before we actually create the catapult, we need to learn something about the revolute joint. To quote the Box2D manual:
A revolute joint forces two bodies to share a common anchor point, often called a hinge point. The revolute joint has a single degree of freedom: the relative rotation of the two bodies. This is called the joint angle.
The revolute joint needs two bodies and an anchor point in the world space. In our case, the two bodies are the ground and the catapult, and the anchor point will be the point where the catapult touches the ground.
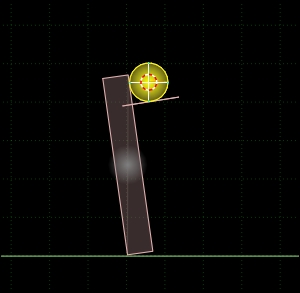
With Level00.rube open in the editor, and with the Edit joints mode selected, select the revolute joint named catapult_joint and delete it. Now go back to the Edit bodies mode and select the ground body as well as the catapult body (hold down the Shift key for multiple selections). Since RUBE will use the cursor as the location for the anchor point for the revolute joint, we need to move the cursor to the hinge point of our choice (once again, that is the point where the catapult touches the ground). Once you've done that, bring up the actions menu and go to Add | Add joint | Revolute. You can now run the simulation to see how the bodies behave with the joint constraining them.
Now that we have the default behavior of the revolute joint in place, we can add properties to achieve the behavior of a catapult. The first thing to implement is limits for the revolute joint. Limits force the joint angle to remain between a lower and upper bound. The limit will apply as much torque as needed to the constrained bodies to make this happen.
Select the joint that you just created and set the Lower limit and Upper limit values to 10 and 60, respectively, within the Properties window. Also enable the Enable limit checkbox and run the simulation. The catapult's rotation is now restricted between two angles like we want, but it doesn't really move back to its original angle. For that, we need to enable the motor on this joint. A joint motor allows you to specify the joint speed and a maximum torque. The motor will move the joint with the specified speed unless the required torque exceeds the specified maximum torque.
Enable the Enable motor checkbox and fill in values -250 and 2000 into Motor speed and Max motor torque, respectively. You can play around with these values to understand how the joint motor actually works. Run the simulation and you will see that dragging and releasing the catapult actually causes it to return to its original angle.
Now that we know how to create bodies and have created a functional catapult, we can move ahead to specify a few level design parameters using an invaluable feature of RUBE: custom properties.
Many a times, you might want your game's elements to have properties other than physics characteristics. RUBE takes care of this by virtue of custom properties that can be assigned to bodies, fixtures, joints, images, and even the world. You can name your custom property whatever you like and bind it to one of the preceding entities. A custom property can be an integer, float, string, vec2, bool, or color. Once a custom property is added to an entity, it can be assigned a value from within the Properties window—just like the physics properties.
For our game, we will need the bodies to have a couple of properties and the world to have a single property, as listed in the following table:
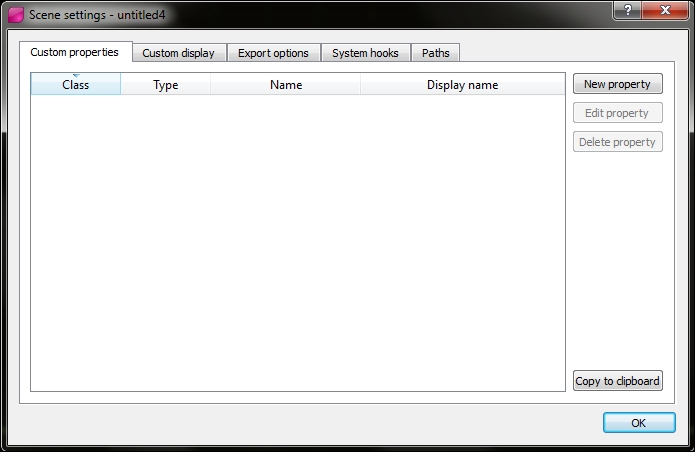
To add the preceding custom properties, go to Scene | Scene settings. This will launch a window that looks like this:
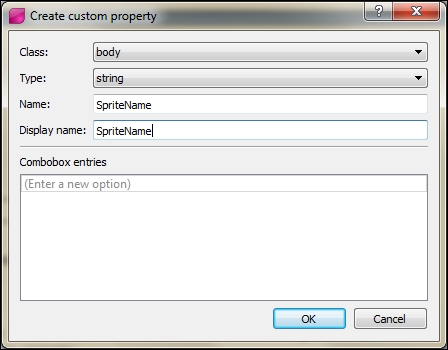
Now click on New property. In the window that opens, add the following entries to create the SpriteName custom property:
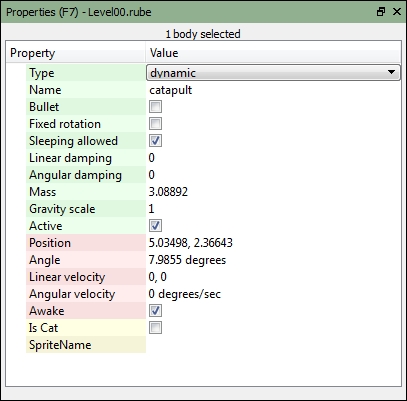
Similarly, add the other two custom properties. Now when you click on a body within the editor, the Properties window should look something like this:
You can open the RUBE file for each level in the source bundle for this chapter and play around with it as much as you like. This is all that we will be doing with RUBE in this chapter, but one important thing remains to be done. We need to export the information within these RUBE files so we can access them back in the Cocos2d-x environment. Unfortunately, the trial version does not let you export the raw data within the RUBE files. However, I have exported the raw data for each of the five levels, and you can find the JSON files in the source bundle.
We have barely scratched the surface with the abilities of the editor, but we've implemented enough to save a lot of time with our Angry Fish game. We still have a lot of work to do. We need to parse the raw data exported from RUBE and use it to generate the physics level. We then need to code in the functionality for the various kinds of fish, and the cats, and wrap up the gameplay.