
In this chapter, you will learn how to make structural database changes using the Entity Framework migrations API. Previously, we used an initializer to drop and recreate the database to handle such changes. Now, you will learn how to use Entity Framework migrations to achieve the same end result without data loss. We will also discuss the process of integrating Entity Framework with an existing database, instead of allowing the framework to create a database from scratch. We will also take a look at some additional features in Entity Framework that we need to be aware of that are not commonly used on a daily basis.
In this chapter, we will cover how to:
- Enable migrations on a project that uses Entity Framework
- Use automatic migrations
- Create explicit migrations
- Add database artifacts, such as indexes
- Add migrations to an existing database
- Use additional Entity Framework features (not covered in previous chapters)
Entity Framework is an ORM tool, thus it works with a database. We already saw that we are faced with the challenge of keeping an RDBMS structure and our Entity Framework entities synchronized. Previously, we used an initializer to drop and recreate the database to have the new structure match our context and entities. Obviously, we cannot do this in production. So, we have two choices. We can pick another tool, for example, SSDT for SQL Server, to separately maintain and upgrade database artifacts. The second choice, the one we are going to work on in this chapter, is to use Entity Framework itself to update the database at such times when the structure changes. In order to utilize this technology, we have to enable migrations on our project.
Previously, we used a single project for our application and Entity Framework's entity classes. This is not a common structure for typical non-trivial solutions. It is more likely that we would separate Entity Framework objects into their own project. This project would be of the type class library. We will do so in the sample project we are going to work on in this chapter. We can create this additional Data project following the same simple steps as we did before. We need to add the Entity Framework NuGet package reference to the new class library project, and write entity classes and the context class. Then, we can add this project as a reference to our application's main project, the console app, in the downloadable sample.
The next step is to enable migrations for our Data project. We will use the NuGet Package Manager Console window we referred to in previous chapters. We can pull up this window by navigating to Tools | NuGet Package Manager | Package Manager Console from the Visual Studio menu. Once this window is visible, select the Data project from the project drop-down menu, then type Enable-Migrations in the window, and press the Enter key, as shown in the following screenshot:

If we need to get detailed help for the PowerShell commandlet, Enable-Migrations, we just type Get-Help Enable-Migrations. We will find the parameters' information, which in part enables developers to point migrations to a specific project or connection string. In our case, we did not need to specify any parameters because we added the target connection string to the configuration file inside our Data project. After we run this command, we will see an additional folder created in our project called Migrations. There will be a class inside that folder that specifies migration configuration, tying it to our context class through the generic type parameter, as shown in the following code:
internal sealed class Configuration : DbMigrationsConfiguration<Chapter7.CSharp.Data.Context>
{
    public Configuration()
    {
        AutomaticMigrationsEnabled = false;
    }
    protected override void Seed(Chapter7.CSharp.Data.Context context)
    {
    }
}
Here is the same class in VB.NET as follows:
Friend NotInheritable Class Configuration
    Inherits DbMigrationsConfiguration(Of Context)

    Public Sub New()
        AutomaticMigrationsEnabled = False
    End Sub
    Protected Overrides Sub Seed(context As Context)
    End Sub
End Class
This class also has the Seed method, which is invoked every time migrations are applied to a database, enabling developers to perform miscellaneous tasks, such as inserting seed data. Since this method can be run many times on a database, we need to ensure that seeded data is not duplicated. Thus, we need to check whether our data already exists in the target database before inserting it.
Now we are ready to proceed with the database creation. If we are working locally, simply creating and/or upgrading the local database, we can continue using the Package Manager Console window. This time we can use the Update-Database commandlet. Again, we can use the Get-Help commandlet to take a look at the parameters we can work with. At this point, we are interested in the -script parameter. This parameter is useful, as it will generate a migration SQL script that we can hand to our DBA or run ourselves. When the Update-Database commandlet is run, it will compare the structure defined by our entity classes and the Context class against the physical database. In our case, we can omit parameters because we copied the connection string into our Data project and we only have a single class that inherits from DbContext in the project. If we run the command now, we will get the following error, shown in the following screenshot:
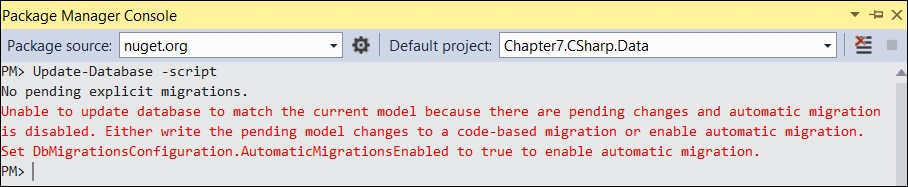
This error refers to the setting that allows us to enable the automatic migration generation. Let's update our migration's configuration class to enable automatic migrations, just as the error informs us. Then, we can build the solution and rerun the commandlet to create the script. We will see that the SQL script will open in Visual Studio. We can then create the target database by running the script. This functionality is useful when we are working with a DBA who needs to review our upgrade scripts. Since we do not need to do this locally, let's create the local database by running the Update-Database commandlet without any parameters. No errors should be shown. If we now open SQL Server Management Studio (SSMS), we will see our new Chapter 7 database! Congratulations, we just used Entity Framework migrations for the first time!
Automatic migrations are really easy to use. We can just make changes and rerun Update-Database to propagate the changes to our SQL Server database. To verify that there is no data loss, let's manually add a row to our People table using SSMS, as shown in the following screenshot:

Let's try the following now. We are going to add a new property to the Person class, called Age, which is a numeric property, and rerun Update-Database. The class looks as follows:
public class Person
{
    public int PersonId { get; set; }
    public string FirstName { get; set; }
    public string LastName { get; set; }
    public int Age { get; set; }
}
This is how the class looks in VB.NET:
Public Class Person
    Property PersonId() As Integer
    Property FirstName() As String
    Property LastName() As String
    Property Age() As Integer
End Class
After we update the database, we will see that our data is preserved. Our existing row is still there, and the Age column value is 0. If we look at the table structure, we will notice our new Age column, which has the database default value of 0. This is what Entity Framework does for us. For non-nullable columns, it attempts to pick a default value, which in fact is the type's default. Let's add a non-nullable string property with a maximum size of 50 characters, called NickName. We remember that we need to update the entity configuration class to do so. Say, we accidentally made a mistake, and we want to make the NickName column smaller, say 40 characters. Let's make this change and attempt to update the database again. We will see an error as shown in the following screenshot:.
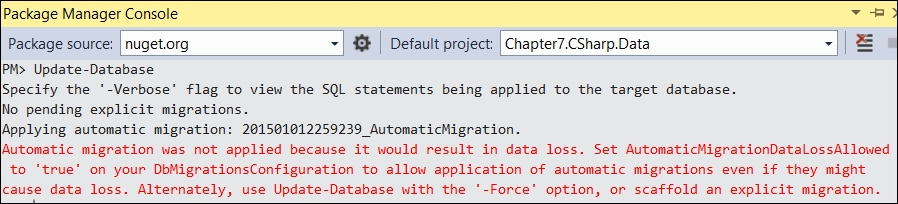
We now need to use another parameter for Update-Database, called Force. It forces change to run, even when it results in potential data loss. We can run Update-Database –Force to update our database this time. Alternatively, we can just enable support for data loss as Entity Framework exposes this setting, just like the error text tells us.
As we saw, simple scenarios can be easily accommodated via automatic migrations. This approach falls apart when our migrations get more complicated, as we will see in the following content.