
CHAPTER 6
Mastering Acoustics and Monitoring
Acoustic science is a vast enough subject to be covered by several books. Because of this, the focus here will be on the most important acoustic-related topics associated with mastering studios. There are a few generally accepted concepts, although each engineer’s room has its own considerations.
Hiring a Professional Acoustician
When the time comes to open a new mastering studio, it is generally recommended to hire a trained acoustician, acoustic engineer, or architecture firm with experience in acoustic design. A mastering studio may begin from a new structure, or an existing building will be gutted and a new interior will be designed and constructed. Businesses that offer services in this area can be found with a search for architectural acoustics, acoustic consulting, and acoustic engineering. The specialists who work with acoustics are called acoustic engineers or acousticians. They can help to design rooms with a balanced frequency response or improve an existing room with acoustic treatments. Some of the common acoustic treatments found in mastering studios are described in this chapter.
Room Modes
Room modes are the collection of resonances that exist in a room when acoustic energy is present. Room modes are the main reason for acoustic treatment.
Absorption
Various materials are used to absorb problematic sound-wave reflections. One of the most popular absorption materials is acoustic fiberglass, with Owens and Corning 703 being the standard. Owens and Corning 703 is rigid, making it easy to work with. Mineral wool and ultratouch cotton are alternatives, although neither is rigid. Too much absorption in a room can lead to a dead sound that is difficult to work with for extended periods. Mastering engineers often prefer a listening environment that has a live feel, which is easier for listening over extended periods. These goals should be discussed with the acoustician during construction.
Absorption Coefficients
The acoustic properties of absorption material are rated with absorption coefficients. Absorption coefficients indicate the frequency ranges where absorption is most effective, although absorption coefficients are not measured according to any standard. For example, absorption coefficients listed by one brand are not necessarily comparable with those of a different brand. While not exacting, absorption coefficients generally can help with finding the right material for addressing problem frequencies.
Diffusers
There are several types of diffusers. The main purpose of a diffuser is to scatter sound waves using an uneven surface. This is often accomplished in mastering studios with quadratic residue diffusers (QRDs). Some manufacturers go as far as to put miniature QRDs on the surfaces of their QRD wells. Diffusion also can be accomplished economically with something like thick, gathered vinyl curtains. There are also curved diffusers, grid diffusers, and many other types.
Front-Wall Treatments
There are two treatments that are common for the front wall behind the speakers: diffusion and absorption. Rooms may have a varying response to these kinds of treatments depending on the dimensions and construction materials of the room.
Treating First Reflection Points
One of the most important areas to treat is the first reflection points. These can be found by having someone move a small mirror along the wall and locating the places where the speakers can be seen from the listening position. These positions are often carefully treated with either absorption or diffusion, depending on the room’s response.
Clouds and Ceilings
Acoustic absorbers, called clouds, are often used to treat the first reflection points on the ceiling above the listening position. Some studios use diffusers in the cloud position, although the best choice varies depending on the room. Ceilings are usually recommended to be at least 10 feet high at the lowest point.
Narrowing the Front of the Room
In many mastering studios, the room narrows toward the front. Each of the sidewalls, as well as the ceiling, has a slope. Nonparallel surfaces are thought to produce a more even frequency response by reducing standing waves and the effects of room modes.
Minimizing Noise
Noise should be minimized from air-conditioning systems, computers, and all other noise sources. In the United States, noise is usually measured by noise criterion (NC), a unit of measure used to specifically rate indoor noise levels. Outside the United States, a similar measurement called noise rating (NR) is used, as established by the International Organization for Standardization (ISO). These measurements can be made with a high-quality sound pressure-level (SPL) meter. Dolby Laboratories suggests a maximum noise level of NC 15, and any such noise should not be perceptibly impulsive, cyclic, or tonal in nature.
Noise also can come from sound vibrating an object or fixture; such sounds are called sympathetic resonances. Various tones can be played in the room to help locate these problems.
Rear Diffusers
One often sees diffusers on the rear walls of mastering studios and sometimes on the rear ceiling as well. While this is generally the best choice, as with nearly everything in acoustics, it may not be the best choice for every room.
Early Reflections
Early reflections are sounds that occur within a few milliseconds of the direct sound. The Dolby Theatrical Sound Production Facility Requirements define early reflections as ones that occur within 15 ms of the direct sound and suggest acoustic treatment so that these reflections are at least 10 dB below the level of the direct sound for all frequencies between 1 and 8 kHz. Absorbers and diffusers reduce early reflections. The Dolby specifications suggest that early reflections in the listening position should be at least 10 dB below the direct signal; others may recommend 15 to 20 dB below. This measurement is usually made with an impulse-response envelope, measurement microphone, and frequency analyzer.
Listen to Tones with an SPL Meter
If measurement equipment is not available, listen to different tones that are reproduced at the same level. Listen to how they sound in the room, and measure them with a sound pressure-level (SPL) meter to see which are exaggerated. This can provide some awareness of and insight into room problems.
Parallel Surfaces
Parallel walls and surfaces in a studio can create a surprising amount of reflections. Mastering studios typically have sloping walls and ceilings to address this. Even desk and rack surfaces can cause significant problems.
Console/Desks/Surfaces
Perhaps the most ignored source of acoustic problems is desks and consoles. Even computer monitors can cause acoustic problems. Mastering studios typically work to minimize flat surfaces, including console space.
Symmetry
While mastering rooms are normally rectangular and parallel walls are avoided, they are generally symmetrical otherwise.
Decoupling Monitors
Monitors are usually separated from their bases or the floor using spikes or foam. This helps to reduce the transference of energy from the monitors to their supporting surfaces and minimizes or eliminates sympathetic resonances.
Bass Traps
Bass traps are usually placed in corners if there are acoustic problems with bass reproduction. MondoTraps from Realtraps are a great option alongside many other bass-trap solutions on the market. There are also many do-it-yourself bass-trap designs available.
Minimal Objects in the Room
The furniture and objects inside the mastering room are minimized, especially objects with large, flat reflective surfaces. If they cannot be avoided, steps may be taken to make them less acoustically detracting.
Ideal Room Dimensions
There are several ideal room size ratios (between length, width, and height). When selecting a room or constructing a mastering studio, it should be fully researched. The very worst rooms are cube-shaped. Acousticians who have published ideal room ratios include L. W. Sepmeyer, M. M. Louden, Ben Kok, J. E. Volkmann, and C. P. Boner. The golden-rule ratio and the IEC-268-13, IEC 60268-13, Industrial Acoustics Company (IAC), and Dolby ratios also should be considered. The first listed on the following page by L. W. Sepmeyer and M. M. Louden are among the most popular room ratios. Typically, mastering rooms have at least 10-foot ceilings and a 12-foot width. Often, 30 feet of length is said to be most optimal because they allow deeper bass response, however this is untrue and many highly-regarded mastering rooms have much shorter depth.
A few of the most popular room ratios include
• L. W. Sepmeyer: 1:1.14:1.39
• L. W. Sepmeyer: 1:1.28:1.54
• L. W. Sepmeyer: 1:1.6:2.33
• M. M. Louden: 1:1.4:1.9
• M. M. Louden: 1:1.3:1.9
• M. M. Louden: 1:1.5:2.2
• J. E. Volkmann: 2:3:5
• C. P. Boner: 1:1.26:1.59 (rounded)
• Golden-rule ratio: 1.236:2:3.236
• IEC 268-13: 2.8:4.2:6.7
• IEC 60268-13: 2.7:5.3:7
• Dolby: 0.67:1:1.55
• ASHREA: 1:1.17:1.47
• ASHREA: 1:1.45:2.10
• Bolt: 1:1.28:1.54
• IAC: 1:1.26:1.60
• Kok: 1:1.12:1.41
Angled Walls Behind Monitors
In mastering studios, the monitors face the mastering engineer. In some highly regarded studios, a small angled wall is located behind the monitors in a way that is parallel with the face of the monitor.
Monitor Visibility
According to a study published in the Journal of the Acoustical Society of America (ASA), when monitors are visualized in a studio, it can affect one’s perception of the sound. Therefore, some studios, such as Chicago Mastering Service, have their speakers behind acoustically transparent fabric where the monitors cannot be seen.
Correcting Acoustic Problems with Equalization
Most acoustic engineers agree that with most attempts to solve acoustic problems with equalization, more problems are created. Rarely, experienced acousticians are able to make certain fine adjustments using an equalizer, although this is virtually always for low bass frequencies only. Room acoustic problems are best addressed with acoustic design and treatments.
Speaker Placement
Speaker placement is of great importance in mastering. Often guidelines for placing speakers are based on the ITU 775 standard (International Telecommunications Union Operational Bulletin No. 775). ITU 775 specifies multichannel surround positioning for 5.1 surround-sound monitoring, which is shown in Figure 6-1.
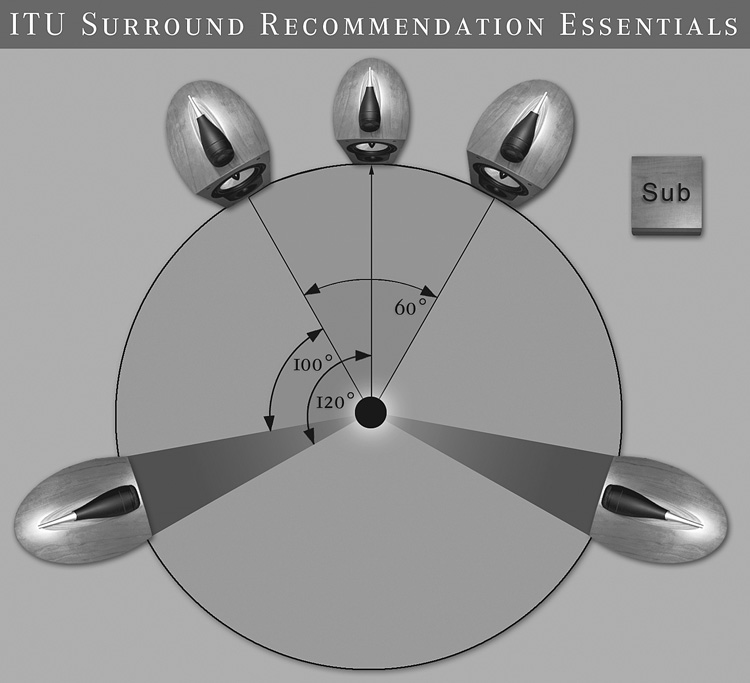
FIGURE 6-1 ITU 775 surround-sound monitoring standard. Many mastering engineers prefer a slightly wider angle for stereo monitoring.
However, many engineers feel that a slightly wider angle should be used for stereo monitoring than what is specified in ITU 775. Generally, for stereo monitoring, speakers are positioned forming an equilateral triangle with the listening position. This means that the three distances between each speaker and the listening position should be the same. As with all equilateral triangles, each angle is 60 degrees—that is 30 degrees to each speaker from the listening position if facing forward. To check the angles, some engineers position mirrors just above the tweeter and check to make sure that they can see themselves in the mirror at the listening position. Speakers should be placed at ear level. Although placement on one side of the room should mirror the other, the speakers are positioned so that the distance between a speaker and its two closest walls is not the same.
Also, because of what is called the boundary effect, the closer a speaker is to a wall, the more the lower-midrange and low frequencies will be exaggerated. Speakers often will be placed significantly away from walls unless the boundary effect is being used purposely. Also, speakers are not laid on their sides unless the manufacturer specifies them to be placed that way.
Speaker Decoupling
Speakers are usually placed on downward-facing spikes or foam as a buffer. This prevents the transfer of energy from the speaker to its base.
Integrating Subwoofers
If midfield or near-field monitors are being used, subwoofers are necessary in mastering.
Subwoofer Placement
Perhaps the best advice for subwoofer placement is to place them where they work best—each room is different. Generally, placing them too close to a wall can introduce problems. Also, it has been recommended that if a room were divided into a grid with four equidistant horizontal and vertical lines, subwoofers should not be placed on the lines or the intersection of such lines. These locations are said to be the worst for introducing room-mode issues. Also, subwoofers are usually placed either directly in line with the main monitors or slightly in front. Another method is to play music over the monitors that has plenty of bass, place the subwoofers at the listening position, walk around the half of the room where the main monitors are placed, find where the bass has the loudest response, and then place the subwoofers in those spots.
Subwoofer Calibration
Subwoofer calibration involves setting the subwoofer phase, crossover frequency, and level. The subwoofer crossover point is the audio frequency below which the subwoofer will reproduce sound. There are several methods for calibrating a subwoofer.
Method A
One of the most popular methods is to use a recording that features several bass notes across the spectrum that are at the same volume level, and adjust the crossover and subwoofer level until all are reproduced at the same level.
Method B
Some engineers use a recording of a bass sweep. The goal is to configure the crossover point and the subwoofer level so that the tones are reproduced uniformly across the sweep.
Method C
Play pink noise over the monitoring system, use a measurement microphone and spectrum analyzer to visualize the pink noise, and set the crossover frequency and level in such a way that the frequency response is most linear.
Method D
Dolby lists 120 Hz as the proper crossover point for theatrical film applications. For DVD and other consumer applications, a crossover point of 80 Hz is listed; in rare situations where the main monitors and the subwoofer have a crossover control, it can be set with this in mind if performing mastering for film.
There is an audio calibration tool that can help with these subwoofer calibration methods in Windows VST format provided freely on the Stonebridge Mastering website. It is called the Gebre Waddell Audio Calibration Tool.
Subwoofer Phase
Subwoofer phase should be set to the position that creates the highest loudness.
Excerpt from the Dolby 5.1-Channel Production Guidelines (the LFE Channel Is the Subwoofer)
“The LFE channel is calibrated such that each 1/3 octave band between 20 and 120 Hz is 10 dB higher than the equivalent 1/3 octave bands for any of the full-range speakers, assuming that the full-range speaker is ideally flat. This level is read from a real-time analyzer (RTA), rather than a sound pressure-level (SPL) meter. If an RTA is not available, an SPL meter may be used to approximate the level. When the level is correct, most meters will read around 90.91 dB SPL C-weighted slow for the LFE channel. The difference in level is because there is no energy being reproduced for the frequencies above 120 Hz (80 Hz for consumer applications).”
RT60/RT30/RT20
RT60 refers to the time required for reflections to decay 60 dBSPL below the direct sound from which they were produced. In some cases, RT30 or RT20 are measured, and RT60 is calculated from them. Although this is usually stated as a single number, it can be measured with a wide-band signal (20 Hz to 20 kHz) or in narrow bands (e.g., 1 octave, 1/3 octave, or 1/6 octave). This feature is built into many spectrum analyzers. RT60 times are often discussed in acoustics but are more relevant for large spaces, such as concert halls, than for mastering studios. With that said, RT60 targets for mastering rooms are usually 200 to 500 ms.
Listen to Translations
The term translation refers to how a recording sounds on various playback systems and in various acoustic environments. Acoustics problems in a mastering studio lead to translation problems outside the studio. The best remedy is to treat the acoustic options. If this is not feasible, engineers should be as aware of the problems as possible and work with them in mind. If masters from a studio are commonly translating with an issue, the engineer should begin paying attention to that issue. When starting off in mastering or with a new monitoring system or environment, it is important to listen on a variety of systems to develop a sense of the translation.
With some issues, the reference level can be adjusted, which is the loudness level of the monitors, while adjustments are being made by the mastering engineer. There is more on this after the next few sections.
Acoustic Methods/Techniques/Design Concepts
Several acoustic approaches may be used when designing control rooms or mastering rooms. The details are outside the scope of this book, although each approach is listed below for easy reference. The advantages and disadvantages should be researched and discussed with an acoustic engineer before planning.
• Front-to-back (FTB)
• Live-end–dead-end/reflection-free zone (LEDE/RFZ)
• Non-environment (NE), also called Hidley/Newell
• Ambechoic
• Controlled image design (CID)
• Reflection-rich zone (RRZ)
Selecting Monitors
Many engineers say that mastering monitors are best selected by auditioning them in the studio where they will be used. During this auditioning, very familiar recordings are played to gain better insight than a blind choice. Often professional engineers do not actually select monitors in this way, instead opting to make selections based on specifications or manufacturing techniques. This is likely due to the difficulty in arranging monitor demos. Overall, mastering monitors are selected that provide the best translation, imperceptible distortion, and precise detail. For more on this topic, check out “The Case for Full-Range Monitoring” by Scott Hull in Chapter 16.
High-Quality Amplifiers
A high-quality amplifier is as crucial to a monitoring system as high-quality monitors. Both are best selected in the same manner—by auditioning favored selections and making a choice based on one’s preference. Mastering studios typically use the highest-quality class A or A/B amps, although some high-quality class D amps (from Hypex, Lipinski, Bel Canto, and others) are on the very same quality level. Class D amps have come a long way in quality and are often called green amps for their energy efficiency.
Biwire
Biwire is a connection between amplifiers and speakers. Some monitors support this feature, with each speaker having four terminals for making the connection (two negative and two positive). There are several stated benefits of biwire, although it has largely been rejected by audio engineers on the basis of the possible benefits being outweighed by the problems it introduces.
K-Meter Explained
A K-Meter has two parts, a peak meter and an RMS meter. It simultaneously displays both peak and RMS levels. There are three K-Meter types: K-20, K-14, and K-12. The main difference in these meters is how they are numbered on the side. The meters are marked so that the RMS that corresponds to their number shows as 0. For example, K-12 meters are marked so that –12 dBFS RMS shows as 0 on the meter.
K-20, K-14, and K-12
With Bob Katz’s K-System, K-20 is to be used for film, K-14 for rock and other types of commercial music, and K-12 for broadcast and pop. Each of these meters is shown in Figure 6-2. According to the system, the compression, limiting, or even expansion should be set so that the peaks of the loudest passages of the recording reach the highest limit of the meter while the RMS level remains at 0.
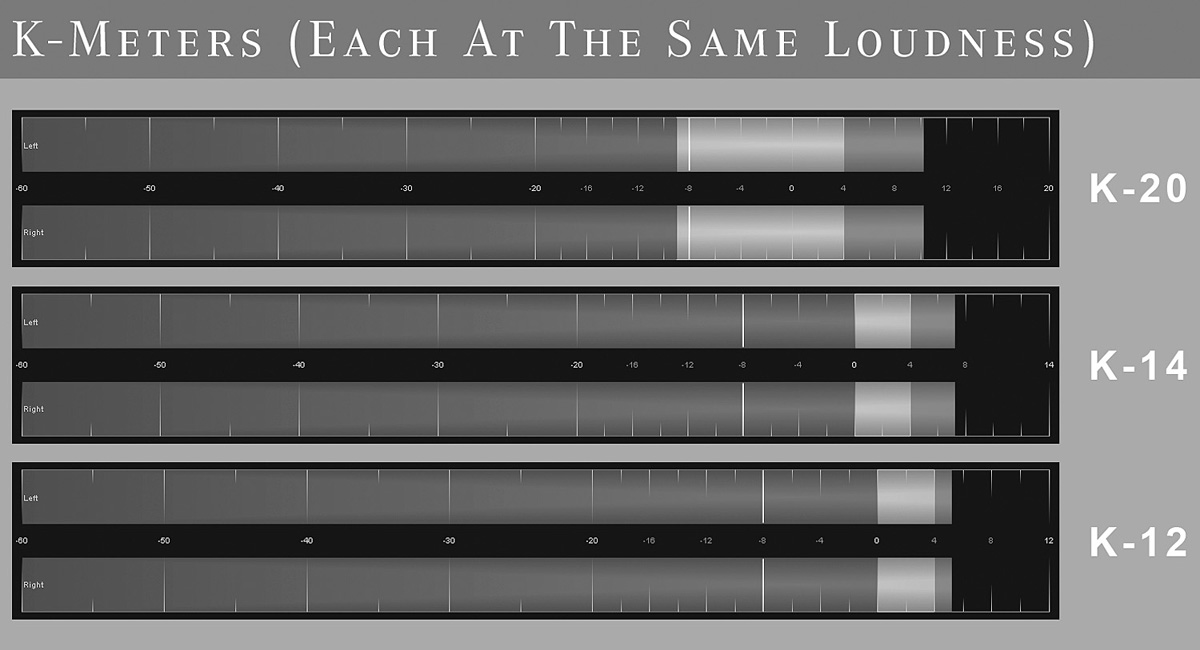
FIGURE 6-2 Bob Katz’s K-Meters (K-20, K-14, and K-12) are intended for use in setting loudness during mastering: K-20 for film, K-14 for rock and other commercial music, and K-12 for broadcast and pop.
Stepped Monitor Gain Control
As discussed in Chapter 5, stepped controls click into a fixed number of positions across their range. Stepped monitor gain controls are important in mastering because they allow you to easily return to the exact level that you have calibrated. With a stepped gain control that is marked in decibel increments, it is possible to easily move between reference levels (e.g., K-12, K-14, and K-20).
K-System Criticisms
One of the main criticisms of the K-System is that 83 dBSPL is either too low or too high, which Bob Katz acknowledges. Also, while RMS metering is a closer representation of loudness than peak metering, it is by no means a precise representation of loudness. With regard to 83 dBSPL, Katz has suggested setting the level at your own personal taste. For some listening environments, this level may be too high; for others, it may be too low. The main idea is not the specific levels (K-12, K-14, and K-20); instead, it is working at a familiar reference level to develop a sense for how things should sound. While the K-System became popular among some engineers, by and large, established professional mastering engineers did not adopt it. Instead, they use their own developed methods. Working with a reference level is a technique that was in use before the K-System was created. Also, professional mastering engineers set the dynamics/loudness according to their ears and best judgment, not a meter value.
Consistency as a Result of Reference Levels
The main purpose of working with a reference level is to create consistency. Our frequency perception changes across loudness levels, so having a single reference level gives a sense for balance at that level.
Monitoring at a Variety of Loudness Levels
Some engineers say that mastering is best performed when a number of loudness levels are considered and monitored. Equal loudness contours show that our frequency perception changes depending on the monitoring level. Because mastering is about making things work in a variety of situations, it may be important to listen at different monitoring levels and make adjustments so that the sound works best across all levels of loudness.
Ear Sensitivity
Our ears have varying frequency sensitivity depending on loudness. The Fletcher-Munson curves (and their most recent evolution, the equal-loudness contours) describe how sensitive our ears are at various levels. The equal-loudness contours are shown in Figure 6-3. This is a factor in deciding a personal reference level. For example, if an engineer is producing masters that are too bright and have too much bass, he or she may consider raising the reference level, which changes the perceived frequency balance. Frequency perception based on ear sensitivity is one of the main factors for engineers developing their own personal reference levels.
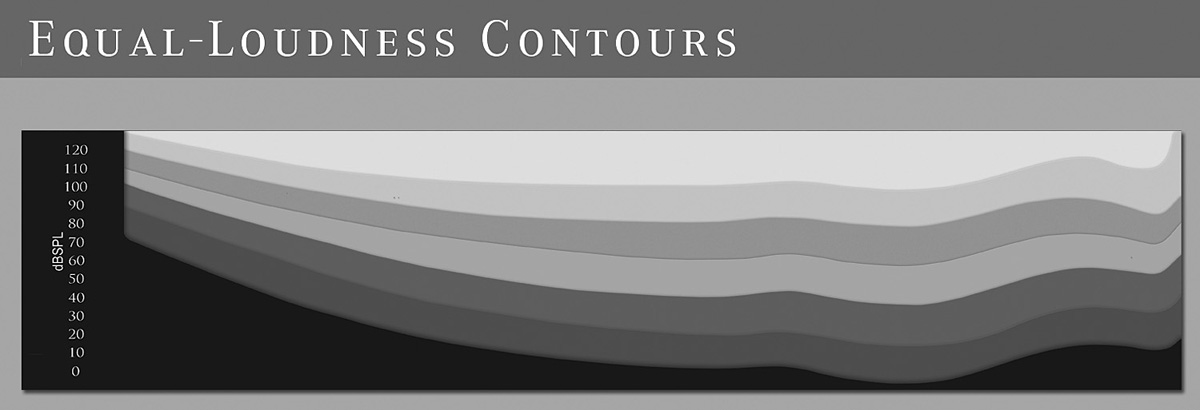
FIGURE 6-3 Equal-loudness contours describing the sensitivity of the human ear across the audible frequency range. This graphic shows that the sensitivity changes depending on the loudness of the sound. We are most sensitive between 2 and 4 kHz, where the graph dips the lowest.
Alternative Reference-Level Selection
Some engineers set their reference level with the simple method of listening to recordings very familiar to them (or similar to the genre of the recording being worked on), finding the most comfortable level for listening, and using that as their reference level. Raising the loudness even 1 or 2 dB higher than this comfortable level may make a well-selected reference recording sound abrasive in the studio, although it truly is not. Therefore, if adjustments were made while mastering above the comfortable loudness level, we might attenuate harshness that would not serve translation.
There is also a practice of setting a reference level and adjusting it over time depending on customer feedback about translation. If masters are consistently dull and with too little bass, the level may be lowered. If they are too bright and the bass is just right, the reference level may be raised, and the subwoofer level may be lowered. There are many possibilities with this approach.
Workplace Safety
Most developed countries have some workplace safety standard for loudness. In the United States, the Occupational Safety and Health Administration (OSHA) specifies that a person can be exposed to 90 dBA for up to eight hours. This assumes that the recommended breaks are taken. Audiologists may recommend a maximum of 85 dBA.
Headphones
Headphones allow more detail to be heard, except in the bass range and the stereo field. While you can hear more detail, headphones distort linear frequency perception. Any adjustments that affect tone or that involve depth or wideness should be made with monitors. Mastering engineers generally use headphones only for quality control so that they can hear the finest detail. Headphone monitoring might be compared to a magnifying glass that has a distorted and discolored lens. More detail is perceptible, but the view is distorted.