
CHAPTER 7
Mastering Practices: Techniques, Problems, and Approaches
In an interview with the Audio Engineering Society, Bob Ludwig described the “ah-ha” moment of his career. He discovered that a producer he worked with preferred the work of a different mastering engineer over his own. While Bob prided himself on his masters being as true to the mixes as possible, his competition would use compression, hype the midrange frequencies, make it brighter, and give a fuller-sounding bass drum. Bob’s big realization was that the producer expected mastering to provide “more of the excitement felt in the mix room.”
It has been quite some time since Bob’s “ah-ha” moment while cutting vinyl, but many of today’s producers are still looking for improvements of their mixes from mastering. This is especially so with home and project studio producers.
Truly improving a recording during mastering is quite a challenge and is often best done with subtlety. The main idea is to do what needs to be done while minimizing the impact on other elements of the recording. Sometimes preserving the existing tone is the best possible outcome. The word tone itself encompasses so many things. It relates to terms such as timbre, color, tonal quality, sound quality, and fidelity. Each one of these terms has its own nuances in our language. For the sake of simplicity, the umbrella term tone is used throughout this book.
This chapter presents a collection of techniques, approaches, and problems in audio mastering that affect tone. The purpose is to present a wide array of practices so that engineers can discover what works for them. These practices range from common to rare. Some help to make improvements, whereas others prevent degradation.
When techniques are described, they may come across as protocol, but it is the underlying principles that are most important. The better someone understands the principles, the more advanced and customized processing can become. This is not to undermine the techniques; they are certainly not irrelevant, but they should be considered a bit differently from instructions.
Technique: Listening
The most important skill in audio engineering is listening. Deeply listen to the song before and during processing. The song must be felt as much as analyzed. What does it feel like? What should it feel like? What can you do to help achieve the emotional goal—the story told by the song? In mixing, this experience is at its height. In mastering, the final refinement is taking place with a different perspective, experience, and tools. Mastering is about removing anything standing between the listener and the emotion created during production. If something can be improved, try it. If it is already perfect, that’s fine. In such cases, mastering will be about minimizing artifacts while setting appropriate loudness levels and creating the destination format.
It is an important listening skill while mastering to focus on the adjustment being made and its effect on other aspects and pulling back to listen to the overall sound while considering the adjustment. Because almost everything in mastering affects more than one thing, benefits and sacrifices must be balanced.
Technique: Working with Intent and Vision of the Result
While listening, develop a vision for improvements—a goal to be reached. Lock onto the vision, and work to make adjustments that produce it. Developing this skill takes time and familiarity with techniques and the equipment at hand.
Technique: Only Making True Improvements
Adjustments should be compared at the same loudness level as the original mix to ensure that intended improvements are true improvements. Making true improvements is more of a challenge than it would first seem. Analog and digital processors alike can boost the loudness very slightly, even as little as 0.1 to 0.5 dB, which gives the impression of a subtle improvement. Such boosts sound like an improvement even when the processing has actually caused something undesirable. Because the ear almost always interprets slight increases in loudness as an improvement, the novice is tricked easily and often. Differences in level should never be allowed to mislead decision making about processing.
For a rigorous test of true improvement, set the processed output slightly below the level of the original, and compare the “improvement” with the original. This will provide insight into how much loudness affects the perception of an improvement. Typically, levels are matched as closely as possible during comparisons, which may be done by ear or with an LUFS meter.
There are several methods for making comparisons at the same loudness. The input offsets or DIM switch of a monitoring control system or console can be useful for this task. When working digitally, one might insert a plug-in with an adjustable gain control at the very end of the processing chain. It can be used to balance levels for comparison. A few tools for matching loudness are shown in Figure 7-1.
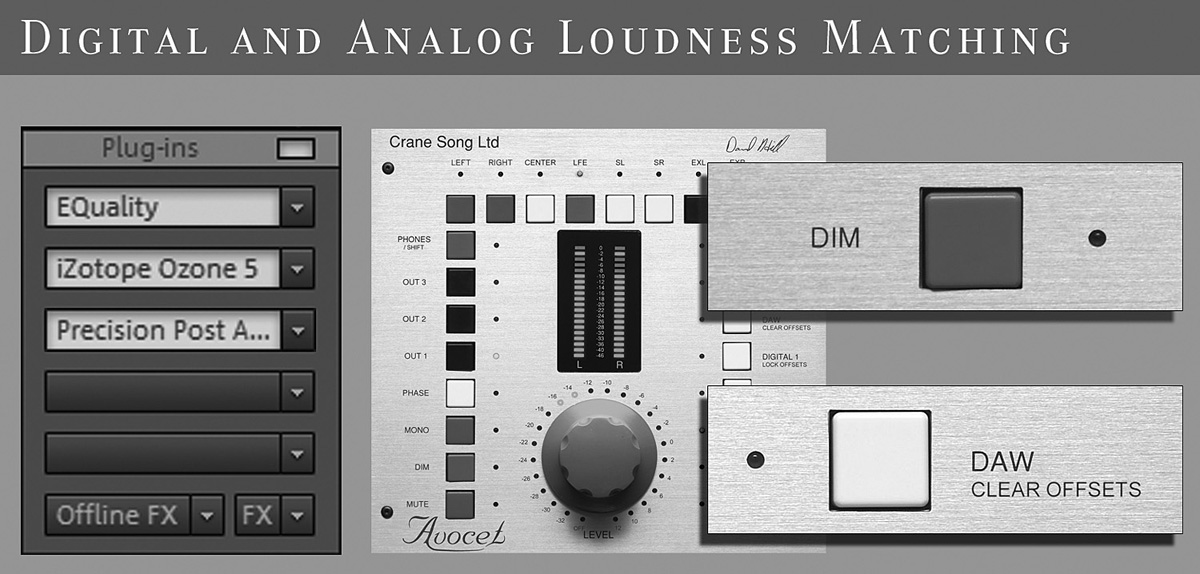
FIGURE 7-1 Various tools can be used to match loudness levels for accurate comparison, including plug-ins, DIM switches, and monitor-level offsets.
A similar but less influential auditory illusion is an effect caused by the visualization of some plug-ins. The graphically appealing nature of a graphical user interface (GUI) seems to activate the user’s senses in the same way an audio improvement might. This effect can be experienced by watching and listening to a high-definition (HD) music video and then turning off the screen. The auditory experience can feel at least subtly different. In fact, there have been many studies that show links between our senses. To easily make the computer screen blank while listening, Windows users can make a shortcut to the “blank” screensaver on the Windows desktop (the file is usually C:WINDOWSsystem32scrnsave.scr). Then right-click the shortcut, go into Properties, and set a shortcut key to quickly launch the blank screen whenever you want to focus on listening. The screen can also be turned off manually, although there can be a longer delay when powering on and off.
While developing mastering skills, it is of the utmost importance to make true improvements. Wasting time with illusory improvements takes away from time that could be used for actually developing one’s senses and methods.
If making a true improvement does not seem possible with a given recording, that’s okay. If this happens, do not feel bad about it. The only processing may be to raise it to suitable loudness with minimal artifacts and prepare it for its destination format.
This may be the most important point of this book: Comparing any processing at different loudness levels is misleading and deserves careful attention.
To help with comparing processing at the same loudness, a Windows virtual studio technology (VST) plug-in was created to coincide with the release of this book called the Gebre Waddell Precision Post Analog Controller. It features long-throw faders that allow for precise level matching and balance control. Holding the ALT key while moving the fader provides the most precise adjustments.
Approach: Destructive versus Nondestructive Processing
In audio engineering, there is destructive and nondestructive processing. This describes whether processing modifies the original content. Destructive processing changes the original content, and without a saved copy, the original content is lost. Nondestructive processing allows settings to be modified and saved in addition to preserving the original content. Nondestructive processing is familiar to audio engineers as the processing that takes place in a digital audio workstation (DAW) session view. Examples of session and waveform views are shown in Figure 7-2. Destructive processing is most familiar as the processing that takes place in a DAWs’ waveform view. Most digital processing in mastering is performed nondestructively so that adjustments can be made later.
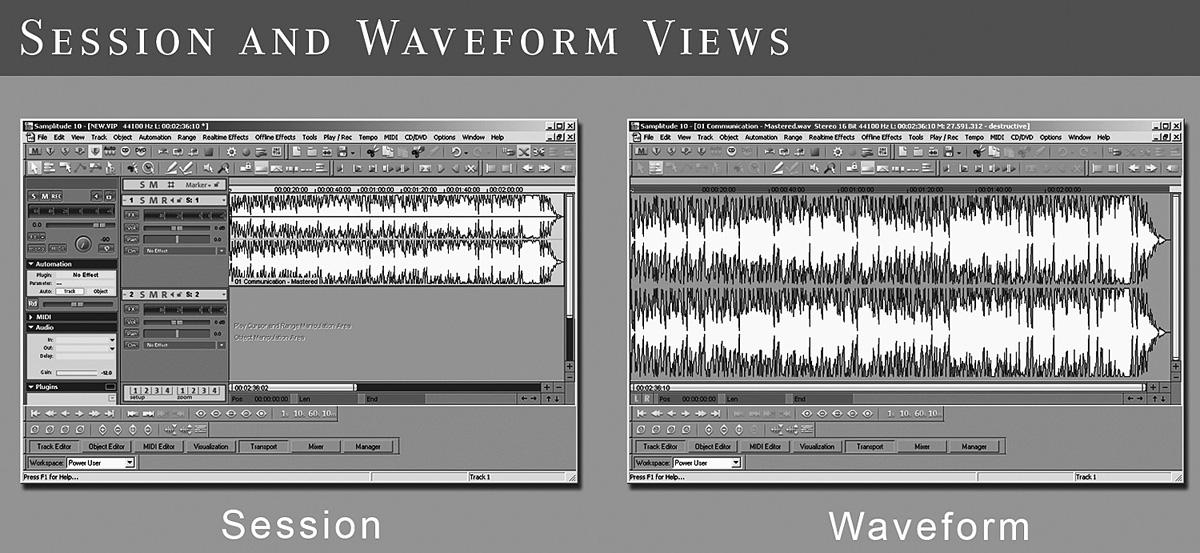
FIGURE 7-2 Most DAWs include a session view, where many waveforms can be worked with together nondestructively, and a waveform view, where a single waveform can be worked with destructively.
Technique: Working with Reference Recordings
Reference recordings are usually popular recordings or recordings of the highest quality in a given genre and can be used for comparison alongside recordings being mastered. Engineers often maintain a collection of reference recordings and may request clients to submit reference recordings to gain insight about their tastes. When a client is trying to communicate his or her sonic vision, it is usually best accomplished through reference recordings. Also, working with a reference can help to maintain a sense of balance and help reset our ears and perception.
References are sometimes audio CDs or digital files. They can be loaded into the DAW or played on a separate device. Reference recordings are often routed to monitor control systems or console inputs so that comparisons can happen instantly at the touch of a button. This allows for instant comparison during both digital and analog processing. If these are not available, the DAW can be configured for the use of the “exclusive” solo mode as described in the next section. Whenever working with a reference, the same D/A converter should be used for both the original and the reference; otherwise, the comparison will not be exact.
Also, reference recordings should be stored in nonlossy formats. When reference recordings are stored on the DAW’s hard drive, they may be ripped from CD to the Free Lossless Audio Codec (FLAC) format. This helps to minimize drive space and is useful for quick loading. It is usually accomplished using Exact Audio Copy (EAC) and the FLAC codec, both of which are free. With a Google search for both “exact audio copy rip to flac” and “eac flac command-line parameters,” one can find a bit of help for properly setting this up.
Sometimes reference recordings are streamed from another device for playback, although you must be careful that reference recordings are converted with the same digital-to-analog (D/A) converter as the recording being mastered; otherwise, the comparison will not be accurate.
The annual Grammy Nominees compilation CDs are an inexpensive way of updating reference collections with essential popular music. Also, recordings from record labels focused on recording quality, such as Decca, Chesky, and Harmonia Mundi, are great for reference-quality recordings.
Technique: Minimizing the Delay Between Comparisons
Comparisons are made in a variety of situations—when working with reference recordings, between original and processed versions, or between several processed versions. Whatever the comparison may be, minimizing the delay between comparisons is important—seamless comparisons are absolutely essential to clear judgment.
Solo modes are a DAW feature that helps to make seamless comparisons. In mastering, the most popular solo mode is exclusive. When the solo mode is set to exclusive and a track’s “Solo” button is pressed, all other tracks are unsoloed. This allows the user to switch seamlessly between tracks simply by soloing them. If the exclusive mode is not selected, groups of tracks will be soloed, and this does not work for making instant comparisons.
Mastering consoles and monitoring control systems usually have features that allow for instant comparisons. For example, the Crane Song Avocet allows input from many different sources, and the user can switch between inputs at the press of a button. This kind of feature allows for seamless comparisons between many types of sources. Of course, whenever digital sources are being compared, you must be careful that they are converted with the same digital-to-analog (D/A) converter and the same monitoring system so that you make a properly controlled comparison.
Technique: Avoiding Ear Fatigue
According to studies, there are two types of ear fatigue—short term and long term. Full recovery from short-term ear fatigue occurs in about two minutes. Because of this, mastering engineers may take a short break before committing to any final decisions. Recovery from long-term ear fatigue requires at least a few minutes but may take several days. Long-term ear fatigue can be induced from a loudness of 75 dBSPL and above for long durations.
Technique: Processing Sections of a Song Separately
Mastering largely involves finding settings that work over an entire song. However, when an engineer notices a problem isolated to a single part, he or she might decide to process that part separately or automate an adjustment.
Some mastering engineers have been known to automate some adjustments, such as stereo widening or extra compression during song choruses. However, this kind of processing is rare and largely viewed as extraneous. Automation of equalizer adjustments is more common, although still relatively rare.
In the case of removing a single click or pop, you might destructively edit a small piece, possibly saving a new version if the change potentially would need to be rolled back. These kinds of repair edits are often done in what many DAWs call the waveform view, which allows destructive editing.
If an entire passage has an issue, the section might be cut into a separate part and processed as if it’s a separate recording. It is important to seamlessly edit the parts back together. When processing this way, phase shifts can cause problems in timing, especially when using processing that involves phase shifting, such as equalization. This may be noticeable as clicks, pops, or other anomalies at the beginning or end of an edit. Careful editing can help to address these problems, and automating the adjustment can eliminate the consideration altogether.
Technique: Minimizing Processing
The number of processors used, both digital and analog, are often minimized. Additional analog processors in the chain beyond what’s needed can add unnecessary noise. Using several plug-ins in succession is especially seen as unfavorable. Minimizing the use of processing, especially with plug-ins, is a good practice.
Technique: Making Client-Requested Changes Properly
When a change is requested, the mastering chain is recalled, and the change is made with appropriate processing. It is important to fix the problem at its proper place in the sequence. It is valuable to save plug-in and analog processor settings to recall settings for making such changes.
Technique: Processing Based on First Impressions
Many engineers believe that their first impressions about what a mix needs are the most valuable. Adjustments are quickly made based on those first ideas. Working this way is a skill that takes time to develop.
While developing their skills, many engineers prepare a version, listen after a break with fresh ears, and make revisions as needed. This is meant to avoid the shifting perceptions and distorted judgment that can come from working with the same material for extended periods at a time.
Technique: Turning Things Off/Listening in Bypass Mode
Making true improvements requires bypassing processors to make comparisons. Processors may be bypassed individually and altogether. As mentioned earlier, making such comparisons at the same loudness is the only way to be sure that processing is making an improvement.
It may be best to make comparisons without knowing which is the original and which is processed, except by listening. There are various ways to accomplish such a comparison depending on the equipment being used. For example, using a button on a console instead of a toggle switch can aid in making blind comparisons. The button can be pressed a few times without thinking of how many times it’s being pressed; then listening can occur without knowing whether the processing is engaged or not. Also, plug-in chain bypass switches can be pressed with the mouse button a few times until it is not known whether they are engaged or not; then the comparisons can be made.
It is important to remain indifferent with processing ideas, especially with unfamiliar processing. Sometimes they can be as rewarding to dismiss as they are to keep.
Technique: Relationships with Mixing Engineers and Producers
A strong working relationship with mixing engineers and producers can create an environment for the best processing and approach. These relationships certainly can help business as well. As with many types of relationships, communication and understanding are key in reaching mutual goals.
Technique: Concurrent Processing
Concurrent processing is processing with several or all processors working simultaneously (as opposed to processing in stages). Arranging a mastering chain for concurrent processing has several advantages. Processors can be adjusted to work in context with each other. This can help to minimize the processing that takes place and create the best combinations. Also, due to making adjustments in context, the strengths of each unit can be leveraged more fully.
Working entirely concurrently is simple when using only plug-ins or only outboard processors. It becomes more complex when using plug-ins both before and after analog processing. In this configuration, track input monitoring can be an option.
Sometimes groups of processors may be used concurrently while other groups are used in stages. For example, some engineers prefer to do all noise reduction in one stage and all other processing concurrently.
Technique: Processing in Stages
Processing may also be performed in stages. There are a few common trends with processing in stages. When restoration processing is required, many engineers perform it in its own stage, before other processing. Even when all other processing is done concurrently, this is still quite common.
Noncreative processing is well suited for a separate stage, such as DC-offset removal or sample-rate conversion.
If analog processing takes place, all analog processing is virtually always done in a single stage. This prevents multiple A/D and D/A conversions, which degrade the signal. Sometimes plug-ins are used concurrently with analog processing.
Some engineers prefer to work with limiters during the final stage and separate from previous processing. This is usually paired with an equalizer to correct the limiter’s impact on tone. While this is convenient, many engineers do not find it to be ideal if concurrent processing is possible with a given set of equipment. This is because it introduces additional filtering.
When working in stages, file naming conventions and other organization become vital in maintaining recall possibilities and workflow.
Technique: Stem Mastering
Stem mastering, as described earlier in the book, is mastering performed from submixes called stems. When all the stems are played simultaneously (e.g., drums, guitars, vocals, and bass), they make up the entire mix.
There are two main ways that stem mastering is viewed. The first, and most common, is that mastering from stems forces the mastering engineer to have a different perspective with the processing. This negatively affects the final result or at least presents a greater challenge during processing.
The views on stem mastering have a wide range including extreme opposition and belief that it is suited only to problematic mixes. Some engineers see stem mastering with less opposition—they welcome the greater control but use it responsibly and with the mind-set of leaving the mix intact. Instead, the stems are used to minimize the common sacrifices in mastering. For example, de-essing may be used on just the vocal stem if it is overly sibilant, or bass frequencies could be cut or raised only on the stem where the bass instruments are present. Also, drum stems may be processed in a different way from the less transient stems.
No matter how stem mastering is viewed, it is almost universally thought to be a good option when a mixing environment is far less than ideal and when there are very significant problems that could not be addressed any other way.
When performing stem mastering, the mixbus compression used almost universally by professional pop and rock mixing engineers cannot be used with the stems. Because of this, stem mastering presents a drawback for genres where mixbus compression is typical.
Mastering is about the big picture. Mixing is about the individual tracks at hand. Stem mastering is not meant to replace mixing, instead it can allow for a different approach to mastering.
Technique: Reverb Processing
Reverb processing is taboo for most mastering engineers and rare for those who do use it. When it is used, it is almost always near the beginning of the chain, after any restoration processing.
A mastering engineer almost never would use reverb on a professional production. However, we do receive problem mixes at times that are in need of significant depth or spatialization. The first request would be to suggest a remix, but if that is not possible, adding subtle, high-quality, tasteful reverb may improve the problem.
The most basic approach is to use a reverb processor over the entire mix, perhaps coupled with a transient processor to regain punch that the reverb may reduce.
Whenever using reverb with any approach in mastering, the reverb predelay setting is usually carefully adjusted to achieve the best results. Reverb predelay delays the reverb signal, reducing the masking it might otherwise cause with the main signal. Also, some reverb units can be configured to work only with specific frequency ranges. With this option, usually reverb is applied only to the middle-and high-frequency ranges. Reverb on lower frequencies usually causes significant problems.
For an extremely subtle implementation, reverb may be added only to the side channel to add depth and to prevent affecting the punch of the primary instruments in the middle channel. With this approach, a transient processor usually is not needed because the punchy elements of the mix do not usually reside in the side channel.
Technique: Mastering Equalization
Equalization is responsible for most of the sound associated with professional mastering. In mastering, equalizers can be used to:
• Balance bass notes
• Remove resonances
• Address harshness
• Remove DC offset
• Highlight the vocal
• Highlight the best-sounding parts
• Add “air”
• Enhance tonality
• Minimize problems
• Enhance depth
The challenge is that these goals must be balanced. Often an improvement of one element requires the sacrifice of another. Engineers hone their equalizer balancing abilities over years and decades.
There are a number of different kinds of equalizers that one may encounter, including various analog and digital equalizers that may have several modes. Analog equalizers work by shifting the phase of an alternating-current (AC) signal and recombining it with the original signal to cancel certain frequencies. Digital equalizers work on the same principle except by using digital delays. It is worse for low frequencies due to pre-ringing artifacts. These phase shifts do not cause a phasing sound, although they can highlight existing comb filtering problems in a mix. Some digital equalizers have multiple modes that can be used, such as linear and minimum phase, each having a distinctly different character.
Parametric Equalizer Controls
There are three main controls on a parametric equalizer that control amplitude, center frequency, and bandwidth/Q. The amplitude of each band can be raised or lowered, the center frequency can be shifted, and the bandwidth, also called Q, can be widened or narrowed.
Analog Equalizers
Analog equalizers are preferred by most mastering engineers for all equalization tasks, especially at the far ends of the audible frequency spectrum. There are several reasons often given for why analog equalizers are thought to be superior to digital equalizers. These include the continuous nature of analog circuits, nonlinear distortion characteristics, unique phase-response characteristics, and accuracy problems with digital equalizers when trying to adjust high frequencies as they approach the Nyquist/sample-rate limit, even when oversampled. While the subjective sound of analog equalizers is widely preferred, there is little consensus about the reasons behind the preference. Weiss Engineering digital equalizers are the exception, which most engineers agree are of the highest quality and comparable with analog, although without providing the character of some analog equalizers.
Digital Equalizers: Minimum Phase
Of the digital equalizer types, minimum-phase equalizers are generally preferred for mastering tasks. These usually provide the most analog-like and musical sound of all digital equalizers.
Digital Equalizers: Linear Phase
Linear phase is generally not preferred in mastering. It is worse for low frequencies due to pre-ringing artifacts.
Technique: Using a Graphic Equalizer
Due to the compromised design concept of common graphic equalizers, they are seldom used in mastering studios for processing. Instead, they are typically used to control a compressor’s side-chain signal, where filter quality does not affect the processing. There are rare exceptions such as the LC-based graphic EQ used for processing by Bernie Grundman.
Technique: Basic Frequency Balancing Using an Equalizer
Some engineers think of the frequency spectrum as having distinct ranges, with each having a unique nature. Typically, the spectrum is thought of in seven ranges: subsonic, bass, lower midrange, midrange, upper midrange, highs, and “air.”
In the following sections, the symbol “~” will be used to mean “approximately.”
Subsonic (~0 to ~25 Hz)
Let’s start with the subsonic range. It is the lowest range and contains frequencies inaudible to the human ear. Because frequency content in this area takes comparatively enormous amounts of energy to re-create, it may be removed with a steep and transparent equalizer filter type, such as the Universal Audio Cambridge Equalizer’s E6 or, an even better tool, the surgical Crane Song Ibis. Cutting these prevents speakers from working hard to produce frequencies we would not be able to hear.
Bass (~25 to ~120 Hz)
The bass range is different in nature from the ranges above it. It contains vastly more energy and has common issues particular to it, such as unintentionally uneven notes, resonances, and being relatively unbalanced compared with the ranges above it.
If bass notes are uneven and the producer agrees that this is not artistically desirable, a mastering engineer can use a transparent, surgical equalizer with a narrow Q value and a frequency chart to find the fundamental frequency of the weaker note and raise it to be even (or conversely, the stronger note can be lowered). If a resonance exists in the bass range, a notch or narrow Q parametric bell might be used to cut it. This might be done by sweeping the area with a medium Q, boosting and sweeping to find the offending frequency, narrowing the Q to shape it according to the resonance, and then cutting it (around –4 dB can be a good starting point, although it depends entirely on the recording). Such resonances are rare and have an out-of-place ringing sound when boosted, distinct from the resonance of the boost itself. Sometimes addressing resonances can create more of a problem than the resonance itself. It is important to verify that resonance corrections produce a true improvement.
Sometimes the entire bass range may be too high or too low and needs to be set. Often this is done carefully with a calibrated subwoofer in a well-treated acoustic environment and sometimes using a reference track to help keep things in perspective. Because there is not much else in this range other than the bass and bass drum, often this area is highly adjustable in mastering. The bass range has a nature of its own and can be especially pleasing to the ear. Don’t let this mislead you, this range must be carefully set to a level that will translate well.
This might be accomplished with a roll-off, which is normally set higher, perhaps around 120 to 230 Hz and with a carefully set Q. Perhaps the best treatment is a low shelf that is generally set lower, perhaps around 80 Hz to 120 Hz, depending on the program material and equalizer at hand.
Lower Midrange (~120 to ~350 to 400 Hz)
The lower midrange area, like the others, has its own nature. Similar to the bass range, there is also a tremendous amount of frequency energy. Resonances are more likely to occur in this range than in the ranges above it. There are many instruments that have fundamental notes in this range that often overlap and cause such resonances. Given the high amount of energy in this range, addressing resonances can make an impact. Problems in this area can cause seemingly unrelated issues across the spectrum. The same procedure for addressing resonances described earlier for bass can be used in the lower-midrange area. Overall, resonances that require attention are not very common.
Addressing resonances in this area requires the highest quality of surgical equalizers. Even a decent-quality equalizer used for this task may not produce a true improvement. It is important to remain honest with judging such comparisons.
Some recordings may benefit from a bell-shaped boost in this area, perhaps around 300 Hz to add warmth to a recording that sounds thin.
Midrange (~350 to ~2,000 Hz/2 kHz)
There is significantly less energy in the midrange and higher than in the lower ranges. Resonances are not typically an issue in this range or the ranges above. This range might be raised or lowered with a bell shape to shape tonality.
Upper Midrange (~2 to ~8 kHz)
This area is of prime importance because it contains vocals. The vocal level may be adjusted if it sounds muffled or weak. If so, it may be boosted at a frequency that suits it best. Also, the human ear is most sensitive between 2 and 5 kHz, so using a bell curve with a center frequency in this range, perhaps at 3,150 Hz, can help to reduce harshness to the ear and help a recording fit with the equal-loudness contours.
Highs (~8 to ~12kHz)
This area may contain cymbal harshness, sibilance problems, or other similar issues, although harshness issues are usually more in the upper midrange. This is also an area that provides clarity, so it must be treated very carefully. Some engineers propose using a high-frequency roll-off to reduce harshness, whereas most mastering engineers disagree with such processing. For many types of music, a roll-off may produce a sound that is too dull. Instead, a shelf may be the best option to adjust harshness in this area or a wide or medium bell in the harsh-sounding frequency area.
Certain equalizers are overwhelmingly more suited than others for adjustments in this range as well as the “air” frequency range above it. In the era of vinyl, audio engineers wished that they could get crystal-clear highs and air. Now, for many styles such as rock and pop, a mastering engineer might work to maximize this area without being harsh. On the other hand, some blues, bluegrass, folk, and other styles may be best with a more warm/dull sound (less highs and “air”).
“Air” (~12 kHz to the Limit of Hearing)
The “air” frequencies can provide a feeling of openness. Adding “air” to a recording that needs it can add a spatial sense to the mix. Some equalizers such as the Sontec and Avalon AD2077 are renowned for their ability to add “air.” In the plug-in world, the Universal Audio Precision Equalizer is often seen as doing a decent job with this task. While these equalizers are commonly praised, there are others that also do a great job. For example, the Buzz Audio REQ-2.2 is great for adding “air” and almost any other task but is not usually mentioned as an “air” equalizer.
To add “air,” most engineers will go to their favorite equalizer for this task, turn up the frequency on the highest band to its maximum, use a bell curve or a shelf depending on which sounds best with the unit and recording, and boost tastefully. If using a bell curve, sometimes the Q also will be adjusted to sound best for the unit and recording. Even when an equalizer’s highest frequency is beyond the range of human hearing, this still usually works best. Baxandall curves are an option for providing a different flavor of “air.” Some engineers use more than one equalizer simultaneously to add a complex “air” sound.
Out-of-Band Noise
Out-of-band noise, above the range of human hearing and above the Nyquist limit for a given sample rate, can cause an A/D converter to distort. This type of noise can be introduced when highs are boosted (especially when boosted significantly). This can cause a harsh high-frequency sound. To prevent this, an extremely high roll-off may be used. The Dangerous Music BAX Equalizer offers such a roll-off at 70 kHz and other various levels. However, unless the high frequencies are of extremely high loudness, this is not a problem. For example, if a recording has 10-kHz peaking around 0 dBFS and the out-of-band frequencies are boosted in the analog domain, then the distortion from the out-of-band noise may cause a problem. With mastering quality converters and in almost all typical situations, this should not concern mastering engineers enough to do any processing.
Filters, Shelves, Bells, and Q Values
The typical parametric equalizer used for mastering is made up of several, independent filters. Each filter typically has its own gain, center frequency, and Q controls. Virtually all filters used in parametric equalizers are of a type called second-order, which is a reference to the amount of delay the filter uses to accomplish it’s task. Many believe the ear functions in a way that is closest to this second order response.*
While filtering, we adjust the gain for the amount of filtering we want to do, we adjust the frequency center to the area that we want to affect, and the Q value for generally how wide we want to adjustment to span. A large part of the art of mastering resides within these adjustments. Wide Q values can be more subtle. As the Q narrows, it causes more phase distortion and larger group delay, which may have an audible effect depending on the amount of gain. The higher the cut or boost (at the same Q), the longer the ringing, a side effect of filtering. However, the narrowest Q values are thought to be surgical, allowing us to address problems such as resonances.
We use shelves to adjust entire ranges such as bass or highs. We use bell-shaped curves to adjust in specific areas. When harshness is present, a bell may be used at or around 3,150 Hz. We might also use a bell shaped curve in the lower midrange to add “warmth.” The bass range is most typically addressed with a shelf. The highs may also be addressed with a shelf, while the air band may be addressed with a shelf or a bell, depending on the equalizer at hand.
To obtain the benefits of what’s known as a Butterworth filtering, there has been a trend in mastering to use a Q-value of approximately .71 (rounded from 1 / ![]() , or 0.70710678…). The benefit of Butterworth filtering is the minimization of frequency ripples in the passband. In other words, it has a more linear, flat response with regard to frequencies outside of those it is set to affect. When using any bell-shaped filter that is second-order, a Q-value of .71 does not create a Butterworth filter and there is no Q-value that would. With second-order filters, only high- and low-pass with a Q of .71 can be meaningfully called Butterworth and obtain the benefit of a maximally-flat passband. To summarize, Butterworth is something that is only possible with high- and low-pass filters, not bell-shaped filters, with virtually all mastering equalizers.
, or 0.70710678…). The benefit of Butterworth filtering is the minimization of frequency ripples in the passband. In other words, it has a more linear, flat response with regard to frequencies outside of those it is set to affect. When using any bell-shaped filter that is second-order, a Q-value of .71 does not create a Butterworth filter and there is no Q-value that would. With second-order filters, only high- and low-pass with a Q of .71 can be meaningfully called Butterworth and obtain the benefit of a maximally-flat passband. To summarize, Butterworth is something that is only possible with high- and low-pass filters, not bell-shaped filters, with virtually all mastering equalizers.
There are other filtering methods with benefits, such as Bessel (maximally flat group delay with maximally linear phase within the passband; Q value of 0.58 rounded from 1 / ![]() , or 0.57735026…), Chebyshev type 1 and 2 (similar to Butterworth but with steeper roll-off and thus more ripple), Elliptic (also known as Cauer, equal ripple in stopband and passband and steepest possible roll-off) and Papoulis (compromise between Butterworth and Chebyschev), none of which can be accomplished with bell-shaped second-order filters.
, or 0.57735026…), Chebyshev type 1 and 2 (similar to Butterworth but with steeper roll-off and thus more ripple), Elliptic (also known as Cauer, equal ripple in stopband and passband and steepest possible roll-off) and Papoulis (compromise between Butterworth and Chebyschev), none of which can be accomplished with bell-shaped second-order filters.
For more on equalization filters, see Pieter Stenekes’ “Digital Filtering” in Chapter 16.
Final Word
As mentioned previously, techniques should not be taken as protocol but rather as a guiding approach that contains insight. The advice in this section describes a single approach that can vary depending on the engineer, genre, and recording at hand. Frequency range designations become less important in the upper-midrange frequencies and higher. There are engineers who think of equalization as an entirely tunable experience and do not consider the frequency spectrum in separate ranges.
Technique: Order of Frequency Adjustment
Some engineers prefer to work with bass frequencies first and work up from there. Owing to the energy needed to reproduce them, lower frequencies have the greatest impact on overall sound. Other engineers prefer to work in a less organized fashion, which is likely the most common approach.
Also, surgical changes typically precede the more broad, tone-shaping changes. Finally, if an issue cannot be resolved with equalization, other methods may be used, such as side-chain compression, multiband compression, or dynamic equalization.
Technique: Substractive Equalization
Subtractive equalization is a technique where frequencies are only cut instead of boosted. Cutting frequencies in one range can result in the same or similar effect as boosting another range. Because any boost in loudness can be perceived as an improvement, if something seems better with a cut, it is most likely a true improvement. Also, some equalizers function in such a way that cuts produce a better sound than boosts. Few mastering engineers subscribe to this method in a strict way, although the idea behind it is relevant and considerable.
Technique: Using Less Common Equalizer Filters
There are a few less common equalizer shelves that some mastering engineers find useful.
Baxandall Shelves
The Dangerous Music Bax and some software equalizers offer Baxandall shelves. The circuit design that originally produced these curves was invented by Peter Baxandall in the 1950s. They are essentially shelves with such a wide Q that they often do not level off within the audible range. Baxandall shelves have a shoulder frequency—the frequency at which they level off into a horizontal shelf. Working with a shoulder frequency of as low as 40 Hz may affect such a far-away frequency as 4 kHz. Baxandall curves are mostly used in the same manner as a shelf, except with more transparency, and they are very popular for adding “air.” A representation of Baxandall curves is shown in Figure 7-3.
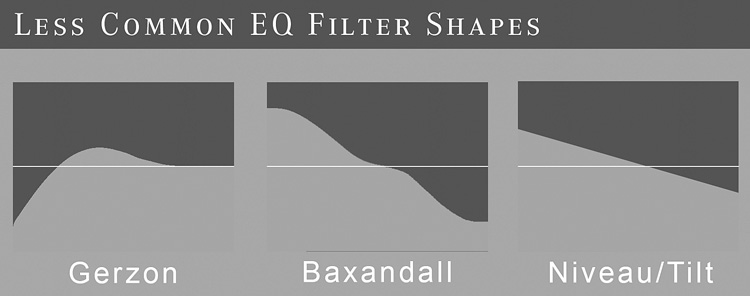
FIGURE 7-3 Gerzon, Baxandall, and Niveau/Tilt shelves are less common but can be found in use by some mastering engineers.
Gerzon Shelves
Michael Gerzon was a mathematician and audio engineer who, among many things, created Gerzon shelves as a way to emulate the action of classic equalizers. The shape of a Gerzon shelf can be seen in Figure 7-3.
Niveau/Tilt Filter
Niveau and tilt filters, such as the Elysia Niveau Filter or the Softube Tonelux Tilt, work in a way that tilts the frequency response. With these equalizers, there is a configurable center frequency that allows the axis of the tilt to be set. An example of the frequency response of these filters is shown in Figure 7-3.
Technique: Frequency Roll-Off on Both Ends
Some engineers recommend roll-offs on the extreme ends of the frequency spectrum using an equalizer. While this seems to be a popular recommendation, it is not nearly as common among professional engineers as it may seem.
There are a vast many engineers who may perform roll-offs on the subsonic frequencies but never the high frequencies. Instead of roll-offs, shelves also may be preferred on the lower and subsonic frequencies. Of course, the choice of any such treatment depends on the recording at hand.
The purpose of high-frequency roll-offs is usually to address harshness. A later section provides many more options for dealing with harshness.
Technique: Extra Equalizer After Compression
Sometimes using an equalizer after the compression in the chain can yield a good result. Even a simple one-band shelving equalizer can prove useful in creating a frequency balance. In the analog domain, these are sometimes used after the compressor and before the conversion to digital.
Technique: Monitoring the Middle and Side Channels
Soloing the middle and side channels of the mix at hand, along with those of reference recordings, can provide useful information. Also, listening to the side channel can help with correcting left/right (L/R) balances to check for drifting of the stereo image, especially when analog processing has taken place. If instruments that should be in the middle channel (e.g., snare, vocal, bass drum, and bass) are present in the side channel, the L/R balance can be adjusted until those elements disappear or become as minimized as possible. This can be quite a useful technique.
Even when making L/R adjustments, some engineers will perform the adjustments with the middle channel soloed. This allows zooming in to the main elements of the recording. For example, de-essing might be performed with the middle channel soloed while adjusting the settings. Also, both middle and side channels may be soloed to find offending sibilance, and only the offending channel will be processed (usually it would be in the middle channel). When applying limiting in L/R, the middle channel can be soloed afterward in the chain to zoom in and judge an acceptable level of degradation with the limiter and exactingly locate the point where audible distortion is introduced. These are a few examples of how soloing the middle channel can help while making adjustments.
Technique: Mid-Side Processing
When an issue exists only in the middle channel, some engineers will make corrections only in the middle channel.
A few engineers find that dynamics processing/compression is best suited for middle-channel processing only because the side channel is rarely overly dynamic. This approach has not been widely adopted. Most engineers dislike any mid-side processing (other than filtering) because of how it disturbs the stereo image.
There are also a few who combine multiband compression and mid-side processing to work toward transparent control when there are specific dynamics problems to address. Perhaps the most common application of this is with middle-channel de-essing.
Another mid-side equalization technique is to embellish the high and lower midrange frequencies of the side channel while enhancing the midrange frequencies of the middle channel. There are a few engineers who adjust the lower frequencies of the upper midrange (somewhere between 350 and 650 Hz) with a slight cut on the sides and a corresponding boost in the middle.
Also, a few engineers boost with a low shelf on the side channel starting around 600 to 650 Hz, setting it to taste. This was discussed in Michael Gerzon’s “Stereo Shuffling: New Approach, Old Technique.” However, most engineers wish to avoid low bass in the side channel.
When working in mid-side, any processing that takes place on the middle or the side will affect the other channel to some degree. Because of this, adjustments made to the mid or side channels are done with this in mind.
Although one may encounter these techniques discussed as being widely applicable, as with any adjustment in mastering, all adjustments depend on the recording at hand. There are several well-respected mastering engineers who hardly, if ever, use any mid-side processing, although there are equally respected engineers who use it regularly, with their own developed techniques. To find out how one seasoned mastering engineer uses mid-side processing, see Brad Blackwood’s “Mid-Side Processing” in Chapter 16.
Technique: Checking Mono Compatibility
While working in mid-side, some engineers recommend checking mono compatibility, which entails listening to how a recording sounds when converted to mono. Other engineers do not worry about mono conversion and see it as irrelevant—they would not sacrifice anything with their stereo image for mono compatibility.
It has been said that listening with a car stereo is more like listening in mono owing to the arrangement of the speakers. Also, when FM radio stations become weak, some receivers will switch into mono mode, and many AM stations today broadcast in mono. These are a few reasons why some engineers believe that it is worth it to give the masters a listen in mono.
Many mastering consoles, monitoring control systems, and DAWs have an easy-to-use feature for listening in mono.
Technique: Using Unique Mid-Side Processors
Basic mid-side processing allows for the middle or side channels to be raised or lowered. With analog processing, there are several mid-side converters that can be used so that any analog device can be used in mid-side mode. Also, some analog processors have mid-side functionality built in.
Of course, there are digital plug-ins that help with mid-side processing as well. This section describes a few of the unique digital mid-side plug-ins.
DDMF Metaplug-in/Mid-Side Plug-in
With a combination of the DDMF Mid-Side plug-in and the DDMF Metaplug-in, any VST can be used in mid-side mode.
iZotope Ozone
The iZotope’s Ozone bundle offers a range of effects that all can be operated in mid-side mode.
Brainworx
Brainworx has focused on creative mid-side plug-in processing. This is reflected in both its bx_digital equalizer and the XL.
Mathew Lane’s DrMS
This plug-in has unique “focus” and “field” controls that allow middle information to be sent to the sides and side information to be sent to the middle channel. This can be especially useful when working with stems.
Technique: Understanding Distortion/Coloration/Saturation
When discussing this subject, one might hear the terms coloration, distortion, linear distortion, nonlinear distortion, intermodulation distortion, harmonic distortion, even-order/odd-order distortion, and saturation. Coloration is the most general of all such terms. It describes any change in the sound that the human ear can detect. Distortion is another general term, referring to any of the more particular types of distortion.
Nonlinear distortion describes a nonlinear relationship between the input and output signals, with a frequency component not present in the original signal. There are two types of nonlinear distortion: harmonic and intermodulation distortion. Harmonic distortion refers to distortion that occurs at a multiple of the original signal. Intermodulation distortion does not occur at multiples of the original signal.
Harmonic distortion, which occurs at multiples of the original signal, has two types: even-order distortion and odd-order distortion. These refer to whether the multiple is an even multiple (e.g., 2, 4) or an odd multiple (e.g., 3, 5).
Saturation is a term that describes a combination of distortion and compression. Linear distortion is not a term used very often in mastering. It describes a distortion of amplitude or time (phase).
In mastering, distortion is sought that is pleasing to the ear. In the analog world, certain types and configurations of vacuum tubes, tape, and transformers are known to create pleasing distortion. Digital algorithm designers have drawn on the discoveries of analog engineers to create emulations and new processes based on them. Read more from one of the leaders of harmonics processing, in Dave Hill’s “Distortions and Coloring” in Chapter 16.
Technique: Using Digital Emulations of Classic Gear
Some of the faithful emulator plug-in designers such as Universal Audio, Waves, and Slate Digital have products that emulate transformer distortion and other nonlinear characteristics from classic equipment. There are some pieces where just “running it through” adds the unit’s characteristic distortion. This is meant to simulate the tubes, tape, or transformers of the analog domain. A few examples include the Universal Audio Pultec and Massive Passive, Slate Digital’s Virtual Classic Console and Virtual Tape, and Waves PuigTec EQP-1A.
Technique: Running Through Twice
With some types of music where adding a high amount of distortion may be desirable, a mastering engineer may wish to run through an analog processor more than once or insert more than one instance of a digital processor that creates distortion. Of course, when experimenting with a process such as this, one must be very mindful to ensure that true improvements are being made.
Technique: Adding Distortion to the Side Channel
Adding distortion to the side channel is sometimes better for adding character than applying it to the entire mix. Because the ear wants to hear voices clearly, too much distortion on vocals can be disturbing. The Brainworx XL plug-in was made with this technique in mind.
Technique: Using the Same Character Processors on All Songs
Processors that impart a particular character may be used on all songs of a collection to give them continuity and a related sound, making the songs sound like they belong with each other.
Technique: Using Dither
Dither is noise added into the signal, noise that only subtly affects the sound of a recording. The purpose of dithering is to remove the digital errors that result from reducing the bit rate.
Dithering in the Visual Realm
Dithering is a concept used in both audio and visual media. The graphic in Figure 7-4 shows how various visual dithering techniques affect a gradient/fade when the number of shades is reduced. This helps to visualize and understand the concept of dithering.
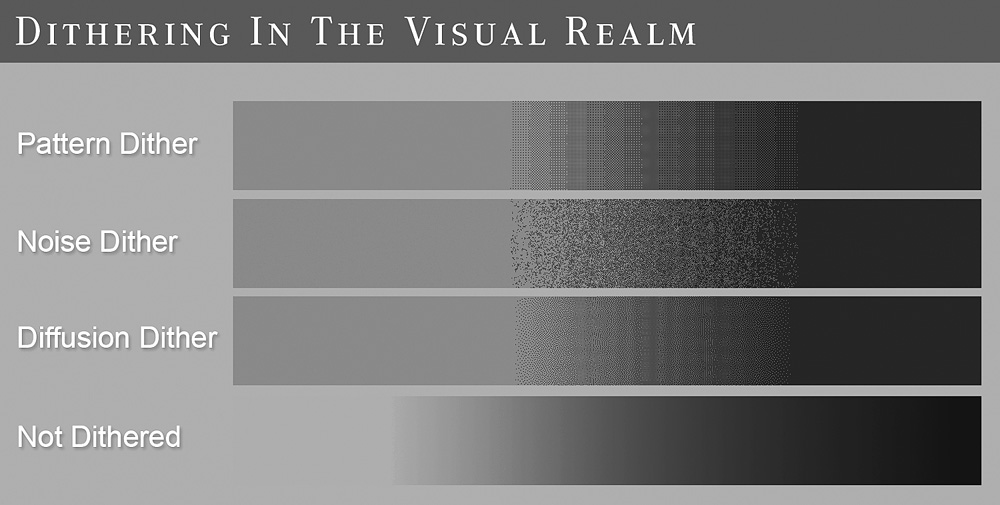
FIGURE 7-4 How dithering looks in the digital imaging. Although this is quite different from professional audio, it helps to visualize the concept.
Audition Different Types
Dithering algorithms can be auditioned to find which fits best for the song. Currently, MBIT dithering set to ultra mode is one of the most popular.
Impact of Dither on the Sound
While the tone of dithering algorithms can sound slightly different, it’s just not that big of a deal.
Dithering Should Be Kept to a Minimum
Because dither is essentially adding noise into the signal, it is something that should be kept to a minimum. It should be done whenever the word length is reduced (e.g., 24-bit to 16-bit conversion). Often, this happens only once. Typically, it is used at the very end of the processing chain. Often dithering is built into digital limiting plug-ins, which are found at the end of the chain.
Dithering for Digital Processing
Some digital processors work at a maximum of 24 bits. Because of this, when the source is 32-bit float, it should be dithered and converted to 24 bits if a processor has a 24-bit maximum. Otherwise, bit truncation could occur. Some mastering engineers work exclusively at 24 bits to avoid this possibility.
Problem: Jitter
Jitter is somewhat of a general term describing anomalies with digital signal transmission. Jitter may have a glitch or static-like sound and even may produce dropouts at its worst. It also can produce subtle effects such as reducing the sense of depth, focus, and clarity. In mastering, jitter is mostly avoided with high-quality wordclocks, correctly distributed wordclock signals, and a high-quality audio interface that minimizes jitter. Mastering studios often use AES/EBU connections along with BNC wordclock connections to distribute clock signals between digital devices because this configuration produces the least jitter. High-quality A/D and D/A converters, short cable runs, and correct cable impedances also keep jitter to a minimum.
Problem: DC Offset/Asymmetrical Waveforms
Today, problems with DC offset are quite rare, although possible. DC offset is when the entire waveform is shifted up or down, which is distinct from the more common asymmetrical waveforms. DC-offset problems are usually caused by a wiring, equipment, or microphone problem and can cause loudspeakers to work inefficiently. Asymmetrical waveforms are not necessarily a problem and can be caused naturally by several sources, including brass instruments. Mastering engineers might address either of these with a steep high-pass filter at a very low frequency before any other processing is done. This kind of high pass also might be used to solve problems with infrasonic rumble, which is very low bass noises that can be caused by air-conditioning systems, airplanes, and other ultra-low-frequency noises during recording. An example of an asymmetrical wave is shown in Figure 7-5.
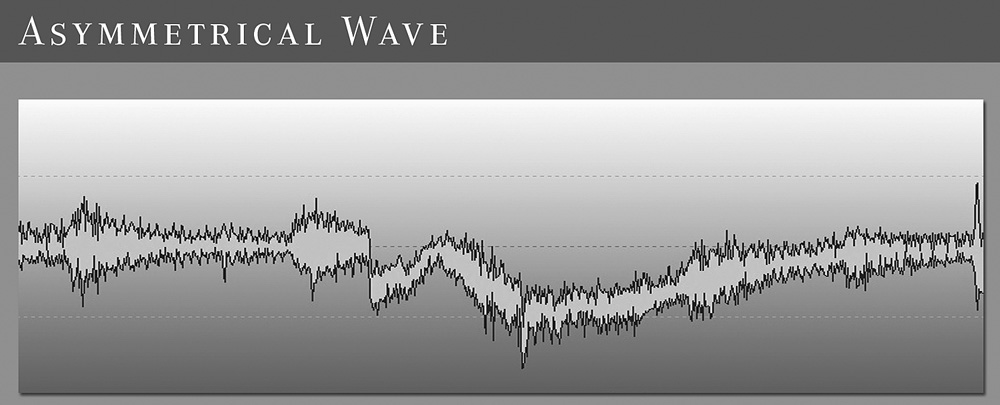
FIGURE 7-5 An asymmetrical wave is not necessarily a problem; it can be caused by several sources, including brass instruments and some synthesizers.
Technique: Bass Enhancement
Harmonic and resonance processing can be used for bass enhancement. However, many mastering engineers only use equalizers for this task. Two of the most widely recognized harmonic bass processors in mastering are the SPL Vitalizer (hardware and plug-in) and Waves MaxxBass. These processors add harmonic distortion related to the bass frequencies.
Resonance processors, such as the Little Labs VOG, are based on special resonant equalization curves to create a full-sounding bass effect. Most mastering engineers prefer to obtain this kind of effect from a mastering equalizer, although the use of this kind of processing is not completely unheard of in mastering.
Problem: Bad Mixes
Major problems are usually repaired before other processing. Most engineers address serious problems digitally, before any other processing occurs. This includes major frequency imbalance, noise problems, and so on.
When a mix has a major frequency imbalance, multiband compression can help to even things out. The way radio stations operate is worth considering. The Orban and Omnia processors are very widely used in radio, and one of the primary processes of these units is their multiband processing. These processors make nearly everything sound even and can be thought of as a kind of automatic mastering. In today’s world, an experienced mastering engineer will always be able to create a better sound than any such automatic method, but you can take from this that multiband compression is a treatment that can work when there are major problems to make them sound acceptable. Of course, every mix is different, so the multiband compression should be set according to the mix.
Spectral dynamics processors, such as Voxengo’s Soniformer, provide another option when working with a mix that has significant problems. Soniformer separates a mix into 32 spectral bands and allows dynamic control over each band. Setting it up can be done quickly and can provide transparent and musical processing.
Multiband processing is not nearly as common in mastering as one might believe from the way the processors are marketed. It’s worth keeping in mind that the use of multiband processing (other than de-essing) is rare on professionally produced recordings, and many very well-respected mastering engineers almost never use this kind of processing.
Problem: Hum in the Analog Signal Chain
When trying to find hum in an analog chain, it is usually best to disconnect devices and cables one at a time to isolate the problem. If a device has a problem with hum, there are two main options. First, if it has a grounding screw, a thick wire can be connected from it to some central (often large) metallic surface in the studio. Examples of the symbols that usually indicate the location of a grounding screw are shown in Figure 7-6. The second option should be done at your own risk, and that is to remove the ground part of the balanced cable connecting that device, which can eliminate the hum but can possibly cause more hum or damage the device.

WARNING Although unlikely, removing the ground from a balanced cable can damage a device. It may be best to consult with a technician when working to address hum.
If there is hum that is coming from the amplifier, even when there is nothing connected to the amplifier inputs, this can indicate issues with the amplifier’s capacitors or possibly other components. Replacement capacitors and other parts usually can be ordered from the manufacturer.
If the services of a technician must be sought, it is best to provide him or her with notes of the problem and details of any attempts to fix it.
Problem: Sibilance
Sibilance is the “s” sound of vocals that’s sometimes sharp and strident. High sibilance is a somewhat common problem with mixes. Sibilance is best addressed in mixing, but often mastering engineers are faced with mixes that contain too much. Processors that help to reduce sibilance are called de-essers. De-essers also can help with harsh cymbal sounds and other harsh high-frequency sounds. There are many mastering engineers who perform de-essing in mid-side mode, only on the middle channel, because that is where vocals most commonly reside. In some situations, sibilance during tracking causes actual distortions in the high frequencies, which cannot be repaired with de-essing.
Technique: Raising Levels Before Analog Processing
Some engineers compress, normalize or otherwise raise levels digitally before analog processing. The noise that can be introduced by A/D and D/A converters is minimized when taking this approach. All A/D and D/A converters have a noise floor. It is important to perform this technique in stereo-linked mode or somehow ensure that level changes are exactly the same on both the left and right channels to avoid any problems with unintentionally modifying the left/right balance. Analog equipment can sound better at lower levels, so this technique must be implemented with care.
Technique: Adding Noise in the “Air” Band for Brilliance
Adding subtle noise/distortion in the highest band, approximately between 16 and 22 kHz, can add what many perceive to be brilliance. There are several tools that can help with this, including iZotope Ozone.
Problem: Limiting Distortion
When limiting is too high, it can cause distortion and a harsh sound that causes ear fatigue. It also can cause consumer D/A converters to distort severely even though a mastering D/A converter may not.
Problem: Intersample Peaks
To understand intersample peaks (ISPs), you must first understand reconstruction. With a digital signal, the highest possible level is 0 dBFS. The digital signal must be converted to an analog signal for listening. Generally, this is called digital-to-analog (D/A) conversion, but the method of the conversion is called reconstruction. In reconstruction, if there are two simultaneous 0-dBFS samples, the actual reconstructed analog level may go above the level that corresponds to 0 dBFS, which is described as an intersample peak—a peak that occurs between digital samples. It exceeds and does not precisely correspond to the samples. Figure 7-7 may help you to understand this idea.

FIGURE 7-7 When audio is converted from digital to analog, intersample peaks can go above the highest intended level. There are techniques and tools to address this possibility.
To avoid intersample peaks and other problems with consumer D/A converters and format conversions, many engineers use a limiter ceiling of –0.3 dBFS.
Technique: Using Sample-Rate Conversion
Sample-rate conversion is entirely a digital process. Whether hardware or software is used, the only thing that matters is the algorithm. In fact, according to some tests, there are software sample-rate converters that outperform hardware.
Many mastering engineers prefer to use sample-rate conversion after limiting and before dithering. In this way, all processing can be performed at the higher sample rate, which may provide a benefit when processing digitally.
When sample-rate conversion occurs, intersample peaks may be a side effect. Because of this, some engineers perform sample-rate conversion in sequence immediately before the final limiting (with some type of intersample-peak prevention). The purpose of this is to gain the benefit of working with digital processors at a higher sample rate but to avoid intersample peaks.
Problem: Using Unbalanced-to-Balanced Connections
Using a combination of balanced and unbalanced connections is not necessarily a problem. The Pendulum Audio compressors, which are very popular in mastering, use unbalanced XLR connections and are typically used with balanced gear.
Problem: Unbalanced Left and Right Channels
Some engineers say that the balance between the left and right channels simply should be adjusted to where it sounds best, the most cohesive, or locked. There are a few producers who are very particular about any adjustment being made to the stereo field during mastering. For these clients, it should be carefully preserved.
There is also a technique, described in the mid-side section, where the side channel is soloed, and the L/R balance is adjusted until the typical middle-channel sounds (e.g., vocals, snare, bass, and bass drum) are completely inaudible, or minimized.
Problem: Unbalanced Bass in the Mix
In mixing, bass instruments (e.g., bass guitar and bass drum) are almost always centered. There are some rare recordings where they will be intentionally mixed more to the left or right side.
If the bass is mixed only very slightly to one side or the other, it usually indicates an intention to center it. In mastering, we may help it along to become centered. Soloing the side channel can reveal whether the bass is panned—if it exists in that channel, it has been somehow panned.
In the vast majority of mixes, bass instruments such as bass guitars and bass drums are centered. Bass frequencies require the highest amount of energy to recreate. Using both speakers allows for the most efficient reproduction of the bass frequency energy. Also, bass frequencies are, for the most part, nondirectional. This means that we do not hear as much, if any, stereo effect with them. For these reasons, bass frequencies are virtually always centered.
With the weight that bass frequencies carry, a mix can feel lopsided if bass is panned. However, there are recordings that work well with panned bass guitar as an intentional effect. This is especially popular with some jazz recordings. However, even with these albums, often the bass frequencies will be centered in mastering, or before mastering.
The term elliptical equalizer is typically used in vinyl mastering. Elliptical equalizers or equalizers with a similar function are used to convert bass frequencies from stereo to mono. The Brainworx bx_digital Equalizer has a simple function called Mono-Maker for converting bass frequencies from stereo to mono below a configurable frequency. Also, the Matthew Lane DrMS plug-in offers this kind of functionality with the highest configurability. Another option is to use a high-pass filter on the side channel with an equalizer that has a mid-side mode or that is used with a mid-side converter.
When bass is not centered, there can be problems with mastering the recording to vinyl at high levels, although cutting at lower levels can make it work, along with a few other methods.
Technique: Upsampling
Upsampling is the practice of using a sample-rate converter to convert a recording of a lower sample rate to a higher sample rate. In mastering, there is a technique of upsampling before performing digital processing to improve the quality of the processing.
While many engineers agree that upsampling can improve the sound of digital processing, it is also possible to degrade the signal with upsampling. This is especially possible with extreme upsampling at levels as much as eight times or more of the original rate.
Today, many digital processors have high-quality upsampling built in, running at a higher rate in the background so that it does not have to be done manually. Upsampling is a very popular feature of modern digital limiters because it can help with the reduction of intersample peaks. Because of the upsampling built into most of today’s digital processors, it is less important to perform manually.
Technique: Digital Limiting
Digital limiting typically is used near the end of the processing chain, just before sample-rate conversion, dithering, and conversion from 24- to 16-bit format. Limiting can have a dramatic impact on the dynamic range and sound quality of a recording. Carefully comparing a processed version with the original can reveal differences. Such comparison is usually done manually, although a simple-to-use comparison function is built into the Slate Digital FG-X limiter with its “constant-gain-monitoring” feature. Without such a feature, comparison is still easy; it can be accomplished by inserting a plug-in with a gain control after the limiter and adjusting it until the original and the limited version are at the same level. The entire plug-in chain can be enabled or bypassed to compare with the original.
In mastering, it is most common to use a limiter output ceiling of –0.3 dBFS when limiting. This prevents problems with consumer D/A converters and format conversions. Most limiters have an output-ceiling option, although setting the ceiling also can be accomplished by lowering a track fader, master fader, or object fader in the DAW software by –0.3 dBFS with the limiter at a ceiling of 0 dBFS.
There are multiband digital limiters, such as the Waves L3, that are preferred by some engineers. There is somewhat of a trend of using these for dance music. However, most engineers do not prefer this type of multiband digital limiting for any task or any genre.
Typically, when applying limiting, special attention is paid to the loudest passages because they will be affected the most by limiting. Sometimes the middle channel is soloed in the chain, after the limiter, to listen for distortion effects more precisely.
Problem: Lack of Vocal Clarity
When the vocals sound muffled or in the background, the most common treatment is to do a subtle boost in the area around 2.5 to 4kHz or a cut in the lower midrange with a bell curve. This equalizer adjustment might be tried in the middle channel. Sometimes adding “air” is the best treatment.
Problem: Matching Equalizers
In the misled spirit of working according to visual references, some novice engineers use matching equalizers such as Har-Bal and the matching features of Voxengo’s Curve EQ. This type of processing is based on false assumptions. Mastering with a matching equalizer according to a reference track will not provide the effect of imparting the same or similar tone. This approach is borne out of the desire for an easy solution to a complex task—a task that simply requires experience and skill. Working to match a spectrum/fast Fourier transform (FFT) display of a reference track while mastering would be as absurd as working to match such a display while writing a song or recording. There is much more to mastering equalization, recording, and song writing than a frequency-response display.
Problem: Harsh/“Digital” Sound
Harshness is often very best addressed with careful bell-shaped cuts, most commonly around 3,150, 2,700, or 5,000 Hz. This area is where the ear is most sensitive.
Addressing Resonances
It is within the realm of possibility that a harsh tone in the high frequencies can come from lower-midrange resonances. A technique for addressing resonances was described earlier in this book.
Raising the Lower Midrange or Bass
Raising the lower-midrange or bass region with a bell curve or a shelf can help to balance a mix if the harshness is caused by excessive highs.
Rolling Off the Highs
One might find recommendations to roll off the high frequencies, although this can result in a very dead sound. Most often the very highest frequencies, which are affected the most by a roll-off, are not the source of harshness. Because of this, many engineers would virtually never consider rolling off the high frequencies.
Using a High Shelf
A high shelf can be a better treatment than a roll-off if a wide range of frequencies must be affected.
Dynamic Equalization on Upper Midrange/Refinement
Dynamic equalization can help to transparently reduce harshness without having a noticeable effect on other elements of the mix. The Weiss EQ1-DYN is perhaps the most popular for this treatment, with some engineers finding it indispensable, especially in today’s world of harsh digital mixes. Also, I developed the “Refinement” plug-in while writing this book to be the best way of precisely addressing harshness using dynamic filtering.
Using a De-Esser
High-quality de-essers, which are basically dynamic equalizers, are sometimes used to reduce high-frequency harshness. One of the most popular is the Maselec MDS-2. As with other de-essing, this function can be tried in mid-side mode to see if it works best that way.
Analog Processing with Tubes or Transformers
Analog processing, especially “character” processors, can help with treating harshness.
Warming with a Compressor
High-quality compression can have the effect of adding warmth. This effect is increased when a side-chain mode is used. The bass is removed from the side-chained signal but is otherwise the same as the signal being processed. In this way, the compressor compresses when loud high-frequency sounds occur, smoothing them out. Analog compressors, such as the Pendulum OCL-2, are specifically known for what they do to smooth out high frequencies, especially when a side chain is used in this way. Multiband parallel compression also may be effective for this purpose.
Problem: Muddiness
Muddiness is quite a general description and could be caused by a number of problems, including masking to a level that cannot be fixed in mastering. Muddiness usually lives in the lower midrange and is addressed with tasteful equalization. The solutions run the gamut of equalization possibilities. Of course, the processing depends entirely on the recording at hand. As with many things in mastering, it is not always the problem range that is treated; sometimes working with other ranges can affect the problem range.
Problem: Part of the Frequency Spectrum Is Out of Balance During Loud Passages
Dynamic equalization allows some amazing feats of surgery to remove unwanted frequencies. Unlike multiband compressors, dynamic equalizers usually allow for the use of many different kinds of equalization curves. Examples include the Weiss EQ1-DYN and the Brainworx bx_dyn EQ. Dynamic equalization is preferred by mastering engineers over multiband compression for many tasks where either might seem applicable.
Problem: One Part of the Frequency Spectrum Is Too Dynamic
Multiband compression may be a solution when one part of the spectrum is overly dynamic or too loud for a short time. This might include an overly dynamic bass drum or vocal. These often can be tamed with multiband compression or dynamic equalization.
Problem: A Broad Part of the Frequency Spectrum Is Too High
When a broad part of the frequency spectrum is too high, a shelf or equalizer bell with a wide Q may be used. It may not always be used on the specific area. For example, if the lower-midrange and bass levels are too low, a high shelf cut might be used.
Problem: Less Than Full Sounding
When a mix needs “fattening,” introducing distortion can provide an improvement. It is preferred to do this using analog equipment with “character,” although there are some digital processors that perform the task well.
Some compressors can add a sound of fullness to a mix depending on the compressor being used and how it is used. The Manley Vari-Mu is certainly a unit known for its abilities with this type of processing.
Techniques for applying compression are covered in several places throughout this book.
Also, harmonic enhancement process such as the Sonnox Inflator, can help a mix to sound more full.
Problem: Fast/Medium Transient Sounds Stick Out Too Much
When fast/medium transient sounds are a problem, it is possible to digitally zoom in and fix them individually with equalization or volume automation. This can be the case with loud “s” sounds or other sounds that deviate markedly from the overall spectrum. Dynamic equalization is also effective here because it is possible to reduce a frequency only when it goes over a certain threshold.
Technique: Manually Reducing Peaks
If a large, single peak exists that is not essential to the emotion of a recording, manually reducing it can produce a better result than compression or limiting. This is typically accomplished using the volume automation that is a feature of virtually every DAW.
Technique: Reducing Level Before a Part Change
To give more impact to a part of a song, the level of the part before it can be lowered so that the change in level creates more impact. This is usually accomplished with volume automation, and the change in volume is usually done over time and in the most transparent way possible.
Technique: Analog-and-Digital Gain Staging
Gain staging is about setting gain controls within a signal path in a way that produces the best sound. Something as simple as gain staging can make a significant difference in sound quality.
Gain staging between digital processors is different from gain staging with analog processors. With digital processors, the main consideration is the differences between 16-, 24-, and 32-bit format.
16-, 24-, and 32-Bit Formats
At this time in mastering, the final output is almost always in 16-bit format. However, mastering engineers would never choose to process at 16 bits if it can be avoided. The only effective difference between bit rates is the signal-to-noise ratio. While noise is more carefully considered by most engineers at 16 bit, it is questionable as to whether it is ever audible, let alone a problem. However, at 24-and 32-bit rates, the signal-to-noise ratio is certainly a nonissue.
The 24-bit range is 256 times greater than the 16-bit range. It is an exponential increase in range. However, there are diminishing returns with respect to the perceptible difference in noise.
Essentially, 32-bit recordings are the same as 24-bit recordings; in fact, the range at 0 dBFS is exactly the same. The only difference is that 32-bit recordings have an extra 8 bits above 0 dBFS to prevent clipping from overs. This makes it virtually impossible for any digital clipping to occur at 32-bit resolution.
Digital Gain Staging
When working at 24 bits, the 16-bit level is located around –48 dBFS. Therefore, digital gain staging at 24 bits is not much of a concern. As long as the levels are decently above the –48-dBFS level, it should be fine.
When working at 32 bits, you must be careful because some digital processors only work at 24 bits. If there are overs (above 0 dBFS), there will be clipping if a digital processor in the chain is functioning at 24 bits. Because of this, when working at 32 bits, you must be sure that every digital processor used is capable of working at 32 bits (or be sure that there are no overs); otherwise, you must dither and convert to 24 bits.
Processing at 16 bits is not recommended during mastering. If provided with 16-bit source material with no other option, many engineers maintain high levels throughout the digital and analog signal chains. Upconverting to 24 bits does not change the range of the 16-bit recording and has no effect.
Analog Gain Staging
Various analog processors operate differently depending on the input level. Therefore, it is typically desirable to have gain controls before devices that work best at certain levels. Some units have gain controls built in, although some built-in gain controls may or may not produce gain that is pleasing. The Manley Vari-Mu is particularly known for its useful, character-adding gain sound.
A/D and D/A converters normally have a noise floor of their own; so many engineers will raise the levels digitally before going out to the converter. Before the D/A conversion, the analog levels are usually set to use the full range. For a clean signal path, it is a good practice to pass a nice and full signal both in and out of the converter.
Technique: Mastering with a Focus on the Vocal
The vocal is the central element, and mastering is best performed with this in mind. The vocal quality almost never should be sacrificed.
Technique: Working with a Vocal-Up Mix
A vocal-up mix is a version of a mix with the vocal boosted, perhaps 1 dBFS or more. Sometimes in mastering the level of the vocal will be affected. Some experienced mixing engineers will provide the mastering engineer with a vocal-up mix. In this way, if the processing begins to necessitate a vocal boost, the vocal-up mix can be used instead of using an equalizer to boost the vocals. Such equalizer boosts nearly always have side effects. Other alternative mixes include instrumental, acapella (vocal only), and TV mix (instrumental including background vocals).
Problem: Lacking Depth, Needs a Three-Dimensional Sound
Depth/three-dimensional (3D) sound largely comes from the skill of the mixing engineer. This is something that is to be preserved and embellished in mastering more so than added. There are a few methods, but they are lightweight in comparison with the possibilities in mixing:
• Expansion instead of compression can help to restore a sense of depth or three-dimensionality to a recording that is overly compressed.
• Mid-side equalization or adjusting the ratio of middle to side can help (e.g., raising the level of the side channel); often this is done with very small portions, perhaps only 0.5 dBFS.
• Skillful high-quality equalization can add to the depth of the sound. This is perhaps the most significant method on this list.
• Some compressors provide a subtle 3D effect, such as the Manley Vari-Mu.
• Parallel compression, in a few situations, can increase depth by raising ambient sounds.
• Use of a specialized stereo processor, for example, Bob Katz’s K-Stereo or similar processors, may produce an improvement.
• Rare cases (usually not with a professional mix): Haas effect delays.
• Rare cases (usually not with a professional mix): Reverb (as described in a previous section).
• Rare cases (usually not with a professional mix): Left and right channels can be intentionally equalized differently to add a sense of depth or wideness to a mix. Sometimes the left and right channels are adjusted so that a cut in one channel is offset by a boost in the other. Different equalizers may be used for each channel that will impart a different character. This technique is seen almost entirely as a mixing technique, but there may be some mastering situations where it could produce a benefit.
Problem: Recordings Sound Different in the Car
In my experience, recordings only started translating to the car and other stereos in a fully satisfying way after upgrading to high-quality, full-range monitors (Tyler Acoustics D1s in my case). Also, using a high-pass filter set to remove most bass frequencies helps to audition how things may sound in a car—even when the car is full range. Auditioning with this high-pass filter in the studio can especially help to highlight loudness and tonal differences that arise in the car—it’s almost like zooming in.
It has been said that the sound heard in the car can be emulated in the studio by listening at the opening of the room where the stereo channels have a somewhat mono presentation or by switching your monitoring system to play back in mono. The car listening environment does provide some stereo field perception, but it more or less tends toward a monophonic sound.
Even with the preceding techniques, it is important to listen in various environments, including a car. This is especially important when first getting started in mastering and when getting familiar with a new monitoring-system component or unfamiliar room.
Technique: Mixing Down to Tape/Mastering with Tape
Many engineers feel that there is no substitute for mastering from tape. It is common to see tape machines from manufacturers such as Ampex or Studer in mastering studios. Studer A80, A810, and Ampex ATR-102s are among the most popular tape machines used for mastering playback. Today, ¼-inch tape is the most popular, with ½-inch tape in second place. One-quarter-inch tape at a speed of 15 in/s (ips) is perhaps the most widely used today.
When mastering from tape, analog processing typically is performed between the tape machine and the A/D converter so that only one conversion to digital occurs. If a mixing engineer works in analog or uses analog processing on the mixbus, then recording to tape can prevent another conversion to digital before mastering takes place.
Layback is another possibility with tape machines. This is a mastering process where digital mixes are recorded to analog tape and rerecorded into digital. This is done to impart the qualities of analog tape into digital mixes. The various types of tapes have their own characteristics and a unique sound. Also, the saturation characteristics vary depending on the input level of the tape machine. The tape-machine components, calibration, and the machine itself play a role in the sonic characteristic it imparts.
When magnetic tape deteriorates with age, it is often called shedding or sticky shed. When this is a problem, tape baking is often used to prepare the tape for playback. When a tape squeals as it passes through the player or the playback sounds muffled or distorted, this indicates that baking is needed. Tape baking is not without risks; it can permanently damage the tape, so it must be done carefully. Also, if older tape is not baked, the friction from squealing is also not without risk because the tape oxide can tear off and permanently damage the tape. There are different methods for tape baking. It is typical to bake between 120 and 140°F for four to eight hours, commonly using a convection oven or food dehydrator. Gas ovens are never to be used for this purpose. An accurate thermometer or thermostat is a must. Acetate tapes and plastic reels are not baked because baking can damage both. Tape baking is only a temporary solution, although it can be done several times. The purpose of baking is to remove moisture, so, after baking, tapes often are sealed in a plastic bag with silica-gel packets to keep moisture down.