
19
MS-ACCESS 2007
Contents
- Introduction
- Database terminology—Data, table, field, record, primary, relational database
- Start MS-Access
- MS-Access screen and its components— Office logo button, quick access toolbar, ribbon, tabs, groups, icons, navigation pane, navigation buttons, object tabs, view buttons
- The office button—New, open, save, save as, print, manage, e-mail, publish, close database
- The ribbon—Home, create, external data, database tools, add-Ins
- Home tab—Views, clipboard, font, rich text, records, sort and filter, find
- Create tab—Tables, forms, report, other
- External data tab—Import, export, collect data, sharepoint lists
- Database tools tab—Macro, show/hide, analyze, move data, database tools
- The help
- Solved example—Company relational database schema and queries
Why this chapter
Reservation of railway tickets, account details of customers of a bank, schedule of trains are some of the common applications that use computerized databases. A database management system is required to store, access, manipulate and manage data in the database. MS-Access is commonly used relational database management system. The purpose of this chapter is to introduce you to MS-Access.
19.1 INTRODUCTION
A database is a collection of logically-related and similar data. Database stores similar kind of data, for a specific purpose that is organized in such a manner that any information can be derived from it, when needed. The database is accessed for the retrieval, insertion, deletion, or updating of data. Database Management System (DBMS) is a software system for creating, organizing, and managing the database. DBMS provides an environment to the user to perform operations on the database for creation, insertion, deletion, updating, and retrieval of data.
Some of the common used DBMSs are—Oracle, IBM’s DB2, Microsoft’s SQL Server, and Informix. Some of the desktop based DBMSs are—Microsoft Access, Microsoft FoxPro, and Borland dBase. MySQL is a popular open source DBMS.
Microsoft Access is an application which allows the creation of databases for the Microsoft Windows family of operating systems. Microsoft Access is a Relational Database Management System (RDBMS). It can also be used as a database server for a web-based application. It is supported by the ODBC and the .NET Framework.
Access is a tool for managing the databases. Database can store any kind of data—numbers, pages of text, and pictures. Databases can also handle wide range of data size—from a few hundreds to many millions. Access allows you to design and create complete databases with quick and easy data entry, maintain them, and search for information.
Within Access there are four major areas—Tables, Queries, Forms, and Reports.
- Tables store the data in your database.
- Forms make it easy to enter data in the tables. Data can be entered directly into a table or into a form (an interface for adding and editing data) which then places it into a table.
- Queries get information from the data stored in the tables. Filters and queries can be used to search a database.
- Reports allow printing of data, based on queries or tables created by the user. Reports enable the user to analyze the results of a search in a printed format.
Some of the important features of MS-Access are as follows:
- You can create tables and manage the tables.
- The data entry forms can be created easily.
- It allows building queries to analyze the data.
- Design reports to present the data.
- It allows filtering the data based on the text, numbers and date, and also sort the data.
- Attach files to the database.
- Access provides rich text support like bold etc. to the data stored in the tables.
- Access supports grouping of information in the reports like subtotals, count etc.
This chapter discusses the using of MS-Access software in detail. There are many versions of the MS-Access software. Here, we will discuss MS-Access 2007 version.
In this chapter, the following terminology is used while working with the mouse:
- Pointer—a mouse pointer
- Click—press left button of mouse once
- Double Click—press left button of mouse twice
- Select—move the pointer of mouse and keep the left button of the mouse pressed over the area that you want to select. The selected area will appear in a dark background.
- Quick Menu—Right click (press right button of mouse once) to get a quick menu
The command enclosed in braces <Command> represents the command to be clicked.
19.2 DATABASE TERMINOLOGY
The database terminology required for the use of MS-Access is described as follows:
- Data elements or data—a basic unit of information, e.g. “Ashima”, 16, 100 etc.
- Table—a matrix of rows and columns.
- Field—a data category, e.g. name, age, marks. Fields make up the columns of a table.
- Record—information about a person or objects. Records make up the rows of a table
- Primary key—a field that uniquely identifies a record in the table. A student registration number is a primary key as it is unique to each student. A surname as primary key is impractical, as there may be many people with the same surname, and the primary key will not be unique.
- Relational database—The relational database may contain a single table stored as file, or, a collection of related tables stored together. The data elements are stored in different tables made up of rows and columns. The different tables are related through the use of common data elements. Storing of data in multiple tables allows you to store a wider range of data and offer greater flexibility in retrieving the information.
19.3 START MS-ACCESS
Figure 19.1 MS-Access icon
MS-Access software for the Windows operating system is installed on the computer. MS-Access is a fully menu-driven software, and the commands are available as icons in various Tabs and Groups. Using a mouse makes working on MS-Access simpler, although one can work to some extent through the keyboard also.
To start using the MS-Access software, any one of the following steps need to be performed:
- If a shortcut key to MS-Access is available as an icon on the Desktop, as shown in Figure 19.1, then double-click the icon.
- <Start> <All Programs> <Microsoft Office> <Microsoft Office Access 2007>. (Figure 19.2)

Figure 19.2 Start MS-Access
19.4 MS-ACCESS SCREEN AND ITS COMPONENTS
The user interface of MS-Access makes it easy for you to work in Access 2007. In contrast to the previous versions of MS-Access, the new user interface has an improved navigation system consisting of tabs which further consist of group of commands.
When Microsoft Access 2007 is started, the screen Getting Started with Microsoft Office Access screen (Figure 19.3) comes up.
Click <Blank database> <Create>
Enter the name of the database, and browse to the location where the database is to be stored on the disk.
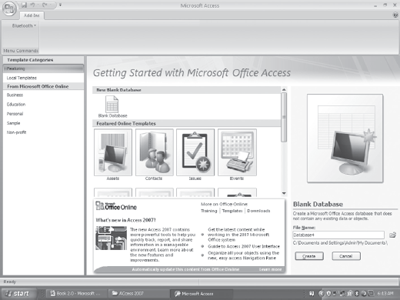
Figure 19.3 Getting started with Microsoft Office Access screen
Now, the MS-Access 2007 screen (Figure 19.4) comes up. This window consists of a number of components to make working in Access easier and more efficient. Some of the components are—Navigation Pane, Access work area, View Buttons, and Ribbon. On the MS-Access screen, some of the features like the Office Logo button, Quick Access Toolbar and Ribbon are common to all Microsoft Office programs like MS-Word, MS-Excel, and MS-PowerPoint. The orientation of the Access 2007 layout and its general features are described as follow:
- The Office Logo Button
 at the top left corner contains commands for the document such as, New, Open, Save, Save As, Print, and Close. This button also has a list of the recent documents. Some of these commands include an expandable menu to provide additional options.
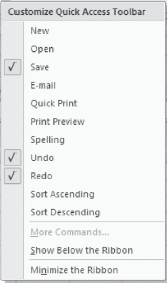
 - The Quick Access Toolbar
 is to the right of the Office Logo button. It contains shortcuts for the commonly used commands, like, Save
  Undo
Undo  (reverses the last change), and Repeat
  (repeats the last action). The icons for the commands that you want to get displayed on the toolbar can be selected from the
  Customize Quick Access Toolbar.
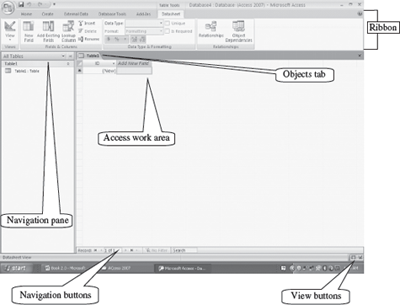
Figure 19.4 MS-Access 2007 screen
- The Ribbon consists of a panel of commands which are organized into a set of tabs (Figure 19.5). The layout of the Ribbon in MS-Access is the same as that of the Ribbon in MS-Word. Within Tabs are Groups, which are designated by the names located on the bottom of the Ribbon. Each group has icons for the associated command. The Ribbon (Tabs, Groups, and Icons) replaces the traditional toolbars and menus of the earlier versions of MS-Access.

Figure 19.5 The ribbon
- The Tabs (Home, Create etc.) on the Ribbon contain the commands needed to insert data, create tables, forms, reports etc. as well as the additional commands that be may needed.

- Each Tab consists of different Groups, like the Home tab has seven groups namely, Views, Clipboard, Font, Rich Text, Records, Sort & Filter, and Find.

- Each group has icons for the commands. To know the function of an icon (or command), leave the pointer on a button for a few seconds, the function of that icon will appear in a small box below the pointer. For example, leaving the icon on
 displays “Bold (Ctrl+B)”.

- Navigation Pane—The Navigation Pane shows the entries for all the tables, forms, queries and reports that are created by the user. For opening database objects, click on one of these entry in the Navigation Pane, and the required object will open in Access work area window.
- Navigation Buttons—The navigation buttons display the record number on which you are currently working. It has buttons which allows you to move back and forth between the different records of the object. If data is entered in the search button, the cursor moves to the location of record where the search is true. Navigation buttons also allows the view of the filtered records.

- Object Tabs—They display the tabs for the objects that you are working with, currently. On clicking on an object tab, the contents of the object are displayed in the Access work area.
- View Buttons—They contain buttons for the different views of the object, like Datasheet view, Design view, PivotTable view, and PivotChart. Clicking on a view displays the object view in the Access work area.
19.5 THE OFFICE BUTTON
The functionality of Office button in MS-Access is almost similar to the functionality provided in MS-Word, MS-Excel, and MS-PowerPoint software. For example, New will open a blank document in MS-Word, a blank workbook in MS-Excel, a blank presentation in MS-PowerPoint, and a blank database in MS-Access.
The Office Button is used to perform file management operations on the file (i.e. the database). It contains commands that allow the user to create a new database, open an existing database, save a database, print a database etc. The Office button contains nine commands (Figure 19.6), namely, New, Open, Save, Save As, Print, Manage, E-mail, Publish, and Close Database. The working of these commands is almost similar to their working in MS-Word. Here, we will discuss them briefly.
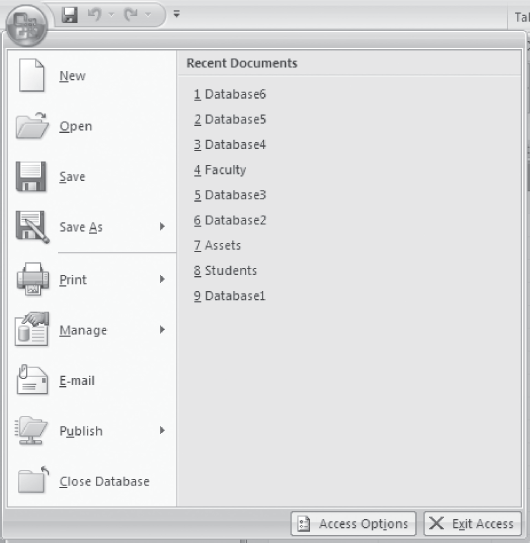
Figure 19.6 The Office button commands
Table 19.1 briefly describes the different commands available in the Office Button.
| Office Button Commands | Description |
| New | Create a new blank database that does not contain any objects. You can also select from different templates like Assets, Faculty, Issues, and Tasks. |
| Open | Open an already existing database |
| Save | Save a database for which a file name and location has already been specified. |
| Save As | Use when you save the database at a different location or by a different name or with a different save type. Specify the filename for the database, the location where the database is to be stored, and the save type of the database (table, query, form or report). The database can also be saved as Access 2007 database, Access 2002-2003 database etc. |
| Print, Quick Print, Print Preview the database. Properties like print quality, paper type etc. and print the selected records or the entire database, can also be set. Preview to see how the database will look after printing. | |
| Manage | View database properties, compact and repair the database and take back-up of the database (Figure 19.7) |
| Send a copy of the database to e-mail | |
| Publish | Share the database by saving it to a document management server, package the database, and apply a digital signature. |
| Close Database | Close an open database. |
Table 19.1 Office button commands description

Figure 19.7 Publish option
The following describes briefly some of the common operations that are performed using the commands of the Office Button.
- Create a New Database: <>New. A new window opens up. <Blank Database> <Create>. There are templates available (Local Templates) for creating a database of a specific type (e.g. Faculty, Assets, Issues, Students). When you create a new database, it also asks you to name the database (unlike MS-Word, MS-Excel or MS-PowerPoint); browse for the folder where you want to save the database and give it a suitable name.
- Saving a Database While Working: <>Save, or, click on the Save button in the Quick Access Toolbar. Access will save the database with the name and at the location that you specified while creating this database.
- Saving a Database Under a Different Name or at a Different Location: Open the database by selecting the <> Open. Next, <> Save As A dialog box will appear. In the field next to File name, type a name with which you want to save the database. Navigate in the top portion of the dialog box to the folder where you want to save the database (choose the appropriate directory where you want to save the file. You can use
 to go up in the directory, Use
  to create a new folder). Select the Save button. You now have two copies of the database, one with the original name, another with a new name.
 - To Print: <>Print. Make settings like number of copies to be printed. (Figure 19.8). Specify if you want to print the headings on each page, print a form only or a datasheet. From the Print dialog box you can make further settings like—Print Range, where you select what you want to print—page numbers, database, or selected records.
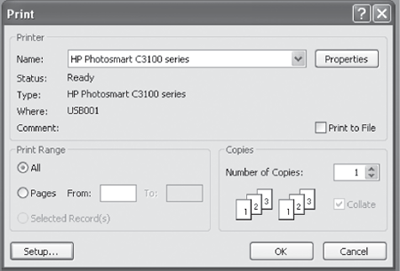
Figure 19.8 Print dialog box
Quick Tips — How to Learn MS-Access
When working with MS-Access, all you need to know is the following:
- What a command does
- When you want to perform a particular action, which command to use
- How to use a command
Here I describe how you can go about learning MS-Access.
What a command does—When you keep your mouse pointer over a command or icon, the function of the command or icon is displayed in a text box. So you can know what a command does by moving the mouse over the command.
Which command to use—
- To search for a command, first see which tab might have the command. For example, if you want to do any formatting, click the Home Tab; to create a form, table or report click the Create tab; to import or export a data, click the External Tools tab.
- You will be able to find the group and command you want, most of the time. The commands that have similar uses are grouped together in the same group in Access 2007.
Once you are able to find the command, then you should know how to use the command.
- For most of the commands, first you place the cursor in the database at the position where the action is to happen, or, you select the object on which you want the action to happen (for example formatting commands). Next, you click on the command. The command gets executed.
- In some commands, there is a set of steps to use the command.
19.6 THE RIBBON
Like the other programs in the Office 2007 suite, MS-Access 2007 has a ribbon. The Ribbon of MS-Access has the Office button and five Tabs, namely, Home, Create, External Data, Database Tools and Add-Ins. Each tab further consists of the groups, and the groups contain icons. Icons are a pictorial representation for a command. The tabs in the Ribbon are self-explanatory; for example, if you want to create a form, click on the Create tab. The groups and icons related to Create are displayed on the screen. Select the appropriate command. The different tabs in MS-Access and the groups within them are as follows:
- Home: Views, Clipboard, Font, Rich Text, Records, Sort & Filter, Find
- Create: Tables, Forms, Reports, Other
- External Data: Import, Export, Collect Data, SharePoint Lists
- Database Tools: Macro, Show/Hide, Analyze, Move Data, Database Tools
The Add-Ins tab contains supplemental functionality that adds custom commands and specialized features to MS-Access.
The commands in the Ribbon have various symbols associated with them, as shown in Figure 19.9. These symbols are interpreted as follows—
- Simple Command—The command start executing when it is clicked.
- Command Followed by Arrow—Clicking on the arrow
 displays more options for the command.
Selecting a command Ways to select a command Using a command Click on a Tab + Click on a Icon Click on any of the Tabs like Home, Create etc. From the displayed icons, click on the icon you want to use. Shortcut key Ctrl + letter Some commands have shortcuts where you can press the Ctrl key and a certain letter. Some commonly used shortcuts are- • Paste: CTRL + V
• Copy: CTRL + C
• Undo: CTRL + Z
• New document: CTRL + N
• Open document: CTRL + O
• Print document: CTRL + P
Figure 19.9 Command symbols
- Faded Command—A faded command means that it is not available currently.
- Group Dialog Box—Clicking on this
 symbol displays the dialog box for the group.
The following sub-sections describe the different tabs in detail.
Working with MS-Access 2007
- Mini Toolbar is a floating toolbar that pops up whenever you right-click on a text. It provides easy access to the most commonly used commands such as Cut, Copy, Paste, Sort, and Filter.
- File Format for the databases created in Access 2007 is .accdb. (For earlier versions it is .mdb)
19.6.1 The Home Tab
The Home Tab contains commands that are frequently used in an Access database. It contains commands for the formatting of text, text alignment, and performing operations on the records. The Home Tab is also used to change the views while working with tables. It is also possible to edit contents of the database like, sort and filter, find and select, and, to perform clipboard operations such as cut, copy, and paste, using the commands available in the Home tab. Figure 19.10 shows the Home Tab.

Figure 19.10 The home Tab
There are seven groups within this tab, namely, Views, Clipboard, Font, Rich Text, Records, Sort & Filter, and Find.
- View group allows you to select from the four views when working with the table.
- The Clipboard group contains the cut, copy and paste commands. The Format Painter is also present here. The Clipboard commands are used in the same manner as you use the MS-Word Clipboard commands.
- Font group commands allow change of the font face, style, size, and color. These options can be changed before or after you start typing of the text. If you use it after you have typed in the text, select the text first.
- Rich Text group is used to insert bullets or the numbered list, to increase or decrease the list level and to highlight the text color.
- Records group contains commands to perform operations on the records like add a new record, save a record, delete a record, perform spell check etc.
- The Sort & Filter group allows to sort the records in ascending or descending order, and to apply filters to the records.
- Find group contains commands to select, find and replace text in the document.
Table 19.2 gives the commands in the different groups (in left to right order) of the Home Tab along with a brief explanation.
| Home Tab Groups | Description |
|---|---|
| Views |  |
| Clipboard |  • Cut removes the selected item and puts into Clipboard for later retrieval. • Copy copies the selected item and puts it on the Clipboard. • Format painter copies formatting from one place and apply it to another (To apply same formatting to many places, double-click the format painter button). |
| Font |  • Align text left, centre or right. • Bold, Italics, Underline. • Change the Font color. • Color the background of the selected cells. • Show gridlines- horizontal, vertical, both or none. • Alternate fill the back color. In this, alternately the background is colored. |
| Rich Text |  • Set the direction of text to be displayed from left to right. • Start a numbered list or a bulleted list. • Make the text look like it is marked with highlighter pen. |
| Records | 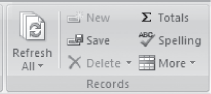 • Create a new record in data sheet view or form. • Add the field Total Rows in the table to find the total number of records when in datasheet view. • Save the records when in datasheet view or in a form. • Perform spell check on the entries in a table. The Spelling dialog box will display when an error is located.. • Delete records from a table. • Adjust row height, column width, hide or unhide columns, freeze or unfreeze column. This button is only available in datasheet view. |
| Sort & Filter | 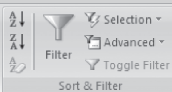 • Clear the sort order that was applied to a table with the ascending and descending buttons. • Apply filter. A filter menu opens. Specify the criteria for displaying records in a table. • Selection — selects records that meet specified criteria in a table field. A list of entries in the field will display. Click the item in the list to display the records that match that criterion. • Advanced — opens the Advanced Filter menu; used to specify more advanced filtering options. • Toggle filter to display the filtered records and all the records in a table. |
| Find | 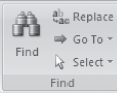 • Replace — To locate data in a table and replace it with new data. The Find and Replace dialog box will display where the criterion can be specified. • Go to the First, Previous, Next, Last, or New record in a table. • Select the record where the insertion point is located or all records in a table. |
Table 19.2 Home tab commands description
Here, some of the operations that are performed using the commands of the Home Tab are described briefly:
- Move Text: Select and highlight the section you want to move <Home><Clipboard> <
 >. Move the cursor to the place you would like the text to be inserted. <Home><Clipboard> <
 >.
>. - Copy Text: Select and highlight the section you want to copy <Home><Clipboard> <
 > Move the cursor to the place you want the copied text to be inserted. <Home><Clipboard> <>.
 - Find and Replace: This is used to find a text and then replace it with the new one. This option is useful for finding a text at multiple places in the database and replacing all of them with the new one.
- Design and Datasheet view: <Home><View>. Select from design view and datasheet view. In the design view (Figure 19.11), first design the structure of the table. Enter all the field names, their data types and field properties. In the datasheet view (Figure 19.12), enter the field names and also type-in the data.

Figure 19.11 Design view
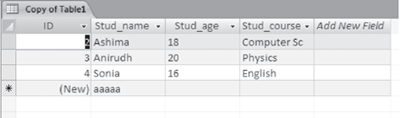
Figure 19.12 Datasheet view
- Apply Filter: <Home><Sort & Filter> <Selection>. Select from columns in the datasheet on which the filter needs to be applied. From the <Selection> select criteria for the filter. Figure 19.13, shows the select criteria “Equals Ashima”. Filter symbol will be seen on the column on which the filter has been applied.

Figure 19.13 Apply filter
19.6.2 The Create Tab
The Create Tab contains commands for inserting different kinds of database objects. The commands in this tab are used to add tables that store data, queries that search it, forms that help edit it, and reports that help print it. Figure 19.14 shows the Create Tab.

Figure 19.14 The create tab
There are four groups within this tab, namely, Tables, Forms, Report, and Other.
- Tables allow creation of a new table in Design view, using a table template, and creation of Share-Point lists.
- Forms group allows working with forms like create a form, split a form, and design a form.
- The Reports group allows working with reports like create a blank report and customized report, and to create a report in the design view.
- The Other group is used to create macros, launch the query wizard and create query in the design view.
Some of the Tabs appear only when you use them; like Table Tools tab, Report Layout Tools Tab, and Form layout Tools Tab
Table 19.3 gives commands in the different groups of Create Tab along with a brief explanation. Some of the tool tabs that appear when a tool is used are shown from Figure 19.15 to Figure 19.18.
| Create Tab Groups | Description |
|---|---|
| Tables | 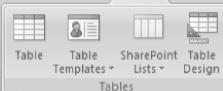 • Table Templates—create a new table using a table template like contacts, issues, tasks etc. • SharePoint Lists—create a list on the SharePoint site and a table in the current database that links to the newly created list • Table Design—create a new blank table in Design view. Add fields, set indexing options and perform other advanced table-defined tasks |
| Forms | 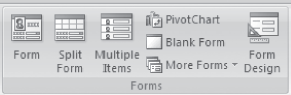 • Split form—Create a split form upper section and a form in the lower section for entering information about the record selected in the datasheet. • Multiple items—Create a form that shows multiple records in a datasheet with one record per row. • Pivot Chart—to display data from a table in different types of relationships. • Blank form—to create a form that does not contain any fields or data. Move the fields into the form from the list of fields that appear on the right side of form. • More forms—to display a list of additional form creation options like Form Wizard, Datasheet, and Pivot Table. • Form design—to create a form in Design View. |
| Reports | 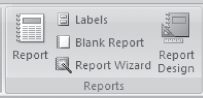 • Labels—to launch the Label Wizard where standard or customized labels may be created. • Blank Report—to create a report without any fields specified. After the report has been created, fields can be inserted. • Report Wizard—to launch the Report Wizard to create customized reports. • Report Design—to create a report in Design View. Advanced design changes can be made to the report. |
| Other |  • Query Design—to create a new blank query. The Show Table dialog box appears. Select a table for creating query. • Macro—to insert macros into the database. |
Table 19.3 Create tab commands description

Figure 19.15 Table tools datasheet tab

Figure 19.16 Form layout tools format tab

Figure 19.17 Report layout tools format tab

Figure 19.18 Query tools design tab
Some of the operations using the Create Tab commands are described below:
- Create Table in Datasheet View: <Create><Tables><Table>. A blank table is created. Add field names and their types. <Table Tools datasheet>. Click on a field in the table. <Fields and Columns> <Rename> to enter name of the field. Press Enter key. Add all field names. To change field types - <Table Tools Datasheet> <Data Type and Formatting> <Data Type>. A drop down menu shows the available data types. Select from it.
- Create Form in Layout View: <Create><Forms><Blank Form>. Drag the fields from the right side of the screen to the center, to be included in the form. Now, format the form. Insert title for the form - <Form Layout Tools Format> <Controls Group> <Title>. Insert Logo <Logo>. Select a format for the form <Auto Format> <More>. To view the form - Right click the form tab <Form View>. Save the form - Right click the form tab <Save>. This is a simple form. You can use other options also for further formatting of the form.
- Create Report in Layout View: <Create><Report><Blank Report>. Drag the fields from the right side of the screen to the center, to be included in the report. Now, format the report. Insert title for the report—<Report Layout Tools Format> <Controls Group> <Title>. Insert Logo <Logo>. Group and Sort - <Group and Sort>. Group, Sorts and Total windows will appear below the Report. Add a group, add a sort. To view the report - Right-click the report tab <Report View>. Save the report - Right-click the report tab <Save>.This is a simple report. It is possible to insert totals, sub-totals, conditional formatting and auto format, and other options, for further formatting the report.
- Create a Query in Design View: <Create><Other><Query Design>. A Show Table dialog box appears. Select a table. <Add> <Close>. A Select Query design grid is displayed. It contains several rows like field, table, total, sort, show or criteria. On clicking on a field, a selection arrow appears. Select a field from the list that appears. To view the query - <Results> <View> <SQL view>. To run the query - <Results> <Run>.
19.6.3 The External Data Tab
The External Data Tab contains commands for importing data into Access and exporting it to other programs. The External Data Tab is shown in Figure 19.19.

Figure 19.19 The external data tab
There are four groups within this tab, namely, Import, Export, Collect Data, and SharePoint Lists.
- The Import group allows import of data from different programs into the Access table.
- Export group is used to export database objects to other programs and formats.
- Collect Data group allows sending of forms through e-mail to different people, to collect data.
- The SharePointLists group are used when SharePoint services are available.
Table 19.4 gives the commands in the different groups of the External Data Tab along with a brief explanation.
| External Data Tab Group | Description |
|---|---|
| Import | 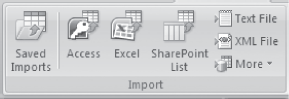 • Access—to import data from or link to another Access database. • Excel—To import data from or link to an Excel file. • SharePoint list—to import data from or link to a SharePoint List. • Text file—to import a text file. • XML file—to import an XML file. • More—to display a list of additional formats from which data may be imported from. |
| Export |  • Excel—to export the selected object in Access to an Excel worksheet. • SharePoint List—to export the selected object to a SharePoint list. • Word—to export the selected object to a Rich Text Format document. • Text File—to export a selected object to a text file. • More—to display a list of additional formats into which a selected object may be exported. |
| Collect Data | 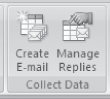 • Manage Replies—to view replies to data collected in email messages and use them to update databases. |
| SharePoint Lists |  • Synchronize the data between the database and the SharePoint server. • Discard changes made to the database on the SharePoint Server. • Cache List Data—to cache list data on the database server. • Relink Lists—to re-link the broken link between the database server and the SharePoint server. • Move to Share Point some or all parts of a database. |
Table 19.4 External Data commands description
Some of the operations that are performed using the commands of the External Data tab are briefly described below:
- To import data from Excel into a table: <Create> <Import> <External Data> <Excel>. A Get External Data-Excel Spreadsheet window will appear. Browse to the location from where the worksheet is to be imported. Specify where to store the data in the current database. Select <Import the source data into a new table in the current database>. Click ok. An Import Spreadsheet Wizard appears. Follow the steps of the wizard. The spreadsheet will be imported to the table name you specify.
19.6.4 The Database Tools Tab
The Database Tools Tab has tools that help experts perform data analysis and add Visual Basic code (a scripting language). This tab is used for the linking of tables. The Database Tools Tab is shown in Figure 19.20.

Figure 19.20 The database tools tab
There are five groups within this tab, namely, Macro, Show/Hide, Analyze, Move Data, and Database Tools.
- Macro contains command to work with macros like run a Macro and open visual basic editor.
- Show/Hide allows you to show or hide the relationships, object dependencies etc.
- Analyze group includes commands to analyze performance of the document, table, form, report, and query.
- Move Data allows to move the data to a new server and to split the database into separate files.
- Database Tools contains tools to encrypt the database with password etc.
Table 19.5 gives the commands in the different groups of the Database Tools Tab along with a brief explanation.
| Database Tools Tab Group | Description |
|---|---|
| Macro |  • Run a macro, create shortcut menu from macro and convert macros to visual basic. |
| Show/Hide | 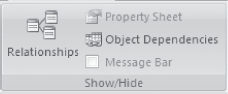 • Open the object’s property sheet to set its properties. • Show the database object like query and tables that rely on other objects. • Show or hide the message bar. |
| Analyze | 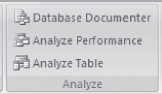 |
| Move Data |  • Split the database into two files - one containing the table and the other containing the forms and queries. |
| Database Tools | 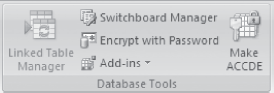 |
Table 19.5 Database tools tab commands description
19.6.5 The Help
The Help button ![]() is located on the right most side of the Tabs in the Ribbon. Click on this button to get help for using any command of the Access. On clicking on the help button, a screen as shown in Figure 19.21 appears. Browse the Help for the specific command. It also allows for operations such as search for a command and view Table of Contents.
is located on the right most side of the Tabs in the Ribbon. Click on this button to get help for using any command of the Access. On clicking on the help button, a screen as shown in Figure 19.21 appears. Browse the Help for the specific command. It also allows for operations such as search for a command and view Table of Contents.
Many of the concepts that used while working with MS-Office suite are common for MS-Word, MS-PowerPoint, MS-Access, and MS-Excel. For example, open, close, save, cutting, and pasting are performed the same way in MS-Access as they are in MS-Word, and MS-PowerPoint. The menus are also arranged in a similar layout. If you are not sure how to do something in Access, then try it as one would do in MS-Word or MS-PowerPoint, and it may work.
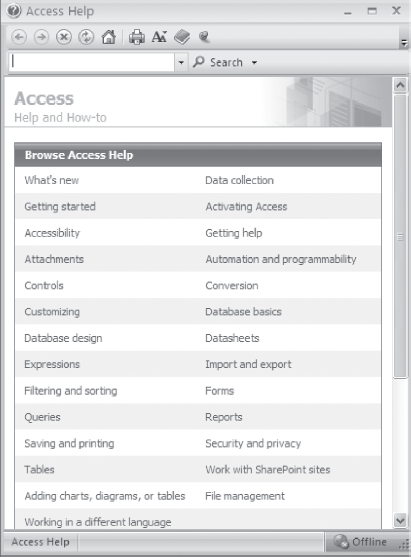
Figure 19.21 Access help
19.7 SOLVED EXAMPLE
This is an example to create a database and query it.
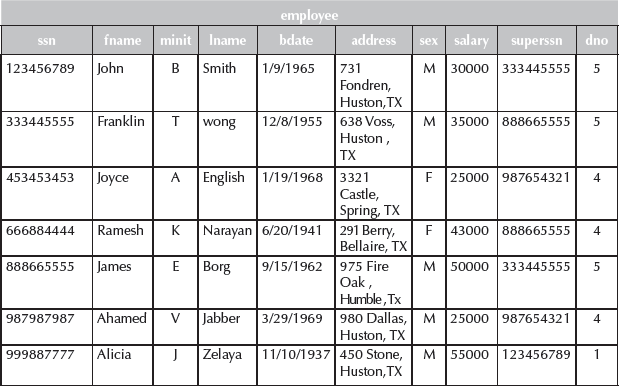
Example 1: Create COMPANY relational database schema, as follows:
COMPANY RELATIONAL DATABASE SCHEMA
| RELATION NAME | ATTRIBUTES |
| EMPLOYEE | Fname, Minit, Lname, SSN, Bdate, Address, Sex, Salary, Superssn, Dno |
| DEPARTMENT | Dname, Dnumber, Mgrssn, Mgrstartdate |
| DEPT_DLOCATION | Dnumber, Dlocation |
| PROJECT | Pname, Pnumber, Plocation, Dnum |
| WORKS_ON | ESSN, Pno, Hours |
| DEPENDENT | ESSN, Dependent name, Sex, Bdate, Relationship |
The underlined fields are the primary key. Fill data into the table and perform the following Queries:
- Retrieve name of manager for each department and date on which they joined as manager.
- Retrieve the names of employees who work on all the projects that ‘John Smith’ works on.
- Retrieve for each female/male employee a list of the names of dependents.
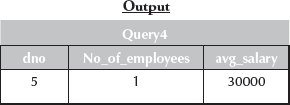
- Retrieve department no, the no of employees in the department and their average salary for each department managed by ‘John Smith ’.
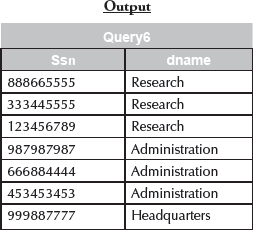
- Retrieve for all employees their SSN and department name.
- Retrieve SSN, names, department no. of all employees whose salary is greater than the salary of all the employees supervised by him/her.
Solution 1.
- Open blank database <New> <Create>.
- Create tables. <Create> <Tables> <Table>.
- Create six tables with given fields for the relation name Employee, Department, Dept_Dlocation, Project, Works_on, and Dependent.
- Fill the data into the tables. There is a relation between the table, which needs to be taken care when filling in the data. Employee (ssn) and Department (mgrssn); Department (dnumber) and Dept_Dlocation (dnumber); Project (dnum) and Department (dnumber); Project(pnumber) and Works_on (pno); Employee (ssn) and Works_on (essn); Dependent (essn) and Employee (ssn).
- Once all the tables with the data are created, design the query. <Create> <Other> <Query Design> <View> <SQL view>.
- The tables and the SQL queries are shown below.
EMPLOYEE TABLE
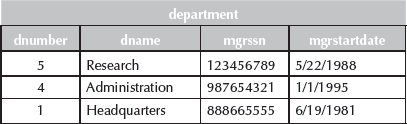
DEPARTMENT TABLE
DEPT DLOCATION TABLE

PROJECT TABLE

DEPENDENT TABLE

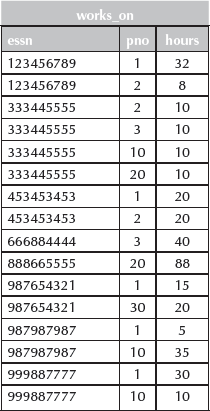
WORKS_ON TABLE
QUERIES
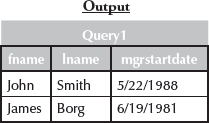
- Retrieve name of manager for each department and date on which they joined as manager.
Sql view
SELECT fname, lname, mgrstartdate
FROM department, employee
WHERE mgrssn=ssn;
- Retrieve the names of employees who work on all the projects that ‘john smith ’ works on.
Sql view
SELECT DISTINCT fname, lname
FROM employee, works_on
WHERE pno in (select pno
from works_on,employee
where fname=‘john’ and lname=‘smith’ and essn=ssn;)
and essn=ssn;

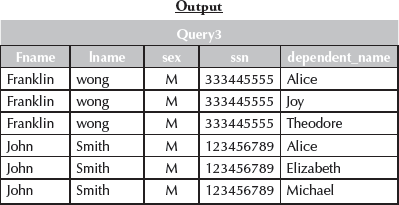
- Retrieve for each female/male employee a list of the names of dependents.
Sql view
SELECT fname, lname,employee.sex,ssn, dependent_name
FROM employee, dependent
WHERE employee.sex=‘m’ and essn=ssn
UNION SELECT fname, lname,employee.sex,ssn, dependent_name
FROM employee, dependent
WHERE employee.sex=‘f’ and essn=ssn;
- Retrieve department no, the no of employees in the department and their average salary for each department managed by ‘John Smith’.
Sql view
SELECT dno, count(dno) AS no_of_employees, avg(salary) AS avg_salary
FROM employee
WHERE dno in(select dno
from department
where mgrssn=ssn and fname=‘john’ and lname=‘smith’;)
GROUP BY dno;
- Retrieve for all employees their SSN and department name.
Sql view
SELECT ssn, dname
FROM employee, department
WHERE dno=dnumber;
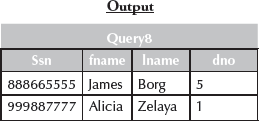
- Retrieve SSN, names, department no. of all employees whose salary is greater than the salary of all the employees supervised by him/her.
Sql view
SELECT ssn, fname, lname, dno
FROM employee AS e1
WHERE e1.salary >
(
select max(salary)
from employee as e2 where e1.superssn=e2.ssn;
);
Exercises:
- Create Suppliers and Parts relational database schema as follows:
RELATION NAME ATTRIBUTES SUPPLIER SNo, Sname, Status, City PARTS PNo, Pname, Color, Weight, city PROJECT Ino, Jname, City SHIPMENT Sno, Pno, Ino, Quantity The underlined fields are the primary key. Fill in the appropriate data in the tables. Perform the following queries:-
- Get full details of all the projects in London.
- Get supplier no. for suppliers who supply project J1.
- Get supplier details for suppliers who supply part P2.
- Get supplier names for suppliers who do not supply part P2.
- For each shipment get full shipment details, including total shipment weight.
- Get all shipments where the quantity is in the range 300 to 750 inclusive.
- Get all distinct part-color combinations.
- Get supplier no. for suppliers in Paris with status > 20.
- Get part nos. for parts that either weigh more than 16 pounds or are supplied by supplier S2, or both.
- Get part cities that store more than five red parts.
- Create Purchase order relational database schema, as follows:
PURCHASE ORDER RELATIONAL DATABASE SCHEMA
RELATION NAME ATTRIBUTES VENDOR Vendorno, vname, street, city, region, zip, contact PRICEINFO Partno, vendorno, catno, price POHEADER Orderno, orddate, vendorno, invoiceno, status PODETAIL Orderno, partno, qty, unit-pr PART Partno, description POHISTORY Orderno, orddate, vendorno, invoiceno, pototal The underlined fields are the primary key. Fill data into the table and perform the following Queries:
- Display all the rows in the part table, sorted by description.
- Display the part description for the part number 4.
- Select all columns of the PODETAIL table which a quantity greater than 500.
- Display all part numbers, descriptions, prices, catalogue numbers and vendor numbers and names.
- How many vendors are located in the city of NewYork?
- Find the unit price and quantity information for order number 1101.
- Which parts are priced at the lowest price?
- Create the following tables:
RELATION NAME ATTRIBUTES BOOKS Book id, Book name, Author name, Publishers, Price, Type, Quantity ISSUED Book id, qty issued The underlined fields are the primary key. Fill data into the table and perform the following Queries:
- Display book name, author name and price of books of Pearson publishers.
- Display book name, author name and price of books that have been issued.
- Give the output of the following queries
- SELECT COUNT(DISTINCT Publishers) FROM Books;
- SELECT COUNT(*) from Books;
- SELECT SUM(Price) FROM Books WHERE Quantity > 5.
- Create Library Management relational database schema, as follows:
LIBRARY MANAGEMENT RELATIONAL DATABASE SCHEMA
RELATION NAME ATTRIBUTES BOOK Book id, title, pub_id BOOK_AUTHORS Book id, author name BOOK_COPIES Book id, branch id, noof_copies BOOK_LOANS Book id, branch id, card no, dateout, duedate LIBRARY_BRANCH Branch id, branch_name, address BORROWER Card no, name, address, phone PUBLISHER Pub id, Pub_name, address, phone_no The underlined fields are the primary key. Fill data into the table and perform the following Queries:
- Retrieve the names of all borrowers who do not have any books checked out.
- For each library branch, retrieve the branch name and the total number of books loaned out from that branch.
- Retrieve the names, addresses, and number of books checked out for all borrowers who have more than five books checked out.