
Appendix D
ASSEMBLING A PC
1.1 INTRODUCTION
To own a Personal Computer (PC), either purchase a pre-built and pre-assembled computer, or, assemble a computer yourself. This chapter discusses the assembling of computer by the user. Assembling the computer by the user has several advantages. The user learns about the hardware components of computer and their interworking. The user can customize the computer according to their specific needs in addition to saving money and having fun.
1.2 COMPONENTS OF PC
A computer installed at your office or home generally has the following components externally—(1) System unit, (2) Keyboard, (3) Mouse, and (4) Monitor. In addition to this you may have other external components like printer, external drives etc., which can generally be attached to a port on the computer case.
- System Unit is the main component of computer. The system unit is a tower like unit which comprises of the chassis and the internal components of PC. The internal components of the PC include (1) Motherboard or system board, (2) Processor or CPU, (3) RAM, (4) Hard Disk Drive (HDD), (5) Power Supply Unit (PSU), (6) Optical drive, and (7) Video card or Graphics card. It also consists of fan and ports to connect components like keyboard, monitor etc.
- Monitor enables the user to view the text and the graphical output. The display devices may vary in shape, size and the technology used.
- Keyboard and Mouse enable the user to enter data into the computer.
- Peripheral Devices provide alternative methods for data input and output, or additional data storage. The external devices are connected to the system unit via a cable or a wireless connection.
1.3 PURCHASING PARTS OF PC
Several factors have to be kept in mind when deciding what parts to buy—
- Compatibility—All parts should be compatible with each other, particularly, CPU, motherboard and RAM.
- Ergonomical Design—Ergonomics deals with the designing of things so that they work with the human body. Ergonomics is important when you choose your keyboard, mouse and monitor. For example the size of monitor, monitor with adjustable height (tilt, angle), keyboard that does not strain the hand while typing, and mouse that is easy to hold. The ergonomically designed components are slightly costly, but they help prevent troublesome strain injuries to the neck, wrist and the fingers.
- Price—Nowadays, hardware components are available at prices that can fit different needs of the customer. While selecting certain components, think of upgradation in addition to the price. Look for components that support new standards and can be upgraded. For example, while you buy a motherboard, look for one that has room to add extra RAM chip when you require upgradation later.
1.4 SELECTING THE COMPONENTS
To build the PC, you will need to purchase the following components.
- Tower case or chassis
- Motherboard
- CPU/Processor
- DDR2 RAM
- Hard disk drive
- Optical drive
- Monitor
- Keyboard and Mouse
To decide the specification of the PC, look for the kind of applications that you wish to run on the PC. This will stop you from buying expensive components, which may not be required for the PC you assemble. The following sub-sections provide some guidance on deciding the configuration of the components required for building of the PC.
1.4.1 Tower Case or Chassis
- A tower case (Figure A.1) is required to hold the components together. Currently, tower cases come in standard ATX form factor, with common sizes- Mini, Midi and Full tower. Most budget tower cases come with the PSU.
- The number of bays for hard disk drives, optical drives you need to fit in the tower case makes you decide if you need a mini, midi, or a full tower case. The bigger the case, the more bays you have.
- It is generally advisable to purchase a midi or full tower case. It will ensure a good air flow.
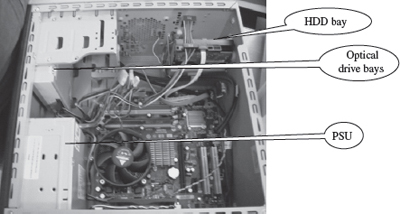
Figure A.1 Tower chassis
1.4.2 Motherboard or System Board
- A motherboard (Figure A.2) is a Printed Circuit Board (PCB) that connects the processor, memory and all expansion cards together to assemble a PC. It is the most important part of computer.
- The motherboard has chips and other components on it. The motherboard may come integrated with the various components like the modem, sound card, video card and other built-in features. Alternatively, motherboards are available with the standard built-in features, and slots are provided for the other components to be attached. For example, the user can choose a high-end video card with high speed for better graphics. It provides the user with the flexibility to upgrade one or more components on the motherboard. The built-in board is economical, but it becomes difficult to upgrade a component of the system board. To change a built-in feature on a board will require replacing the motherboard.
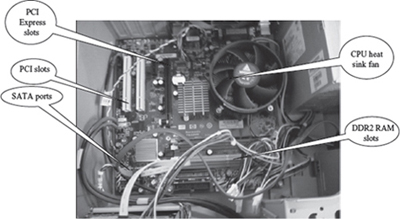
Figure A.2 Motherboard
- While choosing a motherboard consider the CPU interface, Chipset, IDE or SATA support, Expansion slot interfaces, and other connectors. Make sure that the motherboard is of a form factor compatible with the case.
- CPU Interface—Is the plug into which the processor goes. The interface must be an exact match to the processor. Check with the motherboard manufacturer to ensure that the slot on the motherboard supports the CPU you want to use. If the motherboard, CPU, and heatsink/ fan are not compatible and installed correctly, it can destroy the CPU and/or the motherboard.
- Chipset—It determines the efficiency of RAM and Expansion Slots. Intel 915 supports up to 533MHz PC4200 DDRII RAM. Intel 925 supports up to 600MHz PC4800 DDRII RAM. The function of BIOS is important. Newer BIOS have temperature controls that shut down the computer if the temperature gets too high.
- IDE (ATA) or SATA Interface—Currently, motherboards have SATA interface. The SATA interface has four separate slots that allow independent access and this increases the speed at which hard drives and optical drives work. The cables are also narrower, improving the flow of air inside the case. Additionally, two parallel, 44 pin IDE interface connectors are also provided on the motherboard.
- Expansion Slot Interfaces—The motherboard comes with various expansion card slots and connectors. It generally comes with 4 different expansion slots—2 PCI and 2 PCI Express slot. The PCI slot is to connect sound card, modem etc. The PCI Express slot is used to connect a PCI-E graphics card.
- USB—In addition to USB 2.0 (Figure A.3) ports provided on the back panel, most motherboards have connectors for additional ports in the front of the case. USB 2.0 ports are used for connecting peripherals such as printers, external hard drives, MP3 players, cameras etc. The more USB ports the motherboard supports the better it is. The traditional 9-pin serial and parallel ports are much less used now, so, many motherboards have a single serial port and no parallel port.
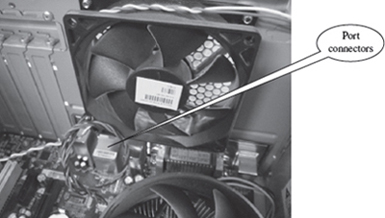
Figure A.3 Port connectors
- The form factor describes size and shape of the system board. It is the specification that provides the physical measurements for the size of components and where mounting devices for them are located. ATX is the most common form factor and is the de facto standard. An ATX motherboard has the standard I/O (Input/Output) connectors such as PS/2 ports, USB ports, parallel port, serial port, etc, built onto the motherboard. ATX motherboard fits into a standard ATX case. Other form factors are—microATX smaller than standard ATX at the cost of fewer expansion slots; WTX is for workstations and servers; BTX is designed for more efficient cooling; and Mini-ITX is smaller than BTX.
- Number of Storage Drive Spaces—Internal hard drives/floppy drives (which go in 3.5” bays) and internal CD/DVD drives (which go in 5.25” bays) take up space in the case. Make sure you consider how many drives you will need and what size slot they require. Optical drives and floppy drives need external slots, i.e. a hole in the case through which their face can be accessed. Hard drives go into an internal slot. Nowadays, floppy drives are not used.
- A power supply converts AC power from an electrical outlet to the DC power needed by system components. The power supply is a metal box in the rear of the system that is attached to the computer chassis and to the system board. The power supply contains the power cord plug and a fan for cooling, because it generates a lot of heat. A power supply with a rating of more than 300 watts is needed; any less will not reliably power modern components.
- Most cases mount one or more case fans, distinct from the fans that may be attached to the power supply, video card and CPU. The purpose of a case mounted fan is to move air through the system and carry excess heat out. Fans currently come in two basic sizes, 80mm and 120mm. Cases support either of them. The larger 120mm fans spin more slowly and are usually quieter fans, so they are generally preferred, though they cost a little more.
1.4.3 CPU/Processor
- CPU is the brain of computer. The faster the processor, the faster it will execute instructions and run the programs.
- CPU is a single microprocessor chip that is installed on the motherboard in a socket.
- The choice of CPU affects the speed of the computer more than any other single component. Some of the CPU properties you need to consider are—
- Clock speed measured in GHz or MHz. It is the number of calculation cycles that the CPU can perform per second. A higher clock speed indicates a faster processor.
- IPC or instructions per cycle, is the amount of work a CPU can do in a cycle. With modern processors this number is an average.
- Front side bus speed (FSB) is the rate at which the CPU communicates with the northbridge chipset component on the motherboard, measured in MHz. A larger FSB value shows that your CPU is able to communicate with other components on the motherboard faster.
- CPU plugs into a socket on the motherboard. It is important that the CPU is a complete match to the motherboard CPU socket.
- Modern processors are either 32-bit or 64-bit. A processor can be called 64-bit if it will support running a 64-bit operating system. The newer chips from Intel and AMD support this for most 64-bit OSs.
- Cache is memory implemented directly on the CPU. Generally, the larger the cache, the faster the system will run. Cache usually comes in three varieties, L1, L2, and L3. Usually only L2 cache size is shown. L3 is rarely used in processor design. L1 stays the same size throughout an entire processor product line.
- Core of CPU is the heart of CPU. Dual-core processors (Intel Core Duo/Core 2 Duo and AMD Athlon 64X2) have two processing centres (cores).
- Retail CPU’s come in a package containing a HSF (Heat Sink Fan), instructions, and a warranty, often 3 years. OEM CPUs do not include these. The current CPU speeds and advantages change frequently.
- Intel and AMD are the leading processor manufacturers. Whichever manufacturer you decide to choose, purchase a compatible motherboard.
- Nowadays, dual core processors are common. The more cores a CPU has, the better it is. Intel Core 2 Duo and Athlon 64X2 are both Dual Core, i.e., they have two CPU cores on one chip. Each core works separately hence the CPU can process two intensive tasks at the same time without slowing down the system. For example, you can run a virus checker in the background and use the word processor in the foreground without slowing the system down. Dual core processors are are 64 bit and support 64 bit OS.
- For video editing, CAD, or playing the latest 3D video games or other CPU intensive tasks use a quad-core or multi-core processor.
1.4.4 Memory—RAM
- Memory stores parts of the operating system and application data that is being run. More the memory of system, the more applications can be run simultaneously and also provides an overall better system performance.
- Currently, DDR2 or DDR3 SDRAM (Double Data Rate Synchronous Dynamic RAM) is being used. RAM has different bandwidths, ie 400, 533, 600, 733, 800. The DDR2-533 RAM is faster than DDR2-400 RAM.
- The RAM you need depends on the motherboard and chipset that has been selected. Chipsets that use dual-channel memory require use of two identical (size and speed) sticks of RAM. For example, an Intel Core 2 Duo CPU will support Dual-channel DDR2 800, 667 or 533. RAM should usually operate at the same clock speed as the CPU’s Front Side Bus (FSB). DDR-2 memory must be run in pairs to run at double data rate. If you get 2GB of memory then buy 2 x 1GB modules.
- The amount of RAM to be used is a simple choice. 1 GB RAM is sufficient for most modern operating systems.
- Some common memory manufactures are Kingston, Corsair and Samsung.
- DDR RAM is identified by memory name or module name (Figure A.4). For example, 400MHz DDR2 RAM is known as DDR2-400, and its module name is PC2-3200 (3.2GB of bandwidth). 533MHz DDR2 RAM is called DDR2-533 and its module name is PC2-4200(4.2GB of bandwidth).
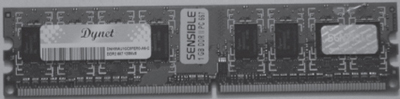
Figure A.4 RAM module
1.4.5 Video Card/Graphics Card
- Graphics card is used for displaying output to the monitor. The choice of graphics card depends on the need of the user.
- For computers which use 2D graphics for office applications and web surfing, an integrated graphic card is included on most motherboards. It also allows the user to run the monitor at various resolutions. An integrated graphics card with around 64MB or 128MB video memory is sufficient for your needs.
- For gaming, or 3D modelling, a 3D graphics card is needed with at least 256 MB or 512 MB of video memory. Companies like nVIDIA and ATI dominate the 3D graphics market.
- There are four different current graphics card interfaces: integrated, PCI, AGP and PCI-Express. Most motherboards that have integrated graphics also have one of the other three slot interfaces available to place a new card, if needed. Most current motherboards have PCI-Express slot as it offers much higher graphics bandwidth which results in higher performance. PCI-Express system supports up to 16x speeds. Older video cards use the standard PCI slots that are now growing obsolete due to limited speed and memory. It is recommended to buy a motherboard with a PCI- Express port so that you can use a PCI-Express graphics card.
1.4.6 Sound Card
- Sound card allows running of multimedia applications with sound, listening to music, or playing audio CD's. Most motherboards have built-in sound features. These are often adequate for most users.
- For gaming, sound card is a must. Sound cards made for gaming or professional music tend to do well for their particular purpose. In games, various effects are often times applied to the sound in real-time, and a gaming sound card is able to do this processing on-board, instead of using the CPU for the task. Professional music cards are built both for maximum sound quality and low transmission delay input and output. One of the popular sound cards is the Creative's soundblaster range.
1.4.7 Modem
- A modem is an essential if you intend to connect the PC to the Internet.
- Modem converts digital signals to analog so that it can travel via telephone line, and vice-versa. Analog modems are currently on the decline as they are being replaced by Digital modems which are used for high speed broadband Internet, also known as ADSL modem or ADSL routers.
- Modems can be attached via USB, a serial port, or an internal card slot. ADSL modems are mostly external. They connect to the serial port.
- Wireless ADSL routers are used if you wish to share Internet connection with multiple PCs.
- Some common ADSL Router suppliers are Netgear, Belkin and D-Link.
- Ethernet card—It is required to connect to a LAN, cable or DSL modem. It comes in speeds of10 Mbps, 100 Mbps, or 1000 Mbps; which are designated as 10 Mbps, 10/100 Mbps or 10/100/1000 Mbps products. The 10/100 and 10/100/1000 are most commonly used. Generally, ethernet adapters are built into a motherboard. If it is not present, purchase one that can be inserted into a PCI slot. To get the full speed of ethernet card, a motherboard with built-in card is the best.
1.4.8 Hard Disk Drive
- Hard disk drive is a non-volatile storage media which stores the data including operating system, applications, user files and documents.
- Hard drives directly connect to the system board via atleast one cable for the data and one for the power. Most hard drives are internal, but some are external.
- When shopping for the hard drive, consider the following—
- Cache—The cache of a hard drive increases the speeds of retrieving short bursts of information, and also allows prefetching of data. Cache of hard drive is normally 2MB, 8MB or 16MB large. Most hard drives have 8MB standard cache.
- Form Factor—PCs usually use 3.5 inch hard drives. 2.5 inch drives are used in laptops.
- Capacity—Hard disks are available that can store data from 160 GB to 1000 GB. For common user, hard disks of capacity 160GB to 500 GB are sufficient.
- Rotational Speed—It is the speed at which the hard drive platters spin. The 2.5 inch laptop drives usually spin at 5400 RPM, and common desktop drives at 7200 RPM.
- Warranty—Many manufactures offer warranty ranging from 30 days (OEM) up to five years. It is advisable to spend slightly more money to get the drive that carries a longer warranty.
- Interface of a Drive is how the hard drive comunicates with the rest of the computer. PATA SATA, SCSI and USB are the hard drive interfaces that are available. Nowadays, the SATA drives are used. While purchasing the motherboard, check that it supports the SATA drive, or, purchase a PCI card that will allow connecting the hard drive. PATA drives are losing popularity. SCSI drives are usually used on high performance workstations and servers. USB or IEEE1394 is used for connecting external drives.
- Some HDD manufacturers are IBM, Seagate, Samsung and Fujitsu.
1.4.9 Optical Drive
- Mostly all operating systems and applications software comes on CD. To watch DVD movies on your PC, a DVD-ROM is required which can perform all the tasks of a CD-ROM as well as play DVD movies.
- Optical disk drives are generally internal and generally have a 5.25 inch form factor.
- Optical disk and drives come in several types—CD-ROM, CD-R, CD-RW, DVD-ROM, DVD- R, DVD+R, DVD+R DL, DVD-RW, DVD+RW, DVD-RAM.
- The DVD dash drives are appoved by the DVD forum while DVD plus drives are not.
- New optical disk formats—Blu-ray disk (BD) and High density or high definition DVD (HD DVD) are two compatible optical disk standards intended for high density stotage of high definition video as well as data storage. Both use blue laser light to read and store data.The blue laser has a shorter wavelength than the existing CD and DVD laser technologies, which enables the system to store more data in the same amount of physical space. HD-DVD can hold 30 GB of data. BDs can hold upto 200 GB of data.
- Currently, DVD writers that are capable of burning 9GB of data to a disk can be purchased for an insignificant amount of money. When purchasing a DVD writer, check that it is capable of burning both the ‘+’ and ‘−’ standards, and is Dual Layer compatible. It is possible to burn almost all recordable DVDs currently on the market.
- Some CD/DVD-ROM manufacturers are Toshiba, Poineer, Hitachi, LG and Samsung.
1.4.10 Peripherals
Anything outside the computer case that connects to the computer is a peripheral. The keyboard, mouse and monitor are the minimum required peripherals. The choice in peripherals depends on personal preference and what you intend to do with your computer.
- Mouse—Optical mouse are commonly used nowadays. Purchase a decent-quality mouse made by companies such as Microsoft or Logitech. A low-end optical mouse may skip if moved too fast. Optical mouse generally have three buttons, which are sufficient for normal computer operation. However, if the computer is to be used heavily for gaming purposes, extra buttons in the mouse may be useful.
- Keyboard—Go for an ergonomically designed keyboard from a reputed company. If you have to key-in most of the time, the comfort of using the keyboard becomes a key factor in choosing an easy-to-use keyboard.
- Monitor—Currently, the most popular viewing device are TFT Flat panels, as they save desk space and are more comfortable to view. They are more affordable than before.
- Monitors (Figure A.5) come is various sizes and refresh rate.
- Monitors are measured diagonally. Nowadays, 17" monitor are becoming standard monitor, though you can also purchase 19” monitor.
- Monitors consist of thousands of pixels. Smaller pixels produce high definition sharp display. Look for monitors with at least 0.25 mm dot pitch.
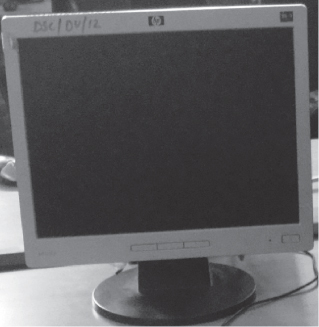
Figure A.5 Monitor

Figure A.6 Speakers
- If purchasing a 17″ monitor, see that its refresh rate is at least 85 Hz at resolution of 1024*768. A 19″ monitor should have resolution of at least 1280*1024 at 85 Hz.
- Printer and Scanner—For home users, multi-function centres (Printer-Scanner-Copier) are often a cost-effective solution to purchasing printer and scanner separately. The printer-cum- scanner is connected to one port on the computer, and to one power point. A mid-range deskjet printer-scanner-copier works well for most people. If you plan to print photos, select a printer which can print at around 4800dpi. Also check the speed of the printer, and the cost of new cartridges, while selecting a printer. You can choose between a black and white, and, color printer.
- Speakers—Computer speaker (Figure A.6) sets come in two general varieties; 2/2.1 sets (over a wide range of quality), and “surround”, “theater”, or “gaming” with four or more speakers, which are more expensive. Low-end speakers compromise sound quality. Powered speakers cost slightly more but sound much better. Headphones can offer good sound much more cheaply than speakers. If your have limited budget, and you prefer not to disturb others, then go for headphones which will give you good quality sound.
1.5 TYPICAL DESKTOP PC CONFIGURATION
- When you purchase PC from the market or assemble it, your specifications may read as follows—
- PC specs 1—
Intel(r) Pentium(r) 4 Processor 3.2GHz with Hyper-Threading Technology and 800MHz FSB
Intel(r) 865G chipset
1GB DDR2 dual-channel 400Mhz
80GB serial ATA150 7200rpm hard drive w/2MB cache
Integrated ultra ATA100 and serial ATA150 controllers
48x/24x/48x CD-RW/DVD combo drive
In 4-bay small form factor case: 1 PCI and 1 AGP
(8) USB 2.0 (2 in front and 6 in back) (1) Serial(1) Parallel(2) PS/2
(1) RJ-45 Integrated LAN(1) VGA(1) Microphone front audio ports
17″ LCD Flat Panel Display
Integrated Intel(r) Extreme Graphics 2 with up to 64MB dynamic video memory
104+ Keyboard
USB Optical Wheel Mouse and mouse pad
Integrated Sound Blaster compatible audio
Integrated Intel(r) 10/100/1000 Ethernet (Gigabit) adapter
- PC specs 2—
INTEL DUAL CORE-3.4 GHz
17" SVGA MONITOR
512MB DDR 2 RAM
80 GB SATA HDD
SPEAKERS
MM KB
MOUSE OPTICAL
COMBO DRIVE
CABINET WITH 400W SMPS
10–100 MBPS LAN
4x AGP FOR GAMING
ONE PARALLEL PORT, 4 HIGH SPEED USB
1.6 ASSEMBLING THE PC
Before you start assembling the PC, make sure you have the following components—
- Metal casing with power supply and a set of screws, connectors and cables.
- Motherboard
- Processor
- RAM modules
- Storage devices—hard drive, DVD-ROM drives
- Expansion cards
Study the motherboard manual so that you are able to identify the different connectors. Also ensure that the PC power supply is unplugged from the mains.
Before unpacking the components from its original anti-static bags you must put on anti-static wrist strap, to discharge your self, otherwise you can damage the components by anti-static shock by touching the components. If you do not have an anti-static wrist strap, you can discharge your self by touching the metal case of the computer with one hand and touching the ground with the other, though this is not recommended.
Screws with a fine thread pitch are normally used for CD-ROM drives. The more coarsely-threaded screws are used for attaching hard drives.
1.6.1 Install Motherboard
- Unpack ATX case. Place the case on a desk with its open side facing you.
- Fix the back plate by placing it near the ATX back plate cut out and pushing the plate outwards, it will clip on (Figure A.7).
- The case comes with motherboard mounting screws. Place motherboard on top of the mounting screw holes. Put ATX devices on motherboard such as PS/2 and serial port facing towards ATX back plate cut out and push the motherboard. The devices will fit into their cut outs.
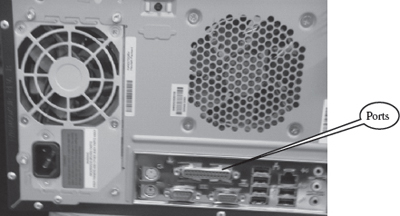
Figure A.7 Ports on backside of chassis
- Align screw holes on motherboard with screw holes on the case. Screw on using a screw driver. Now, the motherboard is mounted.
- Place ATX power connector (Figure A.8) to the motherboard. (ATX case comes with PSU and is already mounted to the case). Clip the ATX power connector on top of power socket on the motherboard. It will only fit one way; if it does not go in, try the other way round.
- The motherboard is then connected to the PC power supply. Inside the case a 12 or 24 pin female plug-in connector comes out of the power supply. This connector should be plugged into the matching socket connector on the motherboard, make sure that the 4 central wires are black (ground).
- Several other components must be connected to the mother board. The row of pins on the motherboard is used to wire the front panel on the case (pc speaker, power button, light indicators, etc.).
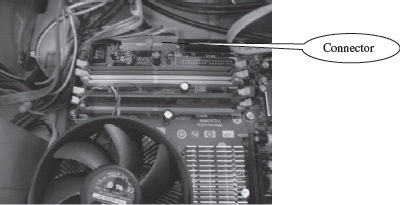
Figure A.8 Power connector on motherboard
1.6.2 Install Processor
- Locate the processor socket on the motherboard. For Intel Core 2 Duo, it is Socket 775.
- Raise the brown lever on socket and put the processor in place. The pin 1 of CPU should go into the pin 1 of socket. If you place it correctly, it will go in gently. Close the lever.
- A retail boxed CPU includes a heatsink + fan (Figure A.9). Both items usually come together in a single unit known as an "active heat sink". If you bought an OEM CPU make sure that the fan is correct for the speed of the CPU, otherwise CPU will overheat and may get damaged.
- Take off the plastic cover from the bottom of the CPU fan that covers the heat transfer pad. Now place the CPU fan on top of the CPU and push down the metal clips on the fan so that it clips onto the CPU socket. Observe the orientation of heat sink when installing—the step on the underside of heat sink should be level with the protruding edge of socket. Do not apply too much force as the central part of processor (silicon) is fragile and may get cracked.
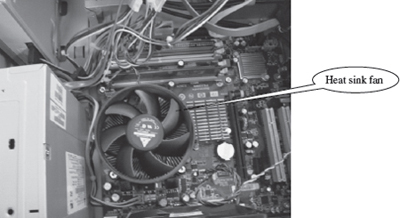
Figure A.9 CPU heat sink
- CPU fan has a power connector which needs to be connected to CPU fan power socket on the motherboard.
- Nowadays, motherboards have automatic detection for the CPU frequency. Please refer to your motherboard manual for more details.
1.6.3 Install Memory
- Look for DDR2 banks (with white clip on each side) (Figure A.10).
- To insert DDR2 RAM module, release the clips so it bends to each side, place the memory module straight down into the slot. The notches on the bottom of the memory modules will help you align the module with the bank. Press down firmly without forcing. The two clips at each end should close by themselves.
1.6.4 Install Hard Drive
- The SATA cable connector is on the left hand side which consists of few pins. Next to the SATA connector on the right side is SATA power connector which consists of many pins.
- Place your hard drive into the HDD mounting slot of the case. The SATA connector should face outwards. Screw the HDD to the case using screws provided with the drive or ATX case.
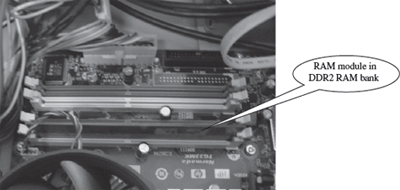
Figure A.10 DDR2 RAM slots
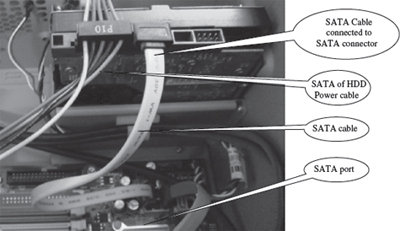
Figure A.11 SATA hard drive
- Connect one end of SATA data cable to SATA connector of the HDD. Fit the other end of SATA data cable to a SATA port on the motherboard (Figure A.11).
- Connect SATA power connector to the power socket of SATA hard drive.
1.6.5 Install Optical Drive
- On the SATA CD/DVD drive, you have the SATA cable connector and SATA power connector on the back side.
- Mount the CD/DVD drive into its mounting slot. Use the supplied screws to screw the drive into position.
- Connect one end of SATA data cable to SATA connector of the optical drive (Figure A.12). Fit the other end of SATA data cable to a SATA port on the motherboard.
- Connect SATA power connector to the power socket of SATA optical drive.
- Finally connect the power cable to power connector.
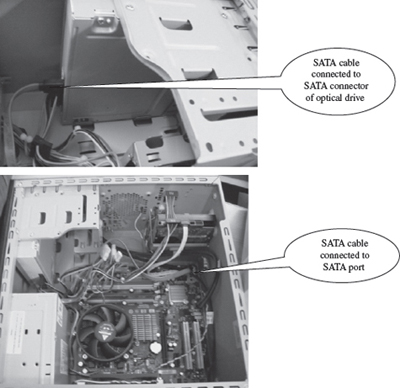
Figure A.12 Connecting optical drive
1.7 EXPANSION SLOTS
- Generally, the motherboard comes with the in-built sound card, modem, graphics card, LAN card etc.
- In case you wish to add your own card, expansion slots (Figure A.13) are provided in the motherboard.
- PCI slots run at 32 bits. Most modern sound cards are designed with the PCI interface and connect to the PCI slot of the motherboard. Find a free PCI slot on your motherboard (assuming your modem is a PCI modem). Place your modem card on top of the slot and gently push it down into position.
- PCI Express slots run at 64 bits. This is a very fast bus, used for graphic cards, and spotted by its brown colour.
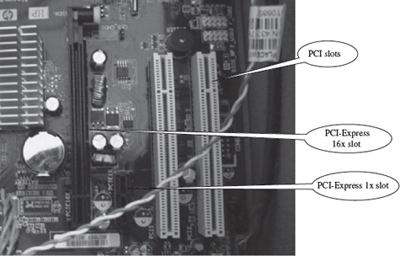
Figure A.13 Expansion slots
1.8 FINAL STAGE
After having installed all the necessary hardware, do the following things before switching on the PC for the first time.
- The ATX case (Figure A.14) has (1) a power switch which turns the PC on, (2) a reset switch for resetting the system, (3) a power LED which comes on when the PC is switched on, (4) a hard drive LED which flashes when data is being written or read from your hard drive, and (5) an internal speaker.
- Connect the switches and LED's to its corresponding connectors on the motherboard. To locate the connectors, refer to the motherboard manual. The connectors for the switches and LED's are normally grouped together.
- Every cable is normally labeled; they are normally named as follows, but could be slightly different on your system. (Power switch—PWR-SW; Reset switch—Reset; Power LED—PWR-LED; Hard drive LED—HDD LED; Speaker—SPK
- The connectors on the motherboard are also labeled. Refer to the motherboard manual which would provide details on which pins you should connect the cables to.
- After having connected all the cables to the correct pins on the motherboard close the cover of the ATX case but don't screw it. You might have possible problems that need rectifying. Connect all the cables to back ofATX case—main power cable that connects to the power supply, PS/2 mouse and keyboard that connects to the PS/2 ports. Monitor cable that connects to the graphics card port, etc.
- Switch on the monitor first. Now switch the PC on by pressing the power switch on the front of the ATX case. If you have performed all the tasks without any mistakes and providing that none of the main components are faulty, the PC should boot. When the PC boots you can see the name of BIOS manufacturer, displayed on the monitor. The CPU type, speed and the amount of memory is also displayed.
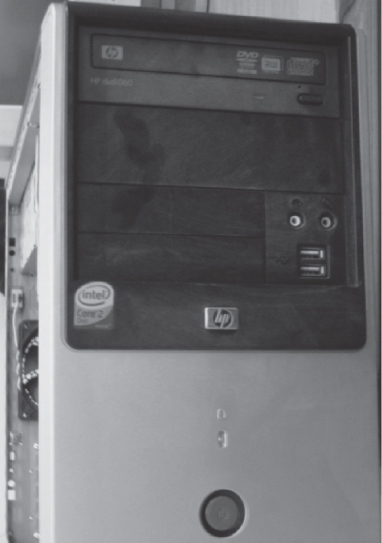
Figure A.14 Power and reset switch
- Currently, plug and play BIOS are used which are set to automatic device detection by default. You can see the devices being detected followed by a prompt about missing operating system. Now, an operating system must be installed before actually using the computer.
- If things did not go smoothly and the PC does not switch on then do the troubleshooting.