
Chapter 1. Photo Fakery Fun with People
So, your little brother found that blackmail photo you had of him as an infant before you had a chance to scan it? No problem! Grab a shot of him with your digital camera and blend his head together with a snapshot of the baby girl next door. That’ll teach him to mess with your old photos and your new digital camera.
Project 1: Lilliputians, or This Is My “Little” Brother
Project 2: Ex, As in Gone
Project 3: Frankensteins, or I’ve Created a Monster

Project 4: (Almost) Instant Moustache and Hair Transplants
Project 1. Lilliputians, or This Is My “Little” Brother
As the oldest brother in a family where my first three siblings were little brothers and the last two little sisters, I had my work cut out for me. My sisters were pretty good, but my little brothers could be a real pain. I dreamed up this particular project to teach them a lesson and to show them that I do still love them all.
Because all my siblings are now adults, at least legally and chronologically, I enlisted the help of the two brothers—young gentleman both, not to mention quite photogenic—who live next door to me. They graciously accepted the thankless (not to mention non-paying) job of modeling for this project.
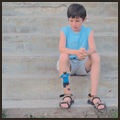
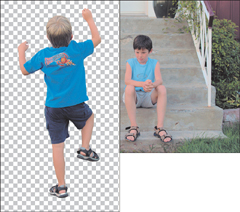
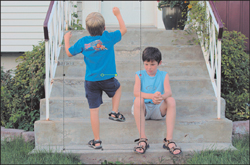
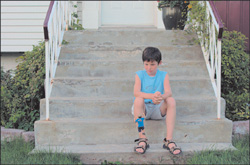
1. To get started, you can take a look at Figure 1.1 and plan your own shots according to what you see in that figure along with my explanations. Or, as with all the projects in this book, you can download the files (Younger Brother.tif and Older Brother.tif) from the companion website and work from them. Of course, after practicing with my photos, you should repeat the projects with your own photographs to gain more experience with Paint Shop Pro and digital darkroom techniques. There’s a whole world out there waiting to be digitized.
Figure 1.1. Two photos of the young men next door.
Removing the Background of the First Image
One of the first things that usually has to take place in a compositing project is that the background of at least one of the images involved must be removed. Another way to look at it is that you need to isolate something in the foreground (a person, an object, and so on) of one image so you can easily (easy being a relative term) composite it with another image.
2. You will need to remove the background from the photo of the younger brother. There are a number of ways you can do this, and how tough it will be really depends on the background and the foreground of the photograph. Because I shot the photo against the gray stairs on which you can see the older brother sitting in Figure 1.1, it was fairly easy to use the Magic Wand tool. To see how this can be done, along with other selection methods, turn to Appendix B,“Paint Shop Pro X in a Nutshell.” Even if you’re fairly comfortable with selection techniques, you might want to check out the appendix to see if you can add a couple of techniques to your arsenal.
3. Make sure the image of the younger brother is active by clicking its title bar. Choose Selections, Select All to select the entire contents of the image. The selection will only contain the young man because the background has been removed—a sort of background-ectomy, if you will. A little digital surgery, perhaps?
4. Activate the other image of the older brother by clicking its title bar.
Pasting and Scaling the Little Brother into Place
Now that you’ve isolated the young man, most of the work is done. However, we do need to paste him into the photo with his big brother and shrink him to Lilliputian size.
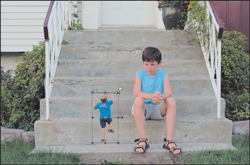
5. Select Edit, Paste As New Layer. Doing so pastes the younger brother over the older brother, but into his own layer so you can manipulate the image as needed (see Figure 1.2).
Figure 1.2. Paste the younger brother’s image into the photo of the older brother.
Note
The dark, lined box you see around the pasted image is a bounding box. It has handles at each corner and in the middle of each of the four sides. These handles can be used to resize the image. They can also be used to rotate, shear, and add perspective to the image. For now, we’ll just use them to resize the image.
6. If you don’t see the bounding box and handles, select the Pick tool.
With the Pick tool selected, grab one of the corners of the box and drag it inward to shrink the image. By using a corner handle, the width-to-height ratio remains unchanged (see Figure 1.3).
Figure 1.3. This is my favorite part: shrink the little brother.
7. Select the Zoom tool and click and drag around the smaller brother (smaller brother…good one…) to zoom in so you can position him correctly.
You might have to resize the image and perhaps even rotate it a little depending on the images with which you’re working. I moved the younger brother into place along the older brother’s shin as if the young man was trying to climb his older brother’s leg. With the image in place, I had to shrink it just a little more. I wanted the effect of the young man really climbing his brother.
Remember to zoom back out a little to see how things are lining up. This lets you get an idea of the big picture (see Figure 1.4).
Figure 1.4. Zoom out to get a better idea of whether every thing is lining up.
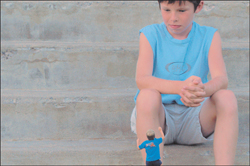
I’m pretty happy with the results so far. The images are lined up well and the sizes are good. Only one thing left to do with this particular image: We need a shadow.
Adding a Shadow
You can add a shadow in several ways. I’ll cover a number of them throughout the various projects in the book. For now, though, we’ll take the simpler route of using Paint Shop Pro’s built-in Drop Shadow filter.
8. Select the Zoom tool and zoom back in on the younger brother. Leave some room around him and his brother’s leg so you’ll be better able to judge the effect.
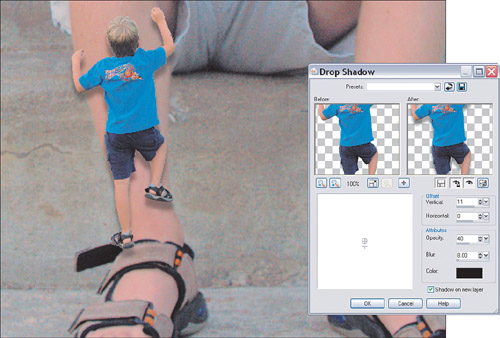
9. Select Effects, 3D Effects, Drop Shadow to bring up the Drop Shadow dialog box (see Figure 1.5). You can control the direction of the shadow, its color, its opacity, and how soft or hard it is. I set the Offset to 11 for the vertical and 0 for the Horizontal in an attempt to match the existing shadows. I also set the Opacity to 40, the Blur to 4, and the Color to black. I made these judgments based on what I saw by previewing the image as I worked.
Figure 1.5. Adding a drop shadow effect helps add realism.
Making Any Final Adjustments
I can see from zooming in to add the shadow that the younger brother needs a little nudge down and to the left. If you have a similar problem, do the following:
10. Select the Pick tool and move the image into place. Zoom in and out a couple of times to see whether the illusion works. My final image is shown in Figure 1.6.
Figure 1.6. Ahhh, little brothers.
Project 2. Ex, As in Gone, or Now You See ‘Em, Now You Don’t
These days it seems as if people are having a harder time staying together. It’s as if one couple or the next is getting a divorce or splitting up. At least that’s the idea you get if you watch too much television, the way I do. A couple who have been together for quite some time graciously agreed to pose for this project.
This project demonstrates how you can make someone disappear completely from a photograph as though they were never there at all. In fact, if you blink during the process, you’ll miss it and believe that there was real magic involved. Here goes:
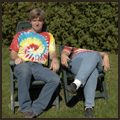
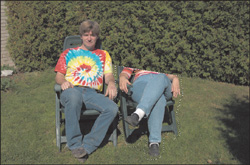
1. Open a photo that contains a person or object you want removed. You can see the photo I’ll be working with in Figure 1.7. If you don’t have a similar photo to work with, you can download the one (Mike and Jo.tif) I’m working with from the companion website.
Figure 1.7. Here are our volunteers.
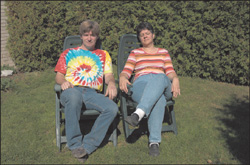
What I’ll attempt to do here is remove the woman from the photograph, leaving the man alone. Of course, the idea is to make it look as if the woman was never there at all. Otherwise, we could just print the image and tear it down the middle.
2. Select the Freehand Selection tool and set the Selection Type to Point to Point. You can use the Freehand Selection tool to make polygonal selections with the Point to Point setting. In a photo like this one, you need to make a selection along the hedges and also around the top part of the woman (see Figure 1.8).
Figure 1.8. Start with the Point to Point Freehand Selection.
Painting Within the Lines
With the selection created, it’s time to “paint” out that part of the woman and the chair. Be sure to watch for shadows and parts of things like shirtsleeves, chair rails, and handles.
Note
I’ve been using a mouse for a long time, and I don’t usually use hotkeys. In fact, if there’s a way to grab or set something from a palette, I usually take that route because I find it quicker than, say, using a menu. That said, there’s always a number of ways to accomplish any task in Paint Shop Pro. For example, you can also add a new layer via the Layers menu. Eventually, you’ll develop habits that work for you and that allow you to work quickly and effortlessly.
I created the selection because it will now be possible to paint out everything in that selection without touching any other areas of the image. I told you it was magic!
3. Create a new raster layer by clicking the small icon in the upper-left corner of the Layers palette.
4. Select the Clone Brush. If you’re unfamiliar with how the Clone Brush works, turn to Appendix B for some extra help.
Set the Brush Size fairly large to make quick work of it. Make sure you turn on Aligned Mode and Use All Layers.
5. Right-click somewhere in the hedges to the right of the woman to set the Clone Brush’s starting point. Then click and drag over the selected area to paint the hedges over the woman (see Figure 1.9). Be sure you cover all of the woman and chair that is in the selected area.
Figure 1.9. Cloning out part of the woman.
6. Choose Selections, Select None. Set the Selection Type to Freehand and draw around the lower part of the woman. You might need to try a couple of times. You can also remove and add to the selected area by holding down the Ctrl and Shift keys, respectively, or setting the Mode.
Again, make sure you get all of the areas you want to remove, but none of those you don’t want to remove (see Figure 1.10).
Figure 1.10. Another selection.
7. Use the Clone Brush to paint out the lower part of the woman, using some of the lawn.
8. When you’re done painting with the Clone Brush, choose Selections, Select None to turn off the selection.
9. Use the Clone Brush to touch up any areas that need it. I found the line between the hedges and the lawn to be too prefect from the point-to-point selection, so I cloned along the hedges using Freehand to make it appear a little more natural.
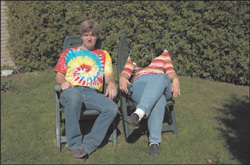
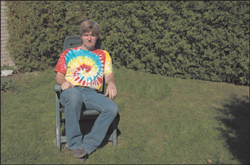
The resulting image is shown in Figure 1.11.
Figure 1.11. Have you seen this man’s wife? She seems to have disappeared.
Crop to Center the Subject
Now that the woman has been removed from the picture (is that a pun?), it looks a little off-center. A final step should take care of that.
10. Select the Crop tool and use it to crop the image so it has a better composition. To do so, simply click and drag in the image to define the area you want to crop to. Before committing the change, which is always undoable, you can resize the area and move it around until you’re happy with the crop. You can see the crop I’m going to use in Figure 1.12.

Note
This technique can be used for many things, from wrinkles to ex-spouses. We’ll make good use of selections and cloning throughout this book. As my mom always says, “Practice makes perfect.”
Project 3. Frankensteins, or I’ve Created a Monster
Frankenstein is one of my favorite monsters. The guy was definitely misunderstood, though. That seems to be the case with the so-called Frankensteins you see on the Web all the time—those photos where some industrious digital artist has pasted the head of one person onto the body of another.
Some of these are quite good, but others are simply awful. Let’s enlist the so-called Frankenstein technique for good instead of evil. A while back a client approached me with two photos. One of the photos was from an office Christmas party and the other from another office get-together. The trouble was that she liked everything about the Christmas snapshot except for the fact that she had her eyes closed in the photo. She proposed I use her image from the photo of the other get-together and see whether I could fix something up for her. I was able to with a little pixel pushing and pulling, and the client was very happy. This next project shows you how that kind of work can be accomplished. Let’s dig in.
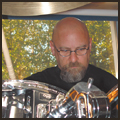
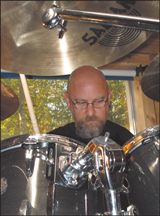
1. Open the two files you will be combining. You can see the photos I will be using in Figure 1.13. If you want to work along with me using these exact images, you can download them (Drummer01.tif and Drummer02.tif) from the companion website.
Figure 1.13. Igor, prepare the switch.
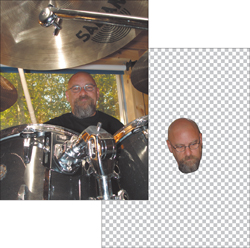
If you take a close look at Figure 1.13 you’ll notice that in the action shot (the one where the drummer still has his body) the face isn’t quite in focus. The other face, though, is in focus. Dr. Frankenstein would be pleased.
You can see form Figure 1.13 that I’ve already started the process of removing the background from one of the photos. Which one, you ask?
Here’s the trouble: The two photos involved are from a series of shots taken during a brief couple of moments. Of course, the photographer relied on her camera to do the right thing by setting it to fully automatic.The trouble is that in some situations, the camera’s auto-focus guesses wrong and doesn’t focus on the right area. In the photo in which the drummer is visible, his face is not in focus and, as a result, it is a little soft. Earlier in the series, though, there is a shot in which his face is in much better focus. You can see that shot with the background removed in Figure 1.13. If you need help with removing the background of the photos you’re working with, take a look at Appendix B.
Two Heads Are Better than One
After you’ve removed the background from the photo, or the head from the background, if you will, it’s time to get the two heads together.
2. With the image that contains the head active, choose Selections, Select All. Select Edit, Copy to copy the head to the Clipboard (I know that sounds a little weird!).
3. Make the full image active by clicking its title bar. Then select Edit, Paste As New Layer.
As you can see in Figure 1.14, the extra head won’t be pasted in the correct place or even at the right size, necessarily. This project’s images were taken at almost the same time, with the same camera and the same settings
Figure 1.14. Igor, is that the right head? They look like twins.
Preparing the New Head
Okay, that sounds a little weird, too. Next, we need to clean up the area around the pasted-in head. Essentially, the head must appear to belong in its new location.
Select View, Palettes, Overview to add the Overview palette to your arsenal of digital tools (see the following figure). With this palette open, you can easily zoom in and out and navigate within your image while zoomed-in. Having this type of tool at your fingertips can help to speed your workflow, especially when doing this type of work where you need to clean up an image without removing too much.
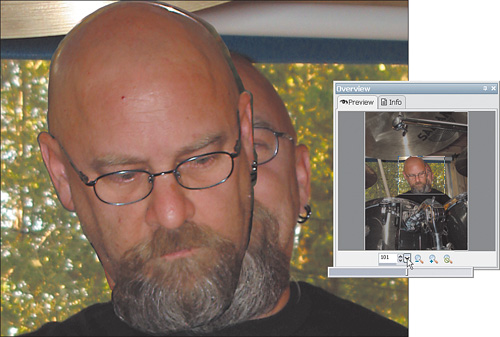
Use the Overview palette to help you zoom in on the troublesome areas.
Note
Use the Zoom tool or the Overview palette, as outlined in the sidebar, to zoom in so you can place the head in position and do any necessary cleanup of stray pixels.
4. Use the Pick tool to put the head into position. Use the Eraser tool to remove any stray bits around the head that might have been left over when the background was removed.
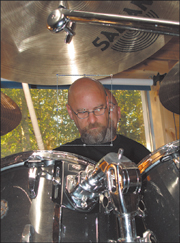
Zoom back out, using the Zoom tool or Overview palette, to take a look at your work so far. You can see my effort in Figure 1.15.
Figure 1.15. Step back and take a look at the overall picture.

I know there are a few things that need to be fixed. For example, I don’t like the tilt of the head. That can be fixed easily with the Pick tool. As well, I’ll need to check around the neck on the left side of the head.
Example of a bad Frankenstein.
If you’re working with your own photos on this project, there are a couple of things you should watch for. Watch for things like collars and clothing matching up, the relative sizes of objects, the placement of objects, the lighting (angle and color), and overlapping.
Here you can see that the overlapping is a problem. Obviously, the cymbal needs to be in front of the head. If I needed the head to remain this big (please, no comments from the peanut gallery), it would be best to clone part of the cymbal over the head, perhaps on a new layer to help keep the illusion intact.
As I mentioned earlier, there’s a problem with the neck area on the left side of the photo. By lowering the opacity of the layer with the new head, I can get a better look at how the two layers are interacting.
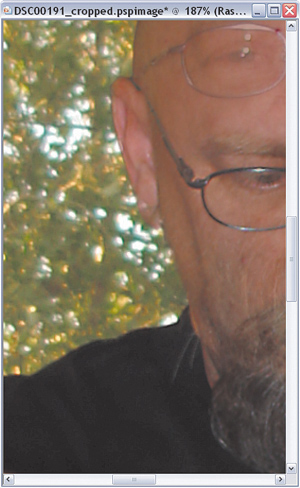
Lower the opacity to see how the two layers interact.
Based on what I see in the second image, I’ve decided to erase the neck area on the head layer. This will make the neck area look more natural.
5. To make one last check, and so that you can clone/erase any boo-boos you might find, zoom way in and use the Pan tool to move around the image. Make your way around the perimeter of the head to make sure everything looks good. If you’re unsure about something, zoom back out to see the big picture. Ultimately, the photo should look as though it was not tampered with. You can see my final image in Figure 1.16.

Note
Now, remember to do only good with this technique. No pasting the head of your little brother onto the body of the cat. Well, okay, okay, but only this once.
Project 4. (Almost) Instant Moustache and Hair Transplants
A project later in the book deals with digital graffiti, but this project was partly inspired by some old-fashioned moustache-type graffiti. On the way home recently I came across a political poster where someone had used a permanent black marker and had taken the liberty of making some poor politician look like a clown.
After getting over the initial shock of this dastardly work of art, I imagined that something like this would make a good digital darkroom project. Instead of using a black marker, digital or otherwise, the Clone Brush could be used and instead of drawing crude line art, a real hair transplant could be performed. If you think that sounds like fun, fire up your digital darkroom tools (your PC and Paint Shop Pro X), plug in your camera, and grab some images so we can get started.
For this project, you’ll need two portraits. At least one of the two should feature someone who has facial hair. Of course, you could do something similar to this project but transplant hair from one portrait to another. It depends on what you want from the results and what source material you have available. In any event, the steps will be similar to those outlined here.
If you don’t have a couple of portraits to work with, feel free to use the same ones I’m using. They are available for download (Tough Guy.tif and Portrait on the Island.tif) from the companion website.
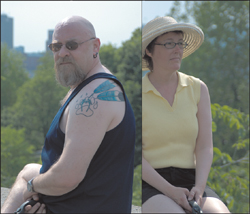
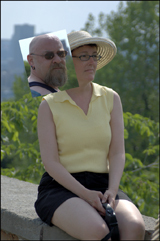
1. Open the two photographs you’ll be using for this project. You can see the two photos I’ll be using in Figure 1.17.
Figure 1.17. The two gracious models.
Copying, Pasting, Resizing, and Placing
Notice how the two portraits are about the same size. Although this isn’t critical, it does help if the two faces are nearly the same size.
2. Make the photo you want to take the hair from active by clicking its title bar. Choose the Selection tool and set the Selection type to Rectangle. Click and drag a marquee around the head; then select Edit, Copy to copy the head to the Clipboard.
3. Make the other image active by clicking its title bar. Select Edit, Paste As New Layer to paste the head into the second photograph.
4. Select the Pick tool and use it to resize the head so it matches the head in the second photograph. Be sure to drag from the corner handles to maintain the aspect ratio.
If necessary, use the Pick tool to rotate the image a little so the two heads match as closely as possible. You can see my effort in Figure 1.18.
Figure 1.18. Move, resize, and place the head.
Note
Those of you with a sharp eye and a keen mind might have noticed that the gentleman’s head looks a little different between Figures 1.17 and 1.18. I flipped (mirrored actually) the head because of the difference in lighting angles and to help the angles of the heads match more closely. The head was flipped using Image, Mirror. Mirror flips an image on its horizontal axis; the Flip command, also from the Image menu, flips the image vertically.
Creating a Custom Clone Brush
Because copying hair isn’t like copying other objects—what with hair being messy and feathery and so on—a good plan of attack is to use something other than the plain default round shape for the brush to be used in the cloning process. A number of custom brushes are available (see Figure 1.19).
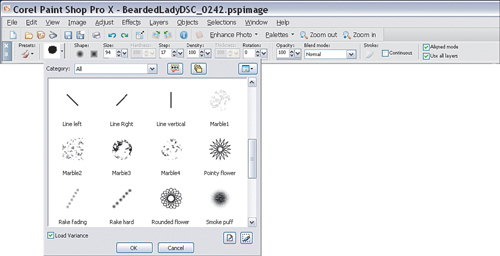
To see the available brushes, simply select a brush tool, such as the Clone Brush. Any one of these may do a better job than the round brush, but if none of these brushes strikes your fancy, you can choose to create your own. Here’s how:
5. Create a new image by selecting File, New. Make the image about 200 × 200 pixels and use the same resolution that your photos are using. Many cameras and scanners use 200–300 dpi, but you should check your equipment’s dpi. Also make sure that the Color is set to Transparent.
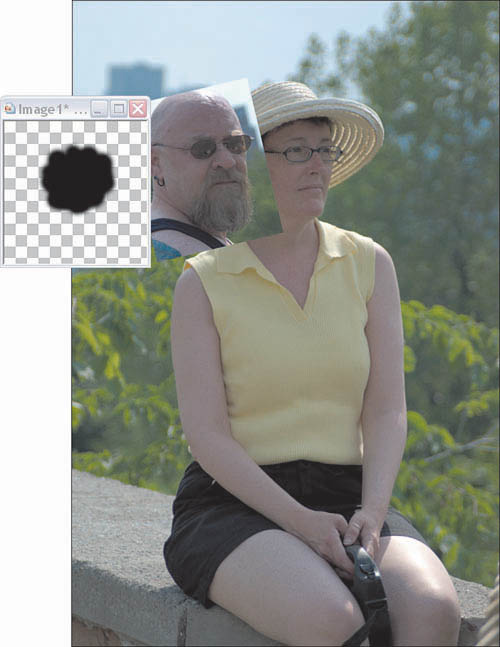
6. Set a fairly small brush size of about 20 pixels or so. Set the foreground color to black, and click and drag with your mouse to draw a blobby shape (see Figure 1.20). This shape will become your brush, so try to get a shape with some texture to the edges. Soft, rounder edges on the brush work best for this project rather than harder, jagged ones.
Figure 1.20. Meet Blobby the Brush.
7. With your brush drawn, choose Selections, Select All.
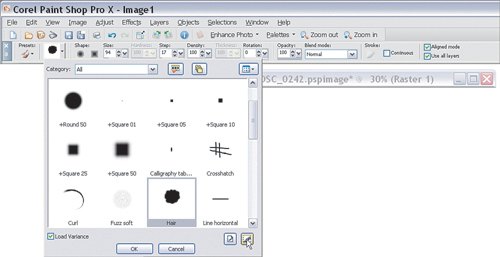
8. Select the Clone Brush to activate its option bar (below the menu and menu icons). Activate the custom brush pull-down menu, and click the Create Brush Tip from Selection icon in the lower-right corner of the dialog box. This brings up the Create Brush Tip dialog box (see Figure 1.21).
Figure 1.21. Create a new brush from a selection.
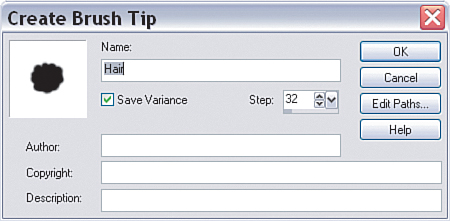
9. In the Create Brush Tip dialog box, name the new brush tip (see Figure 1.22). Leave the check mark in the Save Variance box and leave the default Step setting of 32. This setting will be changed as you work. Click OK to create your new brush tip.
Figure 1.22. The Create Brush Tip dialog box.
10. Now that the brush tip has been created, feel free to close the image you used to create it. You won’t need it any longer.
Transplant Time
Now that you have the two photos in place and your newly created brush tip to help with the cloning, it’s time to do the hair transplant. The transplant will be done using the Clone tool to copy the hair from one layer of the image to another. We could simply copy the hair right over the face in the second portrait, but a better idea is to use an extra layer to clone the hair onto. This approach makes cleanup and modifications much easier.
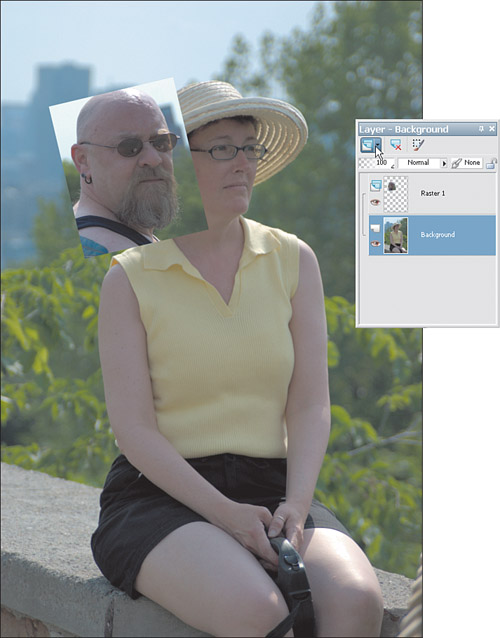
11. Figure 1.23 shows the two layers that are already in the image. The bottommost layer is the one with the whole image present. As usual, because this image was loaded directly from a digital camera file, the layer is called Background. And, because the second layer was the first bitmap or raster layer created (from the Paste As New Layer done in step 3), it’s called Raster 1. Activate the bottom layer by clicking its entry in the Layers palette.
Figure 1.23. Create a new layer to hold the cloned hair.
Tip
You can rename the layers if you like, and certainly this is recommended for larger projects. For now, I’ll leave the default names. If you’d like to change the names of the layers in your project, though, simply click each layer in turn in the Layers palette. This presents you with the opportunity to change the names.
12. Click the New Raster Layer icon, shown in Figure 1.23, to create a new layer between the two existing layers. If you’d like, you can name this layer hair or cloned hair, or something similar.
13. Select the Clone Brush and set the brush tip to your newly created brush tip.
14. Set the brush size to about 40 or 50, and set the step to about 10 or 15. You might want to play with and experiment with the settings to see how they affect the cloning process.
15. Right-click somewhere in the hair. Pick somewhere you can identify in the two photos, such as the area just below the nose. Right-clicking sets the source for the brush.
16. Check that the new layer is active (it will be blue in the Layers palette, while inactive layers are gray) and that the Use All Layers option is selected for the Clone Brush.
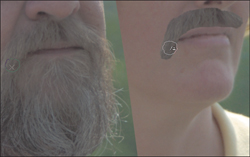
17. Click and drag where you want to paint the hair in. You should start at the same place as where you clicked for the source, but this time you’ll be defining the start of the destination area, so click under the other nose (see Figure 1.24).
Figure 1.24. Using the Clone Brush tool to perform a hair transplant.
Tip
The clone brush has two parts—one that shows the source (the left cursor in Figure 1.24) and another that shows the destination (the right cursor in Figure 1.24). You should learn to keep an eye on both brushes to get a better idea of what you’re cloning and to where.
18. Continue cloning the hair from one layer to the other. If you get too much hair, simply use the Eraser tool to remove it. That’s one reason a new layer was created—to hold the hair transplant.
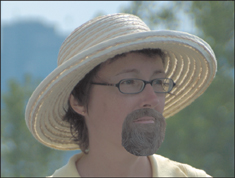
19. From time to time, you might want to resample by right-clicking again in the hair to create a new source area. If you find that you can’t really get it right, delete the layer and try again. The Clone Brush is one of those tools that requires a little patience and practice time. You can see the results of my effort in Figure 1.25.
Figure 1.25. The final hair transplant image.
Wrapping Up
I hope the projects in this chapter inspire you to read on and to play with your digital darkroom even more. Past that, I hope they inspire you to get out and shoot some photos with which you can have fun.
As you shoot more material to play with in your digital darkroom, think of some of the possible uses for the photos outside of their immediate and obvious subjects. For example, you might be tempted to use long cat hair instead of human hair for a hair transplant. I’ve seen some gorgeous mustaches on some of the cats in the neighborhood. Hmmm, I think I’ll get my camera and go for a walk.
Before I do, though, I’d like to interest you in our daily “next chapter” special. You’ll laugh, you’ll cry…no, wait, that will be the sobs of your victims after they see the work you’ve done on their digital portraits. You might still be laughing, however. Now go take some photos and I’ll meet you at the next chapter when you’re done.