
Chapter 7. Whoa! How’d That Get There?
One of the most fun aspects of digital photography is mixing up your images to create outlandish scenarios. And nothing lends itself more to these situations than travel photos. Your travels take on a new perspective when you integrate images from different locales.
Would the wooly mammoth have gotten stuck at the La Brea Tar Pit if there’d been a lifeguard on duty? What if the Victorian houses of San Francisco were in the Grand Canyon? How would your face look on Mt. Rushmore? The keys to making these ideas fly are getting the proper perspective, matching the lighting,and blending them.

Project 1: Watch That First Step
Project 2: No Swimming After a Meal
Project 3: Amongst the Greatest
Project 1. Watch That First Step
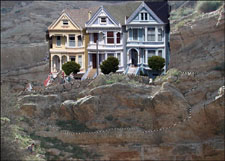
The Grand Canyon is awe-inspiring, majestic, and relatively untouched by the growth of development in the Southwest. Until now, that is. What would the Grand Canyon look like if it were lined with houses? That first step out the door could be quite steep!
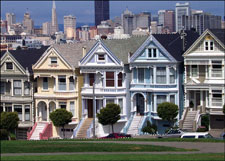
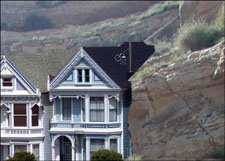
I don’t want just any houses in my canyon. I’m partial to the Stick-Style Victorian homes that line the Pacific Heights district in San Francisco. Because they’re situated on an incline, they should blend in well with the hiking trails of the Grand Canyon (see Figure 7.1).
Figure 7.1. Our travel shots: the Grand Canyon and San Francisco.

Download the Grand Canyon image from the book’s website and the Pacific Heights houses from www.shutterstock.com, image 41033.
All the projects in this chapter involve having good selection skills. If you haven’t had much practice at making selections, see Appendix B,“Paint Shop Pro X in a Nutshell,” for tips.
Let’s start by considering where we’re going to position the houses on the canyon wall. I want to take advantage of the people walking along the trail. If we place them in front of the houses, it will add an element of realism to our completely unreal final image.
1. Select the rock outcropping and people on the trail (see Figure 7.2).
Figure 7.2. Grabbing rocks and people to use later.

2. Copy the selection into a new layer. Click Selections, Promote Selection to Layer. Alternatively, click Edit, Copy and then Edit, Paste into New Layer. You can even click Edit, Copy; create a new raster layer; and then click Edit, Paste. Just like the choice of tools in making a selection, you have a choice in how you copy and paste it.
Don’t worry about that new layer just yet. It’s going to come in handy soon.
House Relocation Service
The Grand Canyon is ready for development. We need to move northwest to San Francisco to prepare the houses for relocation.
3. Click the image of the houses to make it active; then use your favorite selection technique to select the three houses in the middle (see Figure 7.3).
Figure 7.3. Preparing the three middle houses for moving day.
4. Select Edit, Copy to copy the house selection.
5. Activate the image of the canyon, and then select Edit, Paste As New Layer. This copies the three houses onto their own layer in the canyon image (see Figure 7.4).
Figure 7.4. Pasting the houses into the canyon.

6. Click the Pick tool to move the houses into position and scale them to suit the backdrop.
You now have all the key components in one image, but there’s still a lot of work to be done to pull it all together.
Where’d Everybody Go?
The houses are in position, but they look like they’re hanging over the rock instead of integrated into the backdrop. The neighborhood also looks awfully devoid of people. Remember the outcropping we prepared before we moved on to the houses? It’s time for it to make an appearance.
7. Click the outcropping layer in the Layers palette. Drag that layer above the house layer. The outcropping appears to magically cover the edge of the houseline (see Figure 7.5).
Figure 7.5. The outcropping hides all manner of mistakes.
8. If you still have a selection around the outcropping, as I do, click Selections, None.
The houses now look more at home in their new locale. Even better, the outcropping covers the top of the car that accidentally got selected along with the houses. The people who were on the hiking trail earlier now appear to be walking past the houses. What’s left now is some clean-up.
Sweeping Up the Debris
Take a good look around the image as it now appears. There are a few things that stand out. First of all, the roof of the house on the right has some power lines over it.
9. Use the Clone Brush to capture an area of pristine rooftop and brush it over the power lines (see Figure 7.6).
Figure 7.6. The Grand Canyon must have underground power lines.
10. I also don’t like the way the roofline meets the canyon wall. I want the houses to appear to be set back into the wall so they blend in better. There’s an easy way to select just the bit of canyon we need to cover this up.
Change the opacity of the house layer so you can still see the houses, but can also see the canyon layer underneath. To do this, be sure the house layer is active in the Layers palette; then change the Opacity setting at the top of the palette.
11. Activate the canyon layer by clicking it in the Layers palette. Then click the Freehand Selection tool and draw a selection around the area of the canyon wall that should cover the roofline (see Figure 7.7).
Figure 7.7. Making the houses transparent to guide your selection.
12. Click Edit, Copy to copy the selection. After you’ve done this, activate the house layer and create a new raster layer in the Layers palette. By activating the house layer first, the new layer is created on top of it. Activate the new raster layer, and then click Edit, Paste to paste the selection into the new layer.
13. Return to the house layer and change the opacity back to 100%.
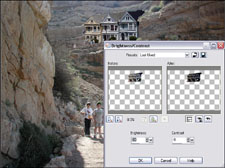
I’m pretty happy with how the houses blend into the canyon now, but the lighting is a bit off.
14. Click Adjust, Brightness and Contrast, Brightness/Contrast. Lower the brightness and contrast a bit to blend into the surrounding environment (see Figure 7.8).
Figure 7.8. Adjusting the lighting on the houses.
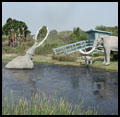
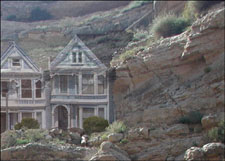
In Figure 7.9, you can see the final image. I just hope those two kids in the foreground don’t have to climb that hill every day to get to school!
Figure 7.9. Victorian Row at the Grand Canyon.

Project 2. No Swimming After a Meal
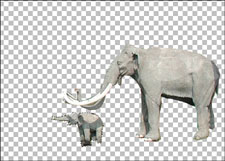
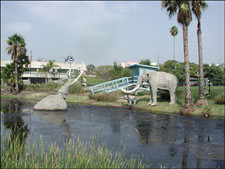
One of the many sights of Los Angeles is the La Brea Tar Pit, where thousands of prehistoric fossils have been discovered. Not trusting our imagination, the fine caretakers of the tar pit have erected models of a mammoth family, two of whom are watching from the shore as the third gets sucked into the tar. The image would be far more realistic without the museum and other buildings in the background, but it’s still rather striking.
Earlier in the day I visited the La Brea Tar Pit; I’d also gone to the beach and snapped an image of a lifeguard tower. Upon capturing those images, one right after the other on my digital camera, I pondered whether the mammoth would have drowned if a lifeguard had been on duty. Okay, it had been a long day, and I was a bit punchy. But it would still make for an interesting image.
If you want to follow along with this project, you can download the images of the La Brea Tar Pit and the lifeguard tower from the book’s website, named labrea.tif and guardtow.tif. As you can see in Figure 7.10, there’s room for a lifeguard tower between the drowning mammoth and the two onlookers. Figure 7.11 shows that I photographed the lifeguard tower from just the right angle to put it where I want in the tar pit image.
Figure 7.10. The La Brea Tar Pit in Los Angeles.
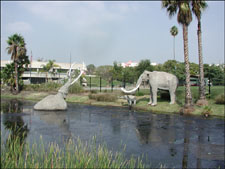
Figure 7.11. A lifeguard tower on Venice Beach.
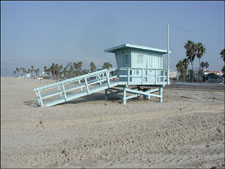
1. Click the title bar of the lifeguard tower image to make it active; then use one of the selection tools to capture the lifeguard tower. Because the tower primarily consists of straight lines, the Edge Seeker mode of the Freehand Selection tool works particularly well here.
2. Copy the selection to a new layer by clicking Selections, Promote Selection to Layer. Hide the visibility of the beach layer by clicking the eyeball icon for that layer on the Layers palette.
3. Use the Freehand Selection tool to select any areas of sand showing through and around the legs of the tower. Then press the Delete button on your keyboard (see Figure 7.12). You can also use the Eraser tool to clean up the selection.
Figure 7.12. Cleaning up the sand at the base of the tower.

4. Use the Magic Wand tool to select the transparent background around the lifeguard tower. Use the Add mode so you can click between the legs of the base.
5. Click Selections, Invert to select the lifeguard tower instead of the transparent background.
6. Select Edit, Copy. Activate the image of the tar pit, and then select Edit, Paste As New Layer to place the lifeguard tower into the image (see Figure 7.13).
Figure 7.13. A levitating lifeguard tower.
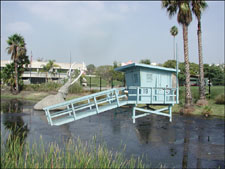
We now have a lifeguard tower levitating over the La Brea Tar Pit. The next step is getting it into position.
Sometimes you can get away with copying or moving an entire layer, whereas other times you need to specifically select the object, even if it’s against a transparent background. How do you know which method to choose? The answer is in what you intend to do with the new layer. If you know the pasted layer will be positioned exactly as you like in the new image, you can get away with copying or moving the whole thing—transparent background and all. But if you’re going to be moving the object around, such as we’re doing with the lifeguard tower, you’re best off selecting only what you need. This will save you a step down the road when you need to apply the Pick tool to the object to move and scale it.
Tip
After you’ve moved the lifeguard tower onto the tar pit image, you can close the lifeguard file. This will speed up response as you complete this project.
Scaling to Size
Mammoths were large creatures. If there were a lifeguard in the tower as it’s currently sized, he would be comparable to the size of the mammoths, and that wouldn’t look right at all.
7. Click the Pick tool and set it to the Scale mode. Click the tower and move it to the edge of the tar pit, set back just a bit on the shore.
8. Click a corner of the Pick tool boundary box and drag it inward to scale down the size of the tower somewhat (see Figure 7.14).
Figure 7.14. Putting the tower in position.

Mammoth Reproduction
The best position for the tower is on the flat area on the shore, behind the land-based mammoths. To make that position work, we’re going to need more mammoths.
9. Turn off the visibility of the lifeguard tower layer for now by clicking the eyeball icon for this layer in the Layers palette. This will give you a good view of the mammoths.
10. Use your favorite selection tools to select the mammoths; then paste them into a new layer (see Figure 7.15).
Figure 7.15. Putting a copy of the mammoths on their own layer.
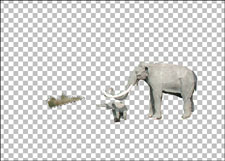
11. I also want to use a bit of the grasses on the shore to cover the front edge of the tower ramp, just to make it look more integrated into the environment. You can select an area of grass and paste it into the same layer as the mammoths, just to save time (see Figure 7.16).
Figure 7.16. Adding a bit of grass to the mammoth layer.
12. To position the grass properly, turn on the visibility of the lifeguard tower layer (see Figure 7.17). You can use the Pick tool to move the grass a bit, if necessary.
Figure 7.17. Using the lifeguard tower as a guide to artfully arrange a tuft of grass.

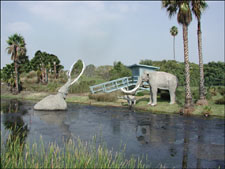
If you turn on the visibility of the background layer, you can now see the lifeguard tower scaled to an appropriate size on the shore of the tar pit. The mammoths appear to be in front of the tower, still waiting helplessly for someone to rescue their unfortunate companion (see Figure 7.18).
Figure 7.18. Everyone in position except, apparently, the lifeguard.

Unwanted Anachronisms
Having a lifeguard on duty at the shore of the tar pit makes perfect sense, especially after wandering around Los Angeles in the heat all day. But having all those buildings and other trappings of modern life surrounding our display pulls us right out of history and into the present. So, let’s get rid of them!
We’re fortunate because this image has a lot of foliage and sky with which to hide things. By the time we’re done, you’d never guess there’d been a museum, information kiosk, fencing, or other modern conveniences in the photo.
13. Click the Clone Brush. Set the brush fairly large to start so you can get the big areas out of the way. Right-click an area of blue sky, and then click and paint the sky over the tops of the buildings (see Figure 7.19).
Figure 7.19. Using the sky as camouflage.
14. Use the Clone Brush over the grass and trees to cover the rest of the buildings, the path and people, and the fencing around the tar pit. Resize the brush as needed to get into the tighter areas, such as between the drowning mammoth’s tusks. Resample the Clone Brush frequently to blend in the trees and grass for a more natural, less repetitive look.
15. Finally, use the Clone Brush in the tar pit itself to hide the soda can and other debris, as well as the shadows from the now nonexistent buildings.
Figure 7.20 shows the final result. With just the Clone Brush, we were able to hide all traces of modern civilization—other than our lifeguard tower—and completely change the landscape.
Figure 7.20. Won’t anyone save this poor beast?
Project 3. Amongst the Greatest
Have you ever had presidential aspirations? What about just wanting your face to become a national landmark? You can picture your face sitting amongst the greatest presidents in history by putting yourself on Mount Rushmore.
For this project, I’m using a stock image of Mount Rushmore (see Figure 7.21) and the same face we’ve used and abused in previous projects. The angle of his head is perfect to replace George Washington (see Figure 7.22). You can, of course, use your own face to replace George or any of the other presidents. You can even use the following steps to add a fifth head to the right of Abraham Lincoln. If you don’t have your own images for this project, just download the ones I’m using here from the website and from www.shutterstock.com (image 20535).
Figure 7.21. One of the most popular landmarks in the United States.
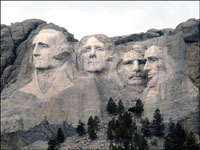
Figure 7.22. Could this man be one of the great persidents of all time?

1. By now, you’re probably quite familiar with the process of making a selection and pasting it into a new layer on the target image. If this is your first project in this book, you can turn to Appendix B for details on how to accomplish this.
2. Click the Pick tool and set it for the Scale mode (see Figure 7.23). Move the head into position over George Washington’s head.
Figure 7.23. Pasting the head into the Mount Rushmore image.

3. Click one of the corners of the Pick boundary box and drag it inward to scale the head down to size. Use George’s head as a guide (see Figure 7.24).
Figure 7.24. Where’d Washington go?
Carving a Place in History
Our new president’s head is in position, but it’s a bit too lifelike. We want it to look carved into the mountain, just as Jefferson, Roosevelt, and Lincoln are. Fortunately, Paint Shop Pro X has effects filters that can convert the face of Rushmore’s newest resident into rock in just a few steps.
4. Select Effects, Texture Effects, Sandstone. The trick is to create a carved effect without losing the detail of the face. I used the following settings: Blur 7, Detail 1, Luminance 10, and Angle 343 (see Figure 7.25).
Figure 7.25. Creating a carved image.
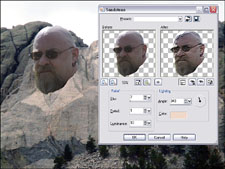
5. For the color, I moved the cursor over an area of the Mount Rushmore image. The cursor turns into an eye dropper, and clicking selects the color. After you click OK and return to the image, you can see how well your new president fits into his new surroundings.
Blending In
Our president is starting to take form, but the color is still a bit off. The granite of the mountain can be very challenging to duplicate without losing the detail of the face. Paint Shop Pro X has a tool that helps.
Note
The Change to Target Brush changes the color of an area without changing its luminance. You can also set the brush to Hue, Lightness, or Saturation mode to change those values without affecting the other attributes. The target color is based on the Foreground color in the Materials palette.
6. Click the down arrow to the right of the Lighten/Darken brush; then click the Change to Target Brush.
7. Click the Foreground color in the Materials palette; then use the Eyedropper tool to select a sample of the granite from Jefferson’s face.
8. Change the size of the Change to Target Brush to cover the entire head of our new president and the surrounding mountain (see Figure 7.26).
Figure 7.26. Blending in the head.

Finishing Touches
After applying the sandstone effect and matching the color, it has become more apparent that the size and angle of the head aren’t quite right. Because the head is still on its own layer, we can use the Pick tool to scale it down and rotate it into perfect position.
9. Click the Pick tool and select Scale mode. Drag one of the boundary corners to scale down the size of the head.
10. Move the cursor into the middle of the Pick boundary box to rotate it clockwise so the head appears to be gazing straight out (see Figure 7.27).
Figure 7.27. Presidents look outward, not downward.

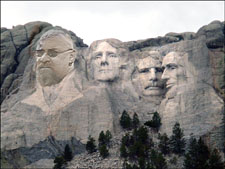
11. There’s only one remaining problem: If you look at the top of our president’s bald head, he has a glare that’s not in keeping with the light on the rest of the presidents (see Figure 7.28).
Figure 7.28. The President has a shiny, bald head.
Use the Freehand Selection tool to create a selection around the bright area on the head.
12. Select Adjust, Brightness and Contrast, Brightness/Contrast to adjust the glare. I adjusted both settings to –26 for this image.
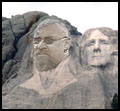
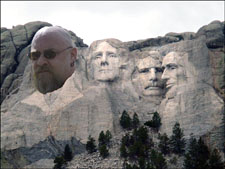
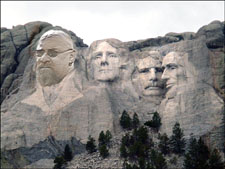
Our president is now ready to be visited by his adoring public. As you can see in Figure 7.29, cutting down the glare has not only corrected the lighting, but has also helped the head blend even more completely into the mountain.
Figure 7.29. The new and improved Mount Rushmore.
For even more fun with Mount Rushmore, try replacing the faces with those of your family pets.
Tip
This is another project where attention to detail can really up the realism. The Dodge Brush can lighten the highlights on the new president’s cheeks and forehead. The Burn Brush can enhance the creases along the jawline, inside the ear, and around the nose to increase the chiseled appearance. The final result is subtle, but that’s the idea (see the accompanying figure). If you go overboard, you’ll find yourself toggling between the Burn Brush and Dodge Brush well beyond the point
Dodging and burning enhance the carved effect.
Wrapping Up
Take full advantage of your digital darkroom by integrating your own images in new and different ways. For example, you could move the canals of Venice onto the city streets of New York. The techniques in this chapter can also be used on nontravel images. Using the Effects options in Paint Shop Pro X, you can send yourself back in time, pasting your image into heritage photos of your family. Experiment.