
Chapter 5. Printable Fun for Kids of All Ages
One of the best things about the state of digital photography is how easy it is not only to edit and modify your photos, but also to print and share them. With some templates and a couple of your favorite photographs, you can create posters, trading cards, comic book covers, and more. This would be a good time to get the kids involved, too. Not only in the post-processing, but also in the creation of the photos themselves. Of course, for a rainy day project, you might want to go through some existing images with these projects in mind.

Project 1: Wanted Posters
Project 2: Trading Cards
Project 3: Superhero Comics
Project 4: Crazy Calendars
Project 1. Wanted Posters
For this project, we’ll need a suitable victim...er, I mean suitable model. Let’s see, who can we coerce, oops, I mean convince to let us play with their image? The young man in the fifth row, yes you. Could you please pass a photo of yourself up here? Thank you.
I want this image to have a certain air about it—kind of an outlaw-ish feeling. The whole idea here is to portray a fantasy type of image, but with real photographs. To that end, for whichever photo is chosen, the background will most certainly be replaced with something like the image from the digital graffiti project in Chapter 9,“Montages,” or something along those lines. After all, it wouldn’t do for our “bad guy” to have his photo showing him sitting at the local mall sipping on a latte. Unless, maybe he was sitting on a big ol’ motorcycle at the time...in the mall. Well, you get the idea. We need it to reflect the fact that this person is “wanted.” Ah, it’s so nice to be wanted.
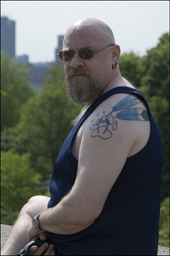
1. To get started with this project, open the photo you want to use. If you can’t find anything suitable, you could go out and shoot something with this project in mind. You’d be surprised at how helpful your neighbors can be. Make sure you don’t tell them that you’ll be posting copies of this around the neighborhood when you’re done. That’ll teach them to let their dog bark all night long. If you can’t convince your neighbor and you haven’t mastered the art of self-portraiture, you can download the image (Tough Guy.tif) I’ll be using from the companion website (see Figure 5.1).
Figure 5.1. Hey, this dude doesn’t look so tough.
Background-ectomy
As with many of the projects in this book, we’ll be removing the background, or the bad guy from the background, or something like that. In any event, we need to separate the gentleman in Figure 5.1 from his background. You can use one of many methods, of course. I’ll briefly outline what I did to this photo and you can follow along, or you can read the section on selections in Appendix B,“Paint Shop Pro 10 in a Nutshell.”
Even if you’re not a big fan of tattoos, you might still want to take a look at the digital tattoos project in Chapter 2,“Digital Plastic Surgery.” Give that project a try and then decide if the tattoos you see in Figure 5.1 are real.
2. Before you begin, you should make a copy of the Background layer to preserve it. To do so, right-click the Background layer and select Duplicate from the pull-down menu.
I started by using the Magic Wand tool to select parts of the background—not the background layer, but the background elements, such as the sky—in the photo and then pressing the Delete key. Doing so can, depending on the image, remove much of the material. While you click and delete, make sure you play with the options for the Magic Wand and lower the Tolerance. For example, in Figure 5.2 I’ve lowered the Tolerance to 6 to help get most of the sky but leave the sky’s reflection on the top of the head alone. We want to remove the sky but not the head, right?
Figure 5.2. Use the Tolerance setting to zero in on the areas you want to select.

Remember to turn off the visibility of the original Background layer; otherwise, you won’t be able to tell when you’ve deleted part of the background of the image.
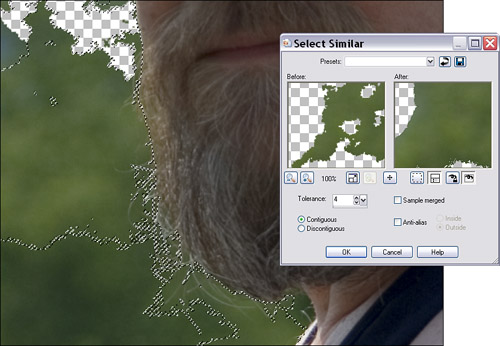
3. After making a selection with the Magic Wand tool, I also chose Selections, Modify, Select Similar to bring up the Select Similar dialog box (see Figure 5.3). I then played with the Tolerance values while keeping an eye on the results of the changes by clicking the Preview icon. I wanted to grab the greenery without removing too much of the facial hair. There’s some real tricky trimming going on here.
Figure 5.3. Take a little off the side please, but leave most of the hair, will you?
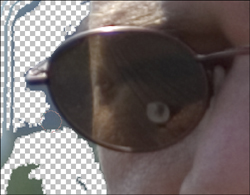
4. When you’ve removed as much of the background as you can, you might have to zoom in and use the Eraser tool to fine-tune the removal process (see Figure 5.4).
Figure 5.4. Zoom in and remove the rest of the background with the Eraser tool.
When you’re done you should have the suspect—sorry—the model against a transparent background.
Adding a New Background
Now that the original background has been removed, it needs to be replaced with something. I figure a snapshot of a fugitive or wanted poster-type of guy would have to have been photographed against a parking lot or a wall covered with graffiti. There are a number of ways in which a brick wall background can be accomplished. You could, for example, simply photograph a wall. In this project, however, the wall and the graffiti will be created digitally. Let’s get started.
5. Click the bottommost layer in the Layers palette to activate it, and then add a new raster layer. Name the layer Wall.
6. Click the Foreground and Stroke Properties and set the foreground color to white. Select the Flood Fill tool and fill the new layer with white.
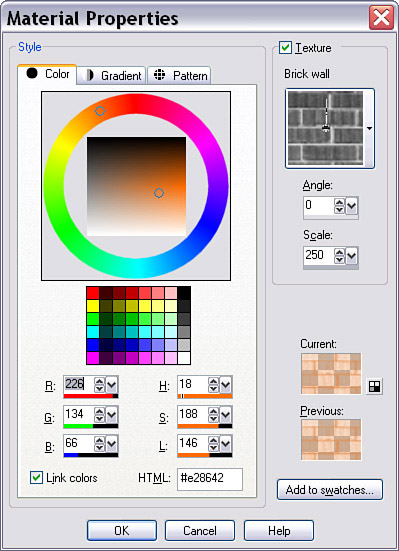
7. Click the Background and Fill Properties and turn on the texture option. From the pull-down menu, select Brick Wall; then set the Angle to 0 and the Scale to 250.
8. Set the color to a reddish-brown brick-like color. I used R: 226 G: 134 B: 66, as you can see in Figure 5.5. Right-click in the image to paint in a brick wall.
Figure 5.5. Choosing a texture and color for the background of the wanted poster.
If you’d like, you can substitute the brick wall we’re creating with a shot from your digital library. You may, for example, have a picture of a motorcycle, a certain neighborhood where there’s construction/demolition going on, an abandoned building, and so on. The idea is to have fun with this and, at the same time, end up with something you can display or send to friends and family.
Making the Illusion More Realistic
You’ll now have a brick wall behind the subject. You can paint some graffiti on the wall if you’d like or do something similar to give the image that not-at-the-mall treatment I mentioned earlier.
Whatever method you’ve chosen to decorate the background, one more thing will make it a little more believable. The background needs to be blurred a little.
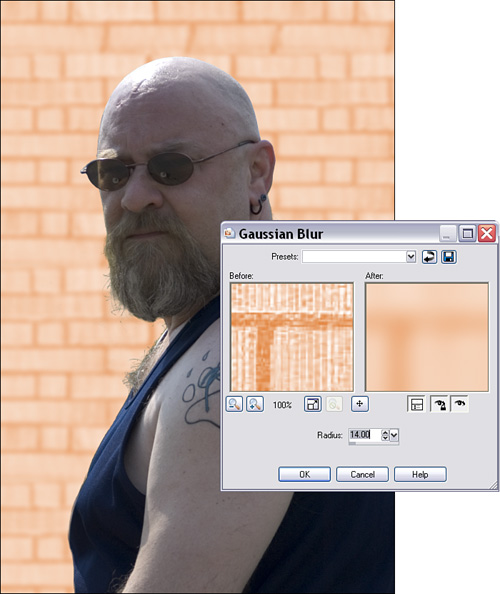
9. Make the Wall layer active and select Adjust, Blur, Gaussian Blur.
Play around with the Radius setting while checking the preview until you get an effect that makes the wall seem as though it’s a distance away. I used 15.00 for the Radius. You can see my result in Figure 5.6.
Figure 5.6. Blurring the background to enhance the illusion.
Adding the Final Touch
Now that the subject is ready, it’s time to move in for the kill. We’ll use the Text tool to add our wanted information:
10. Make the topmost layer active and select the Text tool.
11. Set the Foreground color to black and the background color to a gold-ish color. I used R: 226 G: 173 B: 60.
12. Select the Text tool and type in something like Wanted $10,000 Reward, using a font that will complement the look. I chose Playbill, but you can use any font that suits the image you want.
Figure 5.7 shows my final effort. I actually have a photo similar to this stuck to the side of my refrigerator. It’s quite a head turner.
Figure 5.7. Our bad guy is now a wanted bad guy.

You can have even more fun with this image by using it as a basis for the vintage photo project in Chapter 11,“Photos, Photos, Photos—It’s All in the Presentation.”
Project 2. Trading Cards
This is a fun and easy project. So easy in fact that you might have been approached by a photographer at your child’s football practice hoping to sell you a package of photos including a trading card. Kids love these, but the photographer has to make a profit and you might pay $20 for the package. The good news is that, unlike a decade ago, you might have equipment that rivals that of the photographer. It’s time to put your digital darkroom to work.
You can approach this in a number of ways. I’d start by shooting some of the practices or games and then, with the kids still in their uniforms, shoot a couple of close-up portraits. Don’t be afraid to try setting something up, like a shot at the net. You’ll often find that kids can be real hams and you’ll get some great material for the project.
I’ll be creating a fairly simple stats card with some shapes, line, and text, but you can get as creative as you want.
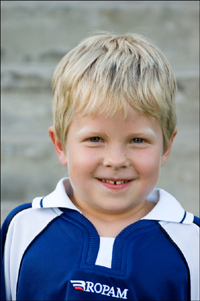
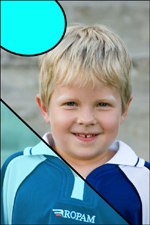
You can see in Figure 5.8 that this photo is mostly good, but I do see a small speck of something in the upper-left corner that I’d like to fix. Here’s what I did to solve the problem.
Figure 5.8. The young sportsman.

1. If you’re following along with this image (Young Man R.tif) from the website or if your image has a similar problem, select the Clone Brush and make sure the brush size is right. The brush should cover the spot completely. I used a size of 32 to get rid of the small spot in this image.
2. Hold down the Shift key and right-click in the image near, but not too near, the spot you want removed. You should be about one or two brush widths away from the spot. Try to select a spot with the same colors and textures as the area around the spot you’re trying to remove.
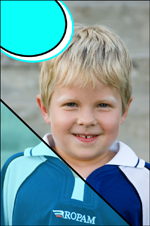
3. Click over the spot to remove it. That’s it! And you thought that was going to be hard, right? Repeat as necessary to get rid of all the unwanted blemishes. Figure 5.9 shows the image ready to go.
Make sure you don’t get overzealous with the Clone Brush and start removing freckles and so forth. The odd pimple is fair game, but we want to keep the realism for the trading cards. Don’t worry, though, you’ll get plenty of opportunity to put your digital cosmetic surgery skills to the test. You could, for example, refer to Chapter 1 or 2 if you’ve just jumped in here. There are a number of fun projects there that will help you hone your cloning abilities.
Adding Some Shapes
Now that the spot problem has been handled, it’s time to get started on creating the trading card. Again, I’ll keep this fairly simple and you can follow along or go as wild as time and skill permits.
To add a simple shape to the image, but with a bit of an elegant wrinkle, we’ll duplicate the shape and set the top one to have no fill and the bottom one to have a fill. However, we’ll keep the bottom layer’s Opacity set low to let the photograph show through. Here’s how.
4. Click and hold down the icon in the upper-left corner of the Layers palette. Select New Vector Layer to create a vector layer for the shape.
5. Repeat this process, but select New Layer Group. I named this group Shapes.
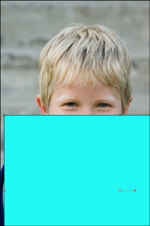
6. Activate the vector layer. Select the Rectangle tool and then set the Foreground and Stroke Properties to black and the Background and Fill Properties to a color that will go well with the image and the trading card design you have in mind. I chose a nice sky blue.
7. Click and drag from near the left of the image, about halfway down, to way off the image to the right. We want the shape to be large because we’re going to rotate it.
8. Select the Pick tool; you’ll see the corners of the shape and its center point (see Figure 5.10).
Figure 5.10. Picking the shape so we can maneuver it into place.
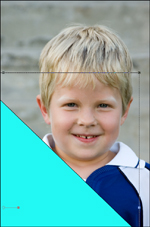
Move the cursor around the end of the handle of the center point until you see it change into two semicircular arrows chasing each other—you’ll know it when you see it. Click and drag the cursor until the shape is rotated into place (see Figure 5.11). Note that you can release the mouse, move the shape, and then hunt for the rotation area as needed.
Figure 5.11. Rotate the shape into place.
9. Right-click the vector shape’s layer in the Layers palette and select Duplicate from the menu to duplicate the shape.
10. Activate the original vector layer by clicking it in the Layers palette; then set its Opacity to about 30.
11. Activate the layer with the new copy of the vector shape and then click the plus sign to the left of the layer. Next, click the shape layer to activate it.
12. Double-click the shape in the image to bring up the Vector Property dialog box. Set the Fill to None by removing the check mark, and set the stroke width to 25. You should have something that resembles Figure 5.12.
Figure 5.12. Set the properties of the two shapes to get a more elegant design.
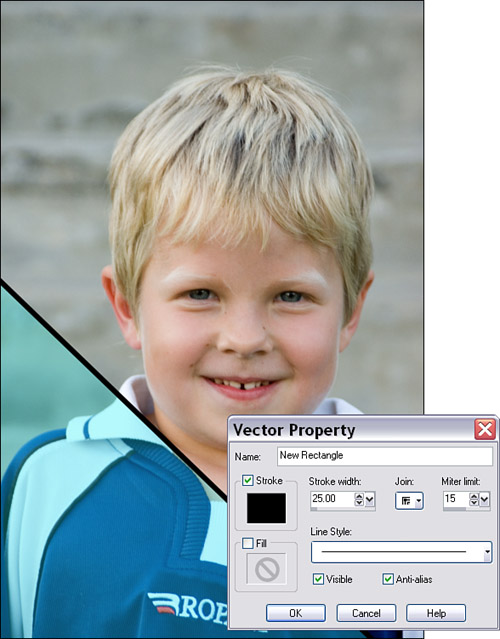
Having the superimposed shapes is a little more sophisticated than simply using a solid shape, and it will still give us something to place the type against later so that it will be more readable. In fact, if you find that the type is too hard to read against the shape, you can always double-click the shape and reset its opacity a little higher.
Adding Another Shape for the Number
We’ll add another shape to one of the corners that will hold the player’s number. This time we’ll use an ellipse and rotate it a little, too.
13. Select the Ellipse tool. You’ll find it together with the Rectangle tool if you click and hold over the small arrow icon to the right of the tool’s icon in the toolbar.
14. In the Materials palette, set the foreground color to black and the background color to something similar to the blue you used for the rectangle.
15. Set the mode to Draw Ellipse, and then click and drag to create an ellipse in the upper-left corner of the image. Don’t be afraid to drag outside the image. You should have something that resembles Figure 5.13.
Figure 5.13. Add an oval shape.
16. As before, duplicate the layer. This time, though, use the Pick tool to increase the size of the lowest shape.
17. Change the colors of the lowest shape to light blue for the stroke and white for the fill.
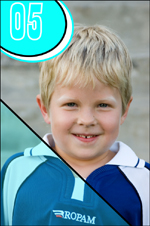
With the two ovals in place, you should have something similar to Figure 5.14.
Figure 5.14. We’re ready for the type.
Adding the Player’s Name and Number
All that’s left is to add some text. We’ll use the Type tool to add the player’s name, number, and team name along with a couple of vital stats such as married status...you know, the important stuff.
18. Click the uppermost layer group in the Layers palette and then add a new vector layer for the type. This is necessary because Paint Shop Pro would otherwise assume that you want the text applied to the shape in the existing vector layer.
19. With the type layer created, create a new layer group to hold it. I know, I know, it’s almost like a pocket for a pocket but I just like to compartmentalize the layers in my images. Doing so makes it easier to work on them in the future. Trust me, you’ll see.
20. Select the Text tool and enter the player’s number, using a font that you like or something that resembles the team’s format, if you have it. I’m using Playbill BT for the number. Note that I’ll be sticking with the blue and white color scheme, too. You can see the result of adding the number in Figure 5.15.
Figure 5.15. Adding the player’s number.
21. With the numbers in place, I decided to add a drop shadow to the number. After selecting Effects, 3D Effects, Drop Shadow, the software warned me that I had to change the type to a raster layer. I agreed and added the drop shadow.
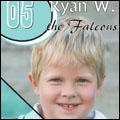
22. Finally, use the Text tool to add the rest of the information. The final result, which is pretty cool if I do say so myself, is shown in Figure 5.16.
Figure 5.16. The finished trading card, ready to print.
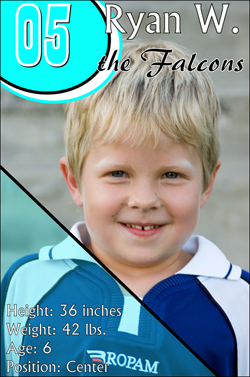
23. All you need to do at this point is resize the image, make sure you save a copy first, and print it on card stock.
Create one of these for each of the kids on the team, and you’ll get an idea of why the other guy wanted $20 for the packages. All kidding aside, though, have some fun with this project and see what you can come up with. Maybe you could dig out some of your own cards and see what the cards looked like back when you were collecting. Nostalgia can be good.
Project 3. Superhero Comics
Ah, superheroes and their comics. I grew up reading about them all: Superman, Batman, the Flash, Suprr Puppy...Suprr Puppy? Yep, Suprr Puppy. Come on, you must remember the best superhero of them all. Mild-mannered boxer pup by day, Sugrrr becomes Suprr Pup at night, when she’s allowed out, that is.
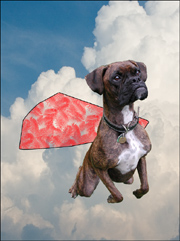
This project will give you a good idea of how you can plan a shot with a certain outcome in mind. I wanted the comic book cover for this project to mimic the oldie-but-goodie comic books where you might see the superhero flying above the clouds. While Sugrrr may not appear as majestic as the superheroes of yore, she will appear to be flying above the clouds decked out in her finest superhero cape.
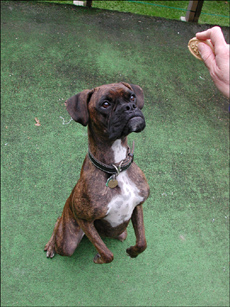
Keeping in mind what I wanted for the shot of our superhero, I used a wide-angle setting on my digital camera. With the puppy sitting waiting for a cookie, I had my wife and digital photo assistant extraordinaire hold the cookie up and get Sugrrr to perform the sit-pretty trick. We did this a couple of times and I found the best result to be the one pictured in Figure 5.17.
Figure 5.17. Mild-mannered Sugrrr performs puppy tricks for the camera.
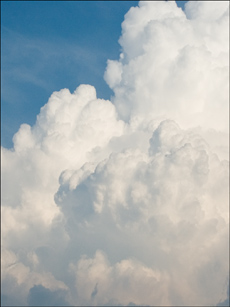
The next shot I wanted was some really nice clouds. As it happens, I took several shots of some clouds right after a storm, just outside my front door in the middle of suburbia for a completely different project and at a completely different time.
Although taken at different times (almost a year apart) and with different digital cameras, the two images will work together quite well for this project (see Figure 5.18 for the photo of the clouds).
Figure 5.18. Just the kind of place you would expect to find a superhero.
Note that the photo in Figure 5.18 has already been moved into place as a layer in the working image. To do so, I opened both images and selected the entire cloud image (Selections, Select All) and then copied and pasted the clouds from one image to the other as a layer (Edit, Paste As New Layer).
The clouds came in quite large because the puppy’s photo was taken with a 3.3MP camera and the clouds were taken with a 6MP camera. No matter, though—the image can be resized or, as in this case, used as is to bring the clouds even closer than the apparent shot.
Now that the photos have been opened and they are together in one image (the clouds pasted into a layer with the puppy image), we can get started creating our superhero.
Notice how I added the larger image to the smaller one. I could have done it the other way around, but the puppy’s image would have been much smaller. It’s best to start with the smaller image and do any resizing downward to help keep the best-quality image for printing.
1. To get started, make a copy of the puppy image layer, or whichever superhero photo you’re working with. Move the new puppy layer above the layer that has the clouds.
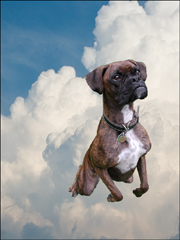
2. Use your favorite combination of methods to get rid of the background. Because there is a similar color around the dog, I used the Magic Wand tool and the Select Similar dialog box from the Selections, Modify menu. After getting most of the material removed, I used the Eraser tool to get rid of the rest; my results are shown in Figure 5.19.
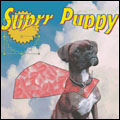
Figure 5.19. The Suprrr Puppy in place—almost.
Adding a Superhero Cape
I know what you’re thinking: This puppy looks pretty super already. Isn’t she a sweetie? I think it’s time to add a cape, though, to really give her that superhero look. This requires a bit of an artistic adventure. If you’re not comfortable drawing the cape, you can skip over it. Or perhaps the photo you’re using doesn’t require a cape—say, if one is already present.
3. To add a textured effect without having to draw one, set the Background and Fill properties to use a texture. I used, believe it or not, Blue Spruce. I set the color to superhero red—that is, fully saturated, or very bright, red. Superheroes need to be recognized, after all.
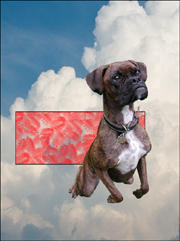
4. Select the Rectangle tool and drag a rectangle shape onto the image (see Figure 5.20).
Figure 5.20. Starting the cape with a rectangle filled with a red textured effect.
5. Select the Pen tool and click and drag one of the corners of the rectangle, this will round the corners of the cape and give us a few more points to play with. If you would like to know more about how the Pen tools work, take a look at Appendix B.
6. Right-click the rectangle shape and select Convert to Path.
7. Use the Pen tool to reshape the rectangle into something that resembles a cape (see Figure 5.21).
Figure 5.21. Bending the cape into shape.
If you find that the cape is below the puppy, as mine is, simply move the layer with the cape above the dog, or whichever superhero you’re working on.
8. With the cape layer in place, right-click the layer in the Layers palette and select Convert to Raster. This converts the vector shape into a bunch of pixels that you can further modify.
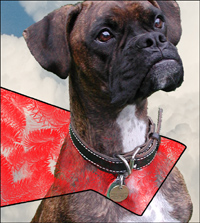
9. Zoom in close and use the Eraser tool to remove some of the cape. I removed everything above the puppy’s collar and also whatever was in front of her medallions. Those might be the source of her superpowers, right? You can see what I did to enhance the image in Figure 5.22.
Figure 5.22. Fine-tuning the cape’s collar.
Adding Some Headings
At this point, it’s time to add some headings, like a title and the price.
10. Use the Text tool to enter a comic book title. I used Albertus Extra Bold at 100 points with a stroke width of 8.0, the stroke color set to a bright blue, and the fill set to bright yellow.
11. With the title in place, use the Pick tool to stretch the text a little so it’s a little longer than normal.
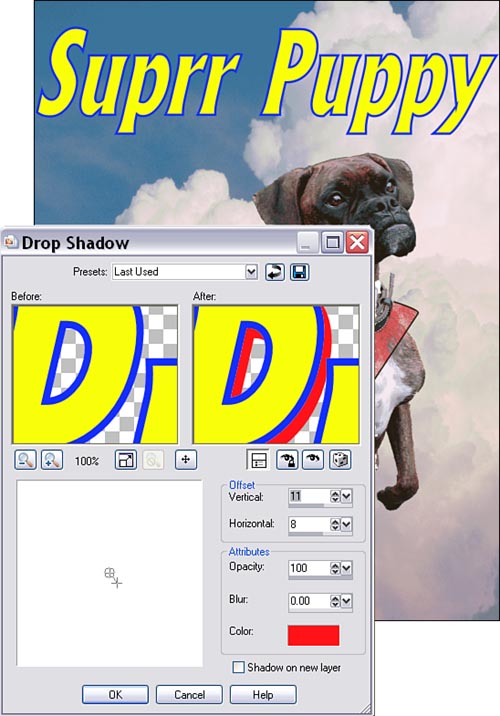
12. Select Effects, 3D Effect, Drop Shadow. You’ll be warned that the type must be rasterized. Click OK to proceed.
I set the Vertical Offset to 11, the Horizontal to 8, and the Color to bright red. I also set the opacity to 100 and the Blur to 0. These settings give the effect of 3D more than they do a drop shadow (see Figure 5.23). You’ve gotta love the versatility.
Figure 5.23. Adding a 3D title.
Add a Comic Book Curve to the Title
I want the title to have a bit of a wave in it like some of the old comic book titles have. This will give the text a better look, and it will be less static.
13. Select Effects, Distortion, Warp. As you can see in Figure 5.24, I set the Horizontal to –5, the Vertical to 46, the Size to 75, and the Strength to 70. I had to play around with the various settings a little at a time to get the look I was after. Depending on your image, even if you’ve been following closely, these numbers will only be starting points.
14. Select the Symmetric Shape tool and set the Number of Sides to 25 and the Radius to 5.00.
15. Set the Foreground color to black and the background color to a gold-ish shade. I chose R: 216 G: 190 B: 44.
16. Click the Background layer to activate it, set the line Width to 5.00, and click and drag to draw a shape near the upper-left corner of the image. Use the Pick tool to move the shape into place, as in Figure 5.24.
17. Use the Text tool to add a price to the cover. I entered $1.25 and used the Pick tool to rotate the text.
18. Finally, use the Text tool to add some eye-catching headlines. You’ll see what I’ve added after we add the finishing touch.
Creating the Comic Book Effect
With the right settings, color reduction—really strong color reduction that is—will give the image a comic book cover effect.
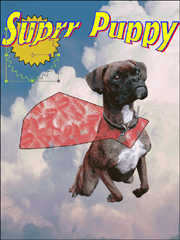
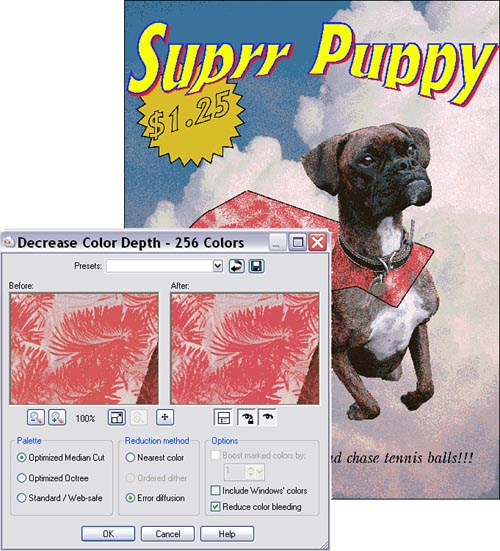
19. Select Image, Decrease Color Depth, 256 Color Palette.
In the Decrease Color Depth – 256 Colors dialog box, set Palette to Optimized Median Cut, set Reduction to Error Diffusion, and place a check mark in the Reduce Color Bleeding box. These, as you can see in Figure 5.25, are the settings I used. You can play with the various settings to see what they do, and you might find something that better suits the image you’re working with.
Figure 5.25. The comic book effect applied by reducing the image’s number of colors.
Note that reducing the colors flattens your image into a single background layer, so be sure you have everything the way you want it before you cut the number of colors.
Project 4. Crazy Calendars
Last but not least, for this chapter at any rate, is a project anyone can do and one that can use any photo you decide to throw at it. Go ahead, wind up and toss away; this project can handle even the toughest photos.
Calendars can be fun to create. On top of that, they can be useful and make great gifts whether they are printed or used as Windows backgrounds.
You can create any number of calendars. We’ll be creating one for a single month with a single photo as the background, but I invite you to play around with some of your own ideas or to look at other calendars to get some ideas.
Open the photo you want to use for the calendar and do a couple of things to help you get started. If you’d like to follow along, you can download the file I’m using (Sugrrr Portrait.tif) from the book’s website.
1. Select File, Open; then browse to and open the file you want to use for your calendar background.
2. With the file open, you might want to change the name of the layer. We’ll have a number of layers in this project, and it’s best to keep track of them right from the start. You can, of course, leave it set to the default Background.
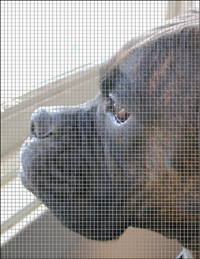
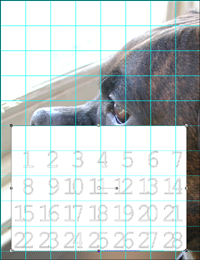
3. We’ll be using the grid to help us line things up. To turn on the grid, select View, Grid. This superimposes a grid over the image (see Figure 5.26).
Figure 5.26. The newly opened photo with the grid visible.
Setting Up the Grid
As you can probably see from Figure 5.26, the default grid is pretty busy and it’s not really well set up for this project. What I really want is to be able to draw a fairly large rectangle to hold the days of the week and the dates. To do so, though, the grid has to be changed. We need a grid that’s 7" × 5" or 7" × 6"—something large enough to hold the calendar information. We’ll build the calendar for February 2009, just so we can have a fairly square calendar month to work on for this project. After you understand the principles, though, you’ll be able to build any calendar month.
Because we’re working with an image that’s 8" × 10", we’ll use that to our benefit while building the grid. I think that 7" across and 5" down will work well. For that reason, set the grid up so that it’s in inches.
4. Select View, Change Grid, Guide and Snap Properties to bring up the Change Grid, Guide and Snap Properties dialog box.
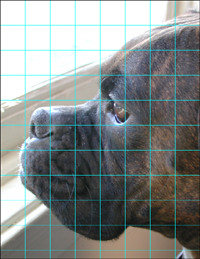
Note that you can change the default settings or only those for the current image. We’ll leave the default and set only the current image’s properties. Set the Units to Inches, set the Horizontal and Vertical grids to 1.000, and select a color that will be visible with your choice of image. I used a light blue (see Figure 5.27).
Drawing the Calendar Shape
I like to use a semitransparent background for the calendar text. Not only does it make the calendar more visually appealing, but it also makes it easier to read. Follow along to see how to add the calendar’s background shape.
Optionally, you can use the Pen tool to drag one of the corners of the rectangle to round the corners a little.
5. Set the Foreground and Stroke Properties to black and the Background and Fill Properties to white.
6. Select View, Snap to Grid. Then use the Rectangle tool to draw a rectangle that’s 7” wide by 5” in height. Use the grid to help you draw the rectangle. Don’t worry if it’s off-center. We’ll correct that later.
7. Select View, Snap to Grid again, but this time to turn off the Snap to. Then rename the layer Shape.
Entering the Dates
No calendar would be complete without dates. Adding the dates might seem pretty easy, but you have to line everything up—and that can be problematic. The next steps guide you through the process, though.
8. Select the Text tool and click in the image away from the rectangle shape.
9. Create a new vector layer and name it Dates.
To keep it easier to line things up, we’ll use a monospaced font. Monospaced means each letter is the same size whether it’s an i or an m, or even a space. Most Windows fonts are not monospaced. A good example of a monospaced font is Courier New. That’s the font we’ll use for this project.
10. Set the Font to Courier New and leave the other settings as is for the moment. We’ll get back to them after we get an idea of where we are in terms of layout and positioning.
11. We obviously need a space between digits, but to help line things up we’ll add an extra space to the single digits. Enter space space 1 space space 2, and so on for all seven digits of the first line in the Text Entry dialog box.
12. Press the Enter key and then build the second line using double spaces again until you get to 10, where you’ll only use a single space (see Figure 5.28).
Figure 5.28. Adding the dates.
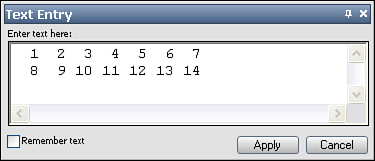
Keep going until you’ve added all the dates from 1 to 28 in four lines.
13. You’ll be able to see the type you’ve created in the image itself, but it won’t be in place or be sized properly. Click Apply and use the Pick tool to move the text into the upper-left corner of the rectangle you created earlier. This won’t be its final resting place, but it will help us get started.
14. Select the Text tool and click your text to bring up the Text Entry dialog box. Highlight the text in the dialog box so the changes you make will be reflected in the type in your image.
You’ll have to play around a bit, but a good starting point for the size is 72 points.
After setting the size to 72, you’ll find that the type fits more or less vertically. Horizontally, on the other hand, our text needs some help.
15. To get the text to line up better horizontally, we can adjust the tracking. I used a value of –0.250. With that value set, I moved the text into place.
16. To move the rectangle and the text into place together, select the type with the Pick tool and then Shift-click the rectangle. With both the text and the shape selected, move them into place near the bottom and center them (see Figure 5.29).
Figure 5.29. Lining things up.
17. Naturally, we want to be able to view as much of the photograph as possible, and this is a pretty big calendar (you can blame my older eyes for this—I’d like to be able to see the date from across the room). We can lower the opacity of the shape layer.
Activate the shape’s layer in the Layers palette and set the Opacity lower until you’re happy with the results. I set it to 40.
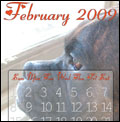
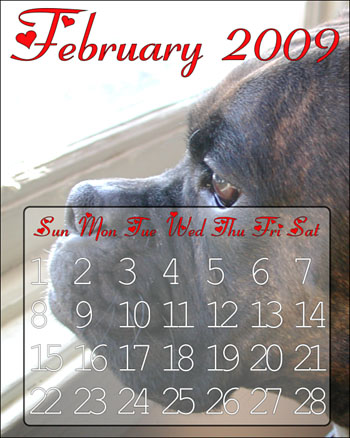
18. At this point, all that’s left is to add the weekdays, month, and year. To help keep things straight, and to help you come back later and make changes, I recommend you put the month and year on one layer and the weekdays on another. Because these are single lines, it won’t be hard to line them up, and you can now use something more decorative for the font. I used Fiolex Girls, a decorative font that contains heart shapes, and I set the color to red. I used three-letter abbreviations for the names of the days and simply used a couple of spaces to help me line things up. My final calendar is shown in Figure 5.30.
Figure 5.30. Puppy love calendar.
Wrapping Up
I hope you enjoyed the projects in this chapter. They were probably among my favorites. There are many other things you could create that weren’t covered here. You could, for example, create your own movie posters, birthday cards, cards for other occasions, and so on. Use some of the techniques in this chapter to help you get started with your own printable projects. Keep the most important thing in mind, though—having fun.
Now that you have the experience of this chapter’s projects under your belt, you might want to tackle the ones in the next chapter. If you’re the romantic type, you’ll love them. The moon, lovers, rainbows—what’s not to love?