
Chapter 3. Virtual Vehicles
You love your car, right? But it would be cooler with racing stripes and your lucky number on its side. NASCAR, here you come. Or, why not create your own outrageous chopper? A quick snap of a motorcycle and a couple of mouse clicks should do the job.
The projects in this chapter feature makeovers for a few forms of ground-based transportation. Some people love their vehicle, and others tolerate it as a necessary pain they must endure, but we all depend on transport in one way or another.
Maybe we can have fun with some of the vehicles we interact with every day.
Project 1: Picturesque 18-Wheelers
Project 2: Virtual Race Cars
Project 3: Outrageous Choppers
Project 4: Toy Cars?
Project 1. Picturesque 18-Wheelers
Many summers ago I was traveling across the country with my youngest brother. We were heading off to some rock concert. It was quite a show. The traveling was great fun, as well, and it was a great chance for my baby brother and me to get to know each other better without all the trappings of daily life. There was one moment on the highway neither of us will forget. No, not the time the horse carriage almost ran us over—that’s another story altogether.
We were near an underpass and the weather was a little dismal when this large 18-wheeler went roaring past us. My brother and I both saw the truck, went silent for a moment, stared at each other, and then both said, “Did you see that?” What we were referring to was the painting on the side of the trailer; it was an amazing desert scene in bold reds and oranges featuring a larger-than-life Yosemite Sam. I tell you, it was a sight.
As I sit in traffic, I often wish that more tractor-trailers were done up with artwork of some kind. I mean, wouldn’t it be awesome to see a truck with a giant Mona Lisa painted on its side? Much better than some of the boring panels seen on many of the trucks that currently inhabit the highways and byways.
I think it’s time to digitally alter a truck to see how it can have an effect on its surroundings. Follow along to see how much fun this can be and how easy it can be to “paint” a truck.
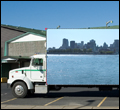
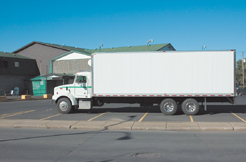
Two files are needed for this project. First, you need a shot of a large truck, then you need to open another image to be painted onto the truck’s side. I’ll use the panoramic image that you can create in one of the projects in Chapter 8,“Messin’ with Mother Nature.” This image will work well because of the shape of the truck’s side. As you can see in Figure 3.1, the truck’s side is a long rectangle. If you haven’t created the panoramic image yet, you can grab a copy of the completed project from the website.
Figure 3.1. A large truck just begging for some digital airbrushing.
1. With both files open, activate the image you want to paint onto the truck’s side by clicking its title bar.
With the image copied to the clipboard, you can close the second image to free up some memory for Paint Shop Pro. These are pretty large files we’re working with, even from a 3MP or 4MP camera (not to mention 5MP, 6MP, or even 7MP cameras). For example, the images in this chapter can weigh in at as much as 40MB.
2. Choose Selections, Select All to select the entire image.
3. Select Edit, Copy or Edit, Copy Merged if the image has extra layers so that you’ll get the entire image.
4. Activate the image with the truck by clicking its title bar. If your image is hidden behind a number of others, you can also activate it by selecting Window, filename, where filename is the name of the image you want to have activated.
5. Select Edit, Paste As New Layer to paste the second image’s contents into a new layer in the truck image.
Places Everyone, Places
You may notice when you paste the new layer in that it’s way too large, or even way too small. In any event it will need to be resized and moved into place.
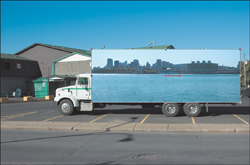
6. With the newly pasted layer active, select the Pick tool and resize the image in the new layer so that it just covers the portion of the trailer that needs to be covered (see Figure 3.2).
Figure 3.2. Moving and resizing the truck’s new digitally painted side.
When resizing the image with the Pick tool, grab a corner of the image and drag it to preserve the height and width ratio of the image.
7. Toggle off the visibility of the new layer so you can see the truck clearly.
Creating a Mask to Add the Digital Artwork to the Truck
We could, of course, move the pasted image around and get it exactly into place, erasing some of it as necessary. A better method, though, is to use a mask with the new layer to allow only enough of the image to show through to cover that part of the trailer. This method is also pretty cool in that you can easily reopen the file and simply paste in another image. With the mask there, it will be just that easy to change artwork on the side of the truck.
8. Select the Freehand Selection tool; set the Selection type to Point; and use the Freehand Selection tool to draw a selection around the truck’s side, zooming in as necessary to see where you’re selecting (see Figure 3.3)
Figure 3.3. Creating a selection of the truck’s side with the Freehand Selection tool.
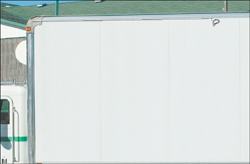
You’ll note in Figure 3.3 that I have ignored the small curve in the upper-left corner of the truck’s side. This can easily be dealt with later. For now, it’s more important to get a decent selection around the area of the truck’s side.
9. With the selection made, activate the layer with the image that will be painted onto the truck’s side by clicking its layer in the Layers palette.
10. Right-click the layer in the Layers palette and select New Mask Layer, Show Selection. Doing so allows the image to show through the mask and be painted on the truck’s side. It masks off only those areas that are outside the side of the truck. Pretty cool stuff.
Creating a Mask to Help with Final Touches
At this point, you can clean up any areas of the mask that might need a little help. For example, I’ll clean up the area where the truck’s side has a rounded corner.
11. If necessary, activate the mask layer and use the Paint Brush tool with either white or black as the painting color. Painting with black masks out an area, and painting with white lets the image show through. In Figure 3.4, I’m using a black brush to restore the rounded area of the truck side’s frame.

Adding the Final Touches
When you’re satisfied with the mask, it’s time for the crowning touch. That is a small change to the blending mode to help bring out any details in the original truck’s side. Note that this setting works for the (mostly) white truck and the color photo I’m using. Your mileage might vary if you’re using two completely different images.
12. Activate the Group layer that holds the photo layer and the mask layer.
13. Change the Blending mode to Multiply. You can see my final digital photo in Figure 3.5.
Figure 3.5. The beautified truck ready to make deliveries in style.
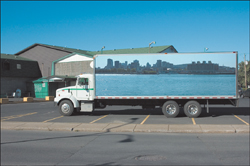
That’s much better. I think we should start a “beautify that truck” movement. At least there would be something nicer to look at while we’re stuck in traffic.
Project 2. Virtual Race Cars
I’m a big race fan. Other than the Grand Prix, though, there isn’t much racing in my neighborhood. I wish there were some NASCAR-type racing around. Most people will never get a chance to drive one of those stock car beasts, but at least they seem more approachable than those airplane-like Formula 1 race cars. I bet that with a little time, effort, and imagination, I could turn my four-door family sedan into a pretty good imitation of a stock car.
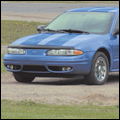
1. Open the file that contains the car you want to modify (the file on the website for this project is called Gray Sedan.tif). I’m using the shot of a four-door, dark gray sedan that you can see in Figure 3.6.
Figure 3.6. A future stock car…feel the power!

This is exciting. I’m starting to feel a little like Jesse James on Monster Garage. Let’s light those (digital) cutting torches and get down to it.
Building Some New Wheels
To help with the illusion, I used the Selection tool with the Selection mode set to Circle to grab a copy of the wheels from the truck that was featured in the last project (see Figure 3.7).
Figure 3.7. I thought the stock car needed beefier wheels.
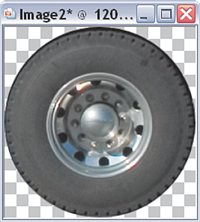
Actually, it’s not the whole wheel that I want—I really only want the mags. I think they look more like racing wheels than the stock ones that came with the sedan.
You can grab the wheel off any vehicle, really. We’ll be deforming it into place in any event. Here’s how:
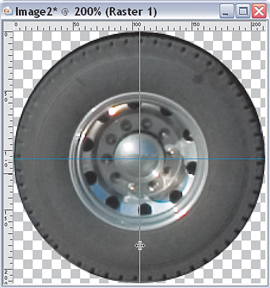
2. With the wheel file (White Truck.tif) open and active, select View, Rulers to turn on the rulers.
3. Select View, Guides to turn on the guides. Click and drag down from the top ruler to create a horizontal guide.
Put the guide as close to the center of the wheel as you can.
Repeat this process, but drag from the ruler at the left to make a vertical guide. Position it near the center, as well (see Figure 3.8).
Figure 3.8. Creating a pair of guides to help create a circular selection.
Grabbing a Mag Wheel
Now that the guides have been created, they can help you make a selection.
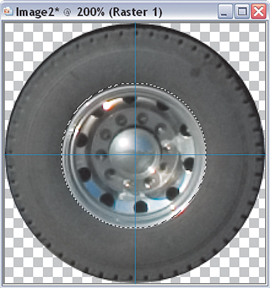
4. Choose the Selection tool and set the Selection type to Circle. Using the center of the guides as a starting point, click and drag to make a circular selection. Depending on the image you used and how you placed your guides, it might take several tries to get the right selection. Don’t move the guides, though; just remember where you started your click and drag and then refine your starting point until you get a good selection around the hub of the wheel (see Figure 3.9).
Figure 3.9. A pretty good circular selection made with the help of the guides.
5. With the selection made, select Edit, Copy to copy the wheel to the Windows clipboard. Then activate the Racing Car image and select Edit, Paste As New Layer to paste the new wheel into the existing image.
You will probably have to resize the wheel, and you’ll almost certainly need to push, bend, and squeeze it into place. All this can be done with the Pick tool.
To help you place and shape the wheel, you might want to turn down the opacity of the layer the wheel is on.
6. Use the Pick tool with the Ctrl key to change the perspective of the pasted wheel by dragging a corner of the bounding box (see Figure 3.10).
Figure 3.10. Deforming the new wheel into place with the Pick tool.
Use the underlying wheel to help with the placement and shape of the new wheel. They are both really just squished circles, after all.
7. When you’re satisfied with the shape and placement of the new wheel, duplicate the wheel layer and drag the copy into place over the other visible wheel. You might have to resize the copy, but if the wheels are straight, you’ll probably not have to do any further shaping. You can see both wheels in place in Figure 3.11.
Figure 3.11. The beefier wheels in place on the sedan.

It’s Time to Add a Racing Number
Things are moving along nicely, but it’s time to add a racing number. I want the number to stand out a little, so I’ll put it on a circular background. Here’s how to do so:
8. Select the Ellipse tool and select a fill and a stroke color. I chose a bright yellow.
9. Use the Pick tool to deform the Ellipse shape you created. It should basically resemble the wheels you added, at least in shape.
10. Use the Text tool to add a number. I used a somewhat fancy serif font with a 6-pixel stroke in red and a bright blue background. Hey, this is racing, right? I used Caslon 224 Medium at a size of 72 points. Note that if you’re following along with the file from the website and you don’t have the Caslon font, Paint Shop Pro X substitutes the font for Arial.
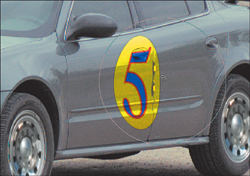
11. Use the Pick tool to bend the number into place within the circle (see Figure 3.12).
Figure 3.12. Adding a racing number.

12. Change the Blending mode of both the number layer and the circle layer to Overlay. This makes the new shapes blend into the existing picture rather than looking like they were simply stuck there (see Figure 3.13).
Figure 3.13. A blending mode change helps add to the realism.
If you’re brave enough, you can further add to the realism by bending, twisting, or pushing the racing number with the Warp Brush, located near the bottom of the toolbar. You might find it hiding behind the Mesh tool, or vice versa. The Mesh tool is worthy of experimentation toward this end, as well. Before you give either a try, though, I recommend doing so on a duplicate layer. If you make many changes as you bend and push the shapes, you’ll have to back out of each, one at a time by pressing Ctrl+Z. It’s better just to trash the duplicate layer, make another copy, and try again. The figure shows my efforts with the Warp tool set to 270 pixels, 0 Hardness, 100% Strength, and the Mode set to Push.
All It Needs Is a Racing Stripe
The final touch for this project, at least as far as we’ll go for now, is to add a couple of racing stripes. The stripes will be added as vector shapes that can be poked and prodded until they bend into the desired shape. I like to keep each shape on its own layer because I find it less messy that way when I need to make any changes.
13. Select the Rectangle tool and then set the fill and stroke colors. I chose the same blue I used for the interior of the racing number. Draw a rectangle near the hood of the car. The shape and size don’t matter too much because we’ll have to bend the shape into, er, shape.
14. Right-click the shape and select Convert to Paths. This enables you to use the Pen tool to shape the rectangle. (see Figure 3.14).
Figure 3.14. Shaping the racing stripe.
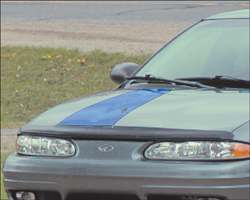
15. Right-click the lower-left corner of the rectangular shape and select Node Type, Curve After. Drag the newly created handle to curve the left side of the rectangular shape. The object here is to try to keep to the lines of the car.
Repeat this process for the lower-right corner, but select Node Type, Curve Before. You can see the result of dragging the new handle on the right side of the racing stripe shape in Figure 3.15.
Figure 3.15. Molding the racing stripe to the car’s shape.
16. Set the blending mode of the layer that has the racing stripe to Overlay. This enables the luminance (in other words the lighting, or highlights and shadows, if you will) from the layer with the car to show through.
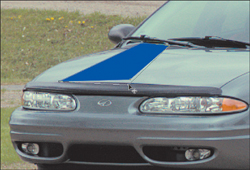
17. Duplicate the shape layer and, using the Pick tool, drag the new shape into place so you now have two racing stripes on the hood of the car (see Figure 3.16).
Figure 3.16. Two racing stripes added to the car’s hood.

18. Using the same process you used to create the stripes on the hood, create two more on the roof of the car. At this point—after saving the file so you don’t lose all your hard work—you might want to rename the layers. I have a comfort point in the number of layers I see in the Layers palette, and this project is falling out of that zone. If you ever come back to a project like this, you’ll appreciate the fact that you renamed the layers. I named the layers Left Hood Stripe, Right Hood Stripe, Left Wheel, Right Wheel, and so on. The time you spend doing this now will be instantly paid back if you ever revisit this project.
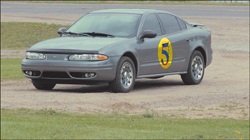
My final racing family sedan is shown in Figure 3.17. Honey, can I go to the store for something? Come on, we must need bread, milk, something...anything?
Figure 3.17. The average family stock car.

If you’d like you can take this project further, here are some ideas to get you started:
• Add some stickers from fictitious companies and sponsors; these can be created from scratch using shapes and type.
• Change the color of the car.
• Increase the size of the wheels.
• Add a hood scoop or a rear airfoil.
• Do some background-ectomy and place the car in a more realistic atmosphere. Are there any tracks near you, or maybe a stretch of highway that would make a better backdrop?
This figure, for example, shows how the car might look in a bright blue rather than the original gunmetal gray. The effect was created by applying Color Balance (select Adjust, Color Balance) to a copy of the car on a separate layer.

Whatever you do, have some fun with it.
Project 3. Outrageous Choppers
There seems to be a large interest in choppers recently. In fact, interest seems to be stronger than it was in the 1960s and 1970s. There are even a number of television shows based on the people who create some of these amazing machines. Even if you don’t ride, you have to appreciate the beauty of some of the machines these people build.
What I’d like to do with this particular project is honor some of those crazy chopped motorcycles and their builders/creators with one of my own making. Of course, this won’t be a real chopper, and probably couldn’t be built in real life, but isn’t that part of the fun of a digital darkroom? You bet it is!
We’ll actually be creating a monster drag bike from one of the racing bikes many riders seem so fond of. I know these bikes are fast, but let’s see if we can add some speed-enhancing improvements.
To get started, open a file that contains a shot of a motorcycle. You can download the one I’m using from the companion website, or you can use your own. If you want to work with a shot of your own, make sure that when you shoot it, you get down a little so the bike is as centered as possible.
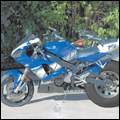
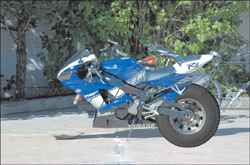
You can see the photo I’ll be working with in Figure 3.18.
Figure 3.18. A digital snapshot of a motorcycle.
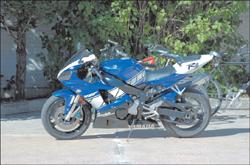
Boy, you can tell that thing’s fast just by looking at it. Let’s see if we can turn it into a bit of a dragster, though.
To add to the “monster-ism” aspect of this project, I’ll borrow the wheels from the truck photo of the first project in this chapter.
1. With both photos open, activate the truck photo and use the Selection tool; then with the Selection Type set to Circle, select one of the back wheels of the truck. You can draw guides through the wheel’s center as we did in the previous project when we selected the mag from one of the truck wheels.
Tip
If you plan to do more projects like the ones in this book, you might want to consider creating a folder where you can keep bits and pieces of images to be reused in other projects. For example, the truck wheel from the first project in this chapter makes an appearance in both the second (Virtual Race Cars) and third (this one) projects. Eventually, you’ll find that you have quite a collection of odds and ends that can be used for many different projects.
2. With the wheel selected, select Edit, Copy Merged (if it has lots of layers, you want to make sure you actually get the wheel).
You can close the truck file, because it is no longer needed for this project.
3. Activate the motorcycle image by clicking its title bar. Then select Edit, Paste As New Layer to paste the truck wheel into the motorcycle image.
4. Using the Pick tool, resize and place the wheel (see Figure 3.19).
Figure 3.19. Adding a large truck wheel and tire to the rear end of the motorcycle.
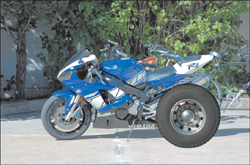
5. As you can see from Figure 3.20, I’ve left the wheel, let’s not say ludicrously large, but…okay, let’s say it—I’ve left the wheel rather large. Of course, that’s part of the point of this outrageous chop job, isn’t it?
Figure 3.20. Painting in a mask to hide some of the new rear wheel.
Using a Mask to Blend the Wheel In
I’d like some of the motorcycle to show through around the new wheel. We could simply erase parts of the wheel, but if we did that it would cause problems if we decided to move the wheel even a little bit.
Instead of erasing the wheel, we’ll use the power of a mask to hide parts of the wheel so the underlying motorcycle photo can show through. The concept is pretty simple: Where the mask is white the wheel will be visible, and where the mask is black the wheel will be invisible. Masks are grayscale, but we’ll only really need black and white.
To help you see which parts you’d like to make visible, you can activate the truck wheel layer and lower its opacity. Be sure to reactivate the mask layer before you start painting again, though.
6. Right-click the layer with the truck wheel and select New Mask Layer, Show All. You’ll now have a mask layer filled with white above the truck wheel layer.
7. Select the Paint Brush tool and set the foreground color to black.
8. Paint over the areas of the motorcycle you want exposed. Parts of the fender, for example, along with parts of the suspension could be brought out to help with the illusion.
You can see the results of my efforts in Figure 3.20. Note that I left out some details, such as the chain. I didn’t feel that it added to the illusion, so I decided to leave it off. Feel free to play around with both ideas to see what works best for you.
Figure 3.20 also shows the mask layer. It’s small, but you should be able to make out the black squiggle where I “painted” out the wheel.
One Wheel Washes the…No Wait, That’s Not Right
With the back wheel’s work completed, it’s time to lavish some attention on the front wheel.
A truck wheel on the front of a motorcycle. Don’t be ridiculous. The back I can see, but the front? Nah. Instead, let’s level the whole bike off by extending the front fork. Hey, is this a chopper, or not?
9. Make the motorcycle layer active by clicking its layer in the Layers palette. Then use your favorite selection tools/methods to select the front wheel and fork of the motorcycle. If you need a bit of a refresher on making selections, take a look at Appendix B,“Paint Shop Pro X in a Nutshell,” before proceeding.
Of course, we’ll only level the bike off. Tilting it up would take quite a bit more work. If you feel comfortable enough with the work being done in these projects, you can give it a try. All you need to do is select the entire bike and copy it to a new layer. When you have it there, use the Pick tool to tilt the bike to the desired angle. With that done, follow along with the rest of the work being done on the front end but make the fork extension long enough to join the bike with the front wheel.
10. With the front wheel selected, select Edit, Copy. Then select Edit, Paste As New Layer to paste the copy of the front wheel to its own layer. Use the Pick tool to move the wheel into position (see Figure 3.21).
Figure 3.21. Move the copy of the front wheel into place.
You can see in Figure 3.21 that I’ve moved the copied wheel down and forward a little. I basically want it lined up horizontally with the new back wheel and lined up in such a way as to make the front forks one straight line.
Out with the Old
With a copy of the front wheel tucked safely away on its own layer, it’s time to hide the old one. The best way to do so is to use the Clone Brush tool to copy parts of the sidewalk, trees, and so on over the front wheel. To make it easy to step back, though, you can paint with the Clone Brush to a new layer. See Appendix B if you need to improve your cloning skills.
11. Select the Clone Brush tool. I set the size of the brush so that it was about as big as the curb in the background, and I chose Use All Layers and Aligned mode.
12. Make the new front wheel layer invisible by clicking its visibility icon in the Layers palette. You don’t want to clone the new wheel over anything else in the image.
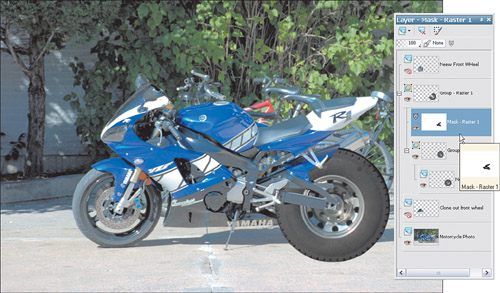
13. Activate the layer with the motorcycle photo. Then click the small arrow in the icon in the upper-left corner of the Layers palette and select New Raster Layer. I named it Cloned out Front Wheel.
14. Use the Clone Brush to clone areas of the sidewalk and background over the existing front wheel (see Figure 3.22). When you’re finished, make the layer with the new front wheel active again to see how it turned out.
Figure 3.22. Clone out the existing front wheel.
15. Use the Clone Brush tool to copy a section of the front fork so it connects the existing front fork with the part of it that came along with the front wheel. Use the Eraser tool to clean up the pasted new front wheel, if necessary. You can see my version in Figure 3.23.
Figure 3.23. The monster bike just needs a bigger shadow to go with its new attitude.
Fixing the Shadow
All that’s left is to fix the shadow. You’ll need your best cloning skills for this task. We need to extend the shadow so the new rear wheel and extended front wheel have a shadow that matches their new positions.
We’ll also need to get creative. The back wheel won’t be bad—it just needs to be enlarged along the bottom. To be a good fake, though, the front wheel and fork shadow doesn’t need to be enlarged, but shifted or tilted. I think a selection copied and pasted to a new layer before the application of the Clone Brush might work best.
16. Activate the Motorcycle layer by clicking its layer in the Layers palette. Then make a selection around the existing shadow about two-thirds of the way from the front wheel to the motorcycle’s stand.
You can use the Selection tool with a Rectangle Selection Type or an Ellipse Selection Type. If you’re brave, you might even give the Freehand tool a try. Just be sure you leave a little bit of the non-shadow area within your selection. It’ll help to blend it later.
17. Select Edit, Copy; then select Edit, Paste As New Layer. Select the Pick tool and use it to rotate the copy of the shadow into place, moving it as necessary (see Figure 3.24).
Figure 3.24. Fixing the shadow of the front wheel.
18. Use the Clone Brush tool to fix the area where the copied shadow meets the original. Be sure you do your cloning to a new layer and that you set the option to Use All Layers.
You can clone the back wheel’s shadow to the same layer. Remember that you can always press Ctrl+Z to undo and try again.
This image is a good example of how changing the brush size and hardness can make a big difference. I used a smaller brush for the front than I did for the back wheel and, after I initially started cloning, I realized that my shadow didn’t quite match. So, I reset the Hardness from 75 to 50. That made a big difference.
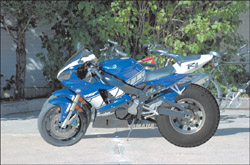
You can see my final image in Figure 3.25.
Figure 3.25. The final “monster” bike.
Project 4. Toy Cars?
I think I’ll end this chapter with something a little lighter. Read on to see what I have in mind.
I had originally intended for this project to demonstrate how to take a toy car and make it barely fit into the driveway. A photo of a toy Hummer RC or Bigfoot-type of toy pickup truck would have done nicely. However, I was sitting in traffic recently when I spotted one of those new Smart cars. It was then that the idea struck me. I realized I could take a photo of a small, super-economical car and make it appear even smaller—say, the size of a child’s toy. As it happens, a neighbor has one of those new cars, so I grabbed a couple snaps of it while walking the pup (you really have to appreciate digital photography for that aspect of immediacy alone). The following project demonstrates what I did with that photo and one other. It just goes to show that simple can be good—simple being a relative term, of course. A bizarre sense of humor probably doesn’t hurt either.
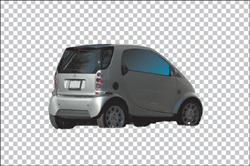
The photo of the car doesn’t have to be exactly like my photo (see Figure 3.26), but you’ll want to pay attention to the angle you’re shooting at so you can find or create something appropriate with which to merge it. Also, pay attention to how the light hits the car in your photo; this will have an effect on what other photographs you can place the car with in terms of keeping the result believable. For example, the light on the car in Figure 3.26 is quite strong on the back of the car, but the side of the car is in shadow. This observation will help you create a better illusion.
Figure 3.26. The car sans background.
I agonized for a while thinking about how best to portray the car. Finally, I decided that the contents of the image would be most helpful in making the decision.
Take a look at Figure 3.26 to see what I mean. Figure 3.26 shows the photo of the car post background-ectomy, meaning I’ve already removed the stuff from around the car.
Notice the raggedness of the bottoms of the wheels. That’s where the grass was when the car was parked.
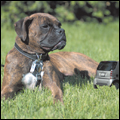
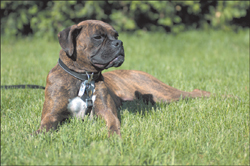
Given the raggedness around the bottoms of the wheels and the fact that the car was originally parked on (or near) grass, I decided that I could place the car in the grass next to my boxer puppy.
The lighting is often one of the hardest things to match up—along with the color, which is, after all dependent on the light. The fact that the shot of the dog was from about the same angle, taken at around the same time of day, and with about the same weather should mean that the two images will work well together. Also, both image were shot from about their relative centers. That will help with the illusion.
Figure 3.27 is the shot of the boxer puppy.
Figure 3.27. Sugrrr the boxer.
1. Open a couple of images, the first being the shot of the auto you want to use and the second being the image you want to place it against. I’ve already removed the background from the image of the car. For several examples of how this can be accomplished, check out Appendix B.
2. With the background of the car removed and the car image made active by clicking its title bar, choose Selections, Select All. Then select Edit, Copy. If you like, you can close the image of the car to free up some memory for Paint Shop Pro.
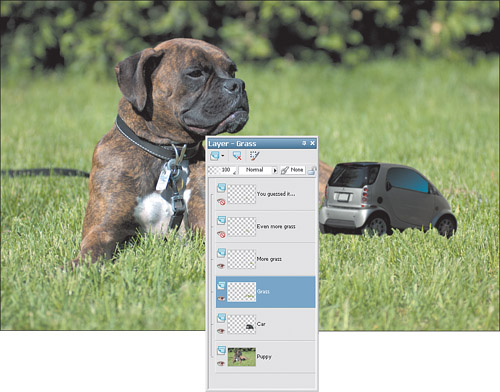
3. Activate the second image—in this case it’s the photo of the boxer—and select Edit, Paste As New Layer. This places the image of the car into the image of the puppy (see Figure 3.28).
Figure 3.28. Putting the car and the puppy together.

4. Select the Pick tool and use it to resize the car by clicking and dragging one of the corners of the bounding box. Move the resized car into position (see Figure 3.29).
Figure 3.29. Resize and position the car in the grass.

Doing a Little Yardwork
There is one more small detail that helps with the illusion, though. If you look closely at the photo of the dog, you’ll see that there’s a pretty small field of depth. Notice that I’ve placed the car, which is in focus, within that narrow band of grass that’s in focus in the photo of the dog.
If necessary, resize the car so that it fits within that bit of the grass.
This is one of those times when you’ll want to zoom in ridiculously close. You also should select a small brush size and play with hardness settings until you can get the cloned grass to look right.
After you’ve cloned some of the grass, you can clean it up with the Eraser tool. You can also copy and paste from the cloned layer into another layer to thicken your cloned grass.
In fact, I used several layers to hold bits of the lawn. This made it fairly east to reposition the different bits so I could get the realistic look I was after.
The lighting and the color look good, but the car still looks like it was pasted into the photo of the dog, which of course it was. To help with that final problem, the Clone Brush can be used to clone some of the grass in front of car along the car’s bottom.
5. With the car layer active, create a new raster layer to clone the grass to it by clicking the New Raster Layer Icon in the Layers palette.
6. Select the Clone Brush and use it to copy some of the grass from the layer with the image of the puppy. Make sure the Use All Layers option is on so you can clone the grass to the new layer from the underlying layer.
Finishing Up
After finishing up the grass implants, I thought the car still looked a little too real. I figured that a little softening might be just what the doctor ordered.
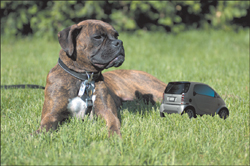
7. Make the car layer active by clicking its layer in the Layers palette. Then select Adjust, Blur, Gaussian Blur. I set the Radius to 2.00 because that setting seemed to give me the best result. That’s it. You can see my final toy car in Figure 3.30.
Figure 3.30. Great, my front lawn is starting to look like a circus tent.
Wrapping Up
This was a fun chapter for me because I love bikes, cars, and trucks. I hope you enjoyed it as well and that it inspires you to grab your camera and head out for a photo-gathering adventure.
Don’t be narrow-minded when thinking about forms of transportation for projects like the ones in this chapter. You could work with bicycles, planes, trains—baby strollers might even be fun to work with.
If you are not inspired by thoughts of travel, maybe you’d like to think about some pet photos. The next chapter has a couple of projects that use some fun photos of our furry friends, so get going.