
Chapter 2. Digital Plastic Surgery
Everyone has a few wrinkles, a regrettable nose, or at least the occasional bad hair day. Even the models on the magazine covers don’t get out of bed looking that perfect. What doesn’t get fixed under a surgeon’s knife can be cut and pasted in the digital darkroom. So, let’s learn how to use their tricks on your own photos.

Project 1: Digital Wrinkle Cream
Project 2: Colorful Contacts
Project 3: Fuller Lips
Project 4: Brighter, Whiter Teeth

Project 5: Lose 20 Pounds in 20 Minutes
Project 1. Digital Wrinkle Cream
The years aren’t always kind. Those crow’s feet at the corners of the eyes are eventually accompanied by frown lines, blemishes, and leathery skin. Wrinkles add character, but they can sometimes be too much of a good thing. You can take off years of sun damage and stress in the digital darkroom.
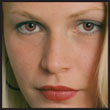
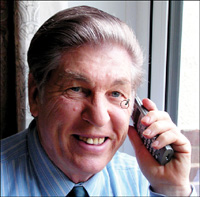
As with the other projects in this book, you can follow along either using your own images or by downloading the ones I’m using here from the book’s website. In Figure 2.1, you can see I’m using an image of a businessman, which is available from www.shutterstock.com (image 188638). He may be smiling in the photo, but he’s clearly had his share of rough days. Here’s how we take away stress, Paint Shop Pro-style.
Figure 2.1. A photo of a businessman.

You’ll notice that, whereas other projects have started with making a selection to separate part of a photo from its background, we don’t need to do that here. The setting of this image is just fine. It’s the subject himself we’re retouching.
1. Start by making a duplicate of the background layer. This allows you to easily start over if you make a mistake. To do this, right-click the layer in the Layer palette and then select Duplicate. You can keep the default name for the new layer, but it’s a good habit to give your layers meaningful names.
2. Zoom in on the subject’s face. This gives you a good look at the wrinkles on his forehead and around his eyes. You’ll also notice a blemish on his right cheek, which we can fix later.
Smoothing the Forehead
As with most digital darkroom projects, there are several ways to do the same thing. In this case, we’re going to remove wrinkles. If your subject has a few light crow’s feet in the corners of his eyes, the Dodge or Smudge brush is just subtle enough to smooth them away. The Clone Brush is another option. In the case of our current subject, however, we need heavier artillery—the Scratch Remover tool.
3. Click the down arrow to the right of the Clone Brush, and select the Scratch Remover tool. Change the selection box option to the beveled edge. Set the width to grab some of the smooth skin on either side of the wrinkle without enclosing neighboring wrinkles. In this example, I used a width of 12.
4. Click and drag the tool from one end of a wrinkle to the other (see Figure 2.2).
Figure 2.2. Positioning the Scratch Remover tool.

Tip
Don’t feel pressured to capture a complete wrinkle or scratch within one stroke of the Scratch Remover tool. Sometimes correcting smaller sections works better than attempting the whole thing at once. This is particularly true for some of the deepest wrinkles, where trying to eliminate it all in one pass leaves behind the appearance of scar tissue.
5. When you release the mouse button, the wrinkle essentially disappears, leaving smoother skin behind (see Figure 2.3). Continue applying the Scratch Remover to other wrinkles on the forehead. Don’t go overboard, though (see Figure 2.4)! Newborn skin only looks natural on a newborn. If you do go a bit too far, though, don’t panic just yet. You can bring back some of those distinguishing features later.
Figure 2.3. The wrinkle disappears.

Figure 2.4. Too much of a good thing?
Pecking Away at the Crow’s Feet
Crow’s feet, those wrinkles that form at the outside corners of the eyes, are often deeper than those on the forehead. Using the Scratch Remover tool on deep folds, particularly those near the subject’s right eye, will leave behind what appears to be a poorly healed scar on the skin. We’ll need to use other techniques around the eyes.
6. Let’s start with the left eye (the one on the right side of your image). The light from the window makes the skin around this eye appear very bright and soft, and we’re going to use this to our advantage. Click the down arrow to the right of the Lighten/Darken brush, and select the Soften brush. You can experiment with the settings for this brush, but what you’re looking for is a stroke that will soften the fine lines without obliterating the detail of the eye. I set the brush for Size 10, Hardness 10, and Opacity 75 and left the other setting at the defaults.
7. Apply the Soften brush to the underside of the left eye, stroking from the inner corner to the outside corner following the shape of the eye. Be careful not to use the brush inside the eye itself—you don’t want to distort the eyeball. As you stroke, the lines are smoothed out (see Figure 2.5).
Figure 2.5. Softening the lines around the left eye.
8. For the upper lid of the left eye, simply decrease the size of the brush. Again, follow the shape of the eye for a natural look. If you go overboard, you can undo a step and try again.
Cloning Away the Deepest Wrinkles
The right eye requires yet a third technique. If you smooth it, it takes on an unfocused appearance, and we don’t want that. A better choice in this instance is the Clone brush.
9. You need to click the down arrow next to the Scratch Removal tool we used earlier to switch to the Clone brush. Modify the settings so you have a small, soft brush that can capture the smooth skin between the folds of the image.
10. Zoom in on the right eye so you can easily get into the nooks and crannies.
11. To apply the Clone brush, center the brush over an area of smooth skin near a wrinkle. Right-click the smooth skin; this is the area that will be cloned. Now left-click to apply the brush to the first wrinkled area (see Figure 2.6).
Figure 2.6. Applying the Clone brush to the right eye.
Tip
In a small area such as the one here, you might have to take small steps, smoothing over one area at a time, adjusting the size of the Clone brush as necessary, right-clicking a new area near a wrinkle, and then applying it.
12. Continue applying the Clone brush under the right eye and down the cheek.
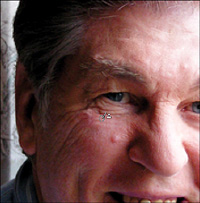
Again, don’t get too carried away because you’re just trying to take off a few years rather than completely reconstruct the subject’s face. You can see where I called a halt in Figure 2.7.
Figure 2.7. The area around the right eye has been smoothed out a bit.

Finding a Balance
Remember when I said not to worry if you go a bit too far? Here’s where you can bring back a hint of what you just took away. This is also where working on a new layer and leaving the original image in the background comes in handy.
13. On the Layers palette, adjust the Opacity on the layer you just retouched. This allows a bit of the background layer to show through, giving just the hint of the original wrinkles (see Figure 2.8).
Figure 2.8. Looking younger, but not too young.

Note
This is purely a matter of personal taste. I found an Opacity of about 83 allowed just a hint of the original to show through without undoing all my hard work.
Our subject is looking much younger. Erasing the wrinkles, however, has enhanced the prominence of another flaw. See the blemish on the right cheek? Let’s see what we can do about it.
Click the Makeover tool and then select the Blemish Fixer from the tool options. Choose a size that’s just a bit larger than the blemish. Center the Blemish Fixer over the blemish on the cheek, and then click. That’s it! The blemish blends into the surrounding skin.
As you can see in Figure 2.9, that last little touch-up has enhanced the final result.

Project 2. Colorful Contacts
Everyone has features they want to change about themselves. Sometimes it’s wishful thinking, wanting to look younger or have a different body type; sometimes it’s as simple as wanting a new hairstyle or different eye color. Paint Shop Pro can help you try on all those different looks without investing in plastic surgery or even colored contact lenses.
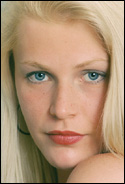
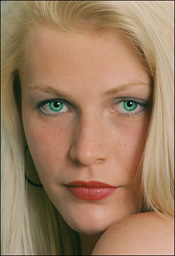
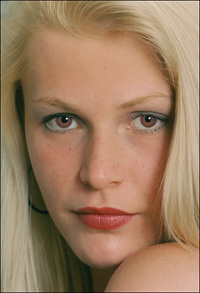
For this project, I’m using Marianne as a model. (see Figure 2.10). Although Marianne’s eyes are quite striking already, let’s see how she’d look with green eyes, or even brown. As always, feel free to use the image of Marianne on the book’s website (marianne.tif) or follow along with your own image.
Figure 2.10. Marianne’s blue eyes.
1. Begin by duplicating the background layer. I labeled this layer Eyes. Retaining the original image in the background lets me quickly revert to it in case of mistakes.
2. Zoom in on the eyes to make them easy to select.
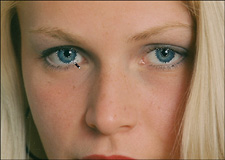
3. Use your favorite selection tools to select the eyes. The Magic Wand works well here because the blue stands out against the whites of the eyes and the pale skin (see Figure 2.11). Using the Add mode, you can select both eyes at once, which ensures both eyes wind up the same color (assuming that’s the effect you’re after). Be careful around the top eyelid, however, so you don’t select the blue eye shadow.
Figure 2.11. The Magic Wand easily selects the blue eyes.
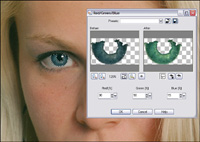
4. With the eyes selected, choose Adjust, Color, Red/Green/Blue. In the dialog box, use the Zoom In button to get close in on one of the eyes. Lower the Red setting to about 30, and then change the Green and Blue settings to 50 and 15, respectively (see Figure 2.12).
Figure 2.12. Zoom in on an eye to see the result as you adjust the color settings.
5. Click OK to accept the changes; then choose Select, None to see the full effect of your work. The flecks of color and other details of the eye remain intact, even as the color has completely changed (see Figure 2.13).
Figure 2.13. Her friends will be green with envy.
What Can Brown Do for You?
Green is striking, but brown eyes are constantly underrated. Brown eyes on the right face can be equally beautiful.
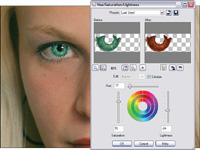
6. Reselect the eyes or select Edit, Undo to return to the previous selection. This time, however, select Adjust, Hue and Saturation, Hue/Saturation/Lightness. Set the Hue to 17, the Saturation to 70, and the Lightness to –24, as shown in Figure 2.14.
Figure 2.14. Changing the hue, saturation, and lightness all at once.
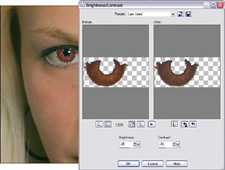
7. Change the brightness of the eyes by clicking Adjust, Brightness and Contrast, Brightness/Contrast. I lowered the brightness to –26 and the contrast to –36 (see Figure 2.15).
Figure 2.15. Lowering the brightness and contrast makes for a more realistic color.
You can use either the Red/Green/Blue or Hue/Saturation/Lightness adjustments for anything from subtle, natural eye color changes (see Figure 2.16) to the downright spooky. Then you can tweak the intensity with the Brightness and Contrast adjustments. Try lowering the Green and Blue settings while ramping up the Red sometime!
Figure 2.16. From green to brown in two easy steps.
Project 3. Fuller Lips
In real life, collagen can make lips look fuller, but it can also give the impression of a duck’s beak if overdone. In the world of the digital darkroom, however, you can enhance the lips without a trip to the plastic surgeon and without risking permanent damage.
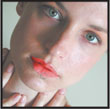
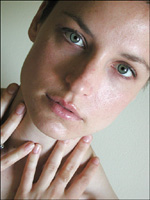
For this project, I’m using a subject without makeup (see Figure 2.17). Not only can we enhance the shape of her lips, but we can also give her a splash of color to complete her look. Feel free to substitute your own image as you complete this project or download makeupfree.tif from the book’s website.
Figure 2.17. It’s a beautiful face, but it could use a little something.
1. After making the requisite duplicate of the background layer, zoom in on the lips. Use your favorite selection tools to select the lips.
Tip
Just a hint: The Magic Wand can prove troublesome with this selection because the skin color is so close to the lip color. If you’re going to use this method, you should set the tool to a low tolerance and proceed slowly. A faster choice is the Freehand Selection tool using the Edge Seeker mode.
2. With the lips selected, choose Selections, Promote Selection to Layer. This creates a new layer with just the lips, labeled Promoted Selection. You can keep this default name or click the name in the Layers palette and enter a more meaningful label, such as Just Lips (see Figure 2.16).
Figure 2.18. The Layers palette now has a duplicate of the background layer and a layer with just the lips.

3. With the new promoted selection layer active, choose Selections, Modify, Feather. Feather the selection to expand it by about 12 pixels. This gives you room to increase the size of the lips. You should keep the lips selected while you follow the next few steps.
Note
You might be asking why it was important to maintain the selection even after we promoted it to the new layer.The answer is that it restrains the amount of warping you can do. If you extend the Warp brush beyond the selection, the lips stop expanding after they hit the selection border.Think of it as coloring within the lines.
4. Now comes the fun part! Click the Warp brush. Select the Push mode, and adjust your brush to the size of the bottom lip.
5. Position the Warp brush over the bottom lip, and slowly start pulling the lips outward to the desired size. Be careful not to catch the upper lip or teeth in this maneuver because it will distort the mouth more than we intend. Small strokes in one direction maintain the continuity of the lines in the lips.
6. Change the size of the brush to the width of the upper lip and use the same procedure to push the lip upward (see Figure 2.19).
Figure 2.19. The selection border keeps the lips from taking on monstrous proportions.

7. When the lips reach the size you desire, click Apply in the Warp brush options palette to finalize your changes.
Tip
The Warp brush isn’t just for collagen simulations. If your subject isn’t smiling quite enough, an adept hand can turn up the corners of the mouth a bit without deforming the rest of the face. Simply follow the same steps in this project, but apply the Warp brush only to the corners of the mouth. Moderation is key unless you want your subject to look like Batman’s nemesis, The Joker.
Adding a Bit of Color
If you toggle the visibility of your new lip layer, you can see the marked difference between the subject’s original lips and her new pout. It’s rare to see such lips without makeup, however, so we’re going to add some digital lipstick.
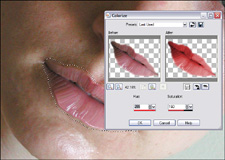
8. With the lips still selected, select Adjust, Hue and Saturation, Colorize. Set the hue to 255 to get a bright red; then use the Saturation setting for just the right shade (see Figure 2.20).
Figure 2.20. Adding digital lipstick.
Of course, there are many things you can do from here. For a summer look, use the Makeover tool to apply a suntan to her skin. If your subject has a bit of the goth in her, you can whiten out her face, make the lipstick a blackish red, and add black eyeliner.
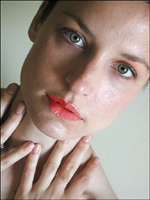
I chose a subtle look, adding a bit of color to the cheeks and eyelids using the Saturation Up/Down brush. You can see the final result in Figure 2.21.
Figure 2.21. Makeover complete.
Tip
The realism you want to achieve in this project greatly depends on your rationale for undertaking it. If you’re aiming to exaggerate the subject’s features for fun or mischief, you might want to leave it here. If, on the other hand, you’re trying to enhance the lips for aesthetics, you should blend them in better so they look more natural. You’ll notice the bottom lip is in particular need of this technique. To blend it in, select the Dodge Brush and use it along the edge of the lips. You can also use the Soften Brush for further blending (see the accompanying figure).
A better blend.
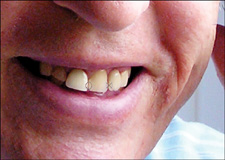
Project 4. Brighter, Whiter Teeth
Have you ever taken pictures of people who refuse to smile? No matter how much you beg and cajole, you just can’t get them to show their pearly whites. In most cases, it’s because their whites aren’t that pearly. More people are ashamed of their teeth than almost any other body part, and although there seems to be no end to the teeth whitening commercials on TV these days, those products don’t do the job for everyone.
You can reassure your friends that their smiles will be at their best if you learn how to do some digital dental work. The best part is that there’s no messy gel or mouthpiece, and instead of waiting weeks to see results, your friends and family can display their brilliant smiles in just minutes, at least in photo form.
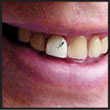
For this project, I’m using the same businessman we de-wrinkled earlier in this chapter. His face is much smoother, but that only serves to make the yellow of his teeth stand out that much more (see Figure 2.22). In a few steps, he can have a younger smile to match his digital dermabrasion.

Note
When we finished the last project with this image, we used the Opacity setting of the top layer to allow a hint of the background layer to show through. Although this suited our purposes for that project, it can work against us here. If you whiten the teeth on the bottom layer, residual yellowing will remain because of the un-retouched layer above it. If you whiten the teeth on the topmost layer, further adjustments to the Opacity setting will allow the yellowing from the background layer to reappear.
The key to avoiding these problems is to be sure you’re happy with your Opacity settings before beginning the teeth whitening process. Then, with the top layer active, select Layers, Merge, Merge Down. This flattens the image back down to one layer, with all your changes incorporated.
1. As always, begin by making a duplicate of the background layer by right-clicking it in the Layers palette and clicking Duplicate. Because this project requires a couple layers, avoid confusion early by labeling the layer something meaningful, such as Businessman.
A Little Orthodontia
If you look closely at the mouth, you’ll notice that one of the teeth is a bit crooked and more prominent than the others. If you want to remain true to your subject, leave this alone. To present him at his best, however, the digital equivalent of braces is in order.
There are actually two problems with the prominent tooth. First, the bottom-right corner overlaps the tooth next to it a bit. Let’s start there.
2. Zoom in on the mouth.
3. Click the Clone brush, and adjust the size of the brush to match the shadow between the two teeth to the right of the prominent one (see Figure 2.23).
Figure 2.23. Borrowing a bit from another tooth.
4. Brush the cloned area onto the right side of the protruding tooth and the left side of the next tooth over. This slightly changes the shape of the tooth to the left so it covers up the prominent one. Be sure to use the area of the cloned tooth where it meets the mouth to round the right edge of the prominent tooth a bit.
5. After you have the shape as you want it, clone a sample of the tooth you’ve just corrected and blend in the color. Even though we’ll be adjusting the color of the teeth shortly, a mismatch in color to begin with will affect the final results.
A Bit Longer in the Tooth
Now let’s look at the left side of the prominent tooth. Even though that tooth appears larger, the bigger problem is that the tooth to the left of it is smaller than its counterpart on the other side of the mouth. We can use this flaw to our advantage. If we lengthen the smaller tooth a bit, it will even things out.
6. Click the Freehand Selection tool, and use your favorite selection method to select an area toward the bottom of the tooth (see Figure 2.24). If your selection skills are rusty, see Appendix B, “Paint Shop Pro X in a Nutshell,” for a refresher.
Figure 2.24. Selecting a bit of the shorter tooth.

7. Click the Pick tool to promote the selected area to a new layer, which you can rename Tooth or any other meaningful label. Set the tool for Free Mode.
8. Increase the length of the tooth a bit, so it conforms with the flow of the rest of the teeth (see Figure 2.25). You might need to sheer the sides a bit so the tooth doesn’t overwhelm the ones on either side.
Figure 2.25. Changing the proportions of the tooth.
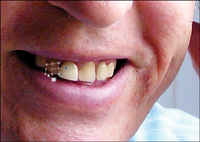
None of these changes have been drastic—although you could certainly make them as outrageous as you want. Even a little bit of cosmetic work has improved the smile, however, and has us ready for the next step (see Figure 2.26).
Figure 2.26. Orthodontia complete...now onto the whitening.

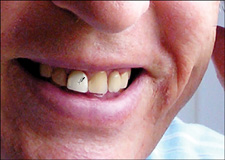
Whitening Without the Mess
After all this prep work, the actual whitening process is easy. There are several digital approaches to tooth whitening, ranging from the relatively simple to the extremely complex. Paint Shop Pro X has made it downright easy, though, with the Makeover tool.
9. Click the Businessman layer.
10. Click the Makeover tool, and then select the Toothbrush option. Set the strength to about 50.
11. Click a tooth. The area around where you click instantly whitens without losing the detail of the tooth (see Figure 2.27). The more times you click an area, the whiter it gets. Be careful not to click the lips or gums.
Figure 2.27. The Toothbrush whitens teeth with just a click.
12. Continue clicking teeth to whiten them. You can change the strength of the toothbrush as necessary to whiten areas of the teeth without applying it to the gums and lips.
Note
Even though it’s tempting to give all your subjects teeth that rival Jessica Simpson’s in brightness, use restraint. Teeth aren’t truly white to begin with, and they naturally yellow a bit with age. Also, teeth at the back of the mouth are darker than those at the front because they’re shadowed.
13. Because the tooth we adjusted earlier is on a separate layer from the others, you’ll need to return to the Tooth layer and apply the Toothbrush to it.
A Step Further...or Not
As you can see from the end result (see Figure 2.28), our businessman now has a whiter smile to go with his softer skin. We could have gone further in our digital orthodontia and narrowed the prominent tooth even further, but I don’t like to completely remove someone’s imperfections. If everyone started looking the same, the world would become very boring visually.
Figure 2.28. Ready for his close-up.

The Makeover tool greatly simplifies tooth whitening, but it comes at a price: The tool limits your control over the process because it guesses which area you intend to whiten and how much whitening to apply. You can mitigate this somewhat with judicious use of the Strength setting, but you’re still compromising ultimate power for ease of use.
For those with the time and inclination, the old-fashioned approaches to digital dentistry are often worth the effort. For one such method, select the teeth, without capturing the lips and gums; then feather the selection (Selections, Modify, Feather) by 1 pixel. Select Adjust, Hue and Saturation, Hue/Saturation/Lightness; set the Saturation to 0; and then bump up the Lightness until you get the desired shade.
Another technique involves selecting the teeth and using the Dodge brush to whiten the teeth. It’s your digital darkroom, so use the technique that gives you the best results!
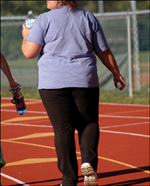
Project 5. Lose 20 Pounds in 20 Minutes
Everyone thinks they could stand to lose a few pounds, and many of us really could. But while weight loss achieved through diet and exercise is mentally satisfying and contributes to better health, it takes awhile. When you need a quick fix, it’s time to put Paint Shop Pro X to work.
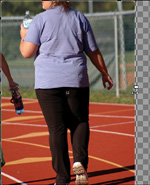
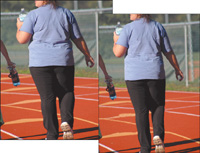
I’ve chosen a subject who’s losing weight the nonvirtual way, walking at the track (see Figure 2.29). We’re going to give her weight loss a digital boost. If you don’t have an image of your own to try this technique on, you can grab a copy of mine from www.shutterstock.com, image 596348.
Figure 2.29. Our subject, losing weight the old-fashioned way.
Tip
One other thing worth mentioning about this image. Getting friends to agree to let you use their photos in a project relating to weight loss can be as impossible as winning the lottery. This is where stock photography comes into play. In most cases, you won’t want to work your digital magic on complete strangers, but stock photography can be useful when looking for particular objects or settings for your images.
Here is one of the rare exceptions to the always-duplicate-your-background-first rule. For this project, the first thing you should do is scale down the width of the entire image.
1. Click Selections, Select All.
2. Click the Pick tool and change the X Scale setting to 95%. The image will get 5% narrower.
3. Change the visibility of the Background layer by clicking the eye icon in the Layers palette.
4. Notice that there’s a transparent band on the right side of your image. Click the Crop tool, and change the Snap Crop Rectangle to setting to Layer Opaque, eliminating the transparent area (see Figure 2.30).
Figure 2.30. Cropping away the pounds.
5. Click Apply in the Crop tool settings. The band disappears, leaving only your narrower image.
6. The process of changing the width of the image has automatically created a second layer labeled Promoted Selection. To keep your layers organized, you should change this label to something more meaningful, such as Cropped.
Note
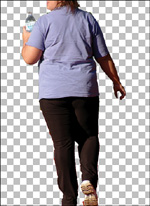
Notice how our subject already looks thinner (see Figure 2.31)? By retaining the height of the image but narrowing the width, everything looks a bit longer and leaner. This technique can take you only so far, though. If you narrow the image any more than about 95%, your subject and the background become too distorted to be believable.
Figure 2.31. Already looking thinner.

Putting the Subject in Isolation
We want to change the person in this image—not her locale. To make the changes we want, we need to pull a copy of her out of the picture.
7. Use your favorite selection method to select the woman in the picture. If you need a review of selection techniques, see Appendix B.
8. Choose Selections, Promote Selection to Layer. I’m labeling this new layer Body.
9. Be sure the new Body layer is active; then choose Selections, None.
If you turn off the visibility of the Cropped layer, you can see that the woman is now on her own layer against a transparent background (see Figure 2.32).
Figure 2.32. Now that we’re alone...
Taking Off a Few Inches from the Sides
Without the track and other background elements as a distraction, we can see which areas need some work. Let’s start with the love handles. We can’t completely change the subject’s body type, but we can shave off a few inches here and there.
10. Click the Warp brush, and set it for Push mode. Set the brush to a medium size (see Figure 2.33).
Figure 2.33. ...let’s slim down to a more comfortable size.
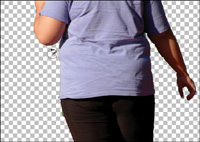
11. Apply the brush to the transparent area along the woman’s left side, stroking downward, just barely overlapping the shirt. If you brush too far into the body, it becomes distorted, leaving you with a mess to clean up.
12. Continue shaving off the sides, a little at a time until you’re satisfied with the result.
13. Zoom into the area between the left arm and the body, and adjust the size of the Warp brush accordingly, to smooth out that area in proportion to the love handles you eliminate lower down.
As we trim some areas of the body, it’s important that we keep an eye on the proportions of the body as a whole. To do this, click the Palettes button on the Standard toolbar and then select Overview. This gives you a full view of the image even as you zoom in on particular areas.

The Overview palette lets you see the whole body.
14. Use the Warp brush on both sides and down the legs. You can even use it sparingly on the arms.
15. When you’re satisfied with your adjustments, click Apply on the Warp brush toolbar to preserve your changes.
As you can see in Figure 2.34, by using the Warp brush only at the very edges of the subject, we’ve been able to subtly change her body without distorting her shirt or pants.
Figure 2.34. The Warp brush has shed quite a few pounds.

Those Last 5 Pounds
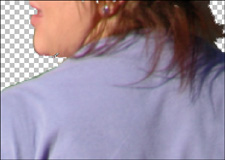
If you’ve ever dieted, you know the last 5 pounds are always the hardest to lose. We’ve made significant losses along the sides and legs, but there are still a few telling characteristics that give away our touch-up job.
If you zoom in on the woman’s face, you see a slight double chin. Using the Warp brush in this area is pretty chancy, but there’s another solution.
16. Click the Eraser tool. Carefully erase the double chin, leaving the neck and jawline intact (see Figure 2.35).
Figure 2.35. The Eraser takes care of the double chin.
17. Another problem area is the woman’s shirt. The wrinkles are no problem—she’s working out, after all—but the bulges on the middle of the left side and the lower right side don’t match our new slim body. The Clone brush can smooth those away.
Click the Clone brush. Then, right-click a fairly smooth area of the shirt near the area you want to correct.
18. Left-click and brush away the bulges. You might need to resample frequently to avoid repeating wrinkle patterns and get the right lighting and shading for each section.
After we’ve completed our digital diet camp, it’s time to put our subject back into her natural surroundings.
Back to the Real World
While our subject has gone into isolation and slimmed down, her world has stayed the same. Thus, when you turn on visibility on the Cropped layer beneath the woman, you’ll see pieces of her former self sticking out around her. There’s nothing worse than going through all that trouble to lose weight and having everyone still perceive you as fat. Let’s help the poor woman out.
19. With the Cropped layer active, but keeping the Body layer visible, use the Clone brush to clone bits of the track and other background elements around the woman’s body. Your changes won’t affect the Body layer, so you can use that as a guide of how much you need to erase.
In less than 20 minutes, we’ve taken more than 20 pounds off our subject (see Figure 2.36). If we’d chosen to, we could’ve copied and pasted our completed Body layer into a completely different background.
Figure 2.36. Back on the track, thinner than ever.
Wrapping Up
Because most digital photos are of family events and activities, I hope the projects in this chapter help you make the most of these images. A light touch can subtly bring out the best in your subjects, while a heavier hand can take off several years or pounds. Many of the techniques in this chapter can be used in other ways. The toothbrush, for example, also works to enhance the whites of the eyes and cloning can add hair to cover a bald patch. Have fun!