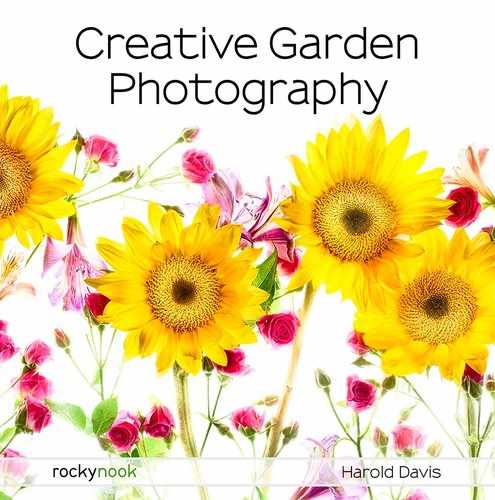
Of Light and the Garden
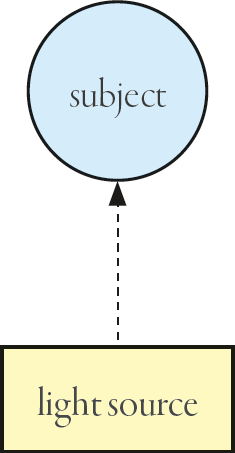
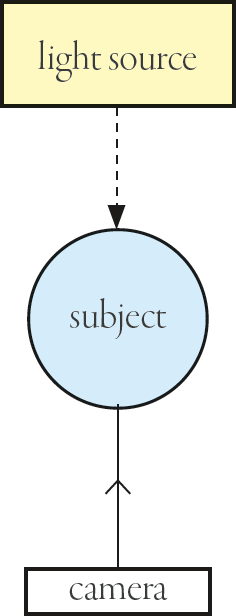
It’s a truism of physics that you can’t photograph an actual object. As odd as this may sound—and I know some folks will go, “say, what?”—I will repeat that it isn’t possible to photograph subject matter itself, only light transmitted or reflected by an object that is the photographic subject.
As counterintuitive as this seems, it is absolutely true, and worth repeating: If light is not being emitted or reflected, there is nothing to photograph.
The implication is that if one is photographing emitted or reflected light, one needs to pay particular attention to that light, perhaps even more so than the object that is doing the reflection or transmission.
It is usually pretty obvious when you are photographing emitted light, such as that emitted by a bare light bulb. It’s not as common to photograph emitted light as reflected light, because not that many objects actually emit light, and when they do, they are often not very attractive.
We don’t usually make photographs of our flashlight beams or strobes, or looking directly into the sun. While a given photo may have some emitted light in it, the vast bulk of photographic compositions deal with reflected light.

Road Less Traveled—This image shows two entrances to the Green Dragon Temple, which is nestled in a valley just to the north of California’s Marin Headlands. On my way out, leaving the monastery and gardens, I turned around and saw the split in the road. The coastal fog cover acted as a diffuser and created a wonderful quality of light, which helps to make this photograph special.
Nikon D300, 60mm, 1/160 of a second at f/6.3 and ISO 200, hand held.
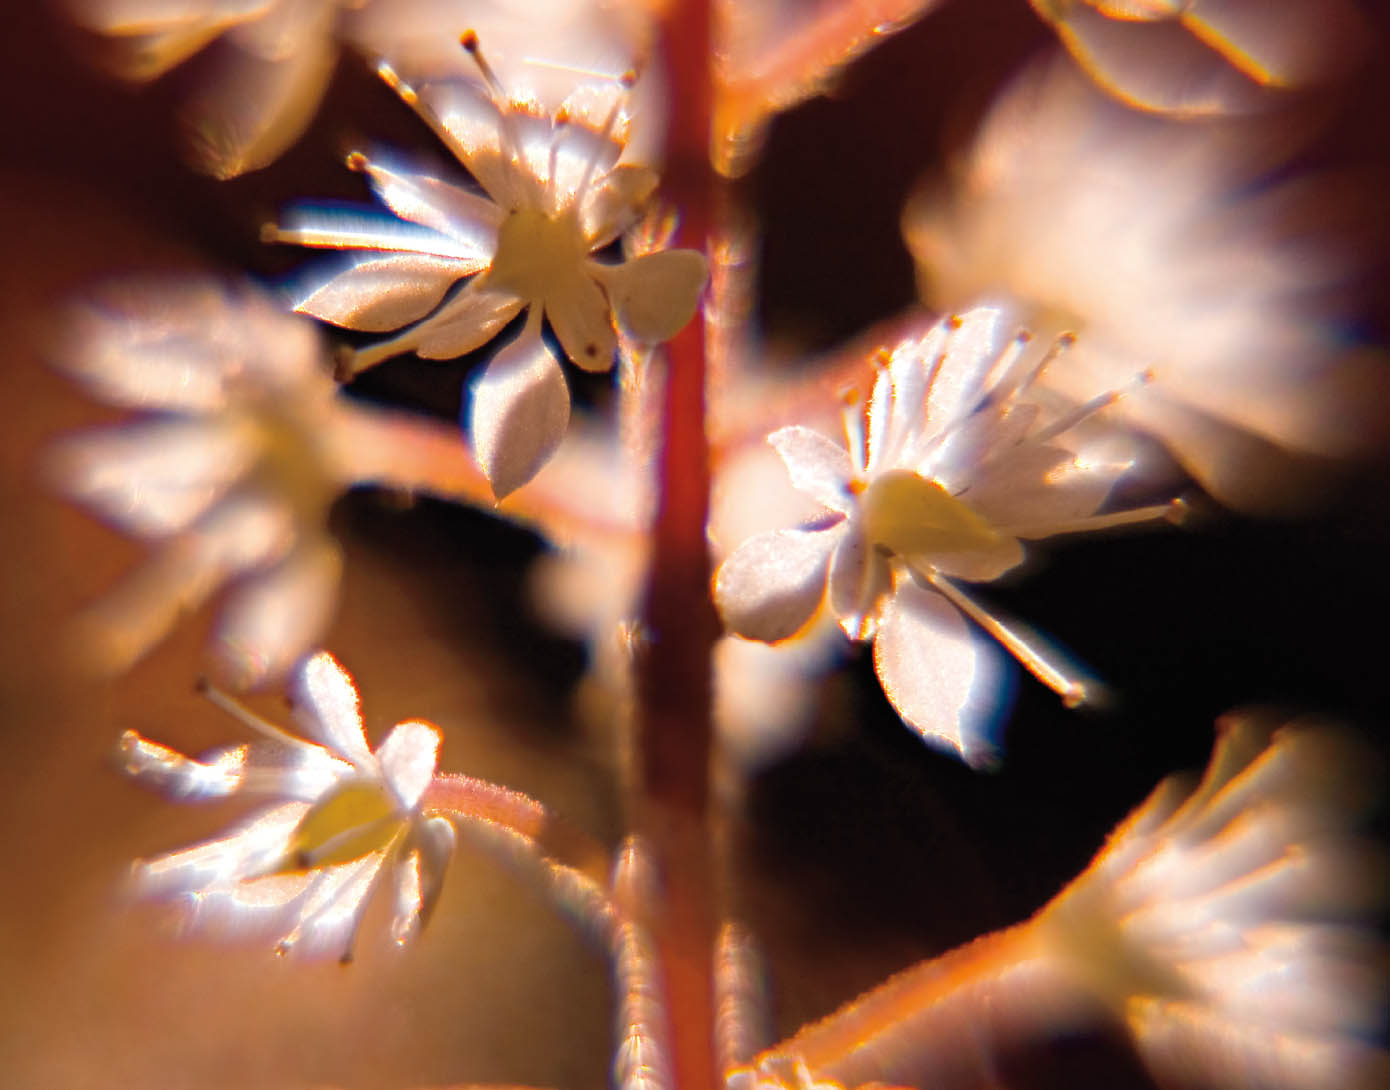
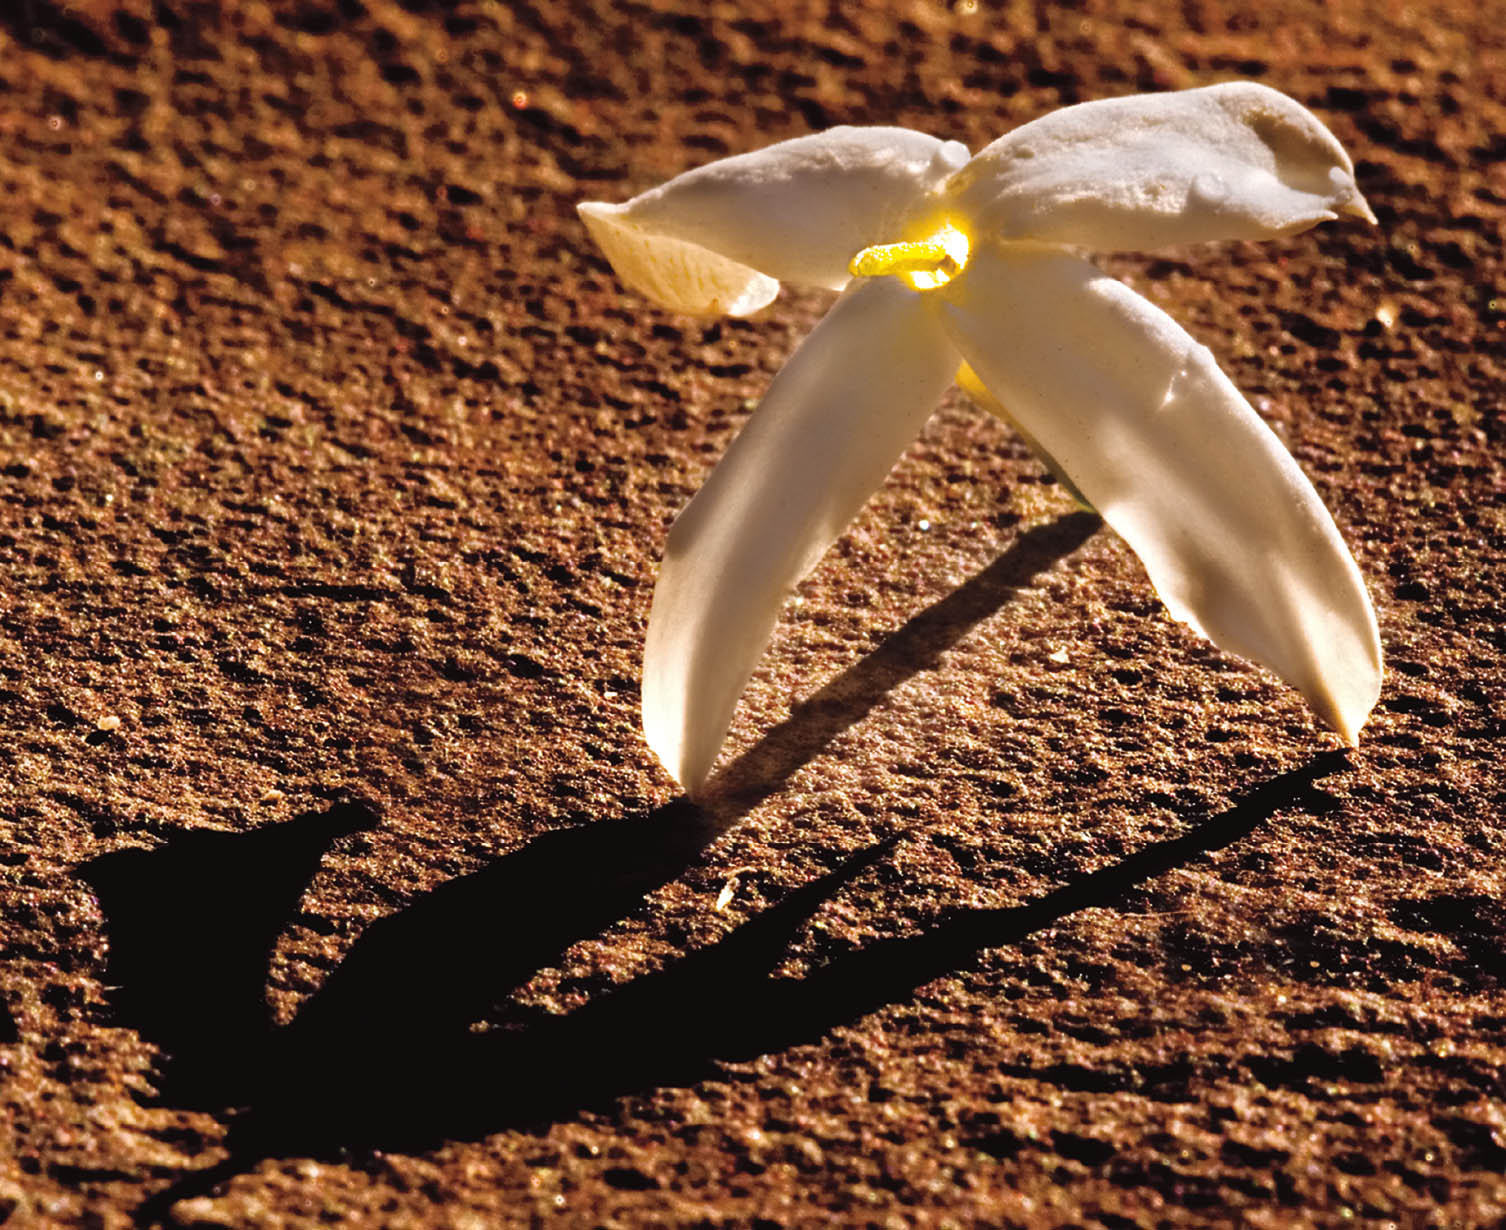
Dawn in the Flower Forest—I watched the way the early morning sun hit this miniature jade flower in my garden over a period of days, waiting for the time when the sun would selectively hit the petals, but not the background of the garden.
Finally the time was right and I lay on my belly with my coffee mug beside me. I was careful to use a telephoto lens that provided me with the additional stability of vibration reduction.
The difference between the intensity of the brightly lit jade petals and the dark background of the garden is what makes this image striking.
Nikon D300, 200mm, 12mm extension tube, +4 close-up filter, 1/400 of a second at f/8 and ISO 200, hand held.
Most elements found in a garden do not emit light. The sun itself is the exception that proves the rule. Therefore, understanding the characteristics of reflected light when photographing in a garden is crucial.
As I’ve noted a few times, light can be either emitted or reflected. In addition, from the photographer’s viewpoint, the following characteristics of light are important:
- Intensity—This is how strong the light is.
- Diffusion—How hard or soft the light is.
- Direction—Is the light coming from behind, to the side, or in front of the camera? Does it fall on the subject or is it coming from behind the subject?
- Color—The color of light is measured in degrees Kelvin and refers to where the light falls on the blue to red spectrum.
Five characteristics—reflectivity, intensity, diffusion, direction, and color—are generally grouped together to form the loosely defined and subjective term, the quality of light.
When I am analyzing a potential photographic subject—such as a flower or in the garden—besides the quality of light, I am also concerned with whether:
- My intentions are to create a dark or light image.
- Transparency plays a role in the image.
- Strong shadows are involved.
- I have pre-visualized the image in color or black and white.
Before I get bogged down in the weeds of light and lighting, so to speak, I do want to say that the first thing I do when I visit a new garden with my camera is to check out the position and strength of the sun, and the weather conditions, such as the extent of cloud cover. From a practical point of view, the role of clouds and the sun in field garden photography is incredibly important.
Often I like to photograph in gardens with some kind of fog or cloud cover. The diffusion of light that this creates is ideal for warm-toned, romantic images with just a hint of softness.
If I am photographing on a full-on sunny day, often I am very aware that the lighting will be best in the late afternoon or the early morning (see pages 92–95).
Intensity of Light
From the viewpoint of understanding light, intensity is perhaps the easiest concept. Intensity of light refers to the strength of the light. This is something that can be measured by a light meter, such as the one in your camera. The strength of the light, as measured by your camera’s light meter, is a great starting place for understanding how to set your exposure in a given situation (see pages 85–91 for more about exposure).
Figure 1. Effective light intensity (side lighting)

*Light falloff subject to the inverse-square law.
It is worth noting that for a photographer, effective light intensity means that, in addition to the strength of the light, you need to consider:
- The distance the emitting light source is from the subject.
- The distance that the subject—which is presumably reflecting light—is from the camera.
To make this a bit more concrete, when photographing a flower in sunlight, you are not actually concerned with the light intensity of the sun as if you were right next to it. (If you were next to the sun, you would be crisped.) You are concerned with the light intensity of the sun as diluted by the distance to the flower. Note that in the real world, dilution of intensity will also occur due to cloud cover, atmosphere, and other factors.
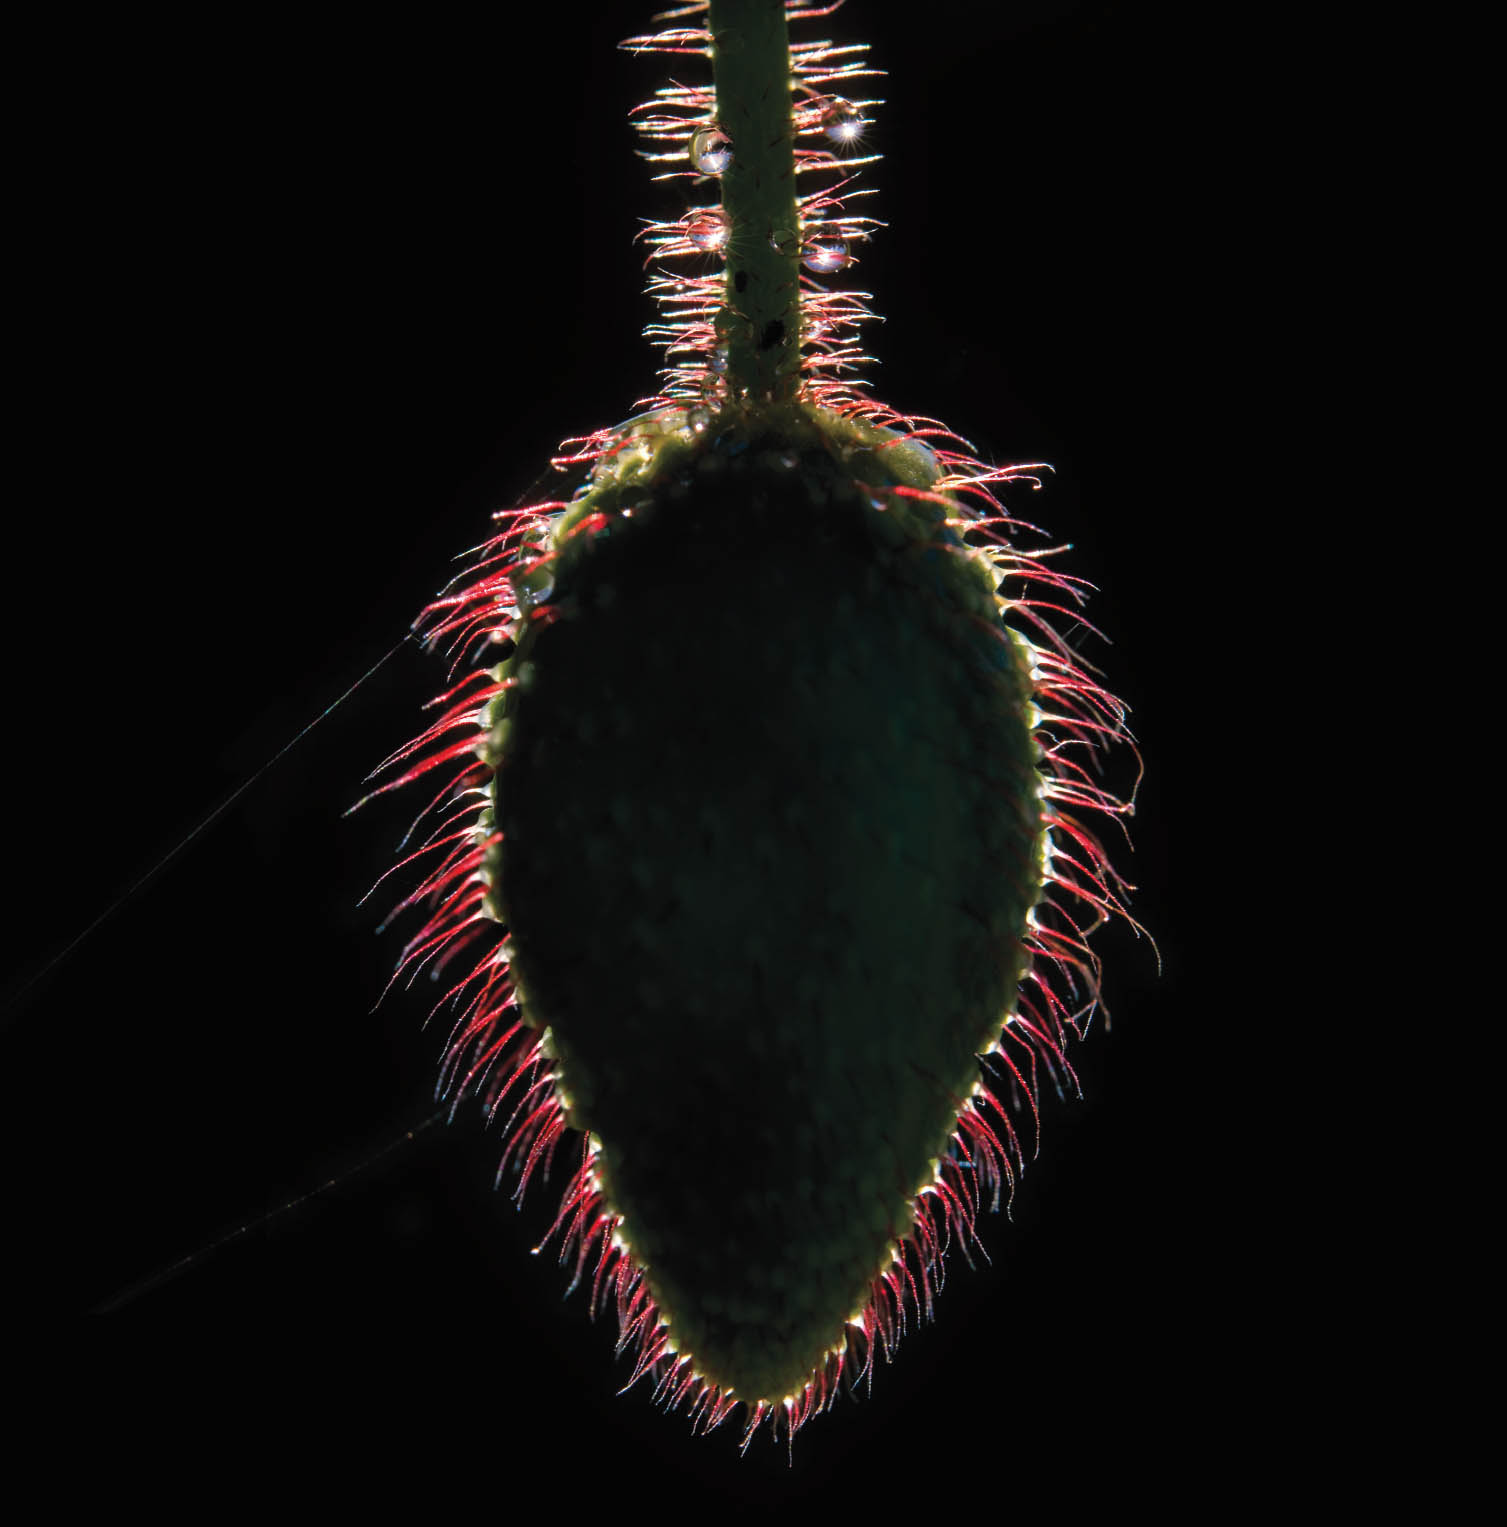
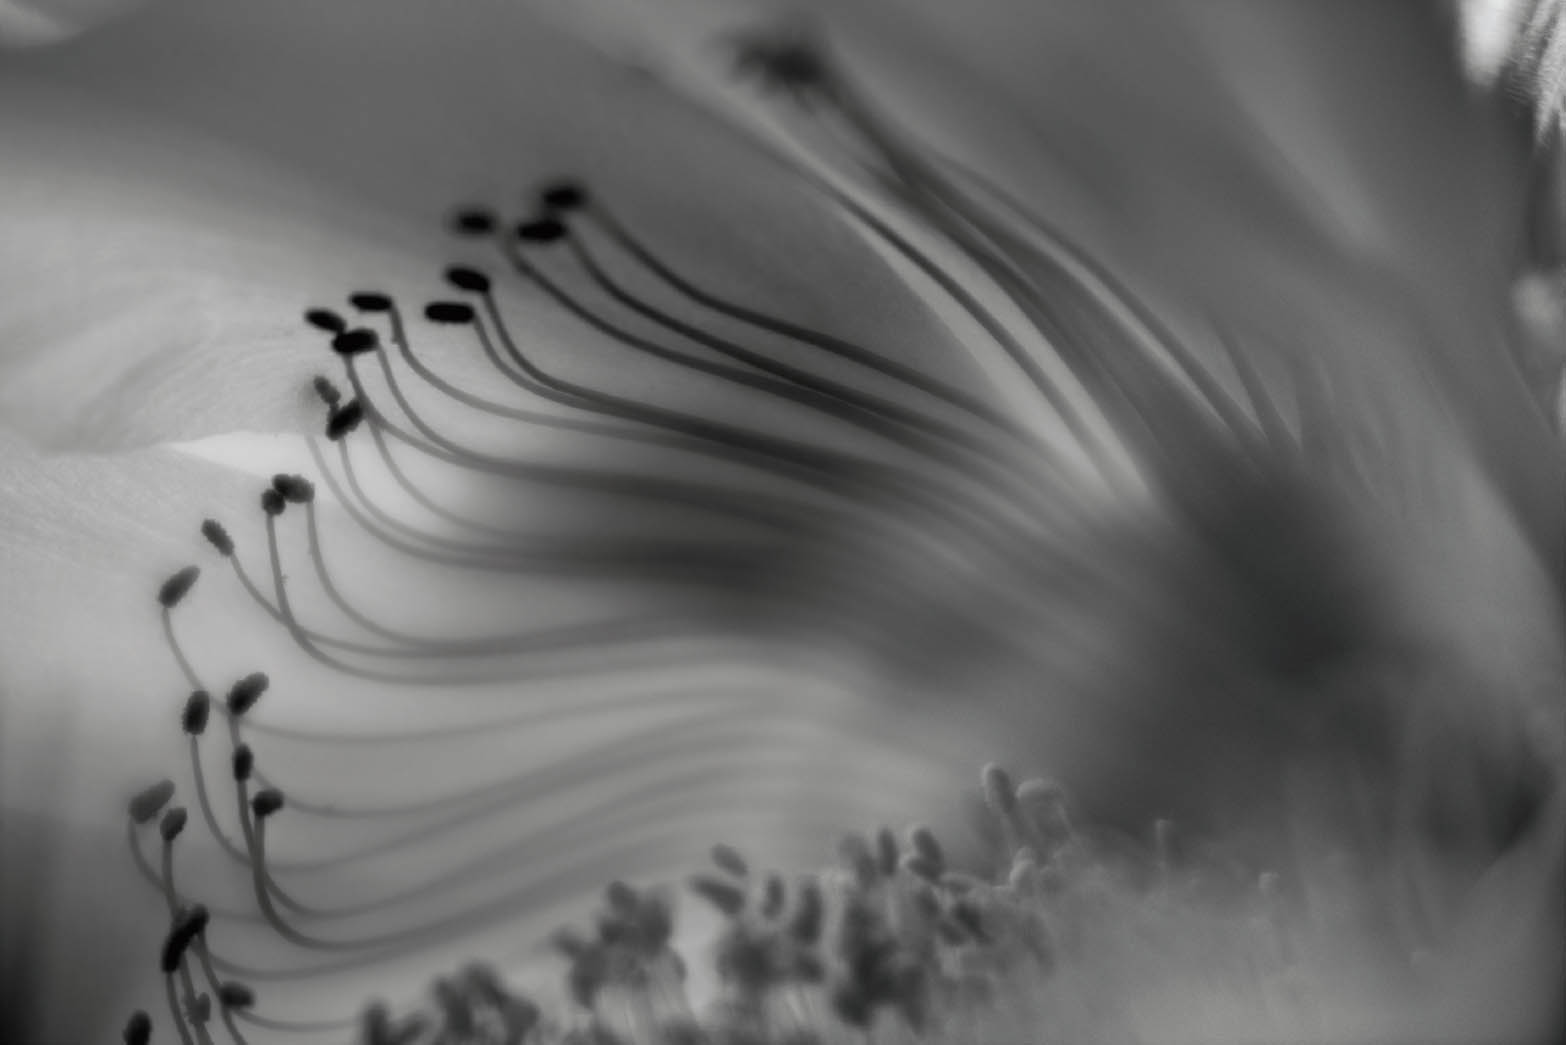
Poppy Snake—This Papaver rhoeas seedpod was backlit by the early morning sun. I exposed for the hairs on the poppy, which are brighter than the shadowed pod itself by several f-stops. The light from the translucent hairs is reflected toward the camera very differently than the light from the seedpod in shadow, and it is this contrast that in part gives this image its punch.
Nikon D300, 200mm macro, 36mm extension tube, 1/400 of a second at f/11 and ISO 100, tripod mounted.
Not only is the emitted light diluted by the distance from the sun (the emitting light source) to the subject, the intensity of the light is further diminished by the distance from the flower (the photographic subject and reflective source) to the camera. This relationship is shown in the context of side lighting in Figure 1 on page 60, with the emitted light called “Distance 1,” and the distance from the camera to the subject labeled “Distance 2.”
The physics of this are pretty simple, and it is a visual relationship that photographers can intuitively understand.
It should also be pointed out that each transmission of light is inevitably subject to the inverse-square law. In the context of the sun as the light source (Distance 1), from the photographer’s viewpoint, the inverse-square law is essentially irrelevant due to the intensity of the sun and the vast distances of solar space. Where this matters practically is when the light travels from the reflecting subject to the camera (Distance 2). The fact that the intensity of light over this short distance is subject to the inverse-square law implies that bringing the camera closer to the light-emitting or -reflecting subject increases the intensity of light more than you’d expect as you shorten the distance. Conversely, moving the camera away from the subject significantly reduces the intensity of light.
If you are interested in the technicalities, the inverse-square law falloff is quadratic, not exponential as is commonly (but incorrectly) written.
Pilea ovalis and Annona muricata—I made this photo in a University of Heidelberg botanical garden greenhouse, where the light was extremely soft and diffused due to the glass panels on the greenhouse roof. The intensity of the light was uniform across almost the entire subject matter. However, the coloration on the individual leaves and the areas in shadow are hardly uniform. So the interest in this composition comes from the variation in intensity caused by differences in reflectivity of specific areas in the subject matter (the leaves), and how these differences are rendered as a pattern in the final result.
Nikon D800, 85mm Nikkor tilt-shift macro, 15 seconds at an effective aperture of f/64 and ISO 100, tripod mounted.
Cactus Flower—Some kinds of cactus rarely flower. In fact, with a number of species, the efflorescence happens only once every hundred years. So I was very excited to learn that a cactus of this sort had gone into bloom in the parking lot of a neighborhood shopping center.
I rushed up with a full complement of macro lenses and hoped to use my tripod. Unfortunately, the wind was blowing so heavily that tripod use was out of the question. Boosting my ISO slightly (to ISO 200), I noted that the white of the cactus flower was reflecting and emitting a great deal of light while the stamen were relatively dark. I made the decision to allow the stamen to silhouette and go dark, and expose for the much brighter blossom, which led to a very fast shutter speed (1/8000 of a second). Focusing on the stamen created a soft effect in the overall blossom with the lens wide open at f/2.8.
I returned to the location later the same day with the hope that the wind had died down so I could use my tripod. Alas, the blossom had come and gone, and was no more for perhaps a century. The moral: Carpe diem! And make the best photo you can with the conditions you have.
Nikon D850, 150mm Irix macro, 1/8000 of a second at f/2.8 and ISO 200, hand held.
Bear in mind that light intensity has significant implications for exposure (see pages 85–91), but it is never, or very rarely, of a single piece. The intensity of light that is reflected by a subject almost always varies considerably across a photographic subject depending upon many factors, including the reflectivity of the individual parts of the subject (some leaves are simply more reflective than others), and the nature of the light that is being reflected (dappled sunlight is inherently irregular).
It is relatively rare to have a photographic subject with uniform light intensity. While this may be the goal in some studio photography, such as when photographing a product, it is almost never the idea in garden photography. In fact, the power and beauty of garden and floral imagery usually comes from the variety of intensities of light in the image. We all know the power of dappled sunlight to evoke wonderful sunny days, and the sense of a single beam of light passing through tree tops to a leafy forest floor. The goal of creative garden photography is to make use of these variations in light intensity, and not to try to deny that they exist.
Diffusion
Diffusion refers to how harsh or soft the light is. This is a qualitative measure that is often fairly obvious from a visual point of view. For example, in the photography studio there are many light modifiers, such as umbrellas, soft boxes, and grids. The point of these modifiers is primarily to soften direct, harsh light.
Hard light can be thought of as coming directly from a stark source, such as a strong light bulb or the sun. Soft light is diffused, in the studio using a modifier and outdoors or in a garden with fog or a cloud cover.
It is worth noting that the act of diffusing light cuts down on the intensity of the light. For example, you could create a diffuse effect by placing something over the camera lens. In the past, this has been accomplished with Vaseline, or somewhat more racily, a ladies’ stocking. The point of the exercise is to create a soft and gentle lighting effect. A side effect and consequence is also to cut down on the overall intensity of light hitting the camera.

Forest Sonata—Waking up before sunrise in Yosemite Valley, California, the world seemed cold and gray with a dense fog in the air. I threw on my clothes, made a quick cup of coffee on my camp stove, and grabbed my camera. At first, the scene was colorless. But as the sun rose and the air started to warm, brilliant shafts of light made their way through the atmosphere.
The point of this image is to show the contrast between the diffused rays of light and the bright sun. By the way, this kind of light ray that is created by moisture in the atmosphere is called “crepuscular.”
Nikon D300, 32mm, 1/500 of a second at f/5 and ISO 100, hand held.
If you put a modifier over the camera lens, then the entire image is modified. However, in the field it is often the case that an image can have different degrees of diffusion. In other words, the photograph can be both hard and soft; for example, when rays of the sun are making their way through early morning fog. Some of the best landscape images are made using the inherent drama in this contrast.
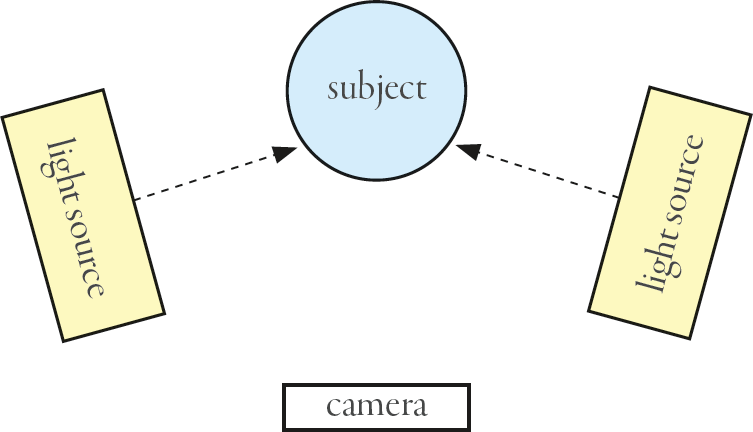
Light Direction
In any situation, one of the first things I take note of is the direction of the light. For example, it is difficult to make a good portrait, or image of nature, with the camera pointed directly into the light—with some notable exceptions in backlit photography proving the rule. One of the most crucial properties of light is its direction in relationship to your subject and your camera.
To keep things simple, when people discuss the direction of light, they generally describe how the light strikes the subject, not the direction of light in relation to the camera. Of course, if you know the direction of light relative to the subject, and you understand the reflectivity (see page 79), then you will have a very good notion about the direction of light related to the camera as well (this is making the usually valid assumption that the subject is a reflective light source and is not emitting light).
Light that hits an object on its front is called front lighting (Figure 2, upper right).

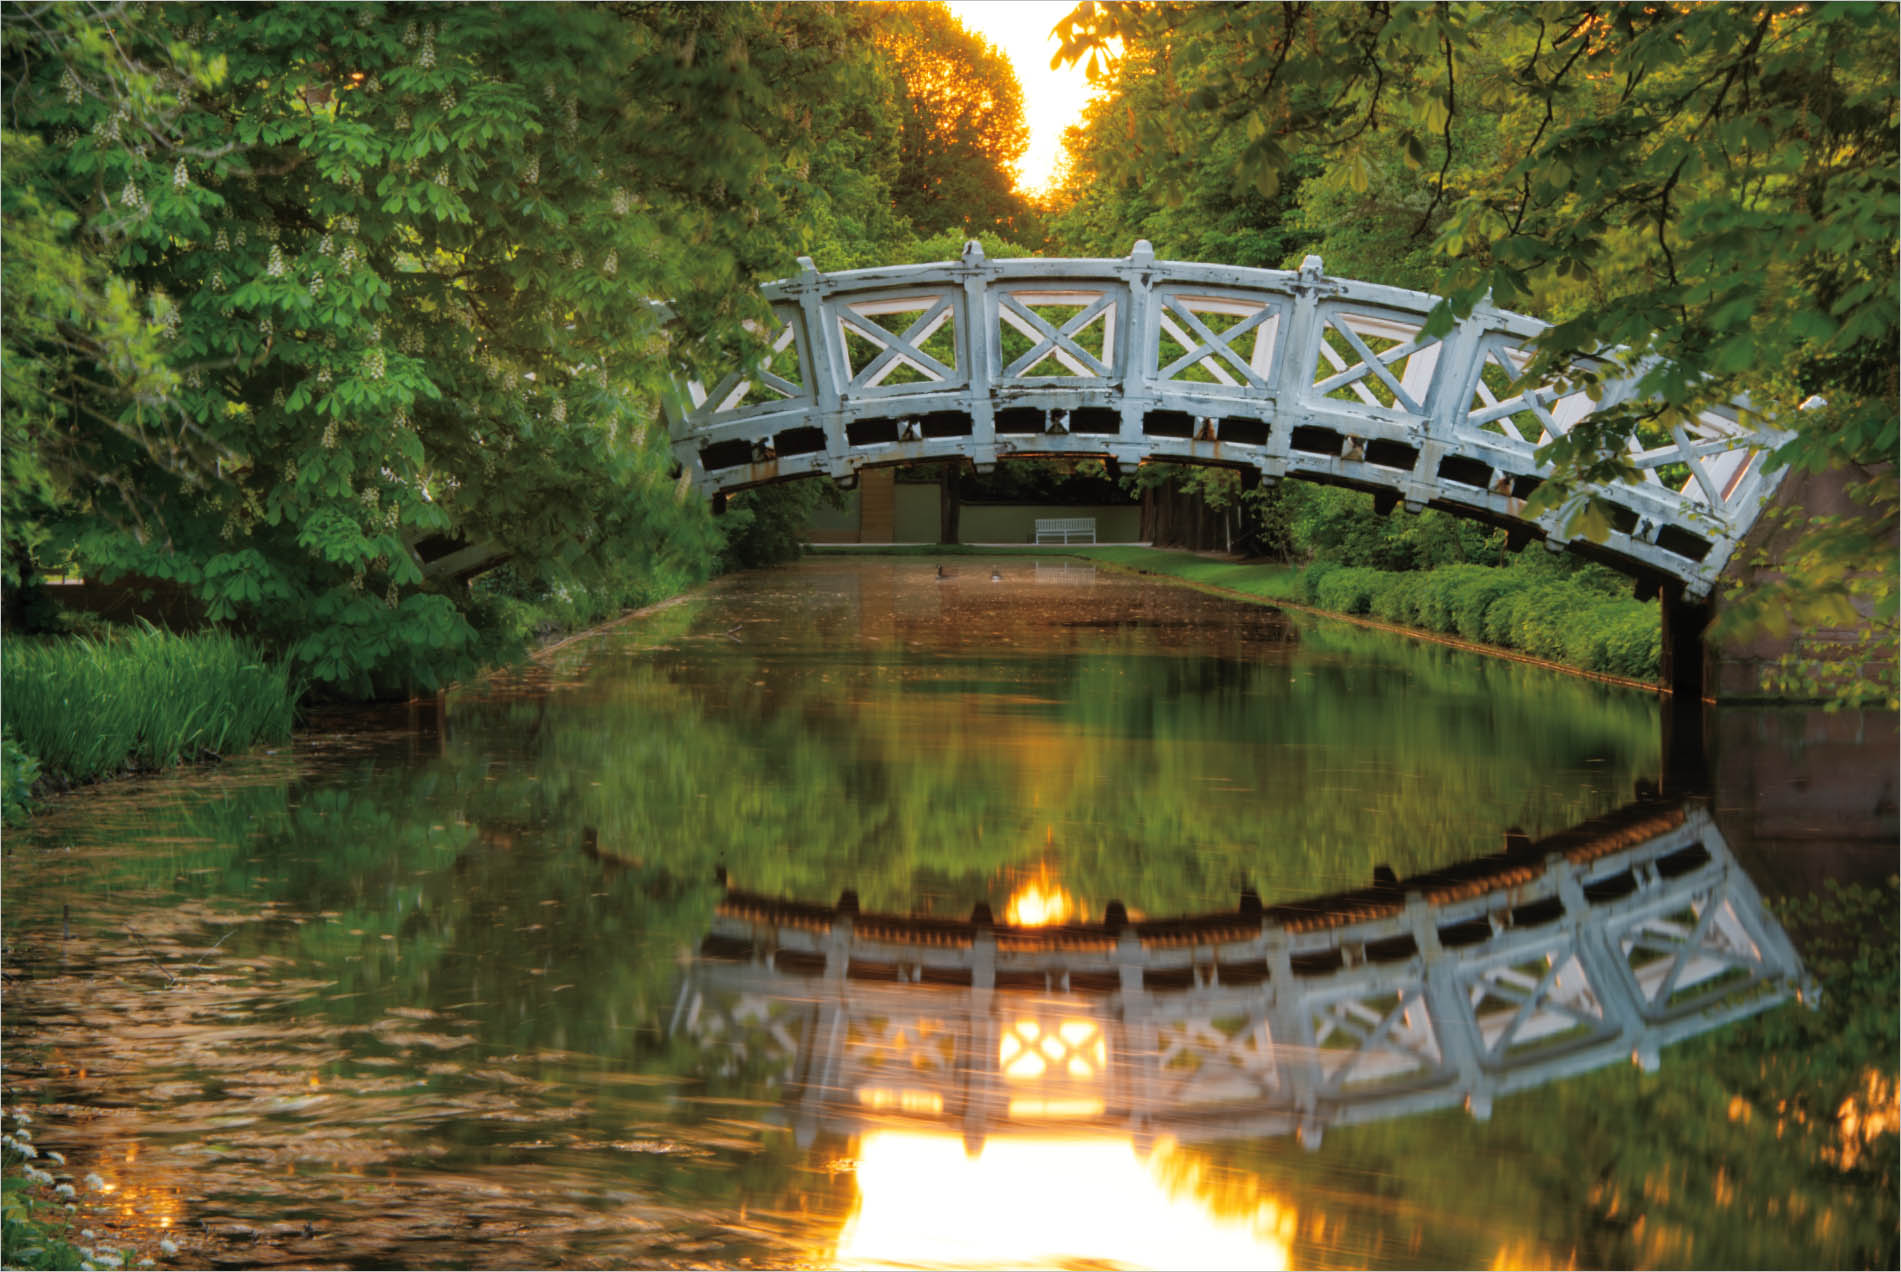
Hagiwara Japanese Tea Garden—In the famous tea gardens in Golden Gate State Park, San Francisco, California, I photographed the stylized, arched footbridge with the front light coming from behind the camera and creating a pleasing reflection in the pond.
Nikon D300, 14mm, 1/200 of a second at f/8 and ISO 200, hand held.
Light that comes in from the sides is called side lighting (Figure 3, page 68).
There is really no clear delineation for when lighting that is basically front lighting becomes side lighting—and a great many photographic subjects involve both front and side lighting. Nevertheless, it is vitally important to get a sense of the predominant lighting because this will help you make a better photo, and also understand how best to expose it.
In some situations, overall lighting is so general that there is really no clear sense of light direction. This can be the case when there is overall cloud cover, often very desirable in garden photography. This kind of overall lighting is often referred to as ambient light.
Japanese Bridge, Schwetzingen Garden—I was fortunate enough to get access to the gardens of Schwetzingen Palace, near Heidelberg, Germany, before sunrise. The exact story of obtaining this access is complex and involves good friends, a secret gate with a special key, a social networking club, and a case of designer beer.
In any case, it was truly a privilege wandering these luscious gardens with my camera in the pre-dawn darkness. Gradually, it began to get lighter. As the sun came up, I made my way to the canal and this Japanese bridge. With the bridge backlit by the rising sun, I made this capture with my camera on the tripod.
Nikon D850, 116mm, 15 seconds at f/36 and ISO 64, tripod mounted.
Ambient lighting may not present an obvious sense of directional clarity, but it is important to take the time to examine it closely. While the direction of light may not be obvious, within the ambient light you can usually find various light directions, sources of illumination, and faint shadows. Ambient light is often far more complex than it initially appears.
In garden photography, and when photographing close-ups in the garden, overall ambient lighting can be best of all. An idea is to start with overall ambient lighting, and add some form of additional lighting to emphasize a portion of the subject matter. This can be done using a reflector, a fixed light, or a strobe (see pages 340–347 for more about artificial lighting).
Backlighting comes from behind the subject (Figure 4, right).
In theory, if the subject is opaque, this would mean that there is no light reflected from the front surface of the object, which is the plane you would be photographing. Think of it this way: A solid black object lit only from behind will not be illuminated on the unlit front side unless light is reflected into the unlit black front areas by some other light source.
In other words, backlighting should be regarded as a special situation requiring special techniques—one that I happen to use a lot in my work. The special situations where backlighting works well are:
- With translucent subjects such as flowers on a light box when the idea is to create the illusion of partial transparency (see pages 224–257).
- There is an interesting interaction between the edges of the object and backlighting. The photo Poppy Snake on page 61 is a good example where the primary subject of the photo is the backlight hitting the edges of an otherwise dark subject.
- The primary intention is to create an image showing a silhouette. This often works best in black-and-white photography (see pages 158–167).

Garden Shrine—If your gardening shed is like mine, mostly there are some tools in it, maybe a little organic fertilizer, and a bag of mulch in the corner. But not all gardening sheds are the same. The shed in the gardens of the Green Dragon Temple near the Marin Headlands, California, also serve as a shrine and have a niche with a Buddha that is lit from the top, often with beautiful glowing light as shown in this image.
Nikon D850, 40mm, 1/25 of a second at f/22 and ISO 64, tripod mounted.
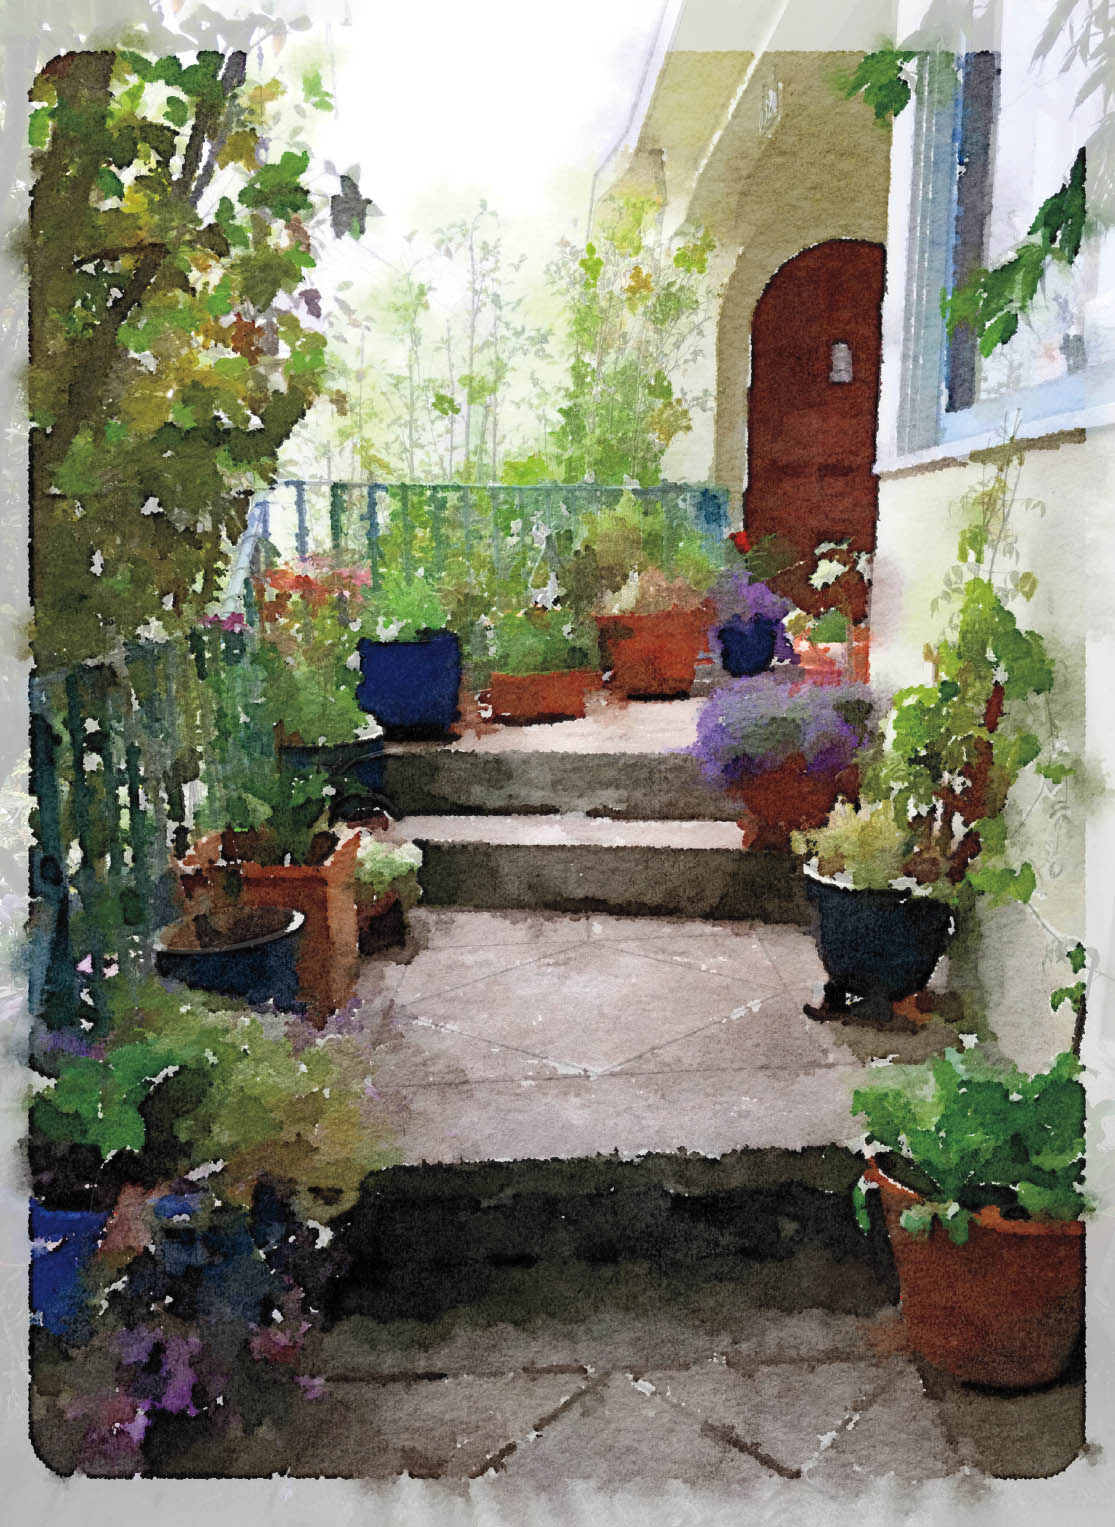
Home—Home, they say, is where the heart is. In my case, it is also where the garden is. Fortunately, in California something is in bloom almost anytime in the year, and it is easy to keep a garden looking attractive. The photo to the left shows the front entrance to our house on a bright, overcast day with diffuse lighting. They don’t know it yet, but some of the flowers growing in the pots are my photo “models” to be.
iPhone 6s, processed in Waterlogue and Image Blender.
Checklist: Finding the Right Position
What is the first thing you do when you see a new photographic scene? Maybe you’ve just entered a garden.
If you’re like me, perhaps you take a deep breath of the garden fragrance, note the wind direction, and check the overall surroundings for the kinds of light you may be dealing with. Ambient light under a diffuse sky calls for very different techniques and makes very different images than harsh, strongly directional light.
Probably this issue of the overall kind of lighting is the most important pre-check you can make before a garden photography session. But it’s also a very good idea to align the lighting with a quick take on the garden style and how you want to position yourself in it.
In this regard, I suggest you ask the following questions, which you may want to modify to suit yourself, to combine a sense of lighting with the topography and layout of the garden:
- What kind of garden is it? Take a look at the section about “Garden Styles” starting on page 34 to get some ideas about possible categories.
- What’s the overall lighting situation?
- Is this a cloudy day good for floral portraits, or a day in which you will take advantage of directional lighting and shadows?
- Can you identify an overall high point in the garden where you can get a vista of the garden as a whole? If there is a high rock or balcony, head up there before you even take out your camera.
- What is the organizing structure of the garden? How does the light direction relate to this structure?
- Is the garden organized around axes, as is the case with many French gardens? If so, how does the light direction compare with the directionality of the axes?
- Identify portals in the garden. The most important portal is the main entrance to the garden. In addition, many gardens have internal portals. Portals and the paths leading up to and away from them are extremely important in garden design and garden photography.
- When you’ve identified a portal, make a point of understanding how the directionality of light relates to the positioning of the portal.
This list of questions can be used as a kind of checklist to provide a good starting point for thinking about light and particularly about light direction in relationship to a garden.

Private Garden, Camden, Maine—This extraordinary backyard garden bears the same relationship to a normal postage-stamp backyard garden (such as my own) that an ocean does to a pond. Designed from the ground up, with terraforming created out of abandoned rocks, it is a true artistic expression.
I have visited this garden a number of times, initially to scout for a visit with a workshop class of mine. When you enter a garden such as this, which was clearly sumptuous but with the design ideas and plan unknown, the photographer’s task is to quickly understand the gist of the place, and the overall design theme that makes it work.
It was clear to me that the arbor, shown in this image, was a key element in the organization of the garden, and right away I set up my tripod to include it in an initial image.
Nikon D810, 28mm, six exposures with shutter speeds ranging from 1/10 of a second to 4 seconds, each exposure at f/22 and ISO 64, tripod mounted.
Keep in mind that your answers to the questions on this list will change. One of the great things about natural light is that it is almost never the same twice. The complex relationship of light to a garden is always in flux.
It is well said that the only thing constant is change. As I photograph a garden, I make sure to revisit the interplay between light and the design of the garden. That way, I can use the specific, wonderful features of a garden, and photograph it at its best in light that is constantly changing.
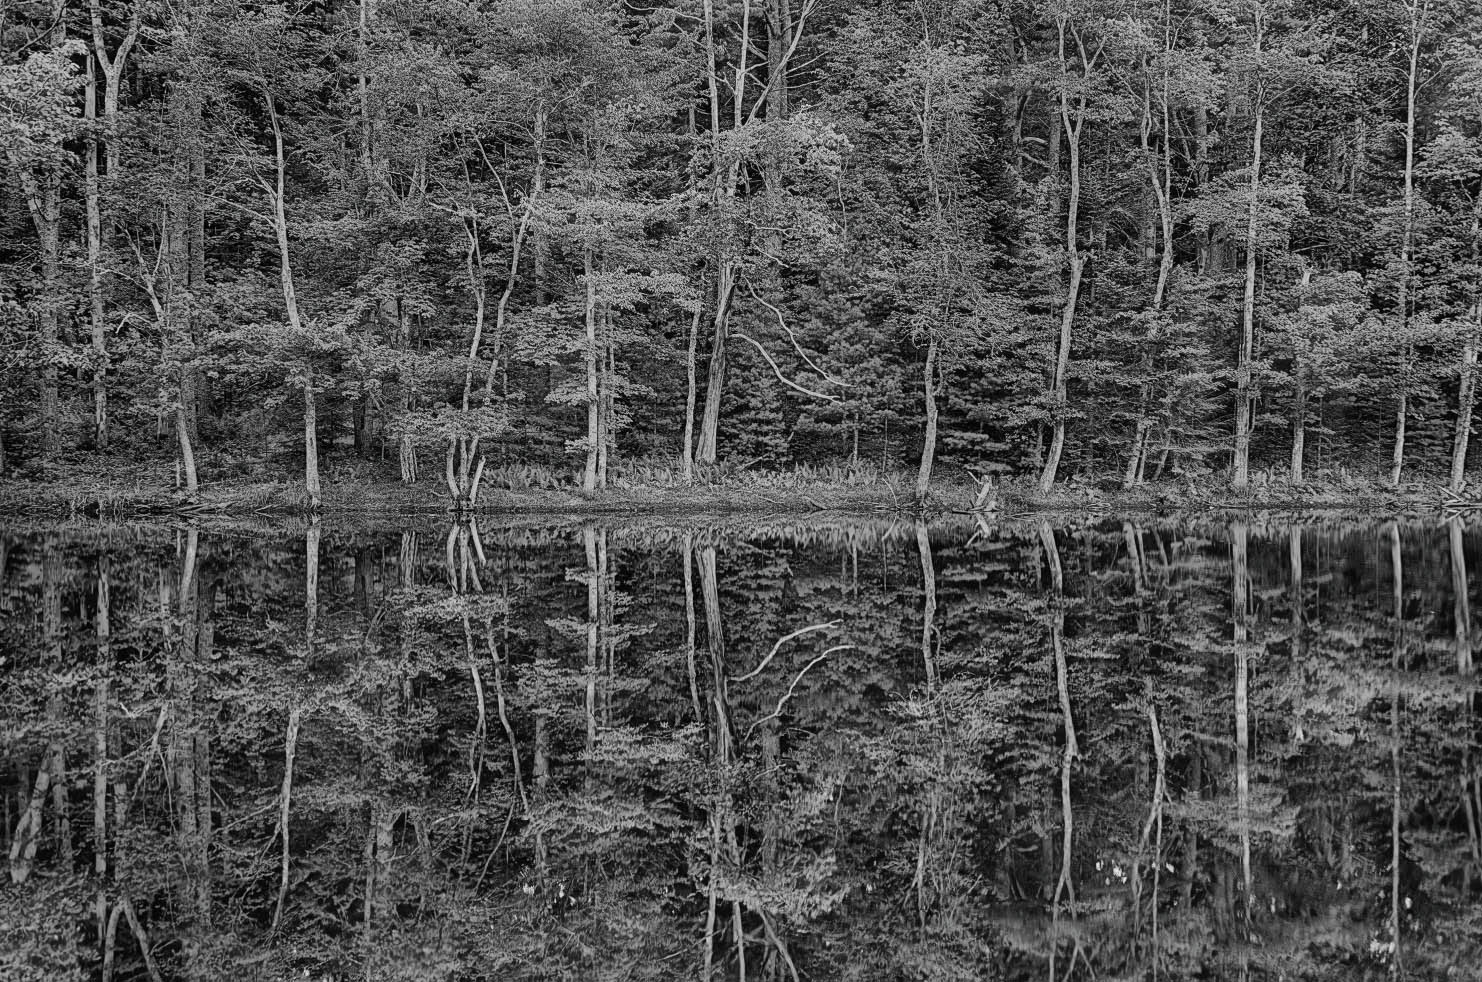
Reflections on a Maine Pond—Standing on a flat rock in this isolated Maine lake, for a brief moment the wind died down and the water was still enough to create a perfect reflective surface. I ignored the whirring clouds of mosquitoes and with my camera on the tripod, made a series of exposures to extend the dynamic range of the resulting image (see pages 169–191).
If you analyze the path of light in this image, what is happening is that the light emitted from the late afternoon sky is striking the trees in the forest, which emits the light back at the angle of reflection onto the water. Since the mirrored surface is almost perfectly reflective, the camera picks up both the primary light reflection (the forest) and the secondary light (the reflection emitted by the forest in the water) as very comparable in tonality and sharpness.
Nikon D810, 38mm, five exposures with shutter speeds ranging from 1/2 of a second to 4 seconds, each exposure at f/9 and ISO 200, tripod mounted.
Understanding Reflectivity
The Fundamental Law of Reflection states that the angle of incidence equals the angle of reflection, as shown in Figure 5 on page 80.
The Fundamental Law of Reflection tells you most of what there is to know about how reflection works from a theoretical viewpoint. What the law doesn’t explicitly state can be deduced from it.
Another way of putting the Fundamental Law of Reflection is that the angle of light shining on an object determines the angle at which that light will leave the object.
The kind of reflection will, of course, depend on the characteristics of the lighting and the surface doing the reflection. Reflections that are diffuse don’t change much in brightness when you shift your angle of view. However, reflections that are caused by direct lighting are close to a mirror image of the light source that made them, and vary from bright to nonexistent depending upon the camera’s angle of view.
For example, a completely white card produces diffuse reflections, and the light is reflected diffusely in almost all directions from the white card. However, a good mirror produces direct reflections. Therefore, a camera positioned at the angle of incidence will see a clear version of the reflected light source, while a camera located away from the angle of incidence will not see the light source at all.
In a great deal of photography outdoors, the subject matter—which, as already noted, can only be light!—is given and cannot vary at a specific time and position. A singular exception to this has to do with the angle of reflectivity. Not only will slight movements in camera position change the reflectivity of incoming light, but there is also a tool designed to do this, providing the light is bouncing off the subject within a specific angular range. This tool is the polarizing filter (“polarizer”), which will literally change the angle of reflection. Polarizers work best with side lighting at approximately 35–45 degrees, but can work in other situations as well. The polarizer is one filter I always carry in my kit because the effect is almost impossible to recreate in post-production.

Color and White Balance
The color of light is a very important part of our perception of light quality. There is no doubt that for some people a bluish fluorescent light, which may be ecologically sound, correlates to a depressing environment. Conversely, the warm light of a sunset coming into the fire-lit room of a cozy mountain cabin almost always invokes feelings of happiness and contentment.
So, the color of light is clearly important to the emotional reaction of most people to imagery; therefore, the photographer must learn to take the color of the light into account when creating an image. If you want to make people unhappy, show them an image of drab soldiers in bluish light. If you want to make them happy, show them something beautiful in warm lighting.

Orchid Water Drop—To make this image of a water drop on a cymbidium orchid, I used a single macro flash unit attached to the end of my lens and hand held another macro flash unit. When you use a light source such as a flash to illuminate the subject, the light emitted by the artificial source (the flash) replaces what might have been emitted by the natural ambient light, and is emitted as a reflection by the object being photographed (the flower inside the water drop). With this image, you can see light reflected by my second hand-held flash unit: it is the hot-spot on the middle left of the water drop.
Nikon D70, 200mm macro, 36mm extension tube, 1/60 of a second at an effective aperture of f/45 and ISO 200, tripod mounted.
Technically speaking, the color of light is measured as temperature on the Kelvin scale. But from the photographer’s viewpoint, it’s not clear that there’s a great need to go into the technicalities of how the Kelvin temperature scale works, other than to know that there is a range from warm to cool.
You can set the reaction of your camera to the color temperature using Auto White Balance, which allows the camera to automatically detect the color temperature of the incoming light. Alternatively, there are sometimes specific reasons for dialing in a generalized white balance setting—for example, daylight—or a specific setting in degrees kelvin. Note that white balance settings are completely adjustable after the fact in post-production, provided you’ve made your capture as a RAW file. When you make a capture as a JPEG, it is harder (but not impossible) to change the white balance after the fact.
There are a fair amount of details involved in technical production of an image that is expected to reproduce light neutrally. For example, if you are a photographer on assignment charged with creating a lifelike reproduction of the Mona Lisa, then you need to be very careful about measuring and controlling white balance. The purpose of this is to make sure that the color in your image capture and subsequent reproductions are true to life.
My thinking with a garden scene is that essentially there is no “true to life”—or, in a day with quickly passing shadows and shafts of light, the scene is constantly in change. If you try to chase “true to life” in the vibrant outdoors, you will never get an image because nature refuses to be pinned down.
I am more interested in the emotional resonance of the light at the time I make an image, and I do make a point of observing this in terms of where the light falls on the white balance scale from warm to cool. Sometimes I even jot it down in a small notebook. When I come back to an image in the post-production process, I try to recall the emotional pull of the light at the time the photo was made, and often recreate this effect in post.
Special times of day lead to special kinds of light. There’s a differential in the color temperature of sunlight at sunrise and sunset. For more about this important topic, see pages 92–95.
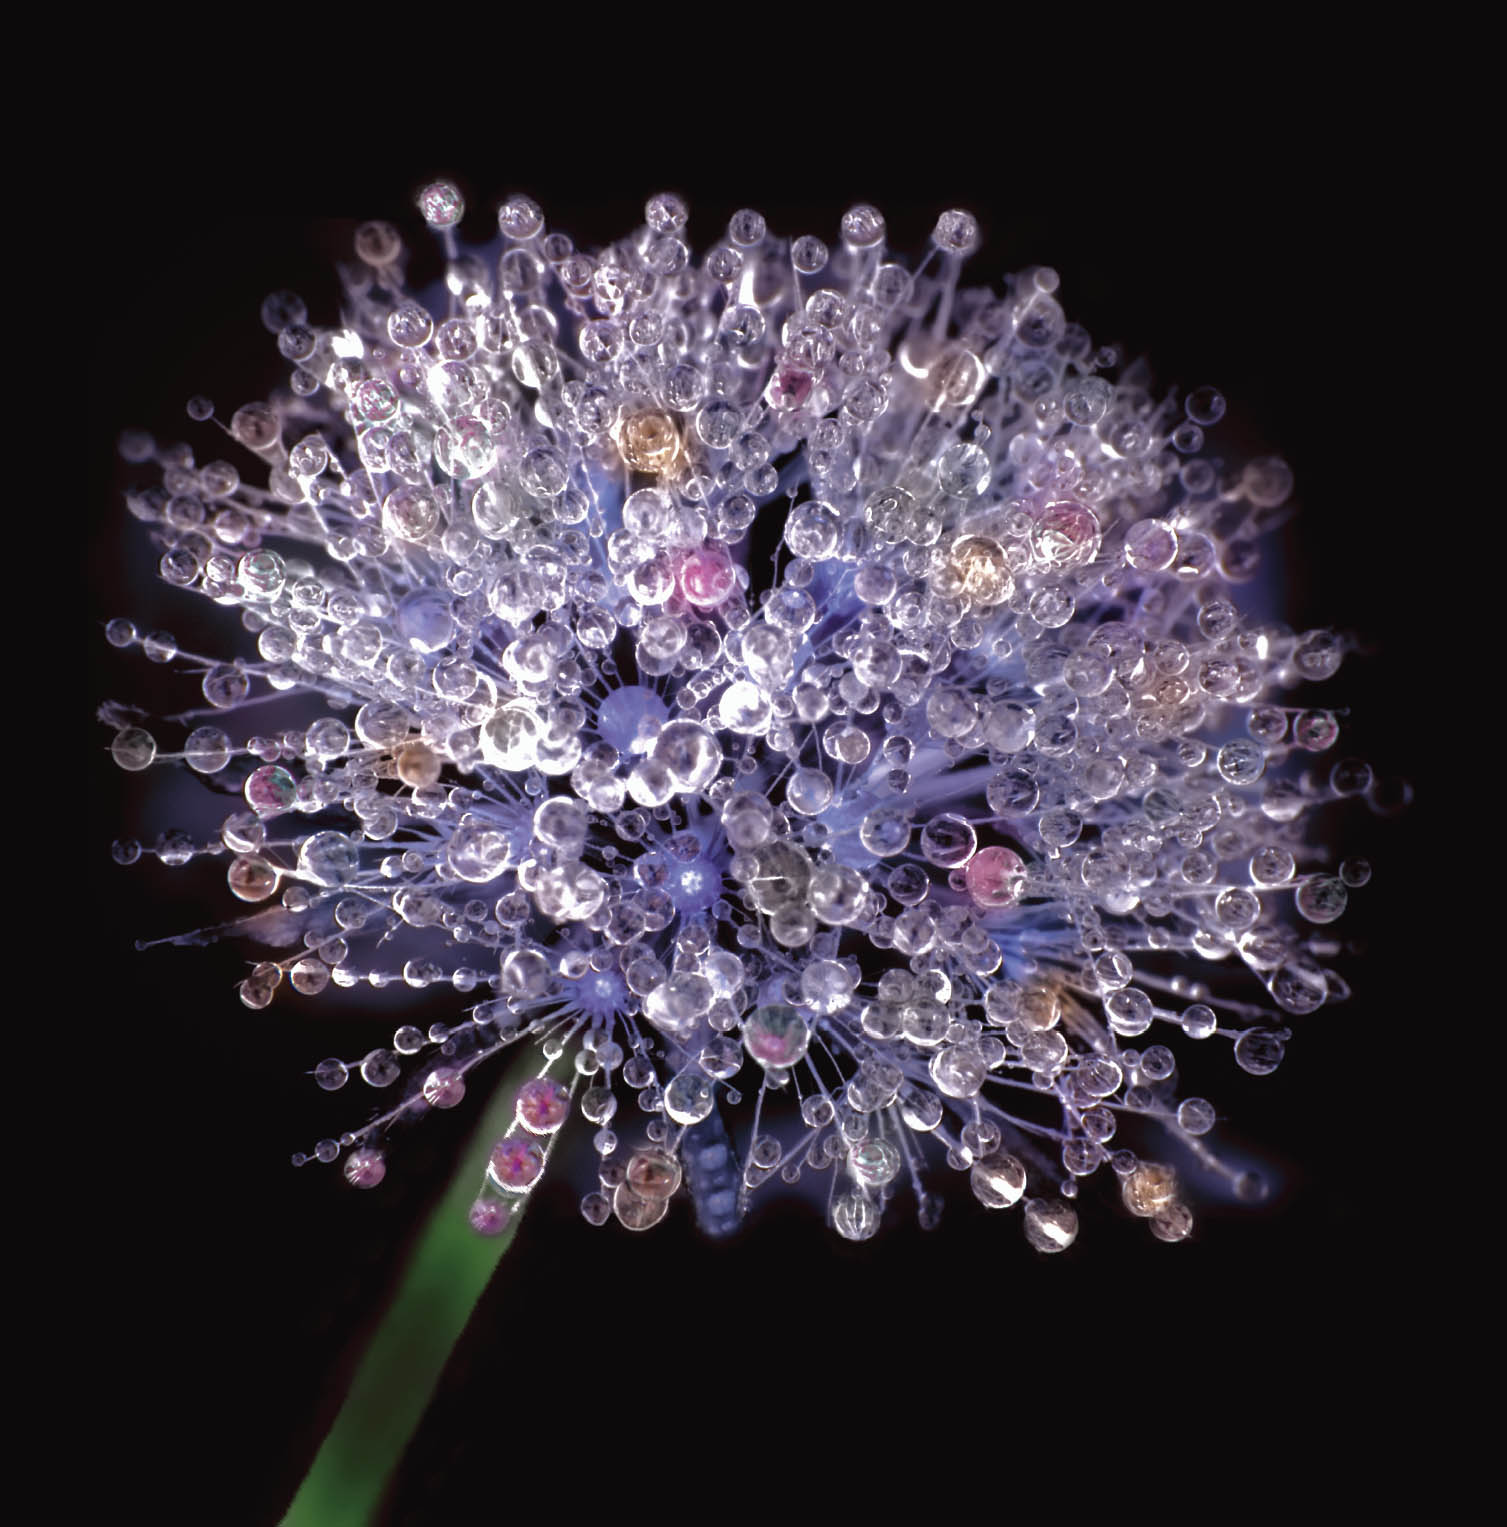
Intricate Detail of Nature’s Perfection—I woke up before sunrise. The world was in darkness and I could sense a heavy morning mist lying on the fields. Throwing on my clothes and grabbing my camera, I headed out. As the sun began to rise, I traversed an entire field covered in dew. Each tiny water drop on this dandelion began to glow with inner colors as the light of the rising sun was reflected and refracted in the drops.
I got down on my belly, lowered my tripod as far as it would go, and photographed the colorful water drops against the backdrop of the still-dark field that the sun had not yet reached.
Nikon D200, 105mm macro, 36mm extension tube, +4 close-up filter, 0.3 seconds at f/32 and ISO 100, tripod mounted.
Jasmine’s Shadow—Much of the poetry of natural life revolves around the sun. Yes, literally our Earth is revolving around the sun, and so are we, all of the time. Our light when we are in nature is also provided by the sun, and it is at its most dramatic when it comes upon us with the rising of the sun or when it fails us at the setting of the sun.
With this extreme close-up of a jasmine blossom, the rising sun creates the internal glow at the core of the flower, the general lowlying backlight, and the dark shadow of the flower.
Nikon D200, 200mm macro, 1/40 of a second at f/32 and ISO 100, tripod mounted.
Exposure and Light
Some people are fixated on sports. Others enjoy playing the stock market. But if you are like me, I am constantly fixated on exposure. Watching exposure values even when I don’t have my camera with me is a true passion.
When you make an exposure, light enters the camera’s lens and hits the sensor. The camera translates this incoming light into a software file that can be viewed or printed.
If the exposure settings are wrong, the resulting photo may be ruined. Letting in too much light can cause an all-white overexposed photo with no detail. Too little light can cause a black underexposed photo, also with no detail.
Between complete overexposure and complete underexposure lies the terrain of the workable image. A workable image involves a two-step dance: The settings in the camera balance the light coming in. Theoretically, a correct (also called a proper) exposure exactly balances the incoming light. This is sometimes called the exposure equation, because the light coming in to hit the sensor is exactly the light expected by the exposure settings. The exposure settings themselves—aperture, shutter speed, and ISO—make up the exposure from the camera-side of this exposure equation. The three exposure settings are often represented as a triangle, as shown in Figure 6 below.
There are two things to observe here. The first is that to keep an exposure constant, if you change one of the settings in the exposure triangle, you have to adjust another one of the settings in the opposite direction to compensate.
The other important observation is that a correct exposure as measured by the light meter in your camera is often not the exposure that will provide a good photo. The correct exposure is only the starting place and is best used as a springboard for your creative exposures.


Torre do Río—On a bend in the Río Umia, in a forested area near Caldas de Reis thermal resort in Galicia, Spain, the Torre do Río is a fantastic boutique hotel created from an abandoned early industrial–era factory. The Río Umia runs around this property as well as through it, in a waterfall that served as power for the original purpose of the building and now feeds the swimming pool.
The gardens of the Torre do Río are many, varied, and mostly feature views of the river below. Wandering the stairs and bridges of this fantastic fairy land, I tried to capture a view that gave a sense of the overall scope and scale of the place. I needed to find a viewpoint that had some uniformity of exposure values, and the view back toward the main building from a footbridge over the river was just right.
Nikon D850, 44mm, five exposures taken at shutter speeds ranging from 1/4 of a second to 2.5 seconds, each exposure at f/29 and ISO 64, tripod mounted.
I recommend taking your camera off Auto exposure and learning to set aperture, shutter speed, and ISO manually. At the very least, it is worth setting these controls manually until you have a good intuitive sense of what they can do for you. After aperture and shutter speed have become your good friends, if you prefer to go back to Auto or Aperture preferred metering, then be my guest, so long as you know what the creative controls can do for you.
You could write a whole book about what each of the exposure controls can do for you creatively. But let’s at least take a quick look.
Aperture: Setting the aperture determines the size of the opening that lets light in through the lens to the camera’s sensor. The primary creative impact of the aperture setting is on depth of field. Depth of field controls how much of an image is in focus from back to front. The smaller the opening in the lens, the more depth of field you have.
Somewhat confusingly, aperture is denoted using an f-number usually written f/f-number—for example, f/16. The larger the f-number, the smaller the opening, and the smaller the f-number the larger the opening in the lens. See pages 134–141 for more information about aperture and depth of field.
Shutter Speed: Despite the name, shutter speed is actually not a speed. Rather, it controls the duration of time that the shutter is open; in other words, the length of time during which light can hit the sensor. Provided you remember to think of shutter speed as actually a duration of time, you will find this setting easy to work with.
It’s intuitively clear that shorter durations of time will freeze motion, and longer durations of time cause motion to blur. This is the key creative property of the shutter speed setting: A short duration of time, such a 1/1000 of a second, will freeze motion, while a far longer duration of time, such as 30 seconds, will cause something in motion, such as clouds and moving water, to blur.
ISO: ISO measures the sensitivity to light of the sensor. It is the least useful of the exposure settings from a creative viewpoint. But you should know about it because it can be used to balance the other two settings in the exposure triangle.
The higher the ISO, the more noise in the resulting image. This is dependent on your camera, and up-to-date cameras have less noise at all ISOs, but you do need to keep this setting within reasonable limits. For example, with my Nikon D850, if I don’t want to see any visible noise in the final image when it is blown up large, I need to keep my ISO below about ISO 500. For lower noise, it’s best to use a camera at its “native” ISO; for the D850, the native ISO is 64.

Arbor at Giverny—It has been one of my great pleasures in life to pay multiple visits to Impressionist painter Claude Monet’s famous gardens at Giverny, France. The gardens are bisected into two parts. When Monet created the gardens, a railroad track separated the two parts. Today, the railroad has been replaced by a road. An underground passage connects the lower part of the garden, which is centered around the famous lily ponds, with the upper gardens, consisting of more conventional flower beds.
To create the lily ponds, Monet damned the local river, which led to a series of conflicts with local farmers.
As I approached this wonderful watery environment, I tried to experiment with giving emphasis to the appearance of the ponds themselves. To emphasize this, I increased the shutter speed as much as possible by lowering the ISO in the camera (to ISO 31). Lowering the ISO meant that I could increase another leg of the exposure triangle (the shutter speed).
Nikon D850, 78mm, five exposures at shutter speeds ranging from 0.3 to 5 seconds, each exposure at f/29 and ISO 31, tripod mounted.
Shukubo Ekoin—Mount Koya in Japan, the center of Shingon Buddhism, is part religious destination and part resort town. The general effect is something like a cross between Arlington National Cemetery, Westminster Abbey, and a resort town. There are more than 100 temples and monasteries in the town.
I stayed in the guesthouse for one of these monasteries. This style guesthouse is called a Shukubo, and it is part youth hostel, part resort hotel, with everyone sleeping on the floor in rooms divided by paper screen partitions. There are guided meditations morning and night, a pre-dawn fire service, and attractive gardens.
When I got to Koya-san, it was autumn and a cold rain was falling. The trick for me was staying warm. Paper walls don’t make for great insulation and the only warmth came from small kerosene heaters.
In the late afternoon, there was a break in the weather. While it was still wet outside, I was able to take advantage of the protection of a covered walkway to get out my camera and tripod and photograph one of the interior monastery courtyard gardens.
Nikon D800, 28mm, three exposures at shutter speeds ranging from 0.3 to 4 seconds, each exposure at f/22 and ISO 100, tripod mounted.
Key Takeaways about Exposure
- Your camera will generally give you a correct, or “proper,” exposure. But the correct exposure is not the one to use in many creative situations. It is just the starting place.
- Exposure controls, particularly aperture and shutter speed, are crucial to creative photography. You should get to know how these controls work—and, most important—what they can do for you and your work as a garden photographer.
- The exposure histogram displayed by your camera includes valuable information about your photography. You can learn more about exposure histograms starting on page 245.
- Understanding your camera controls is one thing. Understanding the theory of exposure is something else. When you understand both the theory and the implementation in your specific camera, you will be able to master the art of making creative exposures.