Focus and Depth of Field
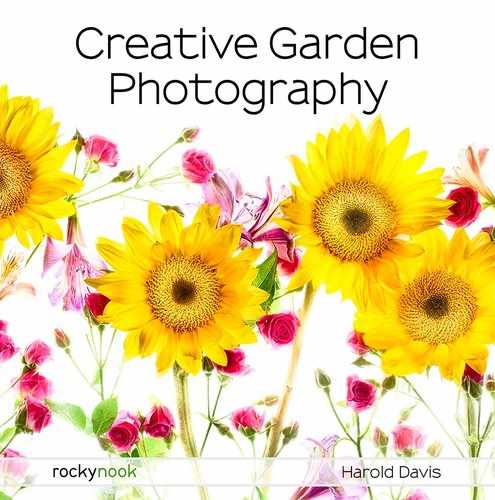
Wheels within Wheels—To create this image of the inside of a poppy, I focused very carefully on the center of the poppy and used a wide-open aperture for low depth of field so the rest of the image went pleasantly out of focus. The quality of this lens together with the pinpoint, wide-open focus helped to create a very special bokeh.
Nikon D300, 100mm Zeiss Makro Planar, 1/800 of a second at f/2.0 and ISO 200, hand held.
One of the key creative aspects of photography involves how much of an image is in focus. Generally, the first thing the viewer’s eye goes to in any image is bright colors. The second thing the viewer is drawn to are areas of an image that are sharp, and in focus. While conceptually being “sharp” is not quite the same thing as being “in focus,” there is a close relationship. Thus, sharpness and focus play an outsize role in photographic composition.
Sharpness is, in fact, controlled by a large number of factors including the optical quality of your lens, the resolution of your camera, and atmospheric conditions, as well as focus. Given that you are in-place with a specific camera and lens, focus is one component of sharpness that is largely under your control.
Returning for a second to the question of why focus is a vital component of the impact an image has, this is pretty intuitively clear. A single flower in focus, such as Red Tulip, Giverny, shown on page 107, is obviously a very different kind of image than the entirely in-focus Gerbera Petals, shown on page 115.
You know the role focus plays, I know this, the world knows this (even if the world doesn’t know how important focus is).
From the photographer’s viewpoint, the issue is learning how to control your camera so you can achieve the creative effects with focus that you pre-visualize. As always with photography, the two components that come together are understanding the theory, and understanding how that theory is implemented in your particular camera.
In this section, I will explain the details of focus and depth of field from a conceptual viewpoint. It is up to you to integrate this with your specific camera, lenses, and your creative objectives.
Focus is primarily controlled by:
- The camera position in relation to the subject
- The focus setting on your camera or lens
- The aperture setting of your lens (see pages 134–141 for more about aperture)
Being in Focus
There’s a lot of verbiage out there regarding determining whether a subject is truly in focus. For example, an image where the subject appears to be completely in focus is sometimes called “tack sharp.” The inconvenient truth is that there is no such thing as being in focus. Focus, like much of life, is relative. To be in focus actually means to be relatively in focus.
When you’re using a manual focusing ring, find the point where the given subject appears in focus.
Then, move the ring a little in both directions (closer and farther away), to see where the subject becomes relatively less in focus. These relatively out-of-focus “boundaries” are used to obtain the best point of focus.
While this working model of focus is a little difficult for folks who like to have hard and fast rules in their lives, it does provide a technique for effective manual focusing: The best way to manually focus is to use the focusing ring to find the place that is “in focus” and then go past it a little bit, so it is slightly out of focus again, and then come back to the focus point “from the other side.”
When photographing in the garden with your camera on a tripod, it is pretty easy to use relative focusing with your manual focusing control to obtain the focus results that best serve your creative purpose.
Soft Focus
It is worth being very clear that not all good photographic imagery is about being in focus. Sometimes the photographer is trying to create an effect akin to Impressionism in painting. This can be accomplished in a variety of ways, including intentionally throwing the camera out of focus, or moving the camera while taking the photo, a technique known as In-Camera Motion (ICM), explained starting on page 192. As is well known, impressionistic effects can also be created in post-production.
Attractive out-of-focus areas are sometimes sought after via selective focus, usually with a wide-open aperture, and termed bokeh (![]() ), with approbation.
), with approbation.
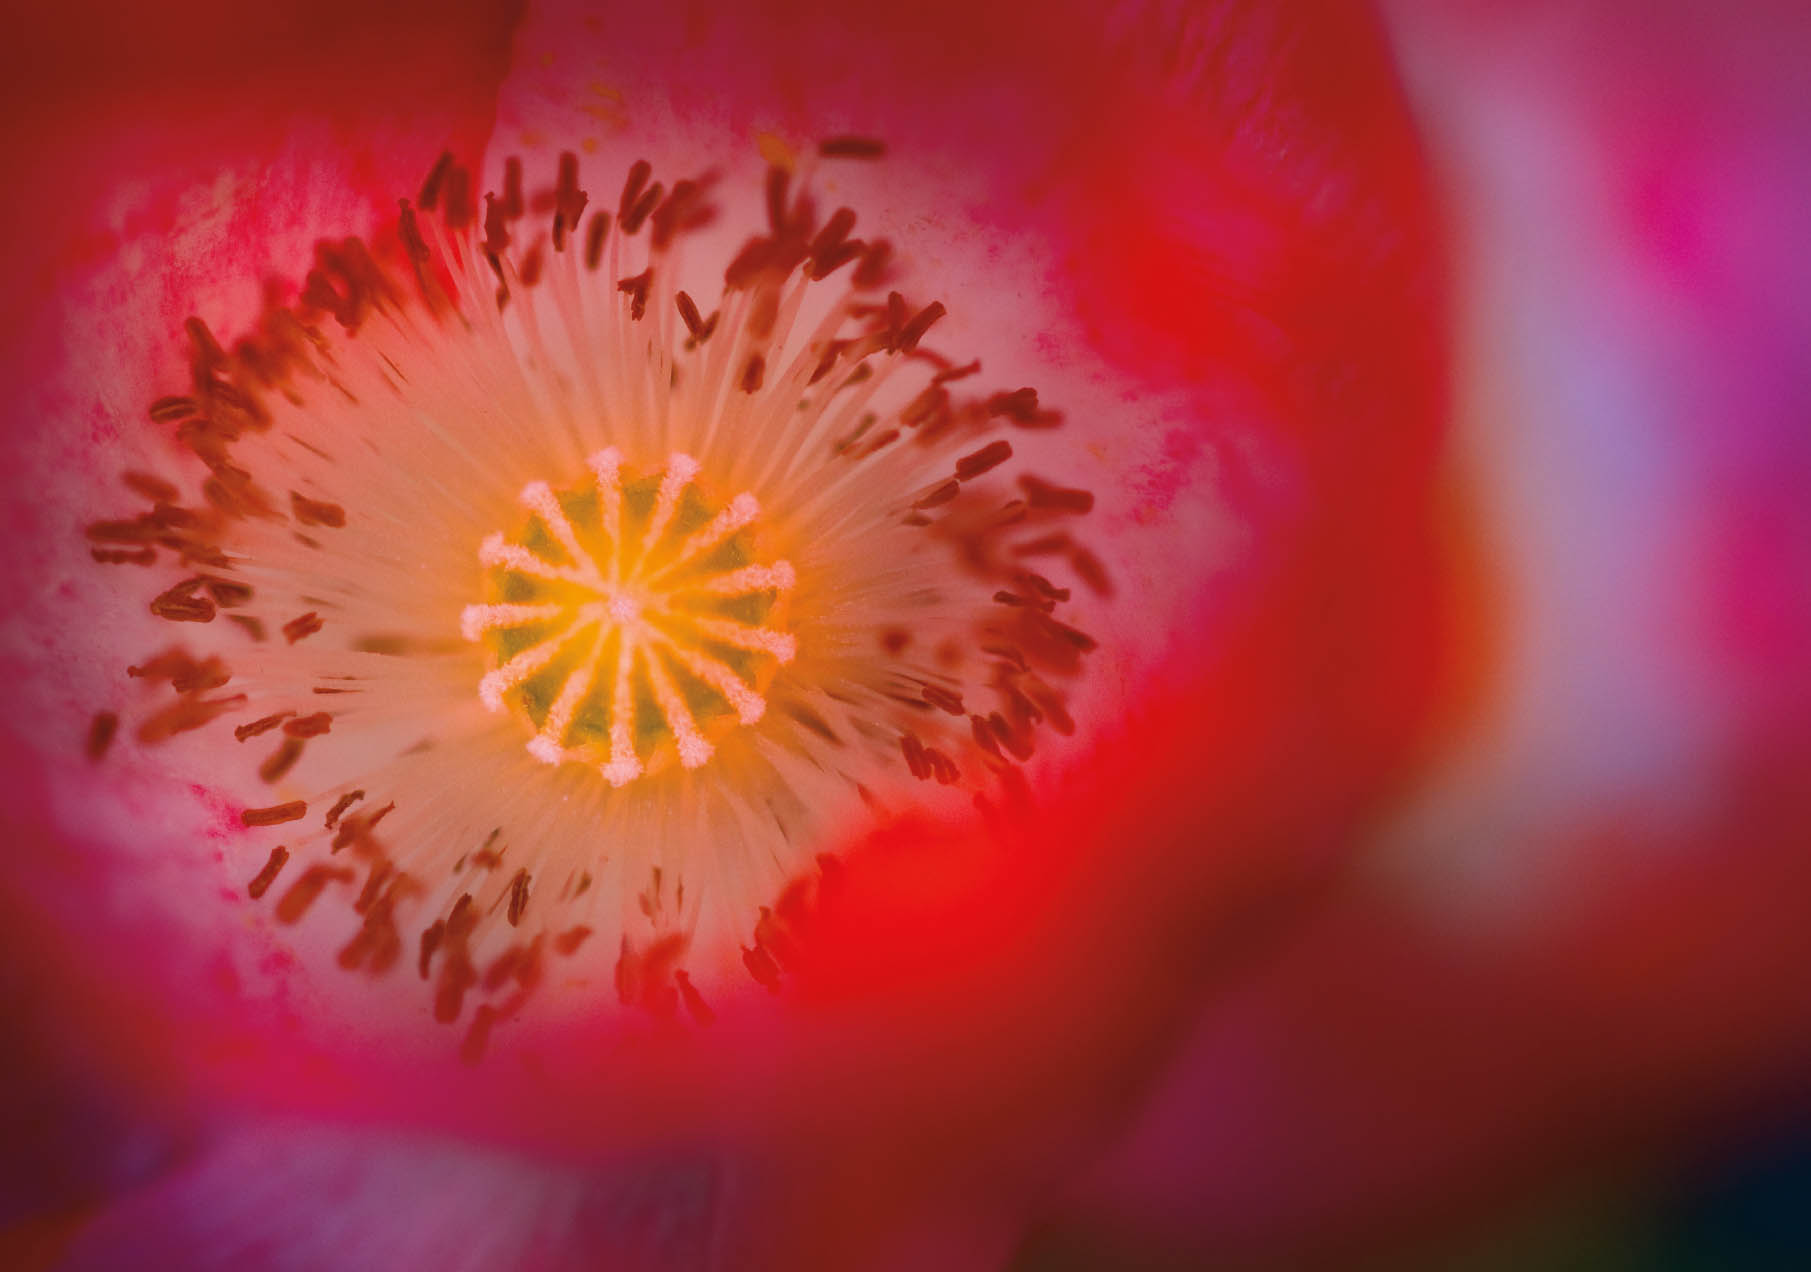
Gerbera Petals—Looking at the petals of this African daisy through my macro lens, I thought that it formed an abstraction as much like a landscape with canyon walls as a flower. I knew that to convey this effect in an image, I would need maximum depth of field to create an image that was in-focus overall.
So I stopped my lens to as small an aperture as it would go, to f/22. Since I was well into macro mode, photographing at 1:1, the camera’s EXIF data was recorded at an effective aperture of f/32 because the additional extension of the lens cut down the light reaching the sensor below what it would have been at a more “normal” focus point.
Nikon D850, 150mm Irix macro, 2 seconds at an effective aperture of f/32 and ISO 64, tripod mounted.
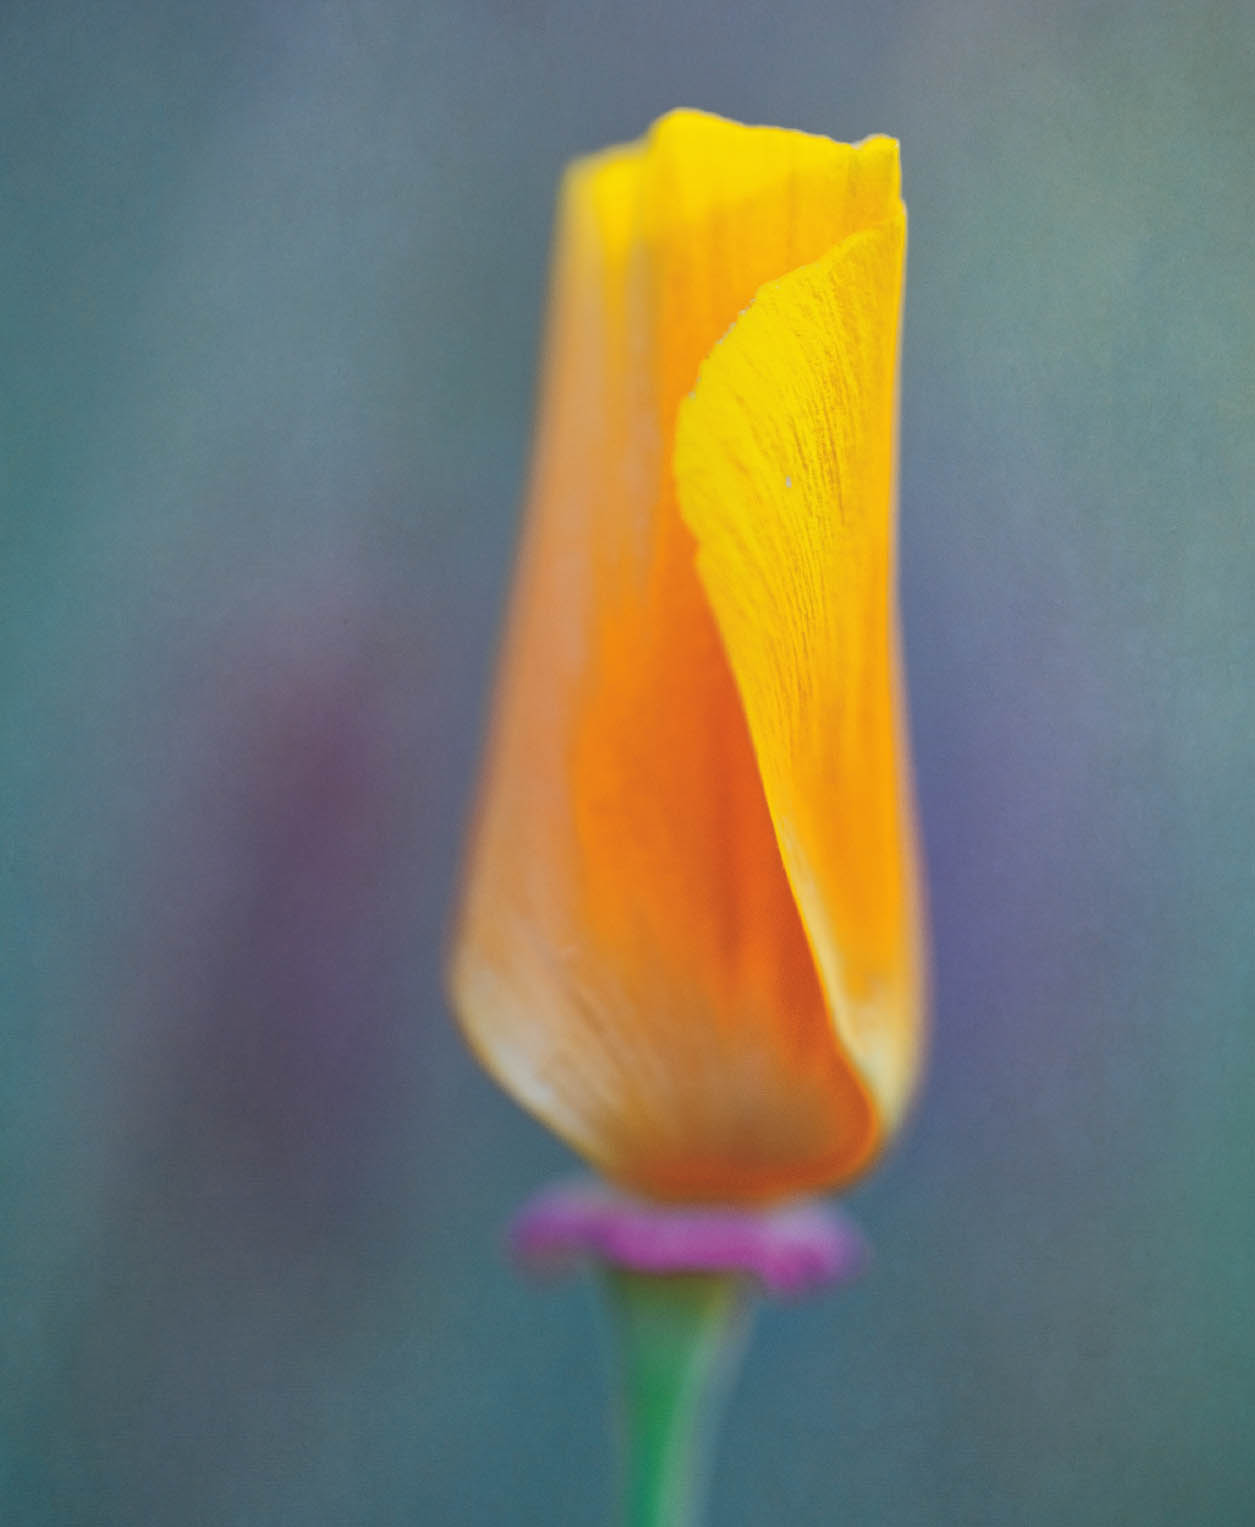
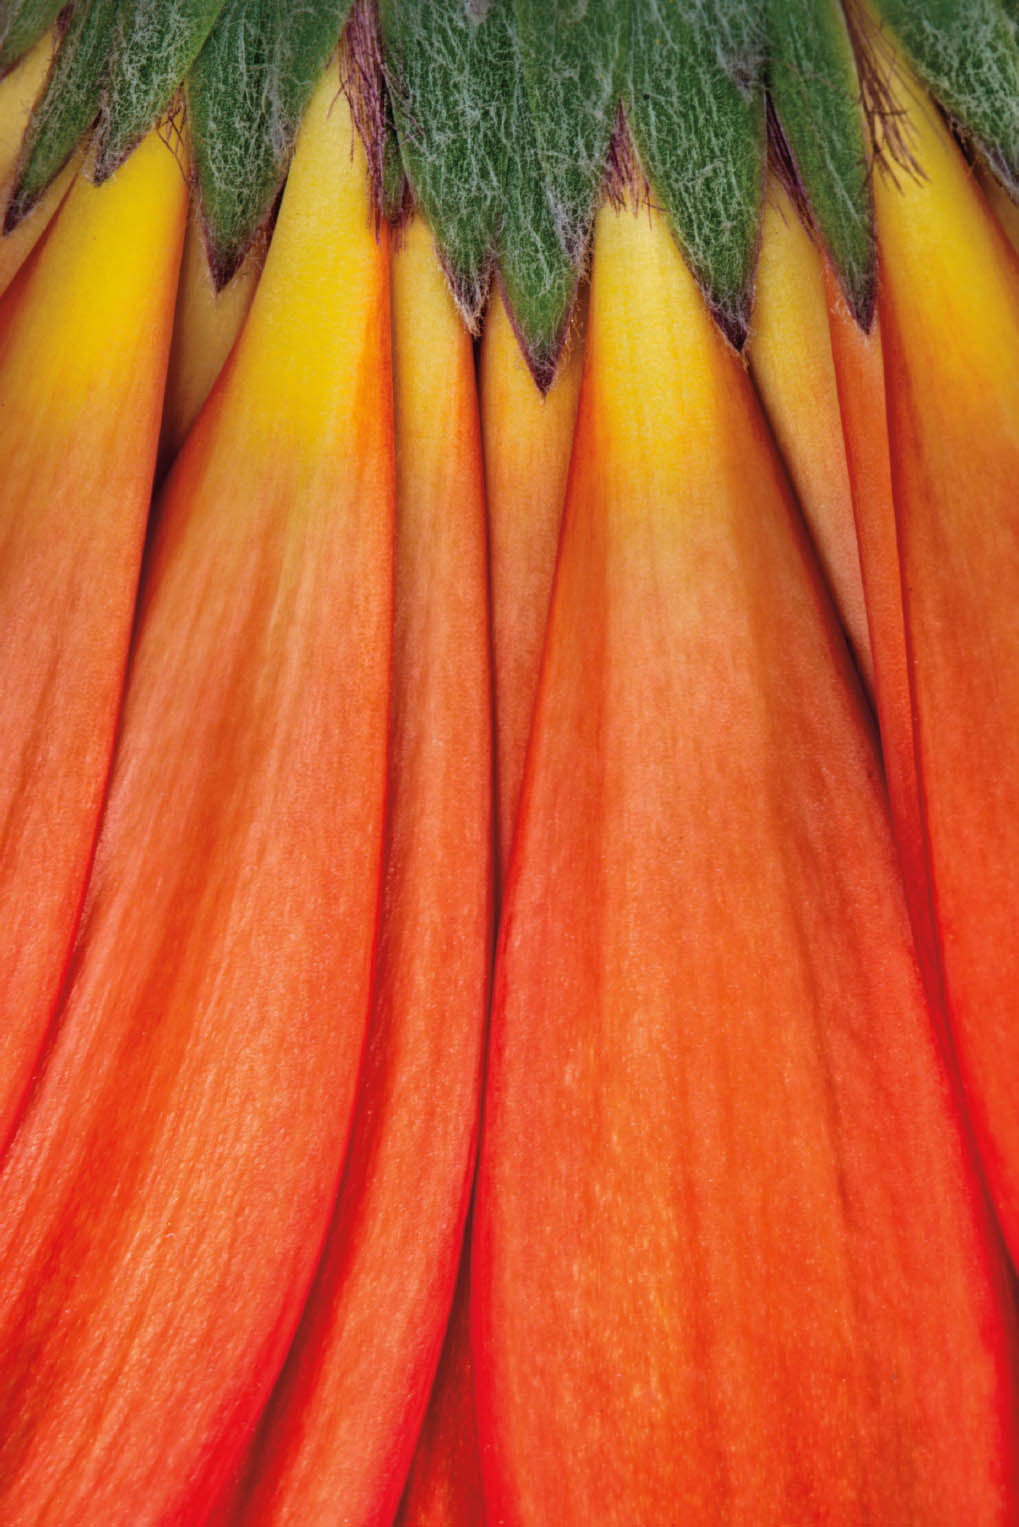
Eschscholzia californica—Eschscholzia californica is otherwise known as the California poppy or the golden poppy. It’s native to the western United States and Mexico, and was named by the German botanist Adelbert von Chamisso after his friend Johann Friedrich von Eschscholtz during an early scientific-exploration voyage to California and the greater Pacific aboard the Russian ship Rurik, circa 1800.
When photographing this petal with my lens wide open at f/1.8, there was absolutely no depth of field. To maintain focus even on the single petal, I realized that I needed to position the camera absolutely parallel to the flower petal.
Nikon D850, 85mm Lensbaby Velvet macro, 1/320 of a second at f/1.8 and ISO 200, hand held.
There are also some equipment-related techniques that produce soft focus. Some specialty lenses, such as the Lensbaby Velvet series, produce a high-quality soft effect. This can also be accomplished in a more homemade way. I’ve been known to coat a filter with Vaseline and place it in front of the lens, and a sheer black stocking has been historically used in front of the lens to much the same effect.
Camera Position
When the camera is precisely parallel to a flat subject, sharpness and focus are easy, and you don’t need any depth of field for the subject to be sharp (see pages 134–147 for more about understanding, setting, and using depth of field). Since depth of field doesn’t matter because the camera is parallel to a flat subject, you can photograph at the maximum aperture of your camera lens and the subject will still be in focus, provided the focus has been correctly set.
The reason that keeping the camera parallel to the subject creates an entirely in-focus image (provided focus has been correctly set) is a matter of simple geometry: With two parallel planes, each point in each parallel plane is the same distance as every other point. This is shown in Figure 7 below.

The implication is that camera position is one of the most important factors in focus and sharpness, and is something that is usually under one’s control. Keeping the camera parallel to the subject is an often overlooked, powerful, and simple mechanism for obtaining “tack sharp” imagery.
One point that needs to be clarified is what I mean by the camera being “parallel” to the subject. You can figure out what the subject is by some analysis of your creative idea. What part of the camera should be parallel to the subject?
More precisely, the focal plane of the camera should be parallel to the subject for optimal sharpness. The focal plane is the capture media within the camera. In a film camera, this would be the film, and with a modern digital camera, it is the sensor. “Wait a minute!” you might well say, “Fine, but how do I know where this is on my camera?”
Almost every camera indicates the focal plane on the exterior of the camera where you can easily see it using a small symbol of a circle with a line through it like so: ![]() (see Figure 8 to the right).
(see Figure 8 to the right).
In this symbol the focal plane is represented by the straight line that is passing through the circle. Extend the line that goes through the circle the length of the camera, and this represents the plane that should be parallel to your subject.
Oddly, many otherwise proficient photographers are not aware of the location of the focal plane symbol on their camera. Have a look around, I assure you that it is there somewhere! This is a surprisingly important and overlooked way to make photographs that are as in-focus and as sharp as possible.
Garden photography is not street photography. In other words, you’re not in a situation where you are trying to capture myriad different people doing all kinds of weird things, for example, in an exotic bazaar in Tangier. For the most part, everything in a garden is still and in place. Plants and trees are rooted. Rocks are not going to move. The only variable may be the impact of the breeze and wind on plant motion.

Figure 8. The focal plane symbol shown on the top of one of my cameras. Can you find the focal plane indicator on your camera?
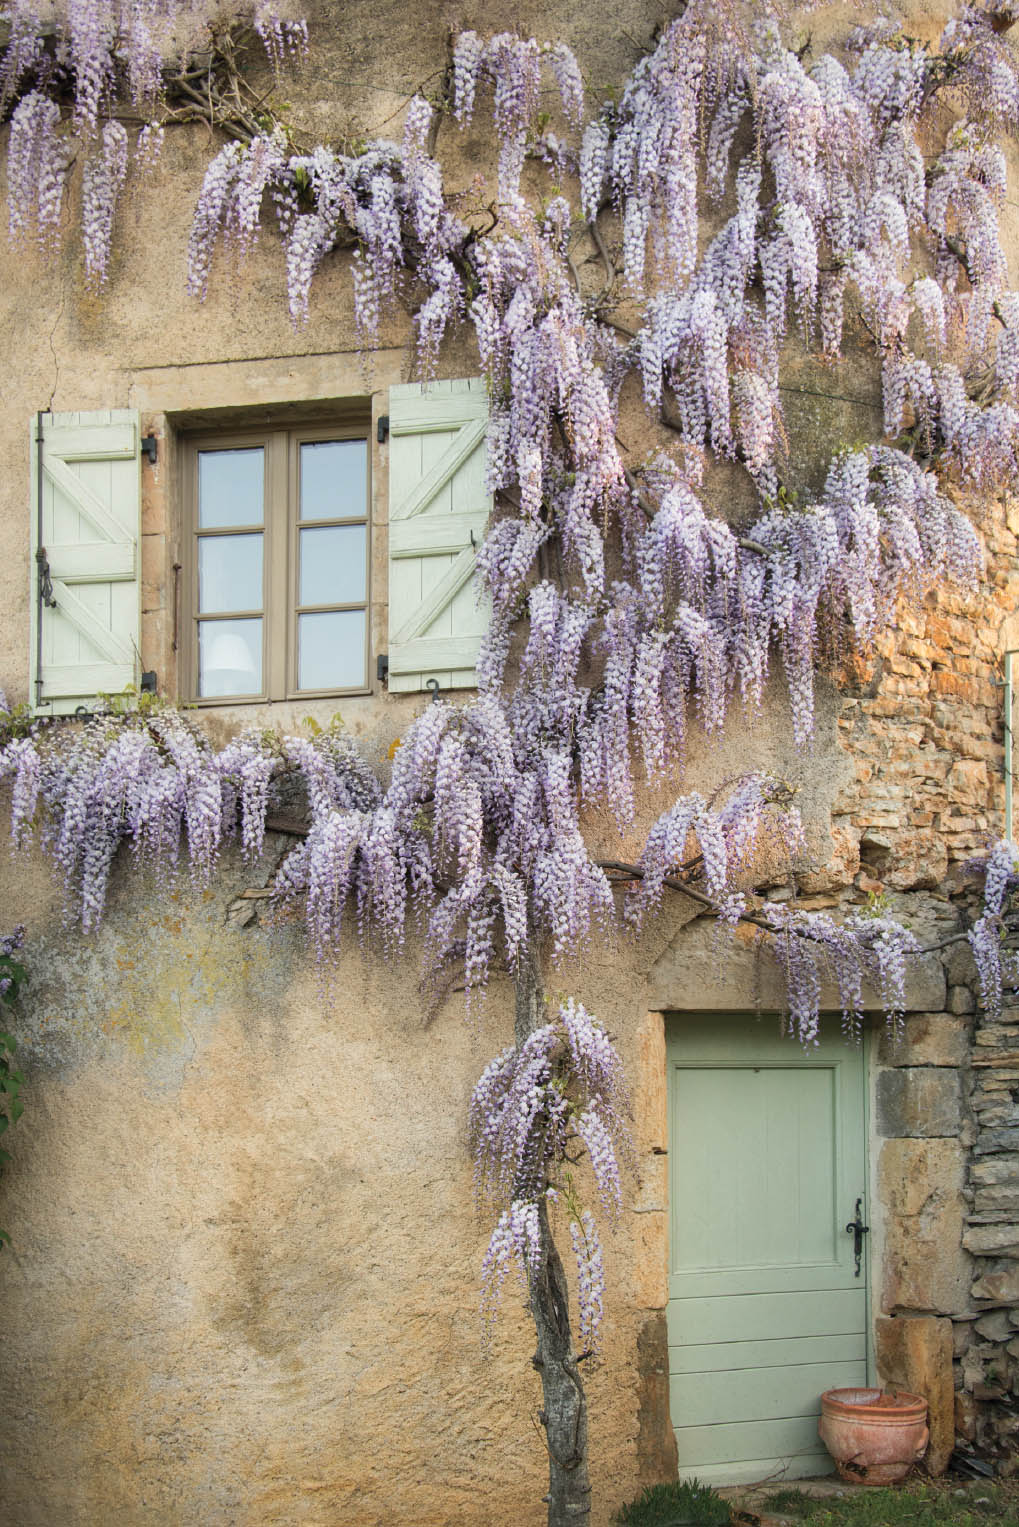
Morning at the Mas de Garrigue—In springtime, the walls of this fifteenth-century hunting lodge and fortified farm in the southwest of France is covered with decorative wisteria. Today, the Mas de Garrigue is a luxury bed and breakfast that I enjoy very much using as a workshop venue.
I stumbled out in the early morning before the odor of croissants was even in the air and saw that the light was gorgeous. I grabbed my camera without waiting for my tripod, because I knew that the nice light was very transient.
To make this photo showing the wisteria, I knew that I needed no depth to the photo beyond that represented by the plane of the wisteria vine. So I set my aperture nearly wide open (at f/5.6) so that I would be able to use a fast enough shutter speed to make the exposure hand held.
Nikon D850, 45mm, 1/80 of a second at f/5.6 and ISO 320, hand held.
In the garden, understanding and positioning the focal plane of the camera so that it is parallel to the key elements of your subject is the single most important factor for creating sharp, in-focus images.
Tilt-Shift Lenses
In the good old days, when photographers carried 120 lbs. on their backs and used a mule to transport their wet plates three weeks from civilization, most folks used view cameras. A view camera consists of a front plate with a lens, a back plate with ground glass for looking at an image upside down and placing the film holder, and a completely flexible bellows, connecting the front and back plates. A black cloth over the photographer’s head was required to block out the external light so the image on the ground glass could be seen. Also, the photographer used a light-proof changing bag to remove exposed film from the sheet-film holders, and to add fresh film.
If all this sounds like a total pain, trust me, it was! However, a view camera has something important going for it that most modern cameras lack. The bellows could be used to change the direction of the light hitting the capture medium. By changing the direction of the light, the perspective of the image is also changed. This becomes relevant and helpful in situations where the normal view of a subject seems unattractive and weird. For example, when you are looking up at a tall tree or building, and the lines of perspective do not seem to continue straight up, but rather diverge, often with apparent curvature.
Using the bellows of a view camera, this perspective distortion can be corrected within limits by manipulating the angle of the bellows.
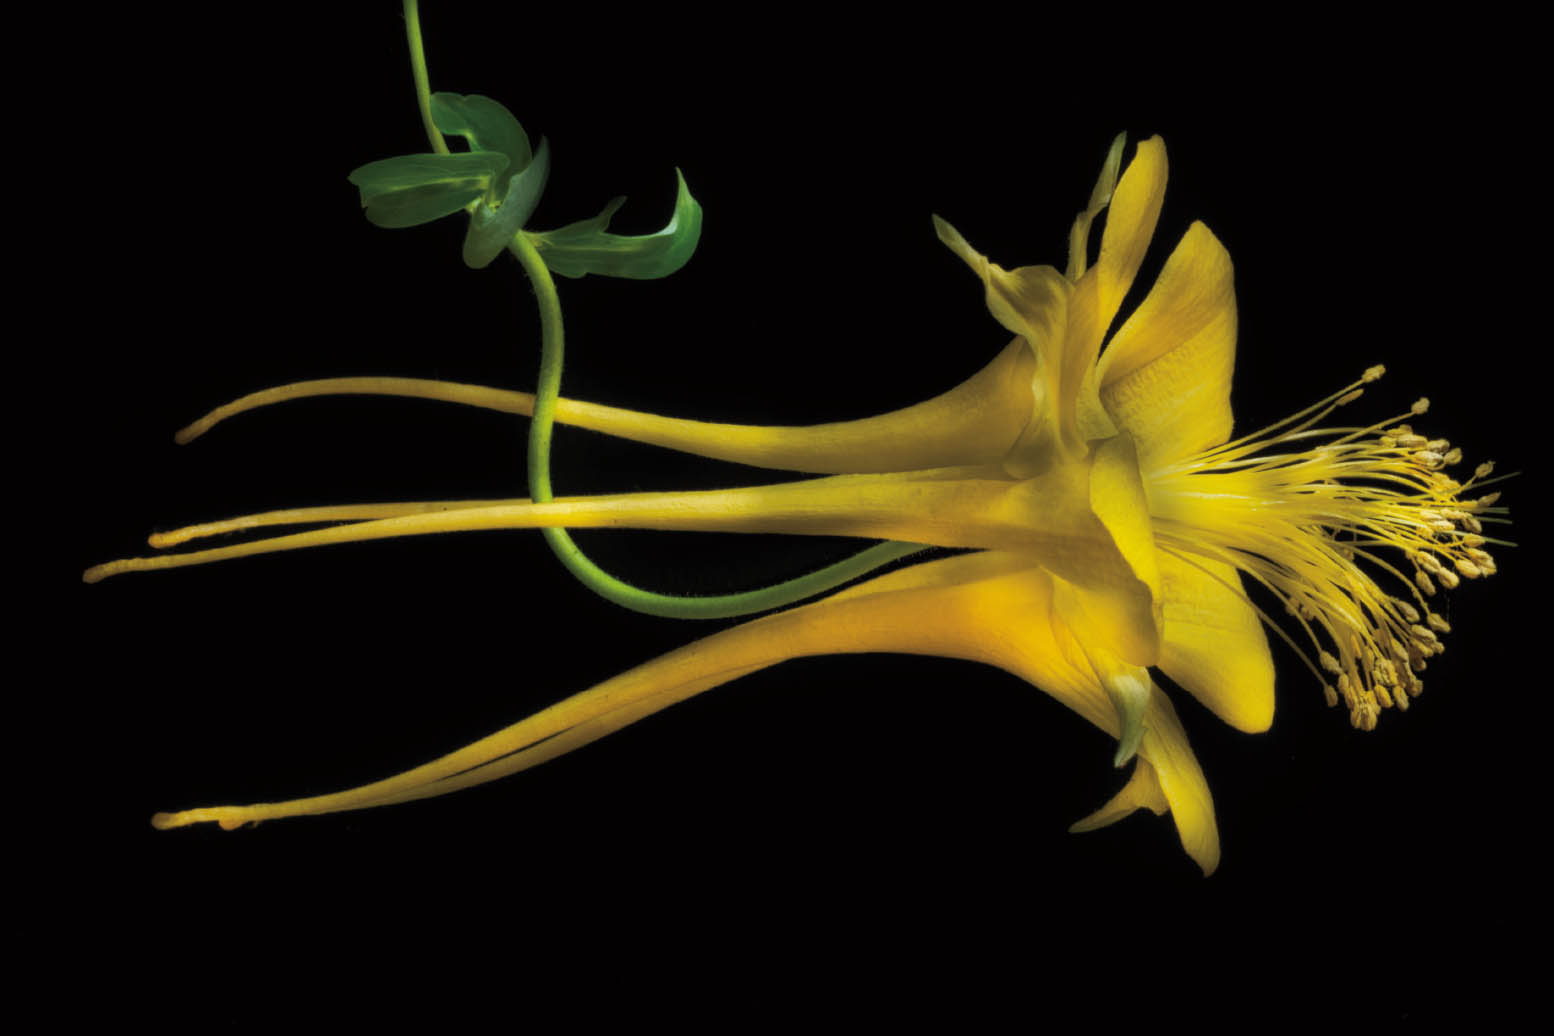
Columbine—I positioned this columbine from my garden in front of a black velvet cloth, suspending the flower using an improvised rig that included paper clips and dental floss.
My thought looking at this columbine was that it resembled a sea creature in the blackness of the deep. To carry this visual metaphor forward, I needed the flower to be in end-to-end focus. As best I could, I positioned the camera parallel to the columbine and focused carefully. There were still some focus issues. When the “head” of the image was completely in focus, one or more of the “tails” fell out of focus. So I tweaked the tilt and shift controls on my lens to resolve these issues as much as possible.
Nikon D850, 85mm Nikkor tilt-shift macro, 0.3 seconds at an effective aperture of f/64 and ISO 200, tripod mounted.
With a normal, modern camera, the lens is fixed and does not angle from side-to-side or up and down. A tilt-shift lens is a special-purpose lens designed to recreate, at least in part, the functionality of a bellows on a view camera. You can use the adjustable controls on a tilt-shift lens to tilt the lens up and down, and from side to side.
In garden photography, a tilt-shift lens is an expensive, single-purpose tool that can sometimes be used to great advantage. Essentially, by carefully manipulating the tilt-shift controls, you can rearrange the effective focal plane (see the Columbine photo on page 120–121) to create an image showing parallel lines, even though the lines are not apparently parallel in reality.
Focal Length
For a photographer, a lens is like a paintbrush. We see the world and are able to capture it through the optics of our lenses.
All lenses are not created equal. One important characteristic of any lens is its focal length.
A so-called “normal” lens has roughly the perspective of view of human vision. This translates on a full-frame sensor to roughly 50mm or 55mm.
This discussion that follows about types of lenses assumes that the sensor is full-size. If you are working with a differently sized sensor, for information regarding the relationship between sensor size and focal length, please turn to page 351.
Types of Lenses
Lenses with a wider field of view than normal are shorter in length than normal lenses (i.e., less than 50mm). These are called wide-angle lenses. For example, a 28mm lens is a moderate wide-angle lens.
Lenses with a narrower field of view than normal are longer in length than “normal” lenses (i.e., more than 50mm). These are called telephoto lenses. For example, a 135mm lens is a moderate telephoto lens.

Spadix of a White Calla Lily—The Laowa Probe macro lens is highly unusual in several respects. This lens sits on a long stalk like a bug’s eye. That makes it great if you are photographing something small and venomous up close like a scorpion or snake. In addition, the lens is that rarest of optics, a wide-angle (24mm) macro lens.
This is not the world’s easiest lens to use effectively, and may be best optimized for video rather than still photography. As a still photographic lens, one downside is that it is not very bright—the maximum wide-open aperture is f/14. Also, focus, which is manual only, is very, very picky. When you get close with the lens, the only way I have found to use it is to put it on a focusing rail, using the rail to ratchet the camera to make the final focus adjustments.
That said, the viewpoint from this lens is absolutely unique. It’s something like an ant’s-eye view: both detailed and close, and at the same time taking in the overall scene that is being photographed. For example, with the interior of the calla lily shown here, this ant’s-eye view presents the top of the calyx, the sex organ of the flower, very close up, and at the same time shows the inside of the bulb of the flower.
Nikon D850, 24mm Venus Optics Laowa Probe macro, 12mm extension tube, 1/4 of a second at f/45 and ISO 64, tripod mounted, using a focusing rail.
Just as wide-angle lenses create a wider perspective than normal lenses, telephoto lenses bring the subject closer, thereby creating a narrower perspective.
Zoom lenses are of variable focal length. So you could have a wide-angle zoom lens, a telephoto zoom lens, and even a zoom lens that goes from wide-angle to telephoto. My “walk-around” Nikkor 28-300mm lens is a good example in this last category, since it goes from 28mm wide-angle through a 300mm telephoto. This lens covers a great deal of the focal-range territory, and when I have it with me, I don’t need much else.
If you think about it, a 300mm telephoto lens brings you 6 times closer than a normal-field-of-view 50mm lens, because 300mm ÷ 50mm = 6. And, 28mm is almost twice as wide as the 50mm normal lens. The ability of a single lens to go from wide-angle to telephoto is quite remarkable, and was not common in the past before the rise of computer-aided optical design.
Just to clarify, a zoom lens is not inherently either a telephoto lens or a wide-angle lens. To say that a lens “zooms” is another way of saying that the focal lengths of the lens vary. So a zoom lens is a variable-focal-length lens.
A macro lens is a lens that focuses close, by most standard definitions, closer than 1:2, meaning that the subject is half life-size on the sensor, or larger. Some purists feel that true macro territory begins a 1:1, meaning the subject is rendered at life-size on the sensor. Be that as it may, “normal” lenses do not focus as close even as 1:2.
Although telephoto and macro lenses are often confused, focusing close does not necessarily imply anything about focal length. You can have normal lenses that are macro lenses, and telephoto lenses that are macro lenses. It is also possible to have a wide-angle macro lens, but this is relatively rare for technical reasons having to do with optical engineering.
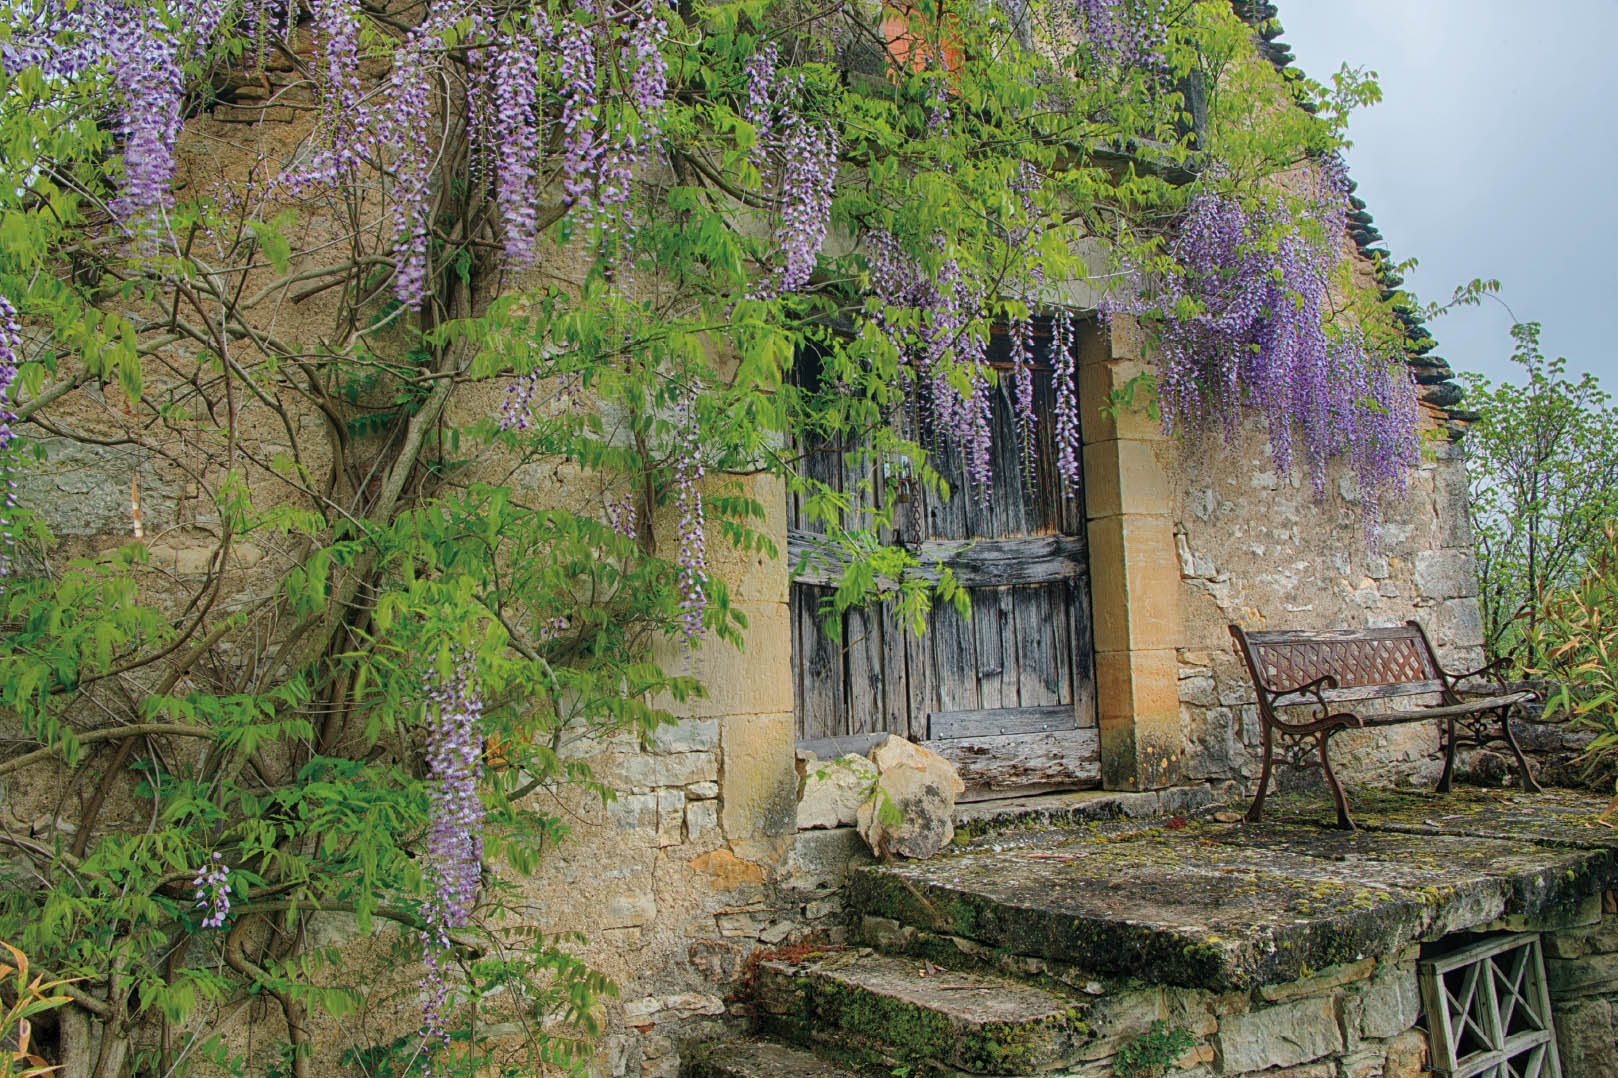
Backyard Garden in Rural France—When I photographed this casual backyard garden in rural France, I chose a moderate wide-angle focal length (32mm) to give a broad vista of the garden. I wanted to show both the bench and the wisteria vine, but at the same time, I wanted to avoid the curvature and distortion that would come with a wider-angle lens. Somewhere in the 28–32mm focal-length range is as wide as one can go without many viewers identifying artificial-seeming distortion.
Nikon D850, 32mm, 1/8 of a second at f/22 and ISO 64, tripod mounted.
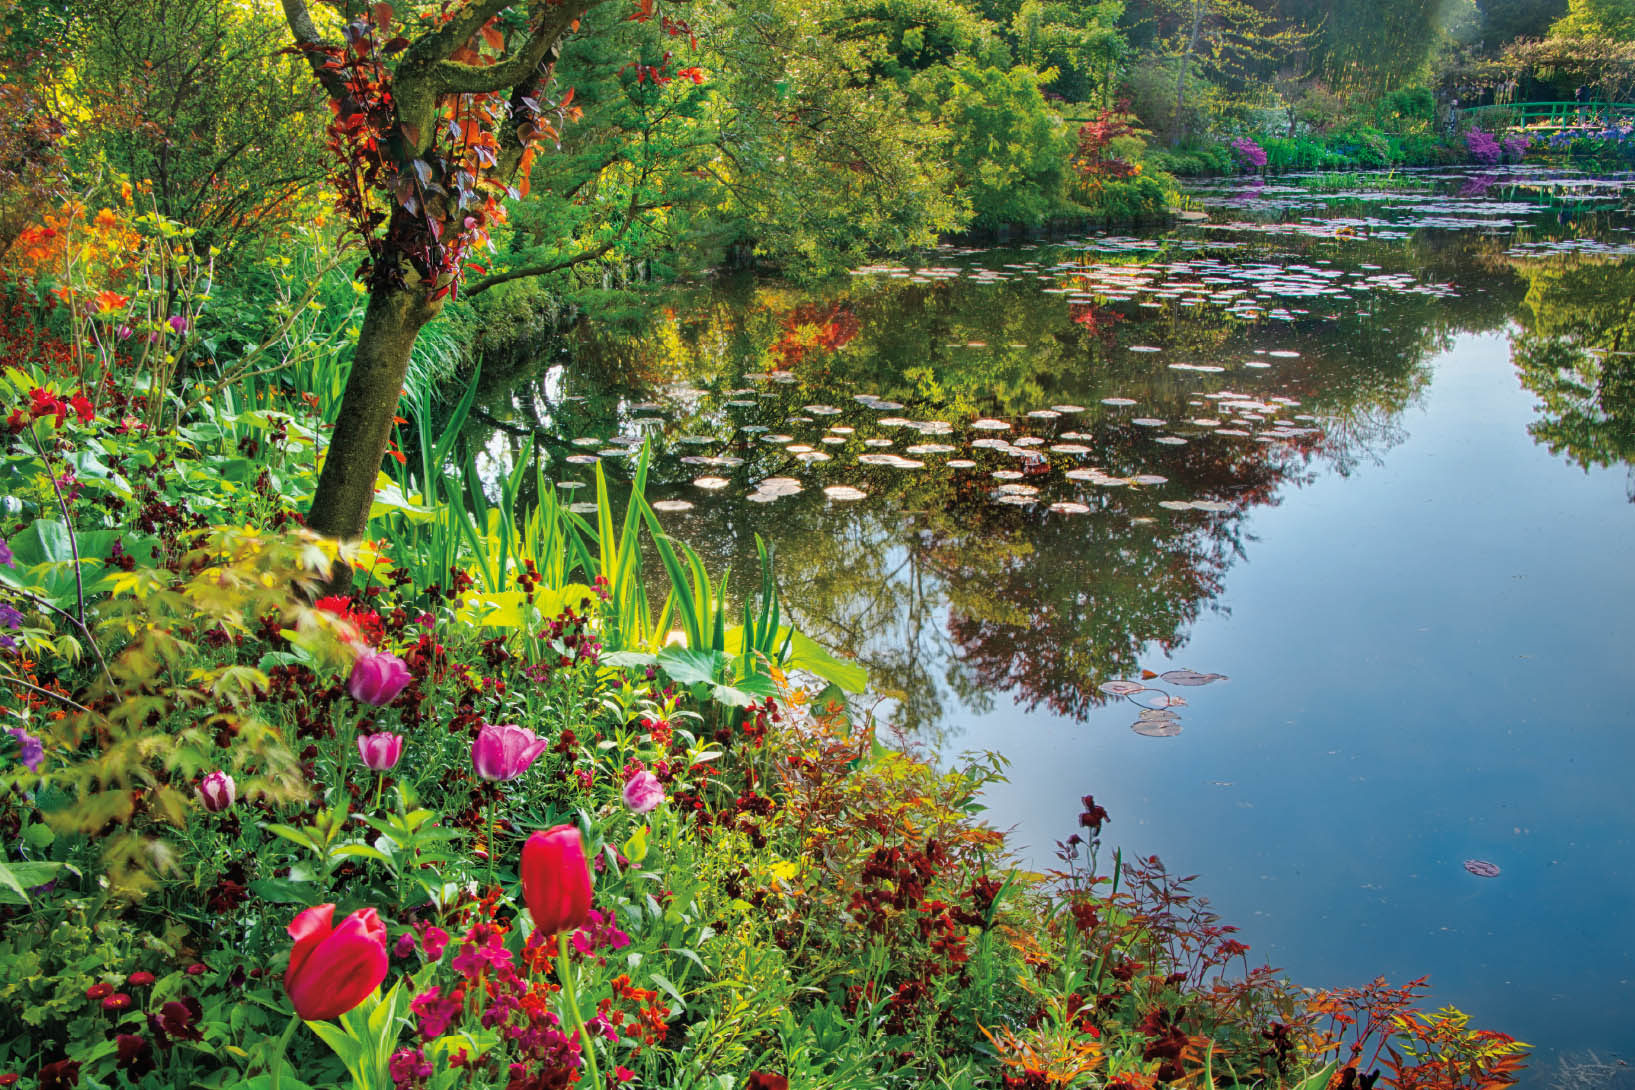
Giverny in the Spring—When photographing this view of one of Claude Monet’s lily ponds on a beautiful spring afternoon, I wanted to get the foreground flowers and the background bridge in focus. So I stopped the lens all the way down to the most closed aperture (f/22, which registered in the EXIF data as f/25). Then I focused on the spot that a back-of-the-envelope calculation indicated was the hyperfocal distance—roughly speaking, the tree trunk you can see in the mid-left.
By using this focusing technique, I was able to maximize the range of the image that was in focus, so you can clearly see both the tulips in the foreground and Monet’s wonderful green bridge in the background.
Nikon D850, 36mm, 2 seconds at an effective aperture of f/25 and ISO 31, tripod mounted.
A good way to think about this is that a telephoto lens is like a telescope: it brings things closer. In contrast, a macro lens is like a microscope: it makes small things bigger. Fortunately, for those photographers among us who like telephoto-macro lenses, you can have both; in other words, a telephoto-macro lens that brings things closer and magnifies them.
I like my telephoto-macro lens because it lets me get out of my own way. What I mean by this is, if you are photographing a closeup of the stamen of a flower with a normal-focal-length macro lens, the front element of the lens has to be almost touching the stamen. This can cause shadows and interfere with lighting. It may cause pollinators to stay away. Also, if the surface is reflective, as in a water drop (see pages 310–323), a normal macro lens will be close enough so that you can see its reflection in the water drop when you probably don’t want to be making a “lens selfie!”
A telephoto-macro lens avoids this problem because the lens is further away while still magnifying the subject. This is also beneficial when trying to photograph critters up close that you don’t want to disturb (think: bees on flowers or dragonflies, see pages 324–339).

White Rose—To create this selective focus image to capture the beauty of a white rose, I carefully focused on the spiral center. Next, I made two exposures, one with the lens all the way stopped down to f/16 for maximum focus, and the other exposure wide open at f/1.8 for selective focus.
Combining the two exposures in post-production, I used the f/16 exposure to create a sharply delineated center of the flower, and the f/1.8 exposure to make use the outer petals were sweetly soft.
Nikon D850, 85mm Lensbaby Velvet macro, two exposures at ISO 64, one exposure at 1/100 of a second and f/1.8, and the second exposure at 3/10 of a second and f/16, both exposures tripod mounted.
Focal Length and Depth of Focus
Smarty-arse photographers sometimes like to say that the best zoom lens is your two feet. In other words, you don’t really need a wide-angle lens to get a wider-field-of-view capture of a subject; all you need to do is back away from it, provided this doesn’t mean backing off a cliff. Conversely, you don’t need a telephoto lens, you can just run up to the subject, again provided there is no moat with piranhas between you and the subject.
Obviously, there can be some physical objections to “zooming with one’s feet;” for example, backing up may mean falling off a bridge, and moving forward may not be practical. Zoom lenses, and having an arsenal of lenses of different focal lengths, can help photographers with pragmatic topographic problems.
Besides specific issues of topography and location, you should be aware that different focal-length lenses have different attributes in relationship to distortion and to the depth of field that can be placed in focus with the lens. Depth of field is explained in greater detail starting on page 134.
Specifically, wide-angle lenses have an inherently great depth of field, meaning they make captures with more in focus from back-to-front. In contrast, telephoto lenses have a shallow depth of field, meaning that they make captures with less in focus from back-to-front.
If you want an image with very selective focus—meaning some areas of the image are not in focus and one specific area is in focus—you are generally best off choosing a telephoto focal-length lens. If you are capturing a landscape where everything should be in focus, this is generally easier with a wide-angle lens. Of course, aperture also plays a role in depth of field and focus, as explained on page 134.
An important point is that when you are focusing with a macro lens, depth of field is inherently very shallow. So a telephoto-macro lens focused close is a “double-whammy” in terms of the shallowness of the depth of field.
The more magnified the subject is, the less that is in focus from back-to-front. In fact, to get a macro of an entire flower completely in focus requires employing many of the tricks in the photographer’s book. One technique is using focus stacking, which employs multiple captures, each with a different focus point, combined together to create a greater range that is in focus. Focus stacking is explained on pages 303–309.
When focusing close, even a minor adjustment can change everything. This means that macro photography is a discipline in which positioning the focal plane of the camera parallel to the floral subject is absolutely critical (see page 117). For more about macro photography techniques and best practices, turn to pages 280–284.
Manual and Autofocus
Most modern digital cameras use automatic focusing. And, as a consumer of cameras, you are probably encouraged to use autofocus. In particular, a fairly high percentage of the advertising for the latest and greatest digital camera gadgets have to do with how “smart” the autofocus is and how good it is at finding the right point of focus, whether the focus point is the face in a portrait or the front of a flower in garden photography.
I have to tell you right now that I do not believe that autofocus can read your mind. That day may come, just as one day intelligent machines may rule the Earth, but that day isn’t here now. And as long as autofocus cannot read your mind, it will not know what you have previsualized for your image. This means that you should strongly consider manual focus as an option, depending on the situation.
There are a few places with some specific gear in which I might use autofocus, where the need for fast focusing is vitally important, for example in sports photography or when photographing birds.
Normally garden photography does not present this kind of subject matter, as high-speed motion is not involved.
I do believe that I have lost more photos to autofocus than autofocus has ever gained for me, because autofocus often focuses on the wrong spot. Many of the extremely high-quality prime lenses that I use (such as those made by Zeiss) are manual focus only.
Regarding manual focus, not all modern lenses are capable of focusing manually. At best, some modern lenses focus manually badly. Maybe the machines are starting to take over the Earth!

Papaver—Every spring I plant poppies in my garden. I wait impatiently until my models are ready for photography. One beautiful flower in a pot caught my eye as it bobbed gently in the sunshine. Bringing the poppy inside, I decided that I wanted to make an extreme close-up.
To make the image, I put the poppy blossom on a light box for back lighting and used my tilt-shift macro lens to focus carefully on the center of the flower.
Nikon D850, 85mm Nikkor tilt-shift macro, 25 seconds at an effective aperture of f/64 and ISO 64, tripod mounted.
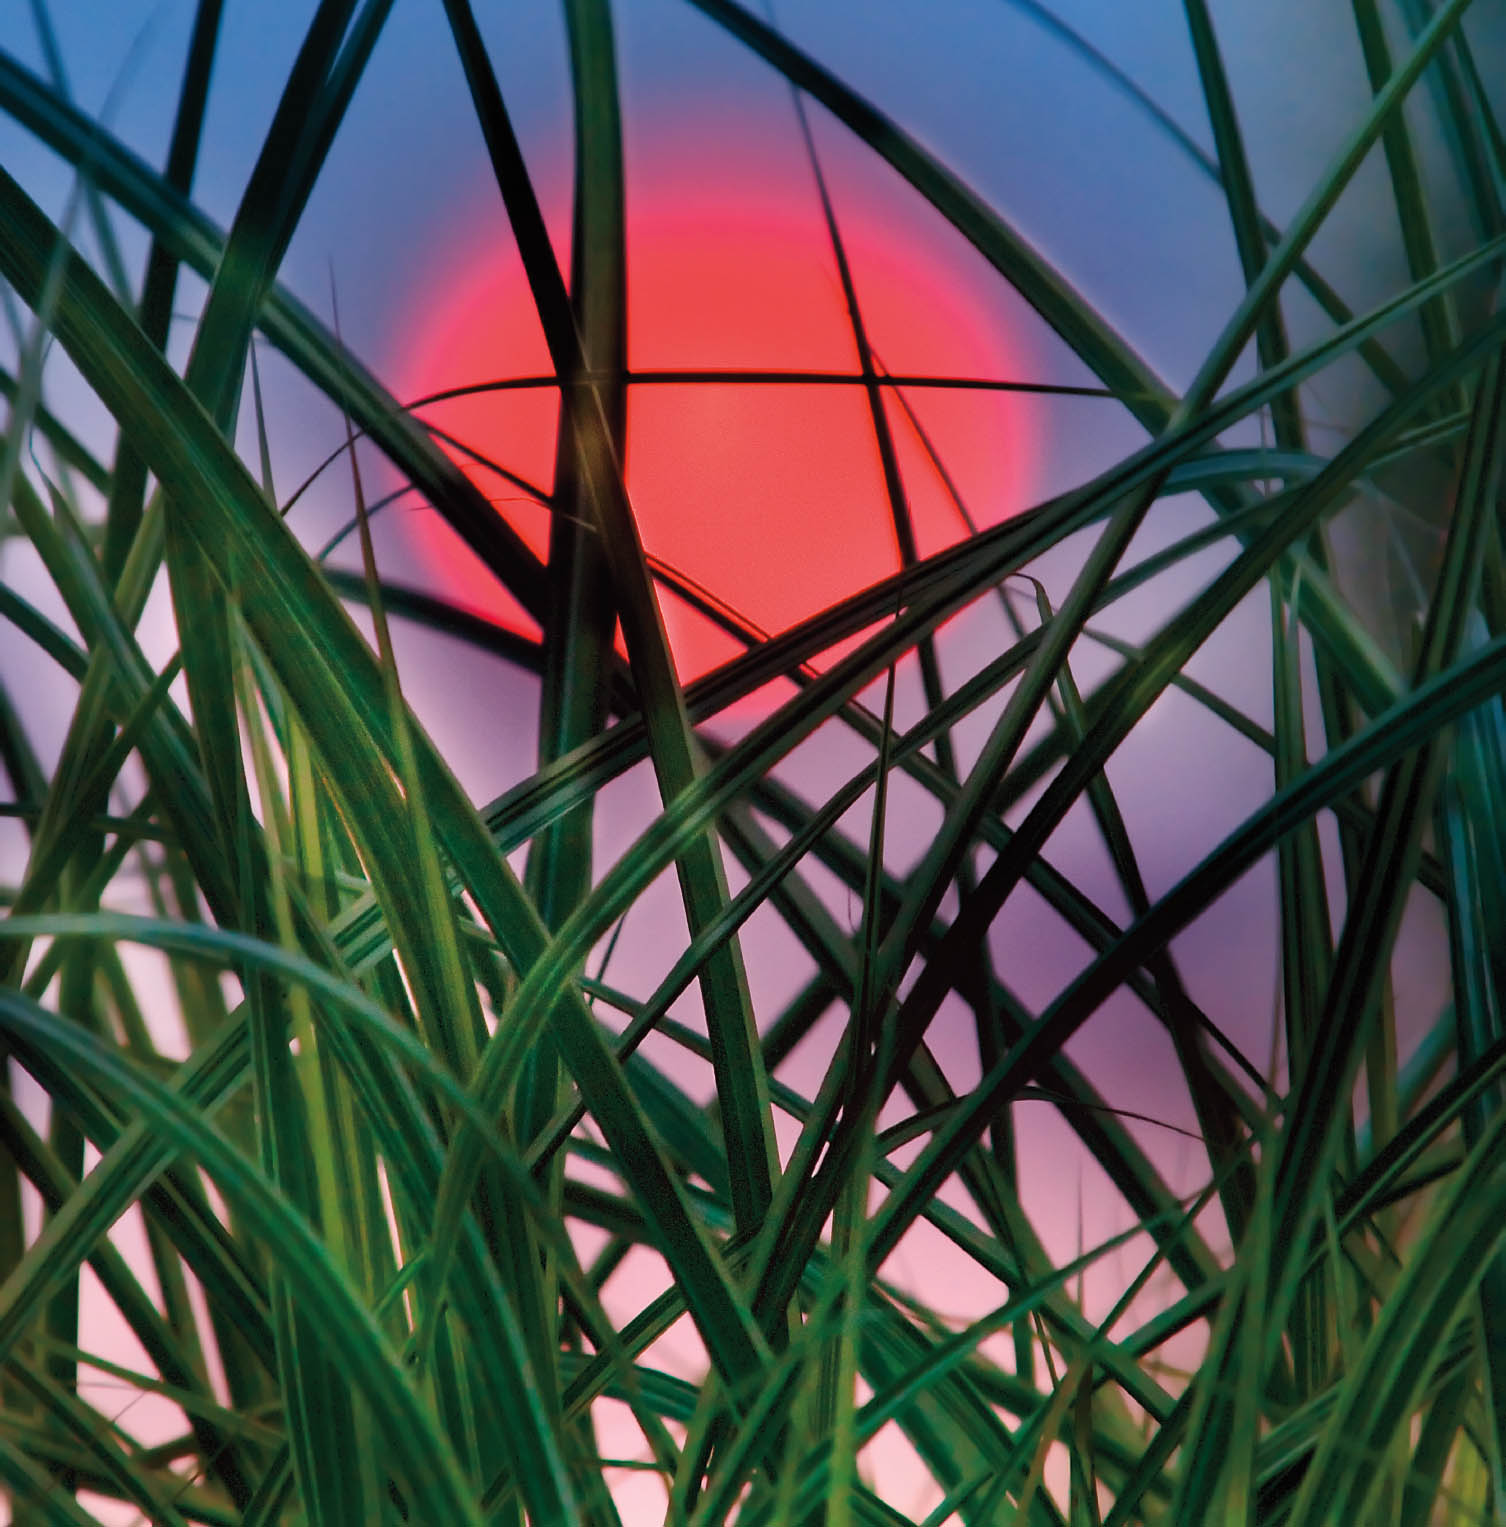
Decorative Grasses—The sun was setting as a fiery red ball in a purple haze. To create this image, dramatically contrasting the large ball of the sun with decorative grasses in the foreground, I got down on the ground at the base of the grasses. Then, I carefully used manual focus to focus on the grasses. I used a wide-open aperture (f/7.1) to separate the grasses in the foreground from the sun in the background, and to help make the ball of the sun seem larger.
Nikon D300, 70mm–200mm zoom with 2X teleconverter at 400mm, 1/320 of a second at f/7.1 and ISO 320, hand held.
Quite a few digitally designed lenses that do allow manual focus only give a head-nod to the possibility of focusing manually. In manual-focus mode, these lenses have a loose, short feeling to the focusing ring, and are designed to over-focus. Over-focusing means that the focus knob will continue past the infinity setting. This is designed to aid the motors in autofocus lenses, but feels sloppy and uncomfortable when you are manually focusing. In particular, when focusing manually, it can be hard to know where the infinity focus point is.
The takeaway for garden photography is that if you’re interested in the possibility of manually focusing, you should choose your lenses carefully with manual focus in mind, even if those lenses also autofocus.
The best technique for manually focusing draws on the concept explained on page 114 that there is no such thing as being “in focus.” There are only degrees of relatively being in focus.
To employ this concept in the real world, start by using the manual focus ring to focus closer than your subject. Next, rotate the focus ring so that your subject seems to be in focus. Once you have achieved apparent focus, use the focus ring to focus slightly beyond the subject so that the subject is no longer in focus. Finally, pull back so that the subject seems optimally in focus.
It’s best to practice this technique with your camera on a steady tripod, because this removes the variable of the camera position from the focusing technique. Once you’ve got the hang of it with the camera on the tripod, you’ll be able to use this technique with the camera hand held also.
Note that this discussion of manual focusing only relies on an optical viewfinder. If you are using a camera with a digital viewfinder, there are a number of additional tools that can be used in conjunction with best-practices visual, manual focusing. These include focus peaking and magnification in the viewfinder (check your camera manual for the specifics of how to use these features).
There are situations in which I use a hybrid process where I start by focusing visually and then fine-tune things by using high magnification on the camera’s LCD screen.
In fairness, as I have noted, there are kinds of photography involving subjects in high-speed motion that almost require the use of autofocus. In addition, recent cameras have improved autofocus greatly from the crude tool it was just a few years ago. Also, some folks have eyesight issues that make manual focus either difficult or impossible—so in this sense, having the ability to autofocus can make photography possible for people with low vision, which is a good thing.
If you do choose to use autofocus, be aware that most cameras have numerous different autofocus modes. You’ll have to check out your camera manual and experiment to see which mode is best for you. As a general matter, on those rare instances when I use autofocus in garden photography, I prefer to use a mode that allows me to set the focus points using controls on the back of my camera, rather than a mode in which the “artificial intelligence” in the camera chooses the focal point for me.
Depth of Field
Depth of field is defined as the range from back to front, or front to back, that is in focus. Therefore, depth of field is a distance. We say the depth of field is great or wide or large when the distance is larger, and we say the depth of field is small, short, or shallow when the distance is smaller.
Depth of field is controlled by the size of the sensor, the focal length of the lens, and the aperture of the lens. With a given camera and lens (or focal length of the lens when using a zoom lens), the only variable setting is the aperture (you can’t change the size of the sensor of the camera you are using). Therefore, in the field and in garden photography, the practical study of depth of field is largely determined by aperture.
Aperture and Depth of Field
Most camera lenses have a diaphragm that controls the size of the opening of the lens that lets light into the sensor. As I explained on page 87, this opening is called the aperture. An f-number is the ratio of the focal length of the lens to the diameter of the aperture. An f-stop is 1/f-number written as f/f-number, for example f/16.
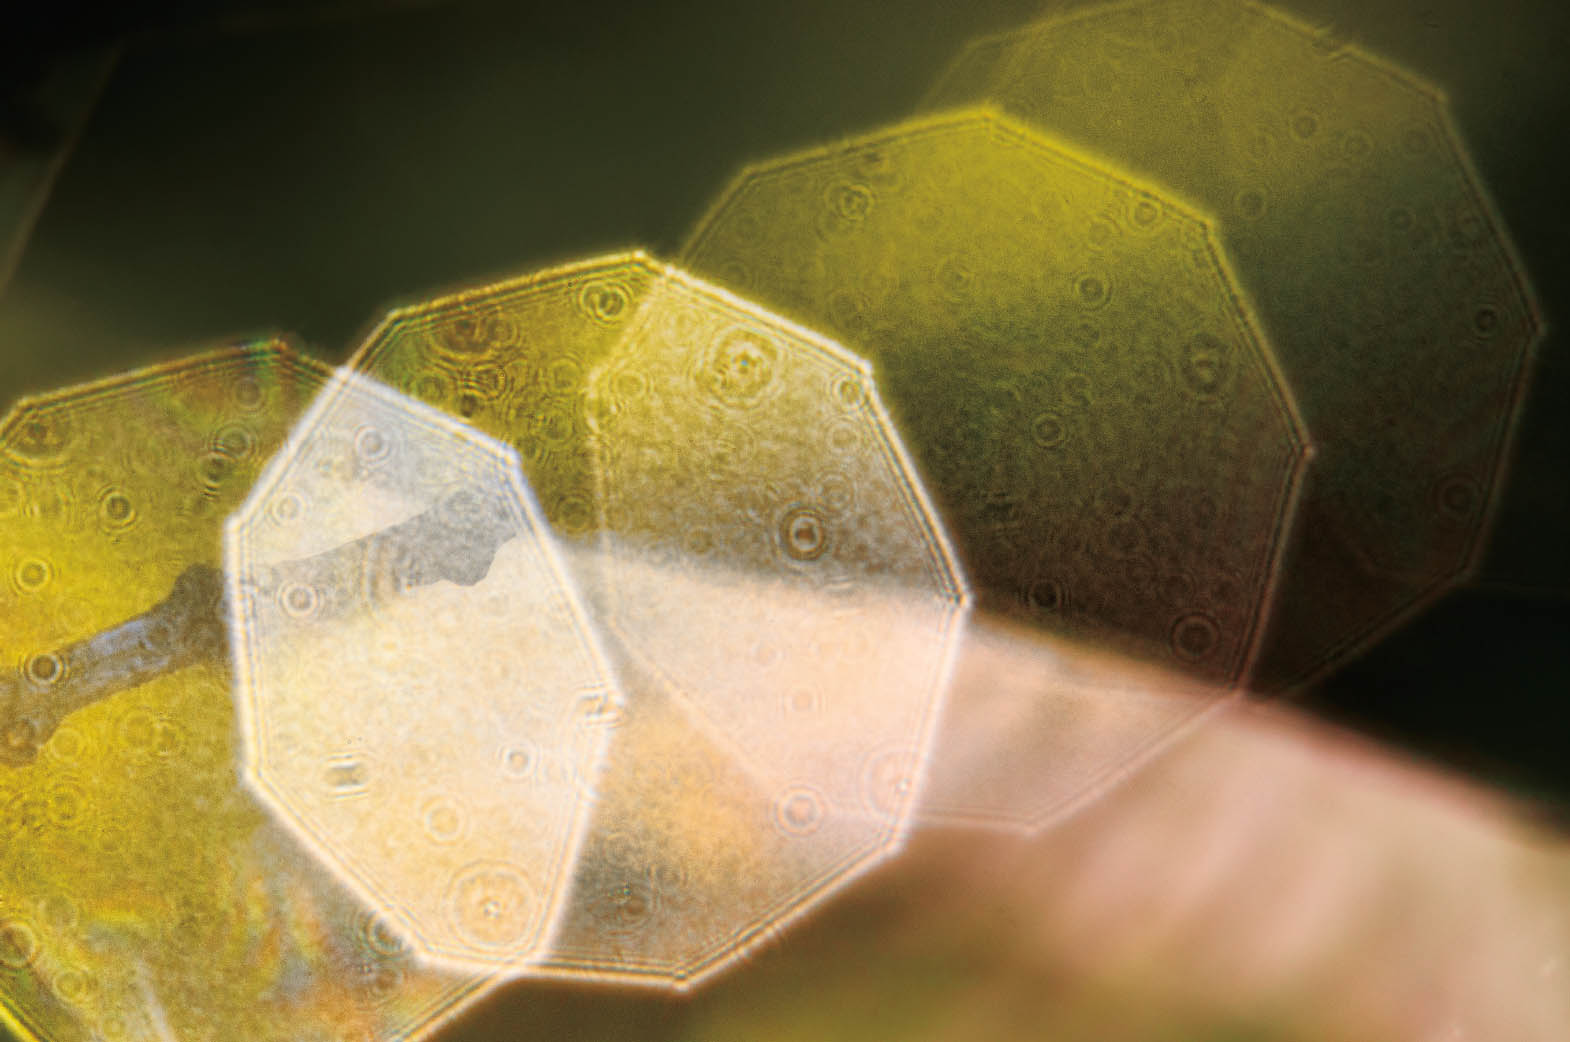
Diaphragm Blades—This photograph of refractions from sunlight generated by water drops in a garden was tightly focused on the refractions and exposed at close to the maximum aperture (f/5.6). The resulting image shows the refractions of the internal blades of the lens diaphragm in detail, but not the surrounding area of the garden.
Nikon D300, 200mm Nikkor macro, 1/200 of a second at f/5.6 and ISO 200, tripod mounted.
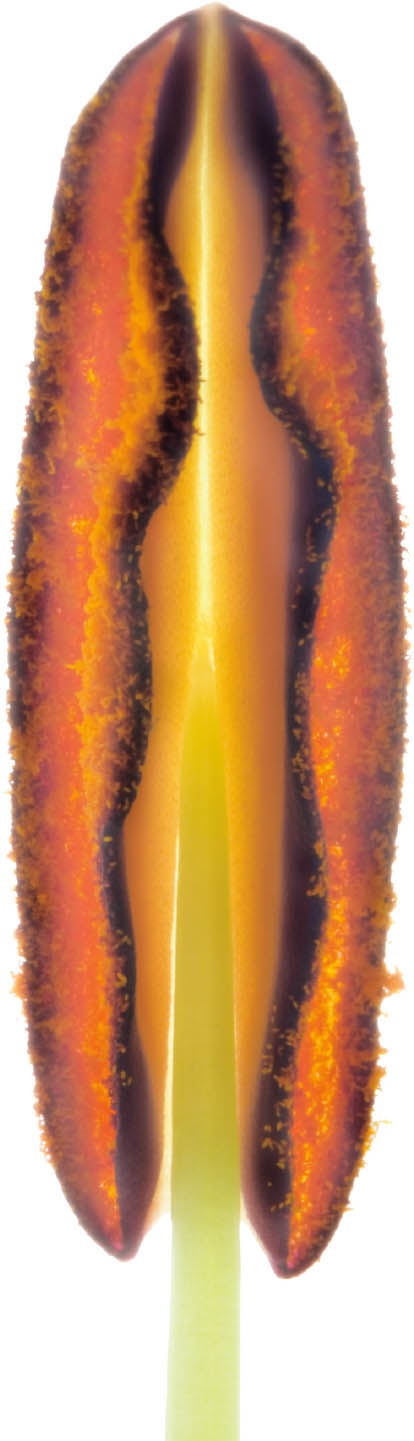
Stamen—To photograph this lily stamen against a white, light-box background, I needed to magnify the stamen as much as possible. I used a macro lens with an extension tube, and a close-up filter—definitely heading into microscope territory.
Once one is this close, minute shifts in the distance between the camera and the subject have a huge impact. So I stopped the lens down as far as possible (to f/32, recorded in the EXIF data as an effective aperture of f/40) for maximum depth of field. For more about macro photography in the garden, see page 303.
Nikon D300, 200mm Nikkor macro, 36mm extension tube, Nikon 5T close-up filter (+1.5 diopters), 6 seconds at an effective aperture of f/40 and ISO 100, tripod mounted.
Aperture is referred to using f-stops. The larger the f-number, the smaller the opening in the lens, as you can see in the diagram of apertures shown in Figure 9, opposite.
Since each full f-stop lets in half the light of the preceding full f-stop, an opening of f/22 is much smaller than an opening of f/2.8. A logarithmic relationship is involved because f-stops are defined using the diameter of a circle.
When a lens aperture is set as small as possible, the lens is said to be stopped down. When a lens is set to the maximum aperture, it is said to be wide open.
Setting the aperture is one of the most important creative controls in photography because of the relationship of aperture to depth of field. Note that it is easy to set aperture when you are in manual exposure mode, or with many cameras in aperture-priority mode (check your camera manual for the exposure modes available to you and how to use them).

Figure 9. F-stops (shown in relative scale)
If you use an automatic exposure mode and do not affirmatively set your aperture, you should once more remember that your camera is not a mind reader, and realize that it is making this important creative decision for you. Please review the results on your LCD. You may need to make an adjustment to the camera’s choices depending upon how the exposure has come out.
For example, even at a fixed aperture, such as f/8, the camera in aperture-priority mode is quite likely going to make an overall exposure for the garden scene in front of you. But your interest may be in the dark-shade areas or the strong, dappled sunlight. A correct overall exposure will be wrong for these dark areas.
To make a creative exposure for your areas of interest, while still using aperture-priority mode with the aperture constant at f/8, you can use an exposure adjustment control, available on most cameras, to make a brighter or darker exposure. Usually, the exposure adjustment control allows you to go up or down by EVs (exposure values), where ±1 EV halves or double the light. Note that the full f-stops shown in Figure 9 are each 1 EV apart from the next full f-stop.
As a concrete example, suppose you are photographing a beautiful garden courtyard using aperture-priority metering at ISO 100 and f/8. The camera makes the exposure at 1/125 of a second. Looking at the results on the LCD, you see that things are much too bright. So you use the exposure compensation control at -2 EV. The next time you make the exposure, it is automatically at 1/500 of a second, because 1/500 of a second is 2 EVs darker than 1/125 of a second.
Note that the third element in the exposure triangle, ISO, is less often varied than either shutter speed or aperture. In my camera, I turn off auto-ISO, so I do not allow ISO to be changed without my explicit control.

Bethesda Terrace—Bethesda Terrace, with its grand staircases and architectural features, is the only formal element in Frederick Law Olmsted’s original plan for Central Park in New York City. Constructed during the American Civil War, on the piazza below the terrace, the well-known Bethesda Fountain with the Angel of the Waters statue commemorates the opening of the Croton Aqueduct, which opened in 1842 and supplied New York City with pure water for the first time.
To capture this moonlit view of the Bethesda Terrace, I stood with my back to the fountain and positioned my camera and tripod facing the terrace. I chose the minimum aperture that put the front pillars of the terrace in focus with the moon still in focus (f/8)—the hyperfocal distance for this situation. Then I used the exposure triangle to calculate the other settings for my manual exposure.
When choosing my exposure settings, I was careful to consider the motion of the moon. With shutter speed durations longer than about 30 seconds, the motion of the moon begins to be apparent. I wanted to keep the moon from seeming to move too much, so I worked my exposure to keep the shutter speed duration to 60 seconds.
Nikon D810, 28mm, 60 seconds at f/8 and ISO 200, tripod mounted.
However, if your camera is set to allow auto-ISO shifting in auto-exposure modes, ISO may, of course, be changed rather than shutter speed when you use an exposure adjustment.
When you stop your lens down all the way, you have maximum depth of field, and when you open the lens up all the way, you get minimum depth of field. To repeat, the larger the f-number, the smaller the opening, therefore the more depth of field. The smaller the f-number, the larger the opening, therefore the shallower the depth of field.
If you want something to be in selective focus, then you want to use a small f-number for a large opening and shallow depth of field. If you want an entire range of distances to be in focus, then you want a large f-number for a small opening and a wide depth of field.
You don’t always need to go to extremes: you can also pick an f-number that produces an intermediate depth-of-field range. Depending upon the situation, this may be the best choice for an overall exposure. Once you understand depth of field, you can use the aperture to control how much of it you want in a given image. Perhaps you want the boxwood hedges to be in focus from front to back, but the ivy-covered wall at the back of the garden and the daffodils in the foreground, not so much. In this case, you can set the aperture for the distance range of focus encompassed by the boxwood hedges.
Of course, you will also need to focus on the subject, such as the boxwood hedges. While where in a depth-of-field range you choose to focus is not generally mission-critical, the best practice is to focus about a third of the way into the range.
How do you tell what the depth-of-field range is in a given situation? The gold standard is to make the image, load it up on a big monitor, and examine it up close and personal for focus. This doesn’t help much out in the field.
In the field, there a number of aids to help you determine depth-of-field ranges at the time you make an image. These include:
- Aperture tables, which can be found in the manual for most lenses, and correlate distance, f-stop, and depth of field. Note that aftermarket aperture tables are also available, and can be found as mobile phone apps. To effectively use an aperture table or aperture app, you will need to measure the distances involved.
- Good lenses, particularly those designed for manual focus, have depth-of-field markings on the lens barrel. At a given focus point, there are indications of the range of in-focus distances.
- Many cameras, particularly DSLRs, provide a depth-of-field preview button. Pressing the depth-of-field preview button stops the lens down to the actual aperture that will be used to make the exposure. It can be kind of dark to see anything, particularly at smaller apertures—but you are looking at the image as it will actually be made and once you learn how to compensate for the darkness, you can determine depth-of-field range visually.
- A camera with an LCD that displays a live-view video can show you depth of field in real-time based on the aperture you’ve chosen before you take the image.
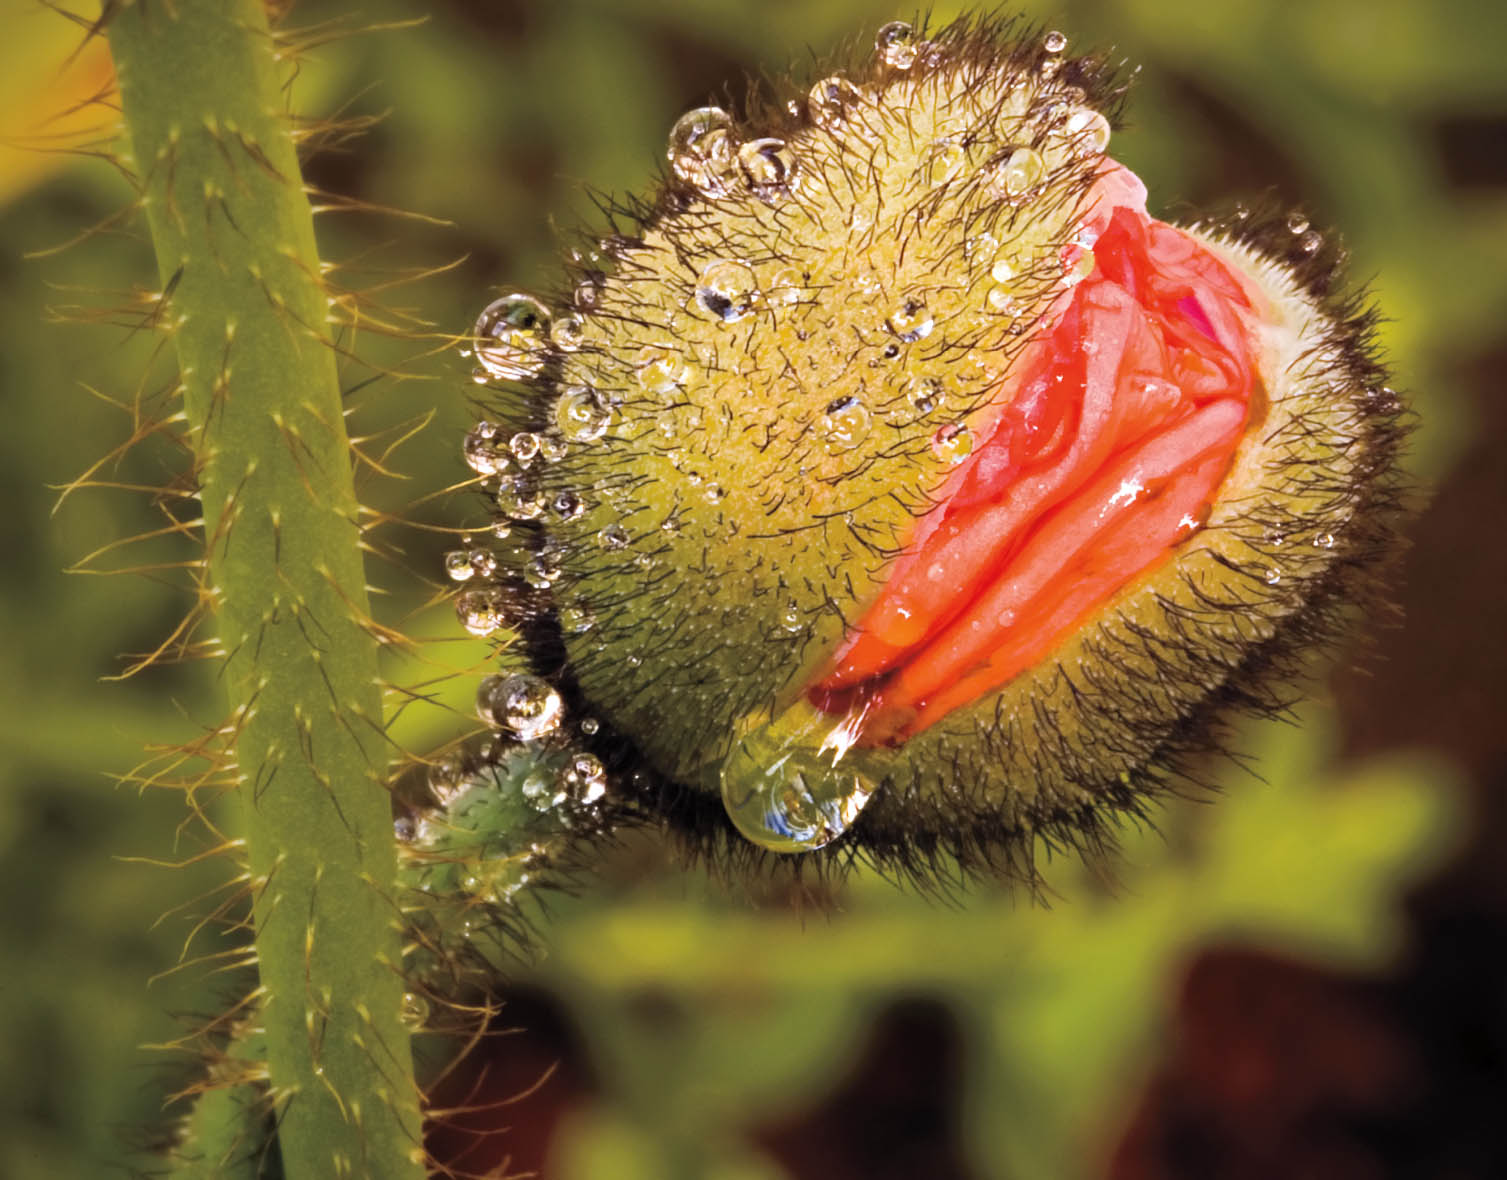
Wet Poppy Bud—For reasons that may be obvious, my photo of a wet poppy bud is much beloved on the internet, on occasion in neighborhoods that seem naughty.
Be that as it is—and I am always very unhappy to see one of my images used without my permission—I photographed this sweet, little Papaver nudicaule (Icelandic poppy) in the garden behind my house. It had been raining, but there was a hiatus in the squall where it was comparatively dry and the wind had stopped blowing for a moment—the calm between the storms.
Getting the tripod into position without disturbing the water drops on the flower proved mighty tricky. I realized that I probably had only one exposure before the wind and the forces of gravity intervened. I was careful to make that one exposure with the aperture stopped down all the way (at f/36), so the entire poppy bud was in focus. After I clicked the shutter, the large water drop at the bottom of the bud fell. Plunk! In photography, as in life, timing can be everything.
Nikon D70, 105mm Nikkor macro, 3 seconds at f/36 and ISO 200, tripod mounted.

Monet’s House at Giverny—With this wide-angle image (14mm on a 1.5 crop-factor camera, which is equivalent to 21mm on a full-frame camera), I wanted to capture the flower beds in focus while leaving artist Claude Monet’s house slightly out of focus. I used a moderate aperture (f/8) and focused on the front of the tulip beds to keep the flowers in focus while allowing the background to go softly out of focus.
In post-production, I added a little “impressionistic” movement to the out-of-focus areas using Topaz Labs’s Glow Photoshop plug-in filter.
Nikon D300, 12–24mm Nikkor zoom at 14mm, 1/125 of a second at f/8 and ISO 100, tripod mounted.
Infinity and Hyperfocal Distance
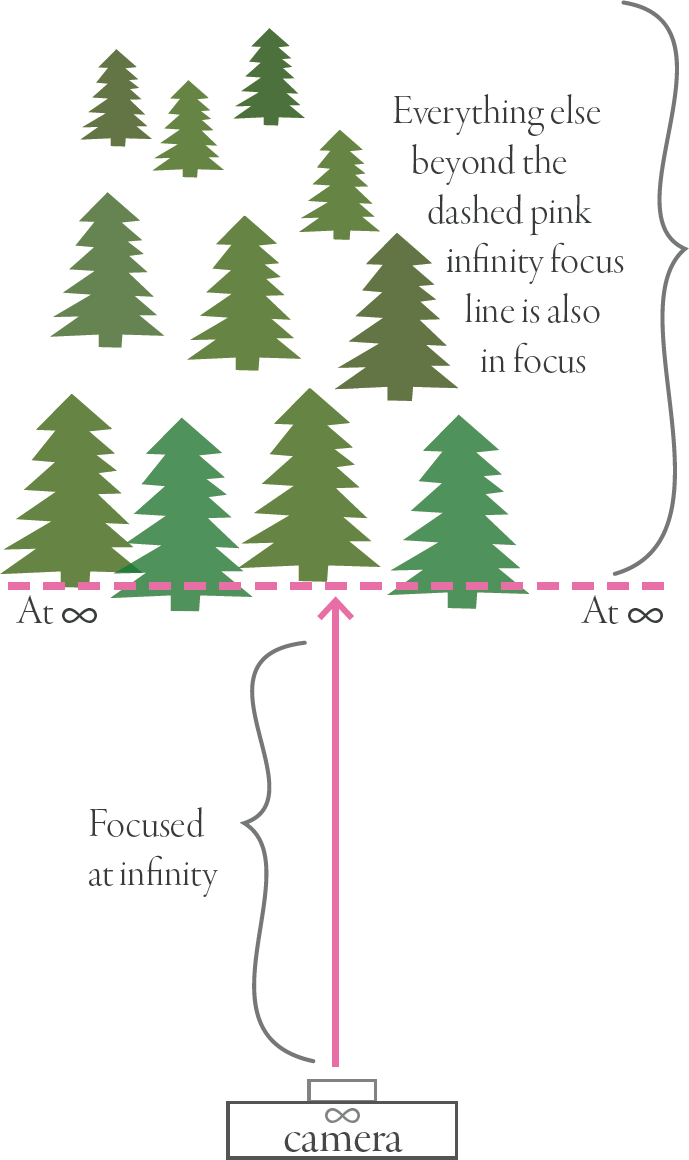
In photography, infinity is defined as the distance beyond which everything is in focus at the maximum wide-open aperture of the lens with the focus setting adjusted all the way for distance.
Infinity is marked on the lens barrel with a symbol like this: ![]()
From the practical viewpoint of a garden photographer, when everything in your image is at infinity, then from a depth-of-field viewpoint, aperture does not matter for focus. You can choose any aperture that you or your camera would like, and the subject matter at infinity will still be in focus.
It’s important to keep in mind that the way optics work in photography there can be a great deal of territory beyond infinity. So, if for a given lens infinity is 20 meters away at the maximum aperture for the lens (for example, f/2.8), when you focus on infinity, a subject that is 20 meters away is in focus, and so is everything further away than 20 meters, as shown in Figure 10 below.
What happens to infinity when you stop down the lens so that it is no longer at the maximum aperture, for example, to f/16? Great question!
Obviously, if you are still focused on infinity, then everything at infinity and beyond is still in focus. But, of course, the additional depth of field buys you some additional focus range.
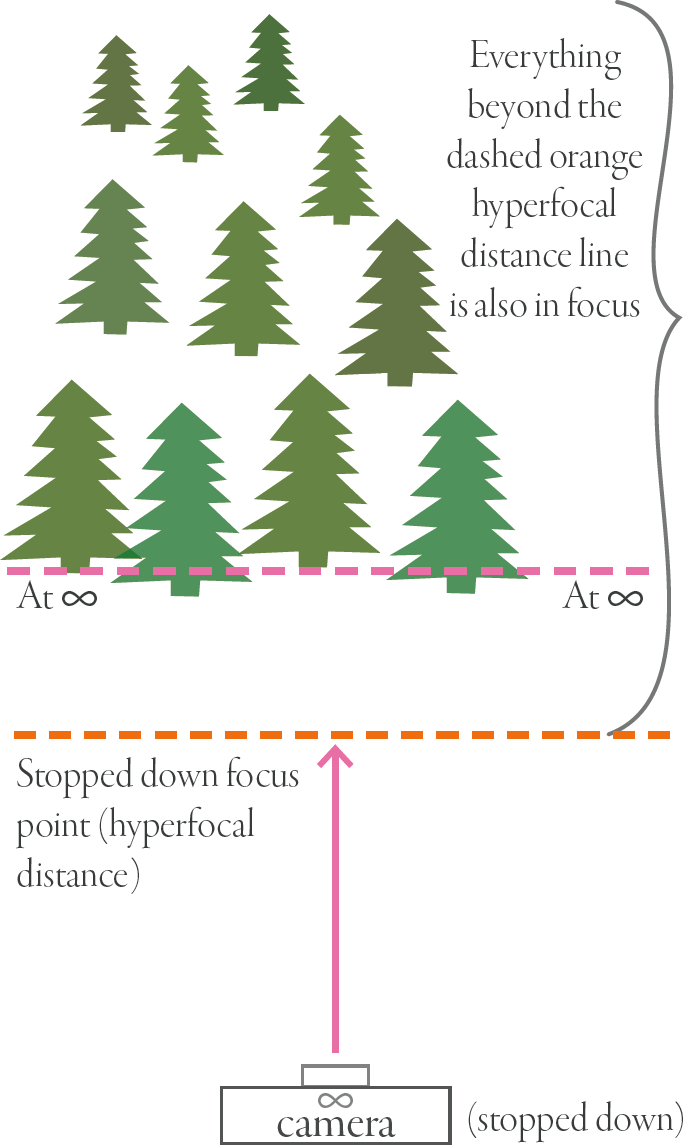
When you stop a lens down to an aperture (such as f/16), the focus point where everything from that point onwards to infinity and beyond is in focus is called the hyperfocal distance. To get the maximum distance range in focus in a photograph that includes infinity—where the lens is not at the maximum aperture—the optimal strategy is to focus on the hyperfocal distance. This relationship is shown in Figure 11 to the left.

Monet’s Lily Pond at Giverny—I have been fortunate enough to visit Monet’s gardens in Giverny, France, many times, often with after-hours access as an artist so that there are very few people in the garden to wander into my photos. Monet’s gardens are extremely special to me because Monet’s painterly abstractions of his wonderful water garden are a large part of what drew me into my life as an artist and photographer. I regard a trip to the gardens at Giverny as a kind of pilgrimage.
To make this photograph, I wanted to keep as much of the surface area of the pond and lilies in focus as possible, so I chose to stop my lens down to a small aperture (f/22) for maximum depth of field.
Nikon D800, 105mm, 0.3 seconds at f/22 and ISO 100, tripod mounted.

Schwetzingen Palace Gardens—Wandering in an orchard that is part of the vast Schwetzingen Palace Gardens in Baden-Württemberg near Heidelberg, Germany, I saw that the sun was about to set. I quickly pulled out a camera that I used as a point-and-shoot (my Sony DSC-RX100 M6) to frame the setting sun in the crook of an apple tree.
I had not a moment to lose! So I made the photo using automatic exposure and focus control. The camera chose an almost wide-open aperture (f/4), which works well in this situation.
Sony DSC-RX100 M6, 18mm (48mm full-frame equivalent), 1/50 of a second at f/4 and ISO 800, hand held.
Determining hyperfocal distance involves a number of variables, and is lens-and-aperture specific. Some lens documentation includes this information and it can also be found in some mobile phone apps, and, of course, by trial and error in the field.
You don’t necessarily have to use hyperfocal distance by the numbers. Photography as a creative endeavor is open to folks who go by the “seat of their pants,” as well as literal rocket scientists. But, it’s a great idea to understand that the hyperfocal distance exists, and to approximate where it might be for focusing in situations where it is important.