Photography on Black
Low-key HDR photography on a black or dark background can be a very effective technique to create stunning imagery, particularly when a single blossom is the star.
This technique should not be confused with post-production LAB L-channel inversion (see pages 264–270). However, when presented with an image of a flower on a black background, it may take a bit of analysis and thought to understand whether the image was, in fact, created via low-key HDR photography or in a post-production black-for-white swap.
To step back for a moment and consider photography on black, it’s easy to see that this is analogous to photography on white—except that we are interested in the dark, low-key dynamic values, rather than the white and high-key values.
The Flower as Diva
Often when I am approaching a flower, what I really want to do with my camera is make the flower a “star.” No distractions, no bit players, cameo roles, or anything else. It’s all about my flower subject as diva, and I don’t want anything to get in the way of this. If you want to portray a flower as a diva, there’s nothing else that works quite as well as capturing your diva against a black background.
In practice, low-key HDR photography on black is a very useful technique in the studio where you can use any background you would like and light the foreground appropriately. This technique can also work miracles in the field in certain situations.
In a garden, you can bring a dark cloth with you to use as a background. Alternatively, it sometimes works to use a naturally dark background. You can then emphasize and add to the background darkness using the photographic and post-production techniques I’ll explain here.
Speaking of backgrounds, just as white is not always white, black is not always black. A black textured card with a flower in the foreground photographed under uniform lighting conditions will be rendered as dark gray.
If you really want black, and are using a background, it’s best to use a light-absorbing material. There are some specialty black paints that can be used for this purpose in studio constructions, but the simplest approach is to use black velvet fabric. Black velvet, particularly high-quality silk material with only a little synthetic content, works best. This kind of fabric can be found in specialty fabric stores or ordered online.
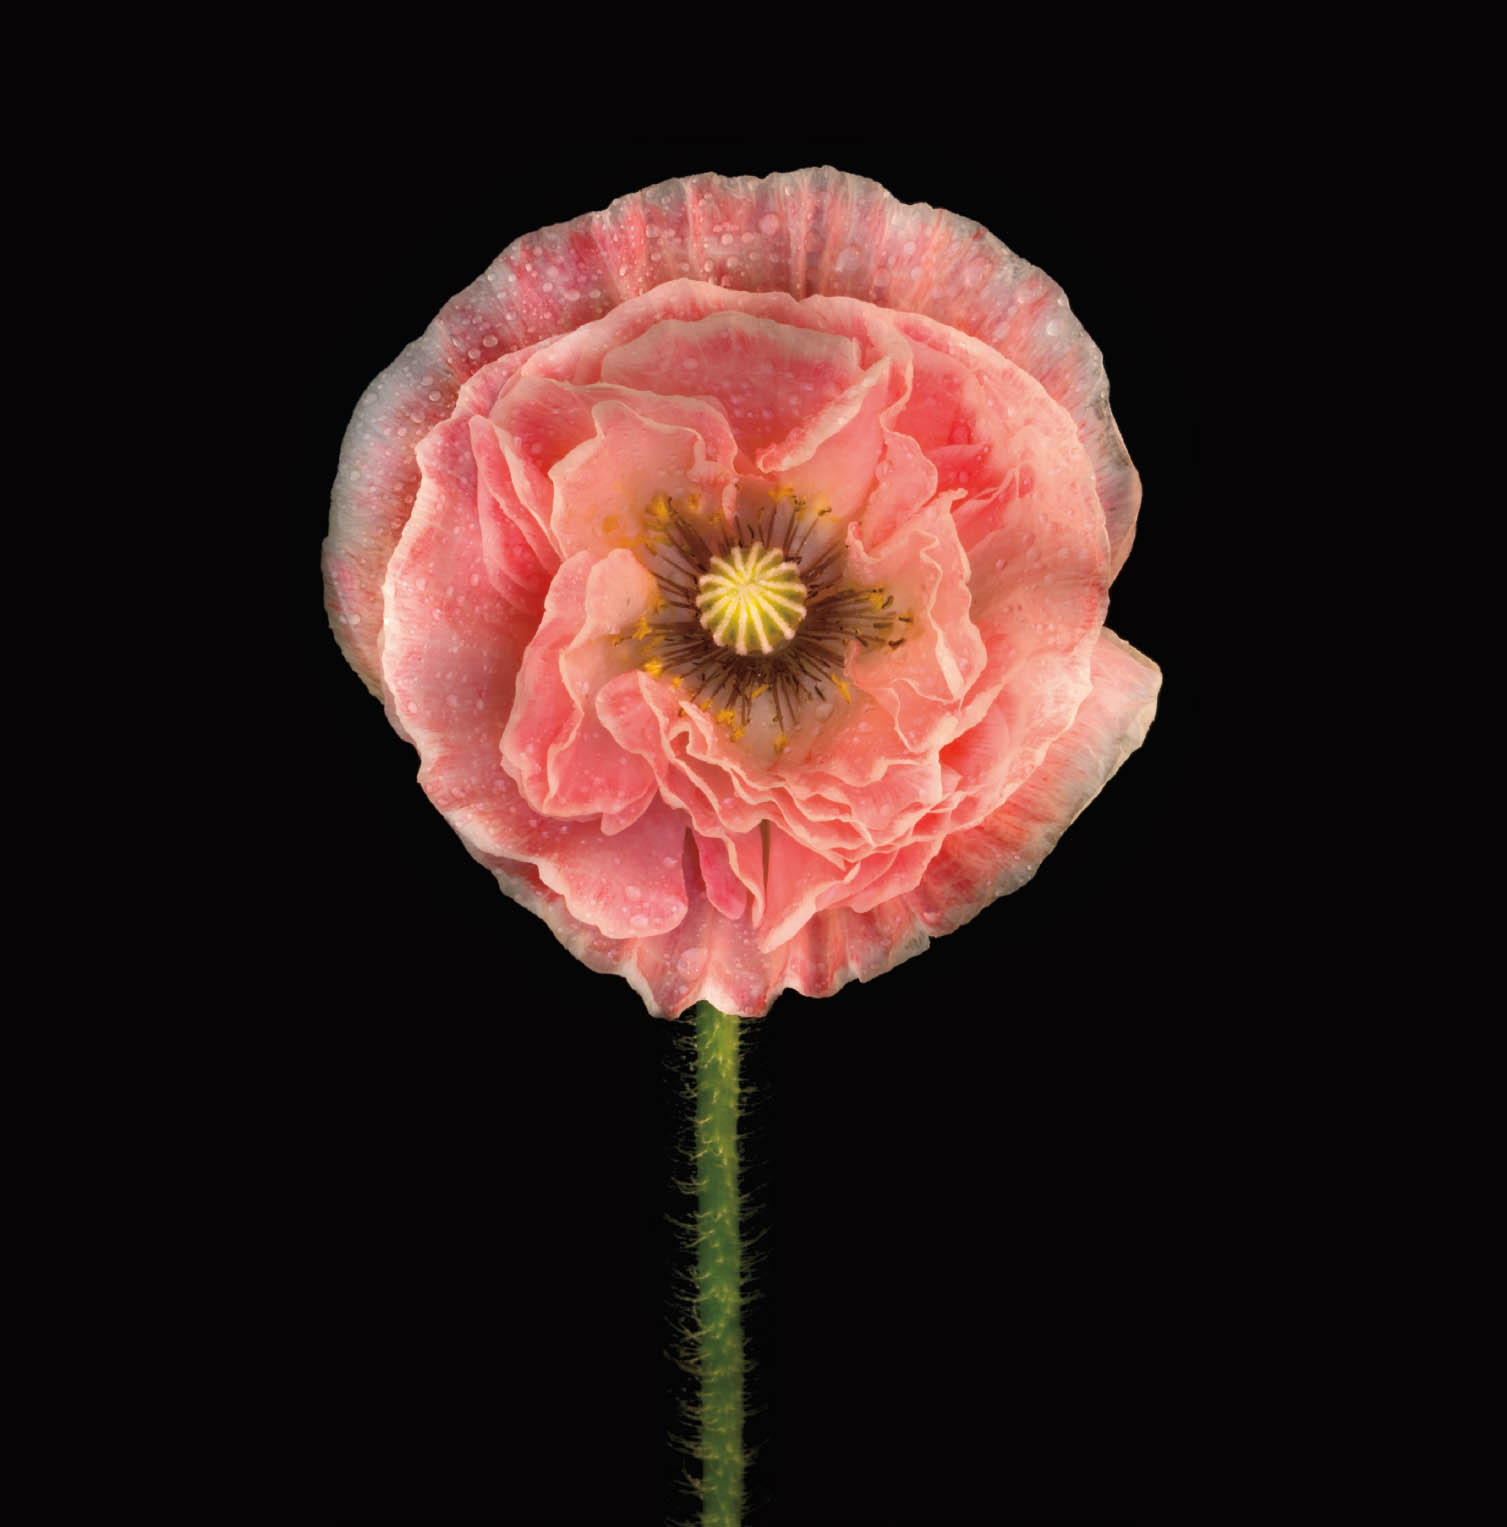
Falling in Love—I grew this Papaver rhoeas ‘Falling in Love,’ a double variety of poppy, in our garden, and cut the flower to photograph it in my studio. I put the flower in a glass flute to keep it upright, and placed the flute on a black velvet background. The flower was lit using controlled ambient sunlight from behind and to one side. I used a large piece of gauze across a frame to soften the incoming sunlight.
Nikon D300, 200mm macro, three exposures with shutter speeds ranging from 1/2 of a second to 2.5 seconds, each exposure at f/36 and ISO 100, tripod mounted.
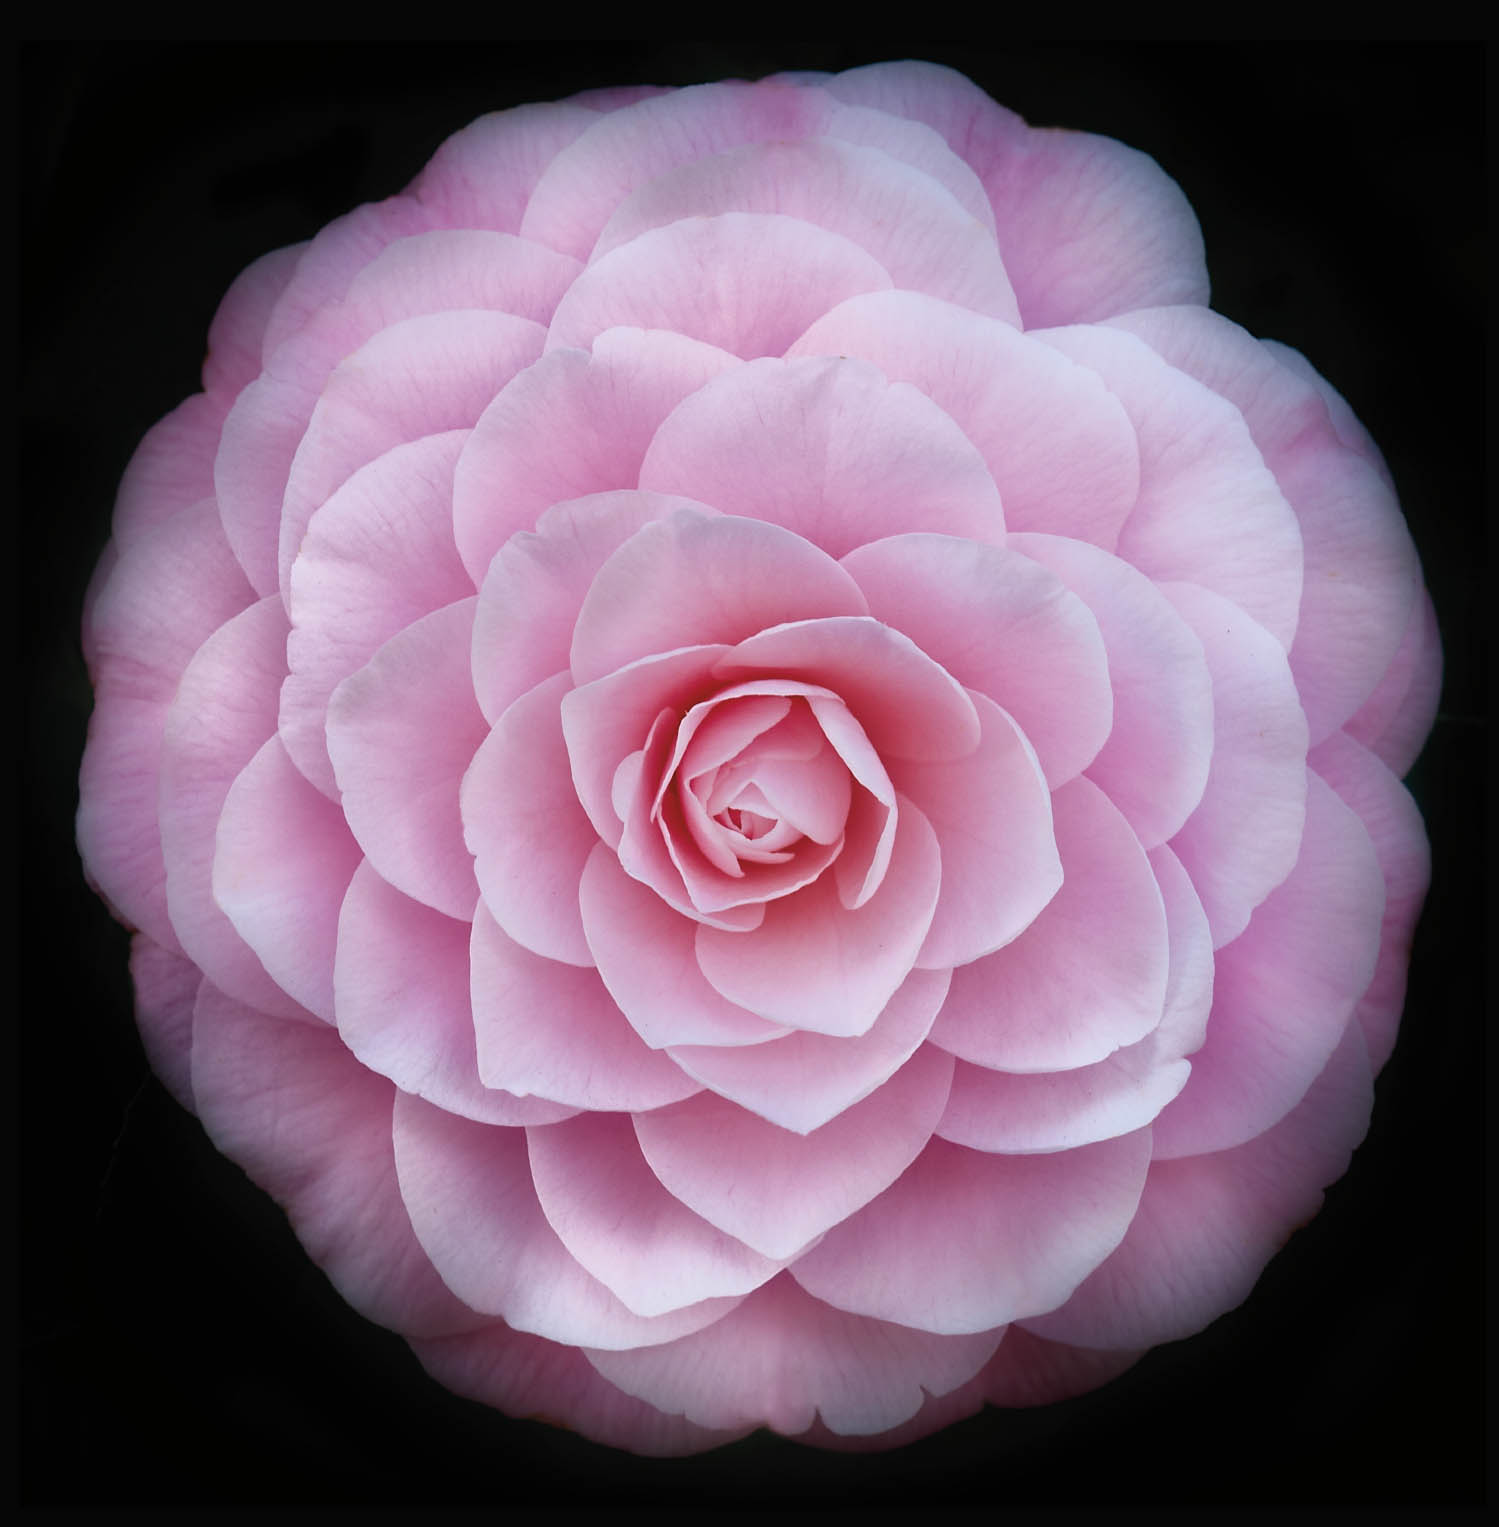
Camellia japonica—I photographed this iconic Camellia japonica on its bush at a local horticultural nursery. It was in fairly dark shade. I used a low-key HDR sequence of photographs, and processed the photo in post-production as described in the text to eliminate detail other than the flower, and to make it appear as if it were posed on a completely black background.
Nikon D300, 200mm macro, four exposures with shutter speeds ranging from 1/25 of a second to 1/100 of a second, each exposure at f/9 and ISO 100, tripod mounted.
Low-Key Photography in the Field and Studio
In the studio or in the field, these steps for creating a low-key bracketed HDR sequence mirror those used for creating a high-key HDR sequence (pages 250–257), but go in the opposite exposure direction.
With the camera on a tripod, to create a low-key HDR bracketed sequence, I perform the following steps:
- I gauge the proper exposure based on an overall reading from my camera’s light meter.
- I generate a bracketed sequence of images, using either manual exposure or the camera’s bracketing feature. Each exposure should be -1 EV darker than the previous exposure, with the bracket using shutter speed as the variable in the exposure triangle that is varying.
- I keep bracketing until I have a dark image with no more information left. This dark image will become the background for my flower on black. Usually, the process requires somewhere between six and eight bracketed images with a ±1 EV difference between them.
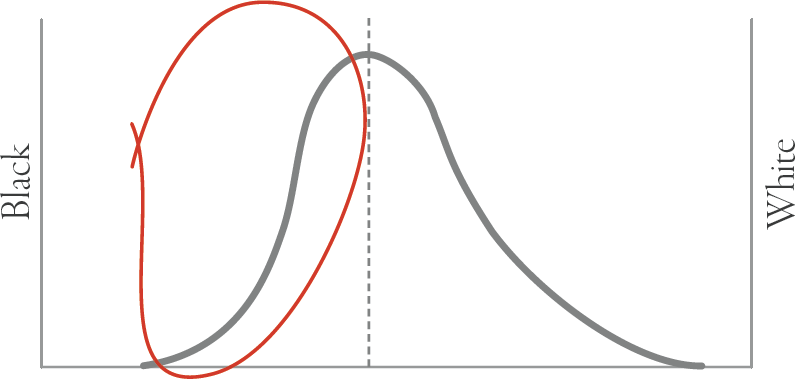
On page 246, I explained how to decode exposure histograms, and that for a light box image, one was only interested in the bright, right side of the exposure histogram.
Working with a low-key HDR bracketed sequence presents the opposite exposure histogram experience. As you can see in Figure 20 below, with a flower on a dark or black background, such as the Camellia japonica (opposite) we are only interested in the left, dark side of the histogram.
As a studio technique, the quality of the image created using low-key HDR bracketing will depend not only on the dark background, but also on the quality of the light on the primary floral subject. The importance of light and lighting remains true when you take low-key bracketed HDR photography into the garden, but surprisingly you can get a completely dark, black background using this technique, even when the actual background is not black (the Camellia japonica on page 274 is an example).
While a black velvet cloth in the garden as a background is probably the best practice, this may not be possible for any number of practical reasons, including the wind, inability to position or hold the cloth up, and garden regulations. Of course, you simply might not have a black cloth with you (when I visit a garden, I often pack a black velvet cloth in my kit).
Low-Key HDR Post-Production
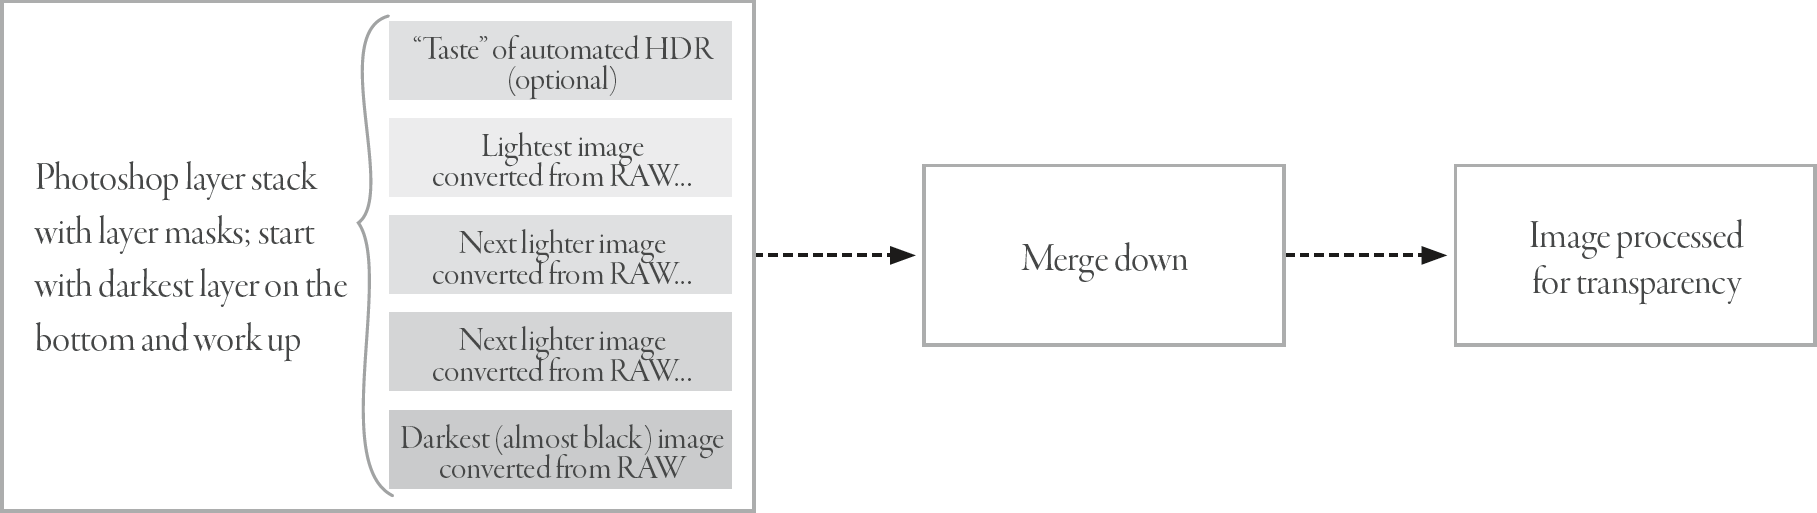
The post-production process of recombining a low-key HDR bracketed sequence of photographs into a final image is very similar to the process I explained for combining a high-key HDR sequence (see pages 250–257)—except that we start with the darkest value rather than the lightest, and add subject matter to the black background rather than a white background. This process is shown in Figure 21 below.
The first step is to start by running the bracketed high-key HDR sequence through an automated HDR program (see pages 183–186 for more about automated HDR). The result of this process is a file that you should set aside for now. The automated HDR file might be used to add dynamic range and structure to the centers of the floral subject, but may also not be necessary for the rest of the low-key HDR process.
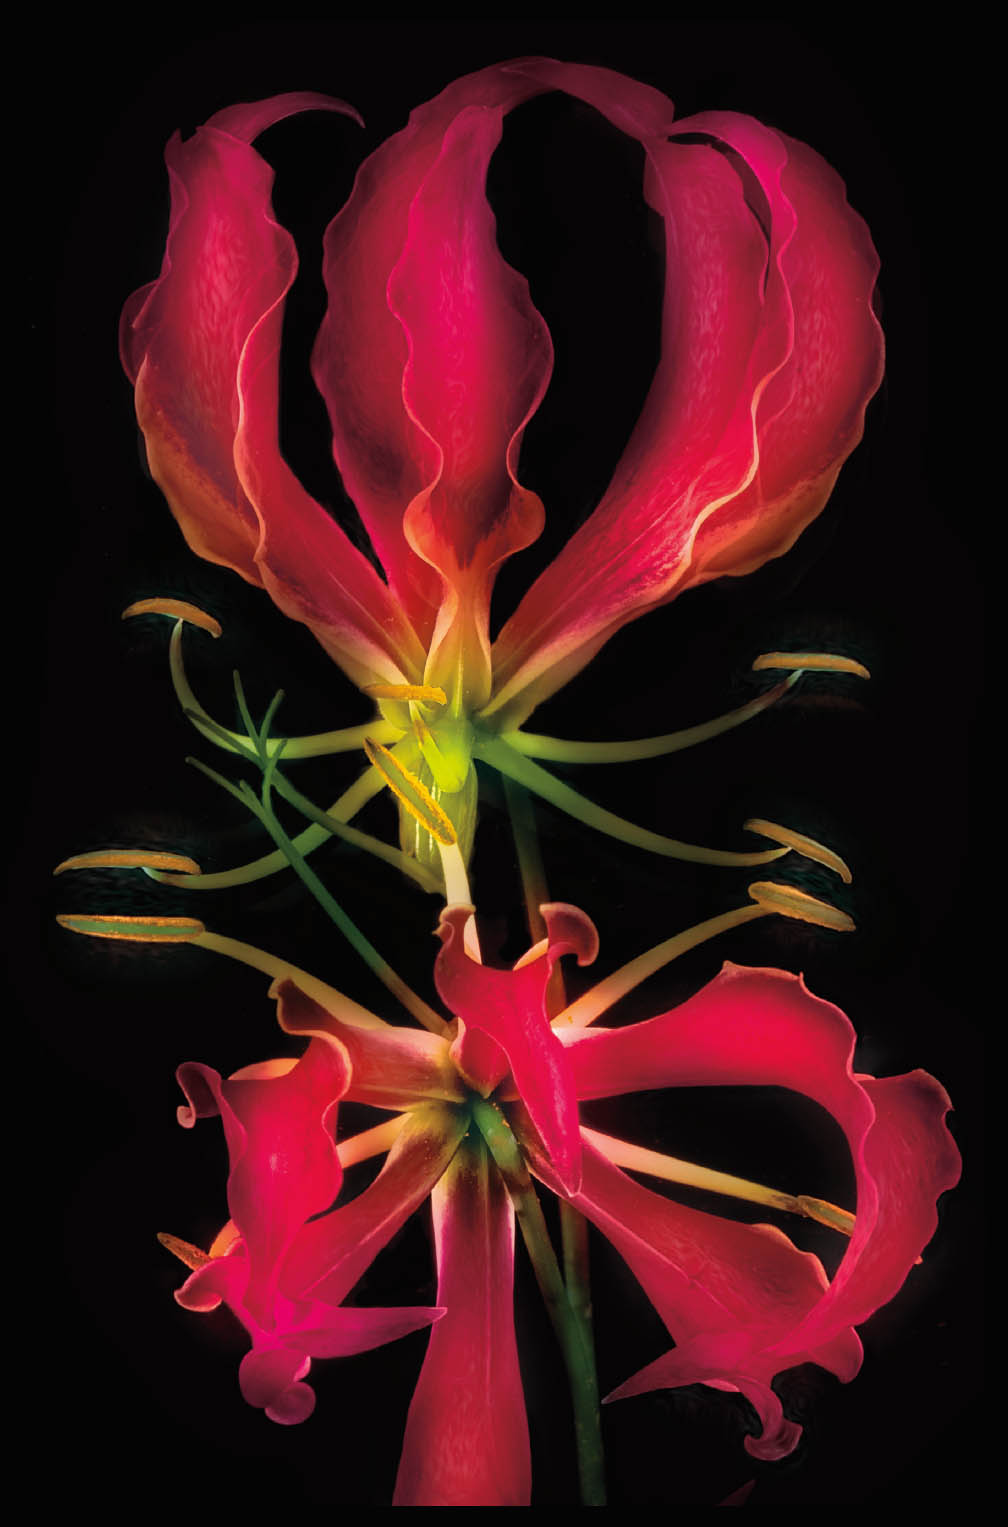
Gloriosa Lily—The setup I used was to place this flower on a mirror in my studio. A black velvet cloth was wrapped around and above the mirror to create a solid-black background.
The gloriosa lily is a very beautiful but very poisonous flower. It’s native to Zimbabwe, and a single flower is toxic enough to kill many people if it were ground up and put in their Mai Tais, sans paper umbrella.
Keeping the attractive danger of the gloriosa lily in mind, I wanted my image to convey a sense of the danger in this flower as well as its beauty. So I intentionally framed my photograph so the composition echoed the iconography of a skull and crossbones, while still portraying intense floral attractiveness.
Nikon D300, 200mm macro, four sets of focus-stacked exposures, each set consisting of six exposures at shutter speeds ranging from 1/200 of a second to 1/15 of a second, each exposure at f/4.2 and ISO 100, tripod mounted.

Papaver Pod—Opium is made from the seeds of a Papaver somniferum pod just like this one. The pod contains hundreds or thousands of seeds. These seeds are ground into a paste, often using a hand mortar and pestle. The paste is turned into opium.
If you are wondering, I grew this opium poppy in my garden. It is perfectly legal in the United States to grow opium poppies for decorative purposes.
I assure you, decoration was the only thing on my mind. I was not thinking about opium at all. In fact, the top view of this poppy pod most reminded me of a sea creature, perhaps some kind of star fish or anemone. In making the image and processing it, I tried to convey this sense of an otherworldly, oceanic creature.
Nikon D850, 50mm Zeiss Makro-Planar, 24mm extension tube, five exposures with shutter speeds ranging from 1 to 15 seconds, each exposure at f/22 and ISO 64, tripod mounted.
To create the main layer stack as shown in Figure 21 on page 276, start with the darkest image at the bottom of the stack. Next, add each subsequently lighter exposure as a new layer to the layer stack you are creating. As each layer is added, it is masked out (in Photoshop, using a Hide All black layer mask). The specific areas of the flower that you want to show against the black background are painted in using the Brush tool.
Make sure that the layers are in the right order—from black at the bottom of the layer stack to the lightest exposure at the top of the layer stack—and paint in the areas of each exposure that you affirmatively want using the Brush tool, taking special care about the edges of the flower against the black background.
It is at least theoretically possible to use a single RAW capture to recombine successively darker exposures for the same kind of post-processing as with a bracketed exposure sequence (for more about multi-RAW processing a single image file, see pages 169–178), and I have found that using this technique with a well-lit floral subject on a dark background can sometimes lead to good results.
Once I am happy with my layer stack created from the bracketed exposures, I then decide whether or not to add a little of the reserved automated HDR blend. This usually depends upon whether I am interested in preserving petal softness (in which case, I will not use the automated HDR blend), or I am more interested in an ultra-real, hard-edged effect (in which case, the HDR blend is just what the doctor ordered). As is usual with a Photoshop layer stack, as a matter of workflow, you should preserve and archive the stack before you merge it down to create your final image.
Whether in the studio or in the field, light and lighting are always, of course, the most important elements in creating stunning floral imagery. But, assuming that lighting is in place, the ability to generate an apparently black background using low-key HDR bracketed photography, and using a cloth or a naturally dark background, adds a hugely important tool to the arsenal of the flower photographer.