Auxiliary Lighting
I think Mother Nature is great! Often there is no more spectacular way to light a landscape or a garden than that offered by Mama Nature. But even sometimes the best of the best—e.g., natural lighting—needs a bit of a boost.
It’s unusual to completely artificially light a garden. But, of course, once things move into the studio, it’s a different ball game, and you can light your floral subjects as you choose.
Continuous versus Strobe
For overall lighting, there are two approaches: continuous lighting versus burst lighting. Burst lighting uses flashes, which are also called strobes.
Here’s the thing: With continuous lighting you can see what you are doing in real time, but with burst lighting there is a delay before you know the results. With the development of LED light sources, continuous lighting has come a long way, and should be considered for applications where it would not have worked even a few years ago. Some newer LED photo lights even provide a fast, high-intensity burst mode in addition to continuous light.
However, LED lighting is not as capable at stopping high-speed motion as a strobe. With a correctly set strobe, the length of the exposure usually doesn’t matter. Motion is stopped by the duration of the burst of light from the strobe. This can be as short as 1/10,000 of a second. Specially equipped strobes do even better, and have stopped speeding bullets for photographs. This gear can be used for high-speed subjects such as hummingbirds in flight.
Since the duration of the exposure doesn’t matter when you are using a strobe as the primary lighting, the key point is to synchronize the camera with the strobe. This is generally done by setting the camera’s synch speed as indicated in your camera’s documentation (often 1/160 of a second), and using this speed as the basis for a manual exposure. Exposure will then be determined using aperture and ISO.
Actual synchronization with external strobe units is accomplished using a Commander function on the camera or a radio-control device positioned on the camera’s flash shoe.
If you get the idea from this discussion that an overall flash is generally best used not directly on the camera, you have got the right idea. A flash positioned in the normal position, right above the lens, produces strong, harsh, and ugly lighting.
Yum!—When I saw this Icelandic poppy (Papaver nudicaule) beginning to open, I was immediately reminded of a mouth and tongue. I put the flower in a small glass flute, and transferred the flute to a white seamless-paper background. I used two LED panels, one on either side of the camera, diffused to make the light a bit softer. This bright flower photo makes me chuckle when I see it, always a good thing!
Nikon D810, 50mm Zeiss Makro-Planar, 1/2 of a second at f/22 and ISO 64, tripod mounted.

Espalier—In the mottled shade of a rural French garden, I saw this vine espaliered on an old stone wall. I liked the way the new orange-red leaves made a colorful contrast against the mottled blue of the stone and lichen. I used a hand-held off-camera flash to light the wall uniformly, with the idea of not distracting with shadows from the pattern of the vine on the stone.
Nikon D800, 135mm Zeiss Apo Sonar, 1/160 of a second at f/4 and ISO 100, hand held.
Anything you can do to get the flash unit off the physical camera unit and away from the lens so it is angled toward the subject is a good thing. This can be accomplished using brackets, hand holding the flash unit, or by attaching the flash unit to a lighting stand and radio controlling it. Of course, two are better than one: Lighting angled from two sides tends to produce a more attractive effect than one single strong light.
Consider for a second the total amount of light output by a continuous light versus an intense but brief amount of light output by a strobe. The point is that at a given exposure, the two total quantities of light should be the same. In other words, if a longer duration of exposure with a continuous light is something that you can see, the strength of a lightning-length flash of light must make up for its comparatively short duration.
Modifying Light
Both continuous lighting and strobe lighting do not have to be “all or nothing.” You can use auxiliary lighting to “fill” shadows that are dark, and bring up exposure values. I feel I must point out that a great deal of the functionality of fill lighting can also be easily accomplished in modern times using post-production techniques such as multi-RAW processing (page 169–178) and hand-HDR (page 187–191).
Another way that you can use auxiliary lighting to improve overall lighting without completely lighting the scene is to throw a “key light” on a specific part of your subject. With portraiture, a key light is often directed at a person’s face. In a garden, you might choose to use key lighting to highlight a particular floral specimen.
Whether continuous or strobe, lights are usually modified in a variety of ways. Diffusers such as umbrellas are sometimes called scrims. To direct light in a specific space or direction, a custom-made stencil called a gobo is sometimes used.
Not all additional lighting involves technology and gadgets. A hand-held reflector—material that is used to reflect light onto a subject—can be a very valuable piece of lighting gear. This can vary in size greatly, from a large panel to a small portable disk that can be used in field macro photography.
A reflector can be as simple as a piece of white cardboard. More intense reflection can be generated using cloth reflectors made of metallic material. A silver metallic sends relatively cool light onto the subject, whereas a gold metallic reflector sends warmer light onto the subject.
I often carry a small disk in my field kit when I am photographing gardens. When taken out of its carrying case, this disk expands into a reflector with one silver side and one gold side.
A portable scrim is a piece of translucent material in a frame that can be mounted on a stand, or hand held, to soften and diffuse harsh light, such as that coming from the midday sun.
Macro Lighting Tools
Taking auxiliary lighting tools into the studio, in the context of close-up and flower macro photography, you have a small stage where you are the lighting director with complete control over the lighting, and a number of specialized tools designed for this very purpose.
Today’s macro lighting tools include:
- Small LED lights mounted like antennae on a fixture that either fits on your camera or attaches to a lighting stand.
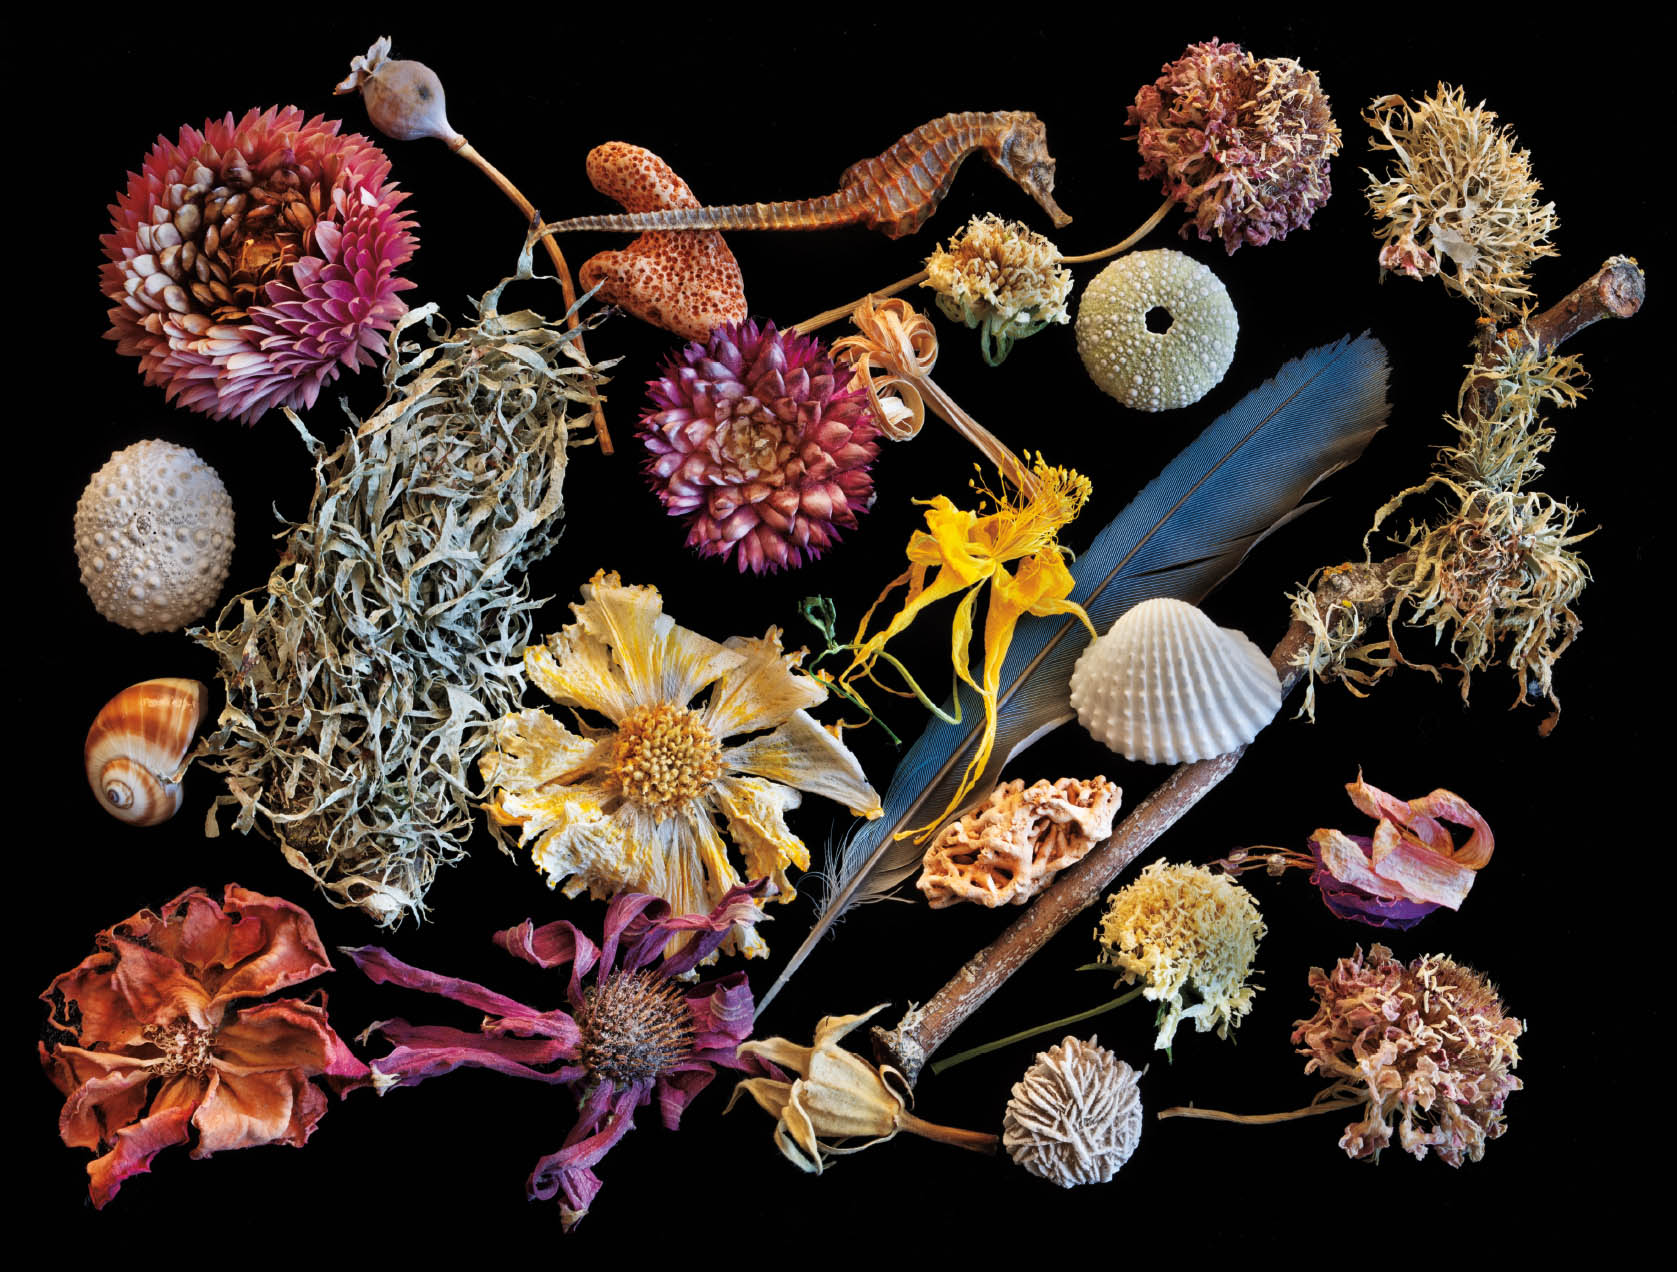
Collection—Part of gardening is what we collect from the gardens. This arrangement on black velvet fabric has dried flowers from our garden, lichen, a blue feather I found in the garden, shells, and so on.
To make the image, I first carefully arranged the objects. My studio was lit with ambient sunlight coming from a northwest-facing window. I used two reflector cards on the side opposite the direction of the light to make sure there were no shadows on the collection, and to add warmth to the composition.
Nikon D850, 50mm Zeiss Makro-Planar, 1 second at f/22 and ISO 64, tripod mounted.

Old-Fashioned Rose—The folds in the beautiful old-fashioned rose appealed to me, but when I lit it directly, the colors seemed to fade and the composition became less interesting. So I let the rose settle into the shadows of ambient lighting. During the 1/2 second exposure, I used a spot LED flashlight to selectively light the flower. I took care to move the flashlight quickly enough during the exposure so that it was not “caught” in the photograph.
Nikon D850, 150mm Irix macro, 1/2 of a second at f/32 and ISO 64, tripod mounted.
- Light cubes that use cloth diffusers to create a uniform light on an internal small stage.
- Ring lights that are a circular strobe mounted around the front element of the lens.
- Small macro strobe units that clamp onto a ring that screws into the lens filter thread. These units are synchronized with the camera and each other, and can also be mounted on external light stands (or hand held). An example is the Nikon R1C1 Wireless Close-Up Speedlight System (a photo made using this system is shown on page 81).
- Specialty lenses, such as the Laowa Macro Probe described on page 299, which come with their own built-in LED ring lights. In the case of the Laowa Macro Probe, the ring light is powered externally using a USB power source, such as a battery pack for a portable phone. Since the business end of the Macro Probe is both waterproof and designed to be put into small, dark holes, having an integrated LED light is very helpful—and sometimes essential, for example, when the Probe lens is poked down a small, dark hole.
In the studio, as absolute director, you can use any tools you want, from ambient light to modifiers, to total studio lighting creations—and also specialty macro lighting tools.
To some extent, the specialty macro lighting tools I have described are intended for field use as much, or more, than in the studio. Keep in mind that if you are using artificial light in the field, your subject will appear differently than it does under natural light before you turn the light source on. This may sound obvious, but it can come as a shock when photos made using strobes do not appear at all similar to the scene as it appears to the eye.
In the studio or in the field, it is worth taking the time to experiment with and learn to use auxiliary lighting tools in addition to, or instead of, ambient light. You won’t always use these tools—after all, it is hard to beat Mother Nature—but when you need to add something special to the lighting of a flower macro, you will be glad that using lighting gear is part of your repertoire.