
Impressionistic Photography
Impressionistic photography involves using a camera in ways that were not intended for the making of images that purport to show the “real” world. I don’t know about you, but I am always in favor of experimenting with tools in ways that they are not normally intended to be used, so I am completely in favor of playing with alternative camera techniques in the garden.
Perhaps this can be taken too far. For example, one popular technique on social media involves tossing a camera in the air mid-exposure and catching it again. Fortunately, there are many impressionistic camera techniques that do not involve risking your expensive gear.
In-Camera Motion
In-camera motion (ICM) is probably one of the best-known techniques for using your camera to create impressionistic images. The somewhat extreme technique of tossing the camera is an instance of ICM, but quality ICM images usually involve more thoughtfulness and control, and less risk.
The key issue with motion is the duration of the shutter speed. Trial and error may be the best way to ascertain this, but do keep in mind that motion means subject motion, camera motion, and the relationship of those two vectors.
In other words, the faster the subject and the camera move, the shorter the duration of time you need to render an impressionistic effect. In this regard, too much time creates an unrecognizable mess, much as an oil painting can become overtly murky if you stir in too many different paints while things are still wet. The goal is usually to add a significant motion blur while still keeping the subject recognizable. To reiterate, the appropriate shutter speed will depend upon the amount of camera motion and subject motion, as well as lighting conditions.

Against the Wall—Walking the paths along the banks of the Seine River in Paris, France, one passes the canonical rows of poplar trees. As I wandered beside the Seine on a wonderful glowing day of intermittent sunshine and clouds, I decided to try a creative approach to photographing this row of trees against a wall.
Using in-camera motion, I hand held the camera and panned slightly up and down over the duration of an intermediate shutter speed (0.3 seconds).
It turns out that the direction you move the camera in ICM exposures is critical. Typically, with a vertical subject such as trees, you want to go up and down. In ICM, too much indecision and mixed camera directions (up and down, sideways, and around) leads to confusing imagery that has no real subject and looks mushy.
As I tried experimenting, what turned out was that I needed a “Goldilocks” shutter speed: not too long, and not too short. An exposure time of 0.3 seconds was just right because it added an impressionistic effect to the trees while leaving them recognizable.
Note also that I needed to stop the camera all the way down (to f/22) and lower the ISO (to ISO 50) in order to get an exposure as long as 0.3 seconds, considering the lighting conditions. For an even longer exposure, I would have needed to use a neutral density filter or wait for the light to fade.
Nikon D800, 28mm, 0.3 seconds at f/22 and ISO 50, hand held.
When I was starting out with in-camera motion, I figured that exposure times would have to be pretty long, possibly in the minutes. Actually, this ain’t so. Most of the time, a surprisingly short-duration shutter speed does the trick. My successful ICM images generally, but not always, range in shutter speeds between 1/8 of a second and 3 seconds. Any shorter than 1/8 of a second and you don’t have time to make the camera move noticeably. Any longer than 3 or 4 seconds, and things just become a blur.
Besides the duration of the shutter speed, the kind of camera motion is also important. Putting the camera on a tripod enables a steady motion in one direction or another, which may (or may not) be the effect you were looking for. The nature of the subject matter plays a role here as well. For example, I find that tree trunks respond particularly well to an up-and-down motion. A more horizontal subject might work better with panning from left to right.
Impressionism in the garden is a visual effect with a significant and important heritage. Using in-camera motion is a great way to create this effect. However, this is a camera technique that involves a tremendous amount of trial and error, with emphasis on the error side of things. I urge you to take the time to experiment with this and get a handle on what it feels like to move the camera during an exposure. You will make mistakes and get messy, to paraphrase Ms. Frizzle of The Magic School Bus fame. In the end, you’ll have a lot of duds, but the few good ones will really be something to celebrate!

Luxembourg Gardens—When Parisian denizens in the 5th or 6th arrondissements of Paris, France, the so-called “Latin Quarter,” come out to play, they often head for the fabulous Luxembourg Gardens. These gardens were created beginning in 1612 by Marie de' Medici, the widow of King Henri IV of France, for a new home she constructed, the Luxembourg Palace.
Today, the Luxembourg Palace is where the French Senate meets, and the French Senate owns the Luxembourg Gardens. Within the gardens, those lucky Parisian denizens find lawns, tree-lined promenades, manicured flower beds, the picturesque Medici fountain, model sailboats on a circular pond, a puppet show, bocci courts, and trees in organized rows.
When I am in Paris, I often stay close by the borders of the Luxembourg Gardens. Much as I enjoy strolling the gardens with my camera, sometimes the mischievous anarchist within me emerges and I long to deconstruct the all-too organized principles of the French garden.
One day, this dissonant feeling struck me within the chestnut tree arbors of the Luxembourg. I put the camera on the tripod and made a one second exposure, using ICM to wiggle the tripod ball head slightly. By the way, this is in contradiction to my previous suggestion about trees and moving the camera up and down (see page 192); I was feeling anarchistic.
On reviewing the image in my LCD and checking the exposure histogram, it seemed fine for the trees but definitely too dark for the trunks and pathways in the deep shadow. So I made a second exposure for the darker areas at two seconds, again wiggling the camera on the ball head anarchistically (Vive la révolution!). I combined the two exposures in post-production using Photoshop, a layer, layer mask, and the Gradient tool.
Nikon D850, 44mm, two exposures, one at 1 second and the other at 2 seconds, both exposures at f/22 and ISO 31, tripod mounted; exposures combined in Photoshop.

Iris in Motion—The first thing you should know about this image is that the title isn’t quite true. The iris wasn’t in motion. Strictly speaking, the camera wasn’t in motion either. I made this image using the zoom on the zoom lens. The zoom lens I used ran from 70–200mm, the 35mm equivalent of 105–300mm (see page 351 for more about focal-length equivalency and sensor size).
First, I stopped the lens down to the smallest aperture (f/32) so there would be enough depth of field so the entire flower would be in focus. Next, I started experimenting with exposure length and smoothly moving the zoom knob.
If you try this kind of exposure on your own, you’ll find that it works best if you are as smooth as possible in changing the focal length on the zoom lens, and also it needs some fixed stops so that not all focal-length exposure times are the same.
The formula I used for this image was two seconds at 200mm, five seconds smoothly zooming down from 200mm to 70mm, and then three seconds panning up and down on the tripod at 70mm.
Nikon D300, 70–200mm zoom lens, various focal lengths, circular polarizer, 10 seconds at f/32 and ISO 100, tripod mounted.

Gaillardia in Flight—Actually, nothing is in flight here except the photographer’s fancy. My idea in this image was to create a blur effect with areas of sharpness (the centers of the flowers) appearing through the blur. The blur effect was created during the longest exposure (1 second) where I gently let the camera swing using the pan-rotation knob on my tripod. Two shorter-duration exposures (1/6 and 1/2 of a second) were used to create sharper captures, and then the three exposures were combined in post-production.
Nikon D300, 100mm Zeiss Makro-Planar, three exposures with shutter speeds ranging from 1/6 of a second to 1 second, each exposure at f/22 and ISO 100, tripod mounted; exposures combined in Photoshop.
Subject Motion
In the previous section on in-camera motion (starting on page 192), I lumped together camera motion and subject motion, because one often finds situations where both are involved in impressionistic photography.
In contrast, techniques that use only subject motion involve keeping the camera still. This means using a tripod. (For more about tripods, see pages 96–111.) With camera motion locked down, you can focus only on subject motion with more control, which can produce stunning imagery in the garden of subject matter like flowing water, and flowers bending in the breeze.
As with the more general ICM, the key to getting subject-motion photographs correctly will depend upon shutter speed. The good news here is that you will likely have quite a few chances to get it right. Unlike ICM, where the camera may be moving quite randomly and erratically, the camera is set in place. If a wave is coming on, or a flower is blowing the wind, this motion is likely to be repetitive. So you can try an exposure at a given shutter speed, see how it works, and adjust accordingly.
It’s a good idea to keep in mind the geometric relationship between the focal plane of the camera (see page 117), and the motion of the subject. The closer this relationship is to parallel, the greater the motion will seem, and the shorter duration shutter speed you’ll need to generate a motion blur.
While ICM images using in-camera motion are often spontaneous and unplanned, I have found that subject-motion photography does benefit from pre-visualization and planning. It’s a great idea to practice this kind of photography in a controlled situation, for example, with a friend who can push the stalk of a flower back and forth for you at different speeds.
If you do practice, you will find that you get the hang of it after a while, and have added an important tool to your quiver of photographic techniques.

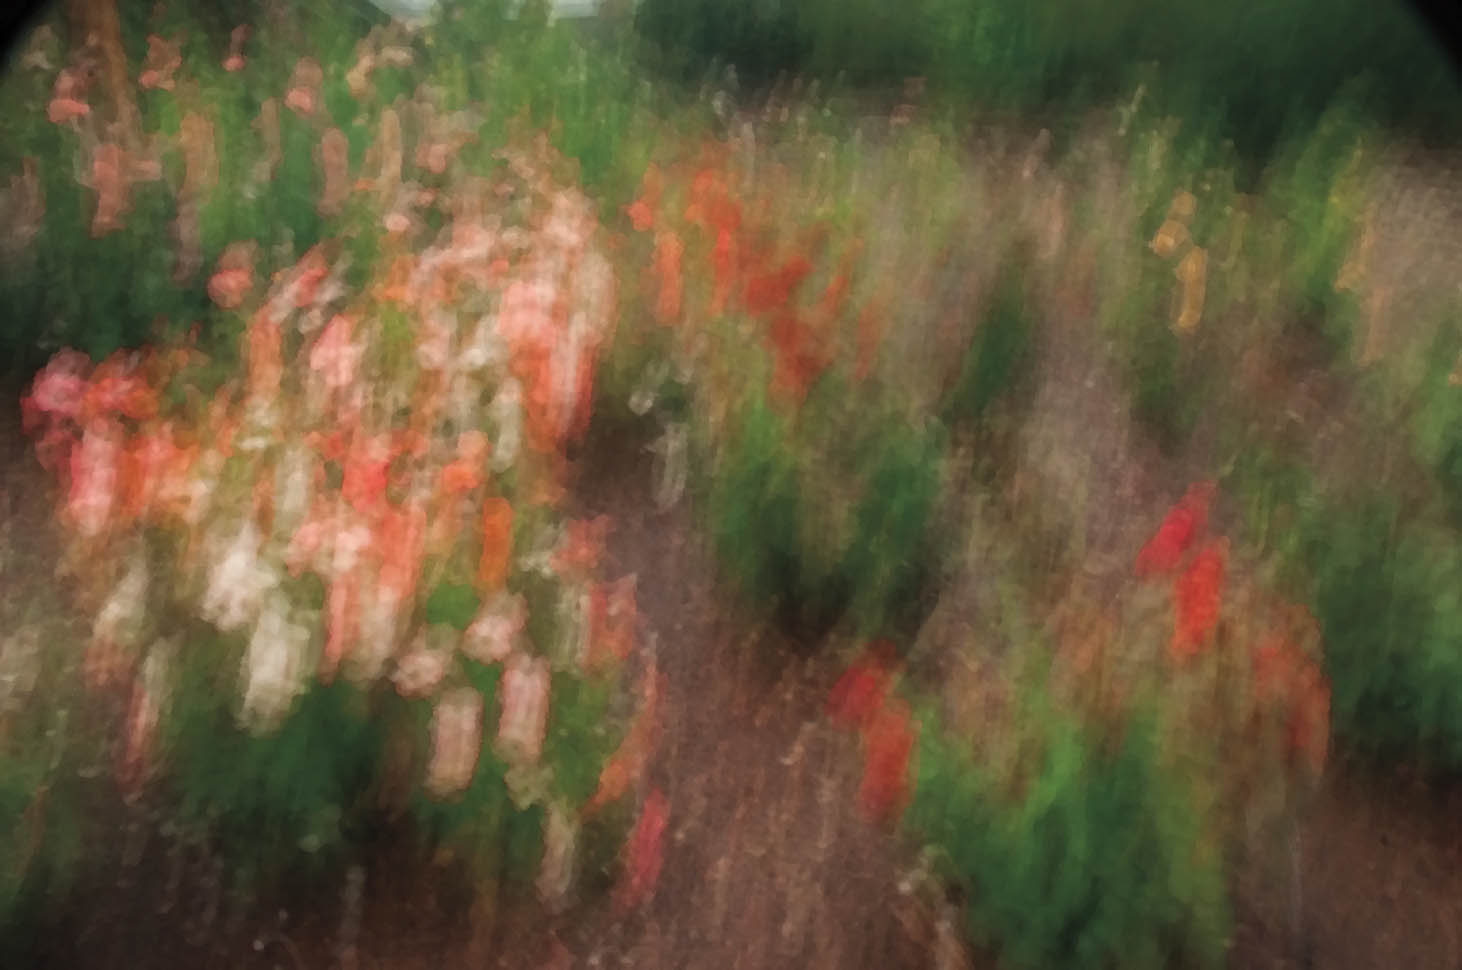
Wind—California’s springtime is short, but sweet. In the coastal range following winter rain, the hills turn green and bloom with a wonderful floral carpet. All too soon, these hills will turn to the canonical golden-brown hue and stay that way until the next rainy season.
During the brief flower season, I drove past a hillside covered with flowers, backed up and parked the car, then grabbed my gear. I decided to capture a bee’s eye view of the wonderful California poppy (Eschscholzia californica).
The problem was that the lupines surrounding my golden poppies were blowing around vigorously in a stiff wind. For that matter, the poppies were also in motion.
As they say (whoever “they” are), if you are given lemons, make lemonade. I decided to use the subject motion as a feature rather than a bug. I got down on my belly and set up the camera very low on the tripod. Next, I chose a fairly wide-open aperture (f/5.6) and an intermediate shutter speed (1/125 of a second). I focused on the poppy. These settings isolated the California poppy against the in-motion blue lupines in the fore- and background.
Note that getting the focus right in this kind of image takes skill, as well as a great deal of trial and error. Generally, I make many attempts for this kind of image, and only a few of the exposures come out well.
Nikon D70, 130mm, 1/125 of a second at f/5.6 and ISO 200, tripod mounted.
Out of Focus
One of the more off-beat ways to create an impressionistic effect in the camera is to throw the camera out of focus. How much “impressionism” this will create depends upon the lens, the distance from your subject, and the aperture you use. What’s really important here is to keep depth of field in mind (see pages 129–147).
While we are on the topic of out-of-focus images, it is worth noting that there are lenses specially designed to generate partially or completely out-of-focus images. The leading manufacturer of these kinds of optics is the American manufacturer Lensbaby, based in Portland, Oregon.
Considering that there is a company that has based its entire product line around being out of focus, perhaps this is an effect that you should consider. Conventional wisdom is that photographs should be sharp and in-focus, but who needs conventional wisdom?
It is worth noting that there are ways of generating a soft or out-of-focus effect besides literally throwing the lens out of focus. These other techniques include placing a smeared filter in front of the lens, and the classic Hollywood stocking, stretched over the outer optic of the lens.

Giverny Impressionism—In his 60s, impressionist painter Claude Monet developed bilateral age-related cataracts. He traveled to London in 1913 to consult a famous ophthalmologist, and eventually underwent cataract surgery. The results of this surgery were suboptimal, and Monet complained that “reds were getting muddy,” colors overall were duller, and that he needed to wear a very broad-brimmed straw hat outdoors, or the sun would badly hurt his eyes.
It is believed that many of the broader-stroked later Monet images owe some of their technique to his failing eyesight. Failing eyesight or not, many of these paintings are, of course, gorgeous.
In making this image at Monet’s lily pond in his garden in Giverny, France, I decided to start with the idea of being myopic, as actually I am (I have worn glasses for most of my life). If a camera is myopic, then it must be out of focus, so I used a wide-open aperture (f/5.6), and manually focused the lens as close as possible (to about one foot) while the subject (the lily pond) was at infinity.
In post-production, I added a slight texture to amplify the effect, along with the notion of brush strokes.
Nikon D300, Lensbaby Composer, 1/1600 of a second, wide-open aperture ring, and ISO 200, hand held.
Creative Exposures
Sometimes it’s right to do wrong. (Don’t tell my kids I said so.) A creative exposure in the controlled and best sense can be contrasted to the correct or “proper” exposure. In this case, the creative exposure is correcting by a mere 1 or 2 EVs the assumption of the camera about which area in an image is important. So, this kind of creative exposure is merely doing right by correcting automation, and I think we should always correct automation when we can, before it can correct us!
In contrast to the controlled creative exposure, a really “wrong” creative exposure is one that makes no sense at all, and may appear wildly over- or underexposed (3 or 4 EV will usually do this). Sometimes this kind of off-the-wall exposure can actually create a really interesting image—for example, the almost black image where one element such as a chiaroscuro flower stands out against the background, or an exposure where wildly going over makes the underlying patterns in the image visible.
There’s no percentage in doing the normal and expected thing, if you want to make interesting art. I urge you to be fanciful and from time-to-time try wildly “wrong” exposures just to see what effect they might make.
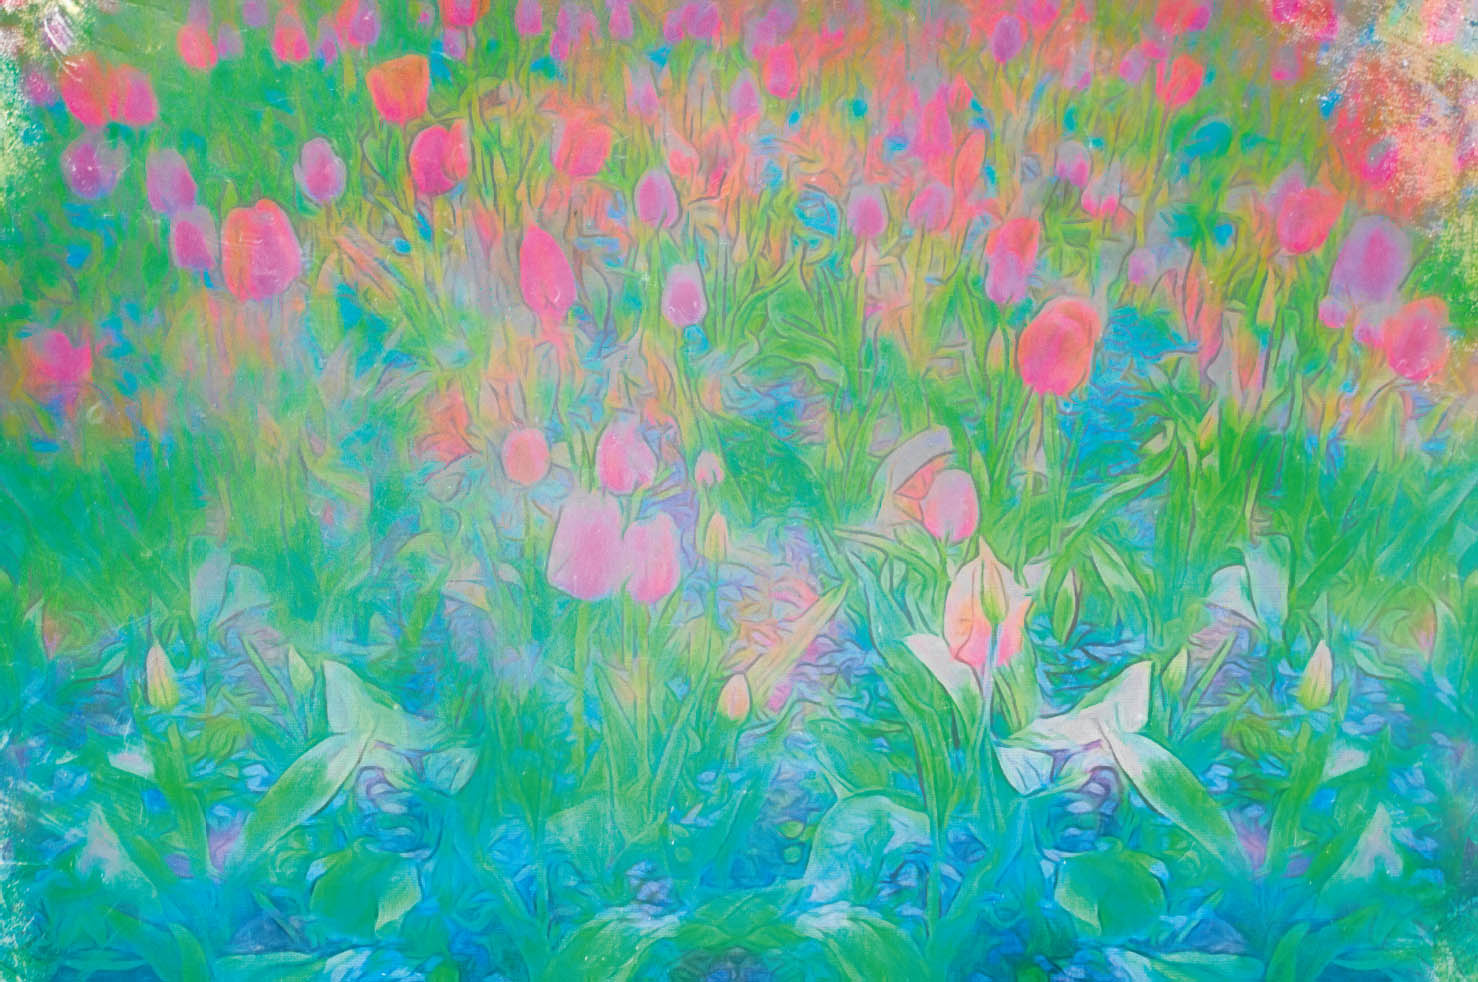
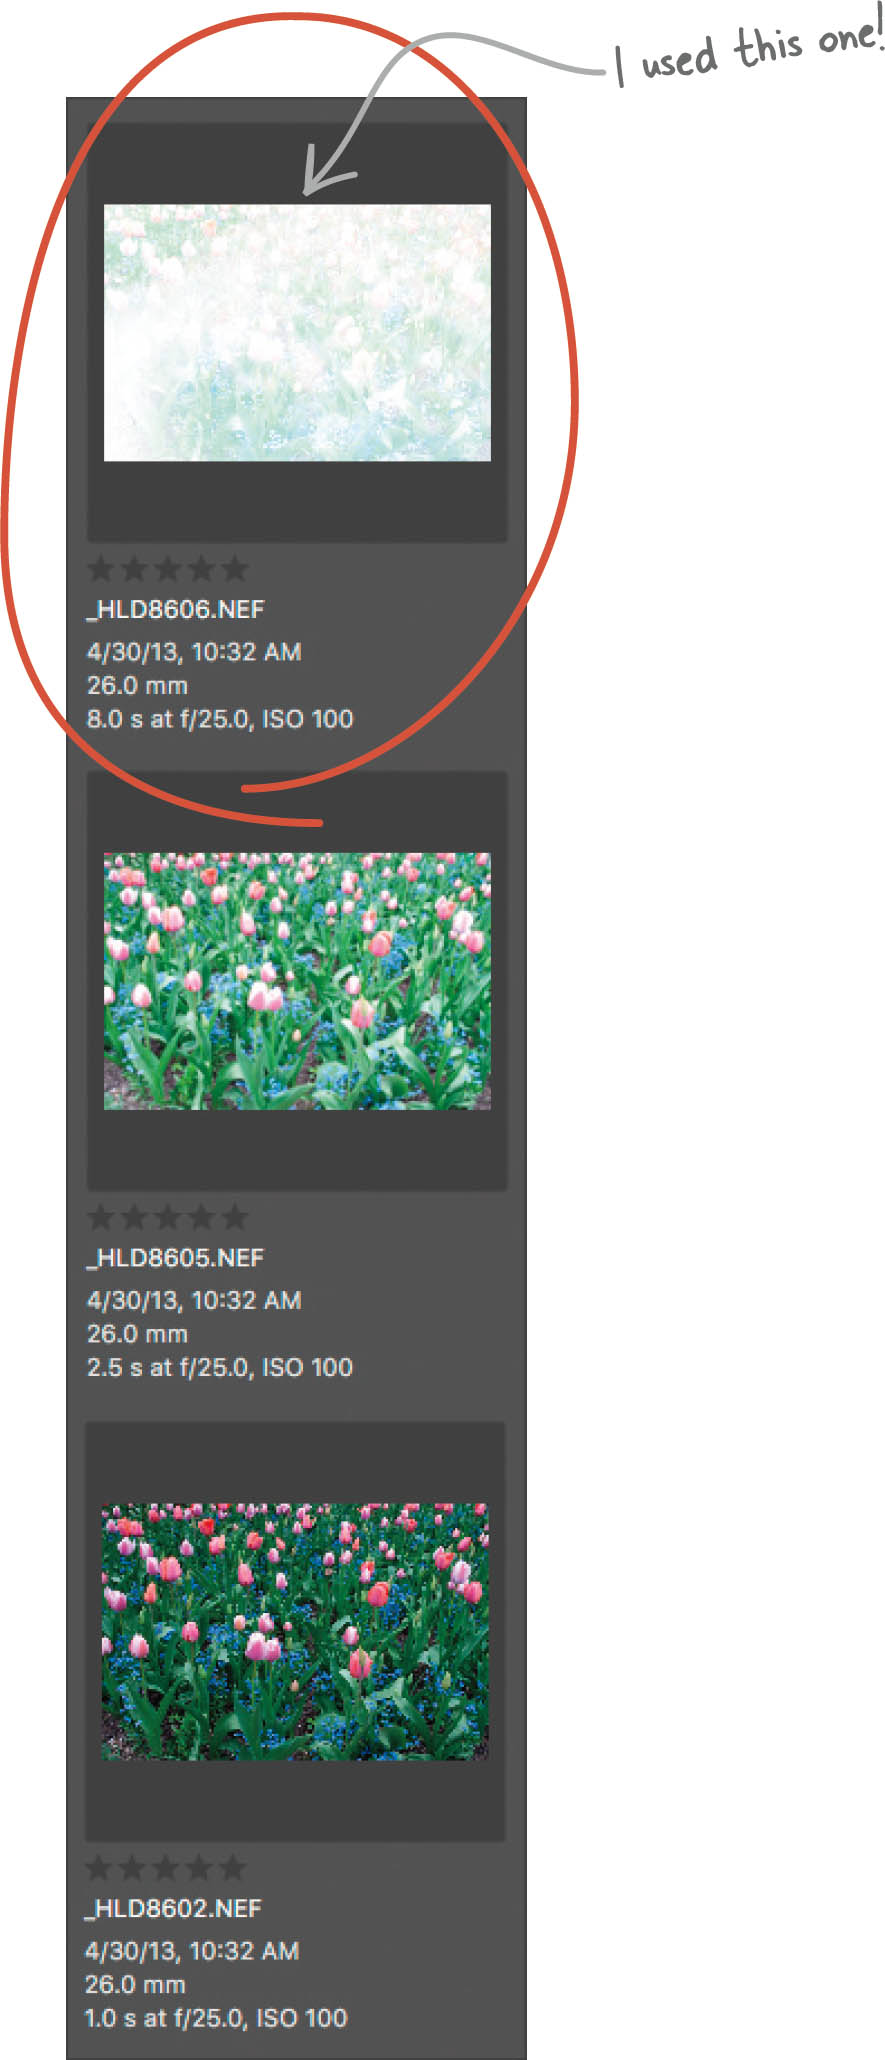
Field of Tulips—The day was bright but overcast with high scudding clouds. I stood near the stairs to the front entrance to Claude Monet’s house at Giverny, France, and studied the pattern of pink tulips and blue forget-me-nots.
When it came time to process this photo in the digital darkroom, I really didn’t have a whole lot of interest in a standard “documentary” photo of this colorful flower bed. But I did think the pattern of the contrast was fascinating. So I took a flyer on an overexposure, in this case by 3 EVs or 23 or 8 times.
You can see the strip of RAW exposures to the left, from the “correct” exposure showing the scene on the bottom, to the wildly overexposed one at the top that I used to create my vision on the right, with a little help from post-production.
Nikon D300, 26mm, 8 seconds at f/25 and ISO 100, tripod mounted.
In-Camera Multiple Exposures
In-camera multiple exposure works by combining exposures in the camera. In the good old days, the combined images were exposed on film. Today, an in-camera combined image is generated and saved without needing post-production or Photoshop.
If you move the camera very slightly between exposures in a multiple exposure, it is possible to fairly easily create a nice impressionistic effect. This in-camera multiple exposure technique is particularly appropriate in garden photography for “breaking up” rows of orderly plantings, such as flower beds, if your vision is more artistic rather than documentary.
Thinking about in-camera multiple exposing is actually a kind of in-camera motion photography. But in normal ICM, the movement is smooth, whereas with in-camera multiple exposing you can decide exactly what “positions” to include in your compositions. It therefore often makes sense to compose in-camera multiple exposures in something like an overlapping grid. In this schematic, one starts by pointing the camera in the lower left, moves right with two exposures, then up to the next row and to the left, and so on.
Different cameras have very different capabilities with in-camera multiple exposing, and some do not allow it at all. You will need to check your camera manual to see what your camera does in this department. The good news is that in-camera multiple exposing can pretty much be replicated in post-production using a series of individual exposures if you can’t do it in the camera; although, of course, this is more work.
If your camera does permit in-camera multiple exposing, you will generally find this option on the Shooting menu. (Different cameras have different names for the “Shooting menu,” so check your camera manual.) Often, you have the option to turn in-camera multiple exposure on for a single sequence, or on indefinitely. If you choose to turn it on for more than one sequence, be sure to turn it off when you are through “being creative.”
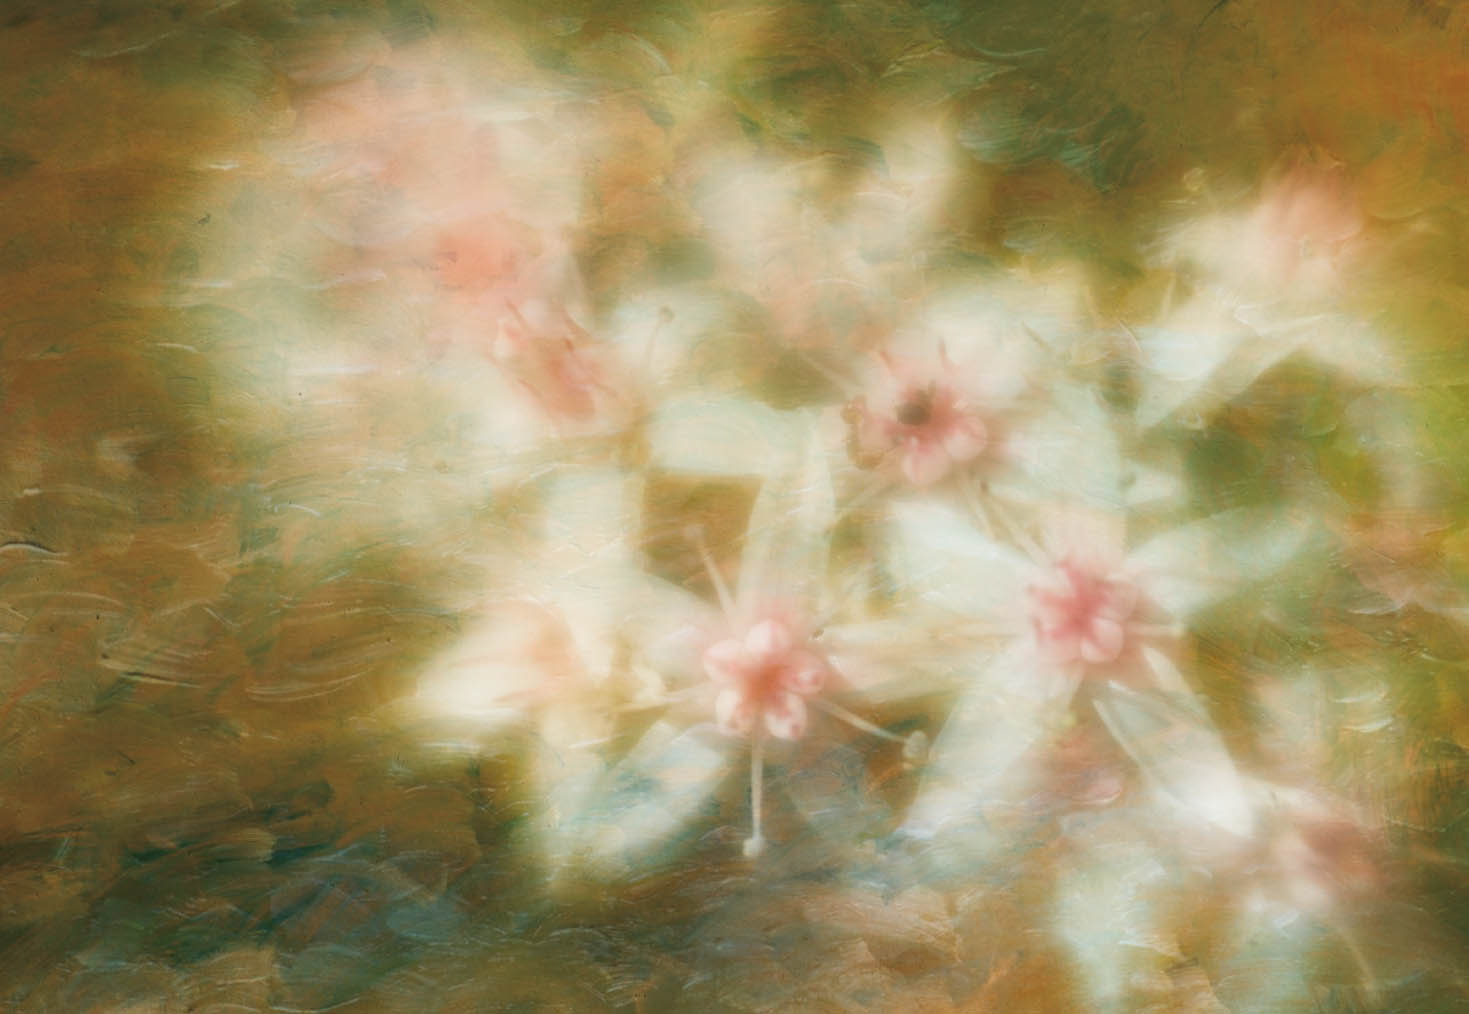
Flower Impressionismo—As someone who has spent a lot of their life fooling around with cameras, lenses, and flowers, I can attest to the benefits of pure, aimless experimentation. This image is a result of one afternoon spent doing the photographic equivalent of doodling with the small flowers growing along my garden fence.
This image combines several fairly extreme close-up views of Jade flowers, taken with a lens designed to promote blurring (the Lensbaby). There were multiple captures, meaning that in-camera multiple exposures were used to combine the captures. In addition, I added a touch of a painterly texture in post-production.
Nikon D300, Lensbaby Composer, 24mm extension tube, 1/5000 of a second, wide-open aperture ring, and ISO 200, hand held; in-camera multiple exposures.
Impressionist Flowerscape—In a rather orderly garden in suburban Denver, Colorado, I was challenged by a client to create an impressionistic image without using Photoshop. In other words, the charge was to create disorder from order just using my camera!
To make this somewhat impressionistic image, I visualized the garden in front of me as a nine-cell, three-by-three grid. I turned on in-camera multiple exposures, and started at the leftmost, bottom cell. I made only slight movements of the camera between the exposures. I went left to right, then up a row and right to left, then up for the final top row, and went left to right, for my total of nine individual captures that made up my multiple exposure.
Right away I presented my impressionist “master piece” to the client on my camera’s LCD screen. The client professed amazement and then decided to try it themselves on their own camera. I suggest you try this technique, too, with the warning that it often takes many tries to get a good image.
Nikon D300, 22mm, 2 seconds at f/22 and ISO 100, hand held; in-camera multiple exposures.
Next, you will need to choose the number of image captures that will go into the multiple exposure, for example, a number between 2 and 10. Other options that your camera may provide include keeping the intermediate captures (a good idea, although it does take up more space on your memory card), and what in-camera blending mode you want to use. I suggest sticking with Normal, but Overlay and Lighten can also produce interesting results.
Using in-camera multiple exposing is a great way to add a very cool impressionistic effect to your photos. This technique also can be useful in other ways for subjects that involve controlled or regular motion, but that is a story for a different day. So go ahead! Check it out. See what your camera can do. I have spent some very happy times image making with in-camera multiple exposures, and I think you will, too.
Gardens of the Mind
In the physical, real world, garden designers have a long tradition of playing visual “mind games.” In some gardens, outside topographic features are brought in to be part of the garden (see page 110 for an example of this in the context of Japanese garden design).
French gardens often employ windows and secret viewing nooks to give the wanderer a sense of private intimacy (see page 159 for an example). It is also not unheard of to use a mirror to extend apparent space.
Another common way to extend the spacial design physically is to use trompe l’oeil painting. Trompe l’oeil, which means “fool the eye,” uses realistic painting and optical illusion to create a kind of garden of the mind with physical attributes that do not actually exist (the photo on the facing page is a good example).
So if you can build it in the real world, “ten will get you one” that similar ideas also apply virtually. Photography combined with Photoshop is a great place to construct illusions. Most folks are pretty aware that if you can visualize it, you can build it in post-production. Tools like Photoshop are simply amazing!
When I look back at the work of artists like Jerry Uelsmann, I am astounded by the level of technical virtuosity that it took to create imaginative images via manual compositing in the wet darkroom.
So many of my images combine photographic techniques with post-production tools including Photoshop. I have come to regard this process as “digital painting,” using photographs as my source material. When the resulting image is botanical in nature, I think of the composition as a “garden of the mind.”
I would encourage you to experiment with post-production techniques and to combine Photoshop and other software with your photographic virtuosity. Coming up with an idea, planning it, photographing it, and putting it together in post-production provides great satisfaction.
I do encourage organization and planning, but if you’d rather be more loose about it, that’s fine. Just keep having fun and experimenting.
In the next part of this book, Taking the Garden Up Close and Inside, I’ll show you the details of how to plan and use photography and Photoshop in combination to create transparent flowers, botanical images on black, hyper-focal images, and more!
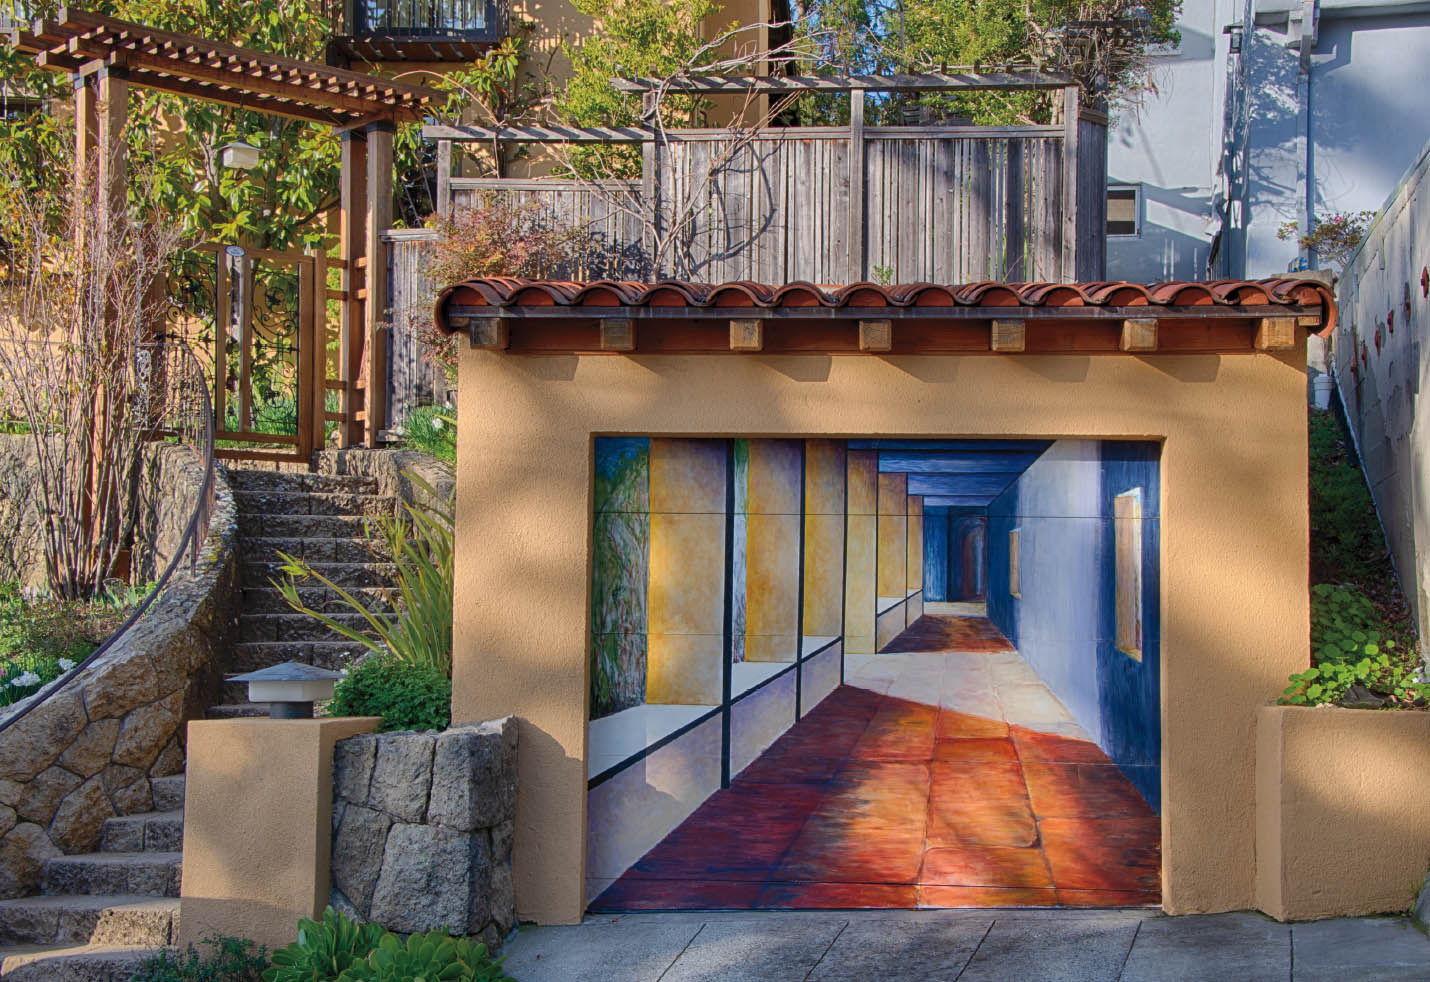
Trompe l’Oeil Garage—Wandering my neighborhood in Berkeley, California, I came across this most-excellent example of a garden extended via a trompe l’oeil painting of a colonnade on the front of a garage door.
Nikon D850, 48mm, six exposures at shutter speeds ranging from 1/800 of a second to 1/5 of a second, each exposure at f/22 and ISO 400, tripod mounted.

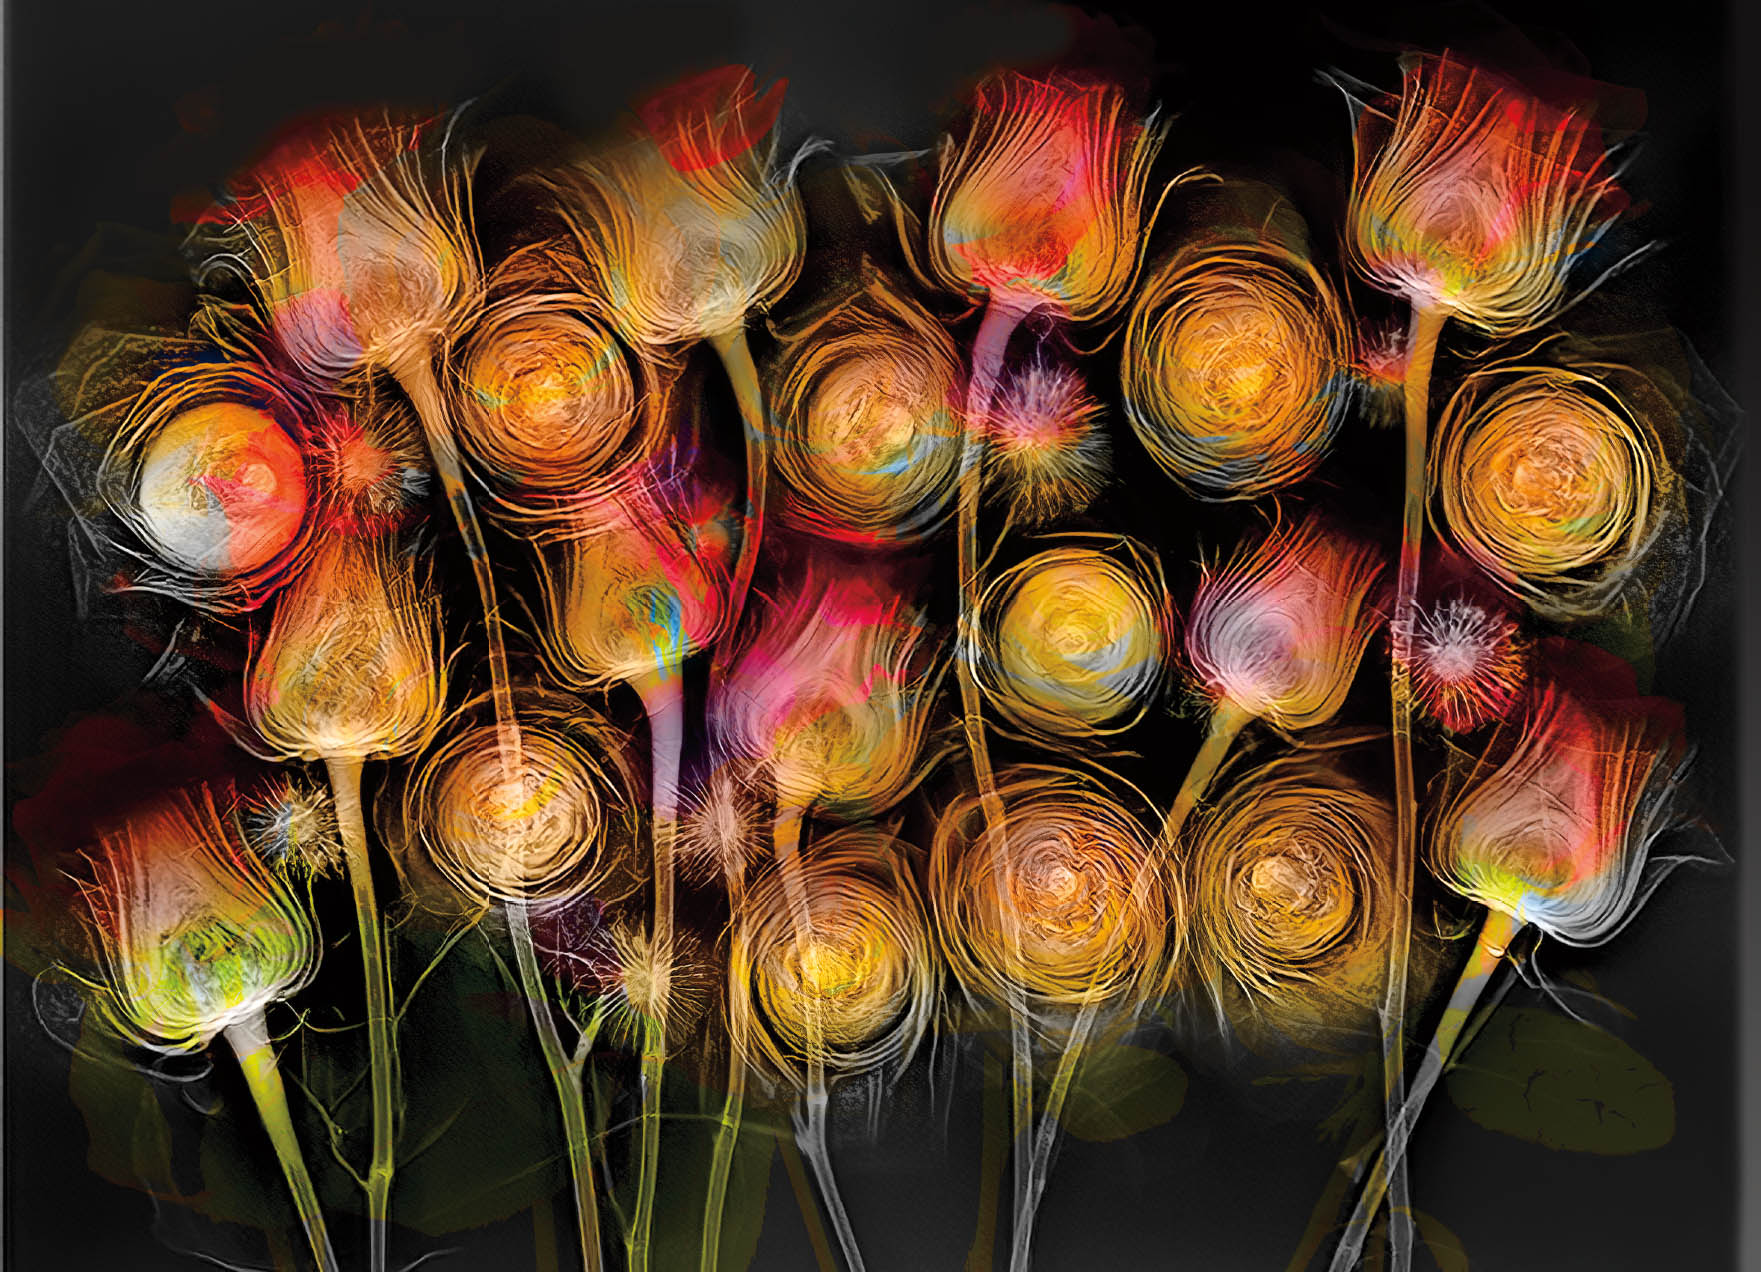
Bouquet for Phyllis—When you are creating a virtual garden or bouquet, one thing I like to teach in my workshops is that every image needs an internal structure. You can think of this internal structure as a kind of scaffolding, which is often not consciously seen in the final result.
In the case of this bouquet that I created with my wife Phyllis in mind, the structure resembles trees and branches, or flowers literally on stalks like in a bouquet.
Nikon D850, 55mm Zeiss Otus, eight exposures at shutter speeds ranging from 1/13 of a second to 5 seconds, each exposure at f/16 and ISO 64, tripod mounted; exposures combined in Photoshop.
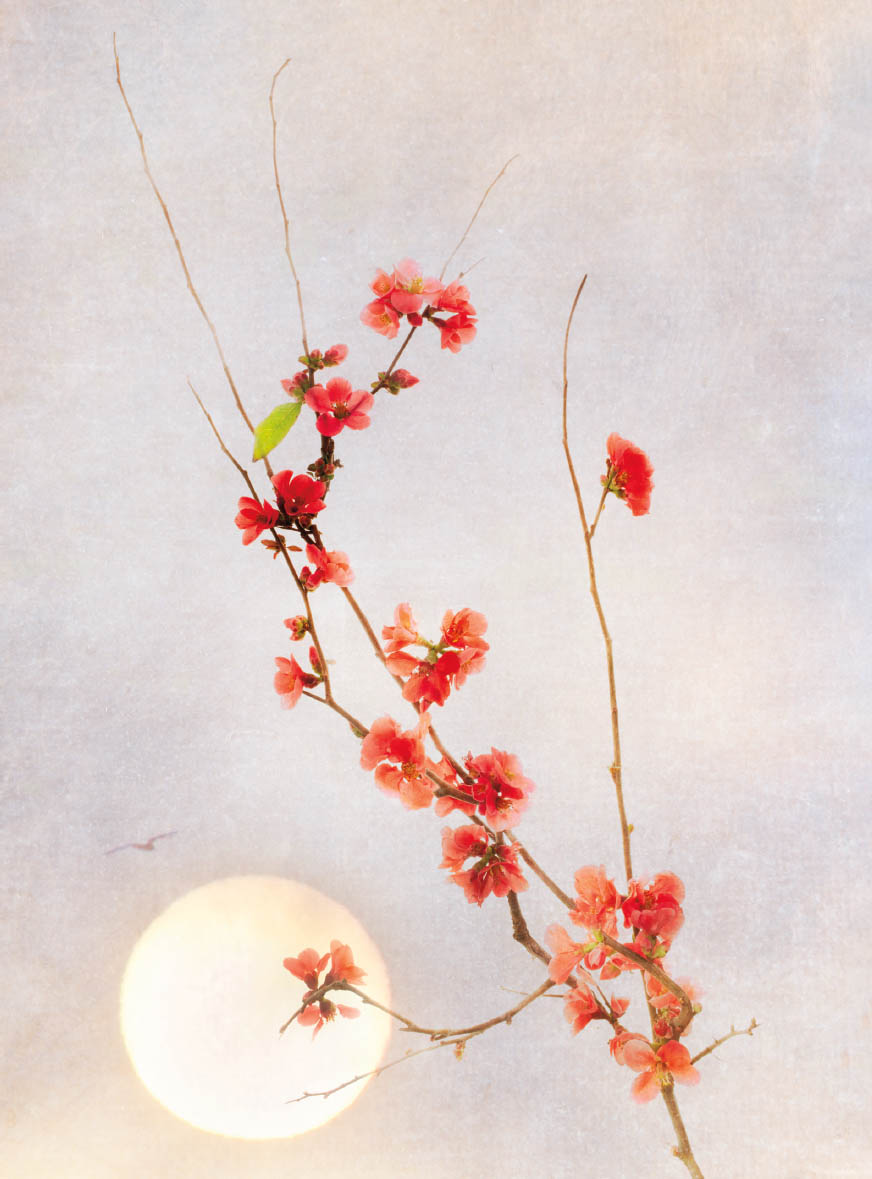
Quince by Moon—The image is a complete confection made of several parts. I found a flowering quince in a deserted and desolate lot in an undesirable part of town. Who planted it? How did it get there?
I brought a branch home and photographed it in my studio. I then put it together with a number of dreamlike elements using post-production tools.
Composite image: Flowering Quince—Nikon D800, 35mm Zeiss Distagon, eight exposures at shutter speeds ranging from 1/25 of a second to 2.5 seconds, each exposure at f/16 and ISO 100, tripod mounted; Moon—Nikon D300, 200mm, 1/60 of a second at f/8 and ISO 320, hand held; scanned texture for background. All elements combined in Photoshop.
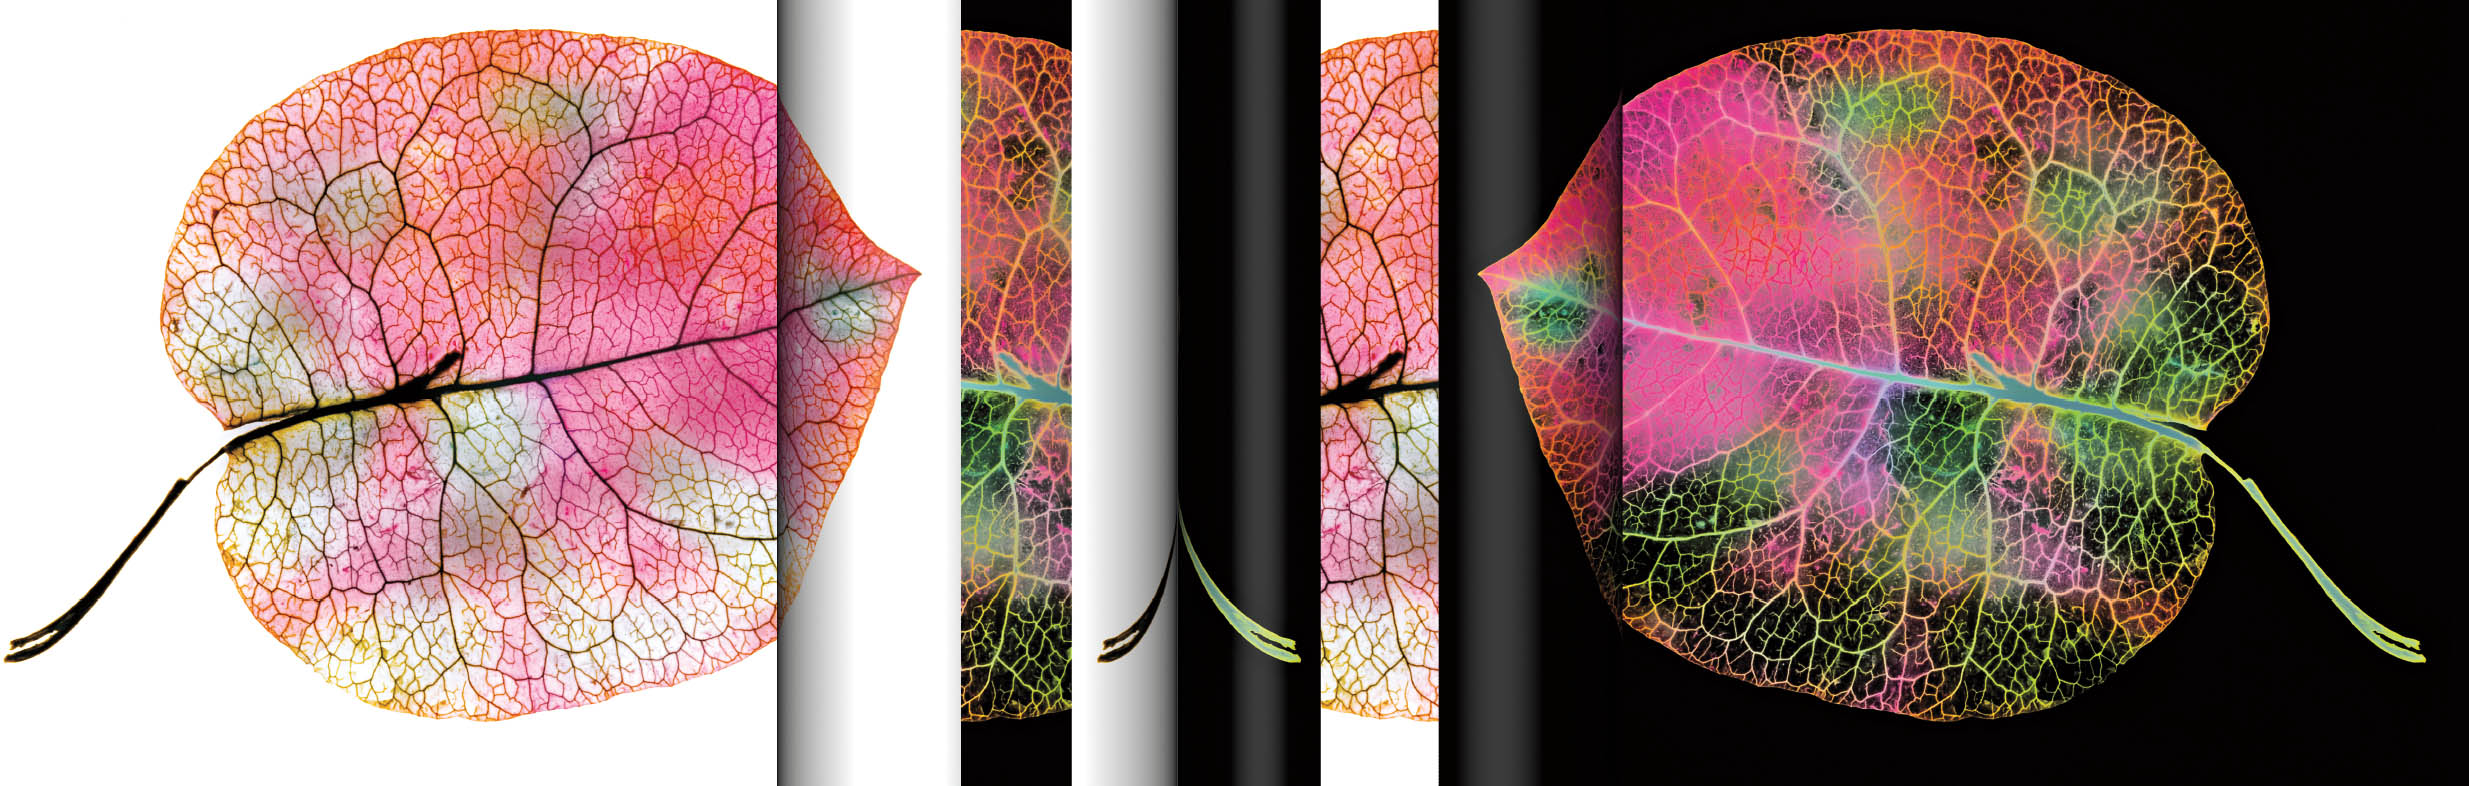
Petal Panorama—This image started with a petal from a bougainvillea vine. I photographed the petal on a light box and worked in Photoshop to create the panorama that you see.
Nikon D200, 200mm Nikkor macro, 36mm extension tube, 0.8 seconds at f/36 and ISO 100, tripod mounted; image composited with itself in Photoshop.
X-Ray Flower Medley Fusion—Working with radiologist and physicist Dr. Julian Köpke, I used an x-ray machine to generate a monochrome x-ray capture of these roses and ranunculuses. Next, we photographed the same flowers on a light box. I combined the x-ray with the photograph to create this “fusion” image.
Fusion image: DICOM medical x-ray file with light box photo overlay.

Dawn Chorus Unbound—Fantasy author Philip Pullman once said that “reason is a good servant, but a bad master.” While an image like Dawn Chorus Unbound, and the other images in this “Gardens of the Mind” section, use a substantial toolset of photography and software in their creation, they also require a sense of play and being open to creative serendipity. I want viewers to experience the fabric of reality a little differently. What is real and what is not? The answer is not always so apparent.
Nikon D200, 70mm, 1/8 of a second at f/22 and ISO 100, tripod mounted; image composited in Photoshop.

Gaillardia-gami—Originally, my idea in photographing this Gaillardia on a light box was to create an image analogous to a digital photogram. After photographing the image, I played with it using color channels in the LAB color space in Photoshop. Using several of these variations, I constructed a composition that I think of as kind of digital origami because it is “folded” virtually. This led to my title: Gaillardia-gami, short for Gaillardia origami.
Nikon D200, 105mm Nikkor macro, 36mm extension tube, 1.3 seconds at f/36 and ISO 100, tripod mounted; image composited with itself in Photoshop.

Study in Petals with Protea Center—Petal picking is a family process in our house. I gather everyone around the light box, and we gently pick and sort flower petals for me to use in my collages.
With this digital collage, I started with a central protea on my light box, and arranged petals around the protea to create the shape of a mandala—or, if you prefer, a virtual flower.
Nikon D850, 55mm Zeiss Otus, eight exposures at shutter speeds ranging from 1/15 of a second to 8 seconds, each exposure at f/16 and ISO 64, tripod mounted; exposures combined in Photoshop. The image on page 218 has been converted to a black background using the version shot on the light box, and an L-channel conversion in Photoshop’s LAB color space.

Paul Klee in Wabi-Sabi’s Garden—Paul Klee has been one of my favorite artists for many years. I think it is tremendous the way he manages to add whimsy and fantasy to finished art that somehow miraculously seems well organized. How does he do it?
Wabi-sabi, the Japanese ideal of beauty through decay, comes together here with a light box composition that is an homage to Paul Klee. Flowers that are no longer pristine but still beautiful are arranged in a fantastical garden, while an out-of-scale moth hovers in the breeze.
Nikon D850, 55mm Zeiss Otus, eight exposures at shutter speeds ranging from 1/8 of a second to 5 seconds, each exposure at f/16 and ISO 64, tripod mounted; exposures combined in Photoshop.