
It’s axiomatic, but true: all video projects start with someone filming some thing. If that someone doesn’t capture all the necessary shots and frame them correctly, you usually can’t “fix it in post,” and project quality suffers. Fortunately, with just a little advanced planning, you can get it right the first time and pretty much every time. That’s what this chapter is about.
I’ll start by outlining some assumptions I’ll be using throughout this book, and then describe some common shooting scenarios that will serve as the templates for this first chapter, and the following chapters on audio and lighting. Then I’ll describe how to create your “shot list,” (the list of shots to take during and after your shoot), how and where to set up your camera, and how to frame your subject in the camera.
I’ll finish with some recommendations regarding setting the scene: specifically, the types of backgrounds and clothing to avoid, and how different distribution media, like streaming video, should impact how you set your scene and shoot your video.
I’ll be using these basic assumptions throughout the book.
You may be flying solo—. I’ll assume that many of you are both camcorder operator and onscreen interviewer (when applicable), so in some scenarios you won’t be able to accomplish certain tasks, like panning the camcorder around the scene or zooming in and out. Since some readers may also have someone to drive the camcorder, I’ll describe how to work solo and with a helper.
You probably only have one camcorder—. Most shoots simply look better when shot with several camcorders, but I’ll assume that you may have only one. I’ll cover where to set the camera up and what to shoot in these instances, and also where to position and point additional camcorders if you have them available.
You’re editing digitally—. I’ll assume that you’re editing the video on a computer, rather than simply playing back the video as recorded to tape. All computer editing systems are nonlinear, which means that you can place the sequences that you shot in any order in the finished video. This means that you can take your shots in the order that’s most convenient, rather than having to shoot them in the order they will ultimately be used.
You’re producing for professional distribution—. Whether you work for a corporation, university, government institution, or other organization, you’re producing this video for enterprise use. You may not be trained in video production, but you’re expected to produce professional results.
We’ll use the following three scenarios in this chapter to describe how to set up the scene, sequence your shots, and frame the subject in the camera. In subsequent chapters, we’ll revisit these scenarios to discuss how to light and mike each scene.
Of course, not all of your video shoots will fall neatly into one of these categories; there are weddings, sporting events, parties, and literally hundreds of other events that we shoot with our camcorders. Keep in mind that most of the rules below, particularly those relating to framing, apply equally to virtually any video shoot.
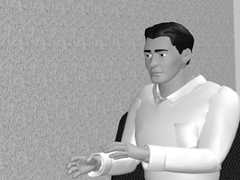
In an executive briefing, a company executive, educational administrator, or government official is talking directly to the audience. Because the subject is speaking directly to the audience, she looks and speaks directly towards the camera (Figure 1.1). As we’ll discuss in more detail below, the subject is framed in the center of the image, with the eye-line approximately one-third of the way down from the top of the frame.

Figure 1.1. In the executive briefing scenario, the subject is speaking directly to the audience, so looks directly at the camcorder.
Use this scenario only when the subject is speaking directly to the audience. For example, in a person-to-person interview, the subject is speaking to and looks at the interviewer, not the camera. In terms of the videography techniques involved, a person-to-person interview is a different scenario entirely (see next section).
For this and the other scenarios, I’m using images generated by Innoventive Software’s FrameForge 3D Studio, a program that produces storyboards, or pictures of sequential shots to help filmmakers visualize, plan, and execute the shots in their movies. To produce this simulated camera shot, I created a virtual set we’ll look at later to study subject and camera positioning. In the meantime, to learn more about FrameForge, go to www.frameforgestudio.com.
In interviews the subject responds to questions from the interviewer and looks at this person, not the camera, as shown in Figure 1.2. Looking at the interviewer is much easier for most people, who freeze up when a video camera is pointed at their face.
Unlike group discussions, where the comments of all participants are more or less equally important, interviews are designed primarily to get the comments of the interviewee in the video. Consequently, they follow different rules. Use this scenario when creating a customer testimonial or interviewing an important visitor to your corporation or campus. Your role as interviewer is less important than that of the subject, so the interviewee gets most of the camera time. Note that the interview scenario is used frequently on the evening news, which makes it a great place to learn and refine your techniques.
In this scenario, I’m assuming that most readers are both cameraperson and interviewer. For this reason, the camera should stay focused on the subject during most of the interview. Even if you do have a separate cameraperson, it’s tough to shift the camera smoothly from one person to another, and so it’s best to keep it on the subject. Don’t worry, we’ll get you into the picture by shooting “noddies” after the interview is over; more on this below.
In a discussion or training scenario, two or more people are talking, and all of them are equally important to the shot. In a one-camera shoot where one of the participants is also a cameraperson (and thus can’t be moving the camera around to focus on the different speakers), this means the camera must stay focused on the entire group all the time.
The discussion scenario, with one possible configuration shown in Figure 1.3, is the broadest; it can encompass conferences, group discussions, training sessions, role-playing, and other instances where all people must be on camera all the time. If you have only one camera, the rules are pretty much the same whether you have two participants or five. You basically have to keep everyone on camera all the time.

Once you’ve identified your scenario, it’s time to plan your shoot. Nowhere is Stephen Covey’s second skill of highly effective people (begin with the end in mind) more important than in video production. In most instances, if you don’t shoot the necessary footage the first time around, you can’t go back to get it later.
For this reason, before you shoot, you should start with a very solid vision of what the final video will look like from start to finish. Then you should compile a list of shots, like the one shown in Table 1.1, that are necessary to fulfill the vision.
Table 1.1. A shot list for our physician recruitment example.
Shot # | Duration | Purpose | Description |
|---|---|---|---|
1-5 | 20-30 seconds | Diverse clients | Patient shots (at least five patients of varying ages each and ethnic backgrounds) |
6-9 | 20-30 seconds | Wide practice | Performing different diagnostic procedures (three each to four) or using different devices |
10-13 | 20-30 seconds | Infrastructure | Working with a nurse, on the computer system, and each with a dictation machine |
14-16 | 20-30 seconds | Reasonable working hours | Turning out office lights, leaving building, and getting into car |
17 | 2 minutes | Ambient noise | Shot of nothing (a Seinfeld shot) to capture ambient audio to use during editing |
18 | 5-10 seconds | Establishing shot | A shot showing the clinic building |
19 | 5-10 seconds | Establishing shot | A shot of the clinic sign |
20 | Multiple, 5-10 seconds each | Noddies | Shots of the interviewer reacting to the subject’s answers |
21 | As necessary | Noddies | Shots of the interviewer asking questions |
As we discussed above, the order in which you shoot your scenes is not important. All nonlinear editors can easily cut and paste videos as necessary to produce the finished video. What is critical is that you create the list, and shoot the shots.
Two different elements contribute to the shot list. First are the shots necessary to visually tell the story. Consider the interview. Perhaps you’re interviewing a customer to produce a customer testimonial. You could produce a video showing only the customer describing the benefits your product or service delivered, but this would be visually uninteresting.
A better approach is to complete the interview, and then get additional shots to visually illustrate the key points made by the customer. Using a technique called “insert editing” described in Chapter 5, you can then insert that video into the movie. While the viewer hears the subject describing your product’s benefits, she sees the benefits onscreen. That’s visual storytelling.
For example, suppose I was creating a recruitment video for a family practitioner to come live and work here in Galax, Virginia. The centerpiece of the production is an interview with a local family practitioner describing why he enjoys working and living in Galax.
Before I show up on site, I would ask the doctor why he enjoyed practicing in Galax. Let’s assume the positive points he mentioned include an interesting base of clients, pursuing a diverse practice not limited by the specialization found in big cities, reasonable working hours, and an infrastructure that minimized paperwork and other hassles.
From this information, I would start creating a list of shots necessary to illustrate these benefits, as shown in Table 1. In TV jargon, completing the shots on this list would be called getting “coverage,” or the footage necessary to tell the story. These shots may also be called “B-Roll” or “cutaways”—shots ancillary to the primary subject of the video, which in this case is the interview.
You should also plan to take shots that enhance the visual continuity of the video; this helps the viewer keep track of what’s going on. For example, most interviews or other news items start with an establishing shot that shows a big-picture view of the shoot. You’ll note that the shot list in Table 1 calls for two establishing shots.
Rather than starting my recruitment video with interview footage, I’ll start with a shot of the clinic building, followed by a close up of the sign in front of the building. This lets viewers know that we’re shooting in a doctor’s office and that the person they’ll soon see is a physician.
Figure 1.4 shows the result. The shots of the clinic and sign last only three or four seconds each, but quickly let viewers know where they are and with whom they’ll be talking. The video continues with some interview footage, interspersed with other clips to back up the doctor’s statements. Not only does the additional video give credence to those statements, the pace of change helps keep the viewer interested in the video. The resulting video is much more compelling than sequential shots of the physician answering questions.

The first time you shoot any footage in any environment, start with an establishing shot that illustrates the environment to the viewer. Then you can zoom into a medium shot, typically defined as any shot that shows mid-chest to the top of the head; this is about as close as you want to get with most executive briefing shots.
Every few minutes, zoom back to a wider shot, often called a re-establishing shot, to remind the viewer where the video is taking place. This sequence is shown in Figure 1.5.
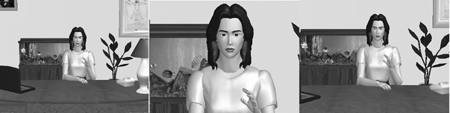
Figure 1.5. Establishing shot on the left, medium shot in the middle, and re-establishing shot on the right.
This is easy if you’re shooting an executive briefing, since you can work the camera and make the adjustments, but if you’re both the cameraperson and a participant in a group discussion or interview situation, getting up and adjusting the camera can break the flow of the conversation.
Oftentimes, I’ll bring a small television set to the interview, which I connect to the camera and use to monitor the shot—out of sight of the interviewee, of course. Then I use the camera’s remote to zoom in and out, which generally works well. Otherwise, to reframe the shot, or zoom the video in or out, I’ll stop the interview or discussion—claiming a “sound check” or other equipment check—adjust the camera, and restart.
A couple of caveats: First, slow zooms don’t work well when you’re producing video for (for example when you’re outputting for the web streaming). These camera motions can cause visual artifacts (usually an exaggerated pixelated effect) in the video. So, when shooting for streaming, make the zoom adjustment as quickly as possible, perhaps even in a gap between questions; which you can then cut out during editing.
Second, long establishing shots don’t work well for streaming either, since the eventual video viewing window is so small. When shooting for Web streaming, it pays to stay closely framed in on the subject, so that he or she almost completely fills the screen, and the talking head looks as large as possible.
Finally, beware of framing the camera too close when you’re both cameraperson and interviewer. If your subject shifts slightly in her seat, she can move out of the picture or disrupt the framing. As I mentioned earlier, when I’m doing double duty as cameraperson and interviewer, I often bring a small television to display the output from the camera. I place it where I can see it, and where the interviewee can’t, and use it to make sure the framing doesn’t get away from me.
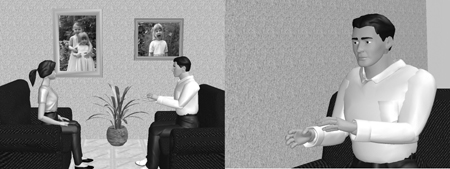
In an interview setting, you should also try to start with a shot showing both you and the interviewee in the interview location, usually called a two-shot. Then you can switch to the shots of the subject that comprise the bulk of the video.
In Figure 1.6, the woman on the left is interviewing the subject on the right. The first shot in the sequence should be the two-shot shown on the left, which helps the viewer understand the physical setup. After displaying this shot, you can jump to the shot of the subject on the right.
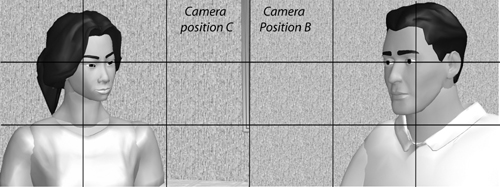
In a one-camera shoot with a separate cameraperson, it’s pretty simple. As shown in Figure 1.7, (a top-down view of the interview set), you shoot the two-shot from Position A, then move to Position B for the bulk of the interview.
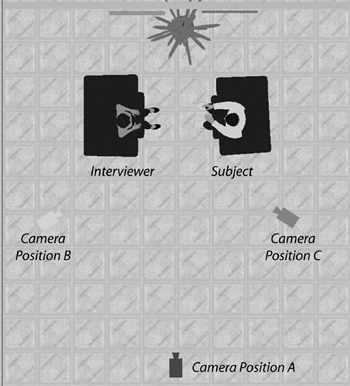
If you’re running both the camera and the interview, set the camera on its tripod, frame the two chairs, and start shooting. Then, take your seat and start chatting with the interviewee about preliminary subjects to get the two-shot. Don’t worry about audio at this point; plan on recording a voiceover back at your studio to use with the two shot (“Today I met with Bill Clinton, author of My Life. Here’s what he had to say about the book”). See Chapter 2 for more on audio recording.
I usually get the two-shot early on, before starting with the real questions. Then, I shift the camera to Position B and get started.
When I want to include myself on camera in the final interview footage, I conclude the interview, say goodbye to the guest, and switch to camera Position C. There, talking to the open chair, I ask key questions again, and nod, smile, or look sympathetic, as if in response to the subject’s answers. These are called noddies, and later, during editing, I’ll insert them seamlessly into the final video.
In some instances, such as interviews in the subject’s office, you can’t stick around to shoot the noddies, so you’ll have to shoot them back in your office. This works well when you can duplicate the background of the original shoot; if not, frame the camera closely so that the background shown is minimal.
Noddies add a professional touch by making it appear that the shoot involved several cameras, one continuously trained on you, the other trained on the guest. Noddies also add an interesting element to the video—your response to the subject’s answers—and break up the interview footage. This is essential if you don’t have sufficient B-Roll.
If you plan to shoot the noddies back in your office, it’s essential to shoot a minute or so of ambient sound at the interview location, also known as “room tone.” Otherwise, when you insert your questions during editing, they’ll sound noticeably different from your subject’s answers.
For example, when I shot the doctor in his office, there was a buzz of patients in the waiting room, Muzak on the speakers, and frequent voices of other doctors and nurses coming and going. To capture this, I simply left my camera running for two minutes while I was packing up. Then, when I recorded my noddies and questions back in my office, I imported this audio as background to my questions and nods, and they sounded as if they had been shot on location.
While on the subject of audio, let’s address the issue of audio continuity. Typically, this isn’t an issue when it comes to interviews or testimonials, since the audio will exclusively be either your voice or that of your subject. You’ll insert cutaways without audio, using your voices for audio, so audio continuity is never broken.
However, maintaining a consistent audio stream can be a significant problem in event videography. For example, say you’re doing a wedding and shooting folks dancing at the reception. Over the course of 15 or 20 minutes, you take multiple shots of the bride, groom, and key guests, which you intend to edit down to three or four minutes.
Each shot is two to ten seconds long, which is fine visually. However, if you retain the audio captured with each shot, when you edit them together, you’ll have a cacophony of different songs, or the same song at different times.
To avoid this, make a point of shooting one song in its entirety, from start to finish. This song will serve as the background audio for all dance clips inserted into the sequence. While you may need to capture separate songs for both slow and fast dancing, typically you can fit most dance shots into one category or the other.
With this as prologue, let’s set the scenes, starting with the executive briefing scenario shown in Figure 1.8. There are six issues to consider in setting the scene, with the first four identical in all three scenarios.
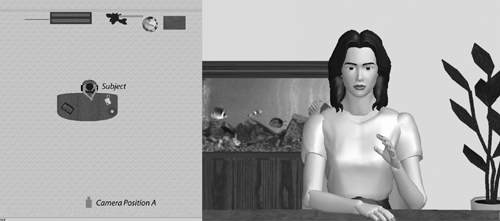
Figure 1.8. Setting the scene for the executive briefing and the Rule of Thirds as applied to a subject facing the camera.
Whenever possible, scout the location beforehand (or at least ask about it) to identify any potential issues. Also, arrive as early as possible on the day of the shoot to give yourself time to assess and address environmental issues.
When setting up the furniture, place the tables and chairs as far from the background as possible; this will help focus the viewers’ attention on the subject. Also, when zooming in for medium shots and close-ups, the camera will focus on the subject, not the background. This approach can slightly blur the background, for a pleasing effect. As you can see in Figure 1.8, the subject is sitting several feet from the background wall.
The subject(s) should wear simple clothing with little detail. Avoid fine pinstripes, herringbone patterns, and tweeds. These types of garments can create moiré patterns that shimmy in the camera. The result is not only distracting but can produce horrendous artifacts when compressed to high levels for streaming.
Avoid high-contrast clothing like a white shirt with a black suit and red tie, since this stresses the camera’s ability to accurately capture such a wide range of colors. It’s best to stick with natural tones like browns and blues, and to tell your subjects this beforehand so they can dress accordingly.
On location, ask the subject(s) to remove all shiny jewelry, which can flare up under the lighting.
Keep the background simple and clutter-free. Avoid finely detailed wallpaper, rows of books, and Venetian blinds, which can also produce a moiré pattern.
Don’t shoot against a blank wall, which can produce a range of artifacts, or defects. Keep the background spare and simple, as shown in Figures 1.1, 1.3, and 1.6.
Avoid shooting against unshaded windows, since light streaming in can backlight your subjects, darkening the faces considerably.
Turn off analog computer monitors, which typically scroll vertically in the video. Note that the newer LCD digital monitors don’t do this, so if you need a computer monitor visible, switch to an LCD panel.
If you’re shooting to deliver over the Internet, consider using a dark flat background (black, dark blue) with nonreflective, light-absorbing material like velour or muslin. More on this in Chapter 6.
In general, the camera should be placed at approximately the same height as the subject’s face.
Pointing the camera down at your subject makes him look subservient (but can hide a double chin).
Pointing the camera upward makes the subject appear dominant or heavenly; notice how many political advertisements are shot in this manner!
The camera should be placed at least 10 feet from the subject—getting too close can distort the image.
The only caveat is sound; specifically, if you’re relying on the camcorder’s microphone as your primary audio source, you’ll need to get as close as possible to capture adequate sound.
In the executive-briefing scenario, the subject will occupy the center of the frame, so the camera should be directly in front of and facing her.
As I’ve mentioned already; framing refers to where the subject is located within the camera frame. In the executive briefing, the subject is placed in the center of the frame, as shown on the right in Figure 1.8, with the eyes roughly one third of the way down the frame. This is one application of the Rule of Thirds.
Framing also describes how closely the camera zooms into the subject. Figure 1.8 is generally considered a medium long shot, since it shows the subject from the waist up. A medium shot is generally from the chest and up, and the closest you would want to frame an executive briefing.
That’s because close-ups are used to show emotion or the subject’s reaction to what another person is saying. As no one else is talking in the executive briefing, and in the absence of a Tammy Faye Bakker-style confession, shots that display emotion shouldn’t be an issue.
In the interview setting, most footage—including that of the subject and the interviewer’s noddies—will be shot with the two parties facing each other, not the camera. For these shots, you’ll position the camera as shown on the left in Figure 1.9.

To recap, Camera Position A is for the initial two-shot where you’ll center the subject and interviewer in the camera. Then you’ll move to Position B for the bulk of the interview, with the camera set up and pointing at the subject at about 30 degrees from the line between the subject and interviewer.
When the subject is not directly facing the camera, the Rule of Thirds dictates how the shot is framed so that the subject’s eyes are located at one of the four “saddle points,” or those points in the frame where the lines intersect. In Figure 1.9, I’ve framed the shot to place the subject’s eyes in the upper right saddle point, because that leaves “look room” toward the left, in the direction the subject is facing. This enhances the desired impression that the subject is looking at the interviewer.
If you’re using a separate cameraperson, shoot the two-shot from Camera Position A, then move to Position B. Shoot an establishing shot showing the subject and the chair, then zoom into medium-shot territory, shooting from the chest up. Zoom out a little if the subject moves his or her arms like John Madden, so the picture won’t constantly cut off the motion.
At intense or emotional points in the interview, don’t be afraid to zoom into a close-up of the face, but linger for only a few seconds. Close-ups are interesting garnish, but shouldn’t be a staple of your production.
Once the interview is over, it’s time to move the camera to Position C and shoot the noddies. When framing the picture, I place the interviewer in the upper-left saddle point, leaving look room on the right, or in whichever direction she is facing (Figure 1.10). During editing, when you cut from a shot of the subject to a shot of the interviewer, it looks like they’re facing each other, which is the desired effect.

When shooting a multisubject discussion with one camera, use Camera Position A, as shown in Figure 1.11, a straight-on shot of the two (or more) participants. Frame the subjects in the center of the camera with their eyes positioned in the upper-third of the frame.

If you have additional cameras, position them across from the target (Camera B focused on the interviewee on the right, Camera C focused on the interviewer on the left), and a few degrees off center.
When framing these shots, use the Rule of Thirds to position each subject’s eyes at the back saddle point, leaving look room towards the front. This is shown in Figure 1.12. As in the interview settings, close-up shots of the subject’s face are appropriate in small doses, but stick with medium shots (chest and up) for the bulk of the discussion.
There’s no doubt about it—working with multiple cameras in a discussion scenario extends your creative options and makes both shooting and editing a lot more fun. If you have two cameras and someone to drive them, it’s pretty simple to achieve, even with just one operator. Follow these pointers for the best results:
Both cameras should be on tripods and should stay in the same physical position at all times. Trying to move a camera can throw off the discussion.
Keep one camera (the primary camera) in Position A at all times. If you have one “good” camera and one “not so good” camera, make the good camera the primary one. If you have one “good” tripod and one “bad” tripod, use the bad one here, since the camera won’t be moving.
Keep the other (secondary) camera in either Position B or C and use it exclusively for medium shots and close-ups of the participants. Use your best tripod on this camera as you’ll be panning and zooming throughout the shoot.
If possible, the primary camera should capture all the audio, while the audio from the secondary camera should be used for backup or discarded.
Start both cameras and keep them running the entire time. That will simplify synchronizing the video from the second camera to the audio from the first camera.
While shooting, operate the secondary camera most of the time, but periodically check back on the primary camera to ensure it’s running and the framing hasn’t been jostled out of place.
Tape all cords around both cameras to the floor, and make sure the path between the two cameras is free from obstacles. Be especially careful when moving around the primary camera to avoid knocking it out of position.
Here’s what’s included in the workbook materials for Chapter 1.
Shot List—a generic shot list to use when planning your shoot.
Storyboards—diagrams of shots and camera placement to use in planning your shoots. There’s one for each of our three scenarios:
Executive briefing
Formal interview
Two- or more-person discussion