
Two applications require specialized shooting techniques: shooting for compositing and shooting for low bitrate streaming distribution. As you can probably guess from the title, this chapter addresses these issues.
Compositing sounds complicated, but really it’s not. Simply put, it’s the process of merging two videos (or a single video and still image) to display one combined video. Compositing is also called “overlay,” as in laying one video over another, “chromakey” or “color key” where you use color values to discern how to combine two videos, or more specifically “green screen” or “blue screen” when using these colors in the compositing process.
This chapter starts by describing how to shoot against a green screen to produce one video you can overlay onto another. The techniques involved in actually compositing the video are highly specialized, so I’ll cover the software side as well.
The final section explores different techniques for producing video that looks good even after being compressed to ultra-low bitrates for streaming, and how working with composited video may actually yield improved quality at low bitrates. I’ll share the results of some extensive green-screen and black-screen testing, and provide some clear guidelines for producing the best possible streaming video quality.
At a high level, compositing combines two videos by eliminating portions of one video, and placing the remaining portions over the other video. For example, in Figure 6.1, we’ll combine the video on the left over the video in the middle to create the video on the right.

Figure 6.1. Compositing takes one video (on the left), eliminates the chromakey color, and imposes the remaining video over a background video (middle) to produce the composition on the right.
You can’t see it in Figure 6.1 (because the book isn’t in color), but the background behind the image on the left is solid green. When compositing the two videos, I’ll use a chromakey filter to remove everything that’s green in the video on the left and overlay the remaining portion- just the video of me, on the video of the building in the middle.
What are the keys to good keying? There are three I’ll briefly mention and then cover in detail below. The first is simple: the object being keyed can’t contain any colors that are similar to the background video; otherwise, those colors will be eliminated along with the background. So if you have a bright green background and wear a bright green shirt, you’ll look like the invisible man from neck to navel.
Second, the background has to be relatively consistent. If you use a cloth background, it must be flat against the wall, smooth, and wrinkle-free. If the background is painted, there should be no chips, bumps, or uneven sections.
Finally, you need a clean video signal, which means a decent camera. If you attempt to shoot green-screen video with an inexpensive DV or analog camcorder, you’ll likely be disappointed with the results.
Now that we’ve got the high level down, let’s take a closer look at the details.
Chromakey backgrounds are typically blue or green. I choose green because blue is plentiful in my wardrobe and green non-existent, but I’m not religious about it. Either color will do just fine, so long as you purchase fabric or paint backgrounds specifically designed for video compositing applications from a reputable source. Hanging up a blue cotton sheet from Wal-Mart just won’t get the job done. As you’ll see, you don’t have to spend a lot of money—we spent $20 for one of our backgrounds—but the color must be consistent.
Your choice of fabric or paint depends on the application. Paint is better if you’re shooting consistently from one location, and is cheaper from a coverage perspective, though probably less so if you have to pay someone to paint the wall. Fabric is faster and more portable, and you can take it down and store it when not in use; this is ideal, given that bright green and blue don’t feng shui very well.
Most chromakey fabric is made of muslin, a heavy fabric that hangs very smoothly. When hanging your fabric, be careful to minimize creases and folds. If the subject will be moving, or you’re shooting outdoors, secure the fabric at the top and bottom to avoid motion from the wind.
For true portability, consider purchasing a collapsible or portable background. Depending on the size of the background and where you buy it, the cost can be anywhere from around $100 to several hundred dollars. Two excellent resources to compare products and prices are www.markertek.com for name-brand products and prices and http://stores.ebay.com/J-and-K-Group for less well-known products at much lower prices.
The conventional wisdom of chromakey lighting and positioning is that the chromakey background must be lighted separately from the foreground speaker and that the speaker should be positioned six to ten feet in front of the background. The concern here is that using one light source for both subject and background would cast shadows on the background, introducing inconsistencies that complicate the chromakeying process. Unfortunately, forcing the speaker to stand 10 feet from the background significantly increases the required size of the background.
Figure 6.2 shows the background I used for all of the chromakey tests shown in this book. I bought it at markertek.com for about $20. In most shots, I stood or sat about four feet in front of the wall, and shot with a tight frame to eliminate all but the green screen. I’m assuming that most readers won’t have access to a green-screen studio and will have to create a similar ad hoc background.
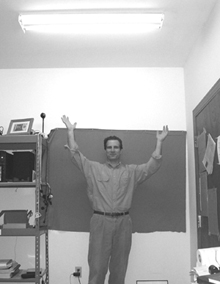
Figure 6.2. Doesn’t matter if your chromakey studio cost $20 or $2,000; if it’s done right, it looks like a million bucks!
If this describes you, take heart—the size of the background screen isn’t anywhere near as important as lighting the screen and the subject correctly. So without further ado, let’s move on to lighting.
The critical point to remember when lighting for compositing is that there are two distinct issues, as shown in Figure 6.3. First, you have to light the background as evenly as possible to produce the most consistent image; for this, you use background lights, as shown in the example. In most instances, I prefer soft lighting over hard lighting because it’s inherently more even.
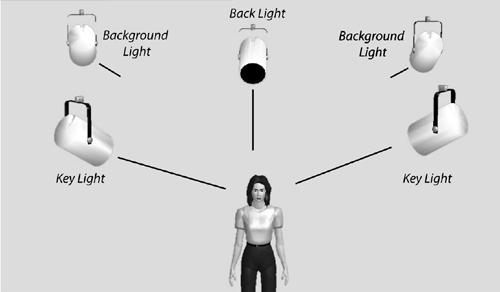
Figure 6.3. Background lights illuminate the background, while key and back lights illuminate the subject. I like flat lighting for compositing, which is why there are two key lights.
Second, you have to light the subject without casting visible shadows on the background. Unlike background lighting, which has to be flat, you can use three-point lighting (key, fill, and back) on the subject, with the desired shadows and modeling.
However, when shooting in close quarters, it can be challenging to use the hard lights necessary for three-point lighting without some light spilling over onto the background. For this reason, you may find you prefer flat lighting with soft lights (that’s why both frontal lights in Figure 6.3 are key lights). In either case—three-point or flat—effective backlighting is essential to create the crisp edges necessary for a high-quality chromakey.
If you’re attempting to insert the subject seamlessly into a specific background, consider how the background scene is lighted and attempt to match that scene’s lighting in your studio with the chromakey screen. At the very least, make sure the primary lights are shining from the same direction so that the shadows all point in the same direction. For example, if the sun is streaming in from the left in the background, makes sure your key light comes from the left.
When I’m producing video for chromakey in my office, I use the fluorescent lights shown in Figure 6.2 to light the background. While the light is slightly brighter at the top of the background than at the bottom, this hasn’t been a problem.
I typically sit a few inches in front of the fluorescent lights and use two soft lights at the key and fill position to produce flat lighting. I attach a clamp light with a fluorescent bulb to the shelving on the left and point is at my back as the backlight. Total cost in background and lights is easily less than $100, yet the results are as good as or better than some I’ve seen shot in expensive studios.
Even if your background and lighting are perfect, if the image acquired by the camera is noisy, the quality of the overlay will suffer. We used two cameras in our tests, a Sony DCR-VX2000 (a three-chip prosumer), and a very old Sony DCR-TRV9 one-chip consumer camera. We got very good results with the VX2000, while the TRV9 proved totally inadequate.
It’s possible that some newer single-CCD camcorders can produce video that’s good enough for a clean chromakey, especially if the scene is professionally lighted, which naturally helps to negate the poor low-light performance of most consumer camcorders. Under most real-world conditions, however, consider using a three-chip camcorder in the Canon GL2 or Sony VX2100 class or better.
Before shooting, white balance the camera, or set it to indoor lighting if manual white balance isn’t available (even if you’re compositing the video over an outdoor scene). We used automatic focus in our shots, but if the subject’s sideways movements may cause the camera to go in and out of focus, switch to manual focus.
Use manual exposure controls as well, otherwise the camera will adjust exposure when minor motions like a tilt of the head or waving hands change the balance of light and dark regions in the frame. As we’ve already mentioned, the chromakey process works by “keying” out a color from the video and overlaying the portion of the video that’s not that color on the background video. Chromakeying works best when the background color is as consistent as possible; this limits the range of colors the software has to exclude.
In automatic exposure mode, even visually imperceptible changes in exposure brighten or darken the green background slightly, expanding the range of colors the software has to exclude. This puts a heavy load on the software, and can degrade the results. Using manual exposure avoids this issue.
Otherwise, advise your subjects to avoid wearing clothing with colors similar to the background color. In addition, avoid white clothing, which can easily reflect the background color, and ask the subject to remove watches, bracelets, and other accessories that can also reflect the background color.
In many ways, the software side is a breeze after the hassles of setting up and shooting the video. To briefly recap, during the chromakey process, you combine two files, one containing the background video and another containing the video to be inserted into the background, often called the overlay video.
Compositing works differently in all programs, but generally follows this workflow: Import the background video into the timeline. Then, load the overlay video onto a track above the background video and apply the chromakey filter to the overlay video.
Many programs offer a specific blue-screen or green-screen filter, which, in theory provides drag-and-drop compositing. I recommend against using these filters, because the preset values for green or blue never match those of your Video, and adjustment will always be necessary. Usually, you’ll get better results faster using a generic chromakey or color-key filter.
Using generic controls, the first step is almost always to choose the background color, typically with an eyedropper or similar control. This is shown in Figure 6.4. Try to choose a spot roughly in the middle of the frame, especially when the lighting is slightly graduated from top to bottom, as it is in Figure 6.4.
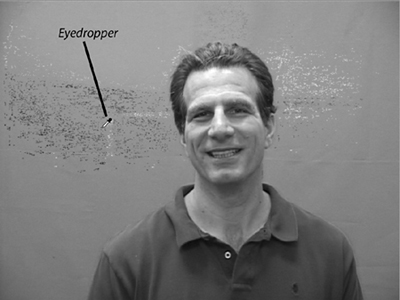
When you choose a pixel with the eyedropper, you choose one color value out of 16.7 million available colors. As you can see in Figure 6.4, this is enough to eliminate some of the small specs on either side of my head, allowing faint glimpses at the background.
However, most of the background doesn’t match the exact color value chosen by the eyedropper, the result of shadows, folds, creases, or other irregularities. To remove more of the color, in this case the green, (although, of course, this book is printed in black and white so you can’t see it) you have to expand the range of colors, typically accomplished via a control labeled Similarity, or some variation on that theme.
Basically, as you increase the similarity value, you’re telling the editor to expand the search from the original color value chosen to additional colors adjacent to that value on the color chart. The effect is illustrated in Figure 6.5, which shows three shots with increasing similarity values. The image in the middle is almost there.

Figure 6.5. Going, going, gone! Expanding the similarity value eliminates more and more of the background color, and—if you go too far—the foreground image.
When adjusting the similarity value (and all chromakey values for that matter), use the program’s zooming controls to focus in on problem areas like hair and the edges between the foreground image and the background.
Don’t be shy with the similarity control; increase it dramatically until you see it eat into the subject itself, as shown in the image on the far right. Then you can back off and find a value that removes the color but doesn’t erode the subject. Once you perform this exercise a time or two, it’s easy to see why your subject can’t wear clothing or accessories that are close to the background color.
If you can’t find a similarity value that works well, try choosing a different starting color with the eyedropper. In addition, don’t rely solely on any single frame to produce the final values. Instead, move from frame to frame to test your values, and use the program’s zooming controls (see Figure 6.6) to analyze the detail. Compositing is more art than science, and is usually an iterative process.

Even the middle image of Figure 6.5 looks pretty clean, we’re not done. Your next concern is the edges, where the subject meets the background video. You’d like the edges to be as smooth as possible because “jaggies” make the overlay obvious, spoiling the illusion.
Most programs include a smoothing control (also known as feathering or softness) to smooth the edges, which achieves the effect shown in Figure 6.6. On the left is the original, unsmoothed image; on the right, the same image, post-smoothing. As you can see, these controls help the background and overlay videos blend together and appear more natural, fostering a convincing compositing illusion.
Sometimes the edges of the overlay video are the toughest regions to eliminate. For this reason, most programs have effects called “garbage mattes” that let you draw a free-form trapezoid around the subject, such as that shown in Figure 6.7, with all segments outside the drawing in the overlay clip discarded as garbage, hence the name.

Figure 6.7. Garbage mattes are very effective when you’re having problems eliminating the edges of the overlay video.
Virtually all prosumer programs have a capability such as the Garbage Matte, though it may have a different name. If you find yourself going crazy trying to eliminate the outer regions of your overlay clip, find the Garbage Matte.
One other feature worth mentioning is Spill Suppression, which is generally available only on higher-end software programs. Operationally, spill suppression identifies background coloring that isn’t eliminated during the chromakey process, and converts it to gray, making it much less visible.
Spill suppression is useful when you can’t increase the similarity value without eliminating portions of the subject, so visible residue of the background color remains. The feature isn’t widely available in the sub-$1,000 class of editors, but if you run across it, now you know what it does.
Whenever you composite one video over another, there’s a risk the overlay process will change the background image in some undesired way. An example of this is shown on the right edge of Figure 6.8, where I’ve moved the overlay video to the left to compare regions of the background image that are covered by the overlay video, and those that were not.

Figure 6.8. Note that the region on the extreme right of the video looks brighter than the rest. That’s compositing residue.
As you can see, the overlay darkened the background video slightly, which is visible in both the sky and the parking lot. Since the effect is subtle, you probably wouldn’t notice it unless you actually shifted the overlay video and looked for it. For this reason, I recommend you do just that whenever you apply a chromakey effect.
In fact, this is my main concern with programs or plug-ins that “automatically” calculate the optimal chromakey settings for you; almost invariably, they leave some residue. It’s easy enough to fix, but unless you specifically look for it, you may not notice it’s there.
Compositing is traditionally used to place your subject in a different environment. One question I’m frequently asked is whether compositing techniques can also produce higher-quality video than noncomposited footage when compressed at the low bitrates required for streaming video. It’s an important question, given that the type of business and educational video we’re creating here is increasingly delivered via streaming media. Here’s the general rule of thumb for creating low bitrate composited video.
Video with limited motion compresses more effectively than video with lots of motion. If you shoot against a green screen and superimpose that video on top of a still image, then encode the result, the entire background doesn’t move, which should allow the codec to concentrate on the foreground subject and produce higher-quality video.
To test this theory, we shot two videos live, one indoors and the other outdoors. Then, we shot video against a green screen and composited that video over a bitmap image of the indoor and outdoor background used in the live shoots. We compressed all files to 100Kbps at 320×240 resolution using Microsoft’s Windows Media Video codec. You can compare the results shown in Figures 6.9 and 6.10.

Figure 6.9. The video on the left is live. On the right, the same clip is composited over a still image of the same background.

Figure 6.10. The video on the left is live; the video right is shot against a green screen and composited over a bitmap of the background.
In both instances, the composited video is sharper, particularly in the outdoor setting where the wind was blowing the trees in the background, creating motion that’s a challenge to compress.
Note that these qualitative differences become more important as the data rate drops. For example, at 500Kbps—a fairly high data rate for 320×240 video—the quality difference between the two videos is minimal. Note also that unless you have a live compositing device, these techniques are useless for live broadcasts. Overall, however, compositing is a great way to boost low bitrate quality.
If you’re looking for absolute quality, production efficiency, and the ability to stream video live without a real-time compositing device (and don’t need to impose your subject on a different background), consider this approach to providing a clear, crisp image at much lower bandwidths: shooting against a black screen.
Specifically, I mean a nonreflective black background such as that shown on the left in Figure 6.11. It costs around $29 on eBay (search under “black muslin video background”).

When shooting against a black background, use either three-point or flat lighting on the subject, but don’t light the background. Don’t worry if some light inadvertently spills on the background since the fabric will soak it up.
As you can see in Figure 6.11, not only is the face significantly clearer than the best image we produced via chromakey technique, the edges around the shoulders are much sharper. Also, the video was easier to produce, because there was no compositing, and the background works for live shoots.
Budget extra time the first time you shoot against a black background to get the lighting and your camera’s exposure setting right; you’ll find the contrast between the lighted face and black background is severe—more than most cameras can handle in automatic mode. It took me about 20 minutes to get the settings right the first time I tried.
If you can, bring a television set to attach to your camera, because relying on your LCD panel under these extreme conditions is not advised. However, as the results show, the effort is clearly worth it.
Both videos in Figure 6.11 were compressed to 100Kbps at 320×240 resolution. Figure 6.12 shows the same video compressed down to 32Kbps (video only, no audio) at the same resolution. As you can see on the left, you still get pretty good quality even at this data rate, but only if the subject is still. Throw in even normal facial and hand motion (on the right) and image quality quickly degrades.

Figure 6.12. Even at 32Kbps, the video (on the left) looks good, as long as the subject doesn’t move (on the right).
Overall, when shooting for low bitrate quality, think chromakey if you have to include a background image. For top-quality, live streaming, and a more efficient production workflow, however, shoot against a flat black background.
The workbook for this chapter includes program-specific instructions for applying the chromakey effect in each video editing program. Go to www.doceo.com/dv101.html for a list of currently supported video editors.