Data ingestion and modification are not only interface-driven in Power Query. In fact, the entire process is underpinned and powered by a highly specific programming language. Called “M,” this language underlies everything that you have learned to do in the last 11 chapters.
Add some additional functionality that is not immediately accessible through the graphical interface
Add programming logic such as generating sequences of dates or numbers
Create or manipulate your own lists, records, or tables programmatically
Create your own built-in functions to extend or enhance those that are built in to the M language
Use the Advanced Editor to modify code
Add comments to your data ingestion processes
The “M” language that underpins Power Query queries is not for the faint of heart. The language can seem abstruse at first sight.
The documentation is extremely technical and not wildly comprehensible for the uninitiated.
The learning curve can be steep, even for experienced programmers.
The “M” language is very different from VBA, which many Excel power users know well.
Tweaking a step manually can cause havoc to a carefully wrought data load and transform process.
In this chapter, I am not going to presume that the reader has any in-depth programming knowledge. I will provide a few comparisons with standard programming concepts to assist any readers that have programmed in VBA, C#, or Java. However, rest assured, the intention is to open up new horizons for passionate Power Query users rather than spiral off into a complex technical universe.
All of this is probably best understood by building on your existing knowledge and explaining how (simply by using the Power Query graphical interface) you have been writing M code already. Then you can extend this knowledge by learning how to tweak existing code, and finally you will see how to write M code unaided.
What Is the M Language?
I should, nonetheless, begin with a few technical stakes in the ground to explain what the Power Query Formula Language (or M as everyone calls the language now) is and what it can—and cannot—do.
M is a functional language. It is certainly not designed to perform general-purpose programming. Indeed, battle-hardened programmers will search in vain for coding structures and techniques that are core to other languages.
It exists to perform a simple function which is to load and transform data.
It is built on a compendium of over 700 built-in functions, each of which is designed to carry out a specific piece of data load and/or transformation logic.
It exists as a series of functions, each of which computes a set of input values to a single output value.
M is case-sensitive, so you need to be very careful when typing in function keywords and variable names.
M is strongly typed—which means that you must respect the core types of data elements used and convert them to the appropriate type where necessary. M will not do this for you automatically.
M is built on a set of keywords, operators, and punctuators.
I don’t want to get too technical at this juncture. Nonetheless, I hope that a high-level overview will prepare you for some of the approaches that you will learn later in this chapter.
M and the Power Query Editor
The good news about M is that you can already write it. By this I mean that every example that you followed in the previous 11 chapters wrote one or more lines of M code for you. Indeed, each step in a data load and transformation process that you generated when using the Power Query Editor created M code for you—automatically.
You do not necessarily have to begin writing M code from a blank slate. Often you can use the Query Editor interface to carry out most of the work—and then tweak the automatically generated code to add the final custom elements that you require.
You do not have to learn over 700 functions to deliver M code as the Query Editor can find and write many of the appropriate instructions for you.
The Query Editor interface is tightly linked to the way that M code is written. So understanding how to use the interface helps you in understanding what M code is and how it works. Indeed, there is a one-to-one relationship between many Power Query interface elements and the underlying M function.
Modifying the Code for a Step
If you feel that you want to delve into the inner reaches of Power Query, you can modify steps in a query by editing the code that is created automatically every time that you add or modify a query step.
- 1.
Open a new Excel file.
- 2.
In the Data ribbon, select Get Data ➤ From File ➤ From Worksheet.
- 3.
Select the Excel file C:DataMashupWithExcelSamplesBrilliantBritishCars.xlsx.
- 4.
Select the source table named BaseData.
- 5.
Click Transform Data to open the Query Editor.
- 6.
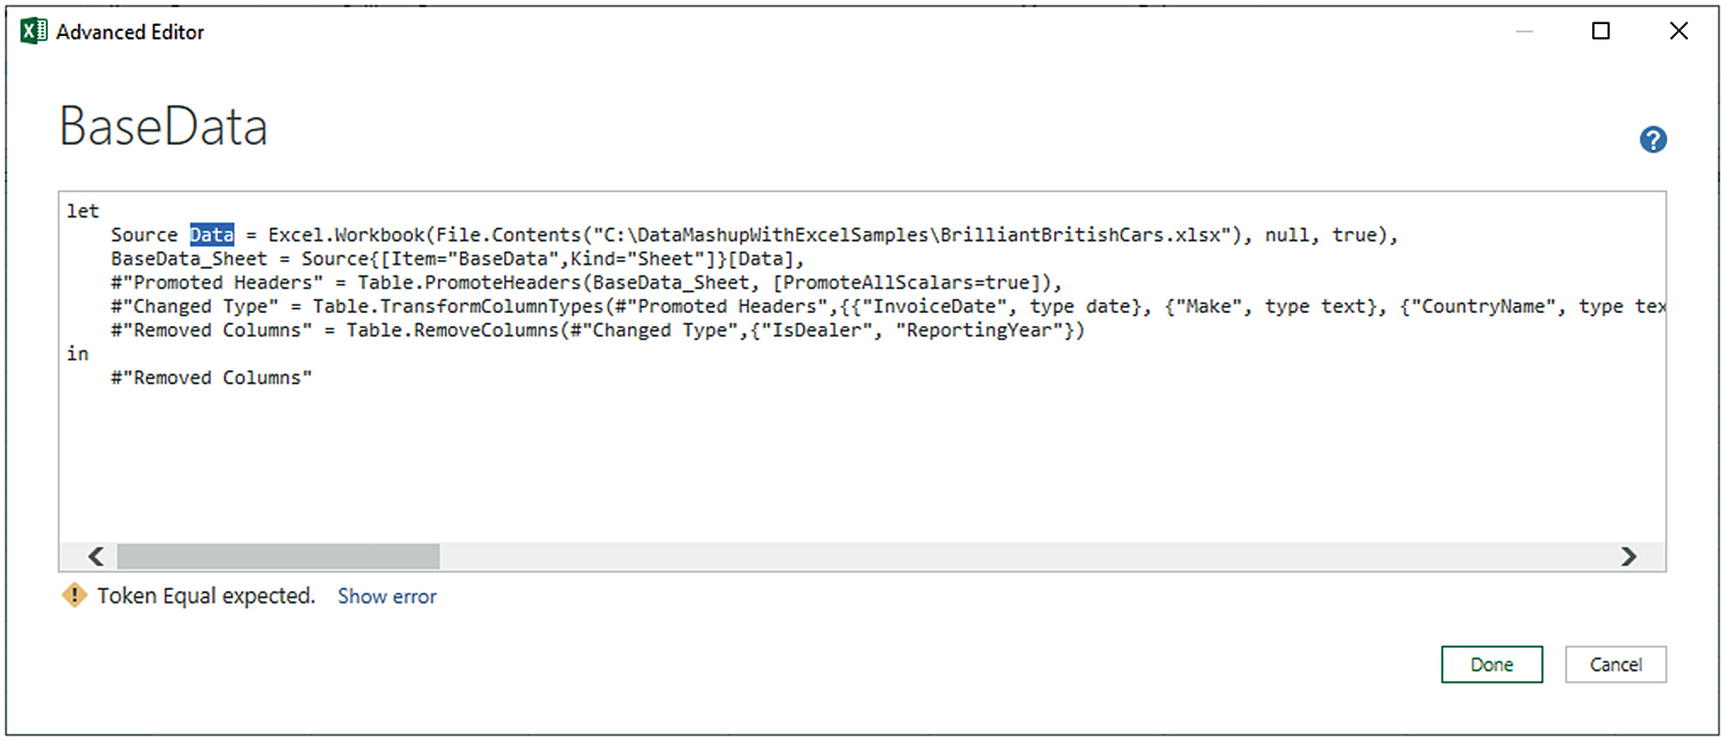
Select the column IsDealer and remove it.
- 7.
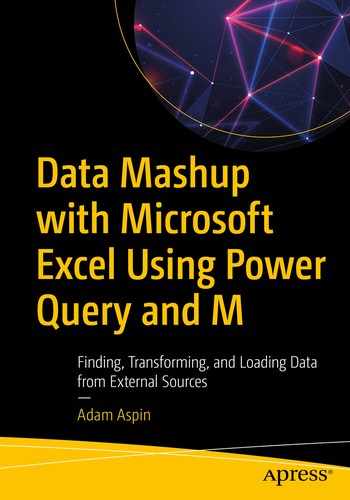
Click the Remove Columns step in the BaseData query. You will see the “M” code in the formula bar. It will look like that shown in Figure 12-1.

“M” code for an applied step
- 8.
In the formula bar, edit the M code to replace IsDealer with ReportingYear.
- 9.
Press Enter or click the tick icon (check mark) in the formula bar to confirm your changes.
The step and subsequent data will be updated to reflect your changes.
The modification that you carried out in step 8 effectively means that you are adding back the IsDealer column and removing the ReportingYear column instead. You could have done this using the interface (by clicking the gear cog icon in the Applied Steps list for this step), but the whole point is to understand that both options are available and that the Power Query interface is only generating and modifying M code. So you can modify this code directly, if you prefer. Indeed, modifying M code is often faster than making a series of interface-based maneuvers.
The core code can be recorded (VBA for Excel, M for Power Query).
The resulting code can then be modified.
This is, of course, an overtly simplistic comparison. The two approaches may be similar, but the two languages are vastly different. Yet if this helps as a metaphor to encourage you to move to M development, then so be it.
Any error will not only cause the step to fail, it will cause the whole data load and transformation process to fail from the current step onward.
You need to remember that M is case-sensitive—and even the slightest error of capitalization can cause the entire process to fail.
The use of quotes to define literal elements (such as column names) must be respected.
M makes lavish use of both parentheses and braces. It can take some practice and understanding of the underlying logic to appreciate their use fully in various contexts.

An “M” error message
More generally, it is often best to look at the code for existing steps—or create “dummy” code using a sample dataset in parallel—to get an idea of what the M code for a particular function looks like. This will then indicate how best to modify the code.
M Expressions
An M expression
Each M expression is made up of functions. These can be any of the built-in functions (such as the Table.RemoveColumns) used here—or functions that you have defined (which is explained a little later in this chapter). They can also be calculations or simple logic.
As you learned in the course of this book so far, data mashup is essentially a series of individual actions (or steps as the Power Query interface calls them). These actions are linked in a “chain” where each expression is built on—and refers to—a preceding expression. In Figure 12-3, this specific expression refers to the output of the #“Changed Type” expression which preceded it.
M expressions can become extremely complex and include multiple functions—rather like complex Excel formulas. As functions can be nested, this can lead to quite complex expressions.
Writing M by Adding Custom Columns
Concatenate (or join, if you prefer) existing columns
Add calculations to the data table
Extract a specific part of a column
Add flags to the table based on existing data
The best way to understand these columns is probably to see them in action. You can then extend these principles in your own processes. This can, however, be an excellent starting point to learn basic M coding—albeit limited to a narrowly focused area of data wrangling in M.
- 1.
Open a blank Excel file.
- 2.
Connect to the C:DataMashupWithExcelSamplesBrilliantBritishCars.xlsx data source.
- 3.
Click Transform to open the Power Query Editor.
- 4.
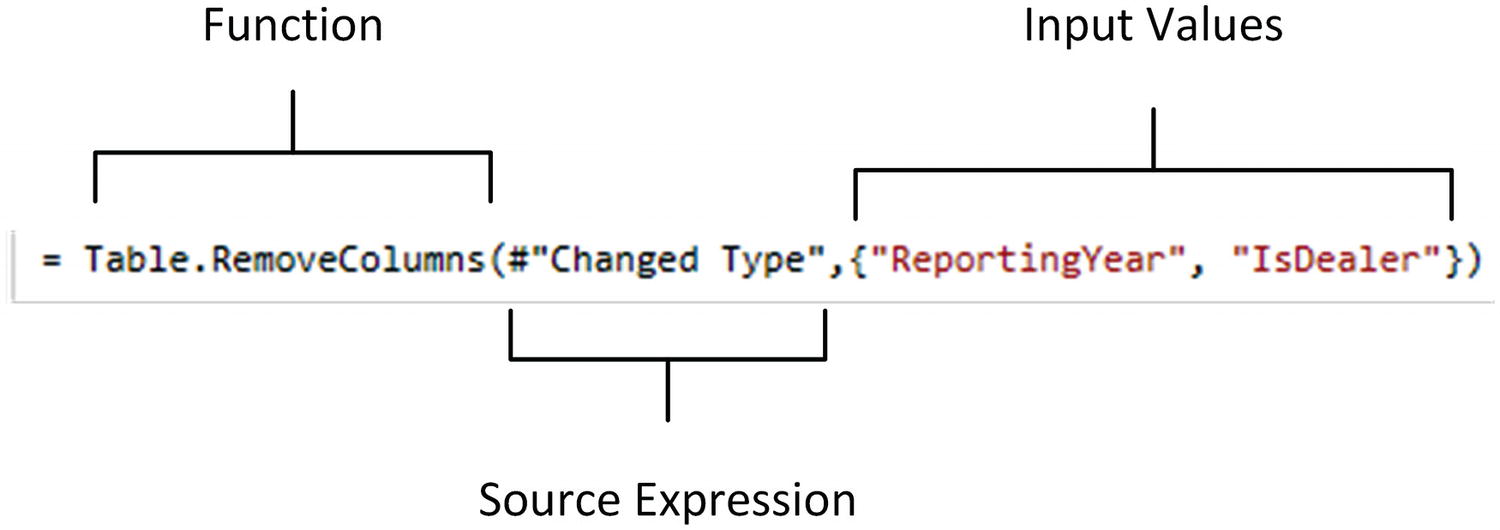
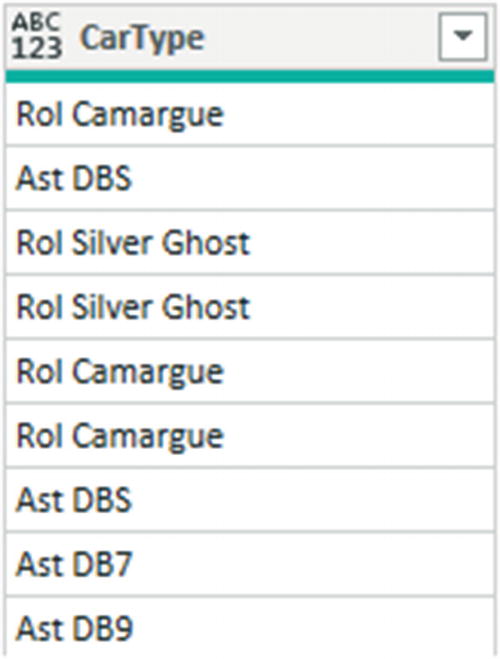
In the Add Column ribbon, click Custom Column. The Add Custom Column dialog is displayed.
- 5.
Click the Make column in the column list on the right, then click the Insert button; =[Make] will appear in the Custom column formula box at the left of the dialog.
- 6.
Enter & “ ” & in the Custom column formula box after =[Make]. Note the space between the pair of double quotes.
- 7.
Click the Model column in the column list on the right, and then click the Insert button.
- 8.
Click inside the New column name box and enter a name for the column. I call it CarType. The dialog will look like Figure 12-4.
The Custom Column dialog
- 9.
Click OK. The new column is added to the right of the data table; it contains the results of the formula. Inserted Column appears in the Applied Steps list. The formula bar contains the following formula:
You can always double-click a column to insert it into the Custom column formula box if you prefer. To remove a column, simply delete the column name (including the square brackets) in the Custom column formula box.
You must always enclose a column name in square brackets.
You can see that this line of M code follows the principles that you have already seen. It uses an M formula (Table.AddColumn) that refers to a previous expression (#"Changed Type") and then applies the code that carries out the expression requirements—in this case adding a new column that contains basic M code.
The each keyword is an M convention to indicate that every record in the column will have the formula applied.
The Advanced Editor
The Advanced Editor shows all the expressions that make up an M query.
It makes understanding the sequencing of events (or steps or expressions if you prefer) much easier.
It has a syntax checker that helps isolate and identify syntax errors.
The Advanced Editor, unfortunately, does not yet have IntelliSense built-in. This means that you cannot see M function popup as you type.
Expressions in the Advanced Editor
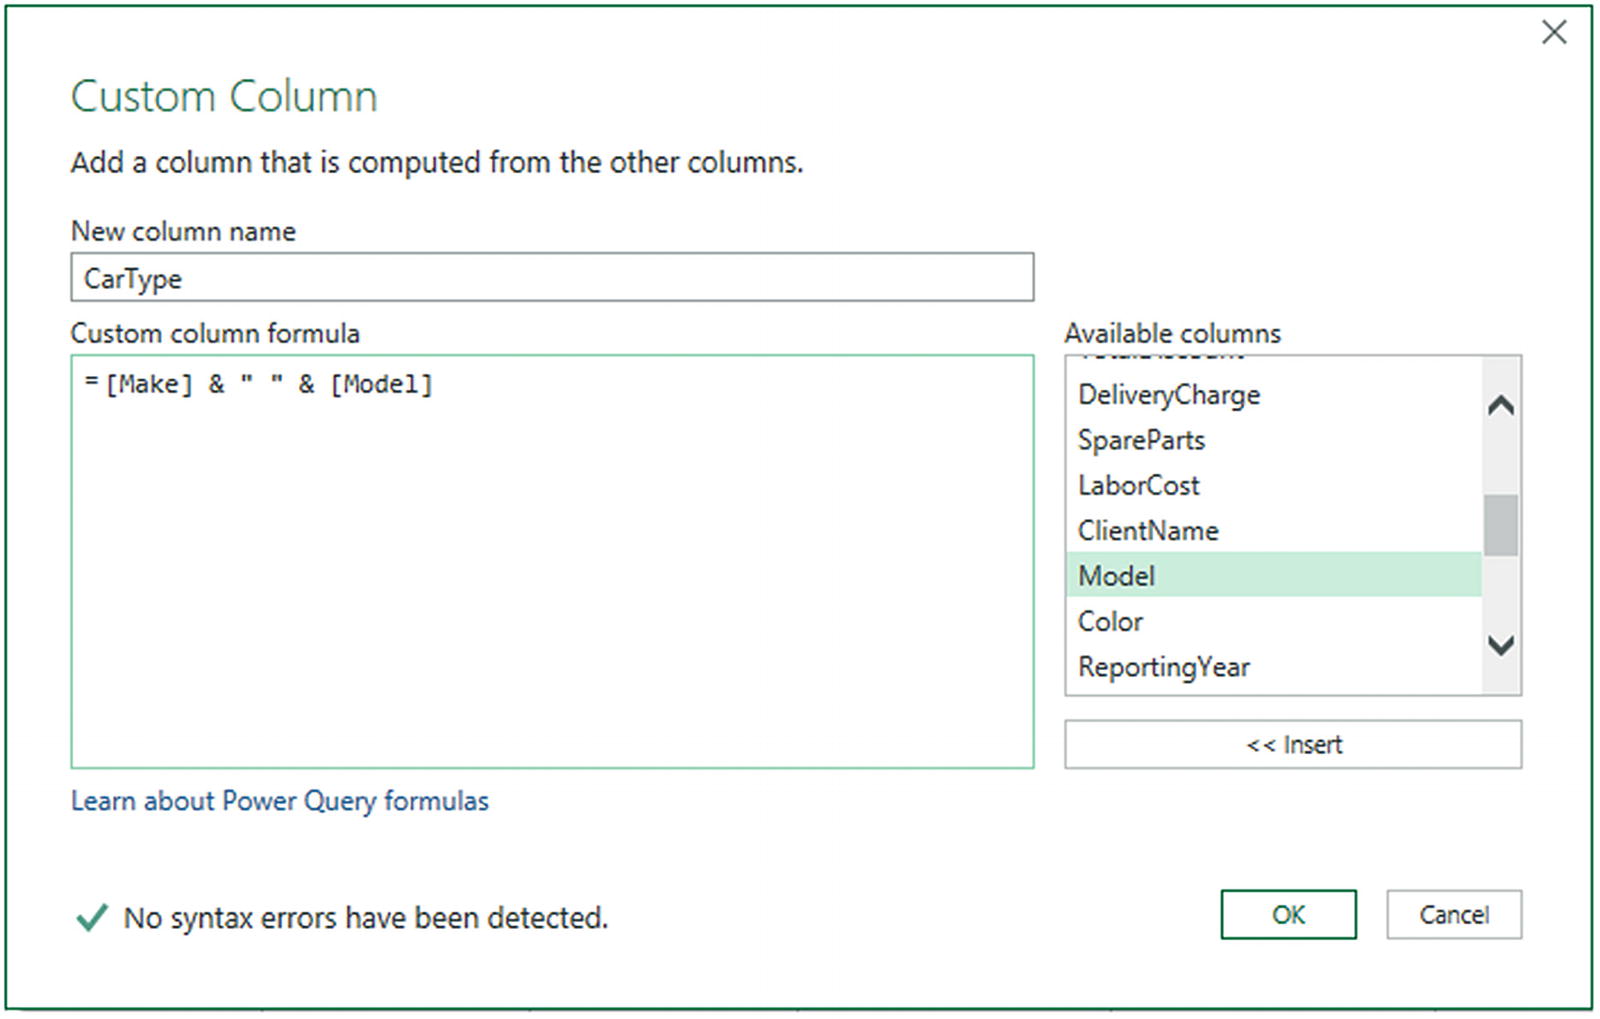
The M expressions that you can see individually in the formula bar do not exist in a vacuum. Quite the contrary, they are always part of a coherent sequence of data load, cleansing, and transformation events. This is probably best appreciated if you now take a look at the whole block of M code that was created when you loaded a table from an Excel file previously.
- 1.
In the Home ribbon, click the Advanced Editor button. The Advanced Editor window will open, as shown in Figure 12-5. You can also see the Applied Steps list from the Power Query Editor to help you understand how each step is, in fact, an M expression.
Syntax checking in the Advanced Editor
A sequence of expressions (which are steps)
A let expression that acts as an outer container for a sequence of data transformation expressions
An in expression that returns the output of the entire query
Each expression is named—and you can see its name in the Applied Steps list.
Each expression refers to another expression (nearly always the previous expression) except for the first one.
All but the final expression are terminated by a comma.
An expression can run over several lines of code. It is the final comma that ends the expression in all but the last expression.
The final expression becomes the output of the query.
Have a Let…In block
Contain one or more expressions that contain functions
The Let Statement
The let statement is a core element of the M language. It exists to allow a set of values to be evaluated individually where each is assigned to a variable name. These variables form a structured sequence of evaluation processes that are then used in the output expression that follows the in statement. You can consider it to be a “unit of processing” in many respects. Let statements can be nested to add greater flexibility.
In most let statements, the sequence of variables will be ordered from top to bottom (as you can see in Figures 12-5 and 12-6) where each named expression refers to, and builds on, the previous one. This is the way that the Query Editor presents named expressions as steps and is generally the easiest way to write M scripts that are easy to understand. However, it is not, technically, necessary to order the expressions like this as the expressions can be in any order.
Modifying M in the Advanced Editor
- 1.
Add a new query that connects to a SQL Server database. I am using a SQL instance and database on my PC.
- 2.
Select this query in the Queries list on the left.
- 3.In the Home ribbon, click the Advanced Editor button. The Advanced Editor dialog will appear, as shown in Figure 12-6.
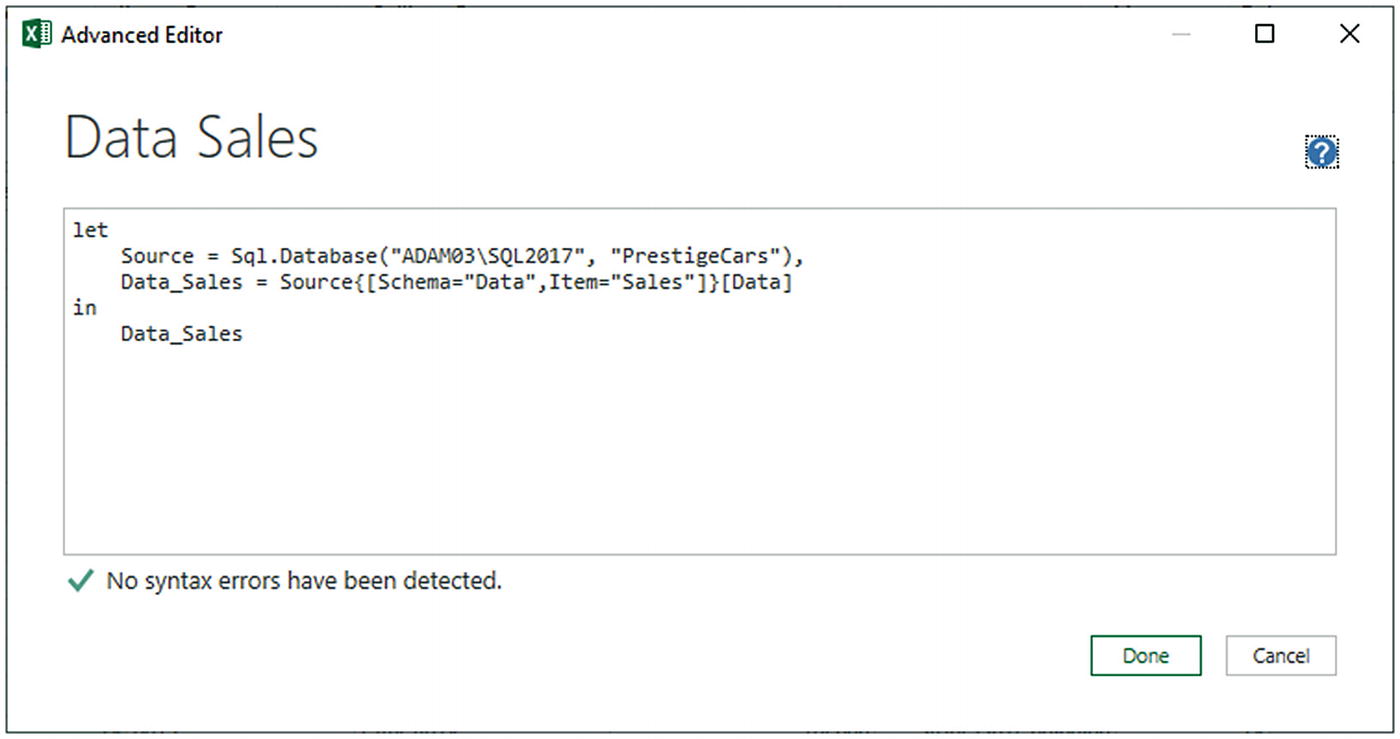 Figure 12-6
The Advanced Editor dialog to alter a database connection
- 4.Alter any of the following elements:
- a.
The server name in the Source line (currently “ADAM03SQL2017”).
- b.
The database name in the second line (currently Name=“PrestigeCars”).
- c.
The schema name in the third line (currently Schema=“Data”).
- d.
The table name in the third line (currently Item=“Sales”).
- a.
- 5.
Click Done to confirm any changes and close the Advanced Editor.
This approach really is working without a safety net, and I am showing you this more to raise awareness than to suggest that you must always code M in this fashion. However, it does open the door to some far-reaching possibilities if you wish to continue learning all about the “M” language.
You can, of course, click Cancel to ignore any changes that you have made to the M code in the Advanced Editor. The Query Editor will ask you to confirm that you really want to discard your modifications.
Syntax Checking
If you intend to write and modify M code, you are likely to be using the Advanced Editor—a lot. Consequently, it is certainly worth familiarizing yourself with the help that it can provide. Specifically, its syntax checking can be extremely useful and is entirely automatic.
Syntax checking in the Advanced Editor
As you can see, in this case the Advanced Editor no longer displays a check box under the code and the reassuring message “No syntax errors have been detected.” Instead you see an error message. Clicking the Show error link will highlight the source of the error by displaying it on a blue background.
Basic M Functions
The M language is vast—far too vast for anything other than a cursory overview in a single chapter. Nonetheless, to give some structure to the overview, it is worth knowing that there are a few key categories of M functions that you might find useful when beginning to use M.
Text functions
Date functions
Time functions
DateTime functions
Logical functions
Number functions
I am focusing on these categories as they are probably the most easily comprehensible in both their application and their use. Once you have seen some of these functions, we can move on to other functions from the range of those available.
Applying a first text function
As you can see, wrapping the Make column inside this particular text function has added an extra layer of data transformation to the expression.
Text Functions
Text Function Examples
Output | Code Snippet | Description |
|---|---|---|
Left | Text.Start([Make],3) | Returns the first three characters from the Make column |
Right | Text.End([Make],3) | Returns the last three characters from the Make column |
Up to a specific character | Text.Start([Make],Text.PositionOf([Make]," ")) | Returns the leftmost characters up to the first space |
Up to a delimiter | Text.BeforeDelimiter([InvoiceNumber], "-" ,"2") | Returns the text before the third hyphen |
Text length | Text.Length([Make]) | Finds the length of a text |
Extract a substring | Text.Range([Make], 2, 3) | Extracts a specific number of characters from a text—starting at a specified position |
Remove a subtext | Text.RemoveRange([Make], 2, 3) | Removes a specific number of characters from a text—starting at a specified position |
Replace a text | Text.Replace([Make], "o", "a") | Replaces all the o characters with an a in the text or column |
Trim spaces | Text.Trim([Make]) | Removes leading and trailing spaces in the text or column |
Convert to uppercase | Text.Upper([Make]) | Converts the text or column to uppercase |
Convert to lowercase | Text.Lower([Make]) | Converts the text or column to lowercase |
Add initial capitals | Text.Proper([Make]) | Adds initial capitals to each word of the text or column |
You have probably noticed if you looked closely at these functions that any numeric parameters are zero based. So, to define the third hyphen when splitting text in a column, you would use 2, not 3.
There are, as you might expect, many more text functions available in M. However, the aim is not to drown the reader in technicalities, but to make you aware of both the way that M works and what is possible.
You may well wonder why you carry out operations like this in Power Query when you can do virtually the same thing in Excel formulas. Well, it is true that there is some overlap; so you have the choice of which to use. However, remember that there is no need to copy formulas down over a column in M, as the formula will apply, by definition, to an entire column.
Overall, you can perform certain operations at multiple stages in the data preparation and analysis process. It all depends on how you are using the data and with what tool you are carrying out the analyses.
Table 12-1 is only a subset of the available text functions in M. If you want to see the complete list, it is on the Microsoft website at https://docs.microsoft.com/en-us/powerquery-m/text-functions.
Number Functions
Number Function Examples
Output | Code Snippet | Description |
|---|---|---|
Returns an 8-bit integer | Int8.From("25") | Converts the text or number to an 8-bit integer |
Returns a 16-bit integer | Int16.From("2500") | Converts the text or number to a 16-bit integer |
Returns a 32-bit integer | Int32.From("250000") | Converts the text or number to a 32-bit integer |
Returns a 64-bit integer | Int64.From("2500000000") | Converts the text or number to a 64-bit integer |
Returns a decimal number | Decimal.From("2500") | Converts the text or number to a decimal |
Returns a Double number value from the given value | Double.From("2500") | Converts the text or number to a floating-point number |
Takes a text as the source and converts to a numeric value | Number.FromText("2500") | Converts the text to a number |
Rounds a number | Number.Round(5000, 0) | Rounds the number up or down to the number of decimals (or tens, hundreds, etc. for negative parameters) |
Rounds a number up | Number.RoundUp(5020, -2) | Rounds the number up to the number of decimals (or tens, hundreds, etc. for negative parameters) |
Rounds a number down | Number.RoundDown(100.01235, 2) | Rounds the number down to the number of decimals (or tens, hundreds, etc. for negative parameters) |
Removes the sign | Number.Abs(-50) | Returns the absolute value of the number |
Raises to a power | Number.Power(10, 4) | Returns the value of the first parameter to the power of the second |
Modulo | Number.Mod(5, 2) | Returns the remainder resulting from the integer division of number by divisor |
Indicates the sign of a number | Number.Sign(-1) | Returns 1 if the number is a positive number, -1 if it is a negative number, and 0 if it is zero |
Gives the square root | Number.Sqrt(4) | Returns the square root of the number |
If you are an Excel user, you can probably see a distinct similarity with how you build formulas in Excel (in pivot tables in Power Pivot) except that here (as in Power Pivot) you use column names rather than cell references.
Table 12-2 is only a minor subset of the vast range of number functions that are available in M. If you want to see the complete list, it is on the Microsoft website at https://docs.microsoft.com/en-us/powerquery-m/number-functions.
Date Functions
M has many date functions. Table 12-3 contains a potentially useful sample of some of the available functions.
Date Function Examples
Output | Code Snippet | Description |
|---|---|---|
Day | Date.Day(Date.FromText("25/07/2020")) | Returns the number of the day of the week from a date |
Month | Date.Month(Date.FromText("25/07/2020")) | Returns the number of the month from a date |
Year | Date.Year(Date.FromText("25/07/2020")) | Returns the week from a date |
Day of week | Date.DayOfWeek(Date.FromText("25/07/2020")) | Returns the day of the week from a date |
Name of weekday | Date.DayOfWeekName(Date.FromText("25/07/2020")) | Returns the weekday name from a date |
First day of month | Date.StartOfMonth(Date.FromText("25/07/2020")) | Returns the first day of the month from a date |
Last day of month | Date.EndOfMonth(Date.FromText("25/07/2020")) | Returns the last day of the month from a date |
First day of year | Date.StartOfYear(Date.FromText("25/07/2020")) | Returns the first day of the year from a date |
Last day of year | Date.EndOfYear(Date.FromText("25/07/2020")) | Returns the last day of the year from a date |
Day of year | Date.DayOfYear(Date.FromText("25/07/2020")) | Returns the day of the year from a date |
Week of year | Date.WeekOfYear(Date.FromText("25/07/2020")) | Returns the week of the year from a date |
Quarter | Date.QuarterOfYear(Date.FromText("25/07/2020")) | Returns the number of the quarter from a date |
First day of quarter | Date.StartOfQuarter(Date.FromText("25/07/2020")) | Returns the first day of the quarter from a date |
Last day of quarter | Date.EndOfQuarter(Date.FromText("25/07/2020")) | Returns the last day of the quarter from a date |
Time Functions
Time Function Examples
Output | Code Snippet | Description |
|---|---|---|
Hour | Time.Hour(#time(14, 30, 00)) | Returns the hour from a time |
Minute | Time.Minute(#time(14, 30, 00)) | Returns the minute from a time |
Second | Time.Second(#time(14, 30, 00)) | Returns the second from a time |
Time from fraction | Time.From(0.5) | Returns the time from a fraction of the day |
Table 12-4 is only a subset of the available time functions in M. If you want to see the complete list, it is on the Microsoft website at https://docs.microsoft.com/en-us/powerquery-m/time-functions.
Equally, as they are so similar to the date and time functions, I have not shown here the datetime functions and the datetimezone functions. These are also available on the Microsoft website.
Duration Functions
Duration Function Examples
Output | Code Snippet | Description |
|---|---|---|
Days | Duration.Days(#duration(10, 15, 55, 20)) | Duration in days |
Hours | Duration.Hours(#duration(10, 15, 55, 20)) | Duration in hours |
Minutes | Duration.Minutes(#duration(10, 15, 55, 20)) | Duration in minutes |
Seconds | Duration.Seconds(#duration(10, 15, 55, 20)) | Duration in seconds |
Table 12-5 is nearly all the available duration functions in M. If you want to see the remaining few functions, they are on the Microsoft website at https://docs.microsoft.com/en-us/powerquery-m/duration-functions.
M Concepts
The time has now come to “remove the stabilizers” from the bicycle and learn how to cycle unaided. This means, firstly, becoming acquainted with several M structural concepts.
Lists
Records
Tables
Data types
M values (also referred to as variables or identifiers)
So, without further ado, let’s start your journey into M.
M Data Types
If you are creating your own lists, records, and tables, then it will help to know the basics about data types in M.
Number
Text
Date
Time
DateTime
DateTimeZone
Duration
Logical (Boolean if you prefer)
Binary
Null
There are other types such as function, any, or anynonnull, but we will not be covering them in this chapter.
Data Type Entry
Data Type | Code Snippet | Comments |
|---|---|---|
Number | 100 0.12345 2.4125E8 | Do not use formatting such as thousand separators or monetary symbols |
Text | "Calidra Power Query Training" | Always enclose in double quotes. Use two double quotes to enter the actual quotes text |
Date | #date(2020,12,25) | Dates must be year, month, and day in the #date() function |
Time | #time(15,55,20) | Times must be hour, minute, and second in the #time() function |
DateTime | #datetime(2020,12,25,15,55,20) | Datetimes must be year, month, day, hour, minute, and second in the #datetime() function |
DateTimeZone | #datetimezone(2020,12,25,15,55,20,-5,-30) | Datetimezones must be year, month, day, hour, minute, second, day offset, and hour offset in the #datetimezone() function |
Duration | #duration(0,1,0,0) | Days, hours, minutes, and seconds comma-separated inside the #duration() function |
Logical | true | True or false in lowercase |
M Values
Values are the output of expressions.
Values are also variables.
The names of values are case-sensitive.
If the value name contains spaces or restricted characters, they must be wrapped in #”” (pound sign followed by double quotes).
This fourth bullet point clearly begs the question “what is a restricted character?” The simple answer—that avoids memorizing lists of glyphs—is “anything not alphanumeric.”
The Power Query Editor interface makes the steps (which are the values returned by an expression) more readable by adding spaces wherever possible. Consequently, these values always appear in the M code as #”Step Name”.
Defining Your Own Variables in M
As the values returned by any expression are also variables, it follows that defining your own variables in M is breathtakingly simple. All you have to do is to enter a variable name (with the pound sign and in quotes if it contains spaces or restricted characters), an equals sign, and the variable definition.
User variables in M
They respect the same naming convention as output values in M.
A variable can be referenced inside the subexpression where it is defined and any expressions that contain the subexpression.
A variable can be a simple value or a calculation that returns a value.
Writing M Queries
- 1.
Open a new, blank Excel file.
- 2.
In the Data ribbon, click Get Data ➤ From Other Sources ➤ Blank Query. The Power Query Editor will open.
- 3.
Click Advanced Editor. An Advanced Editor dialog will open containing only an outer let expression, as shown in Figure 12-10.
Preparing the Advanced Editor to write M code
Technically, a let clause is not required in M. You can simply enter an expression. However, I prefer to write M “by the book”—at least to begin with.
Lists
You met M lists in Chapter 11 when creating popup lists for query-based parameters (showing, once again, that everything in the Query Editor is based on M). Lists are nothing more than a series of values.
Lists have specific uses in M and can be used directly in a data model. However, they are more generally used as intermediate steps in more complex data transformation processes. If you have a programming background, you might find it helpful to consider lists as being something akin to arrays.
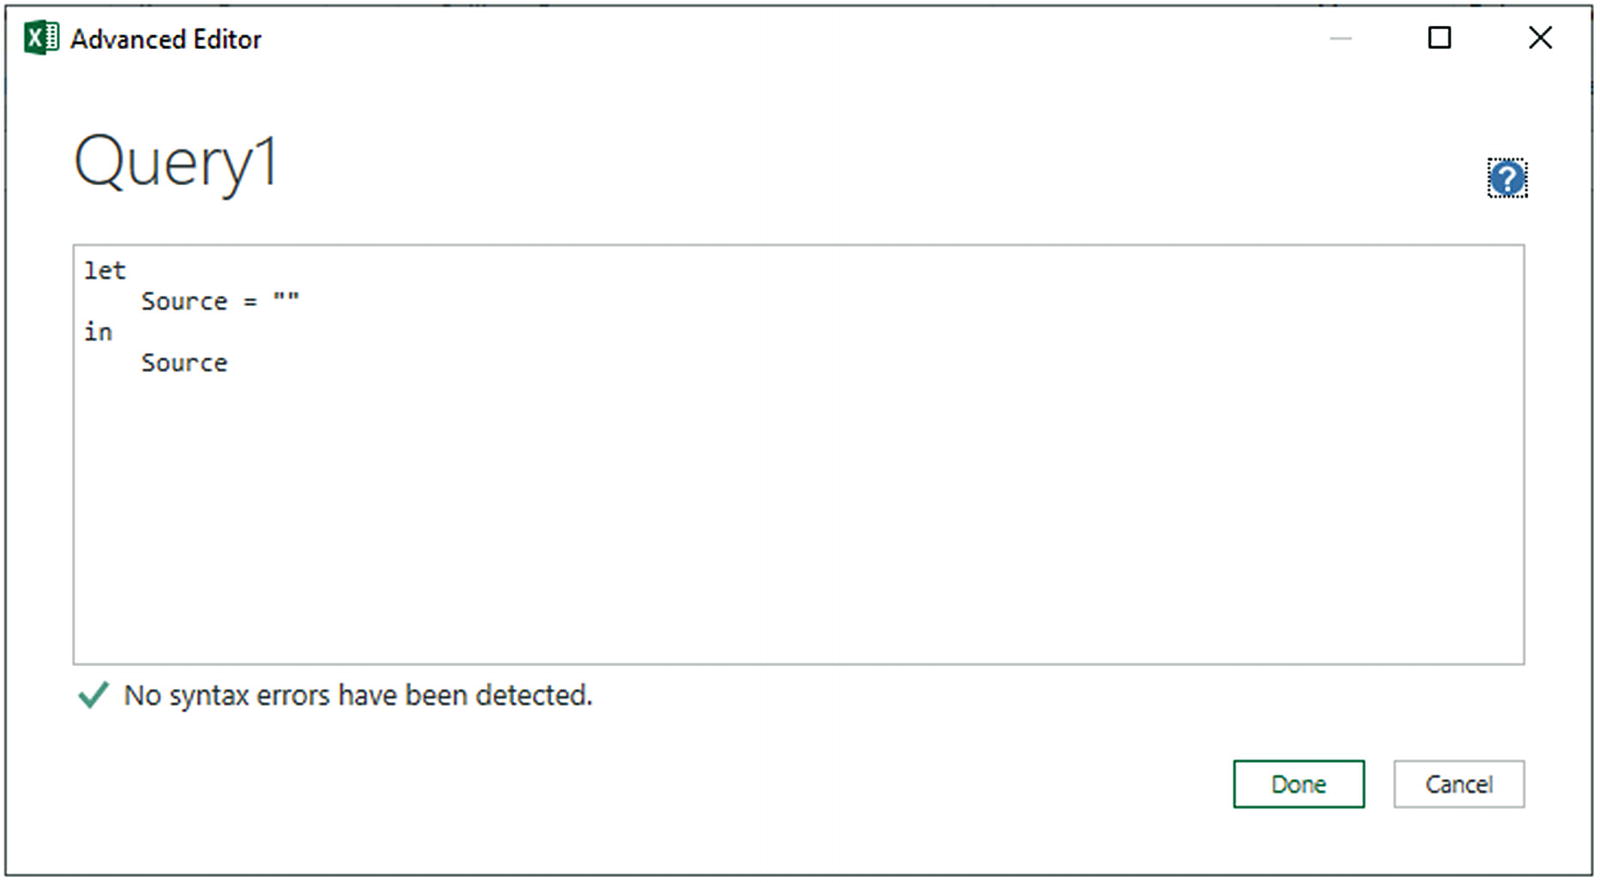
Creating Lists Manually
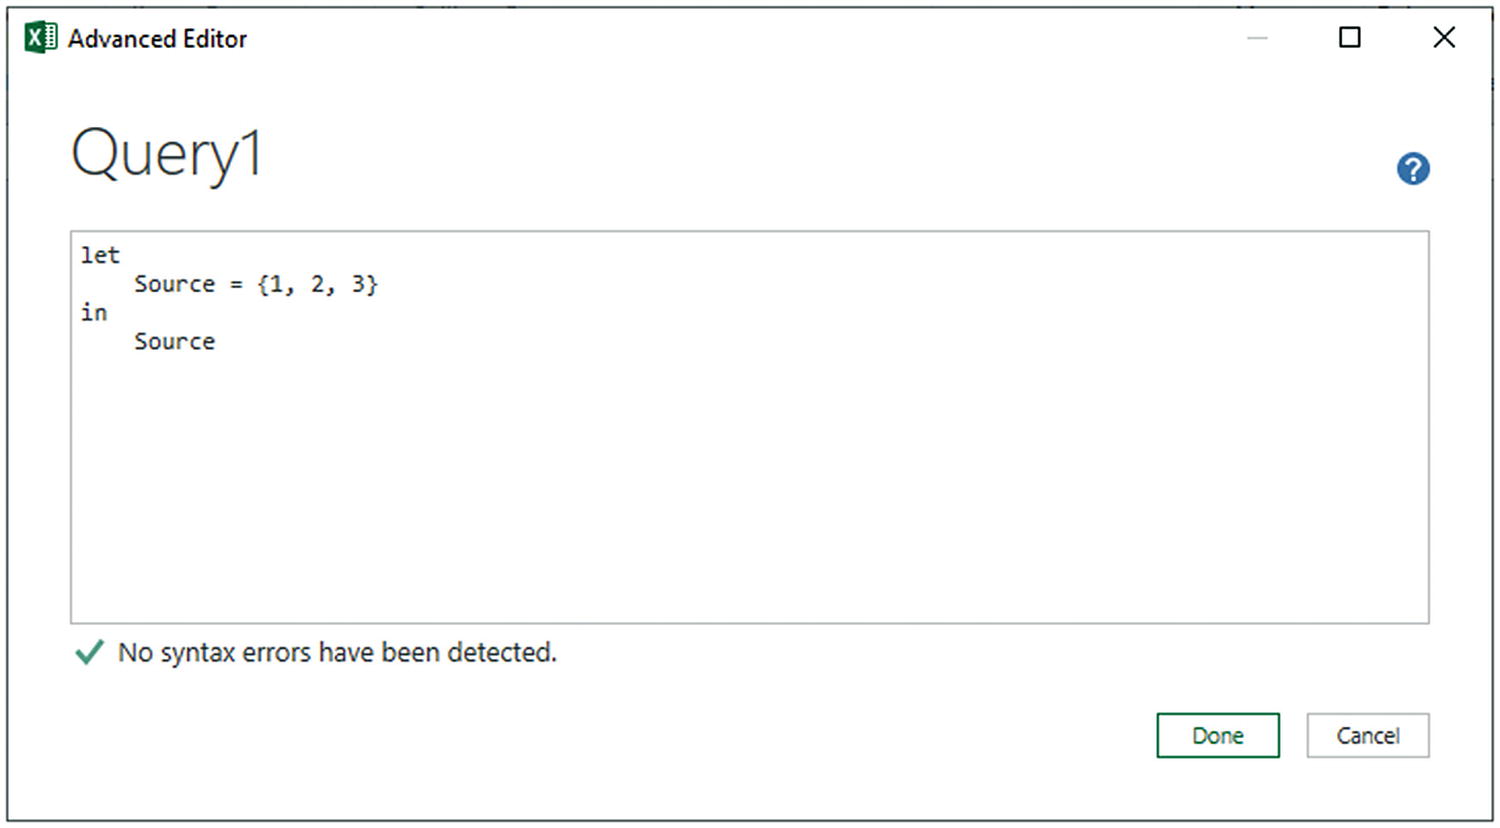
A list in the Advanced Editor
Once created—either as an intermediate step in a query or as the final output of the query—the list can be used by anything that requires a list as its input. Indeed, if you click the Done button for the example shown earlier, the Power Query Editor will display this piece of M code as a functioning list—exactly like the one that you created in Chapter 11. So you can now create custom lists for parameters (for instance) quickly and easily.
Lists are unlimited in size.
Lists can contain data of the same type (i.e., all elements are numeric values, dates, or texts, for instance)—or the data can be of different types.
Lists can be empty—that is, composed of a pair of empty braces.
Lists can be entered horizontally or vertically. That is, the list shown earlier could have been typed in as
Generating lists is really easy; knowing when to use lists is the hard part.
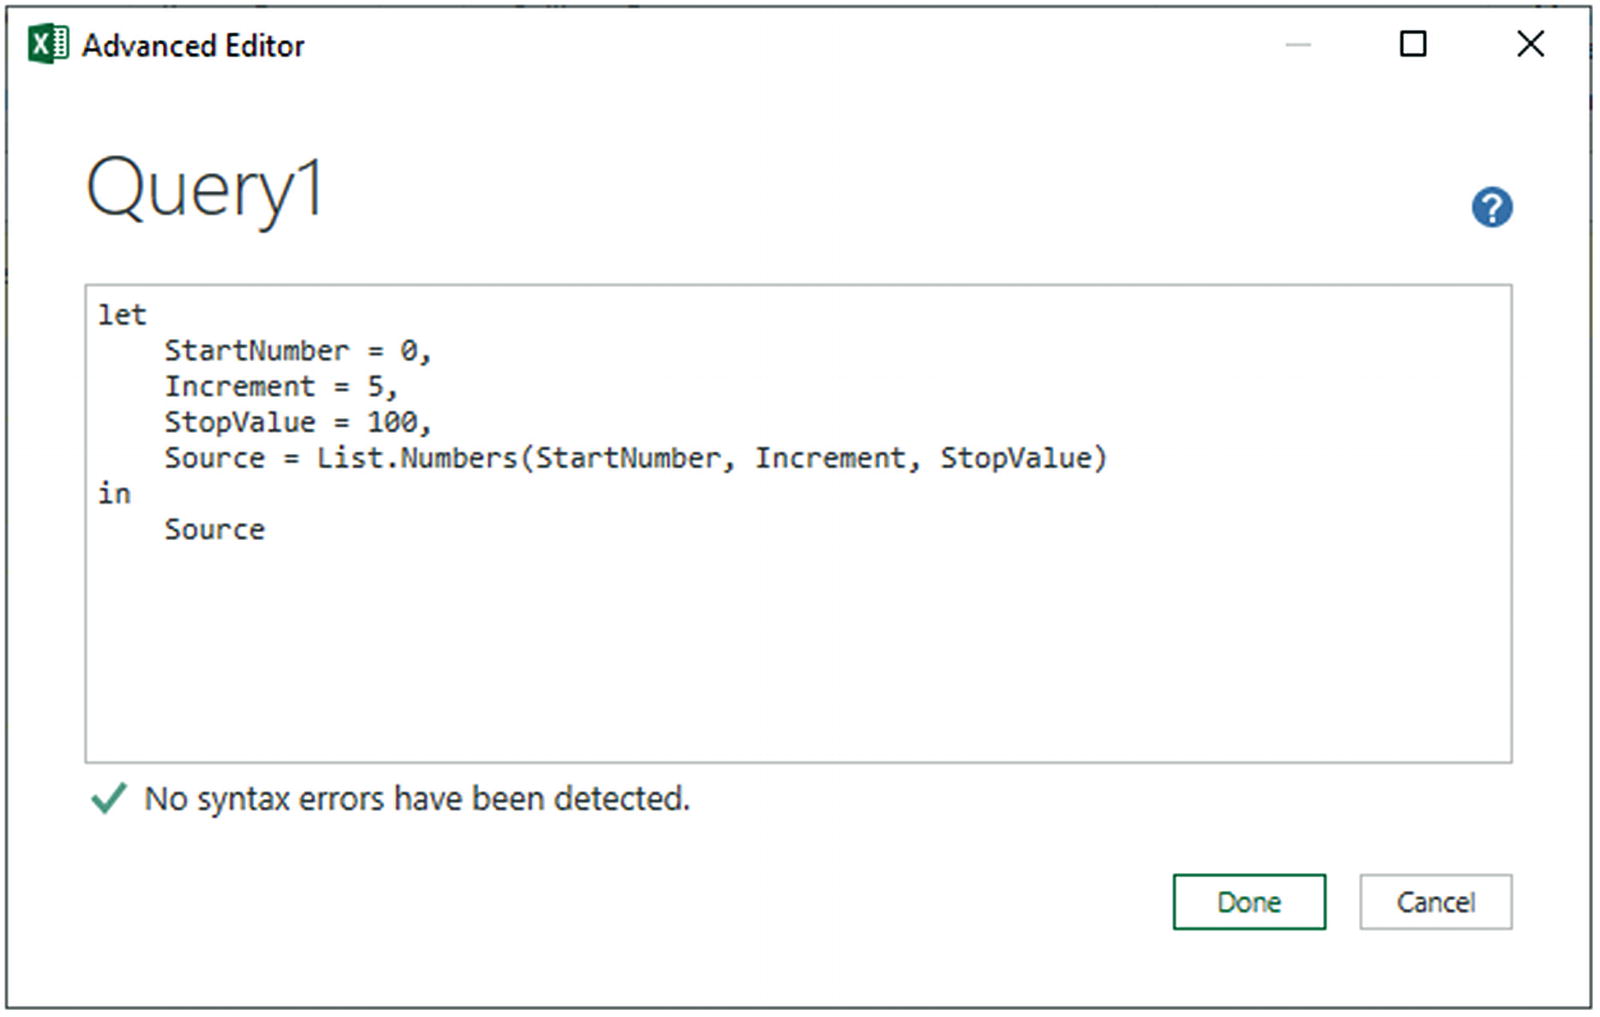
Generating Sequences Using Lists
List Generation
Code Snippet | Description |
|---|---|
{1..100} | An uninterrupted sequence of numbers from 1 to 100, inclusive |
{1..100, 201..400} | An uninterrupted sequence of numbers from 1 to 100, then from 201 to 400 |
List.Numbers(0, 100, 5) | Starting at zero increments by 5 until 100 is reached |
{"A".."Z"} | The uppercase letters A through Z |
List.Dates(#date(2020, 1, 1), 366, #duration(1, 0, 0, 0)) | Each individual day for the year 2020—starting on 1st January 2020, 366 days (expressed as a duration in days) are added |
List.Times(#time(1, 0, 0), 24, #duration(0, 1, 0, 0)) | Each hour in the day starting with 1 AM |
Accessing Values from a List
The output of this code snippet is the fourth element in the list—making the point that lists in M are zero based. That is, the first element in a list is the element 0.
List Functions
List Functions
Output | Code Snippet | Description |
|---|---|---|
First value | List.First(MyList) | Returns the first element in a list |
Last value | List.Last(MyList) | Returns the last element in a list |
Sort list values | List.Sort(MyList) | Sorts the values in a list |
Extract range | List.Range(MyList, 4) | Extracts a range of values from a list |
Return value(s) | List.Select(MyList , each _ ="Adam") | Returns the elements from a list that match a criterion |
Generate a list | List.Generate() | Creates a list of sequential values |
Aggregate values | List.Sum(MyList) | Aggregate the numeric values in a list |
Replace values | List.ReplaceMatchingItems(MyList, {"Joe", "Fred"}) | Replaces a range of values in a list |
Convert to list | Table.Column(MyList) | Returns a column from a table as a list |
Table 12-8 is only a small subset of the available list functions in M. If you want to see the full range of functions, it is on the Microsoft website at https://docs.microsoft.com/en-us/powerquery-m/list-functions.
Records
If lists can be considered as columns of data that you can use in your M code, records are rows of data. You might well find yourself needing to define records when creating more complex data transformation routines in M.
Record Functions
Output | Code Snippet | Description |
|---|---|---|
Add field | Record.AddField() | Adds a field to a record |
Remove field | Record.RemoveFields() | Removes a field from a record |
Rename field | Record.RenameFields() | Renames a field in a record |
Output field | Record.Field() | Returns the value of the specified field in the record |
Count | Record.FieldCount() | Returns the number of fields in a record |
Table 12-9 is only a subset of the available record functions in M. If you want to see the complete list, it is on the Microsoft website at https://docs.microsoft.com/en-us/powerquery-m/record-functions.
Tables
The final structured data type that you could well employ in M code is the table type. As you might expect in a language that exists to load, cleanse, and shape tabular data, the table data type is fundamental to M.
The #table() function
A set of column/field headers where each field name is enclosed in double quotes and the set of field names is wrapped in braces
Individual rows of data, each enclosed in braces and comma-separated, where the collection of rows is also wrapped in braces
The data type keywords that you specify to define the required data type were outlined earlier in this chapter.
Table Functions
Output | Code Snippet | Description |
|---|---|---|
Merge tables | Table.Combine() | Merges tables of similar or different structures |
Number of records | Table.RowCount() | Returns the number of records in a table |
First | Table.First() | Returns the first record in a table |
Last | Table.Last() | Returns the last record in a table |
Find rows | Table.FindText() | Returns the rows in the table that contain the required text |
Insert rows | Table.InsertRows() | Inserts rows in a table |
Output rows | Table.Range() | Outputs selected rows |
Delete rows | Table.DeleteRows() | Deletes rows in a table |
Select columns | Table.SelectColumns() | Outputs selected columns |
Table 12-10 is, as you can probably imagine, only a tiny subset of the available table functions in M. If you want to see the complete list, it is on the Microsoft website at https://docs.microsoft.com/en-us/powerquery-m/table-functions.
Other Function Areas
Other Function Areas
Function Area | Description |
|---|---|
Accessing data functions | Access data and return table values |
Binary functions | Access binary data |
Combiner functions | Used by other library functions that merge values to apply row-by-row logic |
DateTime functions | Functions applied to datetime data |
DateTimeZone functions | Functions applied to datetime data with time zone information |
Expression functions | M code that was used for expressions |
Line functions | Converts data to lists of values |
Replacer | Used by other functions in the library to replace a given value in a structure |
Splitter | Splits values into subelements |
Type | Returns M types |
Uri | Handles URLs and URIs |
Value | Handles M values |
Custom Functions in M
M also allows you to write custom functions that can carry out highly specific tasks repeatedly.
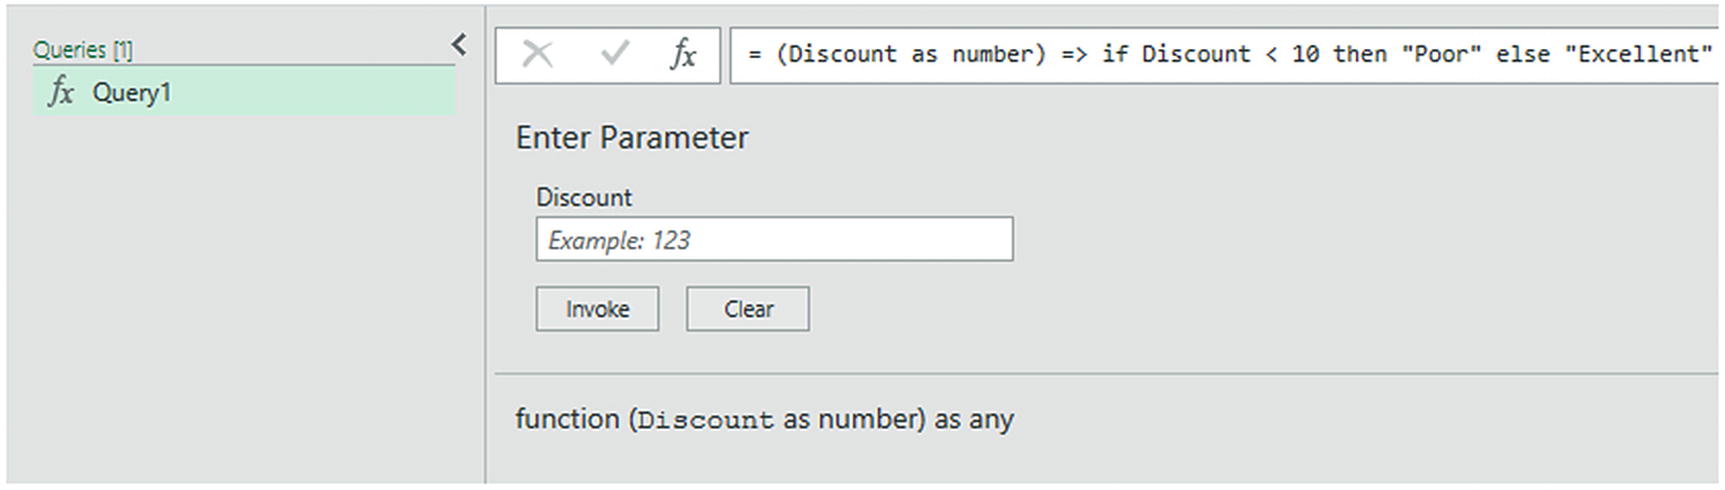
User-defined functions in M
You can now invoke the function at any time interactively by entering a value as the discount and clicking the Invoke button. You can also use this function inside other M functions. Indeed, this is probably why you created a custom function in the first place.
Adding Comments to M Code
Complex M code can be extremely dense. So you will likely need ways of remembering why you created a process when you return to it weeks or months later.
One simple way to make your own life easier is to add comments to M code. You can do this both for code that you have written and queries that have been generated automatically.
There are two ways to add comments.
Single-Line Comments
Everything from the two slashes until the end of the line will be considered to be a comment and will not be evaluated by M.
Multiline Comments
Everything inside the /* …*/ will be considered to be a comment and will not be evaluated by M.
Conclusion
This final chapter completes this book on loading and transforming source data for analysis in Excel. In this chapter, you learned the basics of the M language that underpins everything that you learned in this book up until now.
You began by seeing how you can use the Power Query Editor interface to assist you in writing short snippets of M code. Then you moved on to discovering the fundamental M concepts such as expressions, variables, and values. Finally, you learned about data types in M and the more complex data types such as lists and tables that underlie complex data transformations. This involved learning to use the Advanced Editor to write and debug your code.
In this chapter and the 11 previous chapters, you have seen essentially a three-stage process: first, you find the data, then you load it into Power Query, and from there, you cleanse and modify it. The techniques that you can use are simple but powerful and can range from changing a data type to merging multiple data tables. Now that your data is prepared and ready for use, you can add it to the Power Pivot/Excel data model or directly into an Excel spreadsheet and start using it to deliver real-world analytics.
I hope that you have enjoyed reading this book, and that it will help you to master the art of finding, transforming, and loading external data into Excel using Power Query and M.