Much of the world’s corporate data currently resides in relational databases, data warehouses, and data warehouse appliances either on-premises or in the cloud. Excel—via Power Query—can connect to many of the world’s leading commercial and open source databases and data warehouses. This chapter will show you how to extract data from several of these data sources to drive your Excel-based analytics using Power Query. Indeed, you will discover that once you have learned how to connect to one or two databases, you have learned how to use nearly all of them, thanks to the standardized interface and approach that Power Query brings to data extraction.
You need to be aware, however, that the examples in this chapter use sample data that is not available on the Apress website. In this chapter, I will let you use your own data or use the sample data that can often be installed with the source databases themselves.
It may be stating the obvious, but connecting to a database means that the database must be installed and running correctly and you already have access to it. Indeed, you may also need specific client software installed on the PC that is running Power Query. This chapter will not explain how to install or use any of the databases (or the client software) that are referenced. For this, you will have to consult the relevant database documentation. Not only that, but many of the data sources outlined in this chapter are only available if you have a Pro version or Enterprise Excel subscription.
Relational Databases
Being able to access the data stored in relational databases is essential for much of today’s business intelligence. As enterprise-grade relational databases still hold much of the world’s data, you really need to know how to tap into the vast mines of information that they contain. The bad news is that there are many, many databases out there, each with its own intricacies and quirks. The good news is that once you have learned to load data from one of them, you can reasonably expect to be able to use any of them.
In the real world, connecting to corporate data could require you to have a logon name and usually a password that will let you connect (unless the database can recognize your Windows login or a single sign-on solution has been implemented). I imagine that you will also require permissions to read the tables and views that contain the data. So the techniques described in this chapter are probably the easy bit. The hard part is convincing the guardians of corporate data that you actually need the data and you should be allowed to see it.
Database Sources
Database | Comments |
|---|---|
SQL Server database | Lets you connect to a Microsoft SQL Server on-premises database (on-premises, in a hosted environment, or in a virtual machine in the cloud) and import records from all the data tables and views that you are authorized to access |
Access database | Lets you connect to a Microsoft Access file on your network and load queries and tables (which we explored in the previous chapter) |
SQL Server Analysis Services database | Lets you connect to a SQL Server Analysis Services (SSAS) data warehouse. This can be either an online analytical processing (OLAP) cube or an in-memory tabular data warehouse |
Oracle database | Lets you connect to an Oracle database and import records from all the data tables and views that you are authorized to access. This will likely require client software to be installed |
IBM DB2 database | Lets you connect to an IBM DB2 database and import records from all the data tables and views that you are authorized to access. This will likely require additional software to be installed |
MySQL database | Lets you connect to a MySQL database and import records from all the data tables and views that you are authorized to access |
PostgreSQL database | Lets you connect to a PostgreSQL database and import records from all the data tables and views that you are authorized to access. This will likely require additional software to be installed |
Sybase database | Lets you connect to a Sybase database and import records from all the data tables and views that you are authorized to access |
Teradata database | Lets you connect to a Teradata database and import records from all the data tables and views that you are authorized to access. This will likely require additional software to be installed |
SAP HANA database | Lets you connect to a SAP HANA in-memory database and import records from all the objects that you have permission to access. This will likely require additional software to be installed |
These are the database connectors that are currently available for Power Query to connect to. As the list of database and data warehouse sources that you can connect to from Power Query continues to evolve, this list could likely be extended to include new items by the time that you read this book.
Although Power Query classifies Microsoft Access as a relational database, I prefer to handle it as a file-based source. For this reason, MS Access data was discussed in the previous chapter.
Generic Database Access
Source | Comments |
|---|---|
ODBC data source | Lets you connect over Open Database Connectivity to a database or data source |
OLE DB data source | Lets you connect over Object Linking and Embedding, Database to a database or data source |
Be warned that these generic connectors will not work with any database. However, they should work with a database for which you have procured, installed, and configured a valid ODBC or OLE DB driver. These connection types are explained in Chapter 5.
SQL Server
- 1.
Open a new Excel Workbook.
- 2.
In the Data ribbon, click Get Data ➤ From Database ➤ From SQL Server Database. The SQL Server database dialog will appear.
- 3.
Enter the server name in the Server text box. This will be the name of your SQL Server or one of the SQL Server resources used by your organization. It may even be a local version of SQL Server that you have installed on your PC.
- 4.
Enter the database name. The dialog will look like Figure 3-1 (but with your server and database names, of course).

The Microsoft SQL Server database dialog
- 5.
Click OK. Power Query will connect to the server and display the Navigator dialog containing all the tables and views in the database that you have permission to see on the server you selected.
- 6.
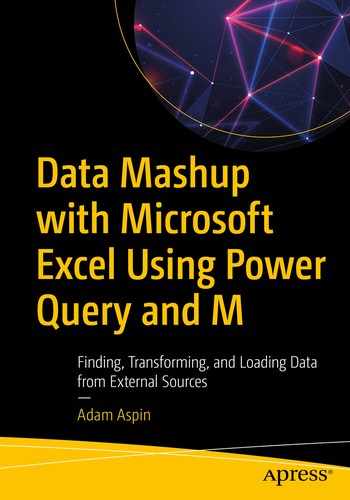
Ensure the Select multiple items check box is checked.
- 7.
Click the check boxes for the tables that you want to load. The data for the most recently selected table appears on the right of the Navigator dialog, as shown in Figure 3-2, where the Stock table is selected.
The Navigator dialog when selecting multiple items
- 8.
Click Load.
- 9.
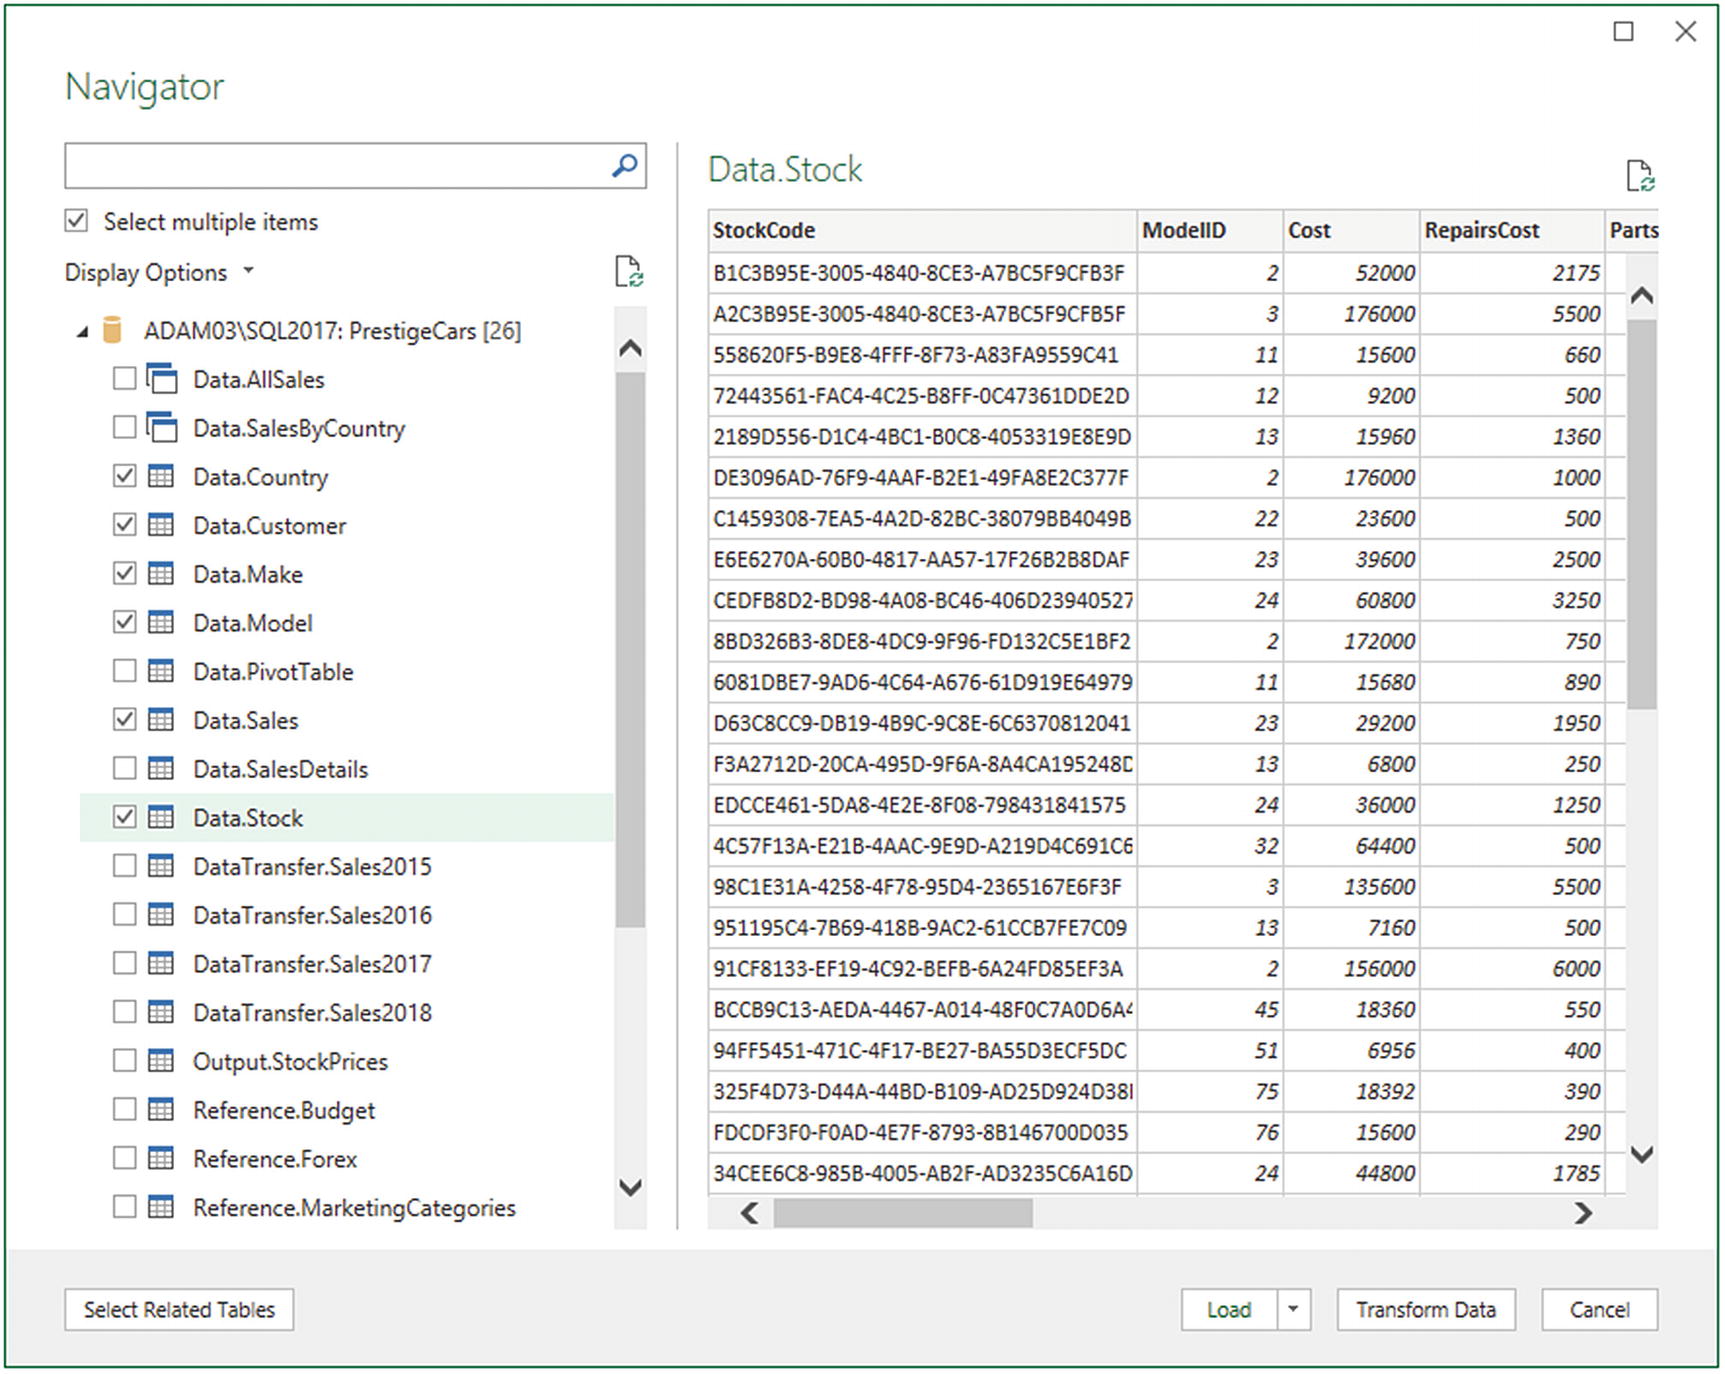
While the data is being loaded, Power Query will display the Queries & Connections pane and show the load progress for each selected table. You can see this in Figure 3-3.
The Load dialog displaying data load progress
- 10.
Once the load is complete, the Queries & Connections pane will display the final row counts for each source table that has been loaded into the data model.
When selecting multiple tables or views, you will only ever see the contents of a single data source in the Navigator dialog. However, you can preview the contents of any of the selected data sources (or even any that are not selected) simply by clicking the table or view name. This will not affect the choice of selected tables and views that you want to load using Power Query.
Since this is very similar to the way in which you loaded data from Access in the previous chapter, I imagine that you are getting the hang of how to use database sources by now. Once again the Navigator dialog is a simple and efficient way to select the datasets that you want to load into Excel.
You can enter the server IP address instead of the server name if you prefer. If there are several SQL Server instances on the same server, you will need to add a backslash and the instance name. This kind of detailed information can be obtained from corporate database administrators.
Automatically Loading Related Tables
Relational databases are nearly always intricate structures composed of many interdependent tables. Indeed, you will frequently need to load several tables to obtain all the data that you need.
Knowing which tables to select is not always easy. Power Query tries to help you by automatically detecting the links that exist in the source database between tables; this way, you can rapidly isolate the collections of tables that have been designed to work together.
- 1.
Connect to the source database as described in the previous section.
- 2.
In the Navigator dialog, click a table that contains data that you need.
- 3.
Click the “Select related tables” button.
Any tables in the database that are linked to the tables that you selected in the Navigator dialog are selected. You can deselect any tables that you do not want, of course. More importantly, you can click the names of the selected tables to see their contents.
Sometimes you have to select several tables in turn and click “Select related tables” to ensure that Power Query will select all the tables that are necessary to underpin your analysis.
Database Options
The world of relational databases is—fortunately or unfortunately—a little more complex than the world of files or MS Access. Consequently, there are a few comments to make about using databases as a data source—specifically, how to connect to them.
Database Connection Options
Option | Comments |
|---|---|
Server | You cannot browse to find the server, and consequently you need to type or paste the server name. If the server has an instance name (a concept that I explain later), you need to enter the server and the instance. Your IT department will be able to supply this if you are working in a corporate environment |
Database | If you know the database, then you can enter (or paste) it here. This restricts the number of available tables in the Navigator dialog and makes finding the correct table or view easier |
SQL statement | You can enter a valid snippet of T-SQL (or a stored procedure or a table-valued function) that returns data from the database |
These options probably require a little more explanation. So let’s look at each one in turn.
Server Connection
The database server name.
The database server name, a backslash, and an instance name (if this physical or virtual server contains several SQL Server instances).
The database server IP address.
The database server IP address, a backslash, and an instance name (if there is one).
If the SQL Server instance is using a custom port, you must end the server name with a comma followed by the port number. This is, inevitably, a question for corporate DBAs.
If you are running a single SQL Server instance that you have installed on your own PC, then you can use the name localhost (or a period) to refer to the local server.
A database instance is a separate SQL Server service running alongside others on the same physical or virtual server. You will always need both the server and this instance name (if there is one) to successfully connect. You can also specify a timeout period if you wish.
- 1.
In the Power Query ribbon, click the small triangle at the bottom of the Get Data button and then click SQL Server. The SQL Server database dialog will appear.
- 2.
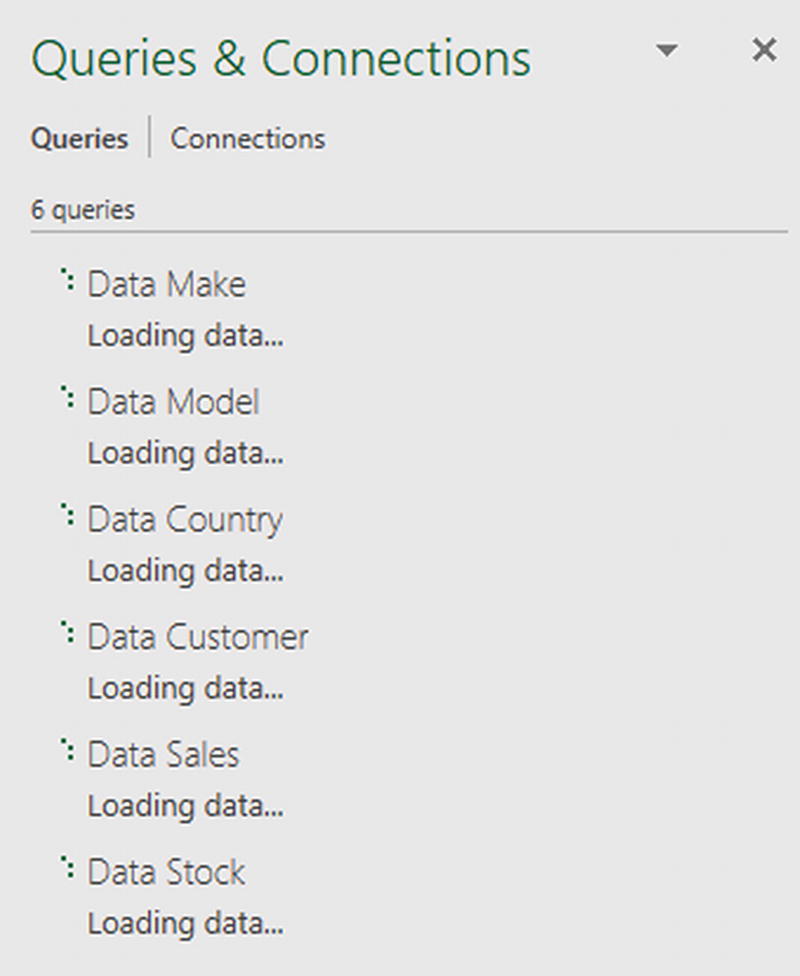
Enter the server name in the Server text box and click OK. Do not enter a database name. The Navigator window opens and displays all the available databases, as shown in Figure 3-4. Of course, the actual contents that are displayed will depend on the server that you are connecting to.
The Navigator dialog when selecting databases
You can see from Figure 3-4 that if you click the small triangle to the left of a database, then you are able to see all the tables and views that are accessible to you in this database. Although this can mean an overabundance of possible choices when looking for the table(s) or view(s) that you want, it is nonetheless a convenient way of reminding you of the name of the dataset that you require.
The actual databases that you will be able to see on a corporate server will depend on the permissions that you have been given. If you cannot see a database, then you will have to talk to the database administrators to sort out any permission issues.
Searching for Databases, Tables, and Views in Navigator
If you are overwhelmed by the sheer volume of table(s) and view(s) that appear in the left panel of the Navigator dialog, then you can use Navigator’s built-in search facility to help you to narrow down the set of potential data sources.
Searching for Databases
- 1.
Carry out steps 1 and 2 in the earlier “SQL Server” section to connect to a SQL Server instance without specifying a database.
- 2.
In the Search box of the Navigator dialog, enter a few characters that you know are contained in the name of the table or view that you are looking for. Entering, for example, US on my server gives the result that you see in Figure 3-5.
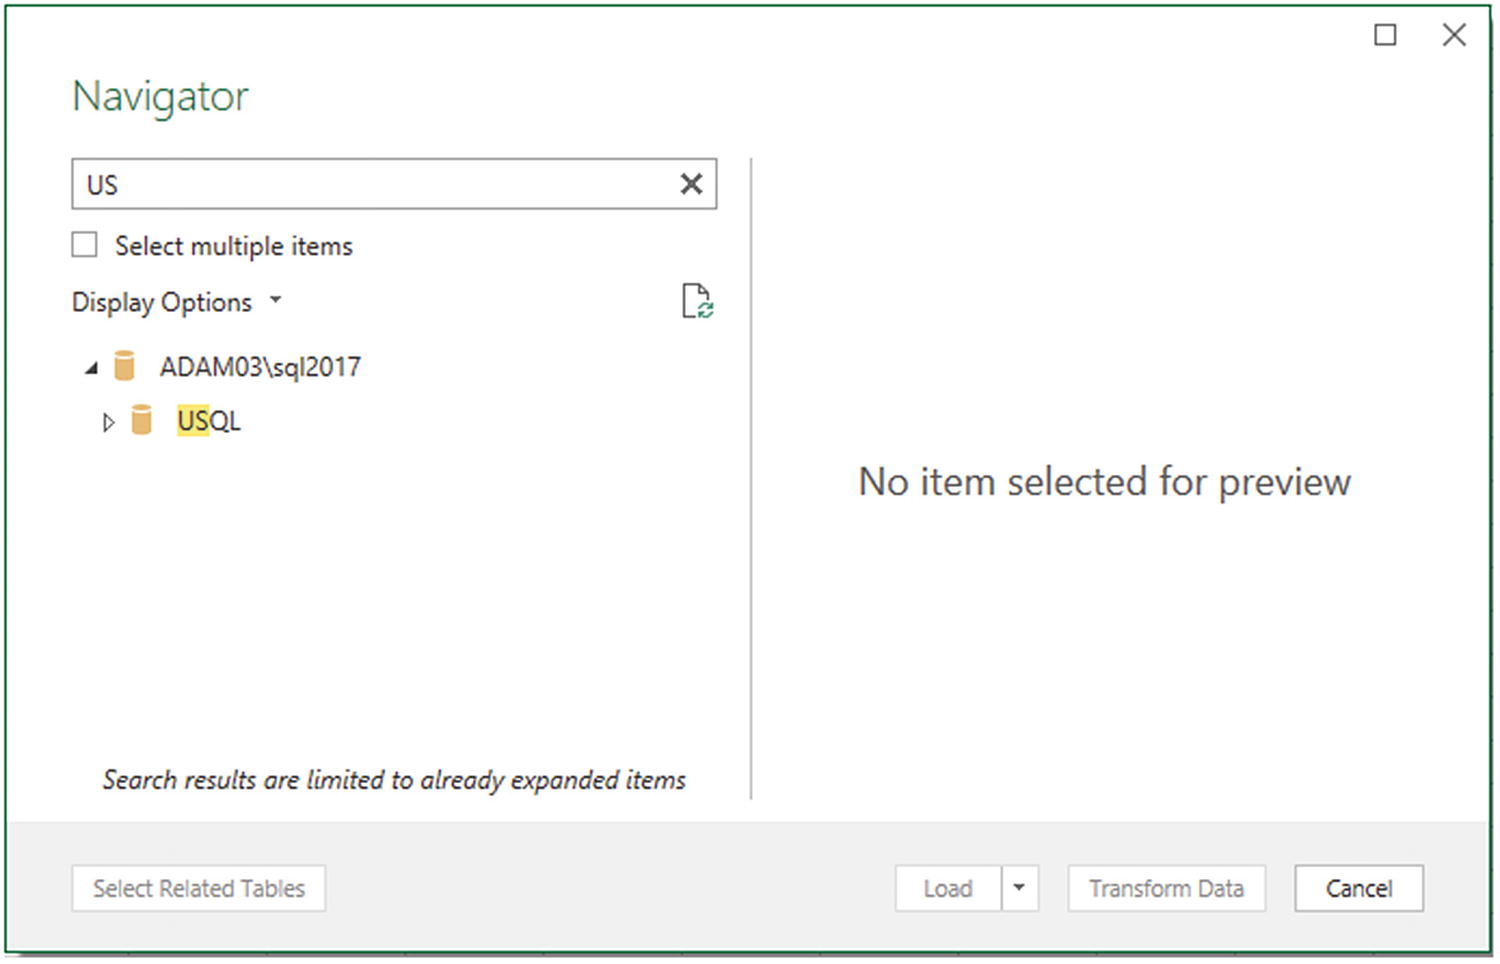
Using Search with Navigator to find databases
Searching for Tables
- 1.
Expand any databases that you want to search for specific tables.
- 2.
In the Search box of the Navigator dialog, expand the database that interests you and enter a few characters that you know are contained in the name of the table or view that you are looking for. Entering, for example, cust on my server gives the result that you see in Figure 3-6.
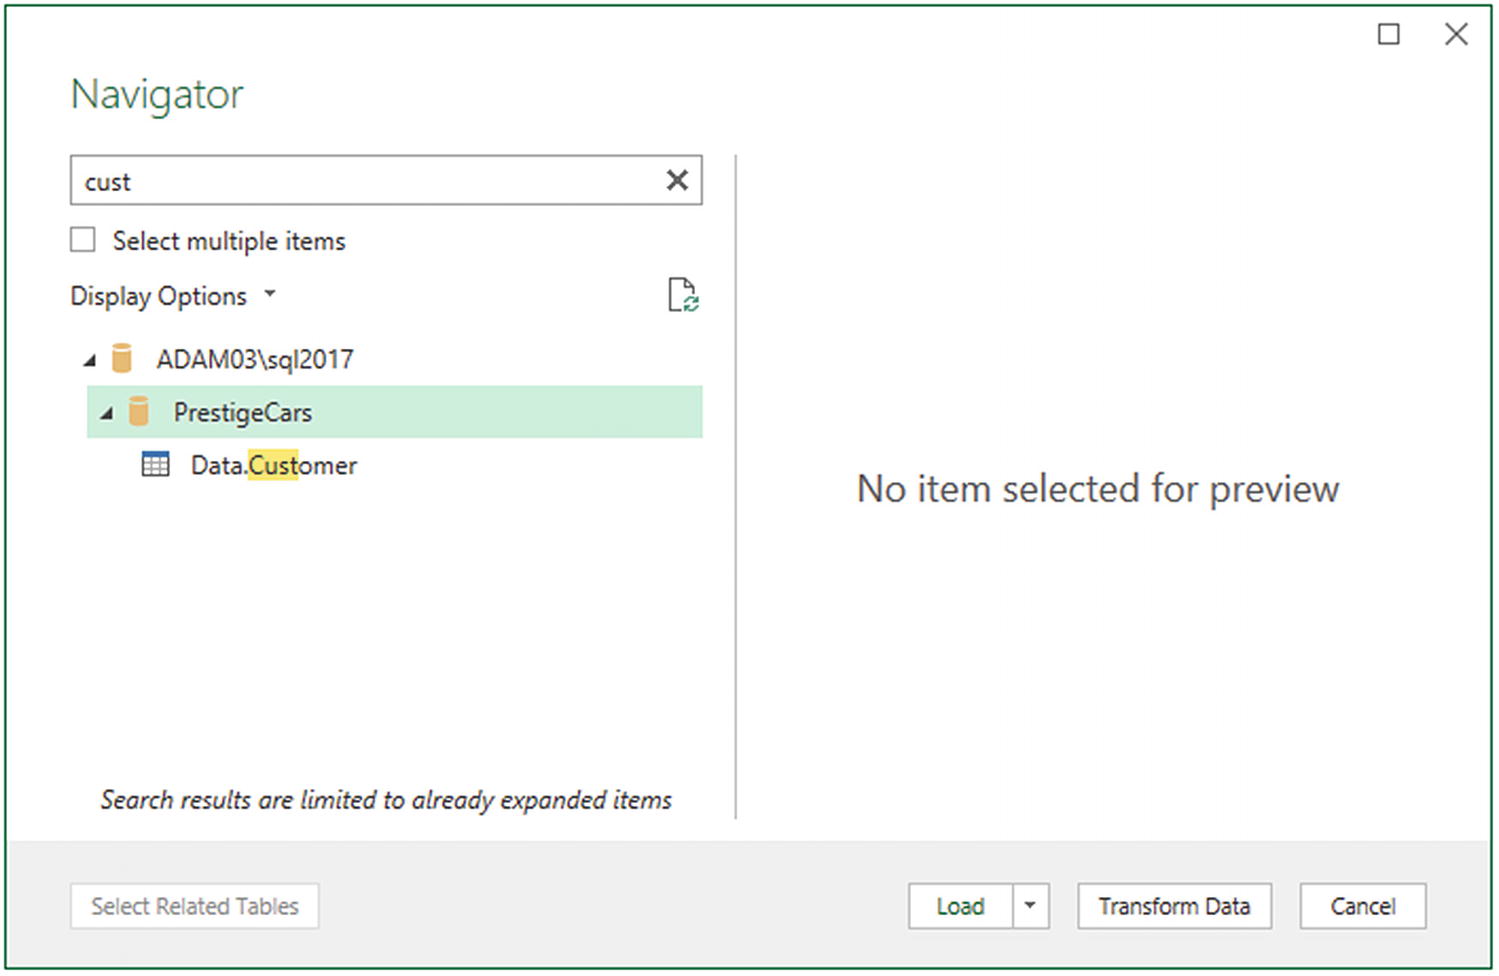
Using Search with Navigator to find tables
When searching for objects, you can enter the text in uppercase or lowercase (with most SQL Server installations), and the text can appear anywhere in the names of the tables or views—not just at the start of the name. With every character that you type, the list of potential matches gets shorter and shorter. Once you have found the table or view that you are looking for, simply proceed as described earlier to load the data into Excel with Power Query.
If your search does not return the subset of tables in any views that you were expecting, all you have to do is click the cross at the right of the Search box. This cancels the search and displays all the available tables, as well as clears the Search box.
If you are not convinced that you are seeing all the tables and views that are in the database, then click the small icon at the bottom right of the Search box (it looks like a small page with two green circular arrows). This is the Refresh button, which refreshes the connection to the database and displays all the tables and views that you have permission to see. Finally, it is worth noting that filtering tables can also be applied to Excel tables, worksheets, and named ranges as well as Access databases. This is another example of how the unified Navigator interface can help minimize the learning curve when it comes to mastering Power Query.
Database Security
Remember that databases are designed to be extremely secure. Consequently, you only see servers, databases, tables, and views if you are authorized to access them. You might have to talk to your IT department to ensure that you have the required permissions; otherwise, the table that you are looking for could be in the database, but remain invisible to you.
If you experience a connection error when first attempting to connect to SQL Server, simply click the Edit button to return to the Microsoft SQL Server database dialog and correct any mistakes. This avoids having to start over.
Using a SQL Statement
If there is a downside to using a relational database such as SQL Server as a data source, it is that the sheer amount of data that the database stores—even in a single table—can be dauntingly huge. Fortunately, all the resources of SQL Server can be used to filter the data that is accessed using Power Query before you even load the data. This way, you do not have to load entire tables of data at the risk of drowning in information before you have even started to analyze it.
SQL SELECT statements
Stored procedures
Table-valued functions
These are, admittedly, fairly technical solutions. Indeed, if you are not a database specialist, you could well require the services of your IT department to use these options to access data in the server. Nonetheless, it is worth taking a quick look at these techniques in case they are useful now or in the future.
- 1.
In the Data ribbon, click Get Data ➤ From Database ➤ From SQL Server Database. The SQL Server database dialog will appear.
- 2.
Enter the server name and the database. This will have to be a server and database that you have been granted access to.
- 3.
Click the triangle to the left of Advanced options. This opens a box where you can enter a SQL command.
- 4.
Enter the SQL command that you want to apply. In this example (using a server and database on my PC), it is SELECT CountryName, MakeName, ModelName, Cost FROM Data.AllSales ORDER BY CountryName. The dialog will look like Figure 3-7—only with your SQL in the SQL statement box, of course.
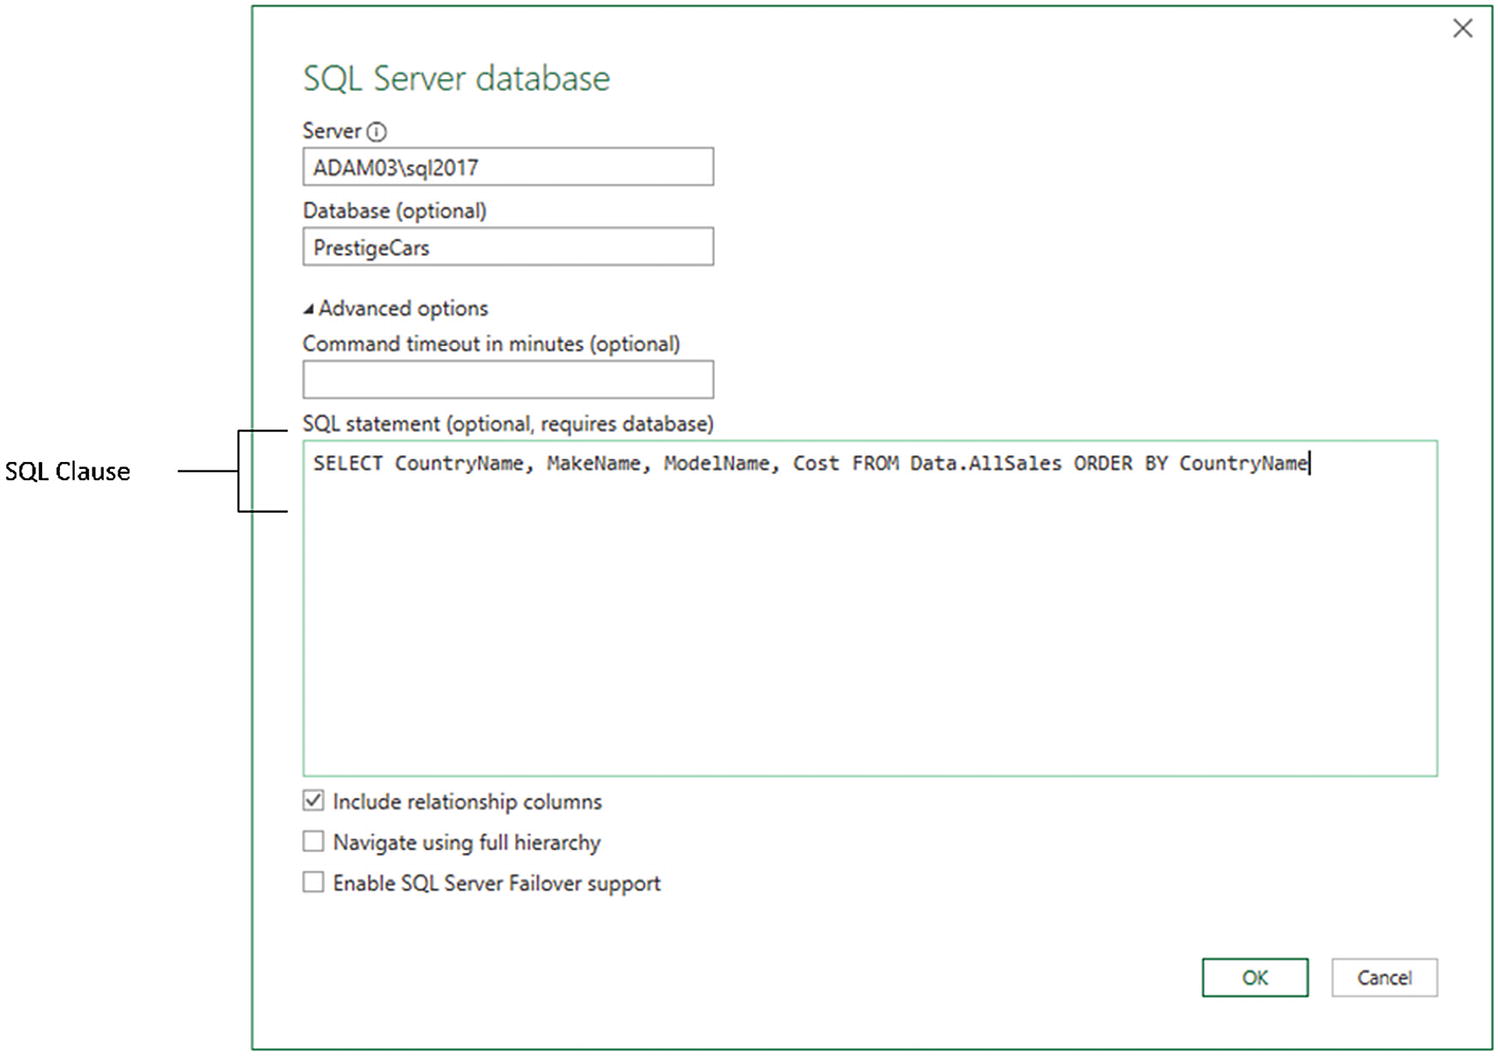
Using SQL to select database data
- 5.
Click OK. A sample of the corresponding data is eventually displayed in a dialog like the one shown in Figure 3-8. The actual data that is returned will depend on the source system that you are using.
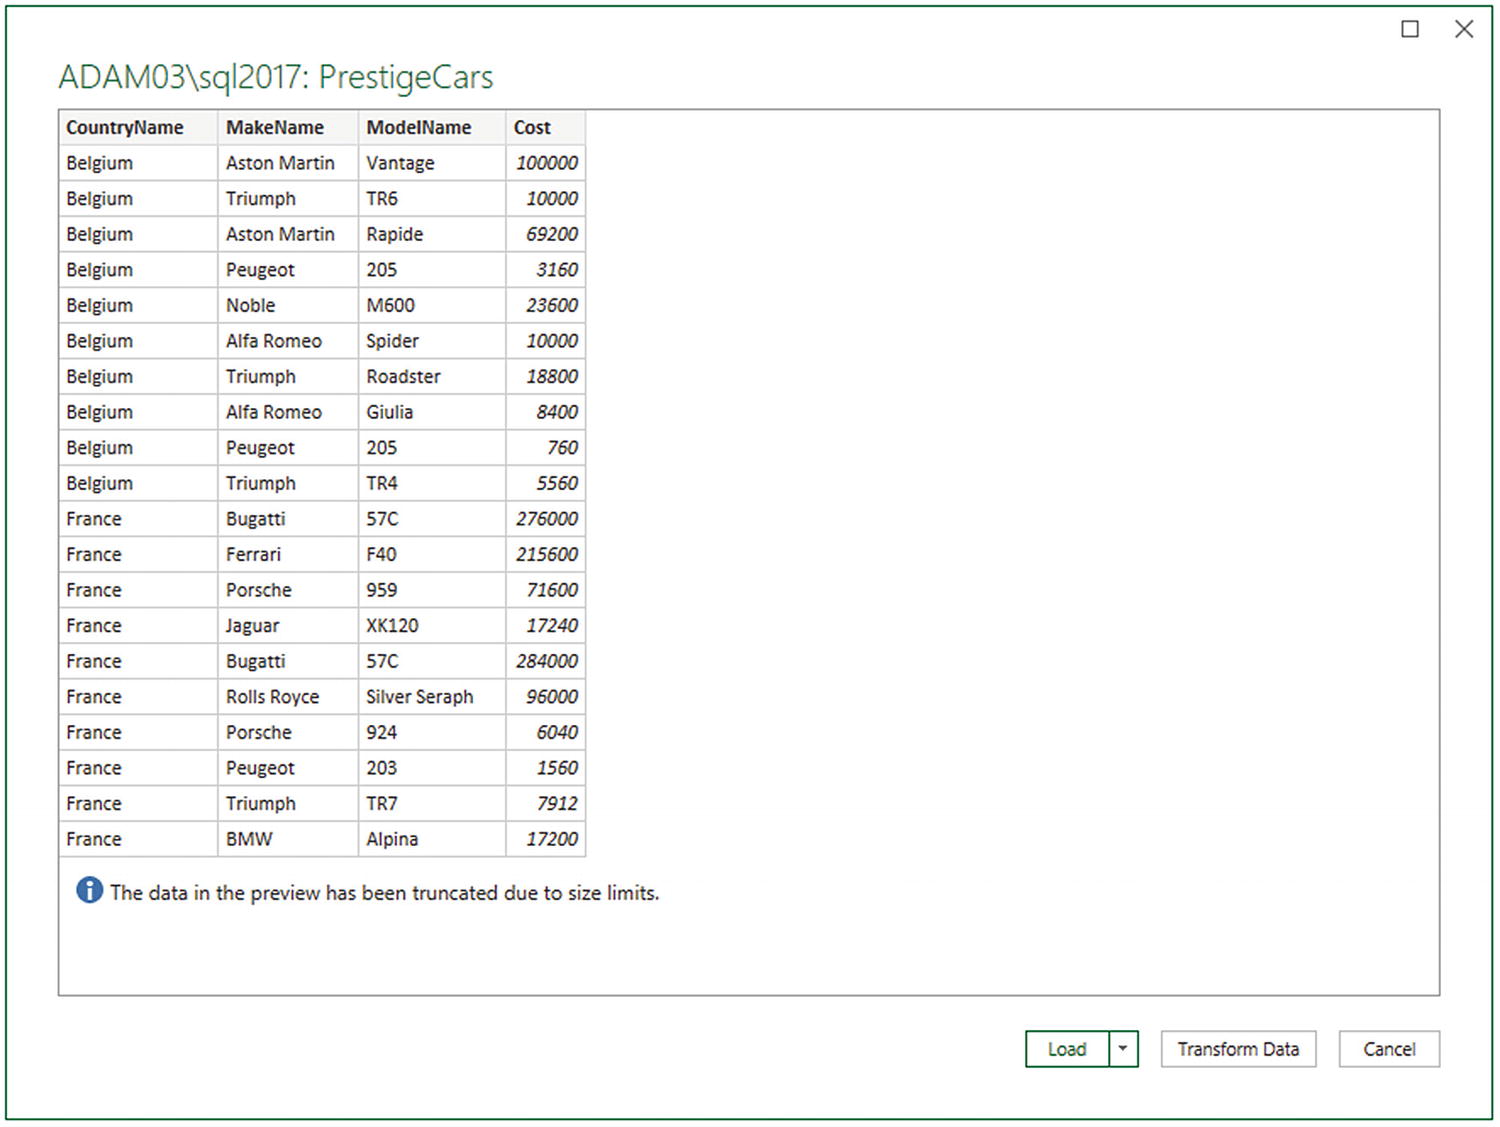
Database data selected using the SQL statement option
- 6.
Click Load or Transform Data to continue with the data load process. Alternatively, you can click Cancel and start a different data load.
When entering custom SQL (or when using stored procedures, as is explained in the following section), you should, preferably, specify the database name in step 3. If you do not give the database name, you will have to use a three-part notation in your SQL query. That is, you must add the database name and a period before the schema and table name of every table name used in the query.
Stored Procedures in SQL Server
Server: <your server name>
Database: <the database name>
SQL statement: EXECUTE (or EXEC) <enter the schema (if there is one, followed by a period) and the stored procedure name, followed by any parameters>
This way, either you or your IT department can create complex and secure ways to allow data from the corporate databases to be read into Power Query from databases.
In the Data ribbon, click Get Data ➤ From Database ➤ From SQL Server Database. The SQL Server database dialog will appear.
Enter the server name and the database.
Click the triangle to the left of Advanced options. This opens a box where you can enter a SQL command.
Enter the SQL command that you want to apply. In this case, it is EXECUTE dbo.pr_DisplayUKClientData. The dialog will look like Figure 3-9.
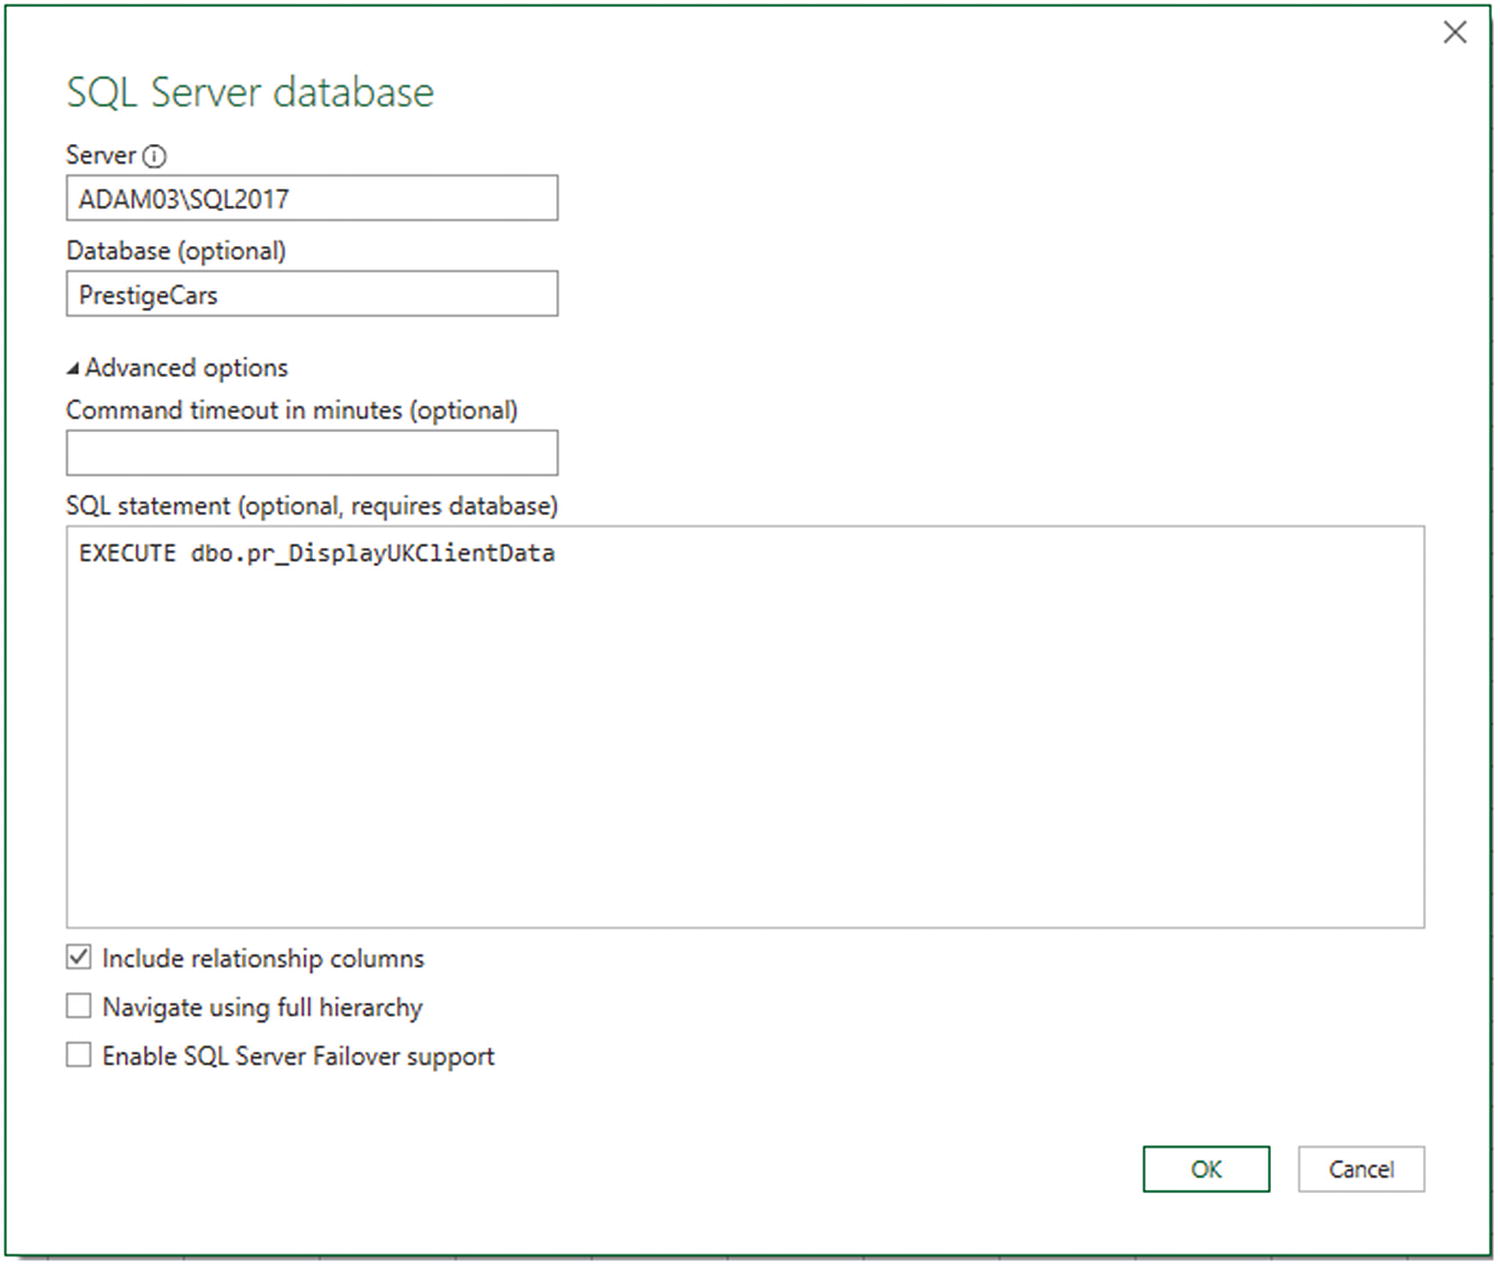
Using SQL to select database data
Click OK. A sample of the corresponding data is returned to the Navigator.
Click Load or Edit to continue with the data load process. Alternatively, you can click Cancel and start a different data load.
The data that is returned in this example is only a subset of the available data that has been selected by the stored procedure. You need to be aware that stored procedures can perform a multitude of tasks on the source data. These can include selecting, sorting, and cleansing the data.
In this specific example, the parameter is “2020”. If you need to enter multiple parameters, they must be comma-separated.
The key thing to remember—and to convey to your IT department—is that the SQL that Power Query expects is the flavor of SQL that the source database uses. So, for SQL Server, that means using T-SQL. In fact, this SQL becomes a “pass-through” query that is interpreted directly by the underlying database.
A SQL statement or stored procedure will only return data as a single table. Admittedly, this table could contain data from several underlying tables or views in the source database, but filtering the source data will prevent Power Query from loading data from several tables as separate queries. Consequently, you could have to create multiple queries rather than a single load query to get data from a coherent set of tables in the data source.
Oracle Databases
There are many, many database vendors active in the corporate marketplace today. Arguably the most dominant of them is currently Oracle . While I have used Microsoft data sources to begin the journey into an understanding of how to use databases with Power Query, it would be remiss of me not to explain how to access databases from other suppliers.
So now is the time to show you just how open-minded Power Query really is. It does not limit you to Microsoft data sources—far from it. Indeed, it is every bit as easy to use databases from other vendors as the source of your analytical reports. As an example of this, let’s take a look at loading Oracle data into Excel using Power Query.
Installing and configuring an Oracle database is a nontrivial task. Consequently, I am not providing an Oracle sample database, but will leave you either to discover a corporate database that you can connect to or, preferably, consult the many excellent resources available that do an excellent job of explaining how to set up your own Oracle database and install the sample data that is available.
Be aware that connecting to Oracle will require installing Oracle client software on the computer where you are running Power Query. This, too, can be complex to set up. So you might need some help from a corporate resource or a knowledgeable friend if you are planning to test using Oracle data with Power Query.
Both these links were active as this book went to press.
If you need to check which version of Power Query you are using (32 bit or 64 bit), click File ➤ Help ➤ About. You will see a dialog that tells you which version you are using.
- 1.
Open a new Excel workbook.
- 2.
In the Data ribbon, click Get Data ➤ From Database ➤ From Oracle Database.
- 3.
Enter the server name in the Server text box. This will be the name of your Oracle server or one of the Oracle server resources used by your organization.
- 4.
Click the Import button. The dialog will look like Figure 3-10.

The Oracle database dialog
- 5.
Click OK. The Oracle database security dialog will appear. Assuming that you are not authorized to use your Windows login to connect to the database, click Database on the left of the dialog.
- 6.
Enter the user name and password that allow you to log in to Oracle. You can see this dialog in Figure 3-11.
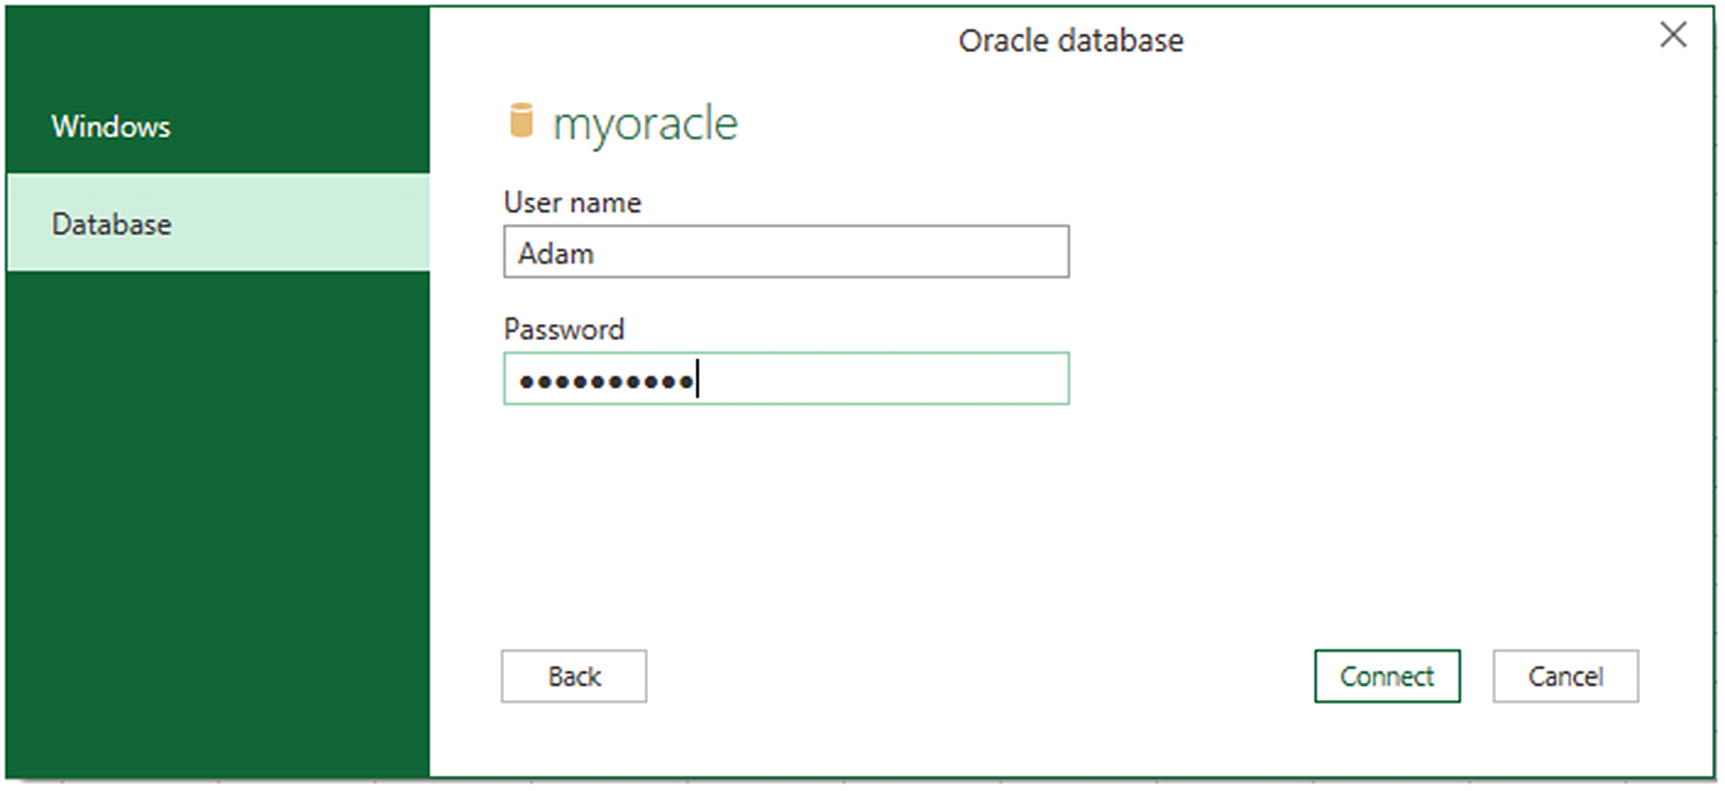
The Oracle database security dialog
- 7.
Click Connect. Power Query will connect to the server and display the Navigator dialog containing all the tables and views in the database that you have permission to see on the server you selected. In some cases, you could see a dialog saying that the data source does not support encryption. If you feel happy with an unencrypted connection, then click the OK button for this dialog.
- 8.
Expand the HR folder. This is a standard Oracle sample schema that could be installed on your Oracle instance. If not, you will have to choose another schema.
- 9.
Check the Select multiple items check box.
- 10.
Click the check boxes for the tables that interest you. The data for the most recently selected data appears on the right of the Navigator dialog, exactly as was the case with SQL Server.
- 11.
Click Load. The Queries & Connections pane will appear and show the query for each selected table.
If you have already followed the example earlier in this chapter to load data from SQL Server, you will probably appreciate how much the two techniques have in common. Indeed, one of the great advantages of using Power Query is that loading data from different data sources follows a largely similar approach and uses many of the same steps and dialogs. This is especially true of databases, where the steps are virtually identical—whatever the database.
Of course, no two databases are alike. Consequently, you connect to an Oracle instance (or server) but cannot choose a database as you can in SQL Server (or Sybase, for instance). Similarly, where Oracle has schemas to segregate and organize data tables, SQL Server has databases. Nonetheless, the Power Query Navigator will always organize data into a hierarchy of folders so that you can visualize the data structures in a clear, simple, and intuitive manner, whatever the underlying database.
Other Relational Databases
Table 3-1 at the start of this chapter contains the list of relational databases that Power Query could connect to as this book went to press. I imagine that the list has grown since this book was published. However, the good news is that you probably do not need much more information to connect to any of the databases that are available for you to use as data sources. Simply put, if you know how to connect to one of them, you can probably connect to any of them.
So I am not going to fill out reams of pages with virtually identical explanations of how to get data from a dozen or more relational databases. Instead I suggest that you simply try to connect, using the techniques that you have learned in this chapter for Oracle and SQL Server.
The server name
A database name (possibly)
A valid username (depending on the security that has been implemented)
A valid password for the user that you are connecting as (this, too, will depend on the security in place)
However, if you have these elements, then nothing should stop you from using a range of corporate data sources as the basis for your analysis with Power Query. You will, of course, need all the necessary permissions to access the database and the data that it contains.
It is also worth knowing that connecting to DB2, MySQL, PostgreSQL, Sybase, IBM Informix, IBM Netezza, SAP HANA, or Teradata can require not only that the database administrator has given you the necessary permissions but also that connection software (known as drivers or providers ) has been installed on your PC. Given the “corporate” nature of the requirements, it may help if you talk directly to your IT department to get this set up in your enterprise IT landscape.
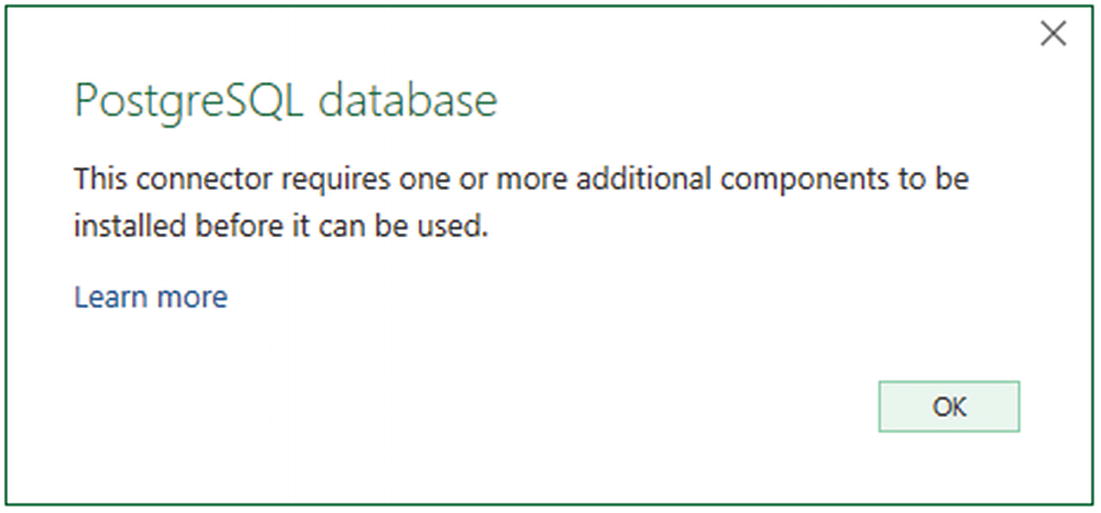
The missing driver alert
Clicking the “Learn more” link will take you to the download page for the missing drivers. Be warned, however, that configuring data providers can, in some cases, require specialist knowledge as well as local admin rights on the computer where the drivers have to be installed.
Microsoft SQL Server Analysis Services Data Sources
An Analysis Services database is a data warehouse technology that can contain vast amounts of data that has been optimized to enable decision making. SSAS cubes (as these databases are also called) are composed of facts (measures or values) and dimensions (descriptive attributes).
In fact—and with apologies to data warehouse purists—an SSAS cube is, essentially, a gigantic pivot table. So, if you have used pivot tables in Excel, you are ready to access data warehouse sources in Power Query and slice and dice the data they contain.
In this section I will be explaining access to dimensional (disk-based) SSAS data warehouses. I explain tabular SSAS in the next section.
Please note that there is no sample SSAS database supplied with this book. This is because installing and configuring SSAS is a considerable task that requires specialist knowledge. So I will leave you to obtain the login details for your corporate Analysis Services database(s) and use those to experiment with.
- 1.
In the Data ribbon, click Get Data ➤ From Database ➤ From Analysis Services Database (Import).
- 2.
Click Connect. The SQL Server Analysis Services database dialog will appear.
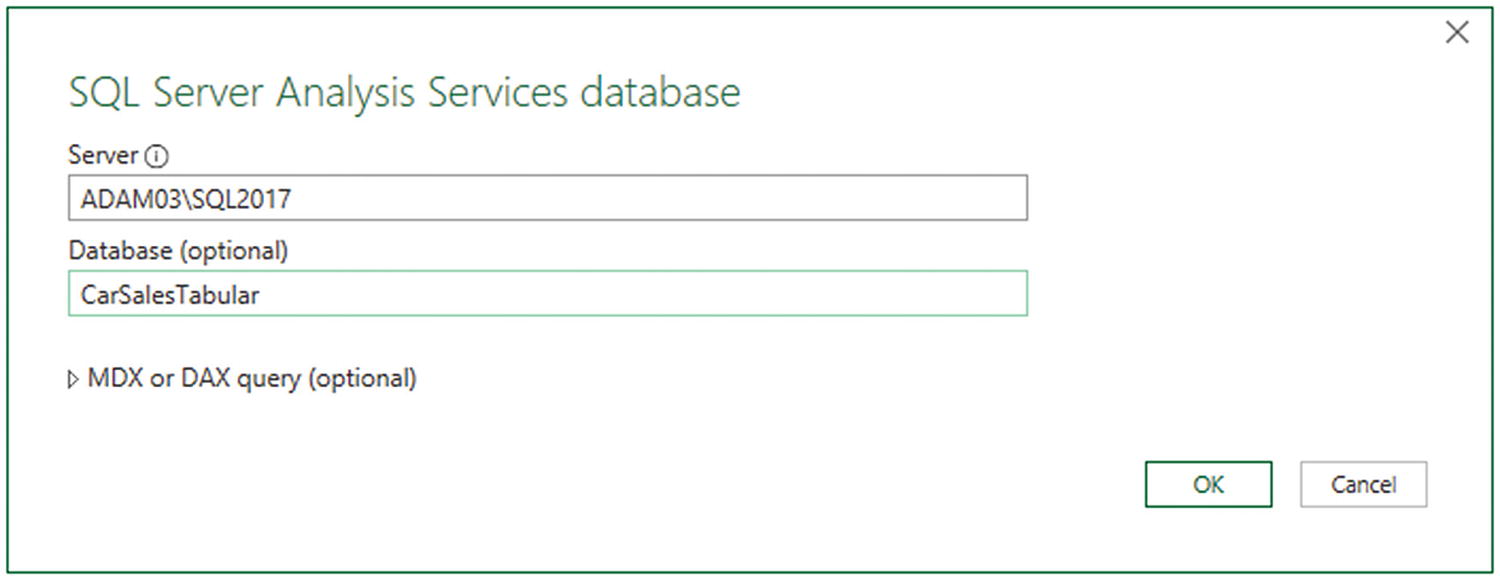
- 3.
Enter the Analysis Services server name and the database (or “cube”) name. The database I am using here is called CarSalesOLAP; you will have to specify your own SSAS database name. In any case, you will need to use the name of your own SSAS server. The dialog will look something like the one shown Figure 3-13—only with your server and database names, of course.
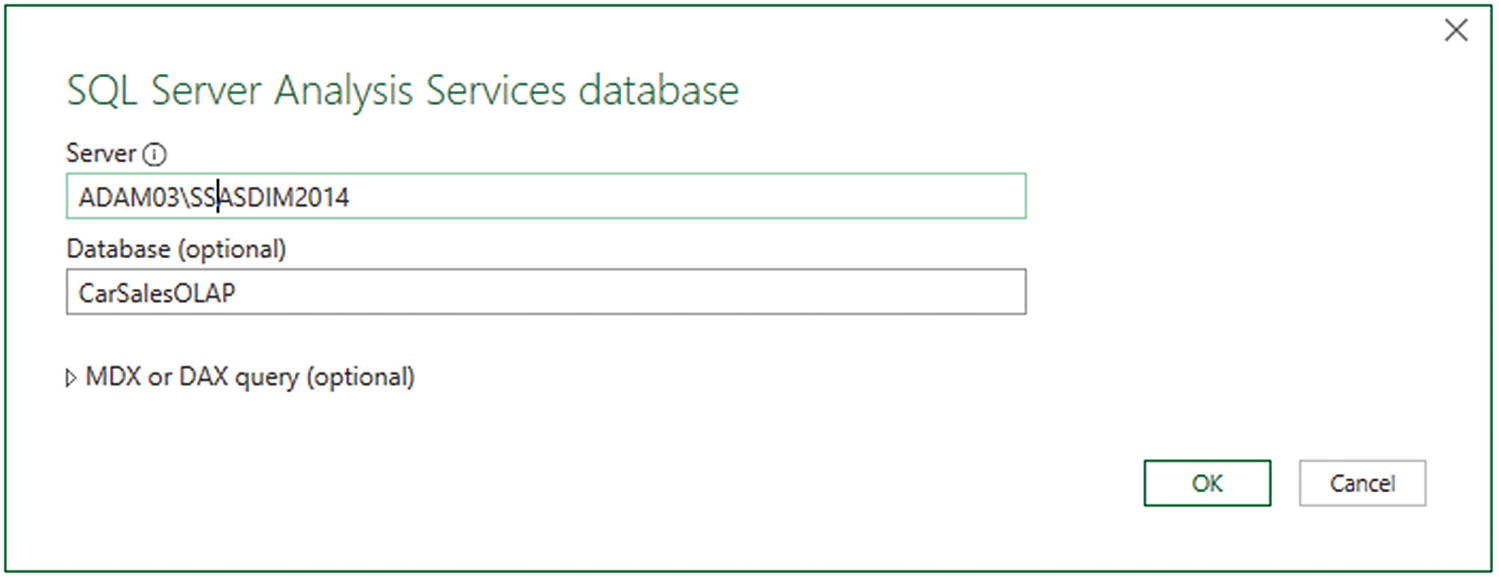
Connecting to an SSAS (multidimensional) database
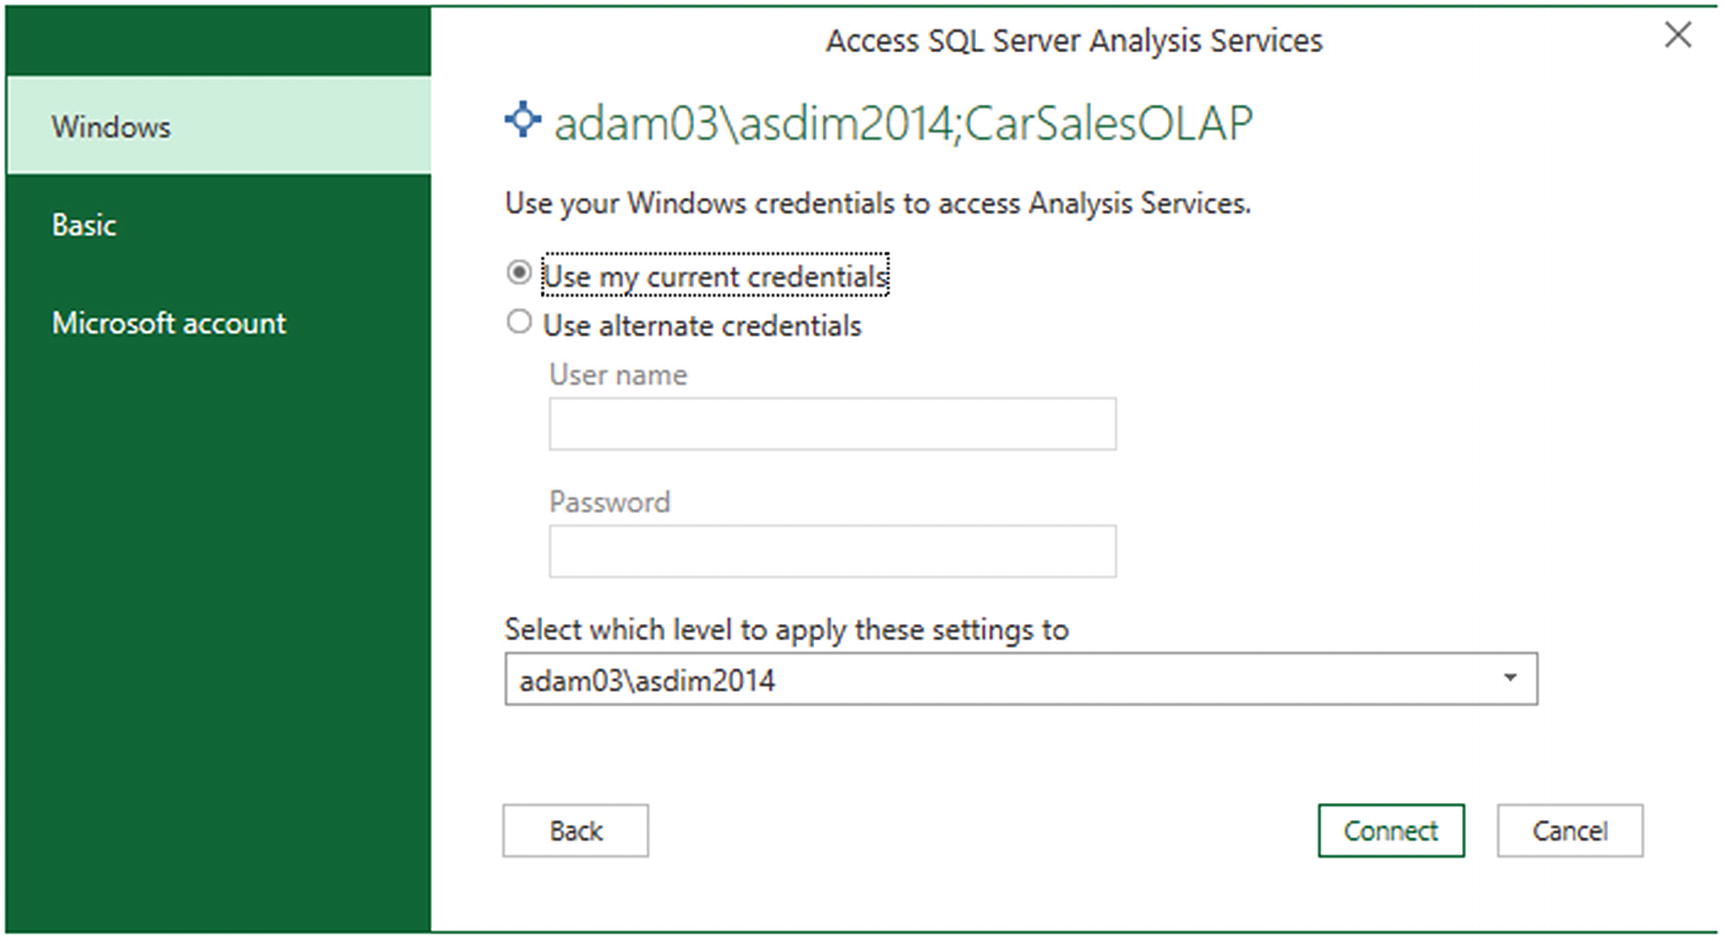
Specifying the appropriate security when connecting to an SSAS (multidimensional) database
- 4.
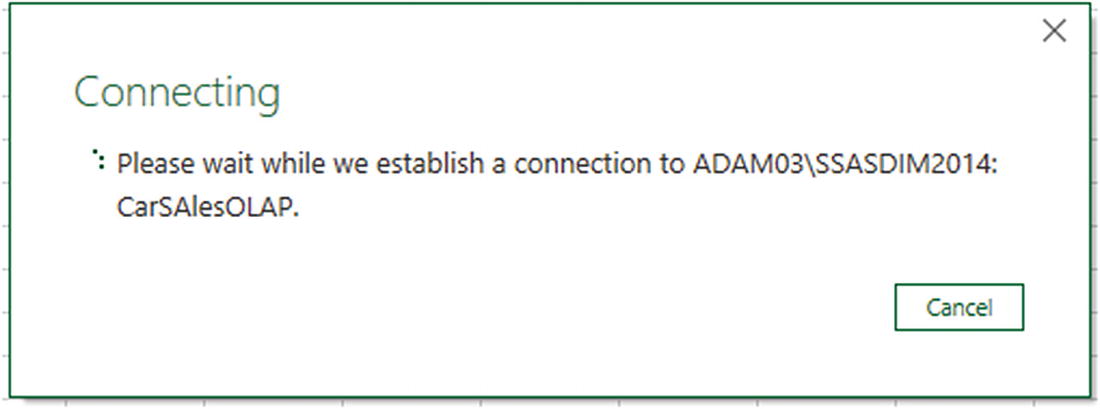
Click Connect. You will probably see the Connecting dialog, briefly, as shown in Figure 3-15.
SQL Server Analysis Services credentials dialog
- 5.
The Navigator dialog will appear. Expand the folders in the left pane of the dialog. This way, you can see all the fact tables and dimensions contained in the data warehouse.
- 6.
Select the fact tables, dimensions, or even only the dimension attributes and measures that you want to load. On my laptop, the dialog looks something like Figure 3-16. Obviously, you will see the fact tables and dimensions that are hosted by the Analysis Services instance that you are connecting to.
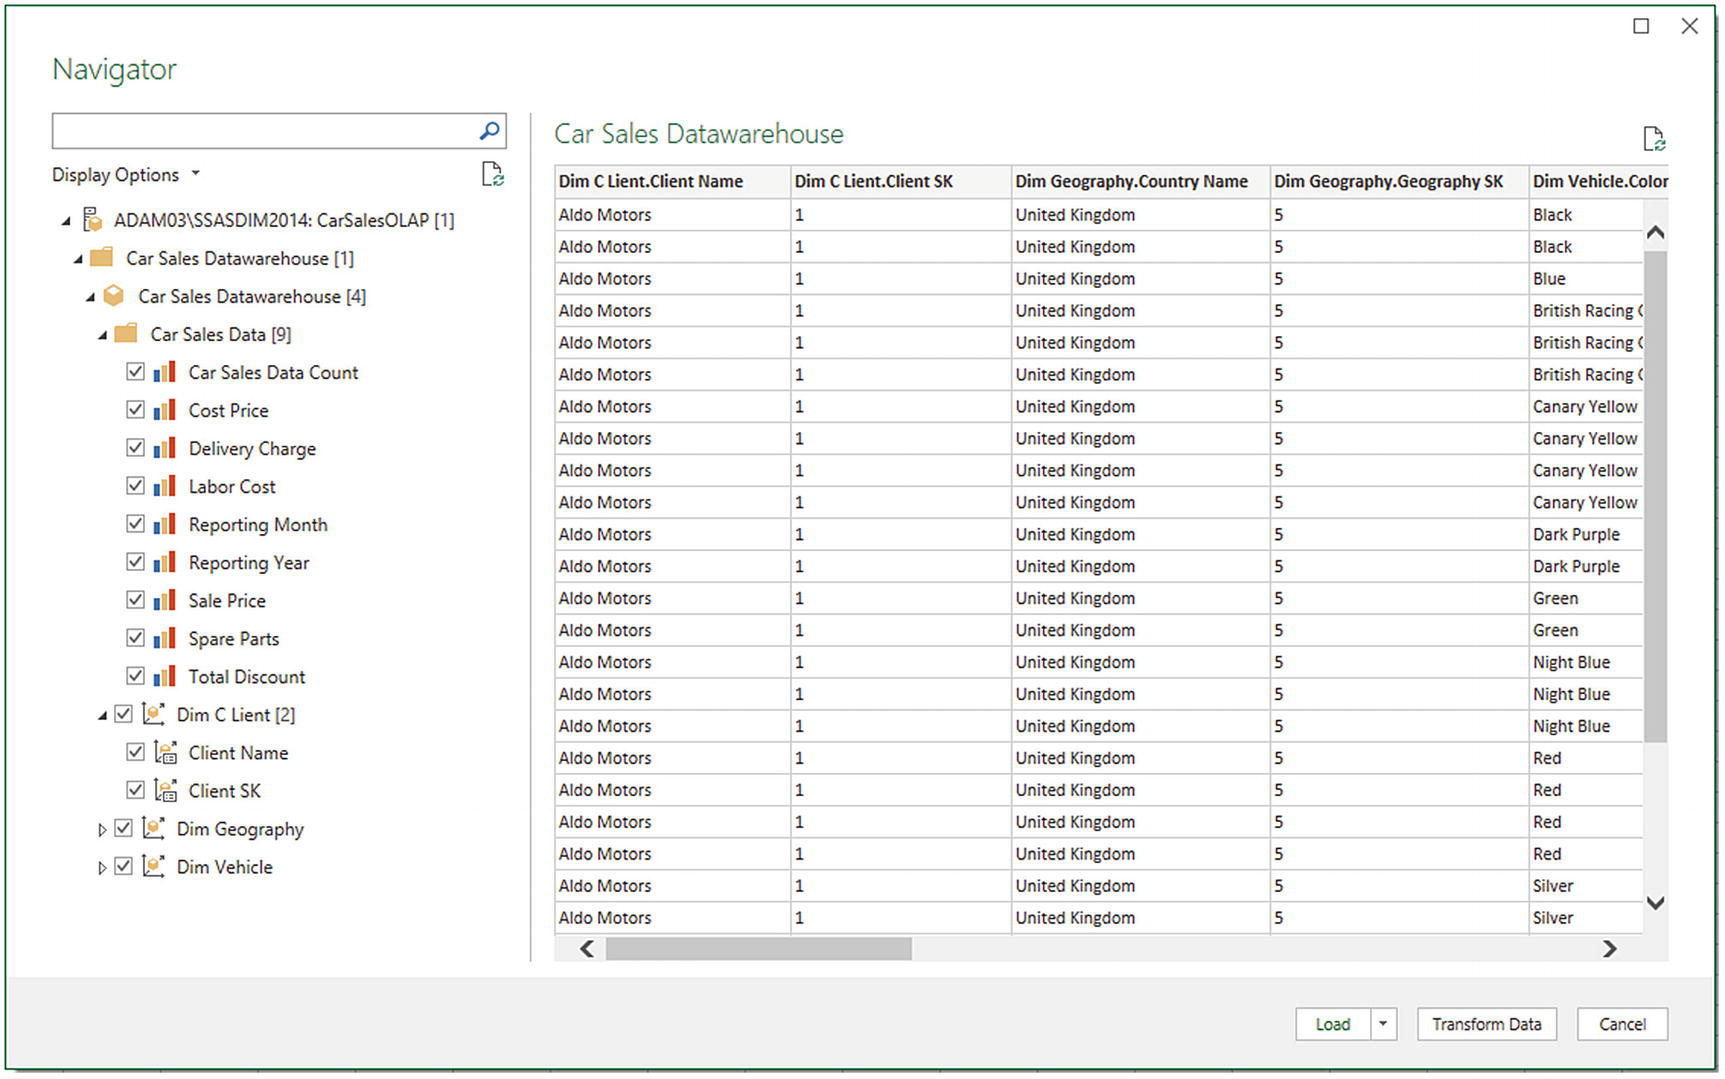
Selecting attributes and measures from an SSAS cube
- 7.
Click Load. The Queries & Connections pane will display a new query, and the measures and attributes that you selected will appear in a new worksheet. You can see an example of this in Figure 3-17.
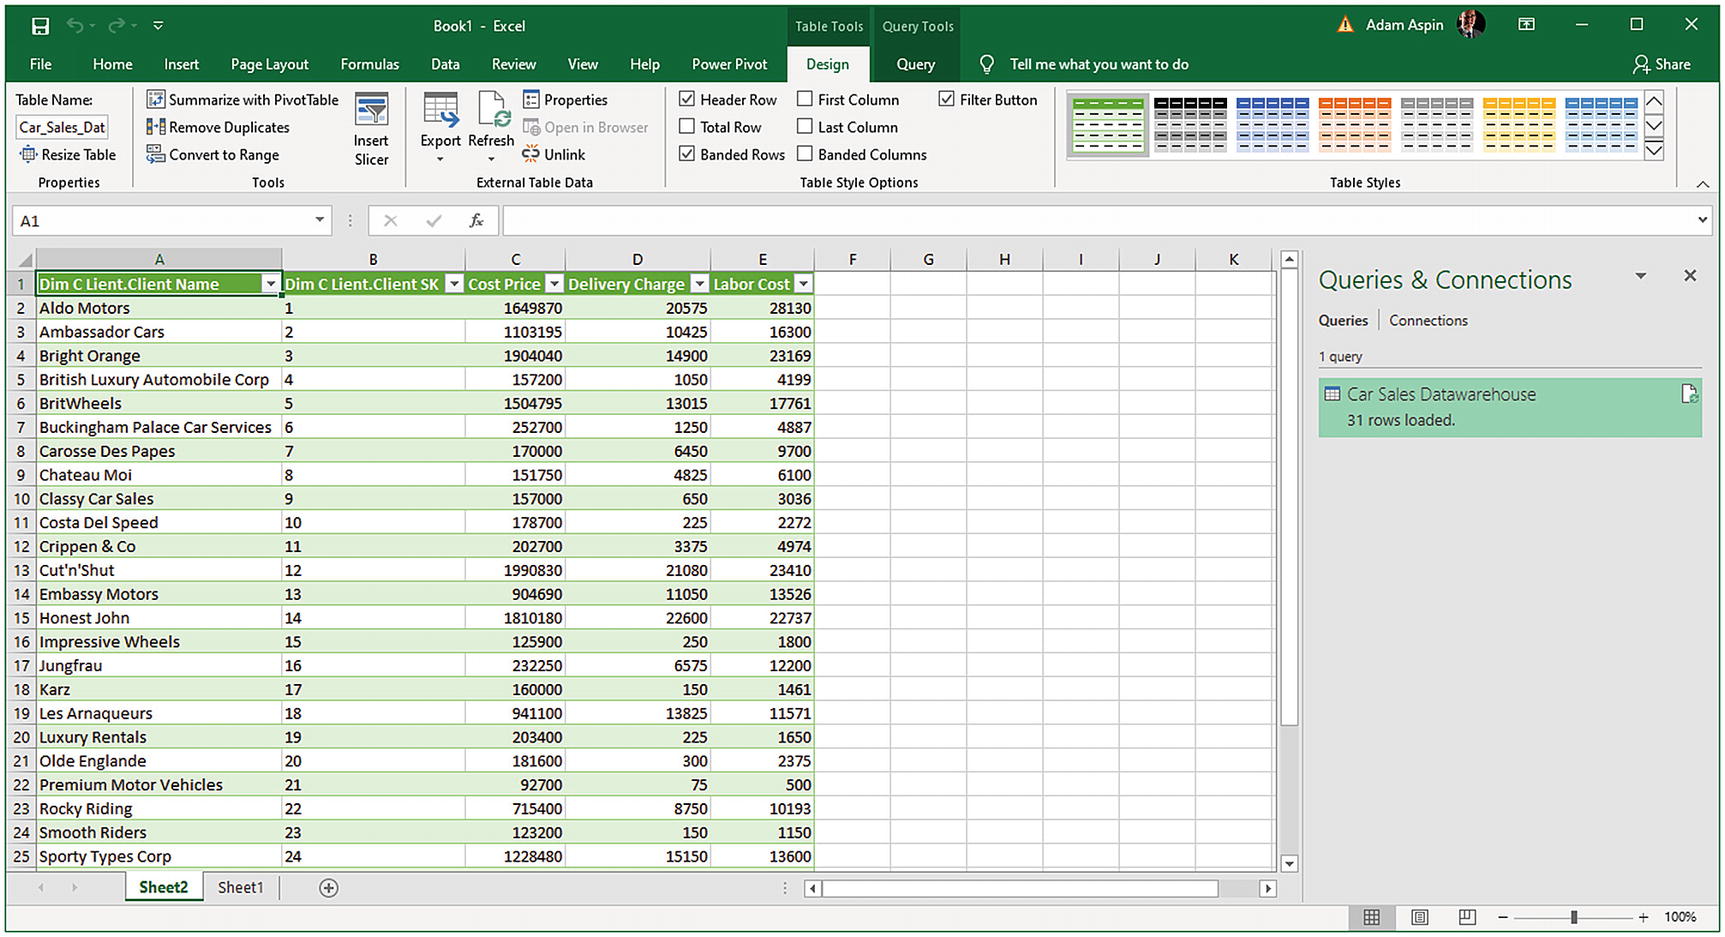
The output from an SSAS cube in an Excel worksheet
In step 7 you can, of course, click the popup triangle at the right of the Load button and choose from the other possible load options that you saw in Chapter 2.
If you did not enter the cube (database) name in step 3, then the Navigator dialog will display all the available cubes on the SSAS server. From here you can drill down into the cube that interests you to query the data you require.
SSAS cubes are potentially huge. They can contain dozens of dimensions, many fact tables, and literally thousands of measures and attributes. Understanding multidimensional cubes and how they work is beyond the scope of this book. Nonetheless, it is important to understand that for Power Query, a cube is just another data source. This means that you can be extremely selective as to the cube elements that you load into Power Query and only load the elements that you need for your analysis. You can load entire dimensions or just a few attributes, just like you can load whole fact tables or just a selection of measures.
You can filter the data that is loaded from an SSAS cube by expanding the MDX or DAX query (optional) item in the SQL Server Analysis Services database dialog. Then you can enter an MDX query in the box that appears before clicking OK. Be warned that “classic” (on-disk) SSAS cubes use queries written in MDX—a specialist language that is considered not easy to learn. The good news is that if an Analysis Services expert has set up a cube correctly, you can see SSAS display folders in the Query Editor.
From Analysis Services
From Analysis Services Database (Import)
From Analysis Services
The first is the one you saw in the previous section and is a totally standard Power Query connection process. The second has, surprisingly, nothing to do with Power Query at all. It is, in fact, an older type of connection that has existed in Excel since the 2007 version. It is called an Office Data Connection.
So, even if this type of connection cannot be used in the context of Power Query (and therefore is, technically, outside the scope of this book), I prefer to explain it anyway—even if this is only to clear up the confusion felt by many users when faced with these two different methods of accessing SSAS data.
- 1.
In the Data ribbon, click Get Data ➤ From Database ➤ From Analysis Services Database. The Connect to Database Server dialog will appear.
- 2.
Enter the Analysis Services server name as shown in Figure 3-18. You will, of course, have to use your Analysis Services instance name.
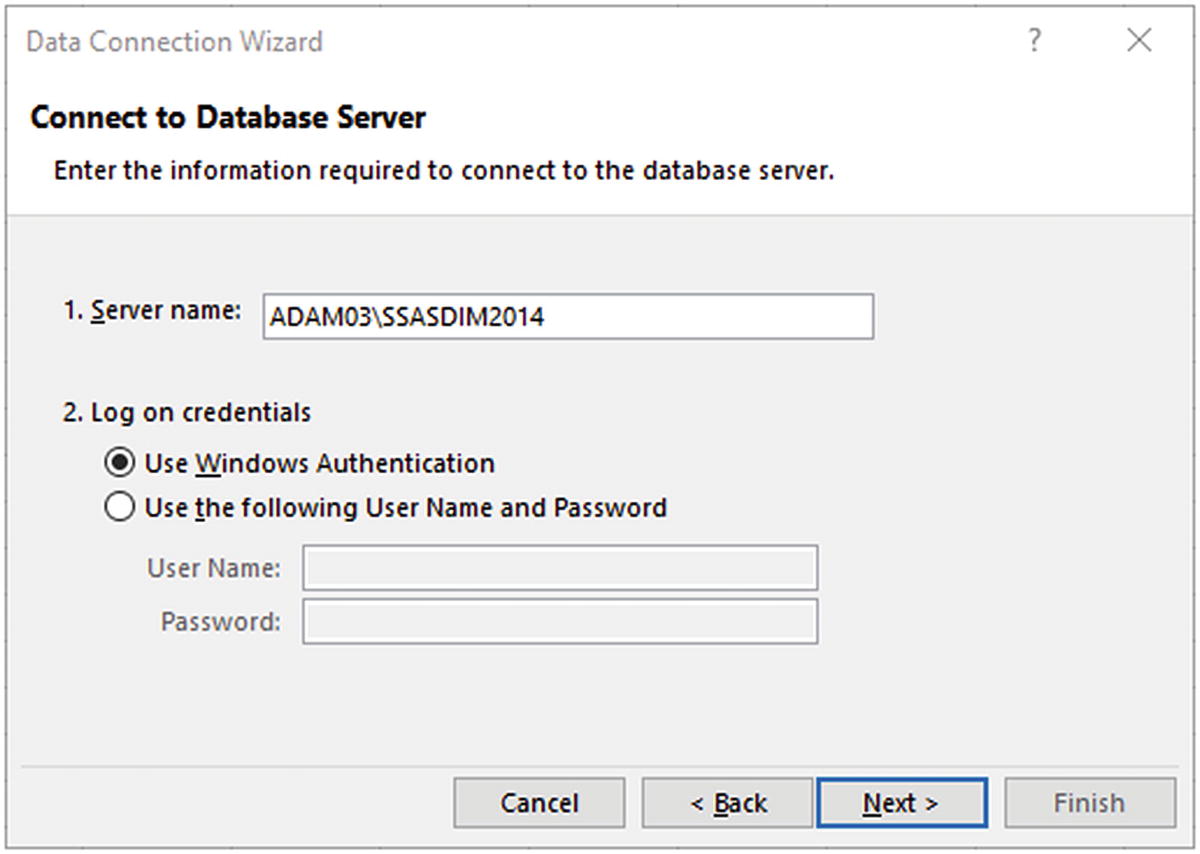
The Connect to Database Server dialog
- 3.
Click Next. The Select Database and Table dialog will appear, as shown in Figure 3-19. Here you can select from any available databases on the Analysis Services server.
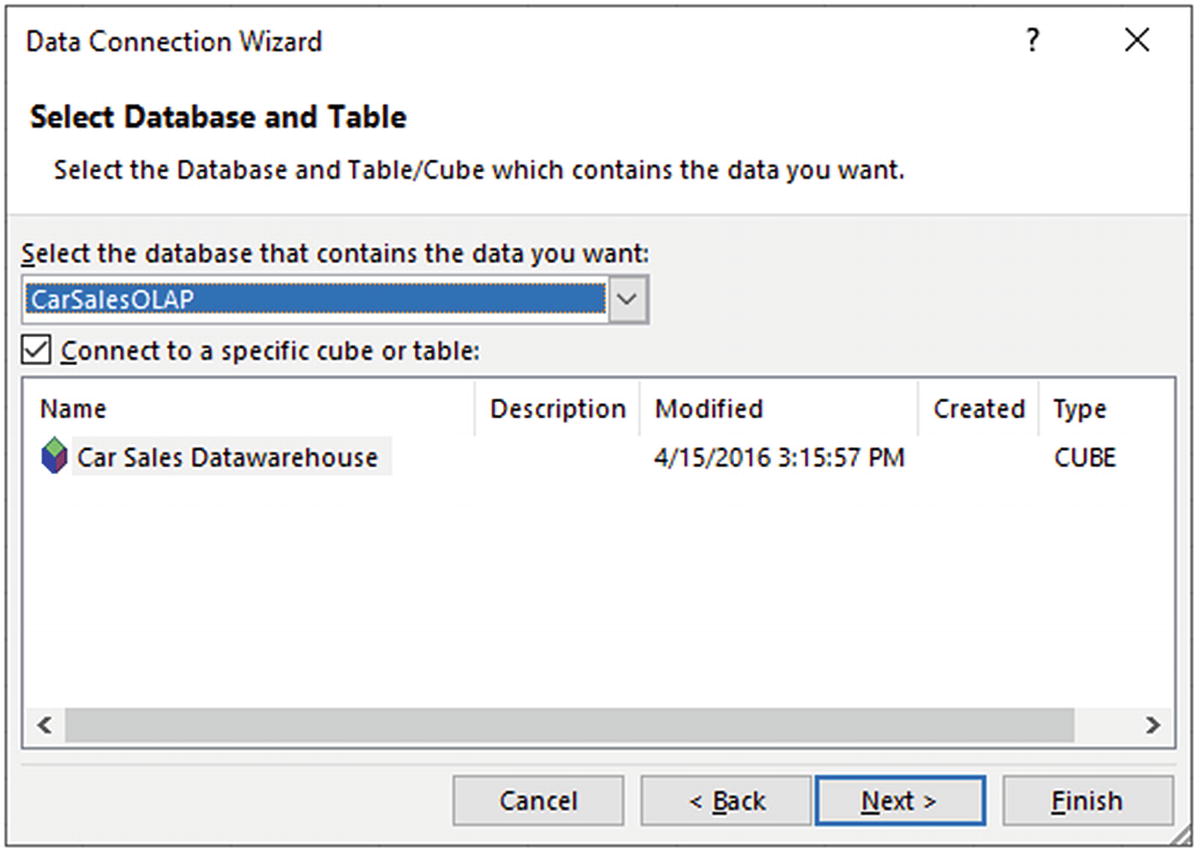
The Select Database and Table dialog
- 4.
Click Next. The Save Data Connection File and Finish dialog will appear, as shown in Figure 3-20. Here you can add a description and a friendly name that will help you—or other users—to identify this connection from those available.
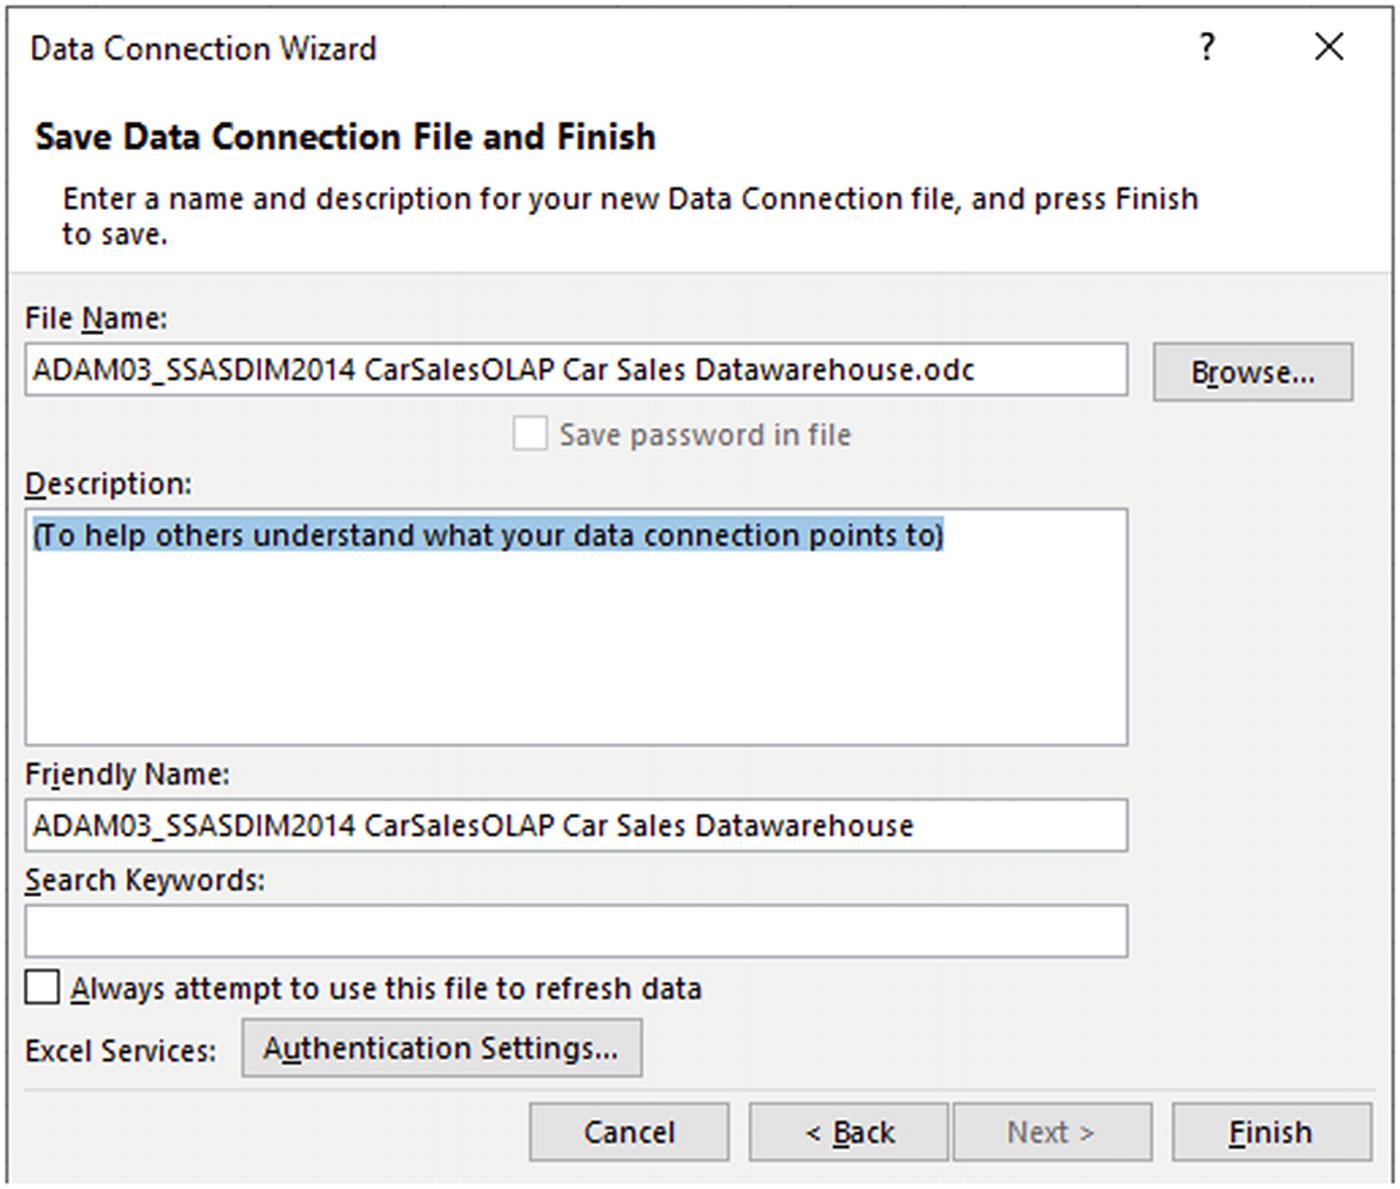
The Save Data Connection File and Finish dialog
- 5.
Click Finish. The Import Data dialog will appear, as shown in Figure 3-21. This offers slightly more restricted choices that you saw previously when using Power Query to connect to Analysis Services.
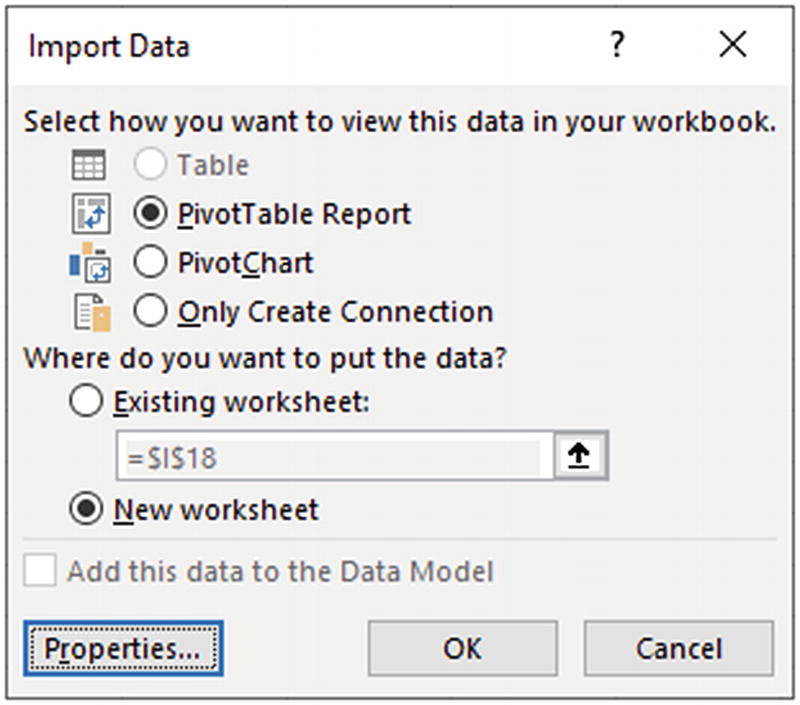
The Import Data dialog
- 6.
Click OK. Excel will create a pivot table (or a pivot chart if this is what you have selected) based on the Analysis Services data in either a new or an existing worksheet.
I must reemphasize that the source data cannot be cleansed, modeled, or tweaked in Power Query when you are using this type of connection and that, consequently, you will not see a query appear in the Queries & Connections pane.
SSAS Tabular Data Warehouses
The “traditional” dimensional cube
The “newer” tabular data warehouse
As more and more data warehouses (at least the ones that are based on Microsoft technologies) are being built using the newer, tabular technology, it is probably worth your while to see how quickly and easily you can use to connect to these data sources with Power Query. Indeed, the steps that you follow to connect to either of these data warehouse sources are virtually identical. However, as Power Query is rapidly becoming the tool of choice to query tabular data warehouses, it is certainly worth a few minutes to learn how to use it to connect to SSAS tabular (as it is often called, for short).
- 1.
In the Data ribbon, click Get Data ➤ From Database ➤ From Analysis Services Database (Import). The SQL Server Analysis Services database dialog will appear.
- 2.
Enter the Analysis Services server name and the tabular database name (we don’t tend to call these cubes). Here, the database is CarSalesTabular on my PC; you will have to specify your own tabular database name. In any case, you will need to use the name of your own SSAS server.
- 3.
Click Import.
- 4.
The dialog will look like Figure 3-22.
Connecting to an SSAS (multidimensional) database
- 5.
Click OK. If this is the first time that you are connecting to the tabular data warehouse, then the Access SQL Server Analysis Services dialog will appear so that you can define the credentials that you are using to connect to the Analysis Services database, where you will have to accept or alter the credentials. You can see this dialog in Figure 3-23.

The credentials dialog
- 6.
Click Connect. The Navigator dialog will appear.
- 7.
Expand the folders in the left pane of the dialog. This way, you can see all the tables contained in the data warehouse. These may—or may not—be structured as facts and dimensions as was the case with a “classic” SSAS data warehouse.
- 8.
Select the tables that you want to load. The dialog will look something like Figure 3-24.
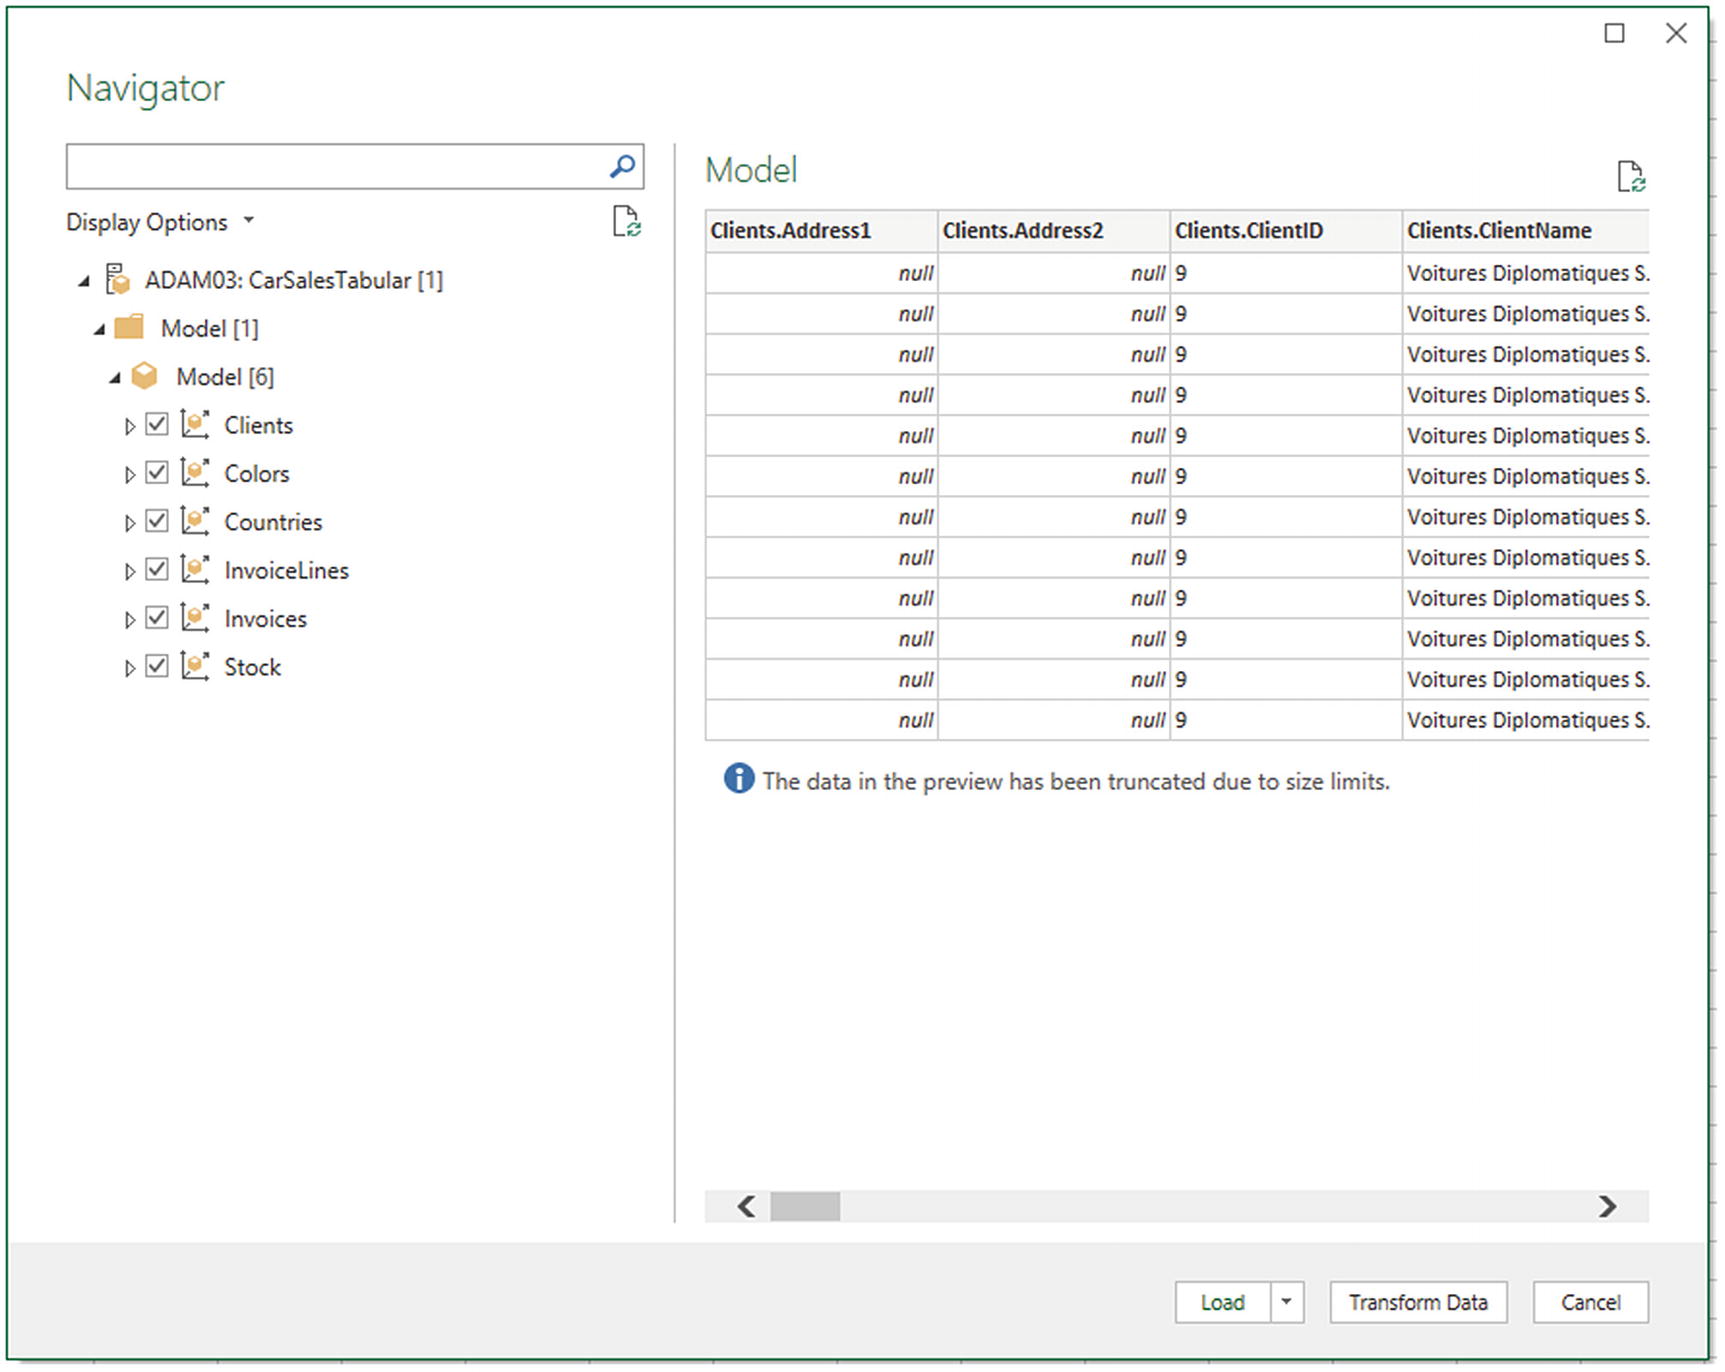
Selecting attributes and measures from an SSAS tabular data source
- 9.
Click Load. The data will be loaded (most probably into a new worksheet—but this will depend on your environment).
You can filter the data that is loaded from an SSAS tabular database by expanding the MDX or DAX query (optional) item in the SQL Server Analysis Services database dialog. Then you can enter a DAX query in the box that appears before clicking OK. SSAS tabular databases use queries written in a specific language called DAX.
Types of Credentials When Connecting
When connecting to just about any database—be it a Microsoft database such as SQL Server or Analysis Services or one of the non-Microsoft databases for which there are connectors available in Excel—you will have to choose how to be authenticated by the database. This will involve specifying the type of credentials that you want to pass through to the database from which you want to extract data.
Windows: This means using your Windows login to the corporate network or local workgroup to authenticate against the database. This presumes that your Windows login has been given the rights to access the database and the data it contains.
Basic: This means entering a user name and password that will be recognized by the database that has been given the rights to access the database and the data it contains. Clearly you will need to have this information to hand before attempting this kind of connection.
Microsoft account: This means using your Microsoft account to access the database and the data it contains. Once again, this account must have been given the rights to access the database and the data it contains.
Power Query saves a data source credential, or sign-in identity, for each data source connection you have used.
Unable to Connect
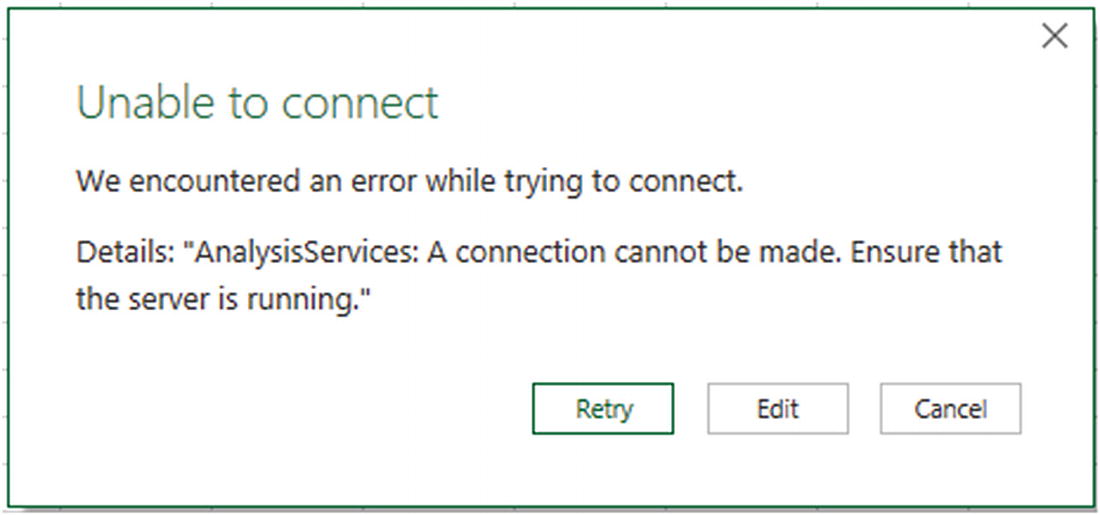
The Unable to connect dialog
Quite simply, the solution is to click the Edit button, which will redisplay the connection dialog for this specific data source. Then you enter the correct connection information—and try to connect, again.
Other Database Connections
Power Query does not limit you to a predefined set of available data sources. Provided that your source database comes complete with one of the generic data providers—ODBC or OLE DB—then Power Query can, in all probability, access these sources too. You will learn about these in Chapter 5.
Conclusion
In this chapter, you have seen how to connect Power Query to some of the plethora of databases and data warehouses that currently exist. Moreover, you have seen that Power Query comes equipped “out of the box” with connections to some of the most widely used databases that currently exist in a corporate environment.