If you take a good look at the Get Data options, you will find that there are currently 40 data sources for which Power Query connectors are available. However, even this range of connectors pales into insignificance when faced with the vast array of potential source data repositories. So what can you do when faced with a source of external data that is not among those currently available?
ODBC data
OLE DB data
OData feeds
You depend on external providers of third-party software.
Documentation is sparse or incomprehensible to the nontechnical user.
You are on your own if you encounter any technical challenges.
Despite these caveats, the main generic connectors do, nonetheless, open up the possibility of connecting to and ingesting data from an immense range of potential sources of external data. So I always advise attempting to make these connections work if you possibly can, as the results are often much simpler and better than attempting to export source data as text or CSV files and then loading them.
If you wish to practice the ODBC and OLE DB connections described in this chapter, you will need to have access to source data that has these connection types enabled. In other words, you will need to have ODBC or OLE DB drivers already installed and functioning.
ODBC Sources
As you have seen in this book so far, Excel can connect to a wide range of data sources. However, there will always be external applications for which there is no specific connector built in to Excel.
This is where a generic solution called Open Database Connectivity (or ODBC) comes into play. ODBC is a standard way to connect to data sources, most of which are databases or structured like databases. Simply put, if an ODBC driver exists for the application that you want to connect to, then you can load data from it into Excel.
Hundreds of ODBC drivers have been written. Some are freely available; others require you to purchase a license. They exist for a wide spectrum of applications ranging from those found on most PCs to niche products. Some products have an ODBC driver that is installed with the application itself; others require you to download an ODBC driver separately. Some ODBC drivers are freely distributed, whereas others require you to purchase a license.
Although ODBC is designed as a standard way of accessing data in applications, each ODBC driver is slightly different from every other ODBC driver. Consequently, you might have to spend a little time learning the quirks of the interface for the driver that you want to use with the application that you want to connect to.
In this section, we will use FileMaker Pro as a data source. This product is a desktop and server database system that has been around for quite some time. However, there is currently no specific Power Query connector for it. The good news is that FileMaker Pro does have an ODBC driver. So we will use FileMaker Pro as an example of how to use ODBC to connect to Excel using Power Query.
I have to add that I am not expecting you to install a copy (even if it is only a trial copy) of FileMaker Pro and its companion ODBC driver to carry out this exercise. What I do want to explain, however, is how you can use ODBC to connect to a data source where an ODBC driver is available. So feel free to download and install FileMaker Pro and its ODBC driver if you wish, but you will have to refer to the FileMaker Pro documentation for an explanation of how to do this.
- 1.
Run the ODBC Data Source Administrator app. This is normally in the folder C:ProgramDataMicrosoftWindowsStart MenuProgramsAdministrative Tools. Be sure to use the 64-bit version if you are using 64-bit Excel or the 32-bit version if you are using 32-bit Excel.
- 2.
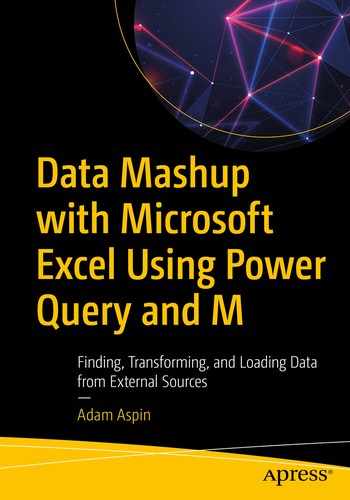
Click the System DSN tab. You should see the dialog shown in Figure 5-1.
The ODBC Data Source Administrator
- 3.
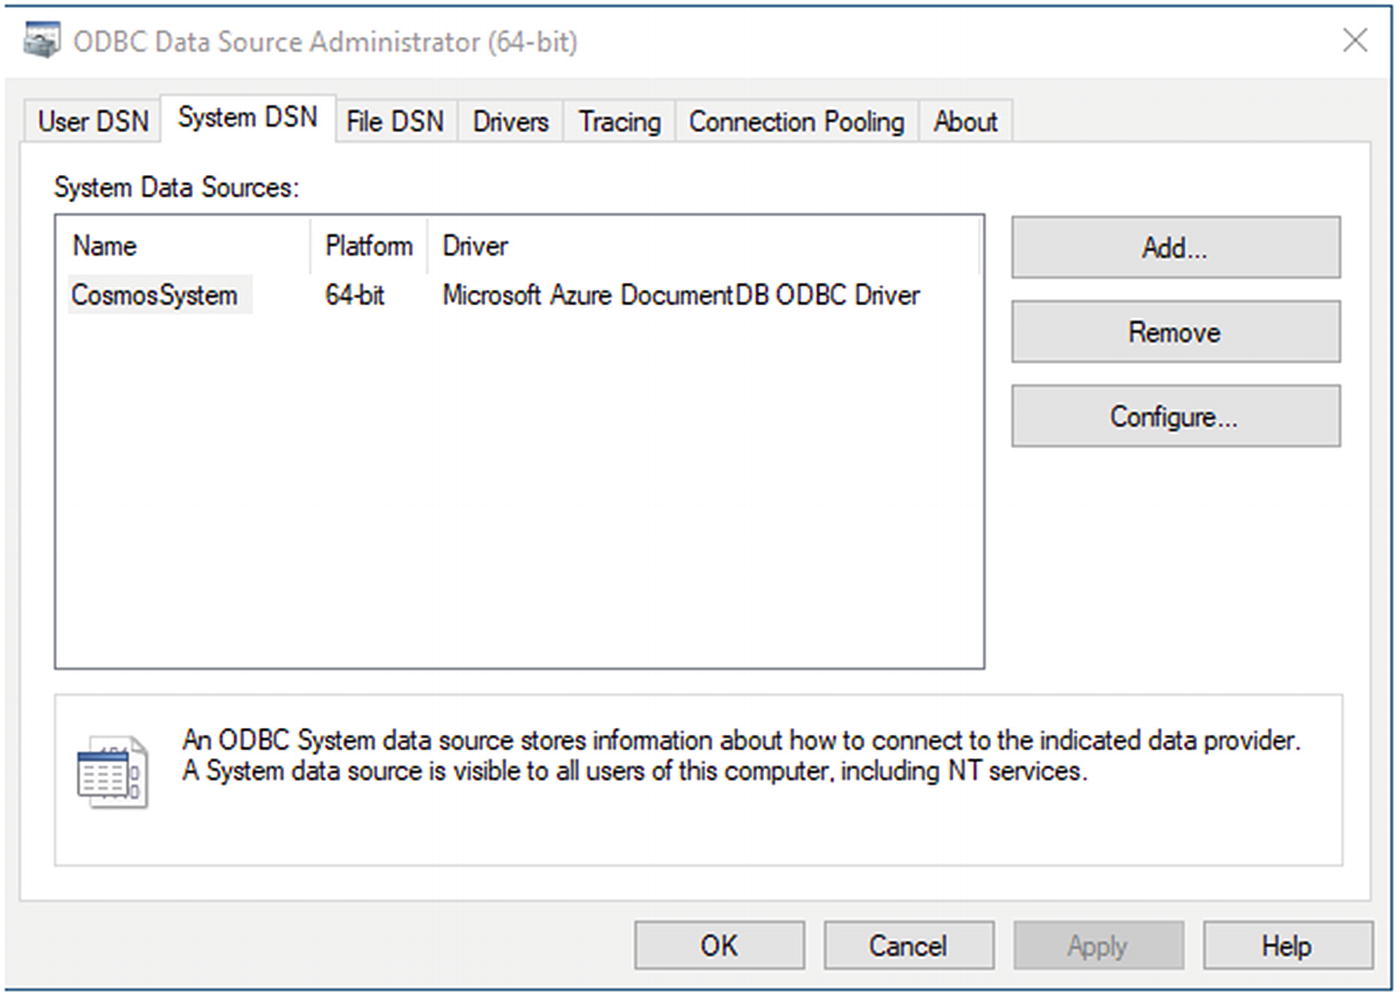
Click Add. You will see the list of all currently installed ODBC drivers on your computer. This should look something like the dialog shown in Figure 5-2.
The list of installed ODBC drivers
- 4.
Select the appropriate ODBC driver corresponding to the data source that you want to connect to (FileMaker ODBC in this example). If you cannot see the ODBC driver, you need to install—or reinstall—the driver. Please consult the documentation for the ODBC driver that you are using for these details.
- 5.
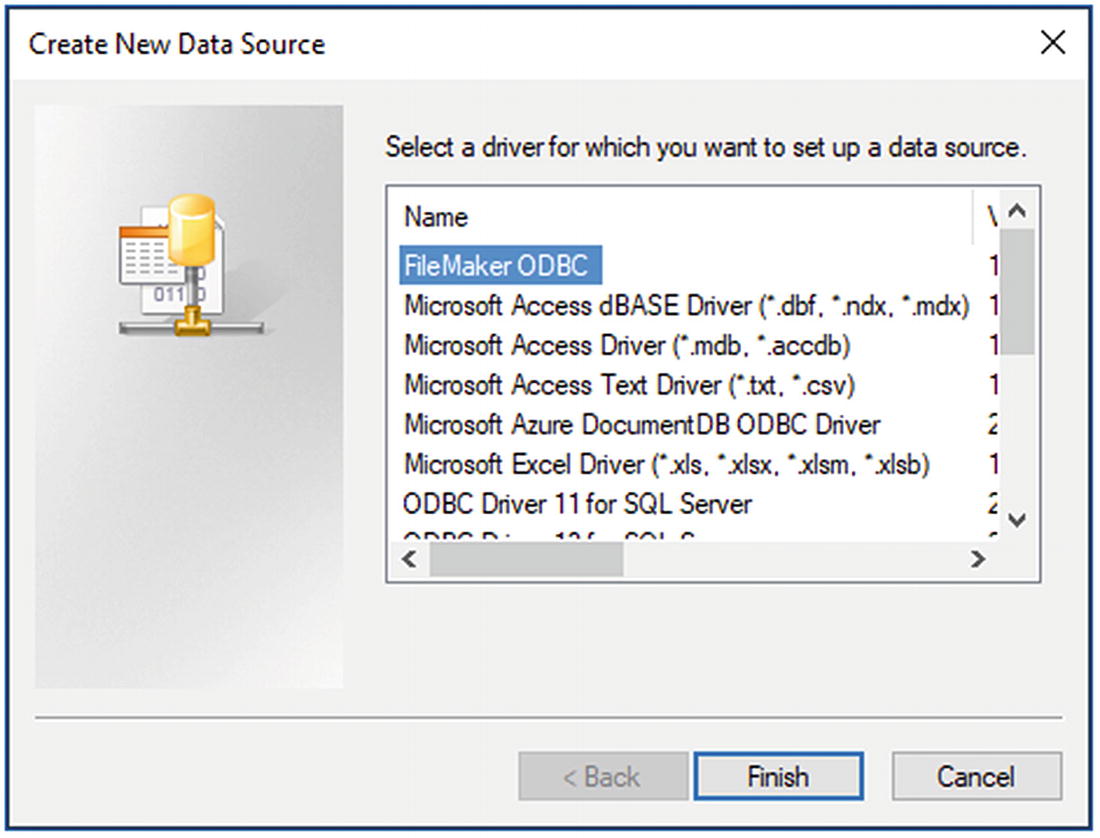
Click Finish. The configuration dialog for the specific ODBC driver that you have selected will appear. If you are using FileMaker Pro, the dialog will look like Figure 5-3.
The FileMaker Pro ODBC configuration assistant
- 6.
Click Next, and enter a name and a description for this particular ODBC connection. This could look something like the dialog shown in Figure 5-4.
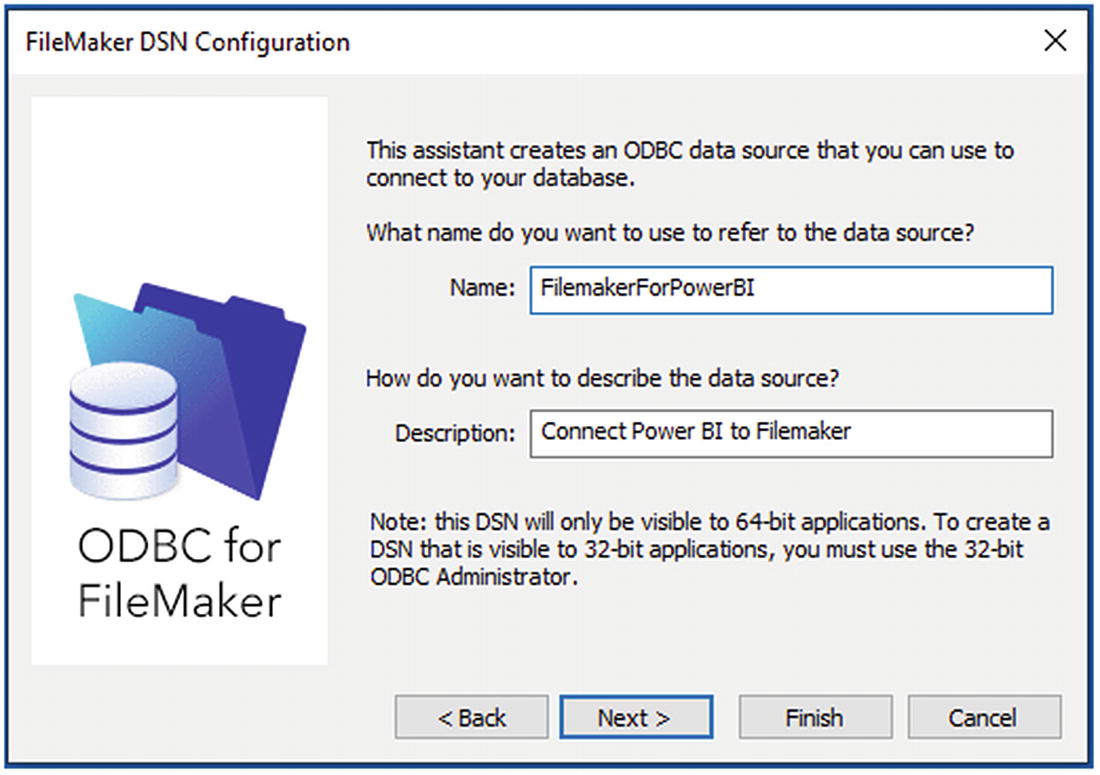
Naming the ODBC connection for FileMaker Pro
- 7.
Click Next and enter localhost as the hostname if you are using a FileMaker trial version on your local computer. Otherwise, enter the IP address of the FileMaker server. You should see the dialog shown in Figure 5-5. This is specific to a particular ODBC driver, of course. When using other drivers, the dialog will be different.
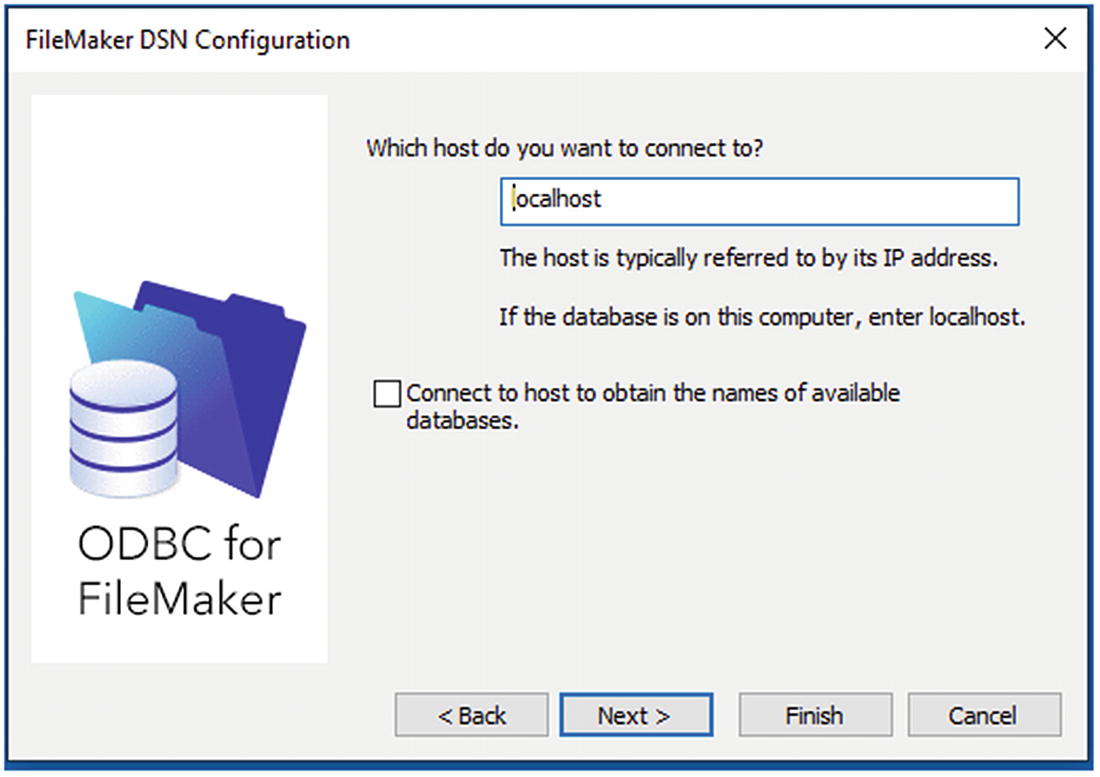
Specifying the host for the ODBC data
- 8.
Click Next and select the database in FileMaker Pro that you want to connect to. You will see the dialog shown in Figure 5-6 (if you are not using FileMaker Pro—remember that these dialogs can vary depending on the specific ODBC driver).
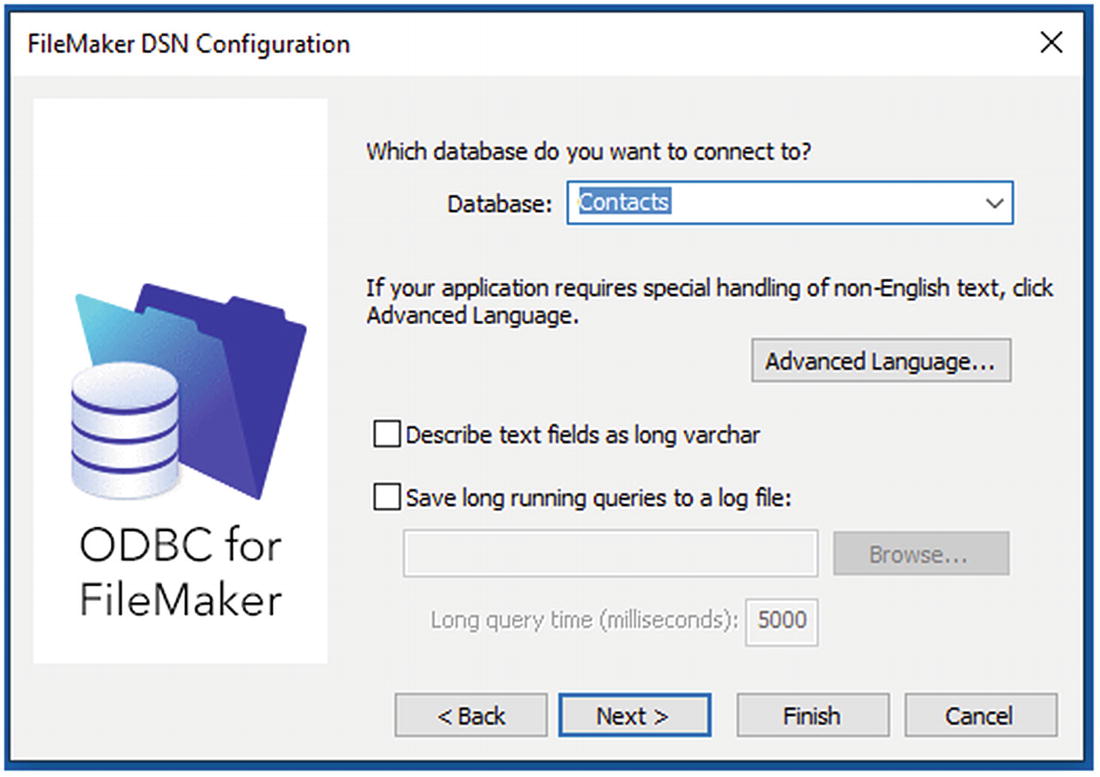
Specifying the database for the ODBC data
- 9.
Click Next. The ODBC configuration dialog will resume the specifications for the connection. This could look something like the one shown in Figure 5-7.
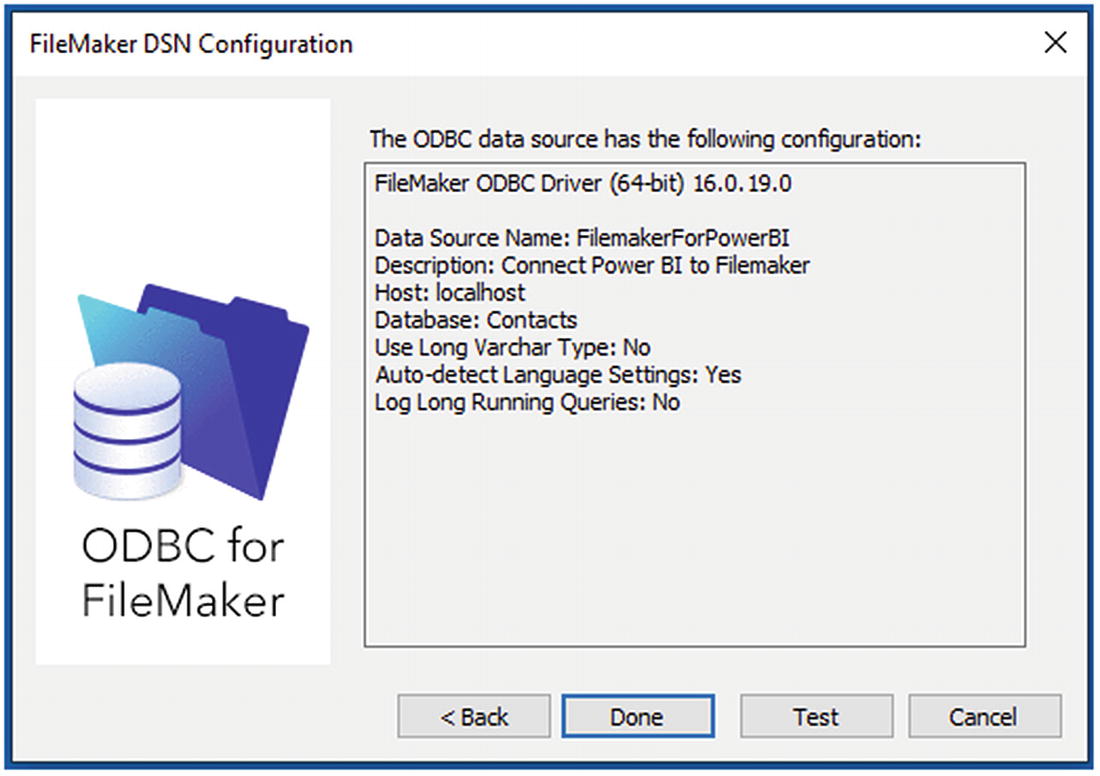
The ODBC connection confirmation dialog
- 10.
Click Done. You will return to the ODBC Data Source Administrator, where you will see the System DSN that you just created. The ODBC Data Source Administrator dialog should look something like the one shown in Figure 5-8.
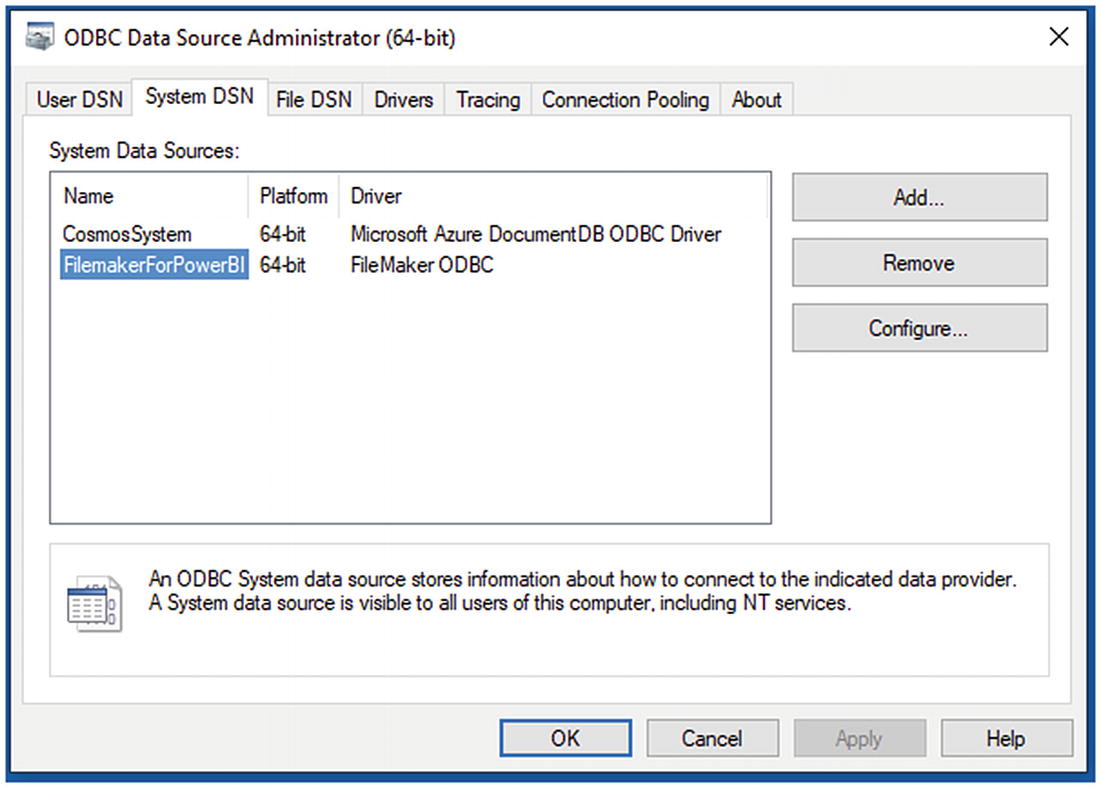
The ODBC Data Source Administrator dialog with an ODBC driver configured
- 11.
Click OK. This will close the ODBC Data Source Administrator dialog.
- 12.
Launch Excel.
- 13.
Click Get Data ➤ From Other Sources ➤ From ODBC. The From ODBC dialog will appear.
- 14.
Expand the list of available DSNs. The From ODBC dialog will look something like the one in Figure 5-9.
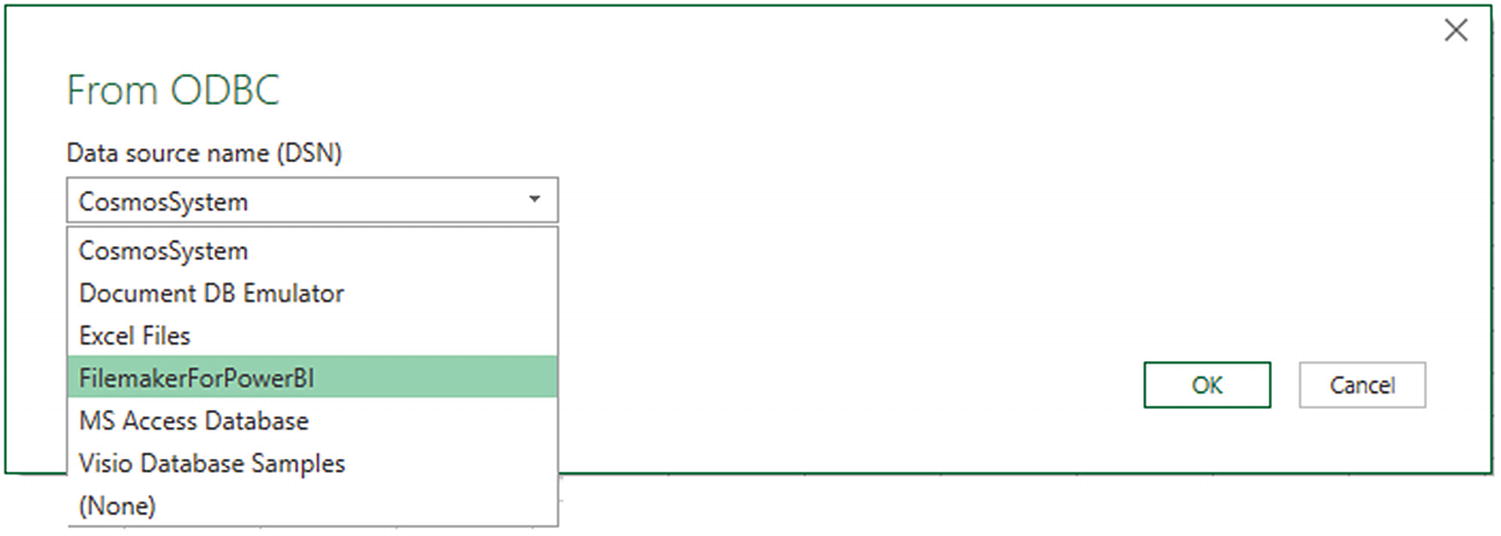
The Excel From ODBC dialog to select an ODBC data source
- 15.
Select the DSN that you created previously (FilemakerForPowerBI in this example).
- 16.
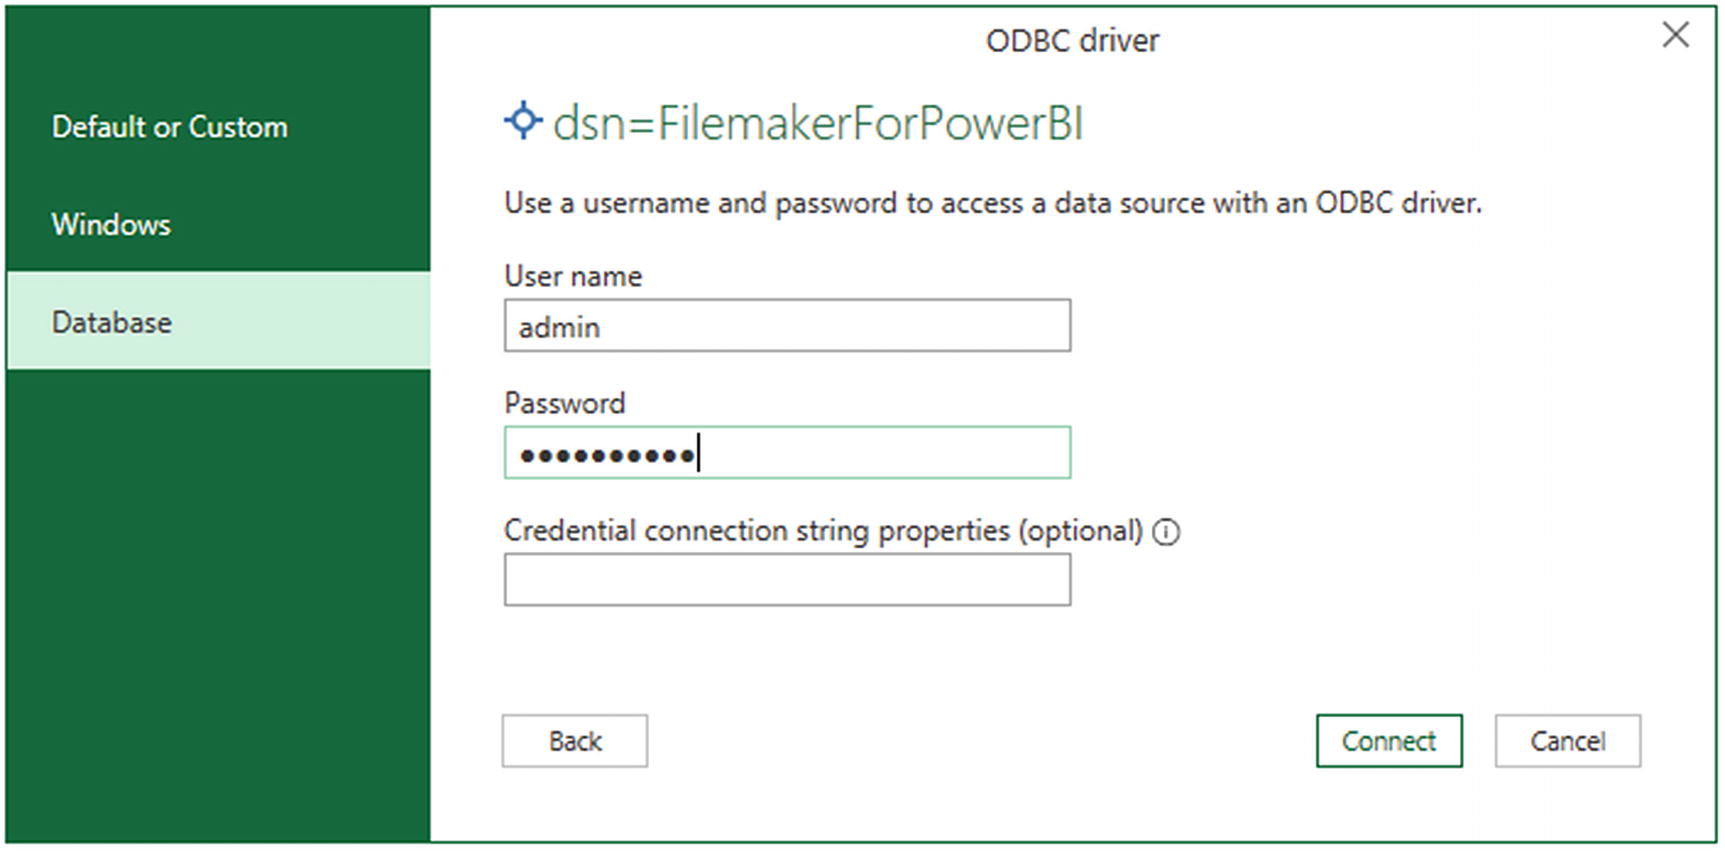
Click OK. The credentials dialog will appear.
- 17.
Choose Windows integrated security or click Database on the left and enter the user name that has permissions to connect using the ODBC driver. The credentials dialog will look something like the one in Figure 5-10.
The ODBC driver security dialog
- 18.
Click Connect. You will see the data that is available in the ODBC data source in the Navigator window.
- 19.
Select the table(s) that you want to load into Excel. Remember to check the Select multiple items check box if you want to load several tables at the same time.
- 20.
Click Load to load the data from the ODBC source into Excel.
I realize that this process may seem a little laborious at first. Yet you have to remember that you will, in all probability, only set up the ODBC connection once. After that you can use it to connect to the source data as often as you want.
Once you have created an ODBC DSN, you can use it in multiple scenarios—and with many different products—that require data from the source that you are using ODBC to connect to. This means that the ODBC source I created here can be used for Power Query in Excel, Power BI, and many other applications where you need to access FileMaker Pro data.
Name the DSN
Specify the host computer for the data
Define the data repository (or database)
Specify any credentials needed to access the data source
There is much more that could be written about creating and using ODBC connections to load data into Excel—or indeed into any number of destination applications. However, I will have to refer you to the wealth of available resources both in print and online if you need to learn more about this particular technology. A good starting point is the Microsoft documentation that explains the difference between System, User, and File DSNs and describes many of the key elements that you might need to know.
The data source application (FileMaker Pro in this example) must be open and/or running for an ODBC connection to work. Other ODBC sources could have their own specific quirks.
As a final comment, I can only urge you to procure all the relevant documentation for the ODBC driver that you intend to use with Power Query in Excel. Indeed, if you are using an enterprise data source that uses ODBC drivers, you may have corporate resources who can either assist or even configure ODBC for you.
OLE DB Data Sources
OLE DB (short for Object Linking and Embedding, Database) is technically what is known as an application programming interface (API ) . Less technically, it is a technique for connecting to database sources in a generic manner.
So, in a somewhat similar fashion to ODBC, you can use OLE DB to connect to data sources (which are often databases, although they can be other sources of data). Indeed, you may find that OLE DB is a useful way to connect to a database even if another method exists.
- 1.
Open a new Excel application.
- 2.
In the Data ribbon, click Get Data ➤ From Other Sources ➤ From OLE DB. The From OLE DB dialog will appear.
- 3.
Click Connect. The From OLE DB dialog will appear. It should look like Figure 5-11.
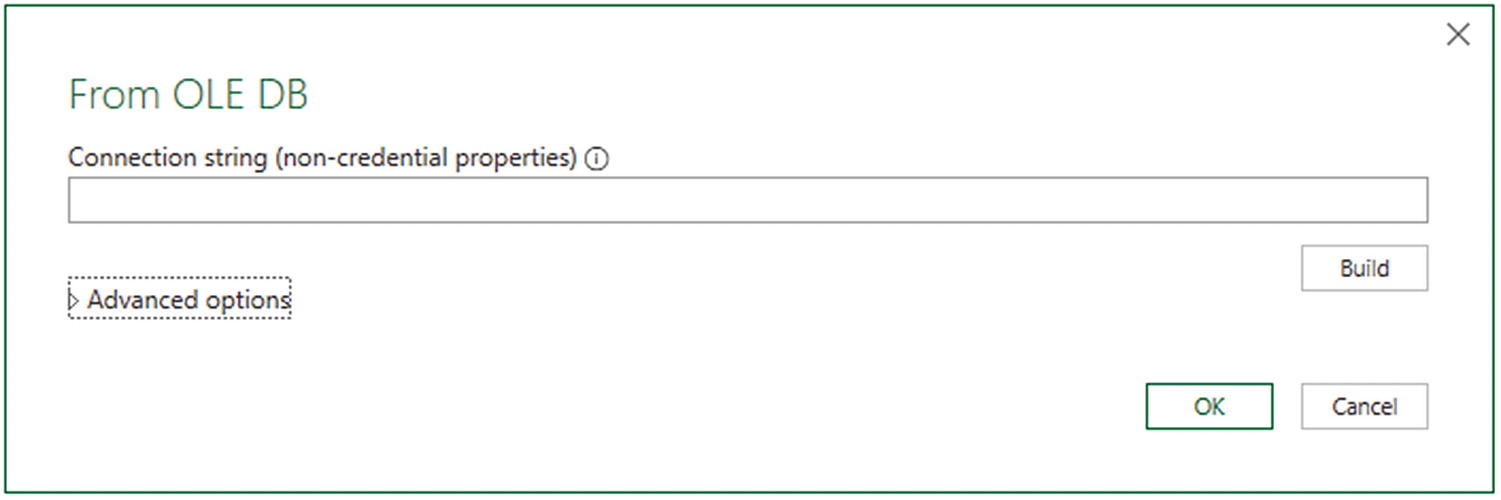
The From OLE DB dialog
- 4.
If you have a fully working connection string, enter it in the Connection string text box.
- 5.
If you do not have a connection string, click the Build button. The OLE DB Data Link Properties dialog will be displayed, as shown in Figure 5-12.
The OLE DB Data Link Properties dialog
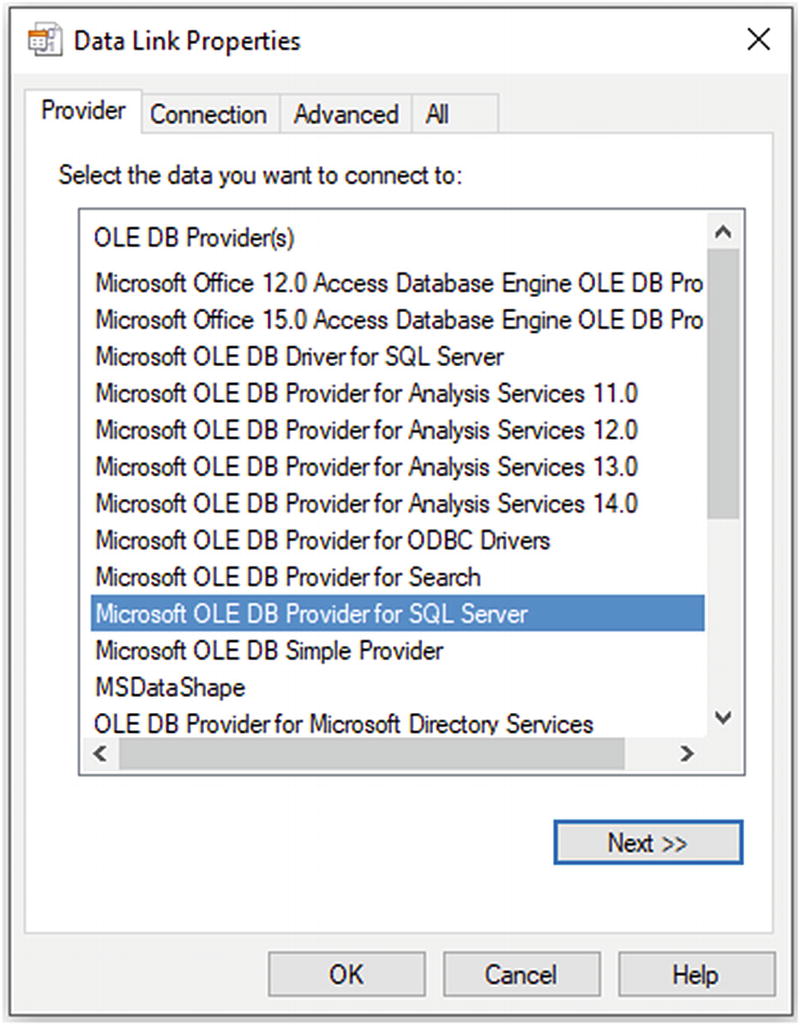
- 6.
Select the OLE DB data provider that you want to use. In this example, it will be Microsoft OLE DB Provider for SQL Server. Of course, you must select the OLE DB provider that you have installed for the data source that you want to access.
- 7.
Click Next. The Connection properties pane of the OLE DB Data Link Properties dialog will appear.
- 8.
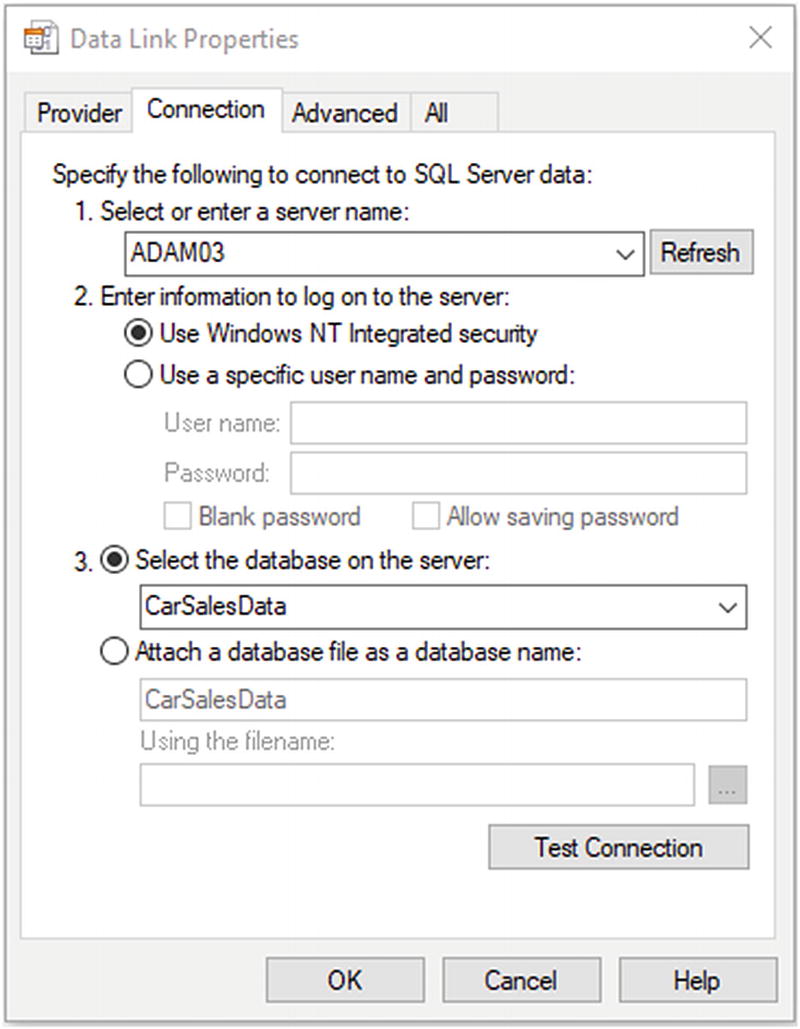
Select an available SQL Server (or enter its name) from the “Select or enter a server name” popup.
- 9.
Select the type of security, and enter a user name and password if you have selected to use a specific user name instead of using Windows NT Integrated security.
- 10.
Select the source database from the “Select the database on the server” popup. The dialog will look something like the one shown in Figure 5-13.
The Connection properties of the OLE DB Data Link Properties dialog
- 11.
Click the Test Connection button to ensure that the connection is valid. You should see the message in Figure 5-14.

The test connection alert
- 12.
Click OK. Excel will build the connection string and insert it into the From OLE DB dialog, as shown in Figure 5-15.
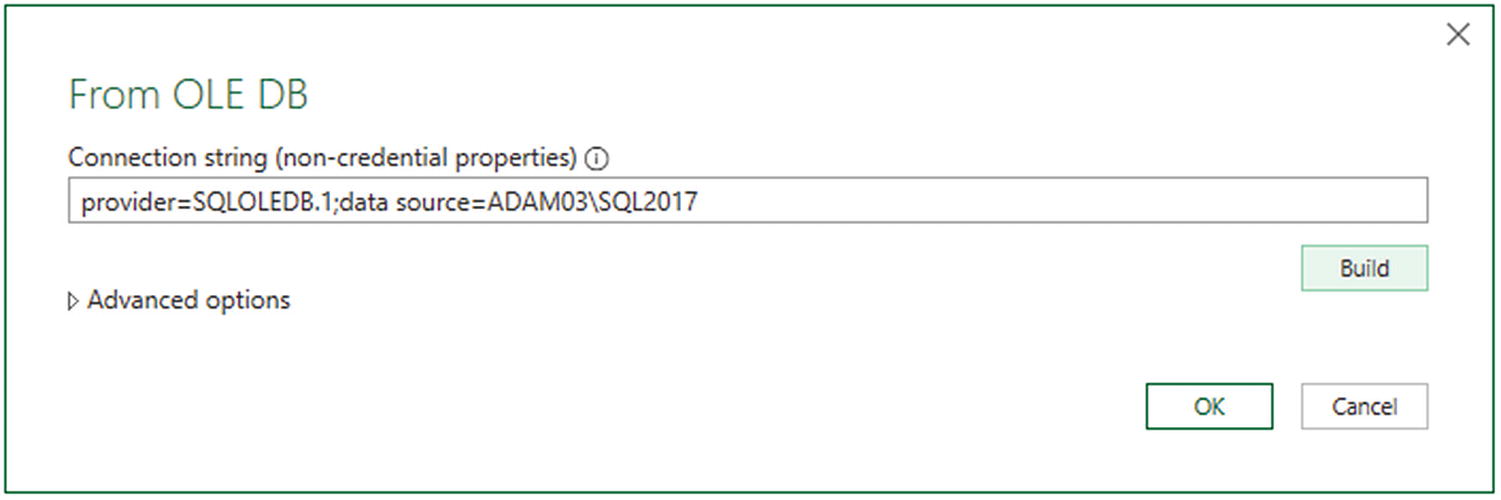
The From OLE DB dialog with a valid connection string
- 13.
Click OK. The Navigator window will appear with the appropriate data displayed.
- 14.
Select the table(s) that you want to load.
- 15.
Click Load to load the data into Excel.
If this is a first connection to an OLE DB source, you may be asked for a user name and password, as was the case with earlier examples in this chapter.
Steps 8 through 10 are specific to the SQL Server OLE DB driver. For other drivers, these steps could be different.
They can use this string to connect to a specified database by pasting it into the From OLE DB dialog. Equally, your IT department might be able to provide you with the appropriate connection string that you can use directly.
There are other advantages to using OLE DB connections too. Specifically, you (or your IT department) can provide an advanced level of configuration in the connection string to speed up or otherwise improve the access to the data. This could be by specifying a mirrored server that is to be used for reporting to relieve the pressure on a main server, for instance. At this level the technical ramifications will depend on the OLE DB data source as well as the driver used and are so manifestly wide-ranging that they are outside the scope of this book.
OData Feeds
OData is a short way of referring to the Open Data Protocol. This protocol allows web clients to publish and edit resources, identified as URLs. The data that you connect to using OData can be in a tabular format or indeed in different structures.
OData is something of a generic method of connecting to web-based data. Consequently, each OData source could differ from others that you may have used previously.
- 1.
In the Excel Data ribbon, click Get Data ➤ From Other Sources ➤ From OData Feed. The OData feed dialog will appear.
- 2.
Enter the URL that you are using to connect to the OData source. In this example, I will use a publicly available OData feed that you can find at https://services.odata.org/TripPinRESTierService/People. The dialog should look like Figure 5-16.
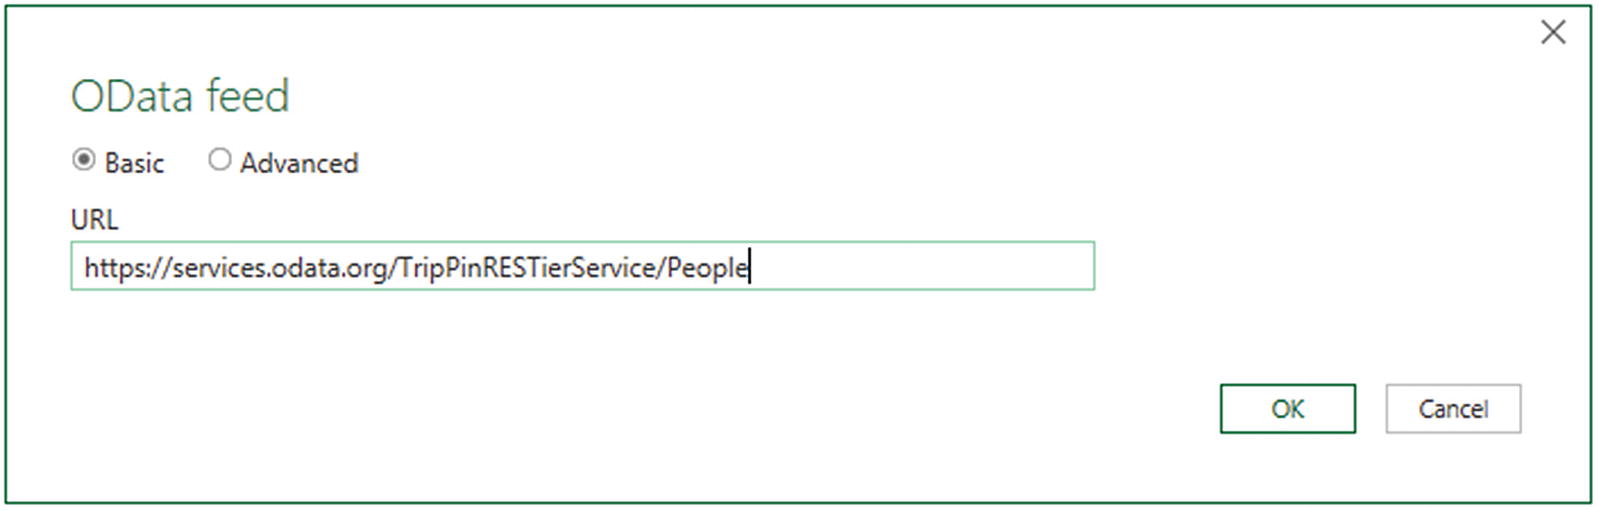
The OData feed dialog
- 3.
Click OK. The OData feed credentials dialog will appear. You can see this in Figure 5-17.
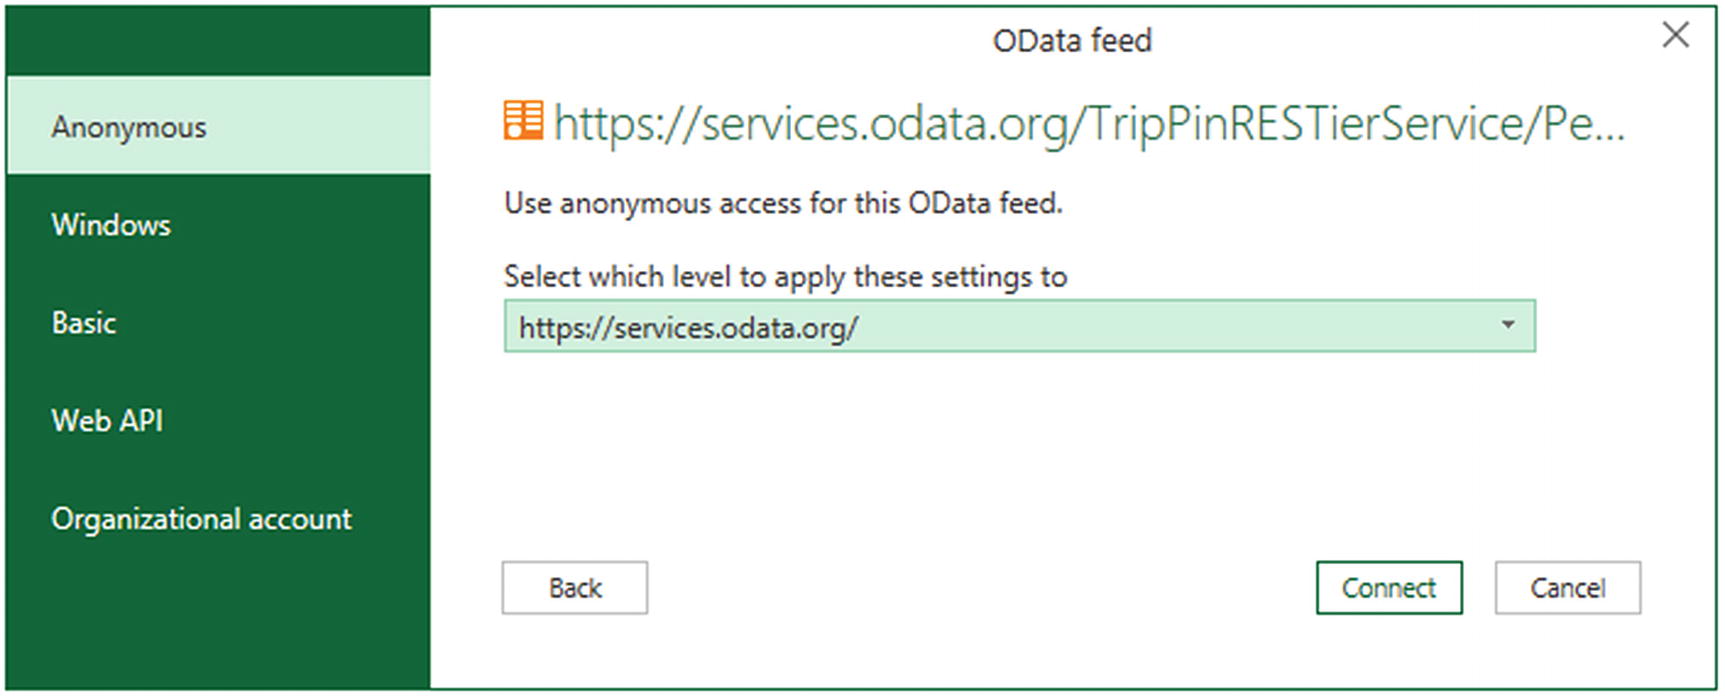
The OData feed credentials dialog
- 4.
Select the type of credential from the available list on the left of the dialog. In this example, anonymous credentials are accepted, so you do not have to enter a user name or password. For other services, you may well need to select the appropriate security method on the left and then enter the required credentials.
- 5.
Click Connect. The Navigator dialog will be displayed and will show the data available using the specified URL. You can see the data returned from this sample URL in Figure 5-18.
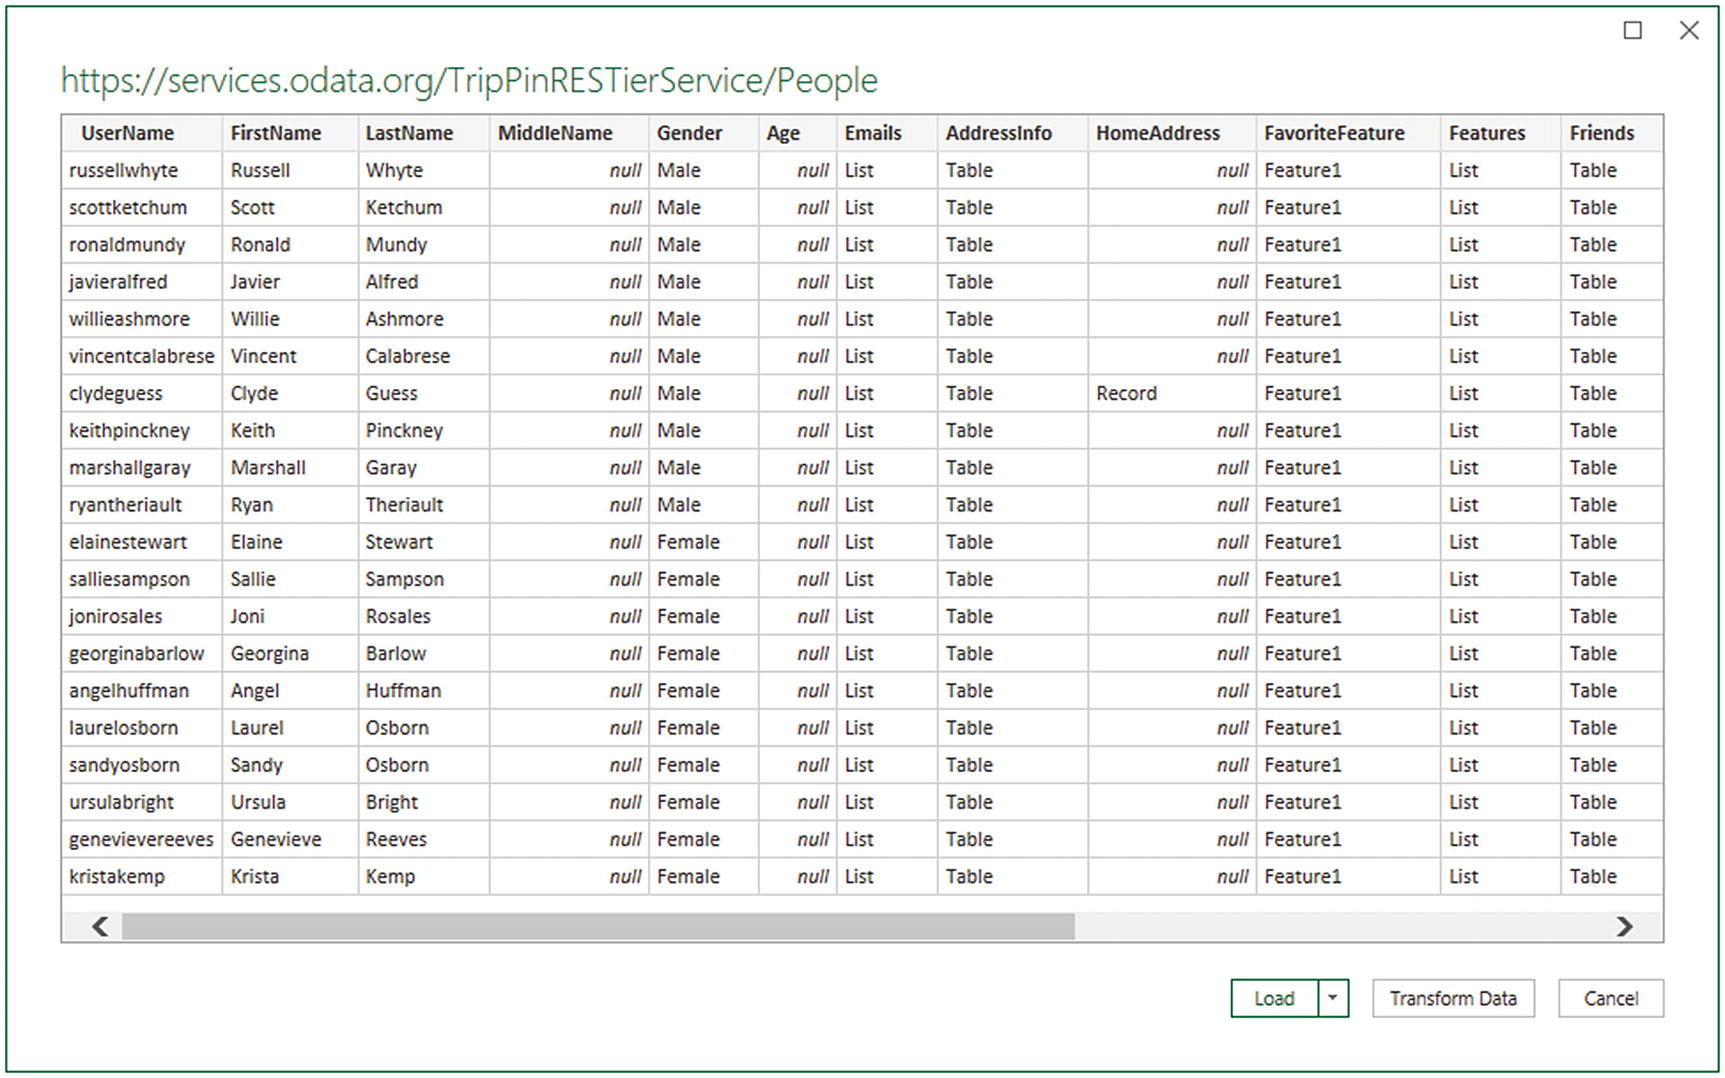
Data returned from an OData feed in the Power Query Navigator
- 6.
Click Load. The data will be loaded into a new Excel worksheet and/or the data model, depending on the load configuration options that you choose.
Interestingly, Dynamics 365 Online uses OData as the connection method.
OData Options
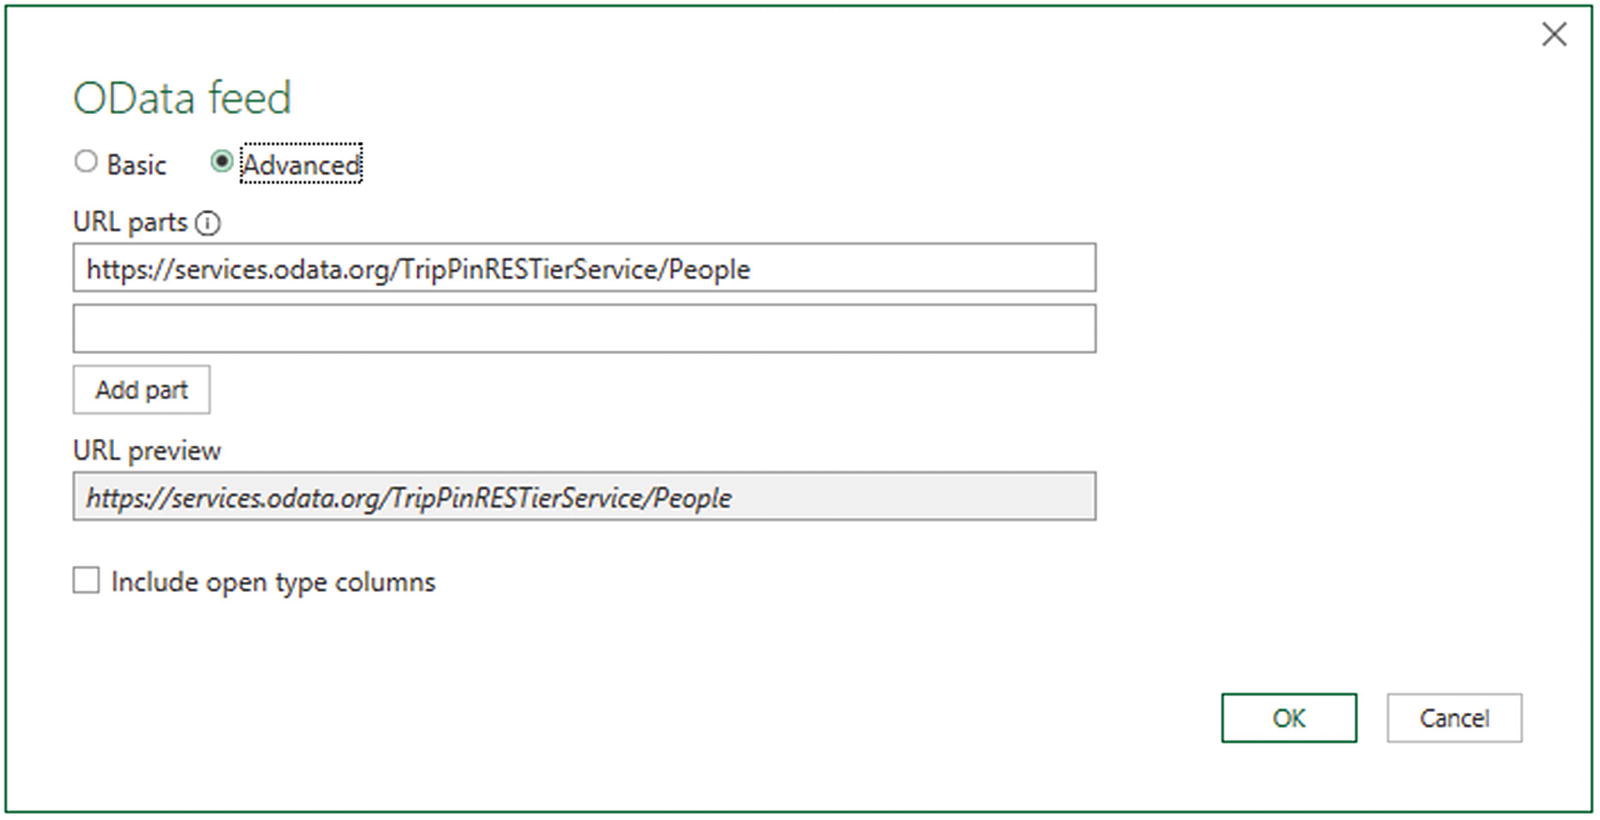
The OData feed dialog Advanced options
URL parts can be parameterized in the Power Query Editor. I will explain parameterization in Chapter 11.
Refreshing Data
Loading data from databases and data warehouses only means that a snapshot of the source data is copied into Excel. If the source data is updated, extended, or deleted, then you will need to get the latest version of the data if you want your analyses to reflect the current state of the data.
Refresh all the source data from all the data sources that you have defined.
Refresh one or more tables individually.
Refreshing the Entire Data in the Excel In-Memory Model
There is only one way to be certain that all your data is up to date. Refreshing the entire data may take longer, but you will be sure that your Excel file contains the latest available data from all the sources that you have connected to.
- 1.
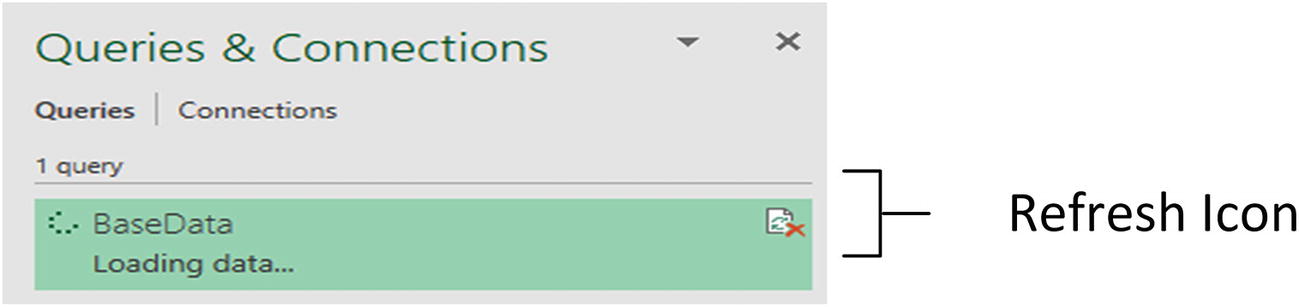
In the Home ribbon, click the Refresh button. The Queries & Connections pane will show all the data sources that are currently being refreshed. The Queries & Connections pane will look like the one in Figure 5-20.
The Refresh dialog
The data currently in any worksheets or the Power Pivot data model will be updated to display the latest data available in the source.
A full data refresh can take quite a while if the source data is voluminous or if the network connection is slow.
Refreshing an Individual Query
- 1.
In the Queries & Connections pane, click the refresh icon for the table that you want to refresh. This is illustrated in Figure 5-20.
The existing data for this table will be replaced with the latest data.
Conclusion
In this chapter, you have learned that you can use generic data access connectors—ODBC, OLE DB, and OData—to connect to sources of data for which there is not (yet) a built-in Power Query connector. You also saw how to refresh the data in Excel.
This chapter concludes the set of five chapters that introduced you to some of the many and varied data sources that you can use with Power Query in Excel. In the course of these pages, you have seen how to load data from a selection of the available sources. The good news is that Excel can read data from many more sources than those we covered here. The even better news is that you can use the knowledge that you have acquired to connect to any other available data source using the standardized Power Query interface.
So I will not be describing any further data sources in this book. This is because now that you have come to appreciate the core techniques that make up the extremely accessible approach that Power Query takes to loading data into Excel, you can probably load any of the connection types that are available without needing much more information from me.
Now that you can find, access, and load the data you need into Excel, it is time to move on to the next step. This means cleansing and restructuring the datasets so that they suit your analytical requirements. Handling these challenges is the subject of the next seven chapters.