For a photo enthusiast, nothing is quite as exciting as unboxing a new camera—particularly one as innovative as your new Canon EOS R. That’s why YouTube and Canon-oriented forums are inundated with “unboxing” videos as soon as a highly anticipated camera starts shipping. After waiting a very long time for Canon’s answer to the booming trend toward compact, fully featured full-frame mirrorless cameras, many of us have been eager to see what’s in the box, see what kind of accessories we have to enhance our shooting, and—finally—take pictures.
If you’re like me, the first thing you probably did when you first extracted your EOS R from the box, was attach one of the available RF-mount lenses, power the beast up, and begin taking photos through a tentative trial-and-error process. Who has time to even scan a manual when you’re holding some of the most exciting technology Canon has ever offered in your hands? If you’re a veteran Canon shooter, you probably found many of the controls and menus very similar to what you’re used to, even though the camera itself is much more compact and lighter in weight than your previous Canon and uses lenses in an entirely new lens mount.
But now that you’ve taken a few hundred (or thousand) photos with your new Canon EOS R, you’re ready to learn more. You’ve noted some intriguing features and adjustments that you need to master. Of course, on the other hand, you may be new to the Canon world, or the EOS R may be your first advanced digital camera, and you need some guidance in learning to use all the creative options this camera has to offer. In either case, despite your surging creative juices, I recommend a more considered approach to learning how to operate the EOS R. This chapter and the next are designed to get your camera fired up and ready for shooting as quickly as possible. And while it boasts both Auto and sophisticated Programmed Auto modes, the EOS R is not a point-and-shoot model; to get the most out of your camera, you’ll want to explore its capabilities fully.
So, to help you begin shooting as quickly as possible, I’m going to first provide a basic pre-flight checklist that you need to complete before you really spread your wings and take off. You won’t find a lot of detail in these initial two chapters. Indeed, I’m going to tell you just what you absolutely must understand, accompanied by some interesting tidbits that will help you become acclimated to your EOS R. I’ll go into more depth and even repeat a little of what I explain here in the chapters that follow, so you don’t have to memorize everything you see. Just relax, follow a few easy steps, and then go out and begin taking your best shots—ever.
I hope that even long-time Canon owners won’t be tempted to skip this chapter or the next one. No matter how extensive your experience level is with dSLRs, your new mirrorless camera has a lot of differences from what you may be used to. Yet, I realize you don’t want to wade through a manual to find out what you must know to take those first few tentative snaps. I’m going to help you hit the ground running with this chapter, which will help you set up your camera and begin shooting in minutes. Because some of you may already have experience with previous Canon cameras, each of the major sections in this chapter will begin with a brief description of what is covered in that section, so you can easily jump ahead to the next if you are in a hurry to get started.

Tip
In this book you’ll find short tips labeled My Recommendation or My Preference, each intended to help you sort through the available options for a feature, control, or menu entry. I’ll provide my preference, suitable for most people in most situations. I don’t provide these recommendations for every single feature, and you should consider your own needs before adopting any of them.
First Things First
This section helps get you oriented with all the things that come in the box with your Canon EOS R, including what they do. I’ll also describe some optional equipment you might want to have. If you want to get started immediately, skim through this section and jump ahead to “Initial Setup” later in this chapter.
The Canon EOS R comes in an impressive box filled with stuff. The first thing to do is carefully unpack the camera and double-check the contents with the checklist on one end of the box. It’s better to know now that something is missing so you can seek redress immediately, rather than discover two months from now that the cable protector you didn’t need right away (but now must have) was never in the box.
At a minimum, the box should have the following:
- Canon EOS R digital camera. It almost goes without saying that you should check out the camera immediately, making sure the color LCD screen on the back isn’t scratched or cracked, the memory card and battery doors open properly, and, when a charged battery is inserted and lens mounted, the camera powers up and reports for duty. Out-of-the-box defects like these are rare, but they can happen. It’s probably more common that your dealer played with the camera or, perhaps, it was a customer return. That’s why it’s best to buy your EOS R from a retailer you trust to supply a factory-fresh camera.
- Lens (optional). At its introduction the EOS R was available as a body only (for about $2,300), and in a variety of kit configurations, such as body plus mount adapter for EF and EF-S lenses ($2,400), or body plus 24-105mm f/4L lens ($3,400). Dealers were also willing to package the camera with one of the other three lenses available at introduction: the RF 35mm f/1.8 IS Macro STM ($500), RF 28-70mm f/2L USM ($3,000), and RF 50mm f/1.2L USM ($2,300). However, unless you were willing to pay out big bucks or wanted to go all in with Canon’s new mirrorless system, you probably opted for the all-purpose 24-105mm optic. Some photographers with a heavy investment in Canon dSLR gear might have eschewed any RF-mount option and got one of the three available mount adapters to use with their existing lenses.
My recommendation: You can’t go wrong with the superb 24-105mm lens, which compares favorably with its Canon EF-mount 24-105mm counterpart. I’ll explain your lens options in more detail in Chapter 7.
- Battery Pack LP-E6N. You’ll need to charge this 7.2V, 1865mAh (milliampere hour) battery before using it. I’ll offer instructions later in this section. It should be furnished with a protective cover, which should always be mounted on the battery when it is not inside the camera, to avoid shorting out the contacts.
- Battery Charger LC-E6/LC-E6E. One of these chargers, described in the “Initial Setup” section that follows this one, is required to vitalize the LP-E6N battery.
- Interface Cable IFC-100U. You can use this 1 meter/3.2-foot USB 3.0 Type-C cable to transfer photos from the camera to your computer (not recommended), to upload and download settings between the camera and your computer (highly recommended), and to operate your camera remotely using the EOS Utility software you can download from the Support page of your country’s Canon website.
My recommendation: I don’t recommend using the cable to transfer images. Direct transfer uses a lot of battery power and is potentially slower. This cable has Type-C connectors at either end—which means you’ll need a Type C to Type A adapter to link to a non-Type C computer or other device. Some generic Type-C to Type A cables I’ve tried do not work properly, particularly with the EOS Utility (an application that allows your computer to communicate with the camera for downloading and displaying images, remote shooting, and control of camera settings). You’ll need to test yours if you’re trying to save a few dollars.
- Cable protector. This fastens to the side of the camera and holds the USB and (optional) HDMI cables snugly in place.
My recommendation: While Canon warns that the camera terminals can be damaged if you do not use the protector, that’s unlikely to occur in normal use. For most applications, say, to transfer files from the camera to your computer over USB, or to temporarily route the EOS R’s output to a TV/monitor, using the HDMI interface, you will not need this clip. The unadorned cables fit quite snugly. However, you’ll find the protector invaluable in other applications. For example, if you want to shoot tethered over USB while connected to a laptop running the EOS Utility or another program, or plan to direct HDMI output to a video recorder, high-definition monitor, or other device, you’ll want to use the clips to make sure your EOS R remains connected.
- Wide Strap. Canon provides you with a “steal me” neck strap emblazoned with your camera model. It’s not very adjustable, and, while useful for showing off to your friends exactly which nifty new camera you bought, it’s probably not your best option, and also can serve to alert observant unsavory types that you’re sporting a higher-end model that’s worthy of their attention.
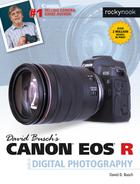
My recommendation: I never attach the Canon strap to my cameras. I use the UPstrap shown in Figure 1.1, with a patented non-slip pad that keeps your EOS R on your shoulder, and not crashing to the ground. I strongly prefer the UPstrap over holsters, slings, chest straps, or any support that dangles my camera upside down from the tripod socket and allows it to swing around too freely when I’m on the run. Give me a strap I can hang over either shoulder, or sling around my neck, and I am happy. Inventor-photographer Al Stegmeyer (www.upstrap-pro.com) can help you choose the right strap for you.
- Lens accessories (if you purchased a kit). If you purchased the EOS R with a lens, you’ll also receive accessories, including the LF-N1 rear lens cap. The lens will also be furnished with a front lens cap of appropriate diameter and may include a case. The Canon RF 24-105 f/4 L IS USM kit lens comes with a Canon E-77 II and LP1319 lens case, for example.
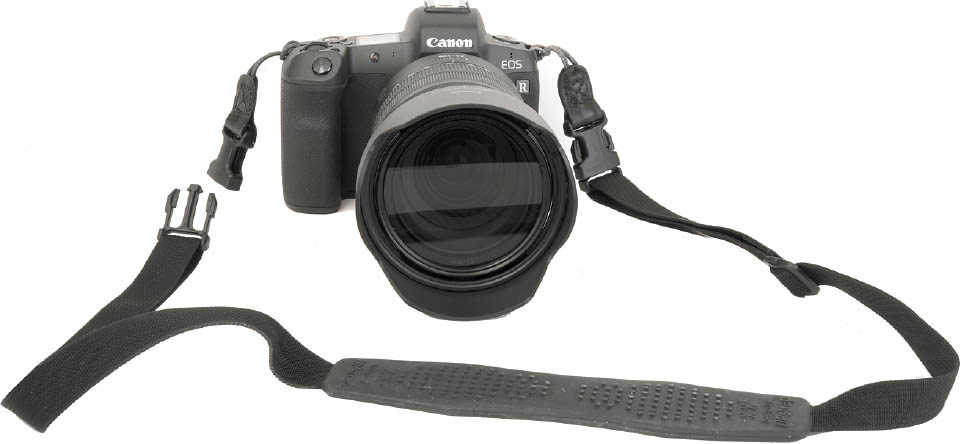
Figure 1.1 The EOS R is light enough to carry comfortably with a neckstrap like the UPStrap shown.
- PC-GF30 body cap. The body cap keeps dust from infiltrating your camera when a lens is not mounted. Always carry a body cap (and rear lens cap). When not in use, the body cap/rear lens cap nest together for compact storage.
- User’s manuals. Canon still provides a basic printed manual with the EOS R. It’s small, but deceptively thick, as only 210 pages are in English, with the rest of the content repeating the same information in Spanish and French. If you need a more comprehensive manual to supplement this book, you’ll have to download a PDF version, available from your country’s Canon website.
- Warranty and registration card. Don’t lose these! You can register your Canon EOS R by mail, although you don’t really need to in order to keep your warranty in force, but you may need the information in this paperwork (plus the purchase receipt/invoice from your retailer) should you require Canon service support.
There are a few things Canon classifies as optional accessories, even though you (and I) might consider some of them essential. Here’s a list of what you don’t get in the box, but might want to think about as an impending purchase. I’ll list them roughly in the order of importance:
- Memory card. You’ll need at least one memory card, as one is not furnished with the camera.
My recommendation: For a 30.1-megapixel camera, you really need an SD memory card that’s a minimum of 16GB in size, and a 32GB, 64GB, or larger card would be much better.
- Extra LP-E6N/LP-E6 battery. Your camera’s sensor and either electronic viewfinder or rear panel LCD screen are active for long periods of time as you use your EOS R, so battery life may be less than what you’re used to. Canon estimates you should get approximately 370 shots from a single battery, and it’s easy to exceed that figure in a few hours of shooting sports at 8 fps. Batteries can unexpectedly fail, too, or simply lose their charge from sitting around unused for a week or two.
My recommendation: Buy an extra (I own four, in total), keep it charged, and free your mind from worry. The latest LP-E6N version is best (it can be charged inside the camera with the USB Power Adapter PD-E1, described in the next section), but if you’re upgrading from a previous model that uses the original LP-E6 batteries and have a spare or two, you can use them as well.
- Add-on Speedlite. Like many advanced enthusiast camera, the Canon EOS R does not include a built-in electronic flash, so you’ll need an external Speedlite such as the Canon 600EX II-RT, the most powerful Canon external flash, or, if you’re looking to cut down on the weight you carry around, the Canon Speedlite EX-100, which has more modest output.
My recommendation: Your add-on flash can function as the main illumination for your photo, or softened and used to fill in shadows. If you do much flash photography at all, consider a Speedlite as an important accessory. For the most flexibility when lighting your subject, you’ll need two flash units: one on the camera to be used as a master, and one off-camera flash triggered wirelessly as a slave. (The two flash units mentioned above can function in either role. Canon also offers the ST-E2 and ST-E3-RT transmitter/triggers which can mount on the EOS R’s accessory shoe and serve as masters.)
- Mount adapters. If you already own a collection of Canon EF and EF-S lenses, Canon offers three adapters that will let you use those lenses on your EOS R. One is a mount adapter only, a second adds a customizable control ring to your EF/EF-S lenses like those found on the RF optics themselves, while a third includes a drop-in filter carrier that lets you use a single size filter behind the rear element of the EF/EF-S lens. That includes polarizers and variable neutral density filters, and the capability works with lenses that ordinarily can’t use screw-in filters at all, such as the Canon EF 11-24mm f/4L USM or Canon Tilt/Shift TS-E 17mm f/4L lenses. I’ll describe the three mount adapters in more detail in Chapter 7, which deals with your full range of lens options for the EOS R.
- AC Adapter Kit ACK-E6N. This device is used with a DC coupler, the DR-E6, that replaces the LP-E6N battery and powers the Canon EOS R from AC current.
My recommendation: There are several typical situations where this capability can come in handy: when you’re cleaning the sensor manually and want to totally eliminate the possibility that a lack of juice will cause the fragile shutter to spring to life during the process; when indoors shooting tabletop photos, portraits, class pictures, and so forth for hours on end; when using your EOS R for remote shooting as well as time-lapse photography; for extensive review of images on your television; or for file transfer to your computer. These all use prodigious amounts of power, which can be provided by this AC adapter.
- Remote controls. Although the EOS R’s self-timer can be used to trigger your tripod-mounted camera without any vibration, it’s more convenient to use a wired or wireless remote control to trip the shutter.
My recommendation: The EOS R works well with the Canon BR-E1 wireless remote control, which operates using the camera’s Bluetooth capability, or wired remote switch RS-60E3. For more sophisticated sequences, the TC-80N3/RA-E3 remote controller/adapter combination also functions as an interval timer. Note that previous Canon remotes that use infrared signals will not work with this camera.
- HDMI cable HTC-100. You’ll need this optional cable if you want to connect your camera directly to an HDTV for viewing your images.
My recommendation: I use standard HDMI mini (not micro) cables in 6-, 9-, and 12-foot lengths. They work fine, and I can buy several for the price of one 9.5-foot Canon-branded cable.
Initial Setup
Many EOS R owners can skip this section, which describes basic setup steps. I’m including it at the request of ambitious photo buffs who have upgraded to this mirrorless camera after switching from a Canon dSLR, another camera brand, or an entry-level model from any manufacturer.
The initial setup of your Canon EOS R is fast and easy. Basically, you just need to charge the battery, attach a lens, insert a memory card, and make a few settings.
Power Options
Your Canon EOS R is a sophisticated hunk of machinery and electronics, but it needs a charged battery to function, so rejuvenating the LP-E6N lithium-ion battery pack furnished with the camera should be your first step. A fully charged power source should be good for approximately 370 shots, based on standard tests defined by the Camera & Imaging Products Association (CIPA) document DC-002.
All rechargeable batteries undergo some degree of self-discharge just sitting idle in the camera or in the original packaging. Lithium-ion power packs of this type typically lose a small amount of their charge every day, even when the camera isn’t turned on. The small amount of juice used to provide the “skeleton” outline on the top-panel monochrome LCD when the EOS R is turned off isn’t the culprit; Li-ion cells lose their power through a chemical reaction that continues when the camera is switched off. So, it’s very likely that the battery purchased with your camera is at least partially pooped out, so you’ll want to revive it before going out for some serious shooting.
Several battery chargers are available for the Canon EOS R. The compact LC-E6 is the charger that most EOS R owners end up using. Purchasing one of the optional charging devices offers more than some additional features: You gain a spare that can keep your camera running until you can replace your primary power rejuvenator. I like to have an extra charger in case my original charger breaks, or when I want to charge more than one battery at a time. (That’s often the case if you’re using the BG-E22 grip.) Here’s a list of your power options:
- LC-E6. The standard charger for the EOS R (and also compatible with earlier cameras that use the LC-E6 or LC-E6N batteries), this one is the most convenient, because of its compact size and built-in wall plug prongs that connect directly into your power strip or wall socket and require no cord. (See Figure 1.2, left.)
- LC-E6E. This is similar to the LC-E6, and also charges a single battery, but it requires a cord. That can be advantageous in certain situations. For example, if your power outlet is behind a desk or in some other semi-inaccessible location, the cord can be plugged in and routed so the charger itself sits on your desk or another more convenient spot. The cord is standard and works with many different chargers and devices (including the power supply for my laptop), so I purchased several of them and leave them plugged into the wall in various locations. I can connect my EOS R’s charger, my laptop computer’s charger, and several other electronic components to one of these cords without needing to crawl around behind the furniture. The cord draws no power when it’s not plugged into a charger. Unhook the charger from the cord when you’re not actively rejuvenating your batteries.
- Car Battery Cable CBC-E6. It includes the Car Battery Cable CB-570 (plug into your vehicle’s lighter or accessory socket). The vehicle battery option allows you to keep shooting when in remote locations that lack AC power.
- Battery Grip BG-E22. This $375 accessory holds one or two LP-E6N batteries. You can potentially double your shooting capacity, while adding an additional shutter release, Main Dial, Quick Control Dial, M-Fn button, AF-ON, AE lock/FE lock, and AF point selection controls for vertically oriented shooting. An included power adapter allows charging LP-E6N batteries (but not LP-E6 packs) while in the camera.
My recommendation: Even though it is expensive, hold out for the BG-E22. Many people love third-party grips from Meike, Neewer, Vivitar, and others, at a cost of less than $70. I have purchased these grips in the past, and found them acceptable for occasional use. I expect a similar unit will be available for the EOS R by the time this book is published. However, most people like to clamp their add-on grips onto the camera and remove them only rarely. If you intend to make a battery grip part of your permanent setup, the Canon model will be better made, more rugged, and guaranteed to work seamlessly with your camera.
- USB Power Adapter PD-E1. Available separately for about $200, this adapter allows charging LP-E6N batteries without removing them from the camera or grip over a USB Type-C connection. Theoretically, you might be able to charge the batteries from a less expensive adapter or power brick if it is capable of providing higher than 5V and has USB-C output. (USB-C uses a Power Delivery specification that initially provides a “profile” that delivers 5V at 2A, but can “negotiate” with a device to provide up to 20V at 5A.) Ordinary USB chargers I’ve tried do not work, and produce an Err message on the EOS R’s top-surface LCD panel. (Don’t panic! Turn the camera off and remove the battery for a few minutes to cancel the error message.)
The access lamp in the lower-right corner of the camera’s back panel will glow green during charging. (This is the same LED that flashes red when the EOS R is writing to the memory card.) When charging is finished, the lamp turns off and [FULL] appears on the LCD panel.
- AC Adapter Kit ACK-E6. As I mentioned earlier, this device allows you to operate your EOS R directly from AC power, with no battery required. Studio photographers need this capability because they often snap off hundreds of pictures for hours on end and want constant, reliable power. The camera is probably plugged into a flash sync cord (or radio device), and the studio flash are plugged into power packs or AC power, so the extra tether to this adapter is no big deal in that environment. You also might want to use the AC adapter when viewing images on a TV connected to your EOS R, shooting video, or when shooting remote or time-lapse photos.
Charging the Battery
When the battery is inserted into the LC-E6 charger properly (it’s impossible to insert it incorrectly), a Charge light begins flashing. It flashes on and off until the battery reaches a 50 percent charge, then blinks in two-flash cycles between 50 and 75 percent charged, and in a three-flash sequence until the battery is 90 percent charged, usually within about 90 minutes. In my experience, to be safe you should allow the charger to continue for about 60 minutes more, until the status lamp glows green steadily, to ensure a full charge. When the battery is charged, flip the lever on the bottom of the camera and slide in the battery (see Figure 1.2, right). To remove the battery from the camera, press the white retaining button.

Figure 1.2 A flashing status light indicates that the battery is being charged (left). Insert the battery in the camera; it only fits one way (right).
Final Steps
Your Canon EOS R is almost ready to fire up and shoot. You’ll need to select and mount a lens, adjust the viewfinder for your vision, and insert memory card(s). Each of these steps is easy, and if you’ve used a previous EOS model, you already know exactly what to do. I’m going to provide a little extra detail for those of you who are new to the Canon or digital SLR worlds.
Mounting the Lens
As you’ll see, my recommended lens mounting procedure emphasizes protecting your equipment from accidental damage, and minimizing the intrusion of dust. If your EOS R has no lens attached, select the lens you want to use and loosen (but do not remove) the rear lens cap. I generally place the lens I am planning to mount vertically in a slot in my camera bag, where it’s protected from mishaps, but ready to pick up quickly. By loosening the rear lens cap, you’ll be able to lift it off the back of the lens at the last instant, so the rear element of the lens is covered until then.
After that, remove the body cap by rotating the cap toward the shutter release button. You should always mount the body cap when there is no lens on the camera, because it helps keep dust out of the interior of the camera, where it can settle in the interior and potentially find its way onto the sensor. (While the EOS R’s sensor cleaning mechanism works fine, the less dust it has to contend with, the better.) The body cap also protects the vulnerable sensor and shutter from damage caused by intruding objects (including your fingers, if you’re not cautious).
Once the body cap has been removed, remove the rear lens cap from the lens, set it aside, and then mount the lens on the camera by matching the raised red alignment indicator on the lens barrel with the red line on the camera’s lens mount. Rotate the lens away from the shutter release until it seats securely. Set the focus mode switch on the lens to AF (autofocus) and the stabilizer switch to On. If the lens hood is bayoneted on the lens in the reversed position (which makes the lens/hood combination more compact for transport), twist it off and remount so it is facing outward. A lens hood protects the front of the lens from accidental bumps, stray fingerprints, and reduces flare caused by extraneous light arriving at the front element of the lens from outside the picture area.
Adjusting Diopter Correction
Those of us with less than perfect eyesight can often benefit from a little optical correction in the viewfinder. Your contact lenses or glasses may provide all the correction you need, but if you are a glasses wearer and want to use the EOS R without your glasses, you can take advantage of the camera’s built-in diopter adjustment, which can be varied from –4 to +2 correction. With the camera powered up, rotate the diopter adjustment control located to the immediate left of the viewfinder (see Figure 1.3) while looking through the viewfinder until the indicators appear sharp.

Figure 1.3 Viewfinder diopter correction from –4 to +2 can be dialed in.
Inserting a Memory Card
You can’t take photos without a memory card inserted in your EOS R, so your final step will be to insert a memory card. Slide the door on the right side of the body toward the back of the camera to release the cover, and then open it. (You should only remove the memory card when the camera is switched off, but the EOS R will remind you if the door is opened while the camera is still writing photos to the memory card.)

Figure 1.4 Insert the memory card in the slot with the label facing the back of the camera.
Insert the memory card into the slot with the label facing the back of the camera, as shown in Figure 1.4, oriented so the edge with the gold contacts go into the slot first. Close the door, and your preflight checklist is done! (I’m going to assume you remember to remove the lens cap when you’re ready to take a picture!) When you want to remove the memory card later, press down on the card to make the memory card pop out.
Formatting a Memory Card
There are three ways to create a blank memory card for your EOS R, and two of them are at least partially wrong. Here are your options, both correct and incorrect:
- Transfer (move) files to your computer. When you transfer (rather than copy) all the image files to your computer from the memory card (either using a direct cable transfer or with a card reader, as described later in this chapter), the old image files are erased from the card, leaving the card blank. Theoretically. This method does not remove files that you’ve labeled as Protected (choosing the Protect images function in the Playback menu) nor does it identify and lock out parts of your memory card that have become corrupted or unusable since the last time you formatted the card. Therefore, I recommend always formatting the card, rather than simply moving the image files, each time you want to make a blank card. The only exception is when you want to leave the protected/unerased images on the card for a while longer, say, to share with friends, family, and colleagues.
- (Don’t) Format in your computer. With the memory card inserted in a card reader or card slot in your computer, you can use Windows or Mac OS to reformat the memory card. Don’t! The operating system won’t necessarily arrange the structure of the card the way the EOS R likes to see it (in computer terms, an incorrect file system may be installed). The only way to ensure that the card has been properly formatted for your camera is to perform the format in the camera itself. The only exception to this rule is when you have a seriously corrupted memory card that your camera refuses to format. Sometimes it is possible to revive such a corrupted card by allowing the operating system to reformat it first, then trying again in the camera.
- Setup menu format. To use the recommended method to format a memory card, just follow these steps, shown in Figure 1.5:
- 1. Press the MENU button.
- 2. Rotate the Main Dial (located on top of the camera as shown) to select the Set-up 1 menu, represented by a wrench icon.

Figure 1.5 Formatting a memory card.
- 3. Spin the Quick Control Dial (at the rear-top edge, with the Mode button in its center) to move the highlighting down within the Set-up 1 menu.
- 4. Select Format Card.
- 5. Press the SET button (with the Q/SET label) on the back of the camera.
- 6. Use the left/right buttons (located on either side of the SET button) to highlight OK, and press SET again to start the format. You can optionally press the Trash button first to perform an extra thorough low-level “clean-up” format, which is a good idea if the card has been used many times.
NAVIGATION
The official name for those four ridges on the pad surrounding the Q/SET button at far right in the figure is “cross keys,” but they are commonly simply called “directional buttons.” From time to time I will also refer to them as left/right or up/down buttons. For some functions, especially menus, you can use the Main Dial or Quick Control Dial to navigate, and, as you’ll discover in Chapter 2, the EOS R’s versatile touch screen.
Setting the Time and Date
The first time you use the Canon EOS R, it may ask you to enter the time and date. (This information may have been set by someone checking out your camera on your behalf prior to sale.) Just follow these steps:
- 1. Press the MENU button, located in the upper-left corner of the back of the EOS R.
- 2. Rotate the Main Dial (near the shutter release button on top of the camera) until the Set-up 2 menu is highlighted. It’s marked by a wrench and the message SET UP2, as shown at left in Figure 1.6.
- 3. Rotate the Quick Control Dial (QCD) to move the highlighting down to the Date/Time entry.
- 4. Press the SET button to access the Date/Time setting screen, shown at right in Figure 1.6.
- 5. Rotate the QCD to select the value you want to change. When the gold box highlights the month, day, year, hour, minute, or second format you want to adjust, press the SET button to activate that value. A pair of up/down pointing triangles appears above the value.
- 6. Rotate the QCD to adjust the value up or down. Press the SET button to confirm the value you’ve entered.
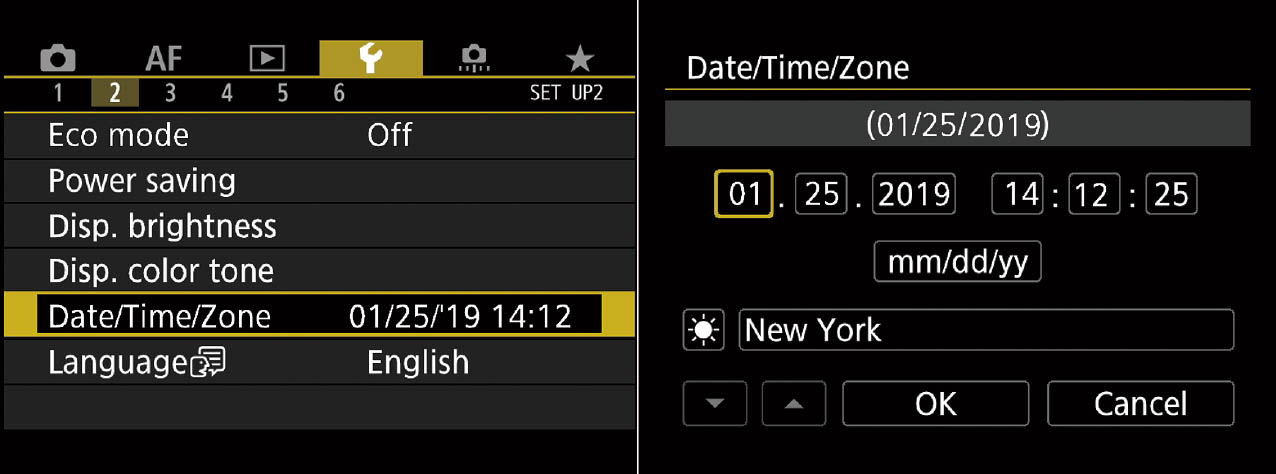
Figure 1.6 Choose the Date/Time/Zone entry from the Set-up 2 menu and set the parameters.
- 7. Repeat steps 5 and 6 for each of the other values you want to change. The date format can be switched from the default mm/dd/yy to yy/mm/dd or dd/mm/yy. You can activate/deactivate Daylight Saving Time, and select a Time Zone.
- 8. When finished, rotate the QCD to select either OK (if you’re satisfied with your changes) or Cancel (if you’d like to return to the Set-up 2 menu screen without making any changes). Press SET to confirm your choice.
- 9. When finished setting the date and time, press the MENU button to exit.
REACH OUT AND TOUCH SOMETHING
As I noted, your Canon EOS R has a touch-sensitive screen that is useful for navigating menus, selecting focus points, and other functions. In many cases, you can use the buttons and dials and the touch screen almost interchangeably, but for this introductory chapter I’m going to stick to using the physical controls instead of the touch controls. There are two reasons for that. First, it’s important you become comfortable using the buttons and dials, because for many functions they are faster, sometimes easier, and work reliably even when your fingers are “encumbered” (say, while you’re wearing gloves). In addition, this chapter is intended primarily for those new to the Canon mirrorless world. I’ll explain how to use the touch screen in Chapter 2.
Selecting a Shooting Mode
The following sections show you how to choose semi-automatic, automatic shooting, or exposure modes; select a metering mode (which tells the camera what portions of the frame to evaluate for exposure); and set the basic autofocus functions. If you understand how to do these things, you can skip ahead to “Other Settings.”
Now it’s time to fire up your EOS R and take some photos. The easy part is turning on the power—that ON/OFF switch on the top-left shoulder of the camera. Turn on the camera, and, if you mounted a lens and inserted a fresh battery and memory card, you’re ready to begin. You’ll need to select a shooting mode, metering mode, and focus mode.
You can choose a shooting method by pressing the Mode button, located in the center of the Quick Control Dial (as shown earlier in Figure 1.5) located on the top-right edge of the EOS R. Press the button once, and press the left/right buttons, or rotate the Main or Quick Control Dials to select a mode. The current mode is displayed on the LCD panel on the top of the camera and color LCD screen on the back of the EOS R. (See Figure 1.7.)
The camera has one fully automatic mode called Scene Intelligent Auto (A+ on the display), which makes virtually all the decisions for you (except when to press the shutter). There are also six semi-automatic/manual modes (what Canon calls Creative Zone on its entry- and mid-level models), including Flexible Priority (Fv), Program (P), Shutter-priority (Tv), Aperture-priority (Av), Manual (M), and Bulb (B). These each allow you to provide input over the exposure and settings the camera uses. There are also three camera user settings (Custom shooting modes) that can be used to store specific groups of camera settings, which you can then recall quickly by choosing C1, C2, or C3 as your shooting mode. You’ll find a complete description of fully automatic and semi-automatic/manual modes in Chapter 4, as well as Custom shooting modes in Chapter 14.
Figure 1.7 The Shooting mode screen includes both automatic and semi-automatic/manual settings.
If you’re very new to digital photography, you might want to set the camera to Scene Intelligent Auto (A+) or P (Program mode) and start snapping away. These modes will make all the appropriate settings for you for many shooting situations.
Your choices are as follows:
- A+ (Scene Intelligent Auto). In this mode, the EOS R makes all the exposure decisions for you.
- Fv (Flexible-priority). The Fv stands for flexible value. This is a recently introduced exposure mode that’s a combination of the four described next in this list. You can manually lock in a specific shutter speed or aperture or ISO sensitivity setting, or any combination of the three, and the other values will be set by the EOS R. You can also allow any or all of them to be selected automatically. You can then make your images darker or lighter using exposure compensation to override your settings.
As its name implies, this option gives you a great deal of flexibility in choosing which settings are chosen automatically, and which are specified by you manually. I recommend that beginners not use this shooting mode until they’ve read my complete description of how to use it easily in Chapter 4.
- P (Program). This semi-automatic mode allows the EOS R to select the basic exposure settings, but you can still override the camera’s choices to fine-tune your image.
- Tv (Shutter-priority). This mode (Tv stands for time value) is useful when you want to use a particular shutter speed to stop action or produce creative blur effects. The EOS R will select the appropriate f/stop for you.
- Av (Aperture-priority). Choose when you want to use a particular lens opening, especially to control sharpness or how much of your image is in focus. The EOS R will select the appropriate shutter speed for you. Av stands for aperture value.
- M (Manual). Select when you want full control over the shutter speed and lens opening, either for creative effects or because you are using a studio flash or other flash unit not compatible with the EOS R’s automatic flash metering.
- B (Bulb). Choose this mode and the shutter will remain open as long as you hold down the release button. It is useful for making exposures of indeterminate length (say, you want to capture some fireworks, and leave the shutter open until a burst appears, then release the shutter after a few seconds when the light trails have been captured). The B setting can also be used to produce exposures longer than the 30 seconds (maximum) the EOS R can take automatically.
Choosing a Metering Mode
Metering mode is the next setting you’ll want to make. Note that for this and the settings that follow, the EOS R must be set to one of the semi-automatic and manual modes and not to Scene Intelligent Auto (A+). Among the four metering modes I’ll describe next, the default Evaluative metering is probably the best choice as you get to know your camera.
To change metering modes, use the EOS R’s Quick Control screen, which comes in several variations and can be accessed using one of these three methods:
- Option 1: While looking through the viewfinder:
- Press the Q (combined Q/SET) button. The screen shown in Figure 1.8 appears for about six seconds, waiting for your input. This is the viewfinder version of the EOS R’s Quick Control screen.
- Use the directional buttons to navigate to the Metering Mode icon, which is the fourth from the top in the left column. Then rotate either dial to select one of the four modes described next.
- Press SET to confirm.
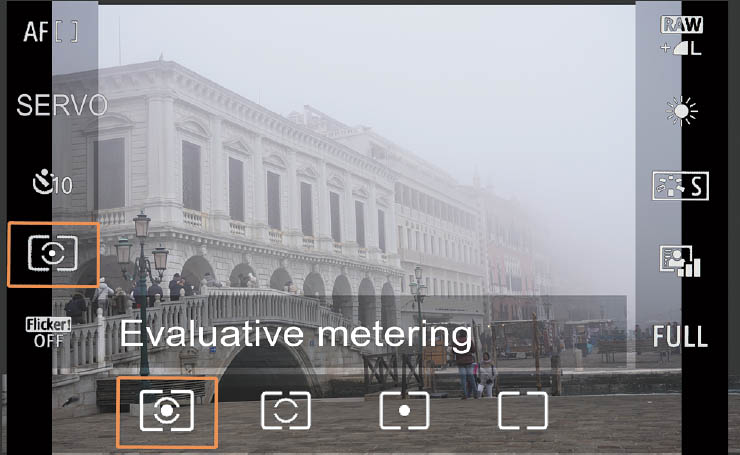
Figure 1.8 When looking through the viewfinder, you can select Metering modes (left to right, bottom of the screen): Evaluative, Partial, Spot, Center-weighted.
GETTING INFO
If at any time the expected display does not appear on the LCD screen or electronic viewfinder display in shooting or playback modes, press the INFO button several times until it is shown. One of the most frequent queries I get from new users asks why, when they follow the directions in my book, the illustrated screen isn’t shown. In virtually all cases, it’s because the photographer has changed the display using the INFO button on the back of the camera to the right of the viewfinder.
- Option 2: While looking at the LCD screen:
- The screen will display either one of several different image previews of your subject, or a graphic-based information screen. (You can cycle among these informational displays by pressing the INFO button.)
- If the image preview is displayed, press the Q button and select a metering mode from the LCD version of the Quick Control screen that appears, using the directional buttons as described above in Option 1. The screen is very similar to the one shown in Figure 1.8; the chief difference is that boxes appear around the choices, which indicates you can tap them with the touch screen instead of using navigational controls, which you can use for Option 3, described below.
- If the graphic screen is displayed, press the Q button to see the graphic version of the Quick Control screen, shown in Figure 1.9. Navigate to the Metering Mode icon, which is in the center of the bottom row of icons. Rotate either dial to choose a mode, then press SET to confirm.
- Option 3: When using touch controls:
- Access either the LCD or graphic versions of the Quick Control screen as described in Option 2.
- Tap the Metering Mode icon in either screen, then tap the metering mode you want to select. Confirm and exit by tapping the “Return” arrow icon. I’ll explain all your touch screen options in Chapter 2.

Figure 1.9 When viewing the graphic screen, Metering modes can be selected by rotating either dial while the Metering Mode icon is highlighted.
The four metering modes you’ll be using are these:
- Evaluative metering. The standard metering mode; the EOS R attempts to intelligently classify your image and choose the best exposure based on readings from a large number of zones within the image sensor.
- Partial metering. Exposure is based on a central spot, roughly 6.1 percent of the image area.
- Spot metering. Exposure is calculated from a smaller central spot, about 2.7 percent of the image area, located in the center of the frame.
- Center-weighted averaging metering. The EOS R meters the entire scene, but gives the most emphasis to the central area of the frame.
You’ll find a detailed description of each of these modes in Chapter 4.
Choosing a Focus Mode
You can easily switch between automatic and manual focus by moving the AF/MF switch on the lens mounted on your camera. However, if you’re using a semi-automatic shooting mode, you’ll still need to choose an appropriate focus mode, which tells the EOS R when to focus when AF is active. (You can read more on selecting focus parameters in Chapter 5.)
To set the autofocus mode, access the viewfinder or two LCD screen versions of the Quick Control display, as described above, and navigate to the Focus Mode icon. It’s located immediately to the left of the Metering Mode icon in the graphic Quick Control screen, and second from the top in the left column of the other two views. Choose one of these options, represented by the labels One-Shot or Servo.
- One-Shot. This mode, sometimes called single autofocus, locks in a focus point when the shutter button is pressed down halfway. Green boxes will appear when the image is in focus at the active focus points, or orange if the EOS R is unable to achieve sharp focus. The focus will remain locked until you release the button or take the picture. This mode is best when your subject is relatively motionless.
- Servo AF. This mode, sometimes called continuous autofocus, sets focus when you partially depress the shutter button, but continues to monitor the frame and refocuses if the camera or subject is moved. This is a useful mode for photographing sports and moving subjects.
Selecting AF Method
The Canon EOS R uses up to 5,655 different focus points embedded in the sensor to calculate correct focus. In Scene Intelligent Auto mode, the focus point is selected automatically by the camera, using the face detection and tracking mode I’ll describe shortly. In the other semi-automatic and manual exposure modes, you can allow the camera to select the focus point automatically, or you can specify which focus point should be used.
Your camera has seven different ways of specifying which of the 5,655 focus points is selected by the camera automatically, or by the user manually. I’ll describe all of them in detail in Chapters 5 and 12, and will include illustrations showing the size and coverage of each of the AF methods. Your options are as follows:
- Face+Tracking. The EOS R uses intelligent algorithms to locate human faces within the frame. The camera will then automatically focus on that face, and track it if your subject moves, refocusing as necessary. A bracketed box appears over the face to show you the active focus area. If no face is found, it will use all the focus points within the frame. As I’ll explain in Chapter 5, you can select the initial position for autofocus when using Servo AF.
I recommend Face+Tracking as your default AF focus method when starting to use your EOS R. I’ll provide extensive tips for choosing the other six methods, and will only describe them briefly in this chapter.
- 1-point AF. Allows you to manually select a single, reduced-size AF point.
- Expand AF area. You can manually select a single AF point, as well as the four points located above, below, and to the left/right of it.
- Expand AF area: Around. You can manually select a single AF point, as well as up to eight points surrounding it (above, below, left, right, and diagonally from the selected point).
- Zone AF. AF points are segregated into square-shaped zones that cover about one-sixth of the frame, and you can select which zone to use. In this Zone mode and the two that follow, the EOS R will seek out faces, if present, and attempt to focus on them.
- Large Zone AF (Vertical). AF points are segregated into larger, vertically oriented zones, and you can select which zone to use.
- Large Zone AF (Horizontal). The AF points are located with a larger horizontally oriented zone that you specify.
The EOS R offers several ways of choosing the AF method. Here’s a quick how-to on choosing the autofocus areas your camera will use:
- 1. Press the AF point selection button. It’s located at the far right of the back of the camera. (See Figure 1.10, left.) You must press this button each time you want to change the AF area selection mode or when you want to select a specific AF point after the mode is specified.
- 2. Change modes. Within about six seconds of pressing the AF point selection button, press the M-Fn button (located on top of the camera next to the shutter release button) repeatedly to cycle among the seven available modes. (See Figure 1.10, center.) You can also opt to rotate either dial or use the left/right directional buttons to cycle among the AF methods. Use whichever control is more convenient for you.
- 3. Select AF area mode. As you press the M-Fn button (or use another control) the display shown at right in Figure 1.10 appears. The highlighting will change to indicate which mode is selected. Press SET to confirm.

Figure 1.10 Choose AF area mode.
SIX-SECOND RULE
Many informational and settings screens will be “live” for about 6 to 14 seconds after you’ve pressed the relevant button. I won’t repeat that information for every setting in this book; if a screen vanishes, just press the appropriate button once more.
MOVING THE AF POINT/ZONE
Once you’ve chosen your AF method, you can move the active focus point around the screen to a location of your choice when using any of the AF methods except Face+Tracking. Just press the AF point selection button, as you did before, but do not touch the M-Fn button. Instead, simply use the Main Dial to move the selected point, group of points, or zone left or right in the array, and the Quick Control Dial to move the point, group, or zone up or down. Or, you can use the directional buttons.
Other Settings
There are a few other options, such as white balance, using the self-timer, or working with flash. You can use these right away if you’re feeling ambitious, but don’t feel ashamed if you postpone using these features until you’ve racked up a little more experience with your EOS R.
Adjusting White Balance and ISO
If you like, you can custom-tailor your white balance (color balance) and ISO sensitivity settings. To start out, it’s best to set white balance (WB) to Auto, and ISO to ISO 100 or ISO 200 for daylight photos, and ISO 400 for pictures in dimmer light. You’ll find recommendations in Chapter 4.
- ISO. The easiest way to change ISO sensitivity is to use the M-Fn button on top of the camera. When you press it (without first pressing the AF point selection button), a screen appears with several functions you can adjust. Rotate the Quick Control Dial to choose which setting will be adjusted. ISO is the one located the farthest to the left. When it is highlighted, rotate the Main Dial to cycle among available ISO settings, which range for ISO Auto to ISO 100–40000. Press SET to confirm. I’ll show you how to expand those available settings from a low of ISO 50 (equivalent) to a high or ISO 102400 (equivalent) in Chapter 14.
- White Balance. This setting is also available from the array displayed by the M-Fn button. Rotate the Quick Control Dial until White Balance is highlighted. It’s the fourth adjustment from the left. Then, rotate the Main Dial to choose a white balance setting, from among two varieties of Auto White Balance (Ambience Priority [warm] and White Priority), Daylight, Shade, Cloudy/Twilight/Sunset, Tungsten, White Fluorescent, Flash, Custom, and Color Temperature. You can also adjust white balance in the Quick Control screen, described earlier in the section on choosing a Metering Mode.
Using Drive Modes and Self-Timer/Remote
Drive modes derive their name from the days of film shooting, when physical mechanisms were used to advance the film and provide a delay before the shutter was triggered. Your EOS R has five “drive” modes, one for taking a single shot each time the shutter is pressed, two continuous shooting modes that can capture images at up to 8.0 and 5.4 shots per second, and two self-timer/remote modes which trip the shutter after 10 seconds or 2 seconds have elapsed.
The fastest way to choose a drive mode is with the M-Fn button, as described earlier. The Drive icon is the second from the left in the M-Fn array. Highlight it using the Quick Control Dial, and then select one of these modes using the Main Dial.
- Single shooting. Each time you press the shutter button down all the way, the EOS R takes one picture.
- High-speed continuous shooting. Hold down the shutter button to capture photos at a maximum rate of about 8 frames per second. Shooting is slower in some picture-taking modes, as I’ll explain in Chapter 6.
- Low-speed continuous shooting. Holding down the shutter button yields shooting at up to 3 frames per second.
- Self-timer: 10 sec./remote control. The EOS R takes a photo 10 seconds after you press the shutter release all the way, or trigger the camera using a remote control, such as the RS-60E3. You’d use this setting when you want to have enough time to get in the picture yourself.
- Self-timer: 2 sec./remote control. This version takes a picture after a delay of only 2 seconds. Use it when you simply want to allow the camera to stabilize after you’ve pressed the shutter release, minimizing camera shake (say, for long exposures).
Taking a Picture
These final sections of the chapter guide you through taking your first pictures, reviewing them on the LCD monitor, and transferring your shots to your computer.
Just press the shutter release button halfway to lock in focus at the selected autofocus point. When the shutter button is in the half-depressed position, the exposure, calculated using the shooting mode you’ve selected, is also locked.
Press the button the rest of the way down to take a picture. At that instant, the shutter opens, the electronic flash (if attached and enabled) fires, and your EOS R’s sensor absorbs a burst of light to capture an exposure. In fractions of a moment, the shutter closes, and the image you’ve taken is escorted off the CMOS sensor chip very quickly into an in-camera store of memory called a buffer, and the EOS R is ready to take another photo. The buffer continues dumping your image onto the memory card as you keep snapping pictures without pause (at least until the buffer fills and you must wait for it to get ahead of your continuous shooting, or your memory card fills completely).
Reviewing the Images You’ve Taken
The Canon EOS R has a broad range of playback and image review options. Here are the basics, as shown in Figure 1.11. I’ll explain more choices, such as rotating the image on review, in Chapter 2.
- Display image. Press the Playback button (marked with a blue right-pointing triangle at the lower-right edge of the back of the EOS R just to the left of the Trash button) to display the most recent image on the LCD screen in full-screen single-image mode. If you last viewed your images using the thumbnail mode (described later in this list), the Index display appears instead.
- View additional images. Rotate the Quick Control Dial to review additional images, one at a time. Turn it to the left to review images from most recent to oldest or toward the right to start with the last image viewed and cycle forward to the newest. You can also move among images using the left/right directional buttons or the touch screen (which I’ll explain in Chapter 2).

Figure 1.11 Review your images.
- Jump ahead or back. When you’re using the single-image display (not zoomed or viewing reduced-size thumbnail images), you can zip through your shots more quickly to find a specific image. Just rotate the Main Dial (seen jutting above the top of the back of the camera in Figure 1.11) to leap ahead or back 1, 10, or 100 images, depending on the increment you’ve set using the last entry in the Playback 2 menu. I find the EOS R’s use of the Main Dial is faster. You can also jump ahead by screens of images, by date, or by folder, and jump among movies, stills, images that have been “protected” or assigned an image “rating.” (You can mark favorite images to protect them from accidental erasure, or with one to four stars, as I’ll explain when I show you how to select all these Playback options in Chapter 13.)
- View image information. Press the INFO button repeatedly to cycle among overlays of basic image information, detailed shooting information, or no information at all.
- Zoom in on an image. When an image is displayed full-screen on your LCD, press the Magnify/Reduce button. This button doubles as the AF Point Selection button, described earlier, and its Playback mode function is labeled with a blue magnifying glass icon. Rotate the Main Dial to zoom in or out. Press the Playback button to exit magnified display. I’ll show you how to specify how much magnification is applied (from 2X up to 10X is available) using the Playback 3 menu, in Chapter 13. Pinching and spreading two fingers on the touch screen can also be used to zoom in and out, as described in Chapter 2.
- Scroll around in a magnified image. Press the Magnify/Reduce button, then use the directional buttons to scroll around within a magnified image.
- View thumbnail images. You can also rapidly move among a large number of images using the Index mode described in the section that follows this list.
- Access functions. While reviewing pictures in full-image view, you can press the Q button to produce a Quick Control screen that gives you access to many simple functions. You can protect or rate images, resize them, change the jumping method, rotate them, perform RAW image processing, enable or disable highlight alerts, search for images, and activate/deactivate AF point display. When the Quick Control screen is visible, use the directional buttons to select the function to perform. I’ll explain the advantages of all these options in Chapter 3.
Cruising through Index Views
You can navigate quickly among thumbnails representing a series of images using the EOS R’s Index mode. Here are your basic options.
- Display thumbnails. Press the Playback button to display an image on the color LCD screen. If you last viewed your images using Index mode, an array of images appears automatically (see Figure 1.12). If an image pops up full-screen in single-image mode, press the Magnify/Reduce button once. Then, you can switch among 4, 9, 36, and 100 images, and back to single-image view by rotating the Main Dial counterclockwise. A few clicks will take you from magnified view to the four-image index view (and continuing to rotate counterclockwise will produce fewer/larger index images), whereas clockwise switches to fewer index images and back to single-image mode.
Figure 1.12 Review thumbnails of 4, 9, 36, or 100 images using Index review.
- Navigate within a screen of index images. In Index mode, use the QCD to move the highlight box around within the current Index display screen.
- Check image. When an image you want to examine more closely is highlighted, press the SET button until the single-image version appears full screen on your LCD screen.
Transferring Photos to Your Computer
The final step in your picture-taking session will be to transfer the photos you’ve taken to your computer for printing, further review, or image editing. Your EOS R allows you to print directly to PictBridge-compatible printers and to create print orders right in the camera.
For now, you’ll probably want to transfer your images either by using a cable transfer from the camera to the computer or by removing the memory card from the EOS R and transferring the images with a card reader. The latter option is generally the best, because it’s usually much faster and doesn’t deplete the battery of your camera. However, you can use a cable transfer when you have the cable and a computer, but no card reader (perhaps you’re using the computer of a friend or colleague, or at an Internet café).
To transfer images from the camera to a Mac or PC computer using the USB cable:
- 1. Turn off the camera.
- 2. Pry back the rubber cover that protects the EOS R’s USB port, and plug the USB Type-C cable furnished with the camera into the USB port. (See Figure 1.13.)
- 3. Connect the other end of the USB cable to a USB Type-C port on your computer. (You may need to use an optional Type-C to USB A adapter if your device lacks a USB Type-C port.)
- 4. Turn on the camera. Your installed software usually detects the camera and offers to transfer the pictures, or the camera appears on your desktop as a mass storage device, enabling you to drag and drop the files to your computer.

Figure 1.13 Images can be transferred to your computer using a USB cable.
To transfer images from a memory card to the computer using a card reader:
- 1. Turn off the camera.
- 2. Slide open the memory card door, and press the gray button, which ejects the Compact Flash card, or press down on the SD card to pop it up for removal.
- 3. Insert the memory card into your memory card reader. Your installed software detects the files on the card and offers to transfer them. The card can also appear as a mass storage device on your desktop, which you can open and then drag and drop the files to your computer.
Mastering the Quick Control Menus
As mentioned earlier, in Shooting or Playback modes, when you press the Q button, a Quick Control menu appears with icons representing adjustments you can make for that mode. In most cases, using an available Quick Control option is faster than making a visit to the multiple tabs of the conventional menu system. The Quick Control menus shown in the electronic viewfinder and LCD screen for each mode are very similar, so I’m going to show you one of each.
Quick Control: Shooting
The viewfinder version of the Quick Control menu in Shooting mode is shown in Figure 1.14. (The LCD screen version is similar, but can be accessed by tapping on the icons, including a Return icon used to exit the Quick Control menu.)
To access any of the features, use the up/down directional buttons to move highlighting from one icon to the next one; movement will wrap around between columns. When you’ve highlighted the adjustment you want to make, use the left/right directional buttons or either dial to select from the options displayed at the bottom of the screen. Your choices include:
- AF method. Choose the area of the frame which will be used to focus automatically, as described earlier in this chapter.
- Focus mode. Choose from One-Shot or Servo modes.
- Drive mode. Select Single Shooting, High-Speed Continuous, Low-Speed Continuous, Self-timer: 10 sec., or Self-timer: 2 sec. You can learn more about continuous shooting in Chapter 7.
- Anti-flicker. Counter the flickering effects of some types of illumination, as explained in Chapter 11.
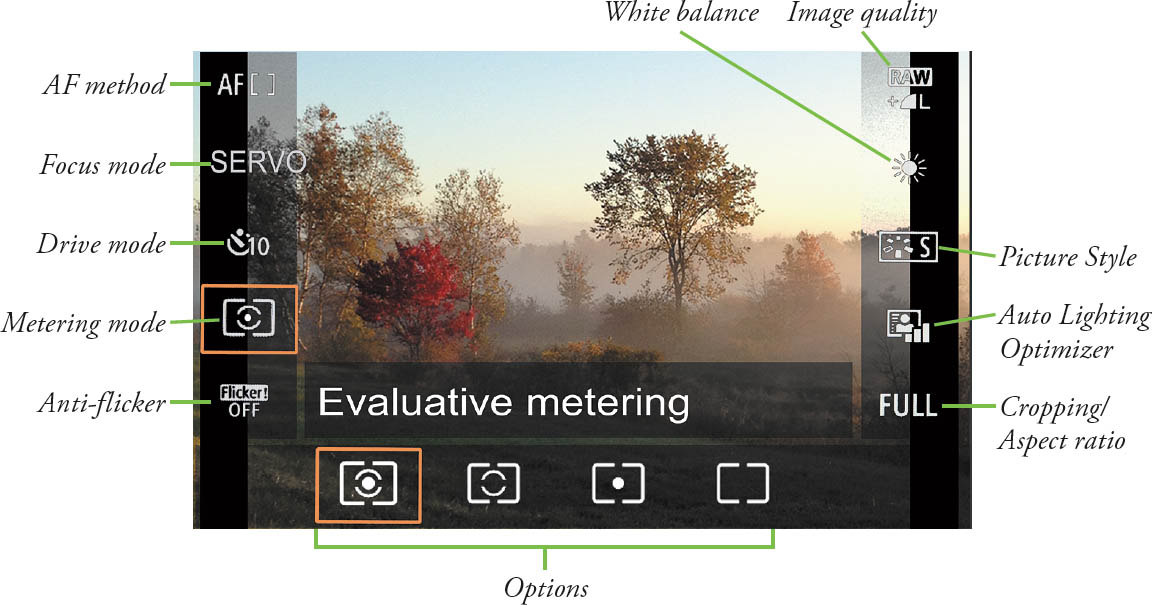
Figure 1.14 Viewfinder version of Shooting mode Quick Control screen.
- Image quality. Choose from RAW and JPEG formats and Large, Medium, and Small resolutions.
- White balance. Select various white balance options, such as Daylight and Incandescent.
- Picture Style. Apply photo-enhancing parameters to your images as you shoot, as described in Chapter 11.
- Auto Lighting Optimizer. Adjust shadow detail in high-contrast images.
- Cropping/Aspect ratio. Crop your image to 1.6X (APS-C) format; or change the proportions to 1:1, 4:3, or 16:9 aspect ratios.
Quick Control: Playback
The LCD version of the Quick Control menu in Playback mode is shown in Figure 1.15. As with the Shooting LCD version, you can access any of the features by tapping the icons or pressing the up/down directional buttons to move highlighting from one icon to the next. When you’ve highlighted the adjustment you want to make, use the left/right directional buttons or either dial to select from the options displayed. Your choices include the following, which I will explain in detail in Chapter 13:
- Protect images. You can protect images or groups of images from accidental erasure (but not from a card format).
- Rotate image. Rotate the current image on the display in 90-degree increments.
- Rating. Apply one to five stars to images; these can be used to sort and search for images assigned to each rating.
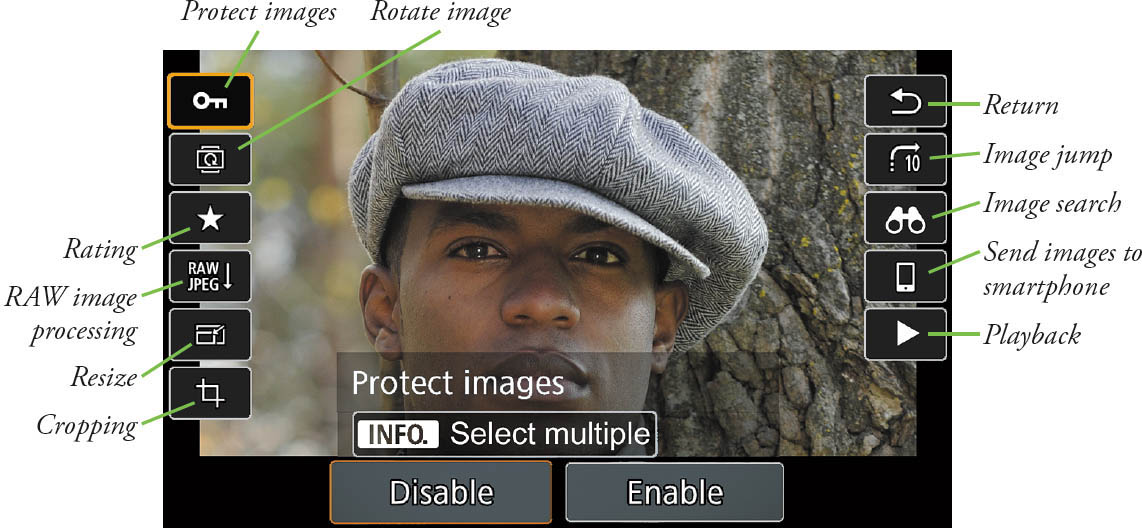
Figure 1.15 LCD screen version of Playback mode Quick Control screen.
- RAW image processing. You can perform many RAW processing functions to a RAW image, such as Brightness, White balance, Picture Style, Auto Lighting Optimizer, High ISO Noise Reduction, Image Quality, Color Space, and Lens Aberration Correction. Then you can save a processed JPEG version, leaving the original RAW file untouched. You can learn more about these parameters in Chapter 11, and the RAW image processing feature in Chapter 13.
- Resize. Convert a full-frame Large image to Medium and Small resolutions.
- Cropping. You can crop, straighten, or change the aspect ratio of an image, and then save a converted copy.
- Return. Tap this icon to exit. It is available only in the LCD screen version of the Quick Control menu.
- Image jump. Jump forward or back among images during playback using leaps of 1, 10, or a specified number of images, or by date, folder name, or by movies, stills, protected, or rated image parameters.
- Image search. You can search for images using one or more search parameters, including a specific rating, specified date, selected folder/protected condition, or file type.
- Send images to smartphone. As I’ll show you in Chapter 6, you can send your shots to your smart device automatically, and select them using this option.
- Playback. Displays most recently shot image.