In the last two chapters, I introduced you to the layout and general functions of the Canon EOS R’s menu system, with specifics on how to customize your camera with the Shooting and Autofocus menus. In this chapter, you’ll learn how to work with the Playback and Set-up menus. If you’re jumping directly to this chapter and need some guidance in how to navigate the EOS R’s menu system, review the first few pages of Chapter 11. Otherwise, you’re welcome to dive right in.
Playback Menu Options
The three blue-coded Playback menus are where you select options related to the display, review, transfer, and printing of the photos you’ve taken. Most of these entries are functions rather than settings, and thus only a few have actual default values, such as Image Jump with Main Dial (10 images), Magnification (2X), and Control over HDMI (Disable). The choices you’ll find include:
- Protect Images
- Rotate Image
- Erase Images
- Print Order
- Photobook Set-up
- Image Transfer
- RAW Image Processing
- Cropping
- Resize
- Rating
- Slide Show
- Set Image Search Conditions
- Image Jump with Main Dial
- Playback Information Display
- Highlight Alert
- AF Point Disp.
- Playback Grid
- Movie Play Count
- View From Last Seen
- Magnification (apx)
Protect Images
Options: Select Images, Select Range, All Images in Folder, Unprotect All Images in Folder, All Images on Card, Unprotect All Images on Card
My preference: N/A
This is the first of seven entries in the Playback 1 menu (see Figure 13.1). If you want to keep an image from being accidentally erased (either with the Erase button or by using the Erase Images entry in the Playback menu), you can mark that image for protection. Use the Protect entry in the Playback version of the Quick Control menu (described next), or use this menu item. To protect one or more images, press the MENU button while viewing an image and choose Protect from the Playback 1 menu. Then, select from the following options:
- Select Images
- Select Range
- All Images in Folder
- Unprotect All Images in Folder
- All Images on Card
- Unprotect All Images on Card
If you choose the first option, you can view and select individual images with the left/right directional controls, Main Dial, or touch screen, followed by pressing the SET button when the image you want to protect is displayed on the screen. A key icon will appear at the upper edge of the information display while still in the protection screen, and when reviewing that image later. Choose Select Range and you can mark the first of a string of images by highlighting it and pressing SET. Then navigate to the last image to be protected and press SET again.
To remove protection, repeat the process. You can scroll among the other images on your memory card and protect/unprotect them in the same way. Image protection will not save your images from removal when the card is reformatted.
A fast way to protect images is to press the Q button when an image is displayed, then navigate to the Protect “key” icon that appears at top in the left-hand column. (See Figure 13.2.) When Enable is highlighted, press SET to protect the current image, or press INFO to select multiple images using the Select Range, All Images on Card, or Unprotect All Images on Card options that appear.
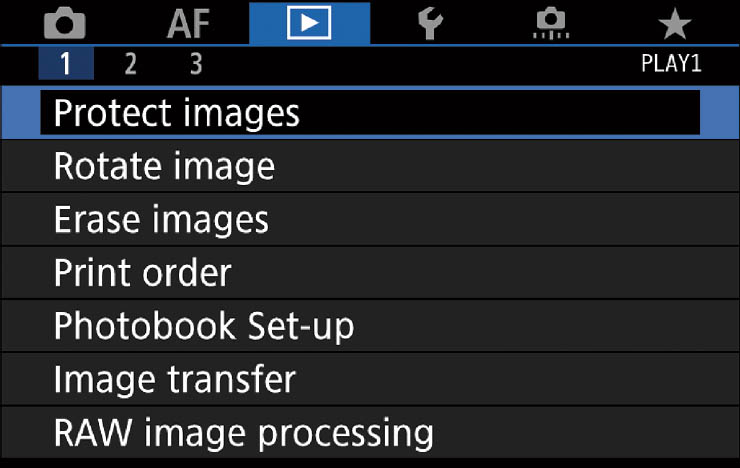
Figure 13.1 The Playback 1 menu.
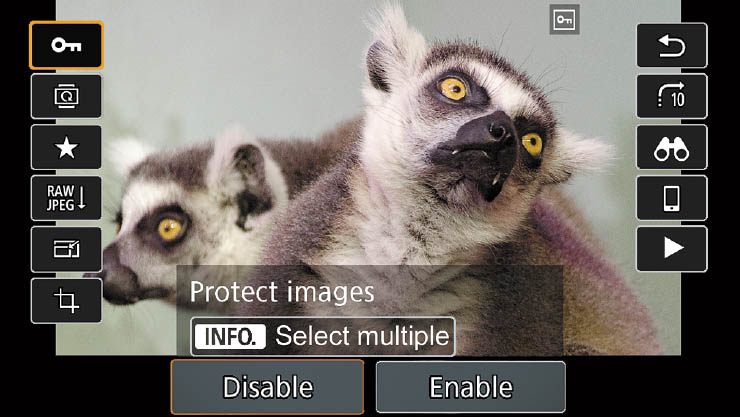
Figure 13.2 Protected images can be locked against accidental erasure (but not preserved from formatting).
Rotate Image
Options: Rotate image
My preference: N/A
While you can set the EOS R to automatically rotate images taken in a vertical orientation using the Auto Rotate option in the Set-up 1 menu (as described later in this chapter), you can manually rotate an image during playback using this menu selection. Select Rotate from the Playback 1 menu, use the Quick Control Dial to page through the available images on your memory card until the one you want to rotate appears, then press SET. The image will appear on the screen rotated 90 degrees. Press SET again, and the image will be rotated 270 degrees. (See Figure 13.3.) Note that you can also rotate images from the Quick Control menu that appears when you press the Q button during Playback. It’s the second icon from the top in the left column, as shown earlier in Figure 13.2.

Figure 13.3 A vertically oriented image that isn’t rotated appears larger on the LCD (left), but rotation allows viewing the photo without turning the camera (right).
Erase Images
Options: Select and Erase Images, Select Range, All Images in Folder, All Images on Card
My preference: N/A
Choose this menu entry and you’ll be given four choices: Select and Erase Images, Select Range, All Images in Folder, and All Images on Card. You can use the first three to selectively remove images, while the third option deletes all the pictures on a card. But, using the Format command is usually faster and more thorough.
- Select and Erase Images. View the images on your card by pressing the left/right directional buttons to scroll through them. To mark an image for deletion or to remove a check mark, press the SET button. When you’re finished selecting, press the Trash button (to the lower right of the LCD) and you’ll be asked to confirm. Choose Cancel or OK and SET to finish.
- Select Range. Operates similarly to the range protect option listed earlier. Choose Select Range and you can mark the first of a string of images by highlighting it and pressing SET. Then navigate to the last image to be erased and press SET again.
- All Images in Folder. You’ll be shown a list of the available folders on your memory card. Select SET, and a prompt will appear asking you to confirm, and reminding you that Protected images will not be removed.
- All Images on Card. A prompt will ask you to confirm this step. The All Images on Card choice removes all the pictures on the card, except for those you’ve marked with the Protect command, and does not reformat the memory card.
Print Order
Options: Select Image, Multiple: Select Range, Mark/Clear All in Folder, Mark All/Clear All on Card; Set Up: Print type (Standard, Index, Both); Date (On/Off); File Number (On/Off)
My preference: N/A
The EOS R supports the DPOF (Digital Print Order Format) that is now almost universally used by digital cameras to specify which images on your memory card should be printed, and the number of prints desired of each image. This information is recorded on the memory card, and can be interpreted by a compatible printer. Photo labs are also equipped to read this data and make prints when you supply your memory card to them.
Once marked for DPOF printing, you can print the selected images, or take your memory card to a digital lab or kiosk, which is equipped to read the print order and make the copies you’ve specified. (You can’t “order” prints of RAW images or movies.) To create a DPOF print order, just follow these steps:
- 1. Access Print Order screen. In the Playback 1 menu, navigate to Print Order. Press SET.
- 2. Access Set-up. The Print Order screen will appear. (See Figure 13.4.) Use the directional buttons to highlight Set Up. Press SET.

Figure 13.4 Select the images to be printed individually, by folder, or all the images on your memory card.
- 3. Select Print type. Choose Print Type (Standard, Index/Thumbnails print, or Both), and specify whether Date or File Number imprinting should be turned on or off. (You can turn one or the other on, but not both Date and File Number imprinting.) You cannot set print type individually; all images in the print order will use the same print type. Press MENU to return to the Print Order screen.
- 4. Choose selection method. Highlight Sel. Image (choose individual images) or Multiple.
- Select individual images. With Sel. Image, use the directional buttons to view the images, and press SET to mark or unmark an image for printing. If you’d rather view thumbnails of images, press the Thumbnail/Zoom In button. Press the Magnify/Zoom Out button to return to single-image view.
- Multiple. Allows you to select a Range, Mark All in Folder, Clear All in Folder, Mark All on Card, or Clear All on Card. Press SET to choose a range or folder, and MENU to return to the print order screen.
- 5. Choose number of prints. If you’ve selected individual images (rather than a range, folder, or card) as an image is selected, you can press the up/down directional buttons to specify 1 to 99 prints for that image. (For Index prints, you can only specify whether the selected image is included in the index print, not the number of copies.) Press SET to confirm. You can then use the up/down buttons to select additional images. Press MENU when finished selecting to return to the Print Order screen.
- 6. Output your hardcopies. If the camera is linked to a PictBridge-compatible printer, an additional option appears on the Print Order screen—Print. You can select that; optionally, adjust Paper Settings as described in the previous section, and start the printing process. Alternately, you can exit the Print Order screen by tapping the shutter release button. Then turn off the camera and printer, remove the memory card, and insert it in the memory card slot of a compatible printer, retailer kiosk, or digital minilab.
Photobook Set-up
Options: Select Images, Multiple
My preference: N/A
You can select up to 998 images on your memory card, and then use the EOS Utility to copy them all to a specific folder on your computer. This is a handy way to transfer only specific images to a particular folder, and is especially useful when you’re collecting photos to assemble in a photobook. Your choices include:
- Select images. You can mark individual images from any folder on your memory card.
- Multiple. You can choose Select Range, All images in folder, Clear all in folder, All images on card, Clear all on card.
Once you marked the images you want to transfer to the specified folder, use the EOS Utility to copy them.
Image Transfer
Options: Image Select/Transfer: Direct Transfer, FTP Transfer; RAW+JPEG Transfer: JPEG only, RAW only, RAW+JPEG; Transfer with Caption
My preference: N/A
You can specify which images are to be transferred to your personal computer when the EOS R is linked to the computer with a USB cable. Individual images are “marked” using a review and selection system like the one used to specify print orders. Your options include:
- Image Sel./Transfer. You must first choose whether you want to do a direct transfer of images by connecting the EOS R to a computer with the USB Type-C cable or whether you’d prefer to perform an FTP transfer using a wireless file transmitter such as the Canon Wireless File Transmitter WFT-E7. Note: For instructions on doing an FTP transfer, consult your transmitter’s instruction manual.
For a direct transfer, connect the camera and computer, turn the EOS R on, and when a request to select a program appears on your computer choose EOS Utility (which you must previously have installed, of course). Direct Transfer will appear on the camera’s screen and you can proceed to select individual images (Sel. Image), a folder (Multiple), or All Images.
For Select Image, use the customary image selection screens to move among images with the QCD, pressing the SET button to mark the image for transfer. Once selected, you can rotate the QCD (or tap the arrows at the bottom of the screen) to mark or unmark (using a check mark) the image, and return to the selection screen by pressing MENU. Press the Magnify/Reduce button to zoom in and out of the image. Using Multiple you can choose images by range, folder, or card, as described earlier for Photobook Setup. During transfer, the display shows the total number of images to be transferred, the number of images that failed to transfer properly, and the total transferred.
- RAW+JPEG Transfer. You can elect to transfer all selected RAW+JPEG images, or, alternatively, tell the camera to transfer either the JPEG images (only) or RAW image (only). For example, if you plan on working with the RAW versions of each shot, you can leave the JPEG files on the memory card, for transfer later, or to discard when you reformat the card.
- Transfer with Caption. You can create captions in the EOS Utility, register the captions with the camera, and then, using this option (which is available only when images with captions have been captured), transfer the caption information along with the image file.
RAW Image Processing
Options: Select Images, Select Range; Use Shot Settings; Customize RAW Processing: Brightness, White balance, Picture Style, Auto Lighting Optimizer, High ISO Noise Reduction, Image Quality, Color Space, Lens Aberration Correction
My preference: N/A
You can produce JPEG versions of your full-size RAW images (but not S RAW files) right in the camera. The original RAW shot is not modified. When you select this menu entry, only compatible RAW images are offered for your selection. Just follow these steps:
- 1. View RAW images. From the first screen that appears, select either Select Images (to choose individual RAW images) or Select Range (to choose a continuous series of images). Rotate the QCD to scroll through compatible images. Press the Magnify button and rotate the Main Dial counterclockwise to view a selection of index images instead.
- 2. Select image to process. Press SET to select an image for processing. A check mark will appear next to it. When you are done choosing, press MENU to move on to the next step.
- 3. Use Shot Settings or Customize RAW Processing. If you select Use Shot Settings in the next screen, the EOS R will immediately create JPEG copies of the RAW image(s) you specified. If you want to customize settings, proceed to Step 4.
- 4. Specify parameters. A screen appears with a selection of parameters you can adjust. (See Figure 13.5.) Navigate to the parameter you want to manipulate using the directional buttons. Your choices include:
- Brightness
- White Balance
- Picture Style
- Auto Lighting Optimizer
- High ISO Noise Reduction
- Image Quality
- Color Space
- Lens Aberration Correction
- 5. Make adjustments. All parameters will already be set to those specified when you exposed the RAW file. When a parameter you want to change is highlighted, press SET, then rotate either dial to select an option. Some changes are difficult to see; press the Magnify button to enlarge a portion of the image for review. Press SET to confirm your option, and return to the main screen.

Figure 13.5 Select from eight types of correction using RAW Image Processing.
- 6. Repeat Step 5 (optional). You can continue making adjustments to any or all of the other parameters. At any time you can press the Trash/Erase button to cancel all the changes you’ve made so far.
- 7. Compare before/after. Here’s the cool part. After you’ve made adjustments, you can press the INFO button to compare your before and after images. The image will be shown in the After Change version (and labeled as such) with the parameters you’ve modified highlighted in orange in the upper-right corner of the screen. Rotate the QCD to toggle between the After Change image and the Shot Settings (original) version. Press MENU to exit Compare mode.
- 8. Save JPEG. When you’re satisfied with your changes, navigate to the Save icon at the bottom right of the screen (just above the Return arrow) and press SET. Choose OK to save as a new file, or Cancel to abort the process. If the original was shot using an aspect ratio other than 3:2, the image will be displayed in those proportions, and the JPEG will be saved in that aspect ratio.
Cropping
Options: Crop, Aspect ratio
My preference: N/A
This entry is the first on the Playback 2 menu. (See Figure 13.6.) If you need to crop an image, you can do it here. You don’t have as much control as you would have in an image editor, but if you, say, need to crop an image for emailing or uploading to a social media site, this may do the job. You can crop only JPEG images. This function does not work on RAW images, or frames grabbed from 4K movies.
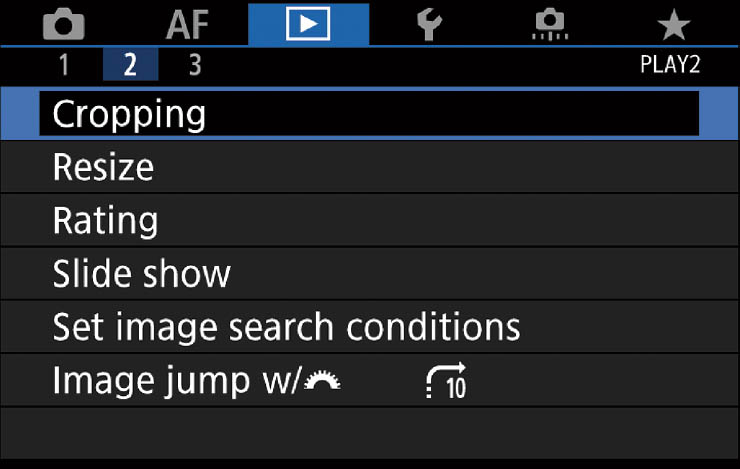
Figure 13.6 Cropping is the first entry in the Playback 2 menu.
Simply select this menu entry and press SET. A compatible JPEG image appears. Use the QCD to select an image for cropping. Press the Magnify/Reduce button and rotate the Main Dial counterclockwise to view and select a thumbnail image in index view. Press SET when you’ve chosen your image and MENU to go to the screen shown in Figure 13.7. (Note that you can also crop images from the Quick Control menu that appears when you press the Q button during Playback. It’s the fifth icon from the top in the left column, as shown earlier in Figure 13.2.)
In the cropping screen you can apply one of these tools:
- Select adjustment. Arrayed along the top row of the screen are function icons. Rotate the QCD to highlight any of these (from left to right):
- Enlarge/reduce crop. Rotate the Main Dial to enlarge and reduce the green cropping frame, seen in Figure 13.7. Use the directional buttons to relocate the position of the cropping frame within the image.
- Correct for tilt. Up to plus/minus 10 degrees of tilt can be corrected. Rotating the QCD will adjust orientation in 0.1-degree increments. Rotational arrows appear in the top row that you can tap on the touch screen to adjust in 0.5-degree increments. A grid appears to help you straighten your image. Press SET to finish this correction and confirm.
- Change aspect ratio. Rotate the QCD to cycle the cropping frame’s proportions among 3:2, 16:9, 4:3, 1:1, 2:3, 9:16, or 3:4 aspect ratios.
- Save cropped image. Press SET and select OK to save your cropped image as a new file. Your original image is retained unharmed.

Figure 13.7 The green frame represents the cropped area.
Resize
Options: Medium, Small 1, Small 2 image sizes
My preference: N/A
If you’ve already taken an image and would like to create a smaller version (say, to send by e-mail), you can create one from this menu entry. Just follow these steps:
- 1. Choose Resize. Select this menu entry from the Playback 2 menu.
- 2. View images to resize. You can scroll through the available images with the touch screen or directional buttons, or press the Thumbnail/Reduce Image button to view thumbnails and select from those. Only images that can be resized are shown. They include Medium, Small 1, and Small 2 images. Small 3 and RAW images of any type cannot be resized.
- 3. Select an image. Choose SET to select an image to resize. A pop-up menu will appear on the screen offering the choice of reduced-size images. These include M (Medium: 13MP, 4464 × 2976 pixels); S1 (Small 1: 7.5MP, 3360 × 2240 pixels); or S2 (Small 2: 3.8MP, 2400 × 1600 pixels). You cannot resize an image to a size that is larger than its current size; that is, you cannot save a JPEG Medium image as JPEG Large.
- 4. Resize and save. Choose SET to save as a new file, and confirm your choice by selecting OK from the screen that pops up, or cancel to exit without saving a new version. The old version of the image is untouched.
As with some other entries in the Playback menu, you can also apply resize images from the Quick Control menu that appears when you press the Q button during Playback. It’s the fifth icon from the top in the left column, as shown earlier in Figure 13.2.
Rating
Options: Select Images (Range, All Images in Folder, All Images on Card); One to five stars
My preference: N/A
If you want to apply a quality rating to images or movies you’ve shot (or use the rating system to represent some other criteria), you can simply press the Rating button during playback multiple times to apply a rating. Or, alternatively, use this entry to give images one, two, three, four, or five stars, or turn the rating system off. The Image Jump function can display only images with a given rating. Suppose you were photographing a track meet with multiple events. You could apply a one-star rating to jumping events, two stars to relays, three stars to throwing events, four stars to hurdles, and five stars to dashes. Then, using the Image Jump feature, you could review only images of one type.
With a little imagination, you can apply the rating system to all sorts of categories. At a wedding, you could classify pictures of the bride, the groom, guests, attendants, and parents of the couple. If you were shooting school portraits, one rating could apply to first grade, another to second grade, and so on. Given a little thought, this feature has many more applications than you might think. Ratings can be used to specify images for a slide show, too, or to select images in Digital Photo Professional. Note that you can also apply ratings from the Quick Control menu that appears when you press the Q button during Playback. It’s the third icon from the top in the left column, as shown earlier in Figure 13.2.
To use the Ratings menu entry, just follow these steps:
- 1. Choose the Rating menu item.
- 2. Choose Select Images, Select Range, All Images in Folder, or All Images on Card to specify images to be rated.
- 3. When an image or movie you want to rate is visible, press SET.
- 4. Now rotate the QCD or press the up/down buttons to apply a one- to five-star rating, or turn a rating off. You can rate up to 999 images.
- 5. When finished rating, choose MENU to exit.
Slide Show
Options: Image Selection, Display Time, Repeat, Transition Effect
My preference: N/A
Slide Show is a convenient way to review images one after another, without the need to manually switch between them. To activate, just choose Slide Show from the Playback 2 menu. During playback, you can press the SET button to pause the “slide show” (in case you want to examine an image more closely), or the INFO button to change the amount of information displayed on the screen with each image. For example, you might want to review a set of images and their histograms to judge the exposure of the group of pictures.
To set up your slide show, follow these steps:
- 1. Choose images. By default, the Slide Show feature chooses all images on the card. If that’s what you want, proceed to Step 3. If you want to choose specific images, continue to Step 2.
- 2. Specify certain images. You can “filter” which images will be displayed in your slide show. The parameters can include Rating, Date, Folder, Protected, File Type (RAW, RAW+JPEG, JPEG, or Movie). You’ll find instructions for filtering images in the entry described after Slide Show: Set Image Search Conditions.
- 3. Choose Set Up. Highlight the Set Up option and press SET to begin choosing display parameters.
- 4. Choose Display time. Highlight Display Time and press SET to produce a screen with a choice of playing times (1, 2, 3, 5, 10, or 20 seconds per image). Press SET to confirm.
- 5. Repeat. If you want the show to keep playing, highlight Repeat, press SET, and Enable.
- 6. Transition Effect. This sub-entry has five possible effects (slide in from left, right, and three fade-in transitions), plus Off.
- 7. Exit Set Up. Press MENU to exit Set Up.
- 8. Start the show. Highlight Start and press SET to begin your show. (If you’d rather cancel the show you’ve just set up, press MENU instead.) Note: the display time of each slide will vary, depending on the file size of the image.
- 9. Use show options during display. Press SET to pause/restart; INFO to cycle among the four information displays for still photos; and MENU to stop the show. The EOS R auto power off feature will not turn the camera off during playback. Sound volume can be adjusted by rotating the Main Dial, and during playback or pause, you can press the left/right buttons to view a different slide.
Adding Music
Use the EOS Utility to add music files to your memory card, so you can play them back during your slide shows. Just follow these steps:
- 1. Connect. Link your EOS R to your computer and then launch the EOS Utility application.
- 2. Choose Register Background Music. When the Camera Settings screen appears, select Register Background Music to view the Background Music window.
- 3. Add tunes (optional). The EOS Utility includes several background music files with themes like sports, memories, and travel. You can also add your own music files in .WAV format to the catalog, using the Add button or by dragging and dropping the files. Up to a total of 20 different background tracks can be stored, each up to 29 minutes, 59 seconds long.
- 4. Register to card. Select the music files you want to include and click Register. They will be copied to your memory card, overwriting any music files already stored there.
Set Image Search Conditions
Options: Filter by: Rating, Date, Folder, Protection, or File Type
My preference: N/A
You don’t need to see every image on your memory card as you play them back. This entry allows you to specify which images are shown during image review, available in a slide show, or subject to the Protect and Erase features. Just follow these steps:
- 1. Choose Set Image Search Conditions. Highlight the entry and press SET.
- 2. Select condition. A vertical column at left appears with the conditions available, listed, from top to bottom: Rating, Date, Folder, Protection, or File Type. Use the up/down buttons to highlight a condition.
- 3. Enter parameter. Use the left/right buttons to set the parameter for a particular condition:
- Rating. You can choose one to five stars.
- Date. Select specific a date where photos were taken. (That is, you cannot select a date on which no images where taken with this card.
- Folder. Select from among the various folders on your card. If only one folder is available, that is chosen by default.
- Protected. Choose Protected or Unprotected images.
- Type of File. Choose to show only stills, various combinations of RAW, RAW+JPEG, and JPEG, plus movie files.
- 4. Set condition. When parameters are set for a condition, press INFO to add it to your conditions. You can press INFO again to unselect it. Mix and match conditions, choosing any one, or any combination of the five parameters. Press Trash to remove all conditions.
- 5. Confirm. Press SET to exit. An informational screen will appear. Press OK to confirm.
Image Jump with Main Dial
Options: 1 Image, 10 Images (default), Specified number (1–100), Date, Folder, Movies, Stills, Protected, Rating
My preference: 10 Images
As first described in Chapter 2, you can leap ahead or back during picture review by swiping across the touch screen with two fingers, or by rotating the Main Dial. You can select from a variety of increments that will be used with this menu entry. The Jump method is shown briefly on the screen as you leap ahead to the next image displayed, as shown in Figure 13.8.
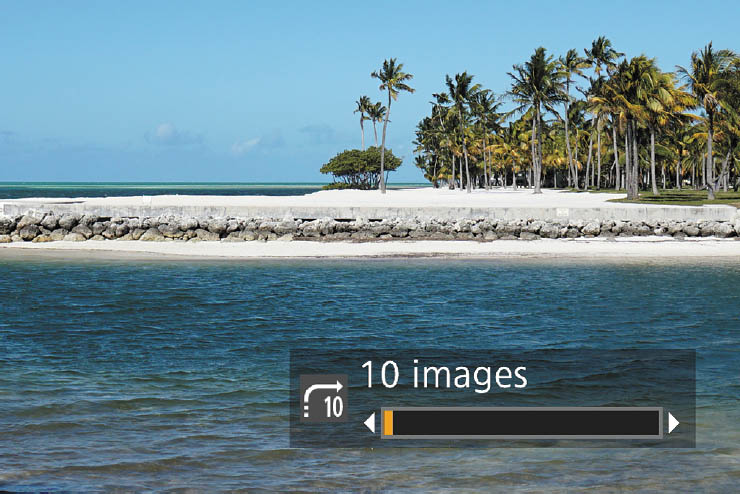
Figure 13.8 The Jump method is shown on the LCD briefly when you leap forward or back using the Main Dial or a two-fingered touch screen swipe.
Your options are as follows:
- 1 image. Rotating the Main Dial one click or swiping jumps forward or back 1 image.
- 10 images. Rotating the Main Dial one click or swiping jumps forward or back 10 images.
- Specified number. When this option is highlighted, rotate the Main Dial to choose the increment between jumps, from one image to 100.
- Date. Rotating the Main Dial one click or swiping jumps forward or back to the first image taken on the next or previous calendar date.
- Folder. Rotating the Main Dial one click or swiping jumps forward or back to the first image in the next folder available on your memory card (if one exists).
- Movies. Rotating the Main Dial one click or swiping jumps forward or back, displaying movies you captured only.
- Stills. Rotating the Main Dial one click or swiping jumps forward or back, displaying still images only.
- Protected. Rotating the main dial jumps between Protected images only. This is a good way to review images you deemed worthy of protection, or which you have marked with the protected attribute for some other reason (say, you wanted to group some favorite shots for review, but not apply a specific star rating).
- Rating. Rotating the Main Dial one click or swiping jumps forward or back, displaying images by the ratings you’ve applied (as described earlier). Tap the touch screen or rotate the Main Dial to choose the rating parameter.
Playback Information Display
Options: Enable or Disable 10 different informational screens
My preference: N/A
This is the first entry on the Playback 3 menu. (See Figure 13.9.) When you press the INFO button during Playback, the EOS R cycles among three different screens, shown in Figure 13.10. They include an uncluttered screen with no overlaid information, a basic information screen, and a shooting information screen that provides more complete information, and can include several additional optional panels of data. Use this entry to specify which of the optional screens you want to display.

Figure 13.9 The Playback 3 menu

Figure 13.10 Press INFO to cycle among these three screens: No information (upper left); Basic Information (center right); Shooting Information (lower left). You can enable or disable all but the No Information version.
Just follow these steps to include/exclude the available displays.
- 1. Access with menu entry. A screen similar to the one shown in Figure 13.11 appears. Checkmarks appear next to any of the 10 available screen options.
- 2. Highlight the screens from 1–10 that you want to see, and press SET to add a check mark. To hide a display, highlight a check marked option from 1 to 10 and press SET to unmark it.
- 3. You can mark or unmark any or all. If none are selected, only the No Information screen will be displayed during Playback. (See Figure 13.10, upper left.)
- 4. The 10 available screens are as follows:
- 1. The Basic Information screen. (See Figure 13.10, center, right.) This shows a limited amount of information, such as battery status, picture number, shutter speed, aperture, exposure compensation, ISO setting, highlight priority, and image quality.
- 2. The Shooting Information screen. which provides more detailed information like that shown in Figure 13.10, lower left. Note the scroll bar at lower right. Options 2–10 in the Playback Information Display represent additional panels that can be appended to the scroll, and described next. By default, a brightness/luminance histogram is displayed at upper right in the Shooting Information Screen. You can press INFO while activating this entry to substitute an RGB histogram instead. I showed you how to work with histograms in Chapter 4.
- 3. Lens information/alternate histogram. Activate this option and scrolling down from the main Shooting Information screen displays information about the lens used to take the current photo, as well as the other histogram display. (If the main screen shows the Brightness histogram, the RGB histogram appears here, and vice versa.) You can press INFO and exchange the order of the two histograms if you wish.
- 4. White balance. Adds WB information to the scrolling screen, including a color bias display.
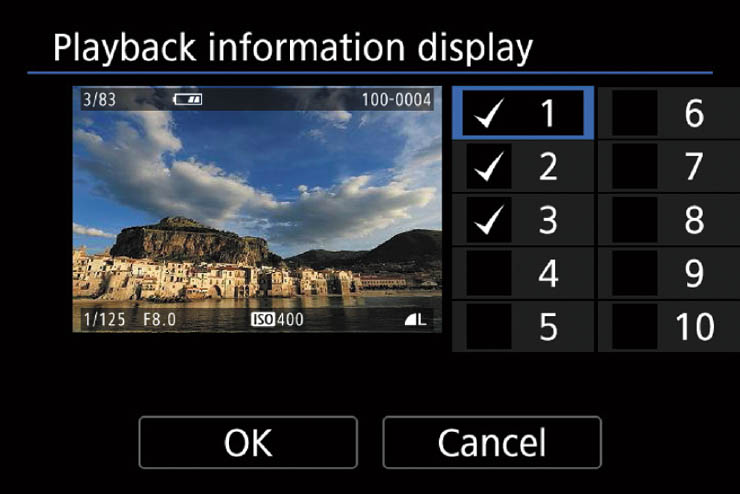
Figure 13.11 Mark any, all, or none of the Playback display options using this screen.
- 5. Picture Control. Displays current Picture Control settings.
- 6. Color Space/Noise Reduction. Appends these details to the display.
- 7. Peripheral Illumination/Distortion Correction. Shows corrections made for distortion.
- 8. Image Sent To. Lets you know that the image has been transferred to your smart device.
- 9. GPS Information. Appears if the image was taken using a GPS device.
- 10. IPTC Information. Displays International Press Telecommunications Council data if you have elected to embed it in your image using the C.Fn. 5 menu entry described in Chapter 14.
- 5. When finished adding screen options, highlight OK at the bottom left of the Playback Information Display screen and press SET.
- 6. During Playback, when the Shooting Information screen is displayed (press INFO to make it appear, if necessary), you can scroll among the activated options using the up/down directional buttons.
Highlight Alert
Options: Enable, Disable (default)
My preference: N/A
Choose Enable, and overexposed highlight areas will blink on the LCD screen during picture review (these are commonly known as “blinkies”). Set to Disable if you find this alert distracting. Many EOS R users use the histogram displays during playback as a more precise indicator of over (and under) exposure.
AF Point Disp.
Options: Enable, Disable (default)
My preference: N/A
Select Enable, and the exact AF point(s) used to determine focus will be highlighted in red. If automatic AF point selection was used, you may find multiple points highlighted.
Playback Grid
Options: 3 × 3, 6 × 4, 3 × 3+ diagonal lines, Off (default)
My preference: N/A
You can superimpose a 3 × 3, 6 × 4, or 3 × 3 plus diagonal lines grid over your image during playback, or disable the grid display entirely. (See Figure 13.12.) The same selection of grids can be displayed as you shoot, using the Set-up 4 menu entry Shooting Information Display, which I’ll explain later in this chapter.

Figure 13.12 Playback grid options.
Movie Play Count
Options: Record Time (default), Time Code
My preference: N/A
Determines whether the movie recording and playback time (Rec Time) is shown on the screen, or whether the Time Code (an absolute positional marker/index) is displayed instead. If you change the Movie Play Count setting in the Shooting 5 (Movie) menu, as described in Chapter 16, or here, the other will be changed automatically. You’ll find additional Time Code options in the Shooting 5 (Movie) menu.
View from Last Seen
Options: Enable (default), Disable
My preference: N/A
This option allows you to specify which image is shown first when you press the Playback button.
- Enable. The EOS R will show you the last image you were viewing during picture review. This is useful when you check your shots, exit Playback, and then want to pick up where you left off. However, if you take a photo in the meantime, the camera will start from the image you just captured instead.
- Disable. Playback always begins from your most recent shot. This may be your best option when shooting events or sports and you always want quick access to the last photo you captured.
Magnification (apx)
Options: 1X, 2X (default), 4X, 8X, 10X, Actual size, Same as last magnification
My preference: Same as last magnification
This setting allows you to specify the initial magnification for magnified view during playback, as well as the starting position on the screen. Choose your starter magnification based on how often you tend to take a close-up look at your images during review. If you’re a pixel-peeper, you might want an in-depth 10X view each time you magnify your image. If you’re more sedate in your zooming habits, the 1X magnification will start you off with a full-screen view you can zoom in on. I like to use the same magnification I most recently used, because I am likely to examine a series of similar images at the same zoom level during a shooting or review session. Your options are:
- 1X (no magnification). When you press the Magnify button, the initial view will be the single image display with no magnification. Continue pressing Magnify to zoom in.
- 2X, 4X, 8X, 10X (from the center of the frame). The initial magnified view will be 2X, 4X, 8X, or 10X (your choice), centered around the middle of the frame.
- Actual Size (from selected point). Magnified view starts at 100 percent, centered around the autofocus point used to achieve focus; if manual focus was used, the image will be centered around the middle of the frame.
- Same as last magnification (from the center point). The EOS R uses the same magnification value you last used, centered around the middle of the frame.
Set-up Menu Options
There are six amber-coded Set-up menu screens where you adjust how your camera behaves during your shooting session, as differentiated from the Shooting menu, which adjusts how the pictures are taken. Your choices include:
- Select Folder
- File Numbering
- File Name
- Auto Rotate
- Format Card
- Eco Mode
- Power Saving
- Display Brightness
- Display Color Tone
- Date/Time/Zone
- Language
- Video System
- Touch Control
- Beep
- Battery Information
- Sensor Cleaning
- HDMI Resolution
- HDMI HDR Output
- Shooting Information Display
- Display Performance
- VF Display Format
- Display Settings
- Shutter Button Performance
- Help Text Size
- Wireless Communication Settings
- GPS Device Settings
- Multi-Function Lock
- Custom Shooting Mode (C1–C3)
- Clear All Camera Settings
- Copyright Information
- Manual/Software URL
- Certification Logo Display
- Firmware
Select Folder
Options: Select Folder, Create Folder
My preference: N/A
Choose this menu option, the first in the Set-up 1 menu (see Figure 13.13) to create a folder where the images you capture will be stored on your memory card, or to switch between existing folders. Just follow these steps:
- 1. Choose Select Folder. Access the option from the Set-up 1 menu.
- 2. View list of available folders. The Select Folder screen pops up with a list of the available folders on your memory card, with names like 100EOS_R, 101EOS_R, etc. (See Figure 13.14.)
- 3. Choose a different folder. To store subsequent images in a different existing folder, use the touch screen or directional buttons to highlight the label for the folder you want to use. When a folder that already has photos is selected, two thumbnails representing images in that folder are displayed at the right side of the screen.
- 4. Confirm the folder. Choose SET to confirm your choice of an existing folder.
- 5. Create new folder. If you’d rather create a new folder, highlight Create Folder in the Select Folder screen and choose SET. The name of the folder that will be created is displayed, along with a choice to Cancel or OK creating the folder. Choose SET to confirm your choice.
- 6. Exit. Press MENU to return to the Set-up 1 menu.
The folders your EOS R creates always follow the nnnEOS_R convention. You can also use your computer to create folders with names that depart from this arrangement, as long as you adhere to the camera’s general rules for memory card folder names.
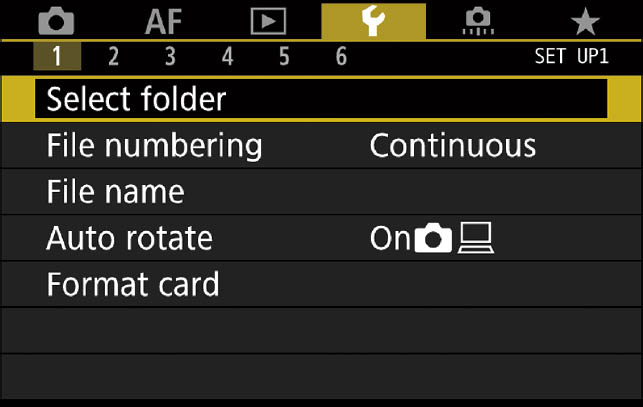
Figure 13.13 The Set-up 1 menu.
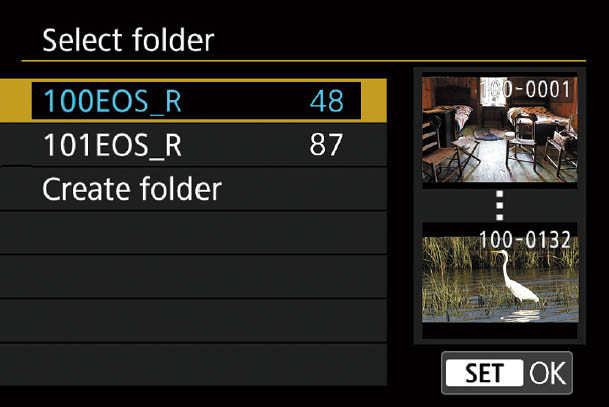
Figure 13.14 Choose a folder or create a new one.
Here’s how to create folders with personalized names:
- 1. Access the memory card from your computer. There are two ways to do this.
- a. USB link. Plug the USB cable into the port on the left side of the EOS R and connect to a USB connector on your computer. In Windows, the EOS R will appear as a generic digital camera icon. A similar icon will appear on the Mac OS X desktop.
- b. Use a card reader. Remove the card from the EOS R and insert it in a card reader attached to your computer.
- 2. Open the camera/memory card in your computer. A folder called DCIM will appear at the top level. All the folders your EOS R can access must be located inside the DCIM folder.
- 3. Create a new folder within the DCIM folder. Although you’re not limited to the nnnCANON arrangement, you must adhere to the rules in the steps that follow.
- 4. Type in a three-digit folder number. You can use any three numbers from 100 to 999, as long as those numbers are not already in use on that memory card. In other words, you can’t have folders named 101CANON and 101SPAIN.
- 5. Add a five-character description of your choice. You can use any uppercase or lowercase letters from A to z, plus the underscore character (to represent a space). You cannot use an actual space, nor any other characters, even if your computer allows them in a file name. An invalid folder name will end up being “invisible” to the EOS R, even if it actually exists on your memory card.
With a little imagination (and caution, to avoid creating “bad” folder names), you can develop some useful folder names, and switch among them at will. I find this capability especially useful when working with very large cards, because I can do a great deal of organizing right on the card itself. Perhaps I have some images in a particular folder that I use as a “slide show” for display on my EOS R’s LCD screen. Or, I might want to sort images by location or date. For example, I could use 104_USA_, 105SPAIN, 106FRANC, or 107GBRIT to indicate the location where the images were shot.
File Numbering
Options: Continuous (default), Automatic Reset, Manual Reset
My preference: Continuous
The EOS R will automatically apply a file number to each picture you take, using consecutive numbering for all your photos over a long period, spanning many different memory cards, starting over from scratch when you insert a new card, or when you manually reset the numbers. Numbers are applied from 0001 to 9999, at which time the camera creates a new folder on the card (100, 101, 102, and so forth), so you can have 0001 to 9999 in folder 100, then numbering will start over in folder 101.
The camera keeps track of the last number used in its internal memory. That can lead to a few quirks you should be aware of. For example, if you insert a memory card that had been used with a different camera, the EOS R may start numbering with the next number after the highest number used by the previous camera. (I once had a brand-new Canon camera start numbering files in the 8,000 range.) I’ll explain how this can happen next.
On the surface, the numbering system seems simple enough: In the menu, you can choose Continuous, Automatic Reset, or Manual Reset. Here is how each works:
- Continuous. If you’re using a blank/reformatted memory card, the EOS R will apply a number that is one greater than the number stored in the camera’s internal memory. If the card is not blank and contains images, then the next number will be one greater than the highest number on the card or in internal memory. (In other words, if you want to use continuous file numbering consistently, you must always use a card that is blank or freshly formatted.) Here are some examples.
- You’ve taken 4,235 shots with the camera, and you insert a blank/reformatted memory card. The next number assigned will be 4,236, based on the value stored in internal memory.
- You’ve taken 4,235 shots with the camera, and you insert a memory card with a picture numbered 2,728. The next picture will be numbered 4,236.
- You’ve taken 4,235 shots with the camera, and you insert a memory card with a picture numbered 8,281. The next picture will be numbered 8,282, and that value will be stored in the camera’s menu as the “high” shot number (and will be applied when you next insert a blank card).
- Automatic Reset. If you’re using a blank/reformatted memory card, the next photo taken will be numbered 0001. If you use a card that is not blank, the next number will be one greater than the highest number found on the memory card. Each time you insert a memory card, the next number will either be 0001 or one higher than the highest already on the card. Note that when your Folder number reaches 999 (that’s potentially a lot of folders on one card!) and that folder has 9999 images, you will not be able to continue shooting until you replace the card with a different one.
- Manual Reset. The EOS R creates a new folder numbered one higher than the last folder created, and restarts the file numbers at 0001. Then, the camera uses the numbering scheme that was previously set, either Continuous or Automatic reset, each time you subsequently insert a blank or non-blank memory card.
File Name
Options: Change User Setting 1, Change User Setting 2
My preference: N/A
The EOS R, like other cameras in the Canon product line, automatically applies a file name with a four-digit alphanumeric string, followed by the four-digit image number, such as BE3B0001.jpg or BE3B0001.cr3 to your image files as they are created. The first four characters are set at the factory and are unique to your camera. However, you can also create two personal User Settings, numbered 1 (with four characters of your choice) and 2 (with three). You can use this menu option to change the names applied to your photos—but only within certain strict limitations. In practice, you can change only four of the eight characters, the BE3B (or your camera’s counterpart) portion of the file name, using rules and industry conventions, such as those set by the Design Rule for Camera File System (DCF) specification.
DCF limits file names created by conforming digital cameras to a maximum of eight characters, plus a three-character extension (such as .jpg, or .cr3) that represents the format of the file. The eight-plus-three (usually called 8.3) length limitation dates back to an evil and frustrating computer operating system that we older photographers would like to forget (its initials are D.O.S.), but which, unhappily, lives on as the wraith of a file-naming convention.
Of the eight available characters, four are used to represent, in a general sense, the type of camera used to create the image. Canon defaults to your factory-set initial four characters. The remaining four are used for numbers from 0000 to 9999, which is why your EOS R “rolls over” to aaaa0000 again when the 9999 number limitation is reached. When the EOS R rolls off the factory assembly line, it is configured to provide a choice of three different file-naming schemes:
- Factory Preset Code. This is unique to your camera. Every EOS R has a different preset code. When active, your images will be given names like (in my case) aaaa0001.jpg when using the sRGB color space. If you switch to Adobe RGB, by industry convention the first character is replaced with an underline, yielding _EOS0001.jpg or _EOS001.cr3, or similar names. You cannot change the factory preset code, but you can switch to one of the alternate naming schemes, as I’ll show you next. This is a pretty cool feature, making it easy to tell which of your many EOS R cameras (it could happen!) was used to take a given image.
- User Setting 1. This is one of two user-definable alternative naming schemes. As the camera comes from the factory, it is set to IMG_0001.jpg/cr3/mov (for video) if you’re using the sRGB color space, or _IMG0001.jpg (etc.) for Adobe RGB. However, you can specify all four initial characters for this setting, and end up with something like EOSR0001.jpg instead, when using sRGB. The underscore still replaces the first characters in the file name when you’re using Adobe RGB. So, if you choose OHIO, you’ll see OHIO0001.jpg for sRGB and _HIO0001.jpg with Adobe RGB.
- User Setting 2. This second user-definable setting allows you to specify only the first three of the four initial characters. The default is IMG for those characters. The camera uses the fourth position for a code representing the image recording quality. So, if your initial three letters are ABC, you might end up with file names like _BCL0001.jpg or ABCL001.jpg. The codes are as follows:
- L. Large Fine JPEG, Large Standard JPEG, or RAW.
- M. Medium Fine JPEG, Medium Standard JPEG, or M RAW.
- S. Small 1 Fine JPEG, Small 1 Standard JPEG, or S RAW.
- T. Small 2 JPEG.
- _ (underscore). The file is a movie, and quality setting is not indicated.
Redefining User Settings 1 and 2
To change the two User Settings from their defaults, navigate to the File Name screen, as shown at left in Figure 13.15. Then, follow these steps:
- 1. Access menu entry. Highlight the User Setting you want to modify and press SET. The screen shown at right in Figure 13.15 appears.
- 2. Remove old entry. Tap the <x (backspace icon) at lower right on the screen, or press the Trash button at the lower-right corner of the camera’s rear panel repeatedly until the previous entry is removed. A vertical line will be shown at the current cursor position.
- 3. Switch to text characters. The Q button toggles between the text screen at the top and the text characters at the bottom. Press it or tap its icon on the touch screen to jump down to the lower text box.
- 4. Select characters. Use the touch screen or the directional buttons to navigate to the first character you want to choose. Only uppercase letters, an underscore, and numerals are available. You can also navigate with the QCD and Main Dial, but that is slower. Press the character or press SET to enter the highlighted character.
- 5. Choose remaining characters. The cursor will advance to the next position, and you can repeat Step 4 to enter the remaining characters (a total of four for Setting 1 and three for Setting 2). You can always press the Q button and use the Trash button to remove one or more characters you’ve entered in error. You cannot use an underscore for any character; that’s reserved for the camera’s use.
- 6. Finish. Press MENU to confirm your text entry, or INFO to cancel.
- 7. Review. The updated definitions are shown at the bottom of the screen, as seen at left in Figure 13.15.

Figure 13.15 Left: Customize and choose your file naming scheme. Right: Enter text here.
Selecting a Naming Scheme
Once you’ve defined your naming alternatives to your satisfaction, you can switch among them at any time during a shooting session. Just access the File Name screen from the Set-up 1 menu, highlight File Name at the top of the screen, and press SET. You can then choose the factory preset code, User Setting 1, or User Setting 2, as shown in Figure 13.16. Renaming a user setting is so easy that I sometimes do it on the fly during a shoot. If you don’t need to differentiate between different cameras or models, you can change the characters to anything else that suits your purposes, including your initials (DDB_ or JFK_, for example) or even customize for a particular shooting session (EUR, GER, FRA, and JAP when taking vacation trips). You can also use the file name flexibility to partially overcome the 9999 numbering limitation. You could, for example, use the template EO1 to represent the first 10,000 pictures you take with your EOS R, and then EO2 for the next 10,000, and EO3 for the 10,000 after that.
That’s assuming you don’t rename your image files in your computer. In a way, file naming verges on a moot consideration, because it applies only to the images as they exist in your camera. After (or during) transfer to your computer you can change the names to anything you want, completely disregarding the 8.3 limitations (although it’s a good idea to retain the default extensions). If you shot an image file named IMG_4832.jpg in your camera, you could change it to Paris_EiffelTower_32.jpg later. Indeed, virtually all photo-transfer programs, including Photoshop Elements Transfer, allow you to specify a template and rename your photos as they are moved or copied to your computer from your camera or memory card.
I usually don’t go to that bother (I generally don’t use transfer software; I just drag and drop images from my memory card to folders I have set up), but renaming can be useful for those willing to take the time to do it.

Figure 13.16 Select a default naming scheme or one you have defined.
Auto Rotate
Options: On: Camera, Computer (default); On: Computer Only; Off
My preference: Camera+Computer
You can turn this feature On or Off. When activated, the EOS R rotates pictures taken in vertical orientation on the display screen so you don’t have to turn the camera to view them comfortably. However, this orientation also means that the longest dimension of the image is shown using the shortest dimension of the display, so the picture is reduced in size. You have three options. The image can be autorotated when viewing in the camera and on your computer screen using your image-editing/viewing software (this choice is represented by a pair of camera/computer screen icons). The image can be marked to autorotate only when reviewing your image in your image editor or viewing software (just a computer screen icon is used). This option allows you to have rotation applied when using your computer, while retaining the ability to maximize the image on your display in the camera. The third choice is Off. The image will not be rotated when displayed in the camera or with your computer. Note that if you switch Auto Rotate off, any pictures shot while the feature is disabled will not be automatically rotated when you turn Auto Rotate back on; information embedded in the image file when the photo is taken is used to determine whether autorotation is applied.
Format Card
Options: Format Card, Low Level Format
My preference: N/A
Use this item to erase everything on your memory card and set up a fresh file system ready for use. When you select Format Card, a display appears showing the capacity of the card, how much of that space is currently in use, and two choices at the bottom of the screen to Cancel or OK (proceed with the format). Press the Trash button if you’d like to do a low-level format. That’s a more basic format that removes all sectors from the card and creates new ones, which can help speed up a card that seems to be slow (because the camera must skip over “bad” sectors left behind from previous uses). An orange bar appears on the screen to show the progress of the formatting step.
Eco Mode
Options: On, Off (default)
My preference: Carry multiple batteries so you don’t have to worry about this.
This setting is the first in the Set-up 2 menu (see Figure 13.17). Even though your EOS R uses the same LP-E6N battery pack supplied with Canon’s upscale digital SLR models (like the 5D Mark IV), it is inherently more power hungry than traditional dSLRs you may have used. The sensor is energized any time you are using the viewfinder or LCD screen (rather than only when capturing a photo), and the EVF and LCD themselves suck up juice. Based on Canon’s own specifications, you may expect to shoot only 370 exposures or capture just 2 hours, 20 minutes of movies with a single fully charged battery.

Figure 13.17 The Set-up 2 menu.
When Eco Mode is enabled, the LCD screen (but not the viewfinder) darkens drastically after if the camera is not used for approximately two seconds, and turns off completely after 10 seconds. To reactivate, tap the shutter release to gain yourself another 2/10 seconds of LCD viewing. While Eco Mode is a thoughtful feature on Canon’s part, in practice it can be a major inconvenience, especially if you are using the LCD to compose your image (say, the camera is mounted on a tripod). In such cases, you’d definitely want to make sure Eco Mode is turned off. Even better, you can turn Eco Mode off and leave it off for the rest of your life though the simple expedient of buying a reasonable number of batteries. Swapping power cells every few hours is preferable to losing your LCD image at a critical moment. I use this feature only when I am down to my last battery (due to unforeseen circumstances, or, stupidity) and want to squeeze every bit of juice I can out of my remaining LP-E6N.
Power Saving
Options: Display Off: Default, 1 min.; Auto Power Off: Default, 1 min.; Viewfinder Off: Default, 3 min.
My preference: Display Off: 3 min.; Auto Power Off: 5 min.; Viewfinder Off: 3 min.
This setting allows you to adjust how long the EOS R remains active before features are turned off to save power. As I noted with the Eco Mode explanation, intelligent power saving can be crucial with mirrorless cameras.
This option is more useful and flexible than Eco Mode; you have three choices:
- Display Off. In this case, by “display,” Canon is referring to the LCD screen. You can specify a delay of 15 seconds to 30 minutes. While the default value is 1 minute, as long as I have a spare battery or two with me, I’m more comfortable with a longer delay of 3 minutes. That gives me time to stop and think about what I am doing if I am working with menus or reviewing an image on the LCD. In special cases, longer delays are appropriate, say, if you have the camera on a tripod and are monitoring a live scene while waiting for wildlife or another subject to appear before taking a picture. If Eco Mode is active, this setting and Auto Power Off are disabled.
- Auto Power Off. This setting controls the amount of time the camera can remain idle before powering down. You can bring the EOS R back to live by tapping the shutter button. I usually set this option for five minutes, but set a longer delay when shooting sports or taking street photos and I want the camera to be ready for a quick shot.
- Viewfinder Off. Power savings from switching off the electronic viewfinder are relatively minimal, which is why your only options are 1 minute, 3 minutes, and Disable. Regardless of the setting, the viewfinder reactivates when you bring the camera up to your eye, so a three-minute delay is reasonable. If you’re in sports or photojournalism mode, you might want to disable automatic power down. Eco Mode doesn’t turn off the viewfinder, so if Eco Mode is active, you can still use this setting to specify a delay of your choice.
Display Brightness
Options: Adjust brightness of viewfinder and/or LCD screen
My preference: N/A
I hope the Canon engineer who designed this feature got a bonus for cleverness. Like every other mirrorless camera I’ve used, the EOS R allows you to adjust the brightness of the electronic viewfinder and LCD screen separately. But, unlike the others, when you access this particular entry, the camera automatically defaults to whichever display you happen to be using. Bring the camera up to your eye and press the left/right directional buttons to brighten or darken the electronic viewfinder display. Fix your attention on the LCD instead, and the adjustment screen switches to the back-panel display. You can then use the directional buttons or touch screen to make your adjustment.
Use the example image and the gray patches shown (see Figure 13.18) to decide whether the brightness is satisfactory. The thumbnail shows the last image viewed during Playback, so you can actually “calibrate” your display for your current shooting environment. You want to be able to see both the lightest and darkest steps at top and bottom of the gray scale, and not lose any of the steps in the middle. Brighter settings use more battery power, but can allow you to view an image on the LCD outdoors in bright sunlight. When you have the brightness you want, press the SET button to lock it in and return to the menu. At concerts, I tend to review my images using the electronic viewfinder; if I want to share images with a companion, I often dial down the brightness of the LCD screen to the minimum to avoid disturbing the other paying customers who might not be as interested in my results.

Figure 13.18 Adjust electronic viewfinder and LCD screen brightness for easier viewing under varying ambient lighting conditions.
Display Color Tone
Options: 1: Warm tone, 2: Standard (default), 3: Cool tone 1, 4: Cool tone 2
My preference: 2: Standard
You can use this setting to adjust the approximate color balance of the viewfinder and LCD monitor to your taste. It works similarly to the Display Brightness entry; bring the camera up to your eye to adjust the viewfinder; look at the LCD screen to set its color tone. You’d use this option if you consistently find that your images are warmer or cooler than what you view, and want to have a (slightly) more accurate preview image. (Neither display will match your final image precisely, especially when you are shooting RAW, because the EOS R shows a JPEG version regardless of the format you choose.)
To set the color, activate this entry, and the last image you played back will be displayed. You should use the ambient lighting conditions you want to standardize on. Then, highlight 1: Warm tone, 2: Standard, 3: Cool tone 1, or 4: Cool tone 2, and press SET.
Date/Time/Zone
Options: Date, Time, Zone, Daylight Savings
My preference: N/A
Use this option to set the date and time, which will be embedded in the image file along with exposure information and other data. As first outlined in Chapter 1, you can set the date and time by following these steps:
- 1. Access this menu entry from the Set-up 2 menu.
- 2. Rotate the QCD to move the highlighting down to the Date/Time entry.
- 3. Press the SET button in the center of the QCD to access the Date/Time setting screen.
- 4. Rotate the QCD to select the value you want to change. When the gold box highlights the month, day, year, hour, minute, or second format you want to adjust, press the SET button to activate that value. A pair of up/down pointing triangles appears above the value.
- 5. Rotate the QCD to adjust the value up or down. Press the SET button to confirm the value you’ve entered.
- 6. Repeat steps 4 and 5 for each of the other values you want to change. The date format can be switched from the default mm/dd/yy to yy/mm/dd or dd/mm/yy; you can turn Daylight Savings time on or off, and choose an appropriate time zone.
- 7. When finished, rotate the QCD to select either OK (if you’re satisfied with your changes) or Cancel (if you’d like to return to the Set-up 2 menu without making any changes). Press SET to confirm your choice.
- 8. When finished setting the date and time, press the MENU button to exit, or just tap the shutter release.
Language
Options: 29 languages
My preference: N/A
Choose from 29 languages for menu display, rotating the Quick Control Dial or using the directional buttons until the language you want to select is highlighted. Press the SET button to activate.
Video System
Options: For NTSC, For PAL
My preference: N/A
This setting, the first on the Set-up 3 screen (see Figure 13.19), controls the output of the EOS R through the HDMI cable when you’re displaying images on an external monitor. You can select either NTSC, used in the United States; Canada; Mexico; many Central and South American, and Caribbean countries; much of Asia; and other countries; or PAL, which is used in the UK, much of Europe, Africa, India, China, and parts of the Middle East.
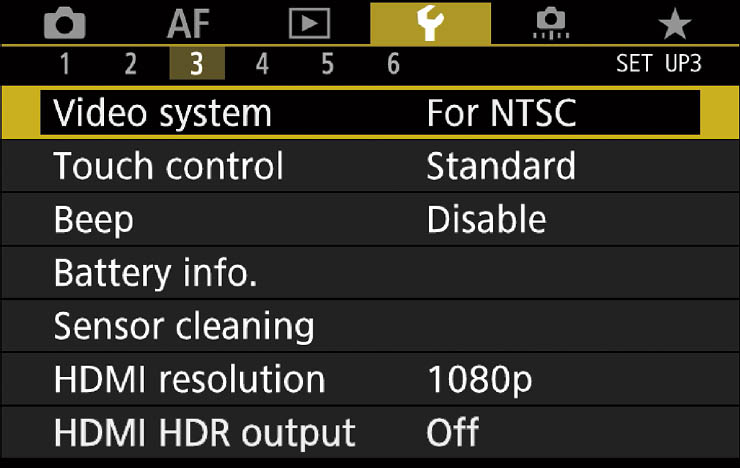
Figure 13.19 The Set-up 3 menu.
Canon makes it quite easy to view your images on a high-definition television (HDTV). Purchase the optional HDMI Cable HTC-100 (or equivalent HDMI Micro C cable) and connect it to the HDMI OUT terminal just below the USB Type-C port on the left side of the camera.
Connect the other end to an HDMI input port on your television or monitor (my 42-inch HDTV has three of them; my 26-inch monitor has just two). Then turn on the camera and press the Playback button. The image will appear on the external TV/HDTV/monitor and will not be displayed on the camera’s LCD. Most HDTV systems automatically show your images at the appropriate resolution if you set HDMI Resolution to Auto using the Set-up 3 entry described later in this chapter.
Touch Control
Options: Standard (default), Sensitive, Disable
My preference: Standard
Here you can specify how sensitive the touch screen is to your taps and strokes. Note that the screen responds to changes in capacitance (changes in an electrical charge), rather than pressure, so using a stylus or other object instead of a finger isn’t advised. Moisture or protective covers for the LCD screen may also interfere with touch operation, although I’ve had no problems with GGS screens available from Amazon and elsewhere. If you find that your everyday handling of the EOS R frequently triggers unwanted actions, you can disable touch control entirely if you never want to use it. Otherwise, set the amount of sensitivity that works best for digital control, so to speak. While Standard works best for most, those who use touch control frequently may want to try the Sensitive setting. However, at that setting, very rapid, light movements may not register.
Beep
Options: Enable (default), Touch to Silence, Disable
My preference: Disable
The EOS R’s internal beeper provides a helpful chirp to signify various functions, such as the countdown of your camera’s self-timer, when an image is in focus, and during touch operations. You can switch it off entirely if you want to avoid the beep because it’s annoying, impolite, or distracting (at a concert or museum), or undesired for any other reason. In the Beep screen, choose Enable to activate, Disable to silence all beeps, or Touch To Silence (which silences the beep only during touch screen operations), as you prefer. Press SET to activate your choice and exit.
Battery Information
Options: Register, Delete Info.
My preference: N/A
This entry is an exceptionally useful feature that allows you to view battery condition information and performance, and track the data among several different batteries. Your EOS R can keep track of multiple LP-E6 or LP-E6N batteries because each of them is given a unique serial number (which is either printed on or available on a sticker you can affix to the battery). The camera reads this serial number and stores information about each of the batteries that you use and have “registered” separately. I always recommend owning at least two and, preferably three or more batteries. That’s especially true if you use the Battery Grip BG-E22, which holds two battery packs itself. I also own other Canon cameras which use the same battery, so I’m able to justify four batteries to shuttle between my multiple cameras.
This feature makes it possible to see exactly how each battery you own is performing, allows you to rotate them to even out the usage, and helps you know when it’s time to replace a battery. When you select this menu choice, a Battery info screen like the one shown at left in Figure 13.20 appears, with a wealth of information (if you use two LP-E6/E6N packs in a BG-E22 grip, information about both packs will appear):
- Battery position. The second line of the screen includes an icon that shows where the battery currently being evaluated is installed (usually the hand grip if you’re not using the BG-E22).
- Power type. Next to the position icon is an indicator that shows the model number of the battery installed, or shows that the DC power adapter is being used instead.
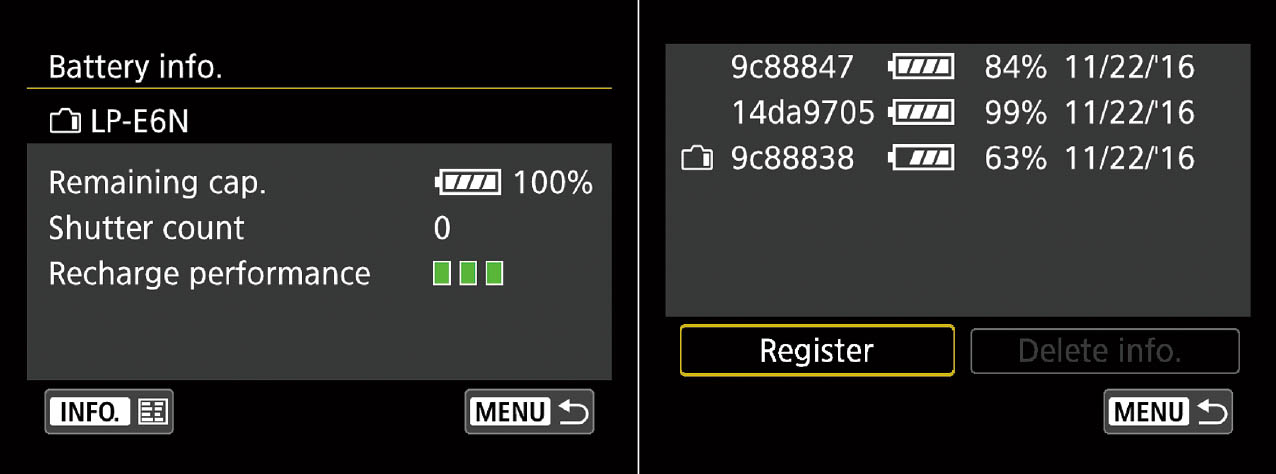
Figure 13.20 View the battery type and position, remaining capacity, number of pictures taken with the current charge, and the performance of your pack (left). Register a new battery (right).
- Remaining capacity. The Battery check icon appears showing the remaining capacity visually, along with a percentage number that reads out in 1% increments. You can use this as a rough gauge of how much power you have remaining. If you’re in the middle of an important shooting session, you might want to switch to a fully charged battery at the 25–33% level to avoid interruptions at the worst probable time. (If you’re using six AA batteries in the BG-E6 grip instead of LP-E6 packs, only this battery capacity notice appears; the other indicators are not shown.)
- Shutter count. Displays how many times the shutter has been actuated with the current charged battery. This info can help you learn just how much certain features cost you in terms of power. For example, if a battery has only 50 percent of its power remaining, but you’ve taken only a few dozen photos, you know that your power is being sapped by picture review, lots of autofocus, frequent image stabilization because of lower shutter speeds, or (a major culprit) that flip-up flash you’ve been using. While in most cases knowledge is power, in this instance knowledge can help you save power, with a tip-off to use fewer juice-sapping features if the current battery pack must be stretched as far as possible.
- Recharge performance. This indicator shows how well your battery pack is accepting and holding a charge. Three green bars mean that the pack’s performance is fine; two bars show that recharge performance is degraded a little. A red bar indicates that your pack is on its last legs and should be replaced soon. To lengthen the service time of your batteries, you might want to rotate usage among several different packs, so they all “age” at roughly the same rate.
Registering Your Battery Packs
The EOS R can “remember” information about up to six LP-E6 battery packs, and provide readouts of their status individually. To register the battery currently in your camera, follow these steps:
- 1. Access the Battery Info. screen from the Set-up 3 menu.
- 2. Press the INFO button, located to the left of the LCD screen.
- 3. Information about the current battery, including its serial number and the current date, will be shown on a new screen (see Figure 13.20, right).
- 4. Choose Register to log the battery; if the pack has already been registered, you can choose Delete Info. to remove the battery from the list. (You’d want to do this if you already had registered the limit of six batteries and want to add another one.)
- 5. Press SET to add the battery to the registry.
- 6. If you’re deleting a battery, the EOS R shows you a Battery Info. delete screen instead. (You can delete a battery pack without having that battery installed in the camera—which could come in handy if you lose one.) Just select the battery (by serial number) and delete.
- 7. Press MENU to back out of any of the Battery Info. screens.
- 8. Once a battery has been registered, you can check on its remaining capacity at any time (even if it isn’t currently installed in the EOS R) from the Battery info page. The camera remembers and updates the status of each registered battery whenever it is inserted in the EOS R. The date the battery was last used is also shown.

Tip
Use this info with caution, however, as a given battery may have self-discharged slightly during storage and, of course, you may have fully recharged it since the last time it was inserted in the camera. However, this data can be useful in tracking the remaining capacity of several different battery packs during a single shooting session, or over the course of several days when you’re not recharging the packs after each session.
Sensor Cleaning
Options: Auto Cleaning, Clean Now (default), Clean Manually
My preference: N/A
One of the Canon EOS R’s most useful features is the automatic sensor cleaning system that reduces or eliminates the need to clean your camera’s sensor manually using brushes, swabs, or bulb blowers. Canon has applied anti-static coatings to the sensor and other portions of the camera body interior to counter charge build-ups that attract dust. A separate filter over the sensor vibrates ultrasonically each time the EOS R is powered on or off, shaking loose any dust, which is captured by a sticky strip beneath the sensor.
Use this menu entry to enable or disable automatic sensor cleaning on power up (select Auto Cleaning to choose) or to activate automatic cleaning during a shooting session (select Clean Now). You can also choose the Clean Manually option to open the EOS R’s shutter and clean the sensor yourself with a blower, brush, or swab. If the battery level is too low to safely carry out the cleaning operation, the EOS R will let you know and refuse to proceed, unless you use the optional AC Adapter Kit ACK-E6N with the DC Coupler DR-E6.
HDMI Resolution
Options: Auto (default), 1080p
My preference: 1080p if your device accepts it
As I mentioned earlier, your EOS R can output to an external monitor or video recorder, using a cable that has an HDMI Mini-C connector to fit the camera and a standard HDMI connector on the other end to link to your device. You can set this option to Auto, in which case the camera will attempt to ascertain the correct resolution for the connected device, and then direct its output in that format. There may be some delay while the appropriate resolution is achieved, but if you know your device can accept 1080p video, you can go ahead and select that setting to avoid the time lag.
The only problem with this procedure is that the EOS R has a nasty habit of not adjusting to the correct resolution for some devices, complicated by the fact that you cannot then select the right setting yourself. I’ve encountered several devices, including my BlackMagic Intensity Shuttle capture device, that the EOS R is unable to recognize automatically, and which require a setting that Canon does not allow you to make manually. I checked with Canon and they offer no solution; there is no way to manually specify a resolution other than 1080p.
HDMI HDR Output
Options: Off/On
My preference: N/A
Television innovations come and go, but some are more likely than others to catch on, and Canon is keeping abreast of the curve. Unlike, say, 3D TV (which suffered from a lack of content and consumer desire and had mercifully died by 2018), High Dynamic Range (HDR) TV is here to stay. If your current television doesn’t have HDR, it’s likely your next one will (along with 4K display). In that case, you’ll be able to output your EOS R’s RAW images for display on your nifty new set. They’ll look mar-velous (at least, that’s what I’m told).
In addition to an HDR-compatible TV, you’ll need to remember to set up your television’s input to accept HDR images. While viewing HDR output from your camera, some features, such as RAW processing, are not available. The camera will also send JPEG images instead of RAW to your HDR TV when displaying multiple-exposure RAW images and photos shot with the L (ISO 50 equivalent) sensitivity setting.
Shooting Information Display
Options: Screen Information Settings, Viewfinder Info/Toggle Settings, Viewfinder Vertical Display, Grid Display, Histogram Display, Focus Distance Display, Reset
My preference: N/A
This is the first entry in the Set-up 4 menu (see Figure 13.21). One of the advantages of cameras that have electronic displays for both viewfinder and LCD screen is that a wealth of relevant information can remain in constant view as you shoot. You’re not forced to remove your eye from the viewfinder to check shooting information, to review images in Playback, or to make changes using the Quick Control and conventional menu systems. Everything you need to know can be shown on both displays.
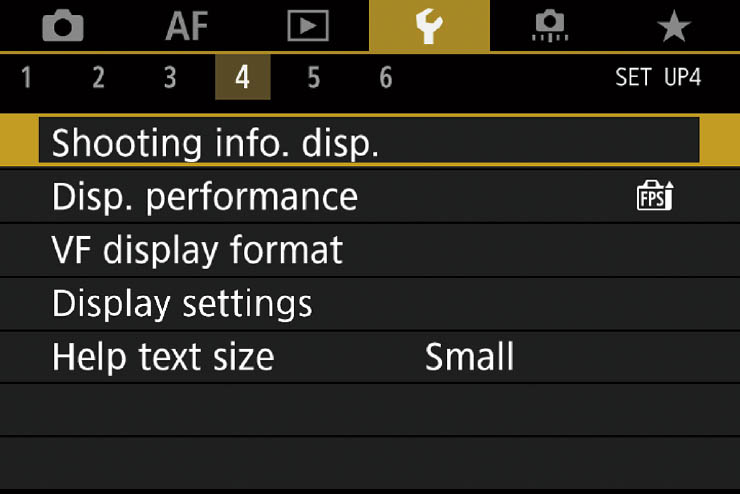
Figure 13.21 The Set-up 4 menu.
One of the disadvantages of cameras that have electronic displays for both viewfinder and LCD screen is that all that data must be overlaid on the image frame, which can be quite cluttered—sometimes with information that you really don’t care about at the moment. Fortunately, you can customize what information appears on the shooting information displays, segregating some data onto alternate screens, and cycle among the screens you do want to see at the press of the INFO button.
You can define up to five different LCD screen layouts, and three different viewfinder configurations using this menu entry. When you choose it in the Set-up 4 menu, a sub-menu like the one shown in Figure 13.22 appears, with six options, plus Reset. I’m going to explain each of them in turn.
Screen Info Settings
This is where you activate/deactivate and edit up to five LCD screen displays. Figure 13.23 (left) shows the enable/disable options, shown numbered from 1 to 5 in the right column. To enable one of the five screens, highlight it using the up/down buttons and press SET to activate (marking with a check) or deactivate (removing a check that is already there). At least one screen must be active; you can’t hide them all.
To edit the type of information that appears on a given screen, highlight it and press INFO. An Edit Screen like the one shown at right in Figure 13.23 appears. Five information types appear in the right column, representing (top to bottom) Basic Shooting Information, Detailed Shooting Information, On-Screen Buttons (display of icons, such as Focus Method, you can tap to make adjustments), Histogram Display, and Electronic Level. As with the numbered screens, you can activate any combination of information types for a given screen.

Figure 13.22 Shooting Information Display Options.
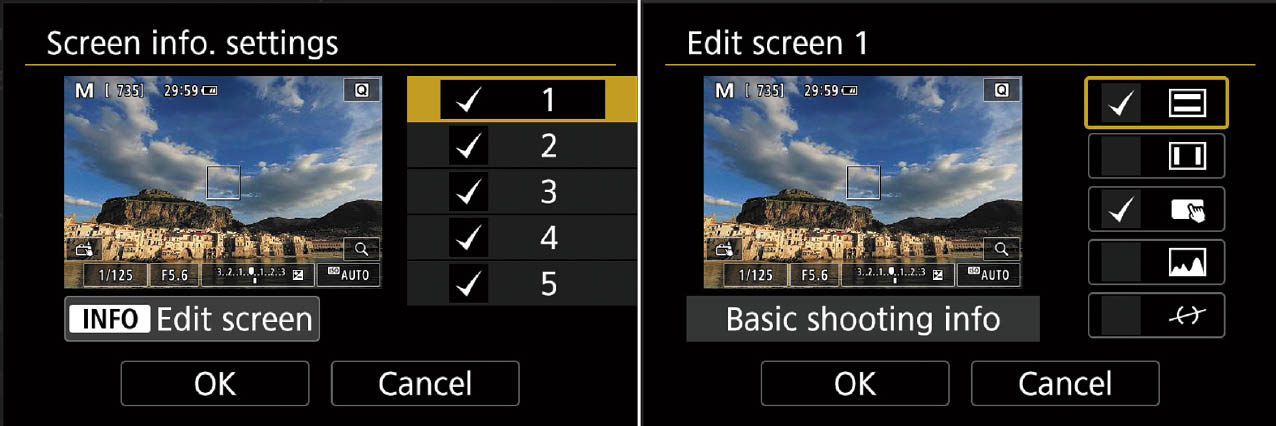
Figure 13.23 Enable/disable specific screens (left); edit each screen’s contents (right).
You obviously won’t want all information to appear on all screens; it makes sense to reserve one screen for Basic Shooting Information, another for Detailed Shooting Information, and using the others either to provide one specific type of data, or a combination you find useful. When you’re finished, highlight OK to confirm or Cancel to eliminate your changes, then SET to exit. When you’re using the LCD screen, cycle among the displays you’ve set up by pressing the INFO button.
Viewfinder Info/Toggle Settings
This option operates very much like the LCD screen setup, except (on the theory that the viewfinder should be kept free of clutter as much as possible) only three screens can be enabled/disabled, and the choices for each of the three are limited to a single trio of settings: Detailed Shooting Information, Histogram, and Electronic viewfinder. Set up any or all three of the available screens with appropriate options, as described above. (See Figure 13.24.)
When you’re using the electronic viewfinder, cycle among the displays you’ve set up by pressing the INFO button.
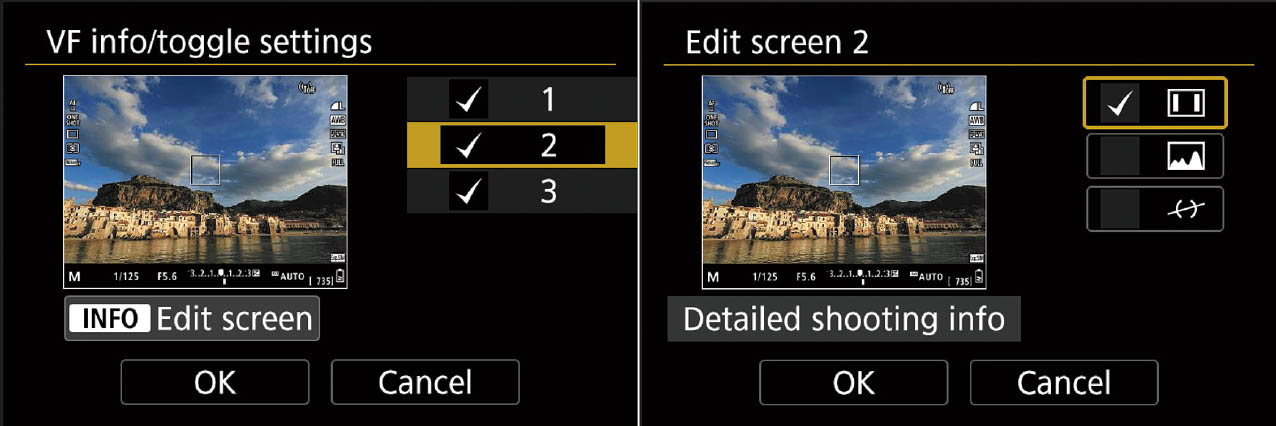
Figure 13.24 Enable/disable specific viewfinder screens (left); edit each screen’s information (right).
Vertical Viewfinder Display
Even though your electronic viewfinder may bristle with overlaid information, you can still read it when shooting vertically oriented pictures. This one’s a no brainer: set to On, and when you rotate the camera, the information display rotates with it, so you can still read it.
Grid Display
Those helpful grids discussed earlier in this chapter in the Playback section are also available for use while shooting. You can superimpose a 3 × 3, 6 × 4, or 3 × 3 plus diagonal lines grid over your image during shooting, or disable the grid display entirely.
Histogram Display
There’s only room for one histogram on the screen when shooting, but you can choose whether the histogram displayed by your selected LCD screens is a brightness or RGB histogram, and whether it is displayed in large or small size. Choose the configuration you prefer, but for most the brightness histogram provides sufficient information while shooting. The RGB histogram may be one to study during playback to see exactly what went right (or wrong) with the tonal rendition of your image.
Focus Distance Display
Canon RF-mount lenses communicate a remarkable amount of information to the camera, so you have the option of showing the actual focus distance on the display. It’s arrayed as a scale on the bottom of the display. Best of all, you can choose when this information is supplied: in Manual Focus mode, any time you are actually focusing (either with autofocus or manual focus), always, or never (Disable). Close-up and macro photographers will particularly find this feature useful.
Reset
Highlight Reset and press SET to return all the shooting information displays to their default values. The Screen Info/VF Info screens are all enabled with preset values; viewfinder vertical rotation and grid display are on, histograms are set to Brightness, and focus distance display is returned to In MF Mode only.
Display Performance
Options: Power Saving, Smooth (default)
My preference: Smooth
One objection that mirrorless cameras like the EOS R have handily overcome is the quality of the electronic viewfinder display. Early EVFs were low resolution, slow in refresh rate, and often looked jerky when compared to the smooth display of the optical viewfinders found in dSLRs. With 3.69 million dots, your camera’s viewfinder has very high resolution and boasts a 0.76X magnification factor that make it almost indistinguishable from an optical display. All that visual horsepower comes with a power penalty. If juice is at a premium, you can use this setting to switch to a slightly slower refresh rate with a display that’s still good. However, most of the time—and especially when shooting sports or other action—you can safely leave this setting on Smooth and enjoy one of the best viewfinder displays available in a mirrorless camera.
Viewfinder Display Format
Options: Display 1 (default), Display 2
My preference: N/A
Your EOS R offers two slightly different viewfinder display formats. Your choice is just a matter of preference. With Display 1, the image fills the viewfinder, with information along the bottom displayed in a black bar, and any information shown at left and right sides overlaid over the image area. Display 2 shrinks the image display slightly to provide room for black bars at right and left sides, so information icons can be displayed in those bars rather than overlaid on the image. If you prefer to declutter your image area as much as possible, choose Display 2. I’m accustomed to shooting mirrorless cameras and don’t mind the overlaid data when it appears.
Display Settings
Options: Auto (default), Manual
My preference: Auto
This option controls how the EOS R switches between the LCD screen and electronic viewfinder:
- Auto. The LCD screen is used for display by default, but the camera switches to the viewfinder when you bring the camera up to your eye, or anything else approaches the eye sensor next to the viewfinder.
- Manual. Specify either viewfinder or LCD screen, and the EOS R will use only that display. I use this frequently at concerts and stage performances when I don’t want the LCD screen illuminating and bothering the other paying customers. I set the display to Manual: Viewfinder, and I can then do all my composing, picture review, and menu navigation using only the electronic viewfinder.
Shutter Button Function
Options: Half press: Metering and Movie Servo AF, Metering and One-Shot AF; Full press: Disable during movie shooting, Shoots Movies
My preference: Half press: Metering and One-Shot AF; Full press: Disable during movie shooting
This setting, which appears when the EOS R is in movie mode, specifies what a half-press and a full press of the shutter release will do during movie shooting.
- Half-press. Partially depressing the shutter release during movie shooting always starts exposure metering. You can choose whether only metering occurs as well, or whether Movie Servo AF or One-Shot AF are initiated when you half-press the shutter release.
- Full press. I prefer to use the Movie button to start video capture, so I set this to No Function. If you prefer, you can choose Start/Stop Movie Recording and use the shutter release as an alternate Movie button.
Help Text Size
Options: Small (default), Large
My preference: Large
When you first begin using your EOS R, you may find yourself pressing the INFO button when the INFO Help message is displayed below a menu. Pressing it will pop up a screen with information on how to choose options for that menu item. You won’t need this help after you’ve had your camera for a while, but as long as you avail yourself of this aid, you might as well have it displayed in large, clear text. You can press the up/down directional buttons to scroll within the help text display.
Wireless Communications Settings
Options: Wi-Fi Settings, Wi-Fi Function, Bluetooth Function, Send Images to Smartphone, Nickname, Clear Settings
My preference: See Chapter 6
This entry allows you to specify wireless communication settings. I explained these functions in detail in Chapter 6, and won’t repeat those instructions here. This entry and the next are not shown in a figure.
GPS Device Settings
Options: Disable GPS, Select GPS Receiver, Smartphone
My preference: See Chapter 6
Your options for using the Canon GP-E2 were explained in more detail in Chapter 6, and won’t be repeated here.
Multi-Function Lock
Options: Main Dial, Quick Control Dial, Touch Control, M-Fn Bar, Control Ring
My preference: N/A
This is the first entry on the Set-up 6 menu (see Figure 13.25). Your EOS R includes a sliding lock switch just beneath the Quick Control Dial. Slide it to the right when you want to prevent the use of the Main Dial, Quick Control Dial, Touch Controls, M-Fn Bar, or Control Ring from accidentally changing a setting. You can select any or all of the controls to lock, while freeing the others (or none) to act normally. I use this sometimes when I am using manual exposure, especially when I’m fumbling around in a darkened environment, and don’t want to unintentionally manipulate my settings. The Multi-Function Lock screen has one option for each control; highlight the control and press SET to lock or unlock it. A check mark appears next to the control’s name when it’s locked, and an L/Lock indicator appears in the viewfinder, top-panel LCD, and LCD screen (see Figure 13.26). In Scene Intelligent Auto mode, only touch control can be locked.

Figure 13.25 Set-up 6 menu.
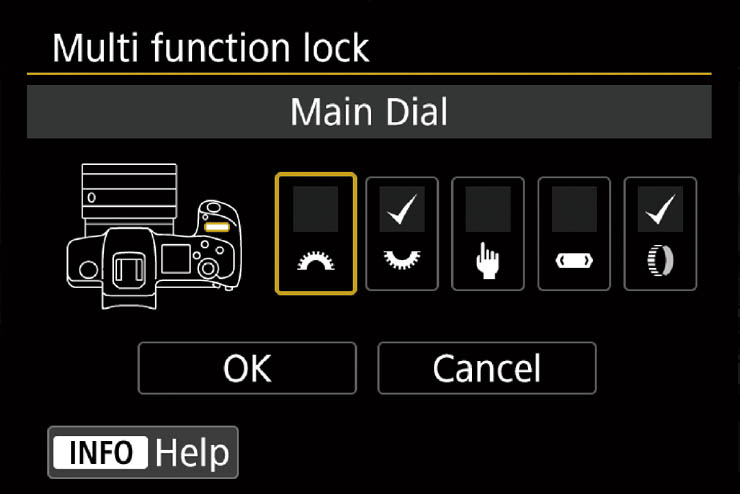
Figure 13.26 Lock any or all of these five: Main Dial, Quick Control Dial, Touch Control, M-Fn Bar, and Control Ring.
Custom Shooting Mode (C1–C3)
Options: Register Settings; Clear Settings; Auto Update Settings, Enable, Disable
My preference: N/A
This entry allows you to register your EOS R’s current camera shooting settings and file them away in the C1, C2, or C3 positions and access them when pressing the MODE button. Doing this overwrites any settings previously stored at that position. You can also clear the settings for any of the three MODE positions individually, returning them to their factory default values.
Register your favorite settings for use in particular situations. I have stored settings for sports, portraits, and landscapes. If you switch to C1, C2, or C3 and forget what settings you’ve made for that slot, just press the INFO button to view the current settings. Keep in mind that My Menu settings are not stored individually. You can have only one roster of My Menu entries available for all the Mode Dial’s positions.
This menu choice has only three options: Register Settings (which stores your current settings in your choice of C1, C2, or C3), Clear Settings (which erases the settings in C1, C2, or C3), and Auto Update Settings. When the latter is set to Enable, any changes you make to your settings in C1, C2, or C3 modes will be stored in that memory slot; use Disable to preserve your registered setting as-is, ignoring any changes you made while using that Custom Shooting mode. Note that you must use this menu entry to clear your settings; when using C1, C2, or C3, the Clear Settings option in the Set-up 3 menu is disabled. The Clear all Custom Func. (C.Fn) option in the Custom Functions menu is disabled as well.
To perform these tasks, just follow these steps:
- 1. Make your settings. Set the EOS R to an exposure mode other than Scene Intelligent Auto.
- 2. Access Camera user settings. Navigate to the Custom shooting mode option in the Set-up 6 menu, and press SET.
- 3. Choose function. Choose Register Settings if you want to store your EOS R’s current settings in C1, C2, or C3; or select Clear Settings if you want to erase the settings stored in either location. Press SET to access the settings screen for your choice.
- 4. Store/Clear settings. The individual screens for storing/clearing are virtually identical. Use the QCD to highlight Mode Dial: C1, Mode Dial: C2, or Mode Dial: C3, and press SET to store or clear the settings for that position. (You’ll be given a choice to proceed or cancel first.)
- 5. Auto update. Keep in mind that if you change a setting while using one of the custom shooting modes and want to retain the new settings, your stored settings can be automatically updated to reflect the modifications. Select Auto Update Set. and choose Enable to activate this option. If you’d rather retain your custom settings until you manually decide to update, select Disable instead.
- 6. Exit. When you confirm, you’ll be returned to the Set-up 6 menu. Press the MENU button or tap the shutter release button to exit the menu system entirely.
Clear All Camera Settings
Options: Clear settings
My preference: N/A
This menu choice resets all the settings to their default values. Regardless of how you’ve set up your EOS R, it will be adjusted to One-Shot AF mode, Automatic AF-point selection, Evaluative metering, JPEG Fine Large image quality, Automatic ISO, sRGB color mode, Automatic White Balance, and Standard Picture Style. Any changes you’ve made to exposure compensation, flash exposure compensation, and white balance will be canceled, and any bracketing for exposure or white balance nullified. Custom white balances and Dust Delete Data will be erased. Tables showing the factory default settings and my recommendations were provided in Chapter 3.
Remember, Custom Functions and Camera User Settings will not be cleared. If you want to cancel those as well, you’ll need to use the Custom shooting mode option (described previously) and the Custom Functions clearing option.
Copyright Information
Options: Display Copyright Information, Enter Author’s Name, Enter Copyright Details, Delete Copyright Information
My preference: N/A
Here’s where you can give yourself credit for the great photos you’re shooting with your EOS R:
- Display Copyright Info. Enable or disable embedding copyright information in your image files. If you’re a double-naught secret agent who wants to submit spy photos anonymously, you’ll definitely want to disable copyright information.
- Enter Author’s Name. You can add your own name (up to 63 characters) to each image file, using a screen like the one shown in Figure 13.15 (right), except with a larger array of alphanumeric characters, using the procedure described earlier in this chapter.
- Enter Copyright Details. You can add more information using the expanded character set. Up to 63 characters can be entered. Note that no copyright symbol is available. While some use a lowercase c within parentheses, technically the correct notification would be (Copyright) or (Copr.)
- Delete copyright information. This removes all the data you’ve entered and gives you a clean slate, so to speak.
Manual/Software URL
Options: None
My preference: N/A
This entry displays a URL you can type in to access manuals and software for your EOS R, as well as a QR code you can scan with your smart device to whisk you off to the same web page.
Certification Logo Display
Options: None
My preference: N/A
This is an informational only screen, which allows Canon to add certification data (similar to what is printed on the bottom panel of the camera) via a firmware upgrade, and without the need to manufacture new stickers for the camera bottom.
Firmware Version
Options: Update firmware
My preference: N/A
You can see the current firmware release in use in the menu listing. If you want to update to a new firmware version, insert a memory card containing the binary file, and press the SET button to begin the process.