You can happily spend your entire shooting career using the techniques and features already explained in this book. Great exposures, sharp pictures, and creative compositions are all you really need to produce great shot after great shot. But, those with enough interest in getting the most out of their Canon EOS R who buy this book probably will be interested in going beyond those basics to explore some of the more advanced techniques and capabilities of the camera. Capturing the briefest instant of time, transforming common scenes into the unusual with lengthy time exposures, and working with new tools like GPS and Wi-Fi are all tempting avenues for exploration. So, in this chapter, I’m going to offer longer discussions of some of the more advanced techniques and capabilities that I like to put to work.
Continuous Shooting
The Canon EOS R’s continuous shooting mode reminds me how far digital photography has brought us. The first accessory I purchased when I worked as a sports photographer many years ago was a motor drive for my film SLR. It enabled me to snap off a series of shots in rapid succession, which came in very handy when a fullback broke through the line and headed for the end zone. Even a seasoned action photographer can miss the decisive instant when a crucial block is made, or a baseball superstar’s bat shatters and pieces of cork fly out. Continuous shooting simplifies taking a series of pictures, either to ensure that one has more or less the exact moment you want to capture or to capture a sequence that is interesting as a collection of successive images.
The EOS R’s “motor drive” capabilities are, in many ways, much superior to what you get with a film camera. For one thing, a motor-driven film camera can eat up film at an incredible pace, which is why many of them were used with cassettes that hold hundreds of feet of film stock. At three frames per second (typical of film cameras), a short burst of a few seconds can burn up as much as half of an ordinary 36 exposure roll of film. Digital cameras, in contrast, have reusable “film,” so if you waste a few dozen shots on non-decisive moments, you can erase them and shoot more. Save only the best shots, like the series shown in Figure 6.1.
To use the EOS R’s continuous shooting mode, press the Q button and navigate to the Drive icon, which is the third from the top in the left column. You can also access Drive mode from the M-Fn button’s Dial Functions; press the button and rotate the QCD until Drive mode is highlighted, then rotate the Main Dial to select. In both cases, you can choose High-speed continuous shooting (up to 8 frames per second) or Low-speed continuous shooting (approximately 3 fps).
Actual frames per second in either mode may be reduced when flicker control is enabled, you’re using Dual Pixel RAW, you’ve activated Servo AF, or when you’re working with electronic flash. Other factors can come into play when shooting in high-speed mode, which is also affected by many shooting settings, including shutter speed, aperture, autofocus mode, silent live view shooting, or even the type of lens you are using. A cold or nearly dead battery can also reduce shooting speeds. With Servo AF, you may get only 5 fps; with flash, just 3 fps, and in Dual Pixel RAW mode, roughly 2.2 fps.
When you partially depress the shutter button, a number representing the maximum number of shots you can take at the current quality settings is displayed. In the viewfinder, that number is located to the left of the battery status indicator at lower right, immediately above the Possible Shots value. On the LCD screen, the maximum burst is located to the immediate right of the Possible Shots indicator at upper left.
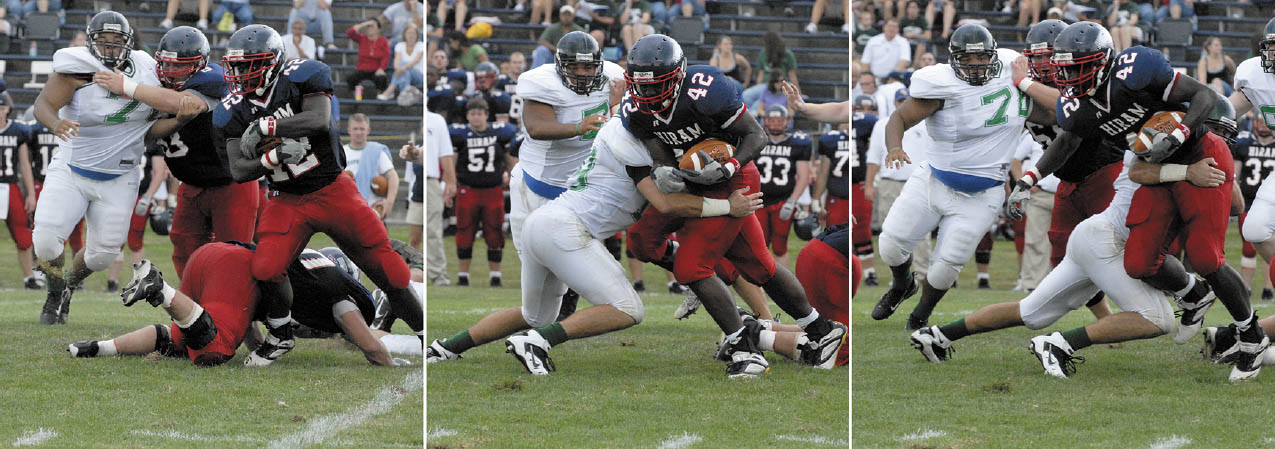
Figure 6.1 Continuous shooting allows you to capture an entire sequence of exciting moments as they unfold.
The display shows a maximum of 99 shots remaining; it’s possible that the camera can take more than that, so the 99 will remain lit until the actual number remaining drops below that value. When the internal buffer is full, a “BUSY” indicator will be shown. When the EOS R’s internal buffer fills, the camera will stop capturing images until enough pictures have been written to the memory card to allow shooting to resume. As you might expect, the number of continuous shots you can fire off before that happens varies with the format you choose and the write speed of your card.
The reason the size of your bursts is limited by the buffer is that continuous images are first shuttled into the EOS R’s internal memory, then doled out to the memory card as quickly as they can be written to the card. Technically, the EOS R takes the RAW data received from the digital image processor and converts it to the output format you’ve selected—either JPG or CR2 (RAW) or both—and deposits it in the buffer ready to store on the card.
This internal “smart” buffer can suck up photos much more quickly than the memory card and, indeed, some memory cards are significantly faster or slower than others. You’ll get the best results when using a shutter speed of 1/500th second, the widest opening of the lens, One-Shot autofocus, and when image stabilization is turned off. However, when One-Shot AF is active, the EOS R will focus only once at the beginning of the sequence, and then use that focus setting for the rest of the shots in the burst. If your subject is moving, you can use Servo AF instead, at a slightly slower continuous frame rate.
Setting High ISO Speed Noise Reduction to High also limits the length of your continuous burst. You’ll also see a decrease if lens aberration correction is active, or you have the camera set to do white balance bracketing. (In such cases, the EOS R stores multiple copies of each image snapped, slowing down the burst rate.) Anti-flicker shooting and Dual Pixel RAW also reduce the continuous shooting speed. While you can use flash in continuous mode, the camera will wait for the flash to recycle between shots, slowing down the continuous shooting rate.
BURSTS NOT JUST FOR ACTION
I often use continuous shooting mode even when I’m not busy shooting action. As I’ve mentioned before, bursts make sense when you’re shooting HDR or bracketing. But here’s a technique you might not have thought of—continuous shooting can give you sharper images!
When I’m photographing concerts, I enjoy greater mobility by not using a monopod (and a tripod would be even more of a ball-and-chain, even if not forbidden by the venue). I’m generally shooting at around 1/180th second, which is usually fast enough to eliminate blur from the performers’ motion. IS has no effect on stopping their movement, of course, and it does a fairly good job of eliminating camera/photographer shake. However, I invariably find that if I shoot in continuous, one of the middle frames in a sequence will be sharpest. Even the most seasoned photographer will add a little bump to the camera when they squeeze (not stab) the shutter release.
More Exposure Options
In Chapter 4, you learned techniques for getting the right exposure, but I haven’t explained all your exposure options just yet. You’ll want to know about the kind of exposure settings that are available to you with the Canon EOS R. There are options that let you control when the exposure is made, or even how to make an exposure that’s out of the ordinary in terms of length (time or bulb exposures). The sections that follow explain your camera’s special exposure features, and even discuss a few it does not have (and why it doesn’t).
A Tiny Slice of Time
Exposures that seem impossibly brief can reveal a world we didn’t know existed. In the 1930s, Dr. Harold Edgerton, a professor of electrical engineering at MIT, pioneered high-speed photography using a repeating electronic flash unit he patented called the stroboscope. As the inventor of the electronic flash, he popularized its use to freeze objects in motion, and you’ve probably seen his photographs of bullets piercing balloons and drops of milk forming a coronet-shaped splash.
Electronic flash freezes action by virtue of its extremely short duration—as brief as 1/50,000th second or less. You can read more about using electronic flash to stop action in Chapter 9.
Of course, the EOS R is fully capable of immobilizing all but the fastest movement using only its shutter speeds, which range all the way up to 1/8,000th second. Indeed, you’ll rarely have need for such a brief shutter speed in ordinary shooting. If you wanted to use an aperture of f/2.8 at ISO 100 outdoors in bright sunlight, for some reason, a shutter speed of 1/8,000th second would more than do the job. You’d need a faster shutter speed only if you moved the ISO setting to a higher sensitivity (but why would you do that?). Under less than full sunlight, 1/8,000th second is more than fast enough for any conditions you’re likely to encounter.
Most sports action can be frozen at 1/2,000th second or slower, and for many sports a slower shutter speed is actually preferable—for example, to allow the wheels of a racing automobile or motorcycle, or the propeller on a classic aircraft to blur realistically.
But if you want to do some exotic action-freezing photography without resorting to electronic flash, the EOS R’s top shutter speed is at your disposal. Here are some things to think about when exploring this type of high-speed photography:
- You’ll need a lot of light. High shutter speeds cut very fine slices of time and sharply reduce the amount of illumination that reaches your sensor. To use 1/4,000th second at an aperture of f/6.3, you’d need an ISO setting of 800—even in full daylight. To use an f/stop smaller than f/6.3 or an ISO setting lower than 800, you’d need more light than full daylight provides. (That’s why electronic flash units work so well for high-speed photography when used as the sole illumination; they provide both the effect of a brief shutter speed and the high levels of illumination needed.)
- Don’t combine high shutter speeds with electronic flash. You might be tempted to use an electronic flash with a high shutter speed. Perhaps you want to stop some action in daylight with a brief shutter speed and use electronic flash only as supplemental illumination to fill in the shadows. Unfortunately, under most conditions you can’t use flash in subdued illumination with your EOS R at any shutter speed faster than 1/200th second. That’s the fastest speed at which the camera’s focal plane shutter is fully open. (Check out “Avoiding Sync Speed Problems” in Chapter 9 if you want to see how you can use shutter speeds shorter than 1/200th second with certain Canon Speedlites, albeit at much-reduced effective power levels.)
Working with Short Exposures
You can have a lot of fun exploring the kinds of pictures you can take using very brief exposure times, whether you decide to take advantage of the action-stopping capabilities of your external electronic flash or work with the Canon EOS R’s faster shutter speeds. Here are a few ideas to get you started:
- Take revealing images. Fast shutter speeds can help you reveal the real subject behind the façade, by freezing constant motion to capture an enlightening moment in time. Legendary fashion/portrait photographer Philippe Halsman used leaping photos of famous people, such as the Duke and Duchess of Windsor, Richard Nixon, and Salvador Dali to illuminate their real selves. Halsman said, “When you ask a person to jump, his attention is mostly directed toward the act of jumping and the mask falls so that the real person appears.” Try some high-speed portraits of people you know in motion to see how they appear when concentrating on something other than the portrait. (See Figure 6.2.)
- Create unreal images. High-speed photography can also produce photographs that show your subjects in ways that are quite unreal. A helicopter in mid-air with its rotors frozen makes for an unusual picture. Figure 6.3 shows a pair of pictures. At top, a shutter speed of 1/1,000th second virtually stopped the rotation of the chopper’s rotors, while the bottom image, shot at 1/200th second, provides a more realistic view of the blurry blades as they appeared to the eye.
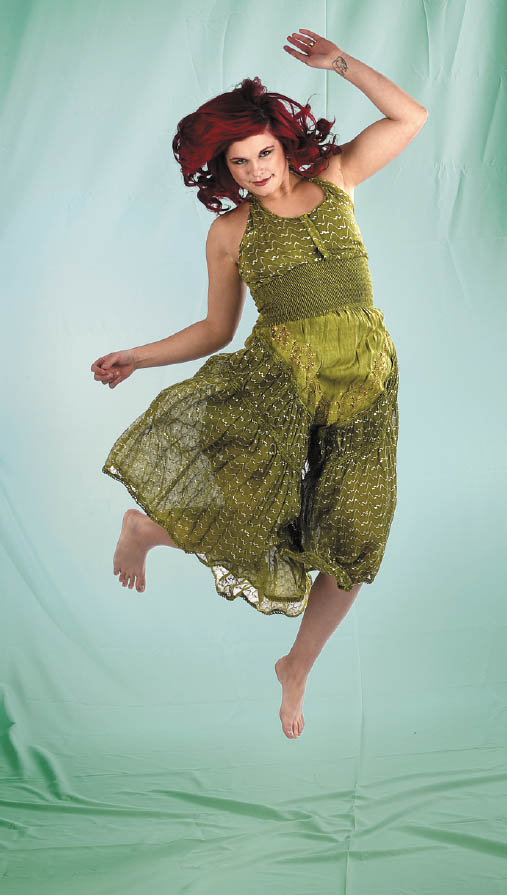
Figure 6.2 When your subjects leap, the real person inside emerges.

Figure 6.3 Top: the chopper’s blades are frozen at 1/1,000th second; bottom: a more realistic blurry rendition at 1/200th second shutter speed.
- Capture unseen perspectives. Some things are never seen in real life, except when viewed in a stop-action photograph. Edgerton’s balloon bursts were only a starting point. Freeze a hummingbird in flight for a view of wings that never seem to stop. Or, capture the splashes as liquid falls into a bowl, as shown in Figure 6.4. No electronic flash was required for this image (and wouldn’t have illuminated the water in the bowl as evenly). Instead, a clutch of high-intensity lamps and an ISO setting of 1600 allowed the camera to capture this image at 1/2,000th second.
- Vanquish camera shake and gain new angles. Here’s an idea I mentioned earlier in this chapter that’s so obvious it isn’t always explored to its fullest extent. A high enough shutter speed can free you from the tyranny of a tripod, making it easier to capture new angles, or to shoot quickly while moving around, especially with longer lenses. I tend to use a monopod or tripod for almost everything when I’m not using an image-stabilized lens, and I end up missing some shots because of a reluctance to adjust my camera support to get a higher, lower, or different angle. If you have enough light and can use an f/stop wide enough to permit a high shutter speed, you’ll find a new freedom to choose your shots. I have a favored 500mm lens that I use for sports and wildlife photography, almost invariably with a tripod, as I don’t find the “reciprocal of the focal length” rule particularly helpful in most cases. (I would not hand-hold this hefty lens with a 1/500th second shutter speed under most circumstances.) However, at 1/2,000th second or faster, and with a sufficiently high ISO setting (I recommend ISO 800–1600) to allow such a speed, it’s entirely possible for a steady hand to use this lens without a tripod or monopod’s extra support, and I’ve found that my whole approach to shooting animals and other elusive subjects changes in high-speed mode.
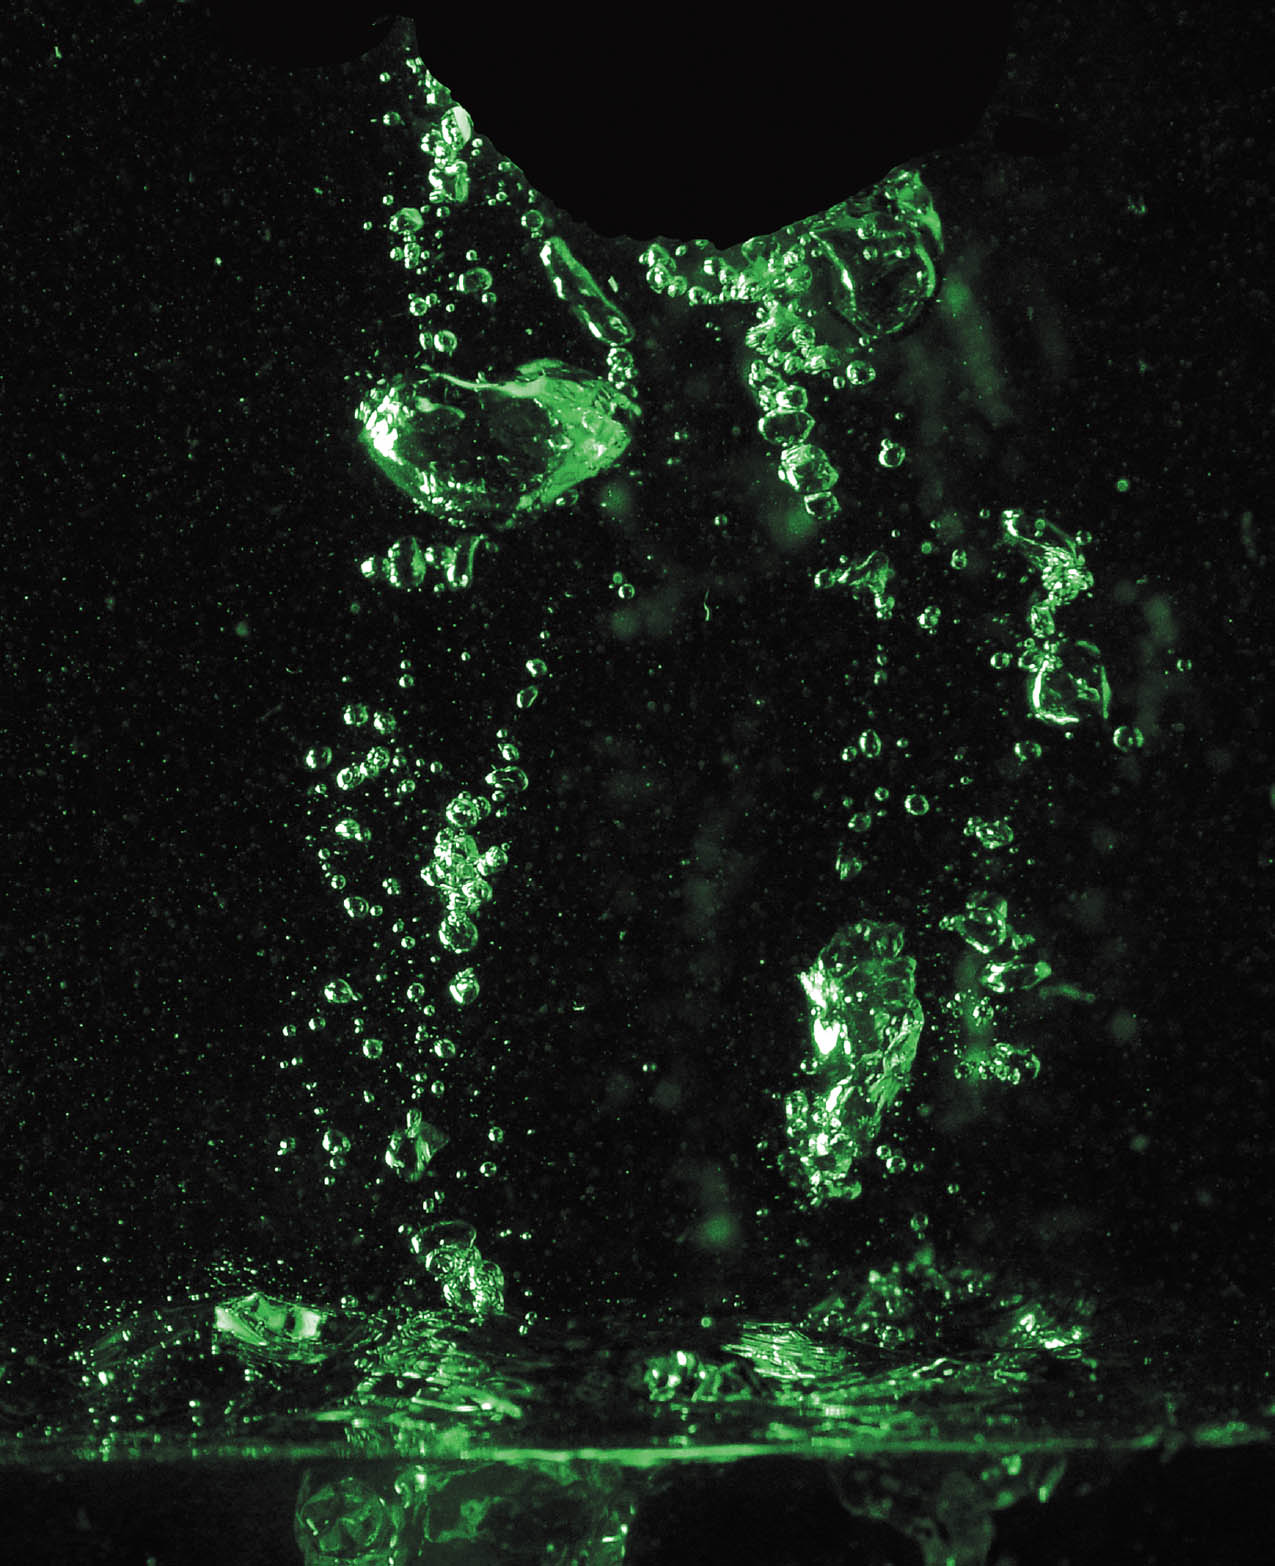
Figure 6.4 A large amount of artificial illumination and an ISO 1600 sensitivity setting allowed capturing this shot at 1/2,000th second without use of an electronic flash.
Long Exposures
Longer exposures are a doorway into another world, showing us how even familiar scenes can look much different when photographed over periods measured in seconds. At night, long exposures produce streaks of light from moving, illuminated subjects like automobiles or amusement park rides. Extra-long exposures of seemingly pitch-dark subjects can reveal interesting views using light levels barely bright enough to see by. At any time of day, including daytime (in which case you’ll often need the help of neutral-density filters, which reduce the amount of light passing through the lens, to make the long exposure practical), long exposures can cause moving objects to vanish entirely, because they don’t remain stationary long enough to register in a photograph.
Three Ways to Take Long Exposures
There are actually three common types of lengthy exposures: timed exposures, bulb exposures, and time exposures. The EOS R offers all three. Because of the length of the exposure, all of the following techniques should be used with a tripod to hold the camera steady.
- Timed exposures. These are long exposures from 1 second to 30 seconds, measured by the camera itself. To take a picture in this range, simply use Manual or Tv modes and use the Main Dial to set the shutter speed to the length of time you want, choosing from preset speeds of 1.0, 1.5, 2.0, 3.0, 4.0, 6.0, 8.0, 10.0, 15.0, 20.0, or 30.0 seconds (if you’ve specified 1/2-stop increments for exposure adjustments), or 1.0, 1.3, 1.6, 2.0, 2.5, 3.2, 4.0, 5.0, 6.0, 8.0, 10.0, 13.0, 15.0, 20.0, 25.0, and 30.0 seconds (if you’re using 1/3-stop increments). The advantage of timed exposures is that the camera does all the calculating for you. There’s no need for a stopwatch. If you review your image on the LCD and decide to try again with the exposure doubled or halved, you can dial in the correct exposure with precision. The disadvantage of timed exposures is that you can’t take a photo for longer than 30 seconds.
- Bulb exposures. This type of exposure is so-called because in the olden days the photographer squeezed and held an air bulb attached to a tube that provided the force necessary to keep the shutter open. Traditionally, a bulb exposure is one that lasts as long as the shutter release button is pressed; when you release the button, the exposure ends. To make a bulb exposure with the EOS R, set the camera on B using the MODE button. Then, press the shutter to start the exposure, and press it again to close the shutter.
- Time exposures. This is a setting found on some cameras to produce longer exposures. With the EOS R, it’s actually an enhancement of the Bulb exposure feature. With the camera’s mode set to Bulb, locate the Bulb Timer setting in the Shooting 6 menu. Press SET, and in the screen that pops up, highlight Enable. Press INFO, and a screen appears that will allow you to set an exposure time of up to 99 hours, 59 minutes, and 59 seconds. You’ll rarely need extra-long exposures (unless you’re shooting continuous star trails), but many exposures longer than 30 seconds are quite useful. For example, if many star photographers shoot multiple one-minute exposures (any longer than that, and the star pinpoints become blurs) and then merge them together to get a different kind of sky photograph.
When using this type of Bulb exposure, you can press the shutter release button, go off for a few minutes, and come back to take your next shot (assuming your camera is still there). The disadvantages of this mode are exposures must be timed manually, and with shorter exposures, it’s possible for the vibration of manually opening and closing the shutter to register in the photo. For longer exposures, the period of vibration is relatively brief and not usually a problem—and there is always the release cable option to eliminate photographer-caused camera shake entirely.
Working with Long Exposures
Because the EOS R produces such good images at longer exposures, and there are so many creative things you can do with long-exposure techniques, you’ll want to do some experimenting. Get yourself a tripod or another firm support and take some test shots with long exposure noise reduction both enabled and disabled using the entry in the Shooting 3 menu, as explained in Chapter 11 (to see whether you prefer low noise or high detail), and get started. Here are some things to try:
- Make people invisible. One very cool thing about long exposures is that objects that move rapidly enough won’t register at all in a photograph, while the subjects that remain stationary are portrayed in the normal way. That makes it easy to produce people-free landscape photos and architectural photos at night or, even, in full daylight if you use a neutral-density filter (or two or three) to allow an exposure of at least a few seconds. At ISO 100, f/22, and a pair of 8X (three-stop) neutral-density filters, you can use exposures of nearly two seconds; overcast days and/or more neutral-density filtration would work even better if daylight people-vanishing is your goal. They’ll have to be walking very briskly and across the field of view (rather than directly toward the camera) for this to work. At night, it’s much easier to achieve this effect with the 20- to 30-second exposures that are possible, as you can see in Figure 6.5.
- Create streaks. If you aren’t shooting for total invisibility, long exposures with the camera on a tripod or monopod can produce some interesting streaky effects, as you can see in Figure 6.6. You don’t need to limit yourself to indoor photography, however. Even a single 8X ND filter will let you shoot at f/22 and 1/6th second in full daylight at ISO 100.
- Produce light trails. At night, car headlights and taillights and other moving sources of illumination can generate interesting light trails. Your camera doesn’t even need to be mounted on a tripod; hand-holding the EOS R for longer exposures adds movement and patterns to your trails. If you’re shooting fireworks (preferably with a tripod), a longer exposure of several seconds may allow you to combine several bursts into one picture. Or, you can record the movement of a Ferris wheel, as shown in Figure 6.7.
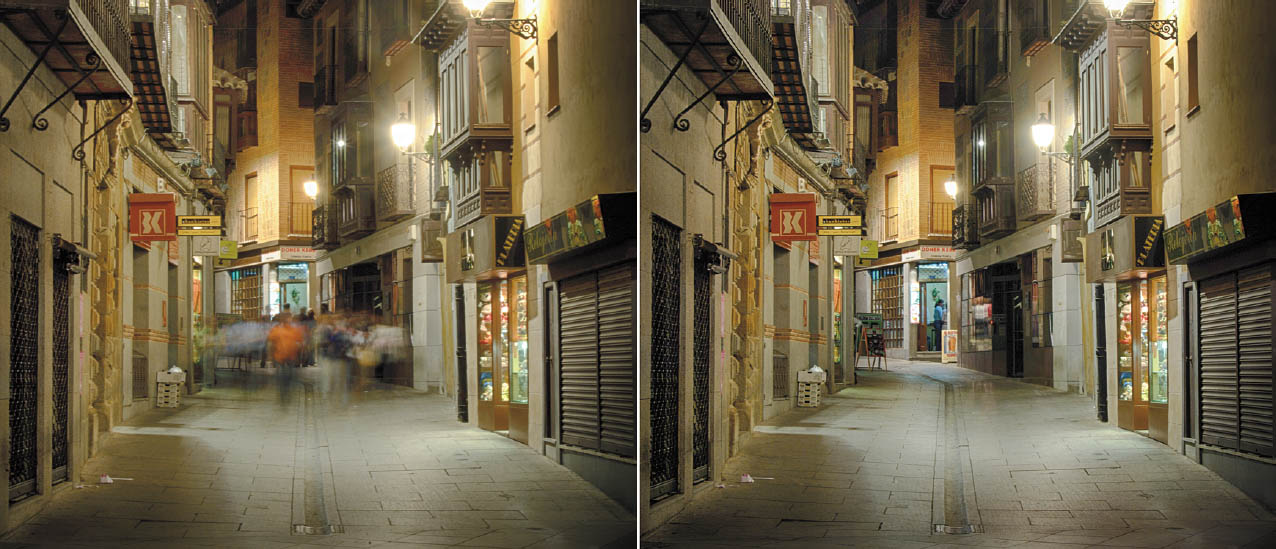
Figure 6.5 This alleyway is thronged with people, as you can see in this two-second exposure using only the available illumination (left). With the camera still on a tripod, a 30-second exposure rendered the passersby almost invisible (right).
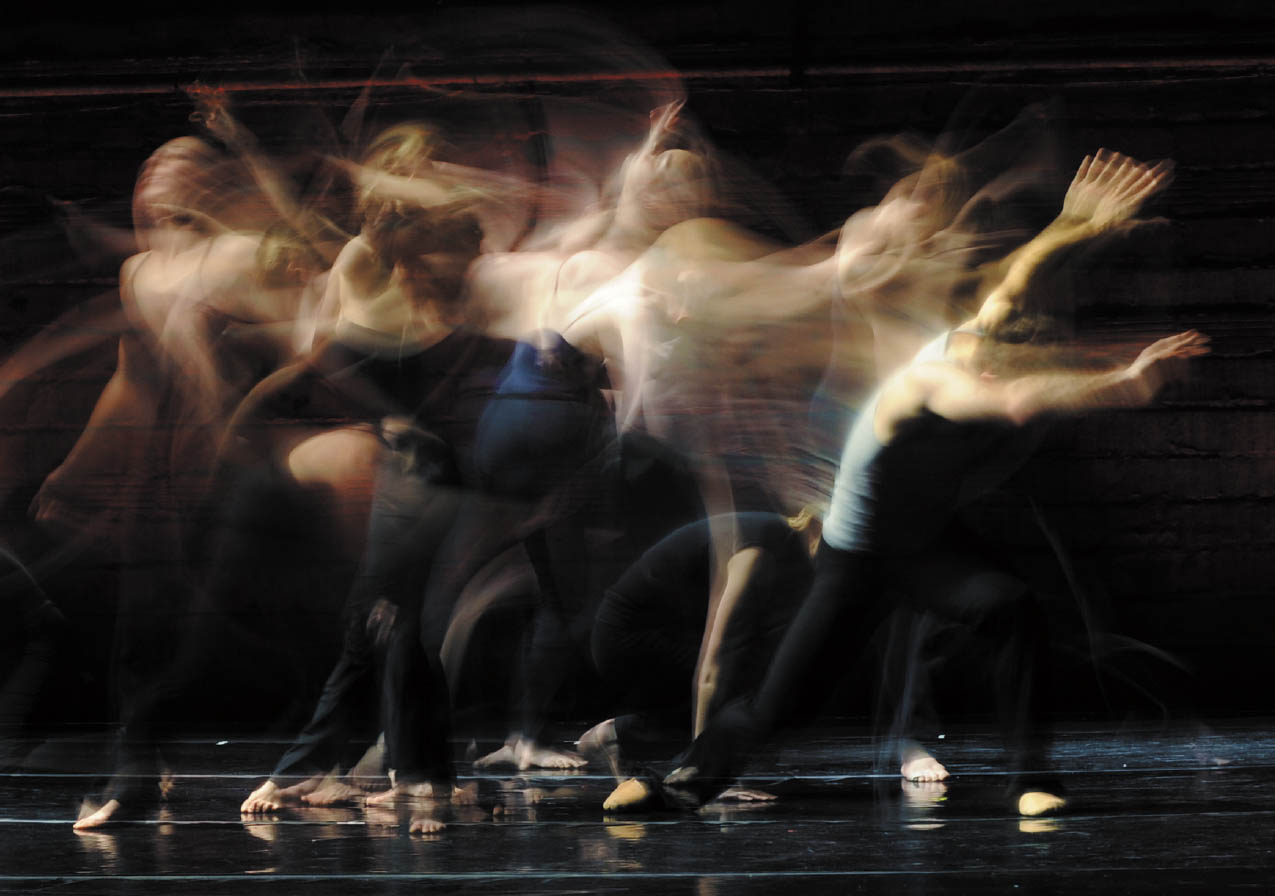
Figure 6.6 These dancers produced a swirl of movement during the 1/8th second exposure.
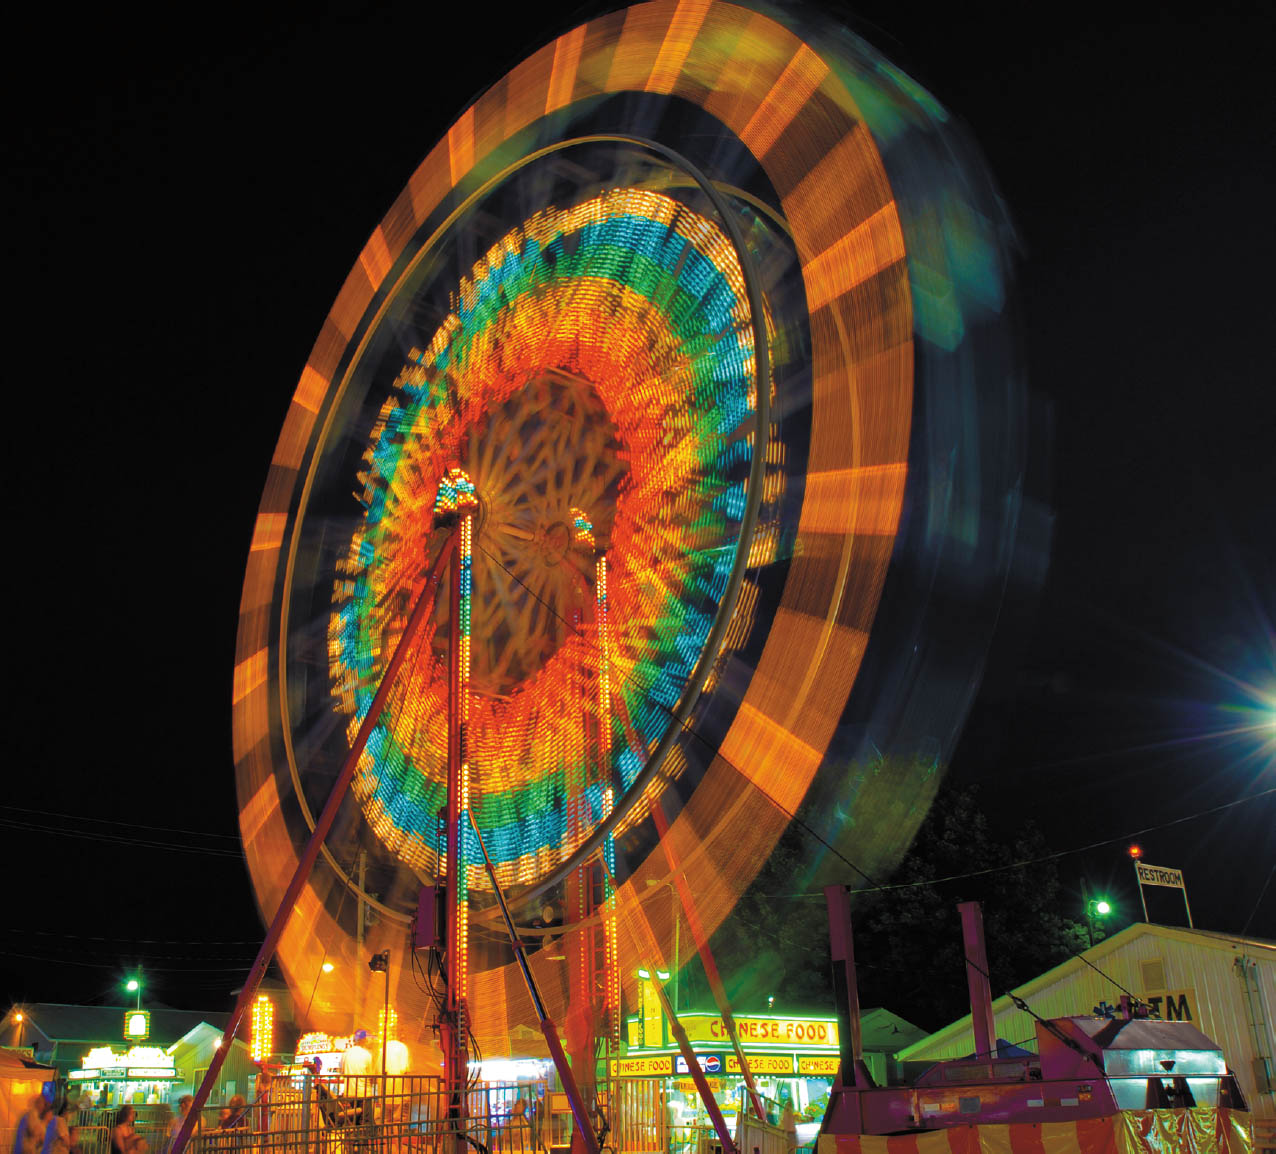
Figure 6.7 A long exposure of several seconds allows capturing the movement of this Ferris wheel.
- Blur waterfalls, etc. You’ll find that waterfalls and other sources of moving liquid produce a special type of long exposure blur, because the water merges into a fantasy-like veil that looks different at different exposure times, and with different waterfalls. Cascades with turbulent flow produce a rougher look at a given longer exposure than falls that flow smoothly. Although blurred waterfalls have become almost a cliché, there are still plenty of variations for a creative photographer to explore, as you can see in Figure 6.8.
- Show total darkness in new ways. Even on the darkest nights, there is enough starlight or glow from distant illumination sources to see by, and, if you use a long exposure, there is enough light to take a picture, too. Figure 6.9 shows San Juan, Puerto Rico late at night.

Figure 6.8 A 1/4-second exposure blurred the falling water.

Figure 6.9 A 20-second exposure revealed this view of San Juan, Puerto Rico.
Delayed Exposures
Sometimes it’s desirable to have a delay of some sort before a picture is actually taken. Perhaps you’d like to get in the picture yourself, and would appreciate it if the camera waited 10 seconds after you press the shutter release to actually take the picture. Maybe you want to give a tripod-mounted camera time to settle down and damp any residual vibration after the release is pressed to improve sharpness for an exposure with a relatively slow shutter speed. It’s possible you want to explore the world of time-lapse photography. The next sections present your delayed exposure options.
Self-Timer
The EOS R has a built-in self-timer with 10-second and 2-second delays. Activate the timer by pressing the Q button and rotating the QCD to select the drive modes. Press the shutter release button halfway to lock in focus on your subjects (if you’re taking a self-portrait, focus on an object at a similar distance and use focus lock). When you’re ready to take the photo, continue pressing the shutter release the rest of the way. The lamp on the front of the camera will blink slowly for eight seconds (when using the 10-second timer) and the beeper will chirp (if you haven’t disabled it in the Shooting menu, as described in Chapter 11). During the final two seconds, the beeper sounds more rapidly and the lamp remains on until the picture is taken. The top-panel LCD displays a countdown while all this is going on.
This is something you might want to do if you’re shooting close-ups, landscapes, or other types of pictures using the self-timer, to trip the shutter in the most vibration-free way possible. Forget to bring along your tripod, but still want to take a close-up picture with a precise focus setting? Set your digital camera to the self-timer function, then put the camera on any reasonably steady support, such as a fence post or a rock. When you’re ready to take the picture, press the shutter release. The camera might teeter back and forth for a second or two, but it will settle back to its original position before the self-timer activates the shutter. The self-timer remains active until you turn it off—even if you power down the EOS R, so remember to turn it off when finished.
Time Lapse Photography
Who hasn’t marveled at interval stills, shot moments or minutes apart to document an event, or wasn’t enrapt by a time-lapse movie of a flower opening, a series of shots of the moon marching across the sky, or one of those extreme interval or time-lapse photography productions showing something that takes a very, very long time, such as a building under construction.
You probably won’t be shooting such construction shots, unless you have a spare EOS R you don’t need for a few months (or are willing to go through the rigmarole of figuring out how to set up your camera in precisely the same position using the same lens settings to shoot a series of pictures at intervals). However, other kinds of time-lapse photography are entirely within reach.
The EOS R has built-in features that allow you to shoot time-lapse movies easily. You can also take stills at fixed intervals, but will need to purchase the Canon Timer Remote Control TC-80N3 and RA-E3 adapter to do that. Before I explain how to use the time-lapse feature, here are a few things to keep in mind:
- Use AC power. If you’re shooting a long sequence, consider connecting your camera to an AC adapter, as leaving the EOS R on for long periods of time will rapidly deplete the battery. The optional Canon DC Coupler DR-E6 and AC Adapter AC-6N are perfect for this application. While shooting time-lapse movies, auto power off will not take place.
- Disabled functions. While capturing time-lapse movies, ISO must be ISO 6400 or slower; shooting and menu functions and playback are disabled, along with Movie Servo AF. You can’t shoot time-lapse movies if digital zoom is enabled, and sound is not recorded.
- Make sure you have enough storage space. Unless your memory card has enough capacity to hold all the images you’ll be taking, you might want to change to a higher compression rate or reduced resolution to maximize the image count.
- Protect your camera. If your camera will be set up for an extended period of time (longer than an hour or two), make sure it’s protected from weather, earthquakes, animals, young children, innocent bystanders, and theft.
- Vary intervals. Experiment with different time intervals. You don’t want to take pictures or frames too often or less often than necessary to capture the changes you hope to image in your movies or still series.
Time-lapse Movies
The EOS R’s time-lapse movie facility is actually a still photography mode that shoots images at intervals you specify, and then stitches them together automatically to create a MP4-format movie in Full HD (1920 × 1080) and 4K formats (3840 × 2160) at a playback rate of 30/25 fps (NTSC/PAL). To create a time-lapse movie, just follow these steps:
- 1. Switch to Movie mode. Press the MODE button and switch to a movie mode (using the INFO button to toggle between still and movie settings, if necessary). Even though time-lapse clips are a series of stills, you must be in Movie mode to access the feature. Even though individual images are still photographs, no stills are stored; the EOS R converts them to a movie file even if you take only one shot in time-lapse mode.
- 2. Navigate to the Shooting 2 (Movie) menu. Select Time-Lapse Movie and press SET.
- 3. Choose Enable. Highlight Time-lapse Movie and press SET. Choose either Enable 4K or Enable FHD (see Figure 6.10 top right and left). Press SET to confirm.
- 4. Specify interval and number of shots. The options shown in Figure 6.10, bottom, appear in the main Time-lapse menu. You can choose the interval between shots, up to 99 hours, 59 minutes, and 59 seconds, and the total number of shots to take in the sequence. The expected elapsed time for the entire sequence is shown near the bottom of the screen.

Figure 6.10 Enable/disable and check settings on this screen (top). Choose interval and number of shots here (bottom).
- 5. Select Exposure Setting. Highlight Auto Exposure and press SET. You can then choose:
- Fixed 1st Frame. Metering takes place and the exposure is set for the first frame, and used for all subsequent frames. You’d use this setting when you want the exposure to remain constant, even if lighting changes.
- Each frame. Metering is performed for each shot in the sequence. A time-lapse movie of a city skyline from dawn to dusk will reflect the correct exposure for each stage of the day.
- 6. Screen Auto Off. Choose this setting to specify whether you want each captured image to be displayed.
- Disable. The sensor image will be displayed at all times during capture, except during the moment of exposure. The screen will eventually turn off roughly 30 minutes after shooting started.
- Enable. The screen turns off 10 seconds after shooting begins. This gives you a chance to monitor the first shot so you’ll know the scene is framed and exposed as you intend.
- 7. Specify beeper. After setting Screen Auto Off, you can enable or disable the Beep As Image Taken feature to provide feedback that the sequence is still underway. Because the electronic shutter is used, there is no other indicator that an exposure has been made.
- 8. Confirm. When finished setting each parameter, highlight OK and press SET to confirm.
- 9. Exit menu and test settings. Press MENU to exit the menu system. A message appears on the LCD monitor advising you to make your exposure settings and press the shutter release to take a test shot. Note that you can use a full range of shutter speeds from 1/8,000th to 1/30th second and if you’ve selected a speed slower than 1/60th second, when capture ends the camera will change to a shutter speed allowable for movie shooting.
- 10. Exit setup. When satisfied with your exposure settings, press OK to exit the set-up screen.
- 11. Start time-lapse. When ready to begin, press the Movie button to commence your time-lapse movie.
- 12. Turn on screen (optional). You can check your settings by pressing the INFO button to turn the screen on or off.
- 13. Stop capture. While the time-lapse movie is recording, you can return to the Time-lapse menu setting and switch to Disable. When time-lapse shooting ends, the settings are cleared and the EOS R resumes normal Movie shooting mode.
Introducing Wi-Fi
Your EOS R has built-in wireless communications capabilities that allow you to link the camera to multiple devices. The various permutations and features are complex, to the extent that Canon includes a 93-page Wi-Fi manual as part of its basic EOS R product guide. This book concentrates on still photography rather than information technology and, obviously, I can’t devote almost 100 pages to Wi-Fi topics in this book. However, I think you’ll find enough information in the following sections to get you started with the basics. You’ll want to study the Canon guide for advanced networking techniques and settings.
First, here is a list of the connections you can make with the EOS R’s built-in Wi-Fi:
- Phones and tablets. You can connect to a smartphone or tablet and use an app on the device to operate the camera remotely or review images on your memory card. Both Android and iOS are supported.
- Connect and control your camera from your computer. The EOS Utility will allow you to connect your EOS R to you computer over Wi-Fi and operate it remotely. The Image Transfer Utility 2 can be used to send images from the camera automatically to your computer.
- Print images. If you have a PictBridge-compatible printer with wireless local area network (WLAN) features, you can print images directly from your camera.
- Connect Station. Canon offers the Connect Station, a 1TB storage device that can download images from the EOS R over a wireless connection, or transfer them directly using its two memory card slots. The transferred images can be viewed using a web browser, or directed to an HDMI-compatible monitor/HDTV over a cable connection. An included remote control allows you to display the images in slide-show fashion.
- FTP transfer. You can send your images to an FTP server for immediate availability by anyone with permissions to access that server.
- Web upload. The free Canon iMage Gateway can be used to share your images with colleagues, family, or friends over the Internet.
I’ll explain all of these in the next sections, but first you need to consider some general guidelines for the EOS R’s built-in wireless functions:
General Bluetooth/Wi-Fi Guidelines
Here are some general tips for using the EOS R’s built-in Bluetooth and Wi-Fi functions:
- Conserve processing power. Wi-Fi uses some of your camera’s internal CPU’s processing muscle, so when the EOS R is busy communicating with another device, give Wi-Fi top priority. Don’t press the shutter release, rotate the Mode Dial, or review images with the Playback button. If you do, Wi-Fi functions may be interrupted.
- Some functions are disabled. When Wi-Fi is enabled, the EOS R cannot communicate with a computer, printer, external monitor, GPS, or other device with a direct (cable) connection, USB, or HDMI cable link. For example, if you’re viewing your camera’s output on a monitor using an HDMI connection, the monitor will go dark during Wi-Fi communication. In addition, you can’t use an Eye-Fi card (an SD card with its own built-in Wi-Fi functions) and the internal Wi-Fi functions simultaneously; if you’ve set the EOS R’s Wi-Fi functions to Enable, any Eye-Fi card is automatically disabled. The camera cannot be connected to other NFC devices, including printers, when you’re using the NFC function.
- No auto shutoff. When using Wi-Fi, the camera’s power-saving shutdown feature is disabled.
- Monitor connection status. Wi-Fi status can be seen within the information displays on both the camera’s LCD monitor and LCD panel. When Wi-Fi is disabled, or enabled but no connection is available, an OFF indicator is shown in both places. When a connection is available, the indicators are animated when data is being transmitted, and blink if the camera is waiting for a reconnection or there is a connection error.
Connecting to a Smartphone via Wi-Fi
When you connect your EOS R to your smart device using Wi-Fi you can:
- View Images on the camera on the phone, or save them to the phone.
- Operate the camera remotely to take pictures or change camera settings using the phone.
- Send images to the phone from the camera.
- Establish a Wi-Fi connection through an Access point.
Connecting to a Bluetooth-compatible Smartphone
Connecting your smart device to your EOS R is most easily done using a Bluetooth connection, which is available on virtually all smart devices introduced within the last three or four years. Just follow these steps:
- 1. Navigate to the Wireless Communications Settings entry at the top of the Set-up 5 menu.
- 2. In the Wireless Communications Settings screen that appears (see Figure 6.11, upper left), select Wi-Fi Settings and choose Enable.
- 3. Press MENU to return to the Wireless Communications Settings screen.
- 4. Next, choose the third entry from the top, Bluetooth Function, and select Smartphone. (See Figure 6.11, upper right.)
- 5. You’ll be asked to register a nickname for the camera. Enter using the EOS R text entry screen. (See Figure 6.11, lower left.) Press MENU when finished and OK to confirm.
- 6. Back at the Bluetooth function screen, choose Pairing. (See Figure 6.11, lower right.)
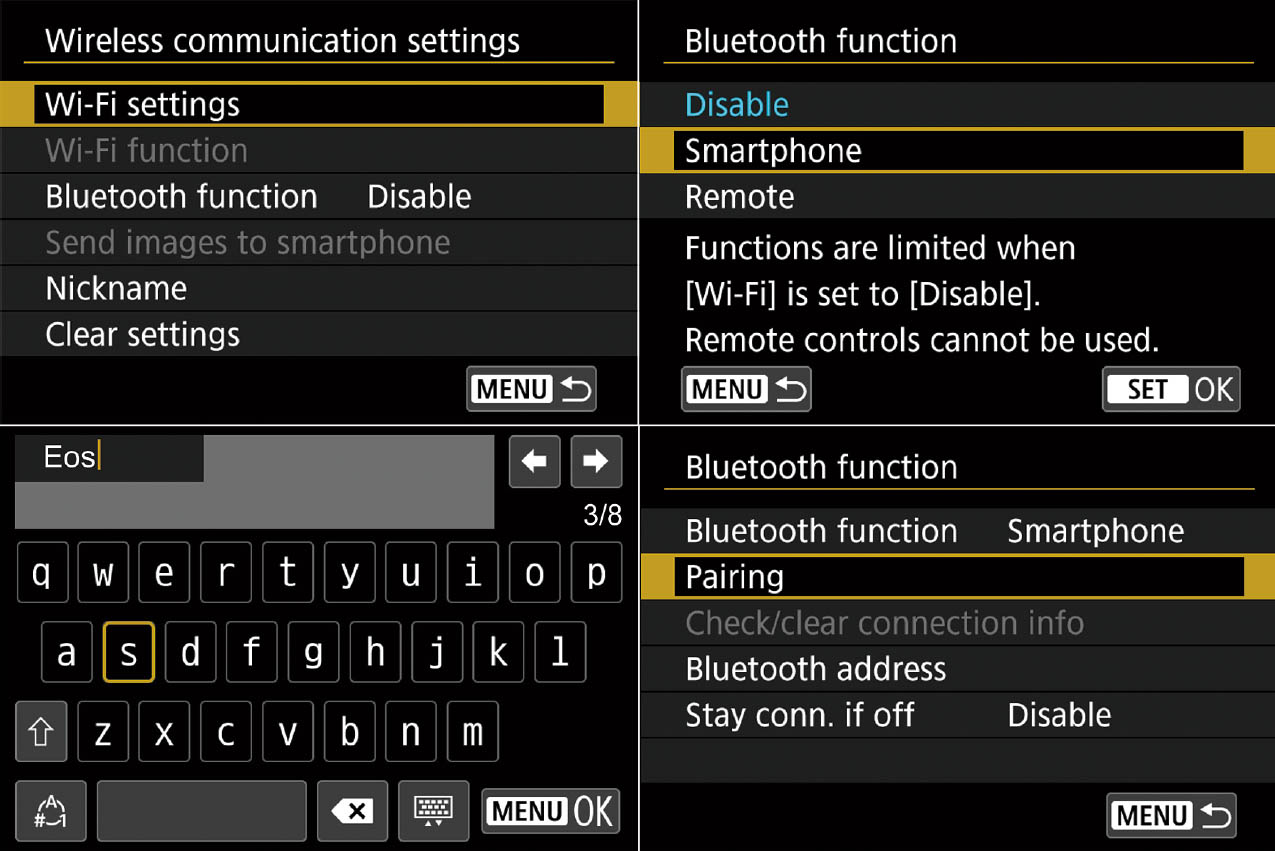
Figure 6.11 Connecting your camera and smart device using Bluetooth.
- 7. At this point you can opt to install the Canon Camera Connect application, if you have not already done so. The screen shown in Figure 6.12, left appears.
- If you have already installed Camera Connect, choose Do Not Display and proceed to the next step.
- If you have not installed Camera Connect, choose either Android or iOS (depending on the operating system of your device) to display a QR code you can capture to access and install the application on your phone from the appropriate store.
- 8. Pairing will now begin and you will need to carry out some subsequent steps on your smart device.
- 9. On your device, turn on the phone/tablet’s Bluetooth feature.
- 10. Start the Camera Connect app on your device.
- 11. A message on the order of “New Bluetooth Enabled Camera Found. Choose Camera for Pairing” will appear.
- 12. The iOS device will next display a Bluetooth Pairing Request screen. Tap Pair. The screen shown in Figure 6.12, center, will appear.
- 13. Your Camera Connect will now display a screen like the one shown at right in Figure 6.12. Tap to connect to the camera and produce a confirmation screen. A message “Wi-Fi On” will be displayed on the camera along with Bluetooth and Wi-Fi icons on the Camera Connect screen.
Once you’ve connected using Bluetooth you can easily keep in touch. Just choose Stay Connected If Off in the Bluetooth Function menu, and the EOS R will remain connected to your device even if you turn the camera off. Low-energy Bluetooth requires very little power, so you can safely enable the camera and device to remain connected when they are in range of each other. Just launch Camera Connect on your device, select Images on Camera (tap Join if using iOS), and you’ll be able to view a list of images on the camera.

Figure 6.12 Final connection steps.
Camera Connect is easy to use. It has three main screens. The screen shown at left in Figure 6.13 allows you to view Images On Camera, use Remote Shooting, or adjust Camera Settings. In Images on Camera mode, you’ll be shown a screen of thumbnails of pictures on the EOS R that you can select to download to your smart device (you can also choose them on the camera and initiate transfer there). Remote Shooting allows you to make the most important camera adjustments and control your camera from the smart device. The Camera Settings screen allows you to make camera settings like date and time, and transfer them to the EOS R.

Figure 6.13 Using Camera Connect.
OTHER CONNECTIONS
If you prefer to link your EOS R to another device (including smartphones, printers, or computers) using a Wi-Fi connection other than the camera’s built-in connection, you can set up a standard link, either semi-automatically using Easy Connection or Find Network functions or manually by entering the information about the external network. It would be impossible to cover all the options for connecting to a network/access point, and choosing among WPS (Wi-Fi Protected Setup) variations for the various Windows and Mac operating systems in this book. I recommend using the EOS R’s internal access point to everyone who isn’t intimately familiar with wireless networking. Canon does provide its lengthy wireless communication functions instructions with all the parameters a LAN-savvy photographer needs to connect to a favorite network. As I noted earlier, this is a photography book rather than computer manual. I’m not going to go into depth on any advanced options.
Remote Control with EOS Utility
While you can control your EOS R using the Camera Connect app on your smartphone as described above, you can also use a laptop or desktop computer to wirelessly operate your camera using the free EOS Utility that can be downloaded from the Canon website.
Connection is done in a similar way:
- 1. Choose Remote Control (EOS Utility) from the Wi-Fi Function screen.
- 2. Select Easy Connection on the camera to display the SSID and encryption key (password) on the EOS R’s LCD monitor. (See Figure 6.14.)
- 3. Access your particular computer/operating system’s wireless settings. Keep in mind that while virtually all laptops have wireless built-in, not all desktop computers do. The screen shown for my Windows 10 OS appears in Figure 6.15.
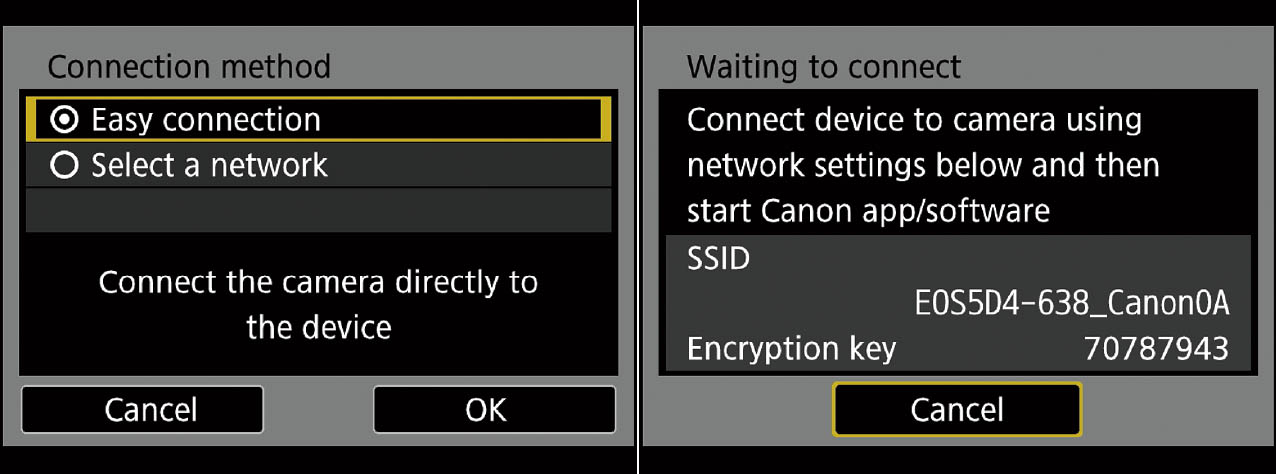
Figure 6.14 Choose the camera’s SSID from your operating system’s network connections screen.
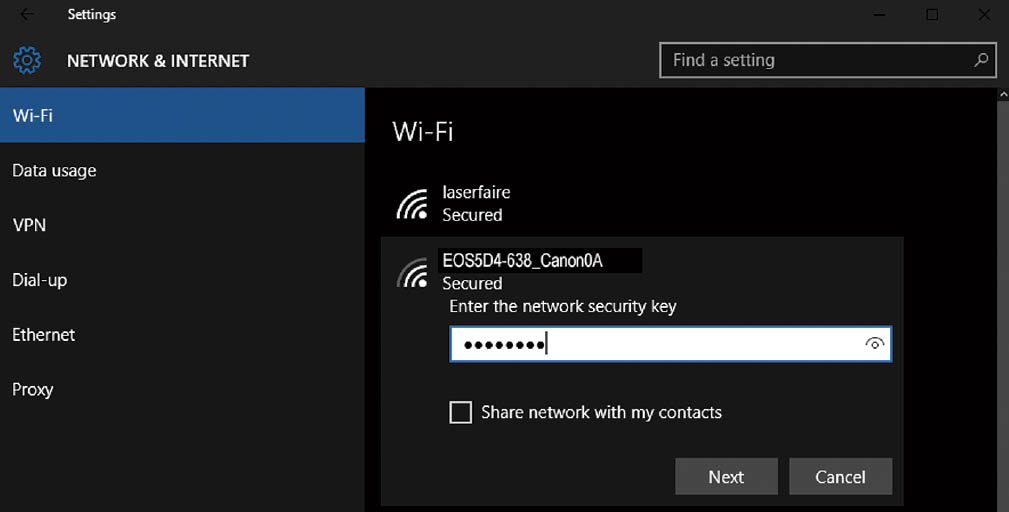
Figure 6.15 Connect wirelessly on your computer.
- 4. Select the camera’s SSID from the list and enter the password/encryption/network security key.
- 5. Start the EOS Utility 3 on your computer, and select Pairing Over Wi-Fi/LAN.
- 6. Choose OK when the Start Pairing Device notice shows up on the EOS R.
- 7. When pairing is accomplished, you will be able to access the camera wirelessly using the EOS Utility.
Printing from Wi-Fi Printer
Many (perhaps most) printers today have built-in wireless capabilities, allowing you to print out directly from your computer without a physical link between the computer and printer. The EOS R adds the same function to your camera/printer setup, so you can make hard copies of your images from files in your camera without the bother of transferring them to a computer first. All you need is your EOS R and a PictBridge-compatible printer that conforms to the DPS over IP standard. (More alphabet soup: Digital Photo Solutions and Internet Protocol.) To use this feature, you must:
- Configure your printer for wireless printing. The instructions vary from printer to printer, so you should consult your printer manual for the procedures. Once you’ve done this, you’ll be able to print photos from your camera, plus files from your computer and other compatible devices, such as smartphones. Wireless printing is not limited to camera-to-printer communications.
- Link your camera to the printer. The procedures are the same as those mentioned earlier. You can use your camera’s connection or connect to your local area network (infrastructure network). A list of detected printers is displayed, and, as before, you can save the camera-printer connection to a setting for re-use later. Multiple printer connections can be registered.
If your printer does not connect wirelessly, you can still connect to the camera using your LAN, as described previously.
- Printing images. Once linked, you can print by pressing the Playback button and scrolling to the image you want to output. Select printing parameters, number of prints, and other settings just as you would for printing over a wired connection to a PictBridge printer.
Uploading to a Web Service
This wireless option allows you to select images and upload them to the Canon iMage Gateway, which is a free-of-charge service. You can register online through your computer and through this entry. Once you’ve become a member, you can upload photos, create photo albums, and use other Canon Image Gateway services. The site also can interface with other web services you have an account with, including e-mail, Twitter, YouTube, and Facebook.
All you need is your EOS R and a computer with the EOS Utility installed. Before you can interface with the Canon gateway wirelessly, you must connect your camera and computer using the conventional digital/USB connection, log onto the Gateway through the “globe” icon, and configure the camera’s settings to allow access to the web services. (Remember that Wireless capabilities must be set to Disable any time you want to use a wired connection between your camera and computer.)
Then, you can remove the direct link, turn wireless features back on, and connect to your computer through the wireless access methods described earlier in this chapter. Still images can be uploaded to the Gateway, and movies to YouTube. Images can be uploaded directly to Facebook, or shared with Facebook and Twitter users by posting a link back to the Canon Image Gateway location of the files. As with the image transfer features described earlier, you can resize images before uploading, and send photos one by one or in batches.
Geotagging
Geotagging is most important as a way to associate the geographical location where the photographer was when a picture was taken, with the actual photograph itself. Geotagging can also be done by attaching geographic information to the photo after it’s already been taken. This is often done with online services which allow you to associate your uploaded photographs with a map, city, street address, or postal code. When properly geotagged and uploaded to compatible sites, users can browse through your photos using a map, finding pictures you’ve taken in a given area, or even searching through photos taken at the same location by other users.
You EOS R can work with the Canon GP-E2 GPS Receiver. It records locational data such as latitude, longitude, and altitude, and saves it to the EXIF metadata in your image files, where it can be retrieved by compatible software to plot to maps or insert into your uploads to Flickr or other sites. You can even track your trajectory of movement with the receiver’s logging function.
If your familiarity with GPS is limited to that gadget that sits atop your dashboard, you’ll be pleasantly surprised at the things that a GPS-equipped camera can do with locational information. When active, the GPS system records the latitude and longitude of each location where a picture is snapped, the elevation, Coordinated Universal Time Code (UTC), and the satellite reception status. This information is embedded in the EXIF metadata included in each photo, where it can be read and manipulated by compatible software. That includes Canon utilities, such as the Map Utility, Digital Photo Professional, and ImageBrowser EX programs; third-party image-editing software, including iPhoto for the Mac and the Map Module in Lightroom; and many photo-sharing sites that can display the location where each image was taken when you upload your pictures to an online album. Google Earth can also use your EXIF data.
You can view GPS data on the EOS R’s display as you review images. Press the INFO button until the view with a histogram appears, then scroll down using the directional buttons until you reach the screen shown at left in Figure 6.16. When the GPS is active, you can also view the information for your current location in the GPS menu, as I’ll describe shortly. I often use this feature when I am traveling around and want to record a specific site that I want to return to at a later time. I can view the latitude and longitude and enter them into my portable Garmin Etrex GPS, or the GPS in my car, and then return by accessing the data I’ve saved. While GPS data is most often used to pinpoint the shooting location of individual images, the receiver’s logging function allows you to re-create the route you took in capturing those photos, thanks to the Canon Map Utility.
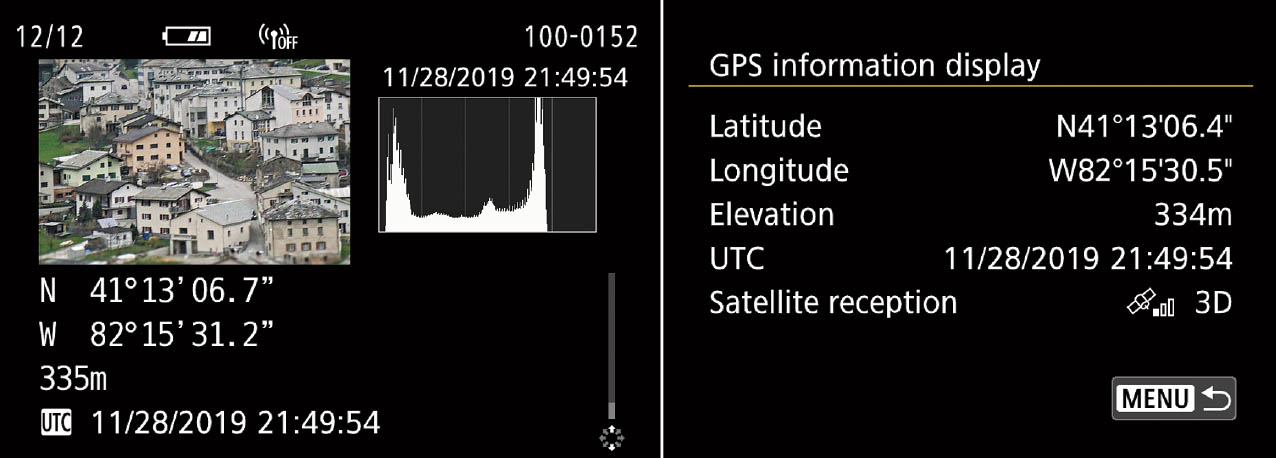
Figure 6.16 Display GPS information about an image (left) or your camera’s current location (right).
Using the GP-E2 Receiver
To activate your EOS R’s external GPS receiver, just follow these steps:
- 1. Navigate to the Set-up 5 menu and choose GPS Settings. The screen shown in Figure 6.17 appears.
- 2. Set GPS mode. You can disable GPS here (to save power) or choose one of two modes:
- Mode 1. When the camera is powered down, the GPS receiver still functions at intervals, keeping track of your location. That’s useful if you’ll be using GPS a lot during a shooting session and don’t want to wait for the receiver to re-acquire GPS satellites (it can take valuable seconds or even minutes). The penalty is that the EOS R draws power continually and your battery life is shortened. Carry plenty of extra batteries if you use this mode.
- Mode 2. When you turn the camera off, GPS is turned off too and no longer drains power. However, if the camera goes to “sleep” due to your auto power off setting, the GPS will receive signals at intervals and draw some power. This mode uses less power than Mode 1, but gives you the option of shutting off the GPS when you know you won’t be using it for a while, but not disabling it when your auto power off setting kicks in.
- 3. Choose time update. With the Auto time setting option, the EOS R can use time data embedded in the GPS signal to set the camera’s internal clock accurately. You can choose Auto Update to set the time automatically whenever the camera is powered up and GPS data is available; disable this function, or Set Now to update immediately. The receiver must be able to link with at least five GPS satellites for the time function to operate; when activated, the time setting in your camera will maintain +/– one-second accuracy. (This feature is great for synchronizing several GPS-equipped cameras, especially when shooting and editing videos and still shots contemporaneously.)

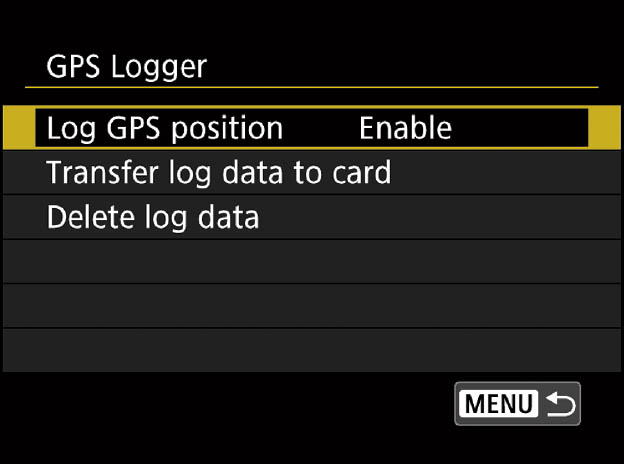
Figure 6.18 Enable, disable logger; transfer log data to a memory card; delete log data.
- 4. Position update timing. Use this to specify the interval the GPS device uses to update position information. Choose from every 1, 5, 10, 15, or 30 seconds, or every 1, 2, or 5 minutes. Select a shorter interval when you are moving and/or accuracy is critical, or a longer interval to save power, when GPS reception is not optimal, or you are shooting from one position for a longer period.
- 5. GPS information display. This entry simply displays a screen of current GPS information, including latitude, longitude, elevation, UTC time (essentially Greenwich Mean Time), and Satellite reception strength/status, as shown earlier in Figure 6.16, right.
- 6. GPS logger. Allows you to enable or disable tracking of GPS position data, transfer log data to your memory card for later manipulation by an appropriate software program, or to delete the camera’s current GPS log. (See Figure 6.18.) Nature and wildlife photographers (now, where did I photograph those rare flowers?), law enforcement personnel, business users, and anyone wandering through a strange city during a vacation will love the ability to track not only individual locations but the routes taken to get from one shooting spot to another.
Your Canon Map Utility, when connected to the Internet through your computer, can easily trace a path for you on a standard road map or satellite view (see Figure 6.19). The logger’s NMEA-0813 format log file, which includes all the information for a single day’s shooting, can be converted by the utility to a .KMZ file and uploaded to Google Earth, where it can be shared and viewed. A new log is created each day, or each time you change time zones. Depending on how often the position update timing is recorded (from every second to every five minutes), the EOS R can store from less than a week to as much as 100 days’ worth of data. However, you’ll probably use the Transfer Log Data to Card option more often than that.

Figure 6.19 Canon’s Map Utility can display the GPS data for an image (left), or show you the log data for a shooting session (right).
- 7. Begin using GPS. After a delay of about 30 to 60 seconds while the receiver connects to the optimum number of satellites, GPS functions will be activated, and remain so until you return to the menu to disable GPS features. If you turn the camera off, it will automatically re-acquire the satellites within a few seconds when it’s powered up again, assuming that GPS reception is available at that location.